概要
Visual Studioでは、「GUI上で」「簡単に」ウィンドウの上にオブジェクトを配置して開発できます。
ですが、そのせいで「テキトーに配置して作るとマズい」という事実に初学者はなかなか気づきません[要出典]。
今回はWPFを例に、ダメなGUI設計の例と、それをどうすれば改善できるかを示していきます。
※今回紹介する範囲内では、メニューなどを利用してGUIの見た目を大きく変える方向の修正は行いません。
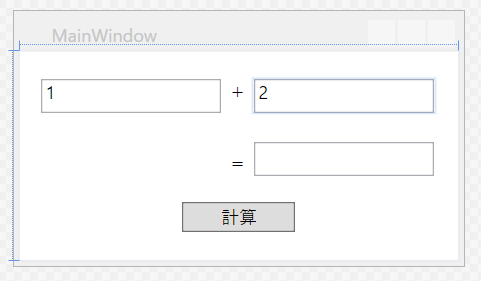
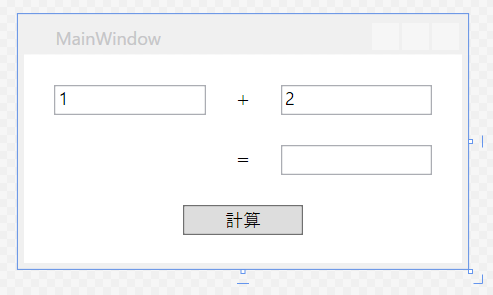
今回改修するGUI
<Window x:Class="WpfApplication1.MainWindow"
        xmlns="http://schemas.microsoft.com/winfx/2006/xaml/presentation"
        xmlns:x="http://schemas.microsoft.com/winfx/2006/xaml"
        xmlns:d="http://schemas.microsoft.com/expression/blend/2008"
        xmlns:mc="http://schemas.openxmlformats.org/markup-compatibility/2006"
        xmlns:local="clr-namespace:WpfApplication1"
        mc:Ignorable="d"
        Title="MainWindow" Height="170" Width="300">
	<Grid>
		<TextBox x:Name="AddLeftTextBox" HorizontalAlignment="Left" Height="23" Margin="14,18,0,0" TextWrapping="Wrap" Text="1" VerticalAlignment="Top" Width="120"/>
		<TextBox x:Name="AddRightTextBox" HorizontalAlignment="Left" Height="23" Margin="156,18,0,0" TextWrapping="Wrap" Text="2" VerticalAlignment="Top" Width="120"/>
		<TextBlock HorizontalAlignment="Left" Margin="139,19,0,0" TextWrapping="Wrap" Text="+" VerticalAlignment="Top" RenderTransformOrigin="-9.667,-5.618"/>
		<TextBlock HorizontalAlignment="Left" Margin="139,67,0,0" TextWrapping="Wrap" Text="=" VerticalAlignment="Top"/>
		<TextBox x:Name="AnswerTextBox" HorizontalAlignment="Left" Height="23" Margin="156,60,0,0" TextWrapping="Wrap" Text="" VerticalAlignment="Top" Width="120"/>
		<Button x:Name="CalcButton" Content="計算" HorizontalAlignment="Left" Margin="108,100,0,0" VerticalAlignment="Top" Width="75" RenderTransformOrigin="0.502,1.6"/>
	</Grid>
</Window>
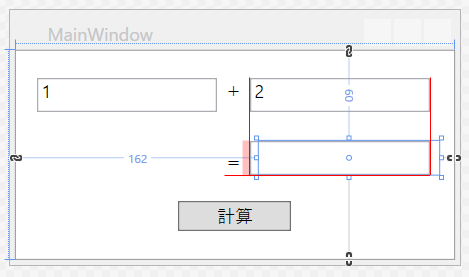
……いかにも「XAMLデザイナーからポン付けしました」と言わんばかりのXAMLですが、(レイアウト)コンテナを知らなかった頃はこれでも良かったのです。なにせ、テキストボックスを動かすとこんな赤い線がガイドしてくれるのですよ? Visual Studioが気を利かせてくれていると思うじゃないですか。それが罠だと気づかずに……。
このようにポン付けしたコードでまず問題になるのは、「オブジェクトを増やしていくと位置合わせが面倒だ」ということです。
まず、赤い線は同じ端には揃えられるが中央揃えには使えないため、中央揃えしたい場合はちまちま(Window直下のGridに対する)Marginを弄る必要があります。
また、オブジェクトをコピペして利用する場合も、Marginの値が同じだと同じ位置になるため、またちまちま数値を弄る必要があります。1つ2つならともかく、5個や6個となるとかなり面倒臭いですし、動的にオブジェクトを増やしたい際には「置き場所を調整するため数値を計算して……」といったことまで考えなければなりません。
更に、ポン付けするとオブジェクトにWidthやHeightが全部入力されているため、例えば「この列にあるオブジェクトの横幅を全部10pxだけ縮めたい」と思った際は地獄のWidth修正作業が待っています(※)。
とにかく、ポン付けのGUIはメンテしづらいのが問題なのです。
※ここだけ見ると、「マウスで選択して伸縮すれば」操作できますが、後述するコンテナを使えばもっと楽ができます
コンテナとオブジェクトの関係について
先のようなポン付けを改善するため、まずはコンテナについてざっくり学びましょう。
先のXAMLにあったもコンテナの一つで、本来なら領域を表形式に分割して配置する機能を持ちます。
ところがXAMLデザイナーの場合、WinForms時代よろしくポン付けできることを優先した結果、とりあえずGridの上にMargin・Width・Heightでガチガチに位置決めしたオブジェクトを配置するといった雑な処理をしてしまいます。これではせっかくのコンテナの性能が生かされません。
Grid
領域を分割して、分割後の領域にオブジェクトやコンテナを置くことができます。
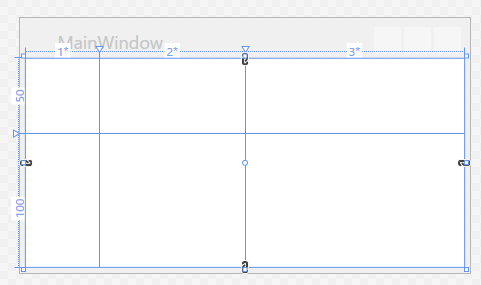
下図のように、分割する際は幅(px単位)や比率を指定することができます。
<Grid>
	<Grid.RowDefinitions>
		<RowDefinition Height="50" />
		<RowDefinition Height="100" />
	</Grid.RowDefinitions>
	<Grid.ColumnDefinitions>
		<ColumnDefinition Width="1*" />
		<ColumnDefinition Width="2*" />
		<ColumnDefinition Width="3*" />
	</Grid.ColumnDefinitions>
</Grid>
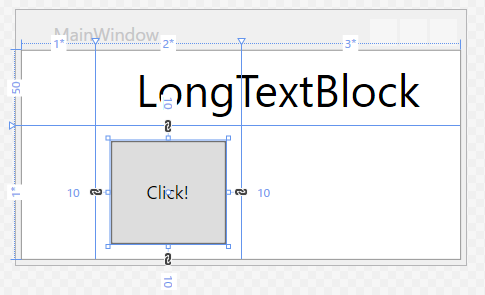
また本来、オブジェクトのMarginはオブジェクトの周囲のコンテナとの距離を指定するものですので、このように区切っておくことにより、WidthやHeightを指定しなくとも自動でサイズを計算して広がってくれます。
更に、Grid.ColumnSpanやGrid.RowSpanを設定すれば縦横2マス以上に跨って配置できますし、HorizontalAlignmentやVerticalAlignmentを使えば(区切られた範囲内で)中央揃えや右寄せ左寄せなどが簡単に設定できます。オブジェクトが端に寄りすぎて困る場合は、それこそMarginを設定すればいいのです。
(MarginやHorizonalAlignmentについての説明画像→WPF 個人用メモ.1 - Qiita)
<Grid>
	<Grid.RowDefinitions>
		<RowDefinition Height="50" />
		<RowDefinition Height="*" />
	</Grid.RowDefinitions>
	<Grid.ColumnDefinitions>
		<ColumnDefinition Width="1*" />
		<ColumnDefinition Width="2*" />
		<ColumnDefinition Width="3*" />
	</Grid.ColumnDefinitions>
	<TextBlock Text="LongTextBlock" Grid.Row="0" Grid.Column="1" Grid.ColumnSpan="2" FontSize="30"
                   Margin="5,5,5,5" HorizontalAlignment="Center" VerticalAlignment="Center"/>
	<Button Content="Click!" Grid.Row="1" Grid.Column="1" Margin="10, 10, 10, 10"/>
</Grid>
StackPanel・WrapPanel
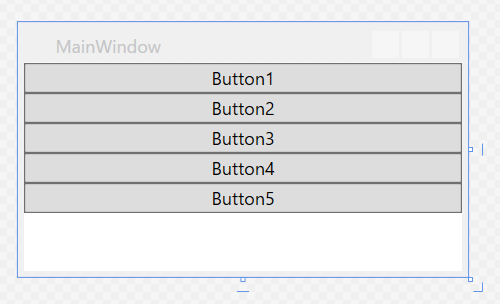
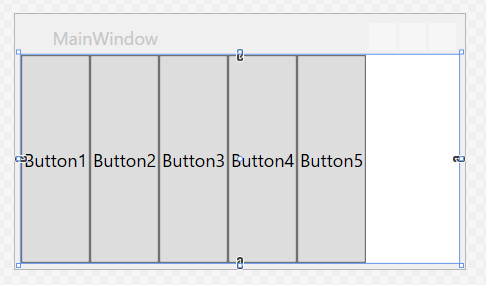
どちらも、領域にオブジェクトやコンテナを、縦か横に並べることができます。
デフォルトでは縦に並びますが、Orientation="Horizontal"と設定すれば横に並びます。
<StackPanel>
	<Button Content="Button1"/>
	<Button Content="Button2"/>
	<Button Content="Button3"/>
	<Button Content="Button4"/>
	<Button Content="Button5"/>
</StackPanel>
<StackPanel Orientation="Horizontal">
	<Button Content="Button1"/>
	<Button Content="Button2"/>
	<Button Content="Button3"/>
	<Button Content="Button4"/>
	<Button Content="Button5"/>
</StackPanel>
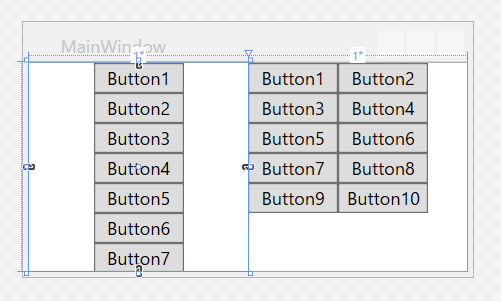
この2種類のPanelの違いは、縦 or 横に大量に並べた際に折り返すか折り返さないかです。
名前の通りWrapPanelは折り返す方、StackPanelは折り返さない方となります。
<Grid>
	<Grid.ColumnDefinitions>
		<ColumnDefinition/>
		<ColumnDefinition/>
	</Grid.ColumnDefinitions>
	<StackPanel Grid.Column="0">
		<Button Content="Button1" Width="60"/>
		<Button Content="Button2" Width="60"/>
		<Button Content="Button3" Width="60"/>
		<Button Content="Button4" Width="60"/>
		<Button Content="Button5" Width="60"/>
		<Button Content="Button6" Width="60"/>
		<Button Content="Button7" Width="60"/>
		<Button Content="Button8" Width="60"/>
		<Button Content="Button9" Width="60"/>
		<Button Content="Button10" Width="60"/>
	</StackPanel>
	<WrapPanel Grid.Column="1">
		<Button Content="Button1" Width="60"/>
		<Button Content="Button2" Width="60"/>
		<Button Content="Button3" Width="60"/>
		<Button Content="Button4" Width="60"/>
		<Button Content="Button5" Width="60"/>
		<Button Content="Button6" Width="60"/>
		<Button Content="Button7" Width="60"/>
		<Button Content="Button8" Width="60"/>
		<Button Content="Button9" Width="60"/>
		<Button Content="Button10" Width="60"/>
	</WrapPanel>
</Grid>
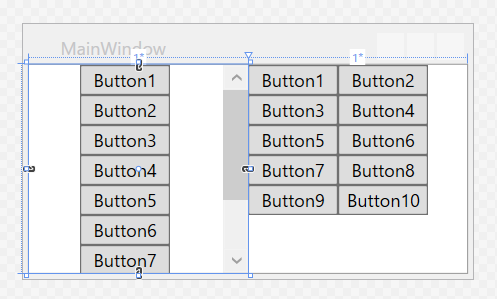
ここで、**「折り返さないのならスクロールさせたい」**といった願望が出てくるかと思いますが、ちゃんとそれ用のコンテナとしてScrollViewerが用意されています。これで覆うことにより、スクロールバーが出現してスクロール可能になります。
<Grid>
	<Grid.ColumnDefinitions>
		<ColumnDefinition/>
		<ColumnDefinition/>
	</Grid.ColumnDefinitions>
	<ScrollViewer Grid.Column="0">
		<StackPanel>
			<Button Content="Button1" Width="60"/>
			<Button Content="Button2" Width="60"/>
			<Button Content="Button3" Width="60"/>
			<Button Content="Button4" Width="60"/>
			<Button Content="Button5" Width="60"/>
			<Button Content="Button6" Width="60"/>
			<Button Content="Button7" Width="60"/>
			<Button Content="Button8" Width="60"/>
			<Button Content="Button9" Width="60"/>
			<Button Content="Button10" Width="60"/>
		</StackPanel>
	</ScrollViewer>
	<WrapPanel Grid.Column="1">
		<Button Content="Button1" Width="60"/>
		<Button Content="Button2" Width="60"/>
		<Button Content="Button3" Width="60"/>
		<Button Content="Button4" Width="60"/>
		<Button Content="Button5" Width="60"/>
		<Button Content="Button6" Width="60"/>
		<Button Content="Button7" Width="60"/>
		<Button Content="Button8" Width="60"/>
		<Button Content="Button9" Width="60"/>
		<Button Content="Button10" Width="60"/>
	</WrapPanel>
</Grid>
Canvas
先ほど説明したGridやStackPanelなどは、オブジェクトを置く位置をピクセル単位ではなく、相対的な位置取りで決定します。
なので楽ができるという話をしていたのですが、場合によってはピクセル単位で決めたいこともあります。その場合に使うコンテナがCanvasです。
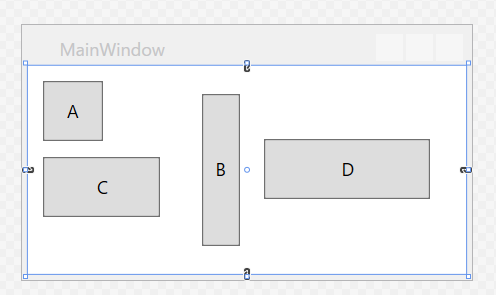
<Canvas>
	<Button Canvas.Left="10" Canvas.Top="10" Content="A" Width="40" Height="40"/>
	<Button Canvas.Left="116" Canvas.Top="19" Content="B" Width="25" Height="101"/>
	<Button Canvas.Left="10" Canvas.Top="61" Content="C" Width="78" Height="40"/>
	<Button Canvas.Left="157" Canvas.Top="49" Content="D" Width="111" Height="40"/>
</Canvas>
DockPanelなど
その他のコンテナについては、次の記事が分かりやすいでしょう。
連載:WPF入門:第7回 WPF UI要素の基礎とレイアウト用のパネルを学ぼう (2_2) - @IT
コンテナを利用して改修してみる
では、冒頭で挙げたGUIを例に、コンテナでどう修正されるかを見ていきます。
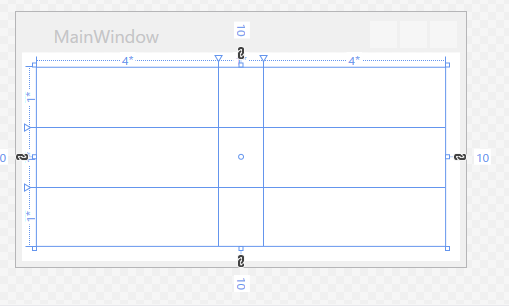
Canvasで並べていけないわけではないのですが、オブジェクトの縦方向や横方向の位置を揃えたいのでGridでまずは区切ります。
<Grid Margin="10,10,10,10">
	<Grid.RowDefinitions>
		<RowDefinition />
		<RowDefinition />
		<RowDefinition />
	</Grid.RowDefinitions>
	<Grid.ColumnDefinitions>
		<ColumnDefinition Width="4*" />
		<ColumnDefinition Width="1*" />
		<ColumnDefinition Width="4*" />
	</Grid.ColumnDefinitions>
</Grid>
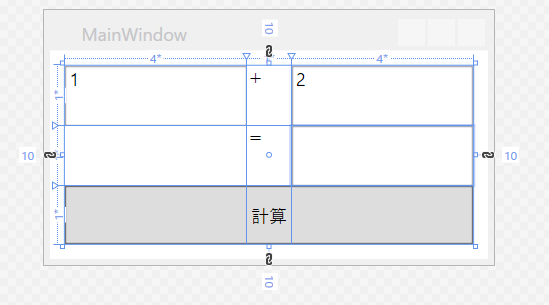
次に、Gridの各マスにオブジェクトを配置します。画面下の計算ボタンは中央に配置したいので、Gridの下段3マスをぶち抜くような設定にします。
<Grid Margin="10,10,10,10">
	<Grid.RowDefinitions>
		<RowDefinition />
		<RowDefinition />
		<RowDefinition />
	</Grid.RowDefinitions>
	<Grid.ColumnDefinitions>
		<ColumnDefinition Width="4*" />
		<ColumnDefinition Width="1*" />
		<ColumnDefinition Width="4*" />
	</Grid.ColumnDefinitions>
	<TextBox Grid.Row="0" Grid.Column="0" x:Name="AddLeftTextBox" Text="1" />
	<TextBlock Grid.Row="0" Grid.Column="1" Text="+" />
	<TextBox Grid.Row="0" Grid.Column="2" x:Name="AddRightTextBox" Text="2" />
	<TextBlock Grid.Row="1" Grid.Column="1" Text="=" />
	<TextBox Grid.Row="1" Grid.Column="2" x:Name="AnswerTextBox" />
	<Button Grid.Row="2" Grid.Column="0" Grid.ColumnSpan="3" x:Name="CalcButton" Content="計算" />
</Grid>
ただ、これだと見栄えが良くありません。Gridの項で説明したように、Gridに配置したオブジェクトやコンテナは、WidthやHeightを設定しないと目一杯にまで広がってしまいます。また、TextBoxオブジェクトはデフォルトだと複数行の入力が行なえませんので、1行入力なのに縦に広いと誤解を招きそうです。
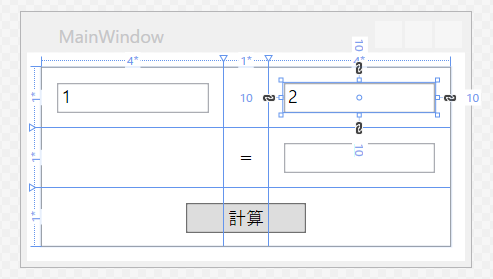
そこで、各オブジェクトに対して次のように属性を設定します。
-
TextBoxはHeightとMarginを設定することで、最低限のマージンと高さを持った上で横に広がるようにした -
TextBlockはVerticalAlignmentとHorizontalAlignmentを設定することで、中央に寄せるようにした -
ButtonはWidthとHeightを設定することで適切なサイズにした - 周囲の
Gridとの間隔との方を大切にするなら、Marginだけ設定してもいい
<Grid Margin="10,10,10,10">
	<Grid.RowDefinitions>
		<RowDefinition />
		<RowDefinition />
		<RowDefinition />
	</Grid.RowDefinitions>
	<Grid.ColumnDefinitions>
		<ColumnDefinition Width="4*" />
		<ColumnDefinition Width="1*" />
		<ColumnDefinition Width="4*" />
	</Grid.ColumnDefinitions>
	<TextBox Grid.Row="0" Grid.Column="0" x:Name="AddLeftTextBox" Text="1" Height="20" Margin="10,10,10,10"/>
	<TextBlock Grid.Row="0" Grid.Column="1" Text="+" VerticalAlignment="Center" HorizontalAlignment="Center"/>
	<TextBox Grid.Row="0" Grid.Column="2" x:Name="AddRightTextBox" Text="2" Height="20" Margin="10,10,10,10"/>
	<TextBlock Grid.Row="1" Grid.Column="1" Text="=" VerticalAlignment="Center" HorizontalAlignment="Center"/>
	<TextBox Grid.Row="1" Grid.Column="2" x:Name="AnswerTextBox" Height="20" Margin="10,10,10,10"/>
	<Button Grid.Row="2" Grid.Column="0" Grid.ColumnSpan="3" x:Name="CalcButton" Content="計算" Width="80" Height="20"/>
</Grid>
ここまで調整した上で、冒頭のGUIと見比べてみましょう。外見はほぼ変化していませんが、
中身は大違いだと分かります。後者の方が全体的にスッキリしているはずです。
<Window x:Class="WpfApplication1.MainWindow"
        xmlns="http://schemas.microsoft.com/winfx/2006/xaml/presentation"
        xmlns:x="http://schemas.microsoft.com/winfx/2006/xaml"
        xmlns:d="http://schemas.microsoft.com/expression/blend/2008"
        xmlns:mc="http://schemas.openxmlformats.org/markup-compatibility/2006"
        xmlns:local="clr-namespace:WpfApplication1"
        mc:Ignorable="d"
        Title="MainWindow" Height="170" Width="300">
	<Grid>
		<TextBox x:Name="AddLeftTextBox" HorizontalAlignment="Left" Height="23" Margin="14,18,0,0" TextWrapping="Wrap" Text="1" VerticalAlignment="Top" Width="120"/>
		<TextBox x:Name="AddRightTextBox" HorizontalAlignment="Left" Height="23" Margin="156,18,0,0" TextWrapping="Wrap" Text="2" VerticalAlignment="Top" Width="120"/>
		<TextBlock HorizontalAlignment="Left" Margin="139,19,0,0" TextWrapping="Wrap" Text="+" VerticalAlignment="Top" RenderTransformOrigin="-9.667,-5.618"/>
		<TextBlock HorizontalAlignment="Left" Margin="139,67,0,0" TextWrapping="Wrap" Text="=" VerticalAlignment="Top"/>
		<TextBox x:Name="AnswerTextBox" HorizontalAlignment="Left" Height="23" Margin="156,60,0,0" TextWrapping="Wrap" Text="" VerticalAlignment="Top" Width="120"/>
		<Button x:Name="CalcButton" Content="計算" HorizontalAlignment="Left" Margin="108,100,0,0" VerticalAlignment="Top" Width="75" RenderTransformOrigin="0.502,1.6"/>
	</Grid>
</Window>
<Window x:Class="WpfApplication1.MainWindow"
        xmlns="http://schemas.microsoft.com/winfx/2006/xaml/presentation"
        xmlns:x="http://schemas.microsoft.com/winfx/2006/xaml"
        xmlns:d="http://schemas.microsoft.com/expression/blend/2008"
        xmlns:mc="http://schemas.openxmlformats.org/markup-compatibility/2006"
        xmlns:local="clr-namespace:WpfApplication1"
        mc:Ignorable="d"
        Title="MainWindow" Height="170" Width="300">
	<Grid Margin="10,10,10,10">
		<Grid.RowDefinitions>
			<RowDefinition />
			<RowDefinition />
			<RowDefinition />
		</Grid.RowDefinitions>
		<Grid.ColumnDefinitions>
			<ColumnDefinition Width="4*" />
			<ColumnDefinition Width="1*" />
			<ColumnDefinition Width="4*" />
		</Grid.ColumnDefinitions>
		<TextBox Grid.Row="0" Grid.Column="0" x:Name="AddLeftTextBox" Text="1" Height="20" Margin="10,10,10,10"/>
		<TextBlock Grid.Row="0" Grid.Column="1" Text="+" VerticalAlignment="Center" HorizontalAlignment="Center"/>
		<TextBox Grid.Row="0" Grid.Column="2" x:Name="AddRightTextBox" Text="2" Height="20" Margin="10,10,10,10"/>
		<TextBlock Grid.Row="1" Grid.Column="1" Text="=" VerticalAlignment="Center" HorizontalAlignment="Center"/>
		<TextBox Grid.Row="1" Grid.Column="2" x:Name="AnswerTextBox" Height="20" Margin="10,10,10,10"/>
		<Button Grid.Row="2" Grid.Column="0" Grid.ColumnSpan="3" x:Name="CalcButton" Content="計算" Width="80" Height="20"/>
	</Grid>
</Window>
まとめ
以上のように、コンテナを理解して構築すると、スッキリとしたXAMLに仕上がることが分かりました。
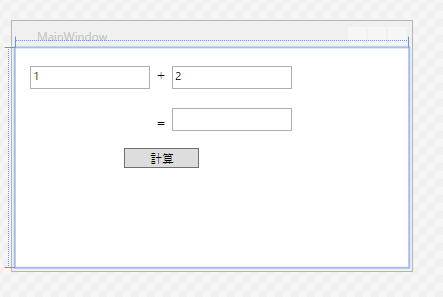
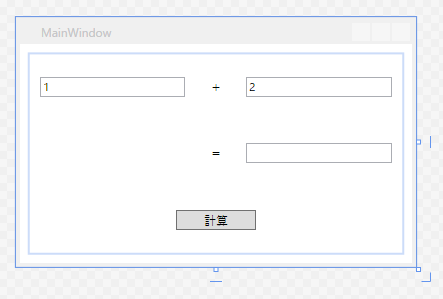
ちなみに先ほどのGUIの例ですが、唐突にウィンドウサイズを400x250にすると次のように変化します。
「左上からの位置」を維持するポン付けと、「コンテナから導かれる位置関係」から再計算される手打ちとの差は明らかでしょう。
