本記事について
- AWS CloudFormationを用いて、色々なアーキテクチャを構築していきます。テンプレートのコピペ元としてご活用いただければ幸いです
- 最新テンプレートはGitHubに配置しています
- 今回は、アプリケーションサーバーを構築します
- また、プライベートサブネットに配置されたアプリケーションサーバーへ踏み台サーバー経由でアクセスする方法についても記載します
構築するアーキテクチャ
- VPCやサブネットといったインフラ周りは既に作成済みであるため、図中赤字のEC2、IAM Role、S3のみを作成します
- Private SubnetにEC2 インスタンスを配置します。記事内では便宜上これをアプリケーションサーバーとみなしますが、用途は特に限定しません
- 本記事ではサンプルとして、アプリケーションサーバー構築時にDockerのインストールも行います
- おまけに、S3バケットを作成して、アプリケーションサーバーからアクセスできることも確認します
作成するリソース
- Application Server
- AWS::EC2::SecurityGroup
- AWS::EC2::KeyPair
- AWS::EC2::Instance
- AWS::IAM::Role
- Test用S3バケット
- AWS::S3::Bucket
構築方法
必要な準備
- AWSアカウントとアクセスキーの設定
- 事前にこちらで説明した仮想ネットワークが構築されていることを前提とします
構築コマンド
Region=ap-northeast-1
OrganizationName=iwatake2222
SystemName=sample

aws cloudformation deploy \
--region "${Region}" \
--stack-name "${SystemName}"-app-server \
--template-file ./application-server.yaml \
--capabilities CAPABILITY_NAMED_IAM \
--parameter-overrides \
OrganizationName="${OrganizationName}" \
SystemName="${SystemName}"
接続確認
セッションマネージャーによるアプリケーションサーバーへのSSH接続
- アプリケーションサーバーへもっとも簡単にアクセスする方法は、AWS Systems manager (SSM) が提供するセッションマネージャーを用いることです。じつは本機能を用いれば踏み台サーバーを経由しないでもPrivate Subnet内のアプリケーションサーバーにアクセスできます
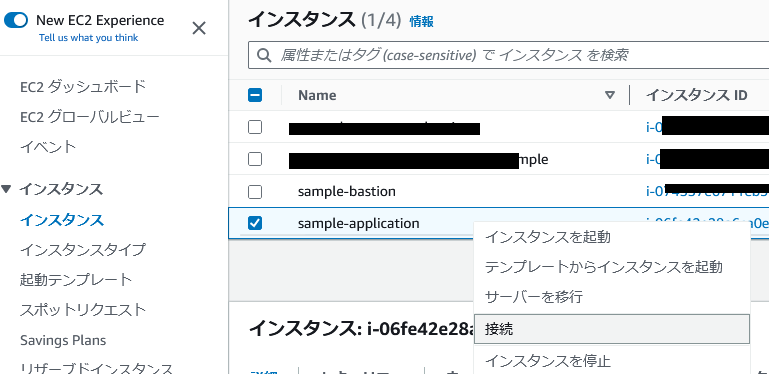
- AWS Console -> EC2 -> Instance を開きます
- 作成したアプリケーションサーバー (sample-application) を右クリックして、接続をクリックします
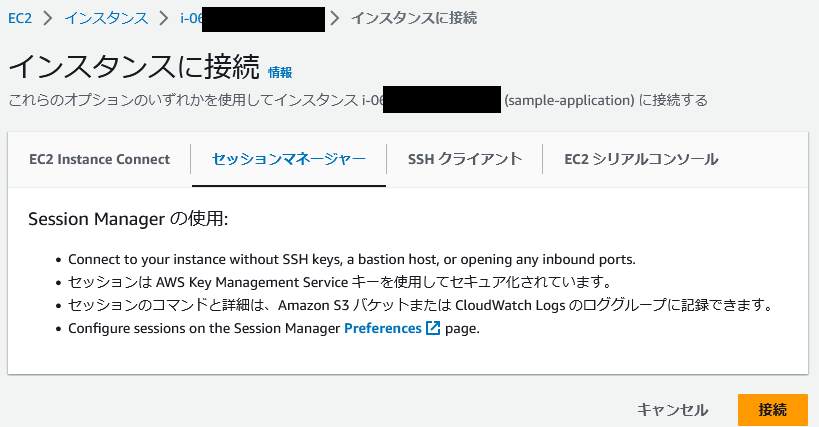
- セッションマネージャーを選択し、接続をクリックします。すると、ターミナル画面が開きます
-
ssm-userとしてログインされるので、以下コマンドでec2-userとしてログインしておきます
sh-5.2$ whoami
ssm-user
sh-5.2$ sudo su
[root@ip-10-0-30-187 bin]# su ec2-user
[ec2-user@ip-10-0-30-187 bin]$ cd
[ec2-user@ip-10-0-30-187 ~]$ pwd
/home/ec2-user
踏み台サーバー経由によるアプリケーションサーバーへのSSH接続
- 軽くログインするだけなら上述のセッションマネージャーによるアクセスが便利です
- が、コマンドラインからsshが出来るようにすると、scpが使えたり、後述のVSCodeから接続出来たりします
-
~/.ssh/configを以下のように作成します-
aws_bastion(踏み台サーバー) とaws_app(アプリケーションサーバー) のホスト設定をします -
aws_bastionのHostname (IPアドレス) は、AWS Console -> EC2 -> Instance -> 踏み台サーバーで表示される、「パブリック IPv4 アドレス」を設定してください -
aws_appのHostname (IPアドレス) は、AWS Console -> EC2 -> Instance -> アプリケーションサーバーで表示される、「プライベート IPv4 アドレス」を設定してください
-
# ~/.ssh/config
Host aws_bastion
    Hostname ooo.ooo.ooo.ooo
    User ec2-user

Host aws_app
    Hostname 10.0.16.ooo
    User ec2-user
    ProxyCommand ssh aws_bastion -W %h:%p

host i-* mi-*
    ProxyCommand sh -c "aws ssm start-session --target %h --document-name AWS-StartSSHSession --parameters 'portNumber=%p'"
- 両サーバー作成時には、キーペアも作成しています。これらを使ってsshアクセスすることは可能です。しかし、キーの管理が面倒。また、踏み台サーバー経由でアプリケーションサーバーにアクセスする際に、キーをいちいちアップロードしなければいけない、という問題も発生します
- そのためここでは、EC2 Instance Connectという機能によって、一時的に自PCのssh-keyを登録することでアクセスできるようにします
- 以下コマンドによって、自PCのSSHキーを送ります。両サーバーのインスタンス名は適宜置き換えてください
AvailabilityZone=ap-northeast-1a
AWS_BASTION_ID=i-ooo
AWS_APP_ID=i-ooo

aws ec2-instance-connect send-ssh-public-key \
--instance-id "${AWS_BASTION_ID}" \
--availability-zone "${AvailabilityZone}" \
--instance-os-user ec2-user \
--ssh-public-key file://~/.ssh/id_rsa.pub

aws ec2-instance-connect send-ssh-public-key \
--instance-id "${AWS_APP_ID}" \
--availability-zone "${AvailabilityZone}" \
--instance-os-user ec2-user \
--ssh-public-key file://~/.ssh/id_rsa.pub
- 以下のような結果が表示されれば成功です
{
    "RequestId": "oooooooo-oooo-oooo-oooo-oooooooooooo",
    "Success": true
}
- その後60秒以内に、以下コマンドでアプリケーションサーバーへssh接続が可能になります
ssh aws_app
VSCodeからアプリケーションサーバーへ接続
- アプリケーションサーバー上のファイル操作をVSCodeから行えるようにします
-
aws ec2-instance-connect send-ssh-public-keyまで行った後、ssh接続する代わりににVSCodeを起動します - VSCode -> Remote Explorer -> Remote を選び、
aws_appをクリックします。接続が成功したら、Open Folderをクリックして、適当に /home/ec-user/ を開いておきます - なお、AWS CLIの操作をWSLで行い、VSCodeをWindows上で起動している場合は、参照している.sshが異なるので注意してください。例えば以下のようにすればWindows上のVSCodeからでもアクセスできます
-
\\wsl.localhost\Ubuntu-22.04\home\iwatake\.ssh\id_rsaをC:\Users\iwatake\.ssh\id_rsa_wslとコピーする -
\\wsl.localhost\Ubuntu-22.04\home\iwatake\.ssh\configをC:\Users\iwatake\.ssh\configへコピー or マージ - 各ホストの設定に、
IdentityFile ~/.ssh/id_rsa_wslを追記する
-
S3へのアクセス確認
- アプリケーションサーバーからS3へアクセス出来ることを確認します
- アプリケーションサーバーへ、上記のいずれかの方法でsshアクセス後、以下コマンドで確認できます
- なお、今回はS3 Endpointを作成しているため、アプリケーションサーバーがS3へアクセスする際にはインターネットには出ずにAWS内で閉じるようになっています
- ちなみに、踏み台サーバー (
ssh aws_bastion) 上で同じことを試してもS3へアクセス失敗します。理由は、踏み台サーバーに対してはS3へのアクセス権を付与していないためです
OrganizationName=iwatake2222
SystemName=sample
dd if=/dev/zero of=dummy_file bs=1M count=100
aws s3 cp dummy_file s3://"${OrganizationName}-${SystemName}-bucket"
aws s3 ls s3://"${OrganizationName}-${SystemName}-bucket"
テンプレート
- 構築コマンド実行時、以下のファイルを
application-server.yamlとして配置してください
application-server.yaml
AWSTemplateFormatVersion: 2010-09-09
Description: |
  Create an application server

Parameters:
  OrganizationName:
    Description: Organization Name
    Type: String
  SystemName:
    Description: System Name
    Type: String

Resources:
  #-----------------------------------------------------------------------------
  # Application server
  #-----------------------------------------------------------------------------
  ApplicationSecurityGroup:
    Type: AWS::EC2::SecurityGroup
    Properties:
      GroupDescription: 'Security Group for an application server'
      VpcId: {Fn::ImportValue: !Sub '${SystemName}-vpc'}
      SecurityGroupIngress:
        - IpProtocol: tcp
          FromPort: 22
          ToPort: 22
          SourceSecurityGroupId: {Fn::ImportValue: !Sub '${SystemName}-bastion-sg'}
      Tags:
        - Key: Name
          Value: !Sub ${SystemName}-application-sg

  # Key can be found in AWS console: Systems Manager -> Parameter Store
  ApplicationKeyPair:
    Type: AWS::EC2::KeyPair
    Description: KeyPair for an application server
    Properties:
      KeyName: !Sub ${SystemName}-application-keypair

  ApplicationInstance:
    Type: AWS::EC2::Instance
    Properties:
      ImageId: ami-08c84d37db8aafe00  # Amazon Linux 2023 AMI
      InstanceType: t2.micro
      BlockDeviceMappings:
        - DeviceName: /dev/xvda
          Ebs:
            VolumeSize: 64
      KeyName: !Ref ApplicationKeyPair
      SecurityGroupIds:
        - !Ref ApplicationSecurityGroup
      SubnetId: {Fn::ImportValue: !Sub '${SystemName}-private-subnet'}
      IamInstanceProfile:
        !Ref ApplicationInstanceProfile
      UserData:        # Log can be found in /var/log/cloud-init-output.log
        Fn::Base64: !Sub
          - |
            #!/bin/bash
            export HOME=/root    # it seems HOME is not set
            sudo yum update -y

            # Install nano
            sudo yum -y install nano

            # Install Docker
            sudo yum -y install docker
            sudo systemctl start docker
            sudo systemctl enable docker
            sudo usermod -a -G docker ec2-user

            # Test code
            echo ${SystemName} >> /home/ec2-user/test.txt
            echo ${ApplicationKeyPair} >> /home/ec2-user/test.txt
          - {
            SystemName: !Ref SystemName,
            ApplicationKeyPair: !Ref ApplicationKeyPair
          }
      Tags:
        - Key: Name
          Value: !Sub ${SystemName}-application

  #-----------------------------------------------------------------------------
  # IAM Role for Application server
  #-----------------------------------------------------------------------------
  AppliactionRole:
    Type: AWS::IAM::Role
    Properties:
      RoleName: !Sub ${SystemName}-application-role
      AssumeRolePolicyDocument:
        Version: 2012-10-17
        Statement:
          - Effect: Allow
            Principal:
              Service:
                - ec2.amazonaws.com
            Action:
              - sts:AssumeRole
      ManagedPolicyArns:
        - arn:aws:iam::aws:policy/AmazonSSMManagedInstanceCore   # To connect to an instance using Session Manager
      Policies:
        - PolicyName: !Sub ${SystemName}-application-access-s3-policy
          PolicyDocument:
            Version: 2012-10-17
            Statement:
              - Effect: Allow
                Action:
                  - s3:PutObject
                  - s3:GetObject
                  - s3:DeleteObject
                  - s3:ListBucket
                Resource: '*'
                # Resource:
                #   - !Sub arn:${AWS::Partition}:s3:::${S3Bucket}
                #   - !Sub arn:${AWS::Partition}:s3:::${S3Bucket}/*

  ApplicationInstanceProfile:
    Type: AWS::IAM::InstanceProfile
    Properties:
      Roles:
        - !Ref AppliactionRole

  #-----------------------------------------------------------------------------
  # S3 bucket
  #-----------------------------------------------------------------------------
  S3Bucket:
    Type: AWS::S3::Bucket
    Properties:
      BucketName: !Sub ${OrganizationName}-${SystemName}-bucket
      Tags:
        - Key: Name
          Value: !Sub ${OrganizationName}-${SystemName}-bucket
簡単な説明
セキュリティグループ
  ApplicationSecurityGroup:
    Type: AWS::EC2::SecurityGroup
    Properties:
      GroupDescription: 'Security Group for an application server'
      VpcId: {Fn::ImportValue: !Sub '${SystemName}-vpc'}
      SecurityGroupIngress:
        - IpProtocol: tcp
          FromPort: 22
          ToPort: 22
          SourceSecurityGroupId: {Fn::ImportValue: !Sub '${SystemName}-bastion-sg'}
      Tags:
        - Key: Name
          Value: !Sub ${SystemName}-application-sg
- 上記でアプリケーションサーバー用のセキュリティグループを作成しています
- インバウンドルールとして、踏み台サーバー (厳密には踏み台サーバー用のセキュリティグループ) からのsshのみ許可しています
EC2 インスタンス (アプリケーションサーバー)
  ApplicationInstance:
    Type: AWS::EC2::Instance
    Properties:
      ImageId: ami-08c84d37db8aafe00  # Amazon Linux 2023 AMI
      InstanceType: t2.micro
      BlockDeviceMappings:
        - DeviceName: /dev/xvda
          Ebs:
            VolumeSize: 64
      KeyName: !Ref ApplicationKeyPair
      SecurityGroupIds:
        - !Ref ApplicationSecurityGroup
      SubnetId: {Fn::ImportValue: !Sub '${SystemName}-private-subnet'}
      IamInstanceProfile:
        !Ref ApplicationInstanceProfile
      UserData:        # Log can be found in /var/log/cloud-init-output.log
        Fn::Base64: !Sub
          - |
            #!/bin/bash
            export HOME=/root    # it seems HOME is not set
            sudo yum update -y

            # Install nano
            sudo yum -y install nano

            # Install Docker
            sudo yum -y install docker
            sudo systemctl start docker
            sudo systemctl enable docker
            sudo usermod -a -G docker ec2-user

            # Test code
            echo ${SystemName} >> /home/ec2-user/test.txt
            echo ${ApplicationKeyPair} >> /home/ec2-user/test.txt
          - {
            SystemName: !Ref SystemName,
            ApplicationKeyPair: !Ref ApplicationKeyPair
          }
      Tags:
        - Key: Name
          Value: !Sub ${SystemName}-application
-
SubnetIdの指定によって、本インスタンスを以前作成したプライベートサブネットに設置しています - サンプルとして、使用するEBS (SSDボリューム) サイズを64GiBにしています
- また、UserDataを用いてインスタンス起動時 (つまり作成時の一度のみ) に実行されるコマンドを記載しています
- サンプルとしてDockerをインストールしています
- また、テンプレート内のパラメータを渡す処理もサンプルとして書いています (特に意味はない)
IAM Role
  #-----------------------------------------------------------------------------
  # IAM Role for Application server
  #-----------------------------------------------------------------------------
  AppliactionRole:
    Type: AWS::IAM::Role
    Properties:
      RoleName: !Sub ${SystemName}-application-role
      AssumeRolePolicyDocument:
        Version: 2012-10-17
        Statement:
          - Effect: Allow
            Principal:
              Service:
                - ec2.amazonaws.com
            Action:
              - sts:AssumeRole
      ManagedPolicyArns:
        - arn:aws:iam::aws:policy/AmazonSSMManagedInstanceCore   # To connect to an instance using Session Manager
      Policies:
        - PolicyName: !Sub ${SystemName}-application-access-s3-policy
          PolicyDocument:
            Version: 2012-10-17
            Statement:
              - Effect: Allow
                Action:
                  - s3:PutObject
                  - s3:GetObject
                  - s3:DeleteObject
                  - s3:ListBucket
                Resource: '*'
                # Resource:
                #   - !Sub arn:${AWS::Partition}:s3:::${S3Bucket}
                #   - !Sub arn:${AWS::Partition}:s3:::${S3Bucket}/*
- アプリケーション用のIAM Roleを作成しています
- 上述したSSMからの簡易アクセスを実現するため、
arn:aws:iam::aws:policy/AmazonSSMManagedInstanceCoreを付与しています - また、S3に対してのアクセス権を付与しています
- 本来これは、S3 バケット名も指定して限定すべきです。が、ここでは簡単のため全てのS3バケットに対してアクセス権を付与しています


