本記事について
- AWS CloudFormationを用いて、色々なアーキテクチャを構築していきます。テンプレートのコピペ元としてご活用いただければ幸いです
- 最新テンプレートはGitHubに配置しています
- 本記事では、仮想ネットワークの構築を行います
構築するアーキテクチャ
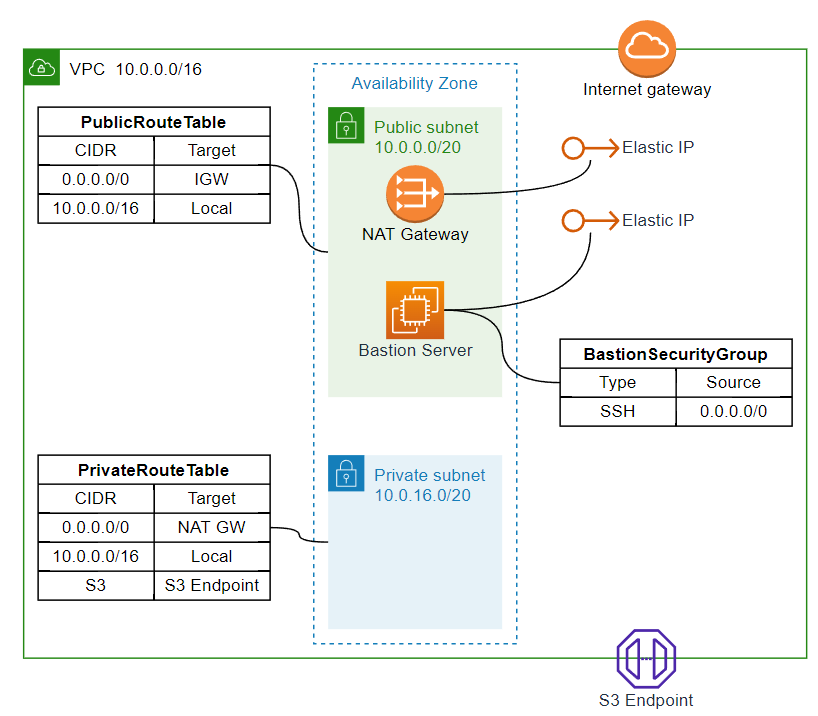
- 最初の一歩として、よくありがちな仮想ネットワークを構築します
- VPC (Virtual Private Cloud) 内に、Public SubnetとPrivate Subnetを構築します
- VPCにはInternet Gatewayを設置して、Public Subnetからインターネットにアクセスできるようにします
- Public SubnetにはNAT Gatewayを設置して、Private Subnetからインターネットにアクセスできるようにします
- また、S3へのアクセスをAWS内で閉じて行うようにS3 Endpointも設置します
- Public Subnetには踏み台サーバーを設置します
サブネット
- 今回は簡単のためにAvailability Zoneは1つだけにします
- AZ (ap-northeast-1) 内に、Public subnetとPrivate subnetを構築します
- サブネットのCIDR設計は以下のようにします
| サブネット | CIDRブロック |
|---|---|
| VPC | 00001010.00000000.XXXXXXXX.XXXXXXXX = 10.0.0.0/16 |
| PublicSubnet | 00001010.00000000.0000XXXX.XXXXXXXX = 10.0.0.0/20 |
| PrivateSubnet | 00001010.00000000.0001XXXX.XXXXXXXX = 10.0.16.0/20 |
作成するリソース
- VPC
- AWS::EC2::VPC
- AWS::EC2::InternetGateway
- Public/Private Subnet
- AWS::EC2::Subnet
- AWS::EC2::RouteTable
- NAT Gateway
- AWS::EC2::EIP
- AWS::EC2::NatGateway
- S3 EndPoint
- AWS::EC2::VPCEndpoint
- Bastion Server
- AWS::EC2::SecurityGroup
- AWS::EC2::KeyPair
- AWS::EC2::EIP
- AWS::EC2::Instance
構築方法
必要な準備
- AWSアカウントを持っていること
- 作業用のIAMユーザーとアクセスキーが作成済みであること
- 作業用PCで
ssh-keygenが実行済みであること - AWS CLI version 2が作業用PCにインストール済みであること
# ~/.aws/config
[default]
region = ap-northeast-1
output = json
# ~/.aws/credentials
[default]
aws_access_key_id = ooo
aws_secret_access_key = ooo
- (Optional) AWS CLIのSession Managerプラグインがインストール済みであること
curl "https://s3.amazonaws.com/session-manager-downloads/plugin/latest/ubuntu_64bit/session-manager-plugin.deb" -o "session-manager-plugin.deb"
sudo dpkg -i session-manager-plugin.deb
構築コマンド
Region=ap-northeast-1
SystemName=sample
AvailabilityZone=ap-northeast-1a

aws cloudformation deploy \
--region "${Region}" \
--stack-name "${SystemName}"-virtual-network \
--template-file ./virtual-network.yaml \
--parameter-overrides \
SystemName="${SystemName}" \
AvailabilityZone="${AvailabilityZone}"
- アカウント内だユニークな名前になる
SystemNameとサブネットを構築するAvailabilityZoneをパラメータとして渡します - リソース名はテンプレート内で付けています。本当は環境 (product/devなど) によって分けた方が良いです
- 今回は
sampleという名前で作成します
接続確認
- EC2 Instance Connectによって踏み台サーバーに接続してみます
- 以下のコマンドによって、IAM権限によってSSHキーを登録し、EC2にSSH接続できるようにします
- AWS_BASTION_IDは自分の環境に応じて置き換え
- AWS Console上で、EC2 -> インスタンス から、作成した踏み台サーバーの
インスタンス IDを探してください
AvailabilityZone=ap-northeast-1a
AWS_BASTION_ID=i-ooo

aws ec2-instance-connect send-ssh-public-key \
--instance-id "${AWS_BASTION_ID}" \
--availability-zone "${AvailabilityZone}" \
--instance-os-user ec2-user \
--ssh-public-key file://~/.ssh/id_rsa.pub
- 以下のような結果が返ってきたらOKです
{
    "RequestId": "oooooooo-oooo-oooo-oooo-oooooooooooo",
    "Success": true
}
- 以下コマンドによってssh接続します
- IPアドレスは自分の環境に応じて置き換え
- AWS Console上で、EC2 -> インスタンス から、作成した踏み台サーバーの
パブリック IPv4 アドレスを探してください
ssh ec2-user@ooo.ooo.ooo.ooo
- 以下のように踏み台サーバーにログインできればOKです
[ec2-user@ip-10-0-12-36 ~]$
テンプレート
- 構築コマンド実行時、以下のファイルを
virtual-network.yamlとして配置してください
virtual-network.yaml
AWSTemplateFormatVersion: 2010-09-09
Description: |
  Create a virtual network

Parameters:
  SystemName:
    Description: System Name
    Type: String
  AvailabilityZone:
    Description: Availability Zone
    Type: AWS::EC2::AvailabilityZone::Name

Resources:
  #-----------------------------------------------------------------------------
  # VPC
  #-----------------------------------------------------------------------------
  VPC:
    Type: AWS::EC2::VPC
    Properties:
      CidrBlock: 10.0.0.0/16
      Tags:
        - Key: Name
          Value: !Sub ${SystemName}-vpc

  InternetGateway:
    Type: AWS::EC2::InternetGateway
    Properties:
      Tags:
        - Key: Name
          Value: !Sub ${SystemName}-igw

  VPCGatewayAttachment:
    Type: AWS::EC2::VPCGatewayAttachment
    Properties:
      VpcId: !Ref VPC
      InternetGatewayId: !Ref InternetGateway

  #-----------------------------------------------------------------------------
  # Public Subnet
  #-----------------------------------------------------------------------------
  PublicSubnet:
    Type: AWS::EC2::Subnet
    Properties:
      AvailabilityZone: !Ref AvailabilityZone
      VpcId: !Ref VPC
      CidrBlock: 10.0.0.0/20
      Tags:
        - Key: Name
          Value: !Sub ${SystemName}-public-subnet

  PublicRouteTable:
    Type: AWS::EC2::RouteTable
    Properties:
      VpcId: !Ref VPC
      Tags:
        - Key: Name
          Value: !Sub ${SystemName}-public-rtb

  PublicSubnetRouteTableAssociation:
    Type: AWS::EC2::SubnetRouteTableAssociation
    Properties:
      SubnetId: !Ref PublicSubnet
      RouteTableId: !Ref PublicRouteTable

  PublicSubnetToInternetRoute:
    Type: AWS::EC2::Route
    Properties:
      RouteTableId: !Ref PublicRouteTable
      DestinationCidrBlock: 0.0.0.0/0
      GatewayId: !Ref InternetGateway

  #-----------------------------------------------------------------------------
  # Private Subnet
  #-----------------------------------------------------------------------------
  PrivateSubnet:
    Type: AWS::EC2::Subnet
    Properties:
      AvailabilityZone: !Ref AvailabilityZone
      VpcId: !Ref VPC
      CidrBlock: 10.0.16.0/20
      Tags:
        - Key: Name
          Value: !Sub ${SystemName}-private-subnet

  PrivateRouteTable:
    Type: AWS::EC2::RouteTable
    Properties:
      VpcId: !Ref VPC
      Tags:
        - Key: Name
          Value: !Sub ${SystemName}-private-rtb

  PrivateSubnetRouteTableAssociation:
    Type: AWS::EC2::SubnetRouteTableAssociation
    Properties:
      SubnetId: !Ref PrivateSubnet
      RouteTableId: !Ref PrivateRouteTable

  PrivateSubnetToInternetRoute:
    Type: AWS::EC2::Route
    Properties:
      RouteTableId: !Ref PrivateRouteTable
      DestinationCidrBlock: 0.0.0.0/0
      NatGatewayId: !Ref NatGateway

  #-----------------------------------------------------------------------------
  # Nat Gateway
  #-----------------------------------------------------------------------------
  NatGatewayEIP:
    Type: AWS::EC2::EIP
    Properties:
      Domain: vpc
      Tags:
        - Key: Name
          Value: !Sub ${SystemName}-ngw-eip

  NatGateway:
    Type: AWS::EC2::NatGateway
    Properties:
      SubnetId: !Ref PublicSubnet
      AllocationId: !GetAtt NatGatewayEIP.AllocationId
      Tags:
        - Key: Name
          Value: !Sub ${SystemName}-ngw

  #-----------------------------------------------------------------------------
  # Endpoint
  #-----------------------------------------------------------------------------
  S3VPCEndpoint:
    Type: AWS::EC2::VPCEndpoint
    Properties:
      VpcId: !Ref VPC
      ServiceName: !Sub com.amazonaws.${AWS::Region}.s3
      VpcEndpointType: Gateway
      PrivateDnsEnabled: false
      RouteTableIds:
        - !Ref PrivateRouteTable

  #-----------------------------------------------------------------------------
  # Bastion server
  #-----------------------------------------------------------------------------
  BastionSecurityGroup:
    Type: AWS::EC2::SecurityGroup
    Properties:
      GroupDescription: 'Security Group for a bastion instance'
      VpcId: !Ref VPC
      SecurityGroupIngress:
        - IpProtocol: tcp
          FromPort: 22
          ToPort: 22
          CidrIp: 0.0.0.0/0
      Tags:
        - Key: Name
          Value: !Sub ${SystemName}-bastion-sg

  BastionEIP:
    Type: AWS::EC2::EIP
    Properties:
      Domain: vpc
      Tags:
        - Key: Name
          Value: !Sub ${SystemName}-bastion-eip

  # Key can be found in AWS console: Systems Manager -> Parameter Store
  BastionKeyPair:
    Type: AWS::EC2::KeyPair
    Description: KeyPair for bastion server
    Properties:
      KeyName: !Sub ${SystemName}-bastion-keypair

  BastionInstance:
    Type: AWS::EC2::Instance
    Properties:
      ImageId: ami-08c84d37db8aafe00  # Amazon Linux 2023 AMI
      InstanceType: t2.micro
      KeyName: !Ref BastionKeyPair
      SecurityGroupIds:
        - !Ref BastionSecurityGroup
        # - !GetAtt VPC.DefaultSecurityGroup
      SubnetId: !Ref PublicSubnet
      Tags:
        - Key: Name
          Value: !Sub ${SystemName}-bastion

  BastionEIPAssociation:
    Type: AWS::EC2::EIPAssociation
    Properties:
      AllocationId: !GetAtt BastionEIP.AllocationId
      InstanceId: !Ref BastionInstance

Outputs:
  VPC:
    Value: !Ref VPC
    Export:
      Name: !Sub ${SystemName}-vpc
  BastionSecurityGroup:
    Value: !Ref BastionSecurityGroup
    Export:
      Name: !Sub ${SystemName}-bastion-sg
  DefaultSecurityGroupId:
    Value: !GetAtt VPC.DefaultSecurityGroup
    Export:
      Name: !Sub ${SystemName}-default-sg
  PrivateSubnet:
    Value: !Ref PrivateSubnet
    Export:
      Name: !Sub ${SystemName}-private-subnet
簡単な説明
RouteTableの設定
PublicSubnet
  PublicSubnetToInternetRoute:
    Type: AWS::EC2::Route
    Properties:
      RouteTableId: !Ref PublicRouteTable
      DestinationCidrBlock: 0.0.0.0/0
      GatewayId: !Ref InternetGateway
- デフォルトで、10.0.0.0/16 (同一VPC) 宛の通信はlocalに送られます
- 上記によって、0.0.0.0/0 (その他) 宛の通信はInternetGatewayに送られます
PrivateSubnet
  PrivateSubnetToInternetRoute:
    Type: AWS::EC2::Route
    Properties:
      RouteTableId: !Ref PrivateRouteTable
      DestinationCidrBlock: 0.0.0.0/0
      NatGatewayId: !Ref NatGateway

  S3VPCEndpoint:
    Type: AWS::EC2::VPCEndpoint
    Properties:
      VpcId: !Ref VPC
      ServiceName: !Sub com.amazonaws.${AWS::Region}.s3
      VpcEndpointType: Gateway
      PrivateDnsEnabled: false
      RouteTableIds:
        - !Ref PrivateRouteTable
- デフォルトで、10.0.0.0/16 (同一VPC) 宛の通信はlocalに送られます
- 上記によって、S3へのアクセスはVPCEndpointに送られます
- 上記によって、0.0.0.0/0 (その他) 宛の通信はNatGatewayに送られます
踏み台サーバーの設定
セキュリティグループの設定
  BastionSecurityGroup:
    Type: AWS::EC2::SecurityGroup
    Properties:
      GroupDescription: 'Security Group for a bastion instance'
      VpcId: !Ref VPC
      SecurityGroupIngress:
        - IpProtocol: tcp
          FromPort: 22
          ToPort: 22
          CidrIp: 0.0.0.0/0
      Tags:
        - Key: Name
          Value: !Sub ${SystemName}-bastion-sg
- 上記によって、踏み台サーバー用のセキュリティグループの設定を行っています
- インバウンドルールとして、ssh(port=22)のみ受け入れる設定をしています (アクセス元は0.0.0.0/0=any)
- なお、自分でセキュリティグループを作成しないで、VPCのデフォルトセキュリティグループを使用することもできます
固定IPの設定
  BastionEIP:
    Type: AWS::EC2::EIP
    Properties:
      Domain: vpc
      Tags:
        - Key: Name
          Value: !Sub ${SystemName}-bastion-eip
- 上記によって、固定IPアドレスを設定しています
- これによって、踏み台サーバーには常に固定のIPアドレスでアクセスできるようになります
キーペアの作成
  BastionKeyPair:
    Type: AWS::EC2::KeyPair
    Description: KeyPair for bastion server
    Properties:
      KeyName: !Sub ${SystemName}-bastion-keypair
- 上記によって、踏み台サーバーEC2インスタンス用のキーペアを作成します
- キーは、AWS console上で、 Systems Manager -> Parameter Storeで取得できます
- が、いちいちpemファイルを指定したりするのは面倒なので以下のいずれかの方法でアクセスするのがおすすめです
- EC2 Instance Connect
- 事前に作業用PCのsshキーを用いてアクセス出来るようにする
- 今回はこの方法でアクセスする
- Session Manager
- インスタンスがVPCに接続していて、SSM用のRoleが割り当てられている必要がある
- 今回は踏み台サーバー用にRoleを作成していないので、この方法は使わない
- EC2 Instance Connect
EC2インスタンスの作成
  BastionInstance:
    Type: AWS::EC2::Instance
    Properties:
      ImageId: ami-08c84d37db8aafe00  # Amazon Linux 2023 AMI
      InstanceType: t2.micro
      KeyName: !Ref BastionKeyPair
      SecurityGroupIds:
        - !Ref BastionSecurityGroup
        # - !GetAtt VPC.DefaultSecurityGroup
      SubnetId: !Ref PublicSubnet
      Tags:
        - Key: Name
          Value: !Sub ${SystemName}-bastion
- 上記によって、EC2インスタンスを作成します。今回はOSイメージとインスタンス種別はテンプレート内で固定にしてしまいました
- 踏み台サーバーは常時使うわけでもないし、性能は低くてよいのでt2.microで良いと思います
- 先ほど作成したPublicSubnetに設置します
注意
課金
- 本テンプレートでは料金のかかるリソースを設置しています (1年間のお試し期間中であっても)
- 特にNAT Gatewayは、 $0.045/hour = 約150円/日 と、そこそこかかりますのでご注意ください
- また、EC2を停止していてもEBSボリュームで課金されることもありますので、そちらもご注意ください
参考資料
- AWSではじめるインフラ構築入門