Rails×ReactでRailsのscaffoldで生成されるような簡単なcrudができるアプリケーションを実装したので、備忘録として残しておこうと思います。
アプリケーションの概要
タイトルと本文のあるメッセージをCRUD+絞り込み検索するアプリケーション
version
- Ruby 2.4.1
- Rails 5.1.4
- React 16.2.0
- webpack 3.10.0
RailsとReactの役割分担
- Rails: APIサーバに徹し、jsonを返すだけの役割
- React: Railsへのjsonの受け渡しやルーティング、viewのレンダリングの役割
やったこと
(1) 環境の構築 (本エントリ)
(2) メッセージ一覧を表示する。
(3) 新規メッセージを作成する。
(4) メッセージ詳細の表示、編集、更新をする。
(5) メッセージを削除する、メッセージを検索する。
やってないこと
- Redux、MobXなどステート管理のためのフレームワークの導入
- テストの実装
- CSSの実装
- セキュリティやデータの整合性を確認する実装
- 用語や実装の解説
用語や実装の解説については、参考にさせていただいたサイトのリンクを各実装毎に貼っておりますので、そちらをご確認下さい。
参考サイトの作成者の皆様ありがとうございます。
完成イメージ
ご一読いただくにあたって
・間違いがありましたらコメントにて教えて下さい。(まだまだ勉強中です。)
環境構築
事前準備
Ruby/Rails/Node.js/yarn/rbenv/ndenvなどのインストール、設定が必要ですが、解説は実施しませんので以下を参考に準備してください。
- Rubyのインストール
- Ruby on Railsのインストールと設定
- MacにNode.jsをインストール
- ndenv で Node.js をインストールする際、同時に Yarn もインストールする方法
- Yarn (yarnpkg) インストール覚書
あと、私はzshを使っているのですが、PATHを通すのにちょっとハマって、こちらも参考にさせていただきました。
Rails
1.rails new でテンプレートを作成します。
--api オプションをつけることで、不要なファイルを生成しないようにします。
rails new react_sample --api
テンプレートファイルが一式生成されたら、ディレクトリを移動します。
cd react_sample
Railsサーバーが立ち上がるか確認をします。
rails s
localhost:3000にアクセスします。
"Yay! You’re on Rails!"の表示が確認できれば成功です。

必要に応じて、pryなどのgemを入れてもよいかもしれません。
今回は省略します。
React
Reactの実装はfrontendディレクトリを作り、そのディレクトリ内で行います。
mkdir frontend && cd frontend
yarn init -yでpackage.jsonを作成します。
yarn init -y
yarn init v1.3.2
warning The yes flag has been set. This will automatically answer yes to all questions which may have security implications.
success Saved package.json
Done in 0.02s.
Babel関連のパッケージとwebpackをインストールします。
yarn add babel-core babel-loader babel-preset-es2015 babel-preset-react webpack webpack-dev-server -D
yarn add v1.3.2
info No lockfile found.
[1/4] 🔍  Resolving packages...
warning babel-preset-es2015@6.24.1: 🙌  Thanks for using Babel: we recommend using babel-preset-env now: please read babeljs.io/env to update!
[2/4] 🚚  Fetching packages...
[3/4] 🔗  Linking dependencies...
[4/4] 📃  Building fresh packages...
success Saved lockfile.
success Saved 581 new dependencies.
├─ abbrev@1.1.1
├─ accepts@1.3.4
├─ ansi-regex@2.1.1
├─ ansi-styles@2.2.1
...
├─ yargs-parser@4.2.1
└─ yargs@6.6.0
✨  Done in 15.59s.
続けて、ReactとReact-domをイントールします。
yarn add react react-dom
yarn add v1.3.2
[1/4] 🔍  Resolving packages...
[2/4] 🚚  Fetching packages...
[3/4] 🔗  Linking dependencies...
[4/4] 📃  Building fresh packages...
success Saved lockfile.
success Saved 11 new dependencies.
├─ asap@2.0.6
├─ encoding@0.1.12
├─ fbjs@0.8.16
├─ isomorphic-fetch@2.2.1
├─ node-fetch@1.7.3
├─ promise@7.3.1
├─ prop-types@15.6.0
├─ react-dom@16.2.0
├─ react@16.2.0
├─ ua-parser-js@0.7.17
└─ whatwg-fetch@2.0.3
✨  Done in 4.45s.
.babelrcファイルを作って内容を追加して保存します。
touch .babelrc
{
  "presets": [
    "es2015", "react"
  ]
}
webpack.config.jsファイルを作って内容を追加して保存します。
touch webpack.config.js
const path = require('path');

module.exports = {
  entry: path.join(__dirname, 'src/index.js'),
  output: {
    path: path.join(__dirname, 'www'),
    filename: 'bundle.js'
  },
  devServer: {
    contentBase: 'www',
    port: 4000,
    inline: true
  },
  module: {
    rules: [
      {
        test: /\.js$/,
        use: 'babel-loader',
        exclude: /node_modules/
      }
    ]
  }
};
次に、wwwディレクトリを切って、index.htmlファイルを作成します。
mkdir www
touch www/index.html
<!DOCTYPE html>
  <html>
    <head>
      <meta charset="utf-8">
      <title>React</title>
    </head>
    <body>
      <div id="app"></div>
      <script src="bundle.js"></script>
    </body>
</html>
次に、srcディレクトリを切って、index.jsファイルを作成します。
mkdir src
touch src/index.js
import React, { Component } from 'react';
import ReactDOM from 'react-dom';

class App extends React.Component {
  render () {
    return (
      <h1>Hello, React!</h1>
    )
  }
}

ReactDOM.render(<App />, document.getElementById('app'));
次に、bundle.jsなるものを作成します。
./node_modules/.bin/webpackのコマンドを叩きます。
bundle.jsとは、ざっくり説明すると、webpackにより、index.jsを始めとする複数存在するファイル(*.js, *.css)が一つのファイルとしてまとめられて、セットされるファイルのようです。 index.html で呼び出します。
Hash: xxxxxxxxxxxxxxxxxxxxx
Version: webpack 3.10.0
Time: 2278ms
    Asset    Size  Chunks                    Chunk Names
bundle.js  729 kB       0  [emitted]  [big]  main
  [14] ./src/index.js 2.27 kB {0} [built]
    + 26 hidden modules
最後に、フロントエンドのファイルを配信する開発用サーバーを起動するコマンドを、package.jsonのscriptsとして追加します。
{
  "name": "frontend",
  "version": "1.0.0",
  "main": "index.js",
  "license": "MIT",
  ↓追加 ========================
  "scripts": {
    "start": "webpack-dev-server"
  },
  ↑追加 ========================
  "devDependencies": {
    "babel-core": "^6.26.0",
    "babel-loader": "^7.1.2",
    "babel-preset-es2015": "^6.24.1",
    "babel-preset-react": "^6.24.1",
    "webpack": "^3.10.0",
    "webpack-dev-server": "^2.11.1"
  },
  "dependencies": {
    "react": "^16.2.0",
    "react-dom": "^16.2.0"
  }
}
以上で、Reactの環境設定は終わりです。
以下のコマンドを叩いて、http://localhost:4000/にアクセスして見ます。
yarn start
以上の設定でAPI用サーバー(Rails), フロントエンド用サーバー(React含む)各々が立ち上がるようになったと思います。
./react_sample直下でrails s => localhost:3000
./react_sample/frontend直下でyarn start => localhost:4000
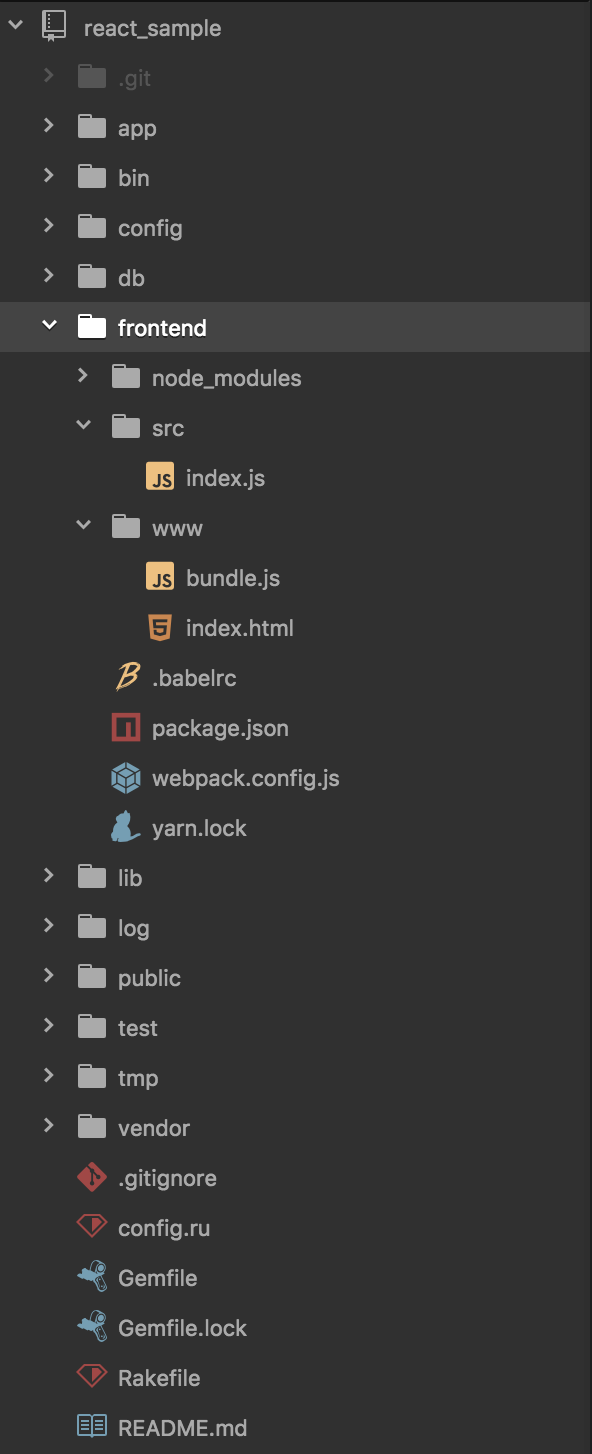
この時点ではディレクトリは以下のようになっているかと思います。

foremanというrailsのgemを使うことにより、コマンド1つで両方のサーバーを立ち上げることもできるようなので、気になる方は調べて見てください。
環境構築はできましたので、次にメッセージ一覧を表示するを実装したいと思います。こちら

