Rails×ReactでRailsのscaffoldで生成されるような簡単なcrudができるアプリケーションを実装したので、備忘録として残しておこうと思います。
アプリケーションの概要
タイトルと本文のあるメッセージをCRUD+絞り込み検索するアプリケーション
やったこと
(1) 環境の構築
(2) メッセージ一覧を表示する。(本エントリ)
(3) 新規メッセージを作成する。
(4) メッセージ詳細の表示、編集、更新をする。
(5) メッセージを削除する、メッセージを検索する。
やってないこと
- Redux、MobXなどステート管理のためのフレームワークの導入
- テストの実装
- CSSの実装
- セキュリティやデータの整合性を確認する実装
- 用語や実装の解説
用語や実装の解説については、参考にさせていただいたサイトのリンクを各実装毎に貼っておりますので、そちらをご確認下さい。
参考サイトの作成者の皆様ありがとうございます。
【ご一読いただくにあたって】
・間違いがありましたらコメントにて教えて下さい。(まだまだ勉強中です。)
メッセージ一覧を表示
API用サーバー(Rails), フロントエンド用サーバー(React含む)各々を立ち上げていない場合は、rails sとyarn startを叩いて立ち上げます。
(解説は省略します。環境の構築をご確認ください。)
Rails
Rails側で一覧に表示するメッセージのデータを作成します。
MessageのModelとControllerを作成
今回のMessageは以下のようなイメージです。
| カラム名 | 型 | null |
|---|---|---|
| id | integer | false |
| title | string | false |
| content | text | true |
タイトル(title)は必須だけど内容(content)は必須ではないという感じです。
rails g model Message title:string content:text
db/migrate/2018xxxxxxxxxxx_create_messages.rb というファイルが生成されているはずなので、そのファイルを開いて、titleにnull: falseを設定します。
class CreateMessages < ActiveRecord::Migration[5.1]
  def change
    create_table :messages do |t|
      t.string :title, null: false # => null: false を追加
      t.text :content

      t.timestamps
    end
  end
end
追加が終わったら rails db:migrate を叩きます。
rails db:migrate
次に、Controllerを作成します。
rails g controller Messages index
messages_controller.rb を編集します。
class MessagesController < ApplicationController
  def index
    messages = Message.all # =>追加
    render json: messages  # =>追加
  end
end
メッセージを全て取得して、それをjsonで返すという処理です。
初期データを作成
db/seed.rbに初期データを記述します。
Message.create!([
  { title: 'Hello, World!', content: 'I like World!' },
  { title: 'Hello, Rails!', content: 'I like Rails!' },
  { title: 'Hello, React!', content: 'I like React!' }
])
記述したデータをセットするため以下のコマンドを叩きます。
rails db:seed
rails consoleを叩いて、データがセットされたか確認しましょう。(解説は省力します。)
ルーティングを設定
config/routes.rb を以下のように編集します。
Rails.application.routes.draw do
  #get 'messages/index' #=> この行を削除
  resources :messages, only: :index, format: 'json' #=> この行を追加
end
json形式のデータを確認
localhost:3000/messages.json にアクセスします。
先ほど初期データで作成した値が確認できればOKです。

React
まずはメッセージ一覧画面Reactのコンポーネントの概要を確認したいと思います。
イメージは以下のような感じです。
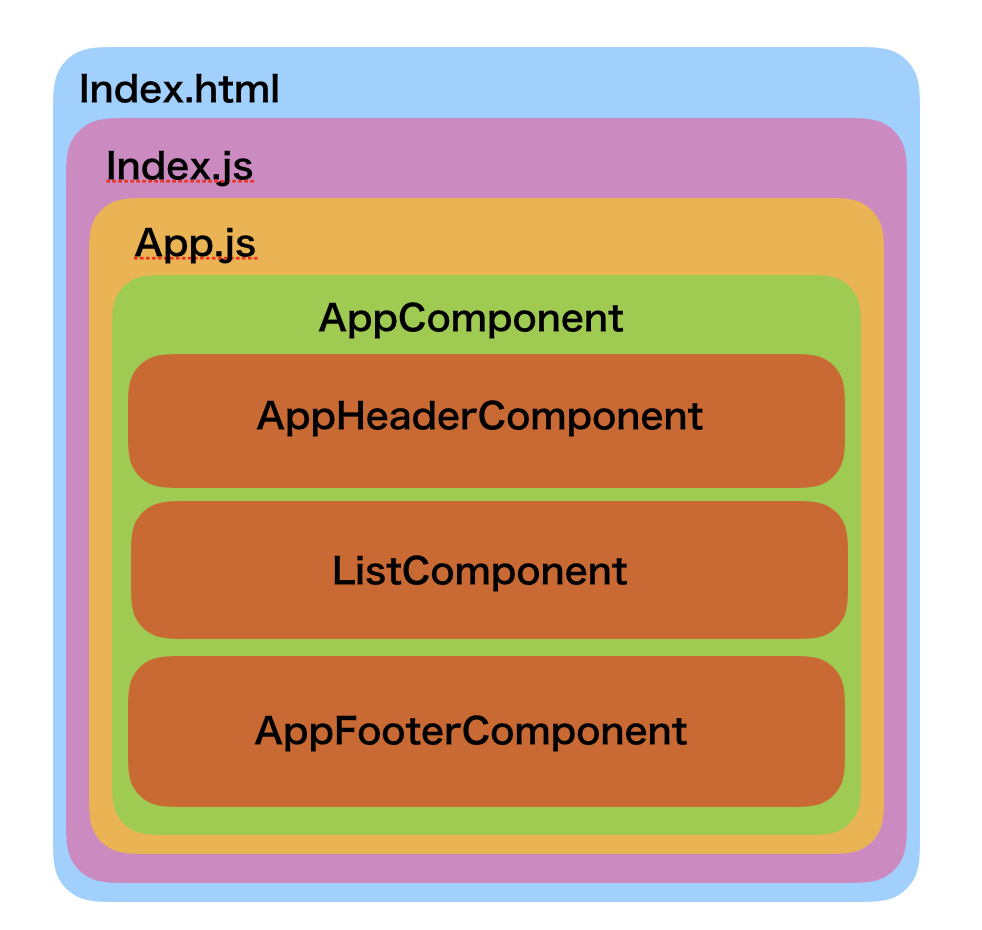
| file/component | 概要 |
|---|---|
| index.html | このファイルでindex.jsを読み込んでいる。 Railsでいうapplication.htmlのようなイメージ |
| index.js | このファイルでApp.jsを読み込んでいて、 それらをindex.htmlに渡している。ブリッジ的な役割をしている。 |
| App.js | このファイルで、これから実装するjsファイルやコンポーネントを読み込んで、ルーティングしたり表示のレイアウトを設定している。 |
| AppComponent |
App.jsの中にあり、全てのコンポーネントのベースとなるコンポーネント。 |
| AppHeaderComponent |
AppComponentの中にあるHeaderのコンポートネント |
| ListComponent |
AppComponentの中にあるコンテンツ部分(一覧を表示する)のコンポーネント。この部分がフォームに変わったり、詳細表示に変わったりする。 |
| AppFooterComponent |
AppComponentの中にあるFooterのコンポートネント |
それでは実装していきます。
index.jsの修正
環境の構築が完了した状態のindex.jsは以下のような内容になっているかと思いますので、そちらをまず修正します。
import React, { Component } from 'react';
import ReactDOM from 'react-dom';

class App extends React.Component {
  render () {
    return (
      <h1>Hello, React!</h1>
    )
  }
}

ReactDOM.render(<App />, document.getElementById('app'));
を以下のように修正します。
import React, { Component } from 'react';
import ReactDOM from 'react-dom';
import App from './App';

ReactDOM.render(<App />, document.getElementById('app'));
Appクラスを削除して、import App from './App'; という形でApp.jsを読み込むように修正しました。
App.jsを作成
次に、srcの直下にApp.jsを作成します。
touch App.js
そして、以下のように編集します。
import React, { Component } from 'react';

// アップコンポーネント
const App = () => (
  <div>
    <AppHeader />
    <div>Messagelist</div>
    <AppFooter />
  </div>
)

// ヘッダーコンポーネント  #ここの実装が上のAppコンポーネントの<AppHeader /> にセットされる
const AppHeader = () => (
  <div>
    <h3>Message App</h3>
    <p>
      <span>[Home]</span>
      <span>[New Message]</span>
    </p>
  </div>
)

// フッターコンポーネント   #ここの実装が上のAppコンポーネントの<AppFooter />にセットされる
const AppFooter = () => (
  <div>
    <p>
      Message App Footer
    </p>
  </div>
)

export default App
ここの段階で、一度 localhost:4000を確認します。
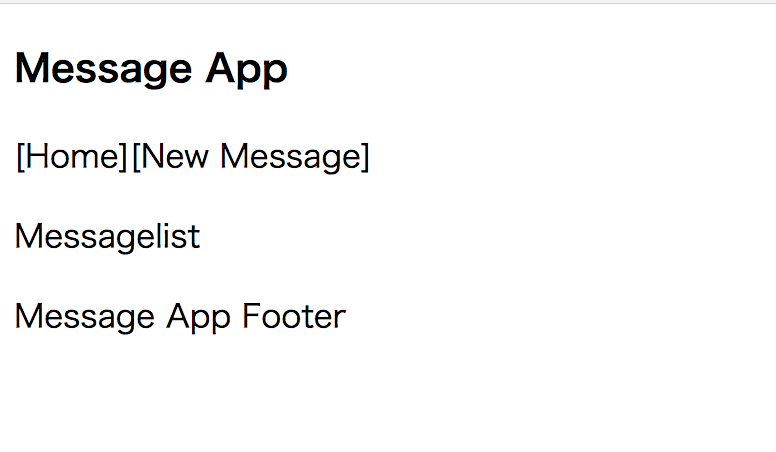
上記のように表示されていれば成功です。
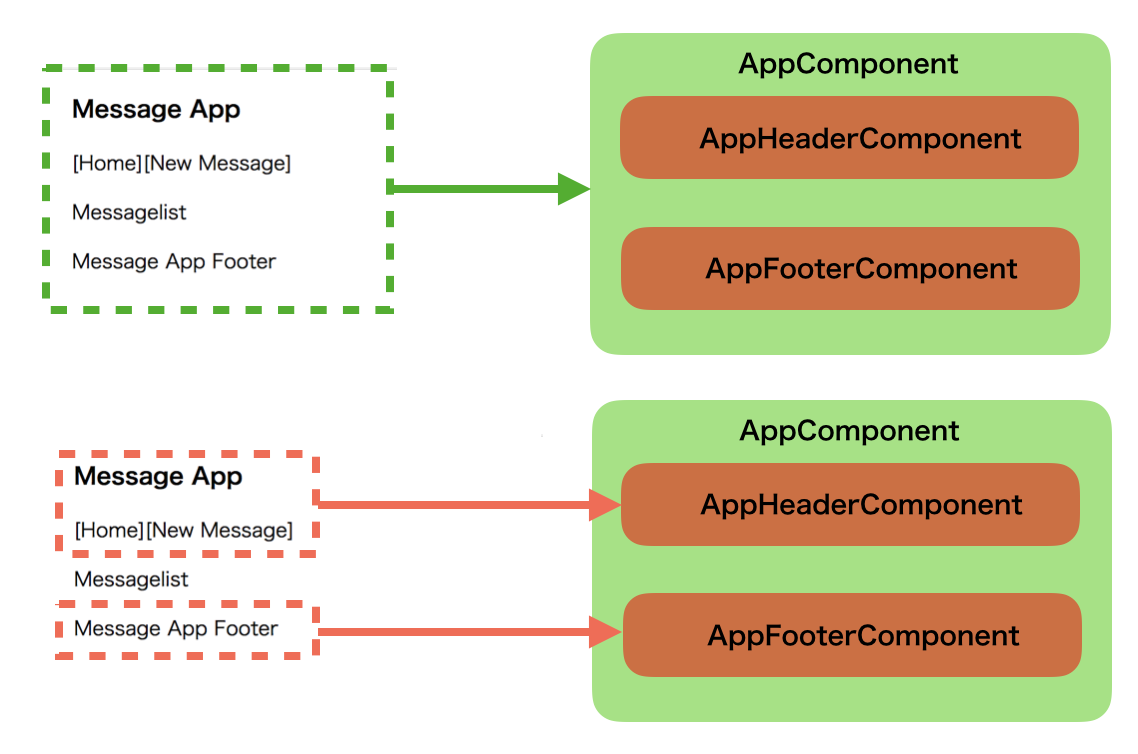
コンポーネントとしては以下のようなイメージです。
List.jsを作成
次にメッセージ一覧を表示するコンポーネントであるList.jsを作成します。
touch List.js
まずはRails(API)からデータを取得するのではなくて、コンポーネント内でデータを定義してそれを表示してみます。
import React, { Component } from 'react';

class List extends Component {
  constructor(props) {
    super(props)
    // Listコンポーネントの state として messages を定義する
    this.state = {
      messages: [
        { id: 1, title: 'test_title1'},
        { id: 2, title: 'test_title2'}
      ]
    };
  }

  render(){
    // Listコンポーネントの state を const messages にセットする const – 再代入不可能な変数
    const { messages } = this.state;
    return(
      <div>
        <ul>
          {messages.map((message) => {
            return <li key={message.id}> { message.title }</li>
          })}
        </ul>
      </div>
    );
  }
}

// Listコンポーネントをexportする。
export default List;
そして、App.jsを修正します。(変更のある箇所のみ表示しています。)
-
import List from './List';を追加する - Appコンポーネントの中でListコンポーネントを呼び出す。
import React, { Component } from 'react';
import List from './List';

const App = () => (
  <div>
    <AppHeader />
    <List /> //<div>Messagelist</div>は削除する
    <AppFooter />
  </div>
)

~省略~
ここの段階で、再度localhost:4000を確認します。
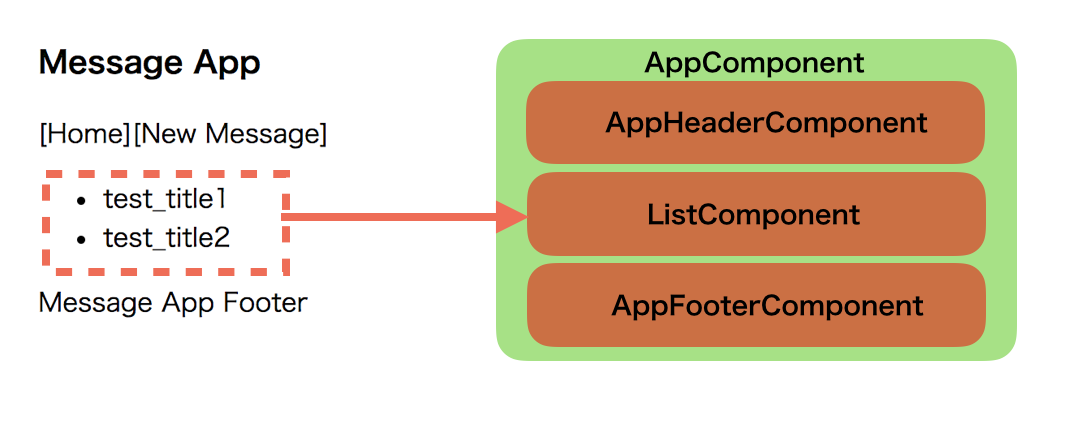
Listコンポーネントで定義したmessagesが表示されていれば成功です。(上記イメージの左側)
Rails(API)からデータを取得する
現状のままReactからRailsにアクセスするとNo 'Access-Control-Allow-Origin' header is present on the requested resource.のようなクロスドメインに起因するエラーが出てアクセス出来ません。
そこで次の設定を行います。(詳細は省略します。)
1. gem rack-cors をインストールする。
2. application.rbに以下を追加する。
class Application
 ~省略~
 config.middleware.insert_before 0, Rack::Cors do
  allow do
   origins 'localhost:4000'
   resource '*', headers: :any, methods: [:get, :post, :put, :delete]
  end
 end
end
3. Railsを再起動させる。
そちらを設定が終わったら、List.jsを以下のように修正します。
import React, { Component } from 'react';

const REQUEST_URL = 'http://localhost:3000/messages.json'

class List extends Component {
  constructor(props) {
    super(props)
    this.state = {
      messages: []
    };
  }
  // renderが呼ばれる前にDataをfetchする処理を発火する。
  componentWillMount() {
    this.fetchData()
  }

  fetchData() {
    // fetchで非同期処理を実行する。
    fetch(REQUEST_URL)
      .then((response) => {
      // 4xx系, 5xx系エラーのときには response.ok = false になる
       if (!response.ok) {
         throw Error(response.statusText);
       }
       return response;
      })
      // レスポンスボディをJSONとしてパースする
      .then((response) => response.json())
      // responseDataをmessagesにsetする
      // setStateが行われる度にrenderが呼ばれ、表示が変わる
      .then((responseData) => {
        this.setState({
          messages: responseData
        })
      })
      // エラーをcatchする
      .catch((err) => {
        console.error(err);
      });
    })
  }

  render(){
    const { messages } = this.state;
    return(
      <div>
        <ul>
          { messages.map((message) => {
            return <li key={message.id}>{message.title}</li>
          })}
        </ul>
      </div>
    );
  }
}
export default List;
それではlocalhost:4000を確認します。
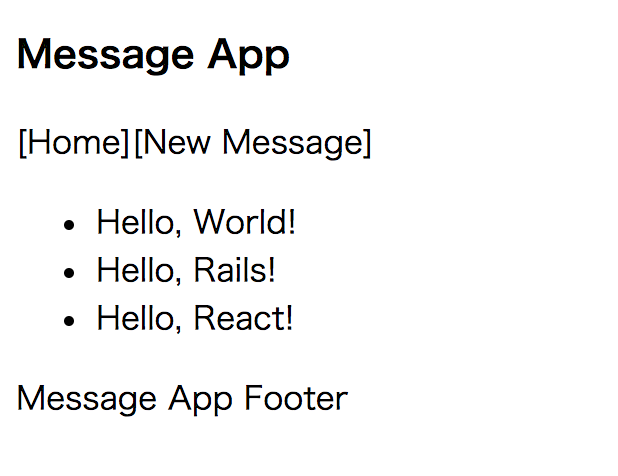
Railsでセットした初期データのtitleが表示されていれば成功です。
次は、新規メッセージを実装してみたいと思います。こちら