ディープラーニングの画像識別は今日では広く認知されているものの、あまり事例が出てこないのはデータ数が膨大に必要である事と、それに伴って学習が長時間になるのが原因ではないかと思います。
そんな課題をクールに解決してくれるのが転移学習です。
転移学習はネットワークの全てをまっさらな状態から学習するのではなく、学習済みのネットワークの一部のみを学習し直す事で、データ数も時間も少なく精度の高い結果を得られる手法です。しかし学習と運用の面ではまだ面倒な事がたくさんあるため、ここではML Engineを使って簡単に転移学習を実現する方法を紹介します。
本記事はNotebookにまとまっています。
Kerasを使った転移学習
転移学習は前述の通り学習済みのネットワークが必要となります。TensorFlowでも一部の方が公開されていますが、デフォルトで且つ簡単に利用できるという点ではKerasが一番おすすめです。
KerasでInceptionV3
Kerasで学習済みネットワークを利用するには、次のたった2行を書くだけです。
from keras.applications.inception_v3 import InceptionV3
model = InceptionV3(weights='imagenet')
ここではInceotionV3モデルをロードしていますが、VGGやResNetなどもあります。このモデルはImageNetの100万枚の画像を学習し、1000種類の物体を識別できるよう訓練されたものです。
識別をするためのコードは次のようになります。
from keras.preprocessing import image
from keras.applications.inception_v3 import preprocess_input, decode_predictions
import numpy as np

# 画像から入力データを作成
img_path = 'seagull.jpg'
img = image.load_img(img_path, target_size=(299, 299))
x = image.img_to_array(img)
x = np.expand_dims(x, axis=0)
x = preprocess_input(x)

# 推論実行
preds = model.predict(x)

# 推論結果を出力
print('Predicted:')
for p in decode_predictions(preds, top=5)[0]:
    print("Score {}, Label {}".format(p[2], p[1]))
InceptionV3は入力画像のサイズが299x299のRGB3色なので、それに合わせて画像を加工する必要があります。Kerasには加工してくれる関数が用意されているので簡単です。
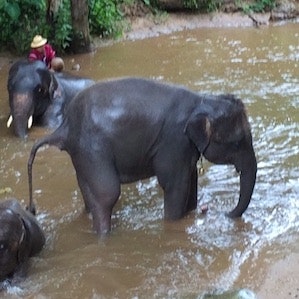
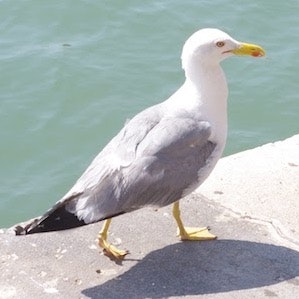
以下2種類の画像を識別してみました。
Predicted:
Score 0.965535342693, Label Indian_elephant
Score 0.0246694963425, Label tusker
Score 0.000626200810075, Label African_elephant
Score 0.000182053816388, Label Mexican_hairless
Score 0.000138055766001, Label hippopotamus
Predicted:
Score 0.278156191111, Label albatross
Score 0.0422638729215, Label drake
Score 0.0255650430918, Label goose
Score 0.0211290325969, Label red-breasted_merganser
Score 0.019902639091, Label lakeside
象は正しく認識できています。2枚めは一応カモメなんですが、albatross(アホウドリ)と出ていますね。スコアはあまり大きくありません。ImageNetコンペの1000種類リストにはgull(カモメ)は無く、似たような候補が代わりに出ています。このように事前学習済みなので予め決まった識別はできますが、この1000種類にないものは識別できません。
そこで転移学習というわけです。
中間層を確認する
出力層の出力は、決まった1000種類のそれぞれの確率となってしまうので再学習のしようがありません。転移学習では中間層の出力以降を再学習します。Kerasでは model.layers でレイヤーの一覧が取れるので、最終段付近がどうなっているか確認します。
import pandas as pd
pd.DataFrame(model.layers).tail()
出力は以下のようになります。
| 0 | |
|---|---|
| 308 | <keras.layers.merge.Concatenate object at 0x7f... |
| 309 | <keras.layers.core.Activation object at 0x7f61... |
| 310 | <keras.layers.merge.Concatenate object at 0x7f... |
| 311 | <keras.layers.pooling.GlobalAveragePooling2D o... |
| 312 | <keras.layers.core.Dense object at 0x7f61a466a... |
今回はレイヤー311のAveragePooling2D以降を再学習するので、ここまでのネットワークとなるモデルを再定義します(実はここで区切るなら、InceptionV3モデルを作る際にinclude_top=Falseを指定することでも同じ事ができます)。
from keras.models import Model

# 中間層を出力するモデル
intermediate_layer_model = Model(inputs=model.input, outputs=model.layers[311].output)
これで1000通りの識別結果ではなく、AveragePooling2Dの出力結果を出力するモデルとなりました。この出力はどうなっているのでしょうか?可視化してみましょう。
feature = intermediate_layer_model.predict(x)
pd.DataFrame(feature.reshape(-1,1)).plot(figsize=(12, 3))
先程と同じく、predictで推論を実行すると出力は次のようになります。
311番目のレイヤーAveragePooling2Dの出力は、2048次元の特徴ベクトルです。InceptionV3ではこの出力を使って、後段のDenseレイヤーで1000通りの識別を行っているわけです。しかし今回は別の識別を行いたいので、新たにDenseレイヤーをくっつけてしまいましょう。
再学習用のDenseレイヤーを加える
今回は2通りの画像識別を行うことにしましょう。
from keras.layers import Dense

# Denseレイヤーを接続
x = intermediate_layer_model.output
x = Dense(1024, activation='relu')(x)
predictions = Dense(2, activation='softmax')(x)

# 転移学習モデル
transfer_model = Model(inputs=intermediate_layer_model.input, outputs=predictions)
これで2通りの画像識別を行う独自のモデルが出来上がりました。しかしこのままでは全てのレイヤーが再学習されてしまうため、再学習する必要のないAveragePooling2D以前のレイヤーをフリーズする必要があります。
# 一旦全レイヤーをフリーズ
for layer in transfer_model.layers:
    layer.trainable = False

# 最終段のDenseだけ再学習する
transfer_model.layers[312].trainable = True
transfer_model.layers[313].trainable = True

transfer_model.compile(loss='categorical_crossentropy',
                       optimizer='adam',
                       metrics=['accuracy'])
これで学習を行えば、最終段だけが学習され、自分が識別したい2種類の画像のみ識別する事ができるようになるはずです。
2種類の画像でFine Tuning
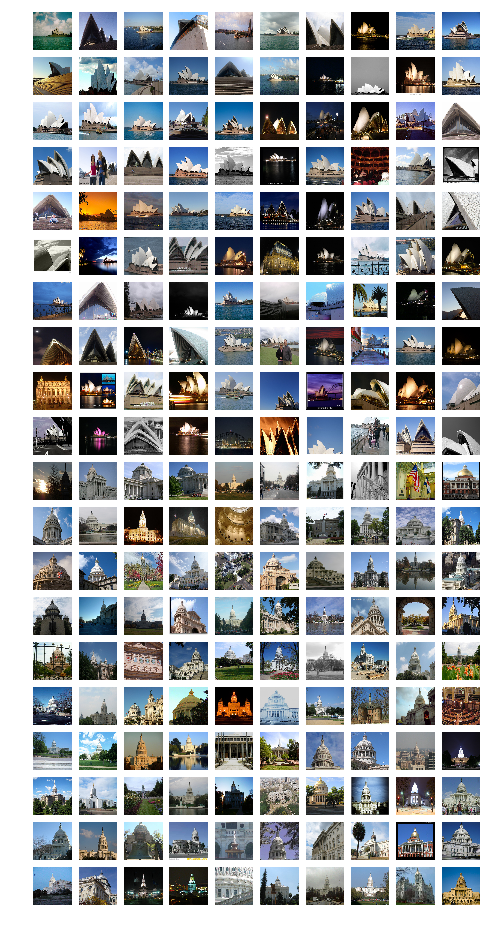
今回使ったモデルは2種類の画像識別ができるはずなので、次のデータセットで識別を行ってみましょう。
これは自作の Opera House - Capitol データセットです。シドニーのオペラハウスと連邦議会議事堂の画像がそれぞれ100枚ずつあります。GitHubに生成コードをおいてあります。
https://github.com/hayatoy/deep-learning-datasets
データセットのロード
このデータセットはnumpyで圧縮した状態でGitHubにアップロードしてあるので、そのままダウンロードして使えます。
import requests

url = 'https://github.com/hayatoy/deep-learning-datasets/releases/download/v0.1/tl_opera_capitol.npz'
response = requests.get(url)
dataset = np.load(BytesIO(response.content))

X_dataset = dataset['features']
y_dataset = dataset['labels']
学習用とテスト用に分けます。
from keras.utils import np_utils
from sklearn.model_selection import train_test_split

X_dataset = preprocess_input(X_dataset)
y_dataset = np_utils.to_categorical(y_dataset)
X_train, X_test, y_train, y_test = train_test_split(
    X_dataset, y_dataset, test_size=0.2, random_state=42)
学習に80%、テストに20%としました。このデータセットはInceptionV3の入力画像サイズに合わせてありますが、階調は0-255のままです。Kerasのpreprocess_inputを使うと0-1に変換してくれます。
ちなみに、元々のInceptionV3で識別を行うとどういう結果が出るでしょうか?やってみましょう。
x = X_dataset[0]
x = np.expand_dims(x, axis=0)

preds = model.predict(x)
print('Predicted:')
for p in decode_predictions(preds, top=5)[0]:
    print("Score {}, Label {}".format(p[2], p[1]))
結果
Predicted:
Score 0.110657587647, Label wreck
Score 0.0671983659267, Label lakeside
Score 0.0309968702495, Label seashore
Score 0.0249739717692, Label breakwater
Score 0.0229569561779, Label fountain
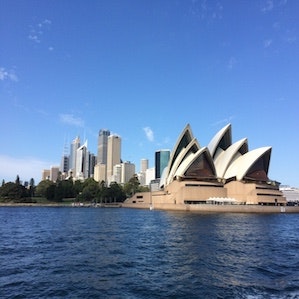
一枚目の画像はオペラハウスですが、wreck(難破船)と出ています。元々のリストに無いのでしょうがないですね。
学習
学習は通常の場合と同様、fitをコールするだけです。
transfer_model.fit(X_train, y_train, epochs=20,
                   validation_data=(X_test, y_test))
loss, acc = transfer_model.evaluate(X_test, y_test)
print('Loss {}, Accuracy {}'.format(loss, acc))
結果…
Loss 0.112133163214, Accuracy 0.975
テストデータで97.5%の精度が出ています!各クラス80枚ずつしか学習に使ってなく、さらに人が写り込んでいたり夜景だったりするデータですが、ここまで精度が出るのも転移学習のおかげかもしれません(建物の輪郭が特徴的なので比較的精度が出やすいのかもしれません)。
ML Engineで学習
ここまでのコードをML Engineで実行してみましょう。CPUのみのローカルマシンだと10〜20分かかる学習ですが、ML EngineのGPUなら1分もかからず終わります。
ML EngineでKerasの転移学習をするには、h5py を別途インストールする必要があります。また、今回のコードはTensorFlow内のKerasではなく単体を使っているので、合わせてインストールしておきましょう。インストールするには、setup.pyにinstall_requiresで指定するだけです。
from setuptools import setup
if __name__ == '__main__':
    setup(name='trainer',
          packages=['trainer'],
          install_requires=['keras','h5py','Pillow'])
しかしいちいちコードをパッケージにしてGCSにアップして学習を実行するのは面倒なので、例によってJupyter(or Datalab)から直接ML Engineを実行できるライブラリを更新しておきました。
https://github.com/hayatoy/cloudml-magic
日本語の解説記事はこちら。
本記事の内容はNotebookにまとまっています。
ML EngineでOnline Prediction
さて、このようにして作ったモデルを使って何かサービスを構築したいとします。サーバーを立てて、HTTPサーバーやTensorFlowなどのセットアップ、ロードバランサー等の設計をするのは面倒です。ML Engineなら、学習済みモデルをGCSに保存しておくだけでオートスケールしてREST APIで推論を実行できるOnline Predictionが使えます。
KerasモデルからSavedModelを作る
Online PredictionはTensorFlowのSavedModel形式でないといけないので、変換してあげる必要があります。前回の記事でも紹介しましたが、今回のモデルでは一手間必要です。
Base64入力&Jpegデコード graphの作成
Kerasのモデルは画像入力する際、rawデータのarrayである必要があります。しかしこれだとOnline Prediction時に無駄にデータ転送量が多くなるため、base64エンコードされたJpeg等の圧縮形式で入力し、rawデータのarrayにデコードするgraphを追加します。
with tf.Graph().as_default() as g_input:
    input_b64 = tf.placeholder(shape=(1,), dtype=tf.string, name='input')
    input_bytes = tf.decode_base64(input_b64[0])
    image = tf.image.decode_image(input_bytes)
    image_f = tf.image.convert_image_dtype(image, dtype=tf.float32)
    input_image = tf.expand_dims(image_f, 0)
    output = tf.identity(input_image, name='input_image')

# 後でつなげるのでGraphDefにする
g_input_def = g_input.as_graph_def()
Kerasモデルをtf.GraphDefに変換
先程のgraphと繋げたいので、GraphDefに変換します。
sess = K.get_session()

from tensorflow.python.framework import graph_util

# Make GraphDef of Transfer Model
g_trans = sess.graph
g_trans_def = graph_util.convert_variables_to_constants(sess,
                                                        g_trans.as_graph_def(),
                                                        [transfer_model.output.name.replace(':0','')])
KerasはよくわからないVariableがたくさん生成され、そのままTensorFlowで使うとInitializeしていない旨のエラーが出るため、graph_util.convert_variables_to_constantsでVariableからConstantに変換しておきます。
Graphの接続
上記2つを繋げます。
with tf.Graph().as_default() as g_combined:
    x = tf.placeholder(tf.string, name="input_b64")

    im, = tf.import_graph_def(g_input_def,
                              input_map={'input:0': x},
                              return_elements=["input_image:0"])

    pred, = tf.import_graph_def(g_trans_def,
                                input_map={transfer_model.input.name: im,
                                          'batch_normalization_1/keras_learning_phase:0': False},
                                return_elements=[transfer_model.output.name])
途中のkeras_learning_phaseは、通常backendから固定設定に出来るのですが、うまく行かなかったため明示的にFalseをfeedしています。
SavedModelの生成
ここまで行けばあとは前回と同様です。
    with tf.Session() as sess2:
        inputs = {"inputs": tf.saved_model.utils.build_tensor_info(x)}
        outputs = {"outputs": tf.saved_model.utils.build_tensor_info(pred)}
        signature = tf.saved_model.signature_def_utils.build_signature_def(
            inputs=inputs,
            outputs=outputs,
            method_name=tf.saved_model.signature_constants.PREDICT_METHOD_NAME
        )

        # save as SavedModel
        b = tf.saved_model.builder.SavedModelBuilder('gs://{BUCKET}/keras-mlengine/savedmodel')
        b.add_meta_graph_and_variables(sess2,
                                       [tf.saved_model.tag_constants.SERVING],
                                       signature_def_map={'serving_default': signature})
        b.save()
さて、SavedModelができたらServeするModelを登録します。これはただ先程GCSに保存したSavedModelのパスを指定するだけですが、ConsoleからだとruntimeVersion 1.2に対応していないようなのでgcloudコマンドで登録します。
gcloud ml-engine models create OperaCapitol
gcloud ml-engine versions create v1 \
          --model OperaCapitol \
          --runtime-version 1.2 \
          --origin gs://{BUCKET}/keras-mlengine/savedmodel
数分で登録完了です。紅茶でも飲んでまっていましょう。
Online Predictionで識別
さて、これでREST APIで識別をできるようになりました。ここでも前回同様Discovery APIを使うと楽です。設定はこんな感じ。
from oauth2client.client import GoogleCredentials
from googleapiclient import discovery
from googleapiclient import errors

PROJECTID = 'PROJECTID'
projectID = 'projects/{}'.format(PROJECTID)
modelName = 'OperaCapitol'
modelID = '{}/models/{}'.format(projectID, modelName)

credentials = GoogleCredentials.get_application_default()
ml = discovery.build('ml', 'v1', credentials=credentials)
次に画像をpayloadに追加しますが、画像はBase64エンコードしてある必要があります。また、画像のリサイズ等の親切な機能は入れてないので予め299x299のサイズにしておきます。
with open('opera.jpg', 'rb') as f:
    b64_x = f.read()
import base64
import json

b64_x = base64.urlsafe_b64encode(b64_x)
input_instance = dict(inputs=b64_x)
input_instance = json.loads(json.dumps(input_instance))
request_body = {"instances": [input_instance]}

request = ml.projects().predict(name=modelID, body=request_body)
try:
    response = request.execute()
except errors.HttpError as err:
    print(err._get_reason())
response
リクエストに成功すると、次のJSONが返ってきます。
{u'predictions': [{u'outputs': [0.9974665641784668, 0.00253341649658978]}]}
outputsのリストは それぞれオペラハウスと議事堂の予想確率です。
オペラハウスが99.7%、正解です!
まとめ
現時点ではKerasのpretrained modelをOnline Predictionで使おうと思うとちょっと一手間必要ですが、学習までならとてもスムーズです。GPUを一瞬だけ借りられるのはとても魅力的です。連携の手間も、ver1.4あたりになれば改善するでしょう。


