はじめに
過去に投稿した下記の記事の続編です。今度は1時間ごとのデータをスクレイピングします。
やること
- 気象庁の1時間ごとの気象データをスクレイピングする
- 取得したデータをPostgreSQLのDBにINSERTする
環境等
- プログラミング言語: Python3.10
- DBサーバ: Amazon AWS RDB
- 実行環境: Amazon AWS EC2
- スクレイピングに使うライブラリ: BeautifulSoup
参考にした情報
制作にあたり、以下の記事と記載のコードを参考にさせていただきました。
スクレイピングするデータを観察する
気象庁のWEBサイトを見てみる
気象庁のWEBサイトをGoogleで検索して開きます。「ホーム>各種データ・資料>過去の気象データ検索」と辿っていくと、下記のURLに行き当たります。なんかいかにもパラメータを入れてくださいと言わんばかりです。
場所とか日付を選んでいくと、パラメータが埋まっていきます。最後に、「~1時間毎の値を表示」をクリックすると次の画面に進みます。
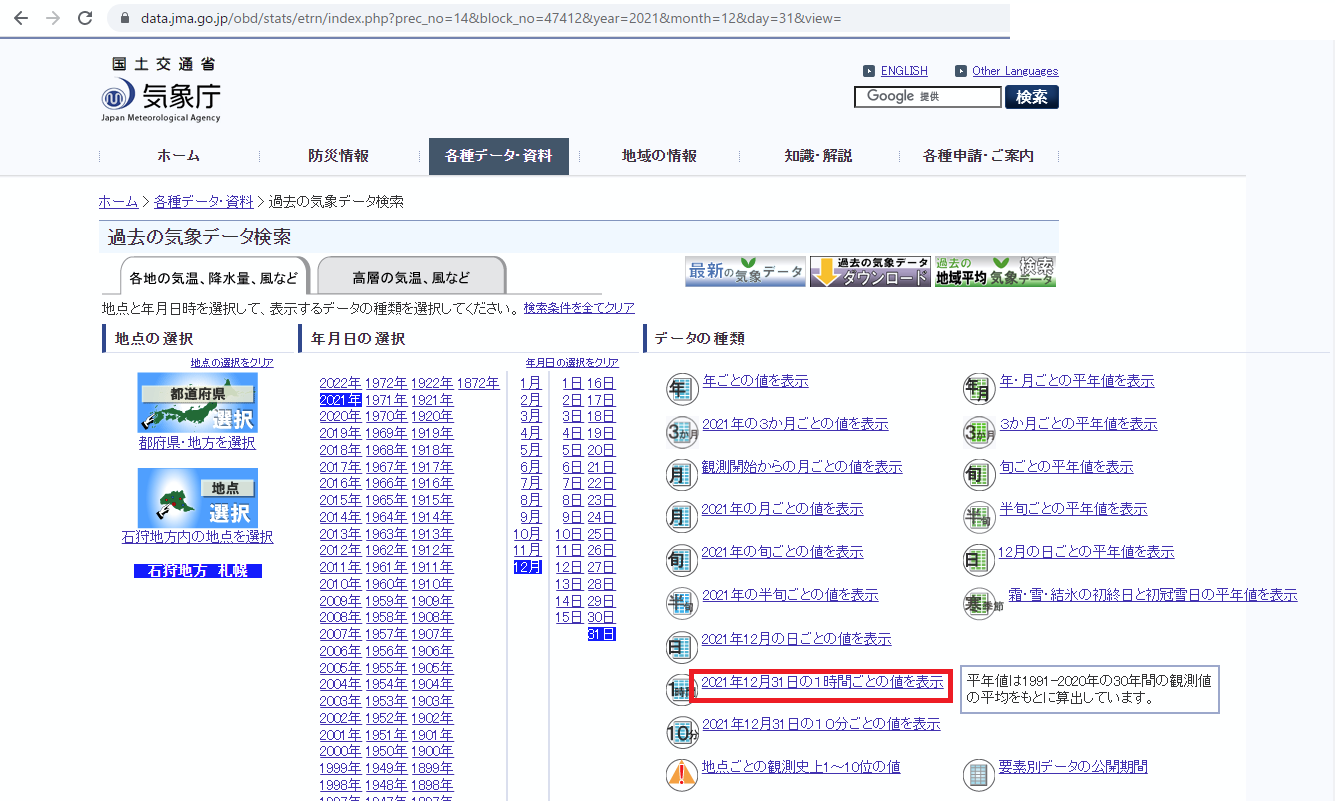
データがどうなっているのか見てみる
データの表示こんなふうになります。

このときにアドレスバーに表示されているURLは次のようになります。
スクレイピングしやすそうなデータです。しかし、"--"が当てはめられているセルや空白のセルがあります。「天気」の欄は天気記号という記号になっていて、画像データが当てはまっています。
ページのソースを見てみる
スクレイピングしやすそうなデータです。BeautifulSoupに放り込めば、うまい感じに切り分けてくれそうです。
気象データがあるところのclassは"mtx"になっているようです。
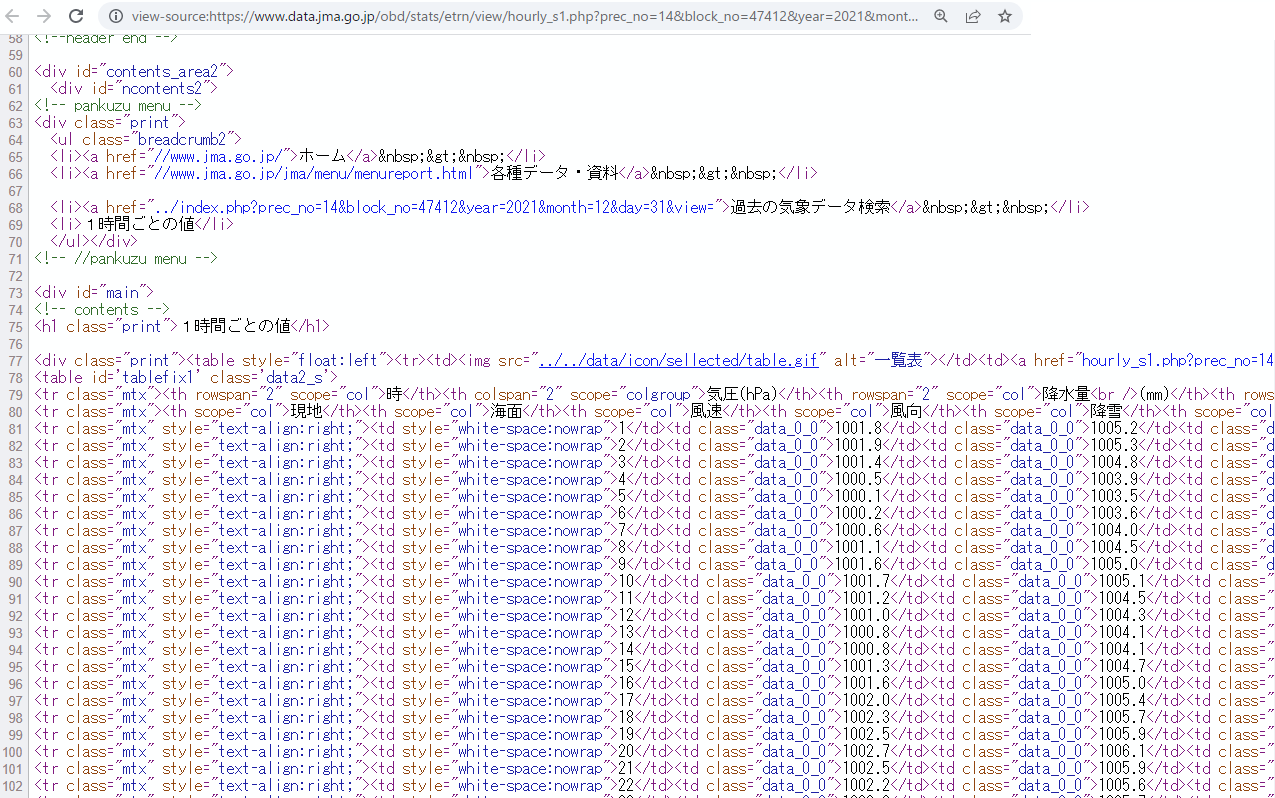
「天気」の欄は、次のようなコードになっていました。天気欄は結構重要なデータなんですが、画像データが当てはめられていて、そのままだとデータを取り込めませんが、alt属性には天気概況がそのまま書いてありました。天気欄は、alt属性を使えば良さそうです。
<img src="../../data/image/tenki/large/F8A0.gif" alt="晴れ"></td>
コードとDBの概要
今回つくったプログラムでやること
このことをやっています
- 1時間ごとの気象データを取得する
- 取得したデータをDBに登録する
- 取得する対象の日を求める
- 取得する最初の日を求め、そこから1日ずつ遡っていく
- 取得する対象の地点を求める
- 地点情報はCSVに書いておいて読み出していく
DB構造
DBは前回同様PostgreSQLでやってます。1日毎のデータのそれぞれの項目をDBのフィールドとします。
テーブル構造はこんな感じにしました。
CREATE TABLE weather_hourly_table(
    id SERIAL PRIMARY       KEY ,
    date_time               TIMESTAMP WITH TIME ZONE,
    prec_no			        INTEGER,
    block_no		        INTEGER,
    pressure_ground         REAL,
    pressure_sea            REAL,
    rainfall                REAL,
    temperature             REAL,
    dew_point_humidity      REAL,
    vapor_pressure          REAL,
    humidity                REAL,
    windspeed_value         REAL,
    windspeed_direction     INTEGER,
    sunshine_hours          REAL,
    global_solar_radiation  REAL,
    snowfall                REAL,
    snowdepth               REAL,
    weather                 VARCHAR(100),
    cloud_amount            VARCHAR(100) ,
    visibility              REAL
);
実際のコード
スクレイピングをする部分のコード
スクレイピングをおこなう部分を関数にまとめました。取得した日付と2種類の地点情報を引数に渡すと、その日の気象データを辞書の配列で返します。配列の各要素は1時間ごとの気象データを辞書形式にしたものです。
各セルのデータはBeautifulSoupが分解してくれます。
文字列で表現できるところは、そのまま文字列で取り込みます。
数値の部分は、変換してfloatとかにしないといけません。しかし、セルの値が"--"とか空欄になっている部分があり、これについての処理を考える必要があります。
次のように方針を考えます。
- 「降水量」の欄に"--"となっているデータがあります。測定限界以下、もしくは雨がふらなかった、と解釈して問題なさそうです。というわけで、数値以外のデータが現れたら0.0として処理するようにします。「降雪量」に関しても同様に考えていいでしょう。
- 「視程」「日照時間」のデータは、空欄になっている部分があります。このようなデータは 0 とか、デフォルト値を当てはめてしまうと意味が変わってしまうので、空欄のまま登録します。
天気の部分は、画像データが当てはめられています。先述のとおり、alt属性が埋め込まれていましたので、alt属性をそのまま利用することにしました。
# 気象庁のWEBサイトから指定日・指定場所の1時間毎の天気データを取得する
# 取得したデータは辞書形式の配列で返す
def fetch_daily_weather(date, prec_no, block_no):
    #date_f = dt.strptime(date, '%Y-%m-%d')

    # 日付データを取り込む
    year = date.year
    month = date.month
    day = date.day

    try:
        # 指定URLからHTMLデータを取得する
        r = requests.get(base_url % (prec_no, block_no, year, month, day))
        r.encoding = r.apparent_encoding
        # 取得したデータをBeautifulSoupで解析する
        soup = BeautifulSoup(r.text, 'html.parser')
        rows = soup.findAll('tr', class_='mtx')
    except:
        return [] #空の配列を返す

    # 最初の2行は見出しなので削除する
    rows = rows[2:]

    # 時間毎の気象データは配列に格納。
    # 格納する配列を初期化する
    d_weather = []

    # 時間ごとに分割
    for row in rows:
        #項目毎に分割
        items = row.findAll('td')

        # 左側から数えて何番目のitemか、ということで場合分けして処理する

        # 時(いま何時!??)
        hour = items[0].text
        if(hour == '24'):  #24時は、次の日の0時にする
            d = dt.strptime('%s-%s-%s' % (year, month, day), '%Y-%m-%d')
            d = d + timedelta(1)  # 次の日の日付
            date_time = dt.strptime('%s-%s-%s %s:0:0' % (d.year, d.month, d.day, '0'), '%Y-%m-%d %H:%M:%S')
        else:
            date_time = dt.strptime('%s-%s-%s %s:0:0' % (year, month, day, items[0].text), '%Y-%m-%d %H:%M:%S')

        # 気圧(地表)(hPa)
        pressure_ground = str2float_n(items[1].text)
        # 気圧(海面)(hPa)
        pressure_sea    = str2float_n(items[2].text)
        # 降水量(mm)
        rainfall = str2float_z(items[3].text)
        # 気温(℃)
        temperature = str2float_n(items[4].text)
        # 露点湿度(℃)
        dew_point_humidity = str2float_z(items[5].text)
        # 蒸気圧(hPa)
        vapor_pressure = str2float_n(items[6].text)
        # 湿度(%)
        humidity = str2float_n(items[7].text)
        # 風速(m/s)
        windspeed_value = str2float_n(items[8].text)
        # 風向
        windspeed_direction = kanji_direction_to_degree(items[9].text)
        # 日照時間(h)
        sunshine_hours = str2float_z(items[10].text)
        # 全天日射量(MJ/m2)
        global_solar_radiation = str2float_z(items[11].text)
        # 降雪(cm)
        snowfall = str2float_z(items[12].text)
        # 積雪(cm)
        snowdepth = str2float_z(items[13].text)

        # 天気
        weather = ''  #空欄だったら''をあてはめる
        img = items[14].img #imgタグを取得
        if(img):
            # データが入っていればalt属性を取得する
            weather =  img.attrs.get('alt', '')

        # 雲量
        if(len(items[15].text) > 0):
            cloud_amount = items[15].text
        else:
            # 空欄だったらNoneをあてはめる
            cloud_amount = None

        # 視程(km)
        visibility = str2float_n(items[16].text)

        # itemを処理し終わったので、辞書にまとめる
        h_weather = {   'date_time' : date_time,
                        'prec_no'   : prec_no,
                        'block_no'  : block_no,
                        'pressure_ground': pressure_ground,
                        'pressure_sea': pressure_sea,
                        'rainfall' : rainfall,
                        'temperature' : temperature,
                        'dew_point_humidity' : dew_point_humidity,
                        'vapor_pressure' : vapor_pressure,
                        'humidity' : humidity,
                        'windspeed_value' : windspeed_value,
                        'windspeed_direction' : windspeed_direction,
                        'sunshine_hours' : sunshine_hours,
                        'global_solar_radiation' : global_solar_radiation,
                        'snowfall' : snowfall,
                        'snowdepth' : snowdepth,
                        'weather' : weather,
                        'cloud_amount' : cloud_amount,
                        'visibility' : visibility
                         }
        # 辞書データを配列に追加する
        d_weather.append(h_weather)
    return d_weather
DBにINSERTするコード
これも関数にまとめました。
1レコード分のデータは1時間毎のデータとして、これを引数にするとDBにINSERTします。
辞書からデータを取り出して、フィールドにあてはめてINSERTするだけです。
日付・時刻のデータには日本標準時だとわかるように"JST"を付加して登録しました。
# 1時間毎のデータをDBに登録する
def insert_hourly_weather_into_db(connector, hourly_weather):
    # cursorの取得
    cursor = connector.cursor()
    # timestampをDBに登録するときは、日本標準時で登録することを指示する
    date_time          = hourly_weather['date_time'].strftime('%Y-%m-%d %H:%M:%S') + " JST" #測定日時
    prec_no            = hourly_weather['prec_no']   #地域コード
    block_no           = hourly_weather['block_no']  #地点コード
    pressure_ground    = hourly_weather['pressure_ground']  # 気圧(地表)(hPa)
    pressure_sea       = hourly_weather['pressure_sea']     # 気圧(海面)(hPa)
    rainfall           = hourly_weather['rainfall']         # 降水量(mm)
    temperature        = hourly_weather['temperature']           # 気温(℃)
    dew_point_humidity = hourly_weather['dew_point_humidity']    # 露点湿度(℃)
    vapor_pressure     = hourly_weather['vapor_pressure']        # 蒸気圧(hPa)
    humidity           = hourly_weather['humidity']              # 湿度(%)
    windspeed_value    = hourly_weather['windspeed_value']       # 風速(m/s)
    windspeed_direction = hourly_weather['windspeed_direction']  # 風向
    sunshine_hours     = hourly_weather['sunshine_hours']        # 日照時間(h)
    global_solar_radiation = hourly_weather['global_solar_radiation']  # 全天日射量(MJ/m2)
    snowfall          = hourly_weather['snowfall']        # 降雪(cm)
    snowdepth         = hourly_weather['snowdepth']       # 積雪(cm)
    weather           = hourly_weather['weather']         # 天気
    cloud_amount      = hourly_weather['cloud_amount']    # 雲量
    visibility        = hourly_weather['visibility']      # 視程(km)

    try:
        # クエリを実行する
        cursor.execute('INSERT INTO weather_hourly_table (date_time, prec_no, block_no, pressure_ground, \
                    pressure_sea, rainfall, temperature, dew_point_humidity, \
                    vapor_pressure, humidity, windspeed_value, windspeed_direction, \
                    sunshine_hours, global_solar_radiation, snowfall, snowdepth, \
                    weather, cloud_amount, visibility) \
                    VALUES( %s, %s,  %s, %s, %s,   %s,   %s,   %s,   %s, %s, \
                            %s,     %s,      %s,   %s, %s, %s, %s, %s, %s)'
                    , (
                    date_time, prec_no, block_no, pressure_ground,
                    pressure_sea, rainfall, temperature, dew_point_humidity,
                    vapor_pressure, humidity, windspeed_value, windspeed_direction,
                    sunshine_hours, global_solar_radiation, snowfall, snowdepth,
                    weather, cloud_amount, visibility)
                    )

        # 反映する
        connector.commit()
    except:
        # 登録失敗
        return False
    # 登録成功
    return True
すでに登録済みかチェックする
DBにINSERTする前に、その日・その地点のデータがすでにDBに登録されているかどうかをチェックすることにしました。
プログラムが途中でクラッシュして、どこまで登録したかわからなくなって再実行するときも、二重登録しなくてすみます。
# 指定日・指定場所のデータがすでにDBに登録されているかチェックする
def check_already_inserted(connector, date, prec_no, block_no):
    # 指定日の1時から、次の日の0時までの範囲で検索するためにタイムスタンプデータを作る
    dt_start = date.strftime('%Y-%m-%d') + " 1:0:0 JST"
    dt_end   = (date + timedelta(1) ).strftime('%Y-%m-%d') + " 0:0:0 JST"

    # カーソルを取得
    cursor = connector.cursor()
    # クエリを発行する。指定日(の1時~次の日の0時の範囲)・指定場所のレコード数をクエリする
    cursor.execute('SELECT count(*) FROM weather_hourly_table WHERE \
        date_time > %s and date_time < %s and prec_no = %s and block_no = %s',
        (dt_start, dt_end,prec_no, block_no))
    # 取得出来たデータ(指定場所のレコード数)を取得
    record_count = cursor.fetchone()[0]

    # レコード数が0を越えていれば登録ありとしてTrue、0ならFalseを返す
    if(record_count > 0):
        return True  #登録あり
    else:
        return False #登録なし
データの変換など
データの変換をおこなう関数をつくっています。
- str2float_z(): 文字列 -> float 変換で、float変換できない場合は 0.0 として変換する
- str2float_n(): 文字列 -> float 変換で、float変換できない場合は None として変換する(DBにはNull値として登録)
- kanji_direction_to_degree(): 方角は「東北東」というような表現なので、北を0度として整数値で表す
# 取得したデータの変換: 方角を整数値に変換、北を0°として360°で表記
def kanji_direction_to_degree(kanji_direction):
    direction = None

    match   kanji_direction:
        case '北北東':
            direction = 23
        case '東北東':
            direction = 68
        case '東南東':
            direction = 113
        case '南南東':
            direction = 158
        case '南南西':
            direction = 203
        case '西南西':
            direction = 248
        case '西北西':
            direction = 293
        case '北北西':
            direction = 335
        case '北東':
            direction = 45
        case '南東':
            direction = 135
        case '南西':
            direction = 225
        case '北西':
            direction = 315
        case '北':
            direction = 0
        case '東':
            direction = 90
        case '南':
            direction = 180
        case '西':
            direction = 270
        case _:  #判別不能なデータがきたとき
            direction = None
    return direction

# 取得したデータの変換:  float型に変換する。変換できない文字は0.0で代用。
# ※観測データのうち、データが無い(または変換不能なデータが当てはめられている)のは
#  測定結果が0とか測定限界以下だったんだな、って思って差し支えないデータはこっちを使う
#  例: 降雨量、降雪量

def str2float_z(str):
    try:
        return float(str)
    except:
        return 0.0

# 取得したデータの変換: float型に変換する。変換できない場合はNoneを返す。
# ※観測データのうち、データが無い(または変換不能なデータが当てはめられている)のは
#  0として考えると差し支えがあるデータの場合(つまり0と言うデータにも意味がある場合)は
# こっちを使う。
# #  例: 気温、気圧、湿度等
def str2float_n(str):
    try:
        return float(str)
    except:
        return None
場所データをCSVファイルから読み出す
場所データは .csv ファイルに記録しています。
場所データの読み出しは関数化しました。
この関数は、場所データを .csv ファイルから読み出して、場所データを辞書形式の配列で返します。ひとつの場所データの要素は、prec_no, block_no, place_name をキーとしています。
# CSVから場所リストを取得して辞書の配列に入れて返す
def get_place_to_fetch():
    #場所データをcsvから読み込み
    csv_file = open(place_csv_file_name, 'r', encoding='utf-8', errors='', newline='' )
    f = csv.reader(csv_file, delimiter=",", doublequote=True, lineterminator="\r\n", quotechar='"', skipinitialspace=True)

    header = next(f)
    # 場所リストを初期化
    place_list = []
    for row in f:
        # 場所データを辞書に設定
        prec_no = int(row[3].strip(' '))   # 地域コード
        block_no = int(row[4].strip(' '))  # 地点コード
        place_name = row[2].strip(' ')     # 地点名
        place = { 'prec_no': prec_no, 'block_no' : block_no, 'place_name': place_name, 'error_count' : 0}
        # 場所を登録した辞書データを配列に追加
        place_list.append(place)
    csv_file.close()

    # 場所リストを返却
    return place_list
その他
AWS上でプログラムを実行するとき、日本標準時(JST)がうまく扱えないみたいなので、JSTを定義しないとうまくいきませんでした。
#AWSでJSTを扱うためのtimezoneを定義
JST = timezone(timedelta(hours=+9)) #timezoneの生成
実行例
プログラムの出力はこんな感じ
$ python3 weather_scraper_hourly_fetch.py
2022-09-18 21:29:38 UTC+09:00: Data Inserted for:date: 2022-09-08 00:00:00, prec_no: 31, block_no: 47581, place_name: 八戸, records: 1056, places: 299.
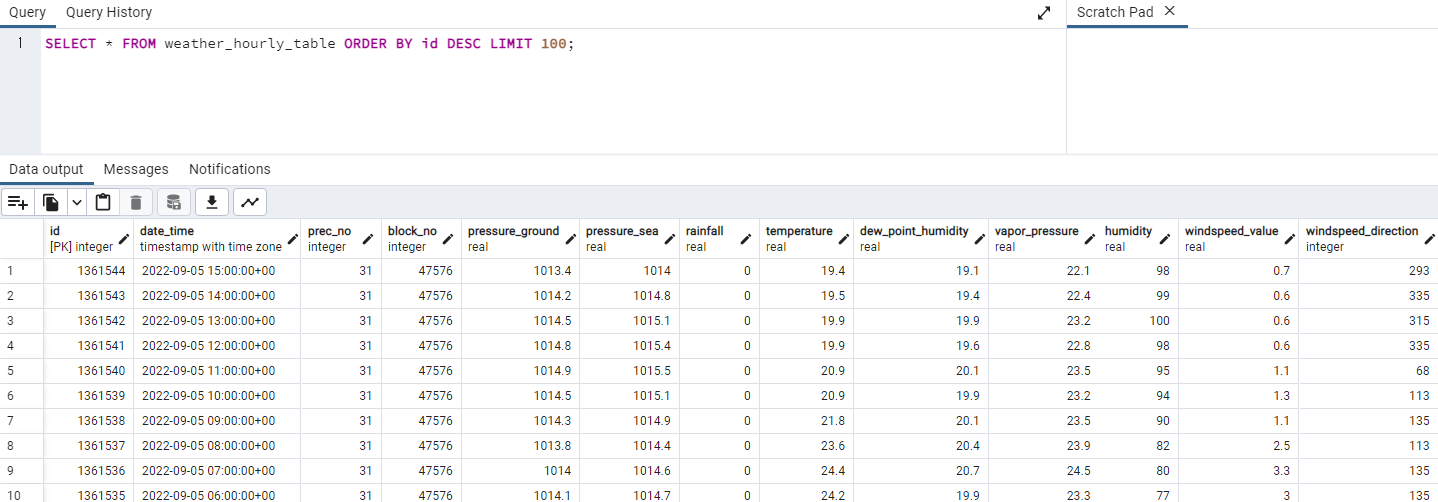
INSERTされたデータをSELECTしてみました。ちゃんと登録されているようです。
コードの全文
主要な部分の説明は異常です。
コードの全文を掲載します。
#from contextlib import nullcontext
#from tkinter import HORIZONTAL
from bs4 import BeautifulSoup

import csv
import json
import requests
import psycopg2
from datetime import datetime  as dt, timedelta, datetime, timezone
import codecs
import time
from urllib.error import HTTPError
from urllib.error import URLError
import sys

# 地点データのcsvファイル名
place_csv_file_name = './place.csv'

# 地点データを読み込んだ辞書データには、その地点のエラー情報が含まれているが、それらを保存しておくファイル名
place_list_with_err_file_name = 'place_list_with_err.csv'

# 気象庁の時間毎のデータを取得するためのURL
base_url="https://www.data.jma.go.jp/obd/stats/etrn/view/hourly_s1.php?prec_no=%s&block_no=%s&year=%s&month=%s&day=%s&view=p1"

# AWSでJSTを扱うためのtimezoneを定義
JST = timezone(timedelta(hours=+9)) #timezoneの生成

# SQLサーバの情報
dbms_hostname = 'weather-db01.cx1jtlkwqeus.ap-northeast-1.rds.amazonaws.com'
dbms_port = 24362
dbms_database_name ='postgres'

# SQLサーバに接続するためのユーザ名とパスワード情報を保存したファイル名
db_auth_filename = 'auth.json'

# logfile名
logfile_name = "./weather_hourly_scraper.log"


# CSVから場所リストを取得して辞書の配列に入れて返す
def get_place_to_fetch():
    # 場所データをcsvから読み込み
    csv_file = open(place_csv_file_name, 'r', encoding='utf-8', errors='', newline='' )
    f = csv.reader(csv_file, delimiter=",", doublequote=True, lineterminator="\r\n", quotechar='"', skipinitialspace=True)

    header = next(f)
    # 場所リストを初期化
    place_list = []
    for row in f:
        # 場所データを辞書に設定
        prec_no = int(row[3].strip(' '))    # 地域コード
        block_no = int(row[4].strip(' '))   # 地点コード
        place_name = row[2].strip(' ')      # 地点名
        place = { 'prec_no': prec_no, 'block_no' : block_no, 'place_name': place_name, 'error_count' : 0}
        # 場所を登録した辞書データを配列に追加
        place_list.append(place)
    csv_file.close()

    # 場所リストを返却
    return place_list

# ログファイルに追記する
def printlog(label_str, body_str):
    print(datetime.now(JST), ',' ,label_str, ',', body_str,
                            file =  codecs.open(logfile_name, 'a', 'utf-8'))

# 端末に印字する(文字が流れていかないように1行で上書きする)
def printmsg(msg):
    print('\r_________________________________________________________________________________________________________________________________' , end='')
    print('\r%s: %s' % (datetime.now(JST).strftime('%Y-%m-%d %H:%M:%S %Z'), msg), end='')

# 進捗を表示する(端末に印字し、ログファイルに記録する)
def show_progress(label, message, date, prec_no, block_no, place_name, inserted_records, inserted_places):
    printmsg(message +'date: %s, prec_no: %s, block_no: %s, place_name: %s, records: %s, places: %s.' % (date, prec_no, block_no, place_name, inserted_records, inserted_places))
    printlog(label, message + 'date: %s, prec_no: %s, block_no: %s, place_name: %s, records: %s, places: %s.' % (date, prec_no, block_no, place_name, inserted_records, inserted_places))


# 取得したデータの変換: 方角を整数値に変換、北を0°として360°で表記
def kanji_direction_to_degree(kanji_direction):
    direction = None

    match   kanji_direction:
        case '北北東':
            direction = 23
        case '東北東':
            direction = 68
        case '東南東':
            direction = 113
        case '南南東':
            direction = 158
        case '南南西':
            direction = 203
        case '西南西':
            direction = 248
        case '西北西':
            direction = 293
        case '北北西':
            direction = 335
        case '北東':
            direction = 45
        case '南東':
            direction = 135
        case '南西':
            direction = 225
        case '北西':
            direction = 315
        case '北':
            direction = 0
        case '東':
            direction = 90
        case '南':
            direction = 180
        case '西':
            direction = 270
        case _:  # 判別不能なデータがきたとき
            direction = None
    return direction

# 取得したデータの変換:  float型に変換する。変換できない文字は0.0で代用。
# ※観測データのうち、データが無い(または変換不能なデータが当てはめられている)のは
#  測定結果が0とか測定限界以下だったんだな、って思って差し支えないデータはこっちを使う
#  例: 降雨量、降雪量

def str2float_z(str):
    try:
        return float(str)
    except:
        return 0.0

# 取得したデータの変換: float型に変換する。変換できない場合はNoneを返す。
# ※観測データのうち、データが無い(または変換不能なデータが当てはめられている)のは
#  0として考えると差し支えがあるデータの場合(つまり0と言うデータにも意味がある場合)は
# こっちを使う。
# #  例: 気温、気圧、湿度等
def str2float_n(str):
    try:
        return float(str)
    except:
        return None


# 気象庁のWEBサイトから指定日・指定場所の1時間毎の天気データを取得する
# 取得したデータは辞書形式の配列で返す
def fetch_daily_weather(date, prec_no, block_no):
    #date_f = dt.strptime(date, '%Y-%m-%d')

    # 日付データを取り込む
    year = date.year
    month = date.month
    day = date.day

    try:
        # 指定URLからHTMLデータを取得する
        r = requests.get(base_url % (prec_no, block_no, year, month, day))
        r.encoding = r.apparent_encoding
        # 取得したデータをBeautifulSoupで解析する
        soup = BeautifulSoup(r.text, 'html.parser')
        rows = soup.findAll('tr', class_='mtx')
    except:
        return []   # 空の配列を返す

    # 最初の2行は見出しなので削除する
    rows = rows[2:]

    # 時間毎の気象データは配列に格納。
    # 格納する配列を初期化する
    d_weather = []

    # 時間ごとに分割
    for row in rows:
        # 項目毎に分割
        items = row.findAll('td')

        # 左側から数えて何番目のitemか、ということで場合分けして処理する

        # 時(いま何時!??)
        hour = items[0].text
        if(hour == '24'): # 24時は、次の日の0時にする
            d = dt.strptime('%s-%s-%s' % (year, month, day), '%Y-%m-%d')
            d = d + timedelta(1) # 次の日の日付
            date_time = dt.strptime('%s-%s-%s %s:0:0' % (d.year, d.month, d.day, '0'), '%Y-%m-%d %H:%M:%S')
        else:
            date_time = dt.strptime('%s-%s-%s %s:0:0' % (year, month, day, items[0].text), '%Y-%m-%d %H:%M:%S')

        # 気圧(地表)(hPa)
        pressure_ground = str2float_n(items[1].text)
        # 気圧(海面)(hPa)
        pressure_sea    = str2float_n(items[2].text)
        # 降水量(mm)
        rainfall = str2float_z(items[3].text)
        # 気温(℃)
        temperature = str2float_n(items[4].text)
        # 露点湿度(℃)
        dew_point_humidity = str2float_z(items[5].text)
        # 蒸気圧(hPa)
        vapor_pressure = str2float_n(items[6].text)
        # 湿度(%)
        humidity = str2float_n(items[7].text)
        # 風速(m/s)
        windspeed_value = str2float_n(items[8].text)
        # 風向
        windspeed_direction = kanji_direction_to_degree(items[9].text)
        # 日照時間(h)
        sunshine_hours = str2float_z(items[10].text)
        # 全天日射量(MJ/m2)
        global_solar_radiation = str2float_z(items[11].text)
        # 降雪(cm)
        snowfall = str2float_z(items[12].text)
        # 積雪(cm)
        snowdepth = str2float_z(items[13].text)

        # 天気
        weather = ''   #空欄だったら''をあてはめる
        img = items[14].img # imgタグを取得
        if(img):
            # データが入っていればalt属性を取得する
            weather =  img.attrs.get('alt', '')

        # 雲量
        if(len(items[15].text) > 0):
            cloud_amount = items[15].text
        else:
            # 空欄だったらNoneをあてはめる
            cloud_amount = None

        # 視程(km)
        visibility = str2float_n(items[16].text)

        # itemを処理し終わったので、辞書にまとめる
        h_weather = {   'date_time' : date_time,
                        'prec_no'   : prec_no,
                        'block_no'  : block_no,
                        'pressure_ground': pressure_ground,
                        'pressure_sea': pressure_sea,
                        'rainfall' : rainfall,
                        'temperature' : temperature,
                        'dew_point_humidity' : dew_point_humidity,
                        'vapor_pressure' : vapor_pressure,
                        'humidity' : humidity,
                        'windspeed_value' : windspeed_value,
                        'windspeed_direction' : windspeed_direction,
                        'sunshine_hours' : sunshine_hours,
                        'global_solar_radiation' : global_solar_radiation,
                        'snowfall' : snowfall,
                        'snowdepth' : snowdepth,
                        'weather' : weather,
                        'cloud_amount' : cloud_amount,
                        'visibility' : visibility
                         }
        # 辞書データを配列に追加する
        d_weather.append(h_weather)
    return d_weather

# DBの認証情報をファイルから読み取る
def read_auth(filename):
    file = open(filename, "r")
    auth = json.load(file)
    file.close()

    return auth

# DBMSに接続する
def connect_dbms():
    auth = read_auth("auth.json")
    dbms_username = auth['username']
    dbms_password = auth['password']

    try:
        con = psycopg2.connect(
            host = dbms_hostname,
            port = dbms_port,
            database=dbms_database_name,
            user= dbms_username,
            password=dbms_password)
    except:
        return None

    return con

# 指定日・指定場所のデータがすでにDBに登録されているかチェックする
def check_already_inserted(connector, date, prec_no, block_no):
    # 指定日の1時から、次の日の0時までの範囲で検索するためにタイムスタンプデータを作る
    dt_start = date.strftime('%Y-%m-%d') + " 1:0:0 JST"
    dt_end   = (date + timedelta(1) ).strftime('%Y-%m-%d') + " 0:0:0 JST"

    # カーソルを取得
    cursor = connector.cursor()
    # クエリを発行する。指定日(の1時~次の日の0時の範囲)・指定場所のレコード数をクエリする
    cursor.execute('SELECT count(*) FROM weather_hourly_table WHERE \
        date_time > %s and date_time < %s and prec_no = %s and block_no = %s',
        (dt_start, dt_end,prec_no, block_no))
    # 取得出来たデータ(指定場所のレコード数)を取得
    record_count = cursor.fetchone()[0]

    # レコード数が0を越えていれば登録ありとしてTrue、0ならFalseを返す
    if(record_count > 0):
        return True  # 登録あり
    else:
        return False # 登録なし


# 1時間毎のデータをDBに登録する
def insert_hourly_weather_into_db(connector, hourly_weather):
    # cursorの取得
    cursor = connector.cursor()
    # timestampをDBに登録するときは、日本標準時で登録することを指示する
    date_time          = hourly_weather['date_time'].strftime('%Y-%m-%d %H:%M:%S') + " JST"  # 測定日時
    prec_no            = hourly_weather['prec_no']  # 地域コード
    block_no           = hourly_weather['block_no'] # 地点コード
    pressure_ground    = hourly_weather['pressure_ground']  # 気圧(地表)(hPa)
    pressure_sea       = hourly_weather['pressure_sea']     # 気圧(海面)(hPa)
    rainfall           = hourly_weather['rainfall']         # 降水量(mm)
    temperature        = hourly_weather['temperature']           # 気温(℃)
    dew_point_humidity = hourly_weather['dew_point_humidity']    # 露点湿度(℃)
    vapor_pressure     = hourly_weather['vapor_pressure']        # 蒸気圧(hPa)
    humidity           = hourly_weather['humidity']              # 湿度(%)
    windspeed_value    = hourly_weather['windspeed_value']       # 風速(m/s)
    windspeed_direction = hourly_weather['windspeed_direction']  # 風向
    sunshine_hours     = hourly_weather['sunshine_hours']        # 日照時間(h)
    global_solar_radiation = hourly_weather['global_solar_radiation']   # 全天日射量(MJ/m2)
    snowfall          = hourly_weather['snowfall']        # 降雪(cm)
    snowdepth         = hourly_weather['snowdepth']       # 積雪(cm)
    weather           = hourly_weather['weather']         # 天気
    cloud_amount      = hourly_weather['cloud_amount']    # 雲量
    visibility        = hourly_weather['visibility']      # 視程(km)

    try:
        # クエリを実行する
        cursor.execute('INSERT INTO weather_hourly_table (date_time, prec_no, block_no, pressure_ground, \
                    pressure_sea, rainfall, temperature, dew_point_humidity, \
                    vapor_pressure, humidity, windspeed_value, windspeed_direction, \
                    sunshine_hours, global_solar_radiation, snowfall, snowdepth, \
                    weather, cloud_amount, visibility) \
                    VALUES( %s, %s,  %s, %s, %s,   %s,   %s,   %s,   %s, %s, \
                            %s,     %s,      %s,   %s, %s, %s, %s, %s, %s)'
                    , (
                    date_time, prec_no, block_no, pressure_ground,
                    pressure_sea, rainfall, temperature, dew_point_humidity,
                    vapor_pressure, humidity, windspeed_value, windspeed_direction,
                    sunshine_hours, global_solar_radiation, snowfall, snowdepth,
                    weather, cloud_amount, visibility)
                    )

        # 反映する
        connector.commit()
    except:
        # 登録失敗
        return False
    # 登録成功
    return True

# main関数
if __name__ == "__main__":

    printmsg('Weather Hourly Scraper Started.')
    printlog('MESSAGE', 'Weather Hourly Scraper Started.')

    # DBに接続する
    conn = connect_dbms()
    if(conn == None):
        printmsg('Could not connect DB.')
        printlog('ERROR', 'Could not connect DB.')
        exit(0)

    # データを取得する場所のリストを読み込む
    place_list = get_place_to_fetch()

    date_start = '2022-9-9'  # データを取得する最初の日付
    date_back  = 7           # 何日遡ってデータを取得するか

    total_inserted_records = 0  # 登録したレコードの数
    total_inserted_places  = 0  # 処理した地点・地域の数

    # 場所毎にループする
    for place in place_list:
        total_inserted_places = total_inserted_places + 1

        # 場所の情報を辞書から取り出す
        prec_no =  place['prec_no']
        block_no = place['block_no']
        place_name = place['place_name']

        # 日付データをdtに変換する
        date = dt.strptime(date_start, '%Y-%m-%d')

        #何日目のデータか、を初期化する
        day_count = 0

        # ループの冒頭で1日遡るので、1日進めておく
        # (Cスタイルのfor文が使えればこんなことしない)
        date = date + timedelta(1)

        # 無限ループだが、ちゃんと脱出条件あり
        while(True):
            # 指定日数分だけ遡って取得する
            date = date - timedelta(1)  # 1日ずつ遡る

            day_count = day_count + 1

            # 指定した日数遡ったら、次の場所に行く
            if(day_count > date_back):
                break # 次の場所へ

            # この日のデータがすでに登録されているか
            already_exists = check_already_inserted(conn, date, prec_no, block_no )

            # すでに登録されていたら、その日はスキップする
            if(already_exists == True):
                show_progress('MESSAGE', 'Data alredy exists on DB', date, prec_no, block_no, place_name, total_inserted_records, total_inserted_places)
                continue  # この日はスキップ

            show_progress('MESSAGE', 'Fetching data for ', date, prec_no, block_no, place_name, total_inserted_records, total_inserted_places)

            # 指定した日付、場所の1時間毎のデータを読み込む
            daily_weather = fetch_daily_weather(date, prec_no, block_no)

            # ちゃんとデータが取得出来たかチェックする
            if(len(daily_weather) > 23):
                # データが取得できていた場合は、登録する
                show_progress('MESSAGE', 'Inserting data for :', date, prec_no, block_no, place_name, total_inserted_records, total_inserted_places)
                for hourly_weather in daily_weather:
                    insert_hourly_weather_into_db(conn, hourly_weather)
                    total_inserted_records = total_inserted_records + 1

                show_progress('MESSAGE', 'Data Inserted for:', date, prec_no, block_no, place_name, total_inserted_records, total_inserted_places)
                time.sleep(10)   # 10秒やすみ。サーバへの気遣い
            else:
                # 取得出来ていない場合は、登録しない
                # データが取得出来ないのは、その場所の測定データが無いものと考える
                time.sleep(10)  #10秒やすみ。サーバへの気遣い
                show_progress('MESSAGE', 'No data exists  for: ', date, prec_no, block_no, place_name, total_inserted_records, total_inserted_places)

                # その場所のエラー回数をインクリメントする
                place['error_count'] = place['error_count'] + 1

                break   # この場所はあきらめる、次の場所へ

        # 場所データのエラー回数を含めたデータを書き出しておく
        with open(place_list_with_err_file_name, 'w', encoding='utf-8') as csvfile:
            writer = writer = csv.DictWriter(csvfile, fieldnames = ['prec_no', 'block_no', 'place_name', 'error_count'])
            writer.writerows(place_list)

    # 全データ取得終了
    show_progress('MESSAGE', 'Fetching done.', date, prec_no, block_no, place_name, total_inserted_records, total_inserted_places)
以上