はじめに
AWSでp2.xlargeインスタンスを作成し、anacondaはインストールされているものとします。また、構築はrootユーザで実施します。
下記をインストールしていきます。
- GCC==4.8
- CUDA==9.2
- cuDNN==7.5
- nvidiaドライバー
- tensorflow-gpu==1.12.0
参考
- Build from source:バージョンの対応
- GPUを使えるようにする for tensorflow:全体インストール手順
- TensorFlow 環境構築 (CPU/GPU版):全体インストール手順
- TensorFlow ソースコードからのビルド方法:パスの設定
- gccをソースからビルド/インストールする:gccのインストール手順
- AWS Amazon Linux 2 にCUDA 10環境を作る:CUDAのインストール
- CentOS 5.8 に CUDA 開発環境を導入する:kernel-develのインストール
- TensorFlowからGPUが認識できているかを2行コードで確認する:動作確認
- Get Started with TensorFlow:サンプルコード
環境
- インスタンスタイプ==p2.xlarge
- OS==AmazonLinux2
- python==3.6.8
- cuDNN==7
- CUDA==9
- GCC==4.8
- tensorflow_gpu==1.12.0
手順
python環境準備
必要はありませんが、一応GPUの種類を確認しておきます。Tesla K80があることがわかります。
$ lspci | grep -i nvidia
00:1e.0 3D controller: NVIDIA Corporation GK210GL [Tesla K80] (rev a1)
anacondaでpython3.6の環境をつくります。
$ conda create --name py36 python=3.6.8 anaconda
仮想環境が出来ていることを確認します。
$ conda info -e
# conda environments
#
base                  *  /root/anaconda3
py36                     /root/anaconda3/envs/py36
gccのインストール
$ which gcc
/usr/bin/which: no gcc in (/root/anaconda3/bin:/usr/local/sbin:/usr/local/bin:/usr/sbin:/usr/bin:/root/bin)
gccが入っていなかったので、インストールします。情報を見てみましょう。
$ yum info gcc gcc-c++

読み込んだプラグイン:extras_suggestions, langpacks, priorities, update-motd
7 packages excluded due to repository priority protections
利用可能なパッケージ
名前                : gcc
アーキテクチャー    : x86_64
バージョン          : 7.3.1
リリース            : 5.amzn2.0.2
容量                : 22 M
リポジトリー        : amzn2-core/2/x86_64
要約                : Various compilers (C, C++, Objective-C, ...)
URL                 : http://gcc.gnu.org
ライセンス          : GPLv3+ and GPLv3+ with exceptions and GPLv2+ with exceptions and
                    : LGPLv2+ and BSD
説明                : The gcc package contains the GNU Compiler Collection version 7.
                    : You'll need this package in order to compile C code.

名前                : gcc-c++
アーキテクチャー    : x86_64
バージョン          : 7.3.1
リリース            : 5.amzn2.0.2
容量                : 13 M
リポジトリー        : amzn2-core/2/x86_64
要約                : C++ support for GCC
URL                 : http://gcc.gnu.org
ライセンス          : GPLv3+ and GPLv3+ with exceptions and GPLv2+ with exceptions and
                    : LGPLv2+ and BSD
説明                : This package adds C++ support to the GNU Compiler Collection.
                    : It includes support for most of the current C++ specification,
                    : including templates and exception handling.
gccをインストールします。
$ yum install gcc gcc-c++
$ gcc --version
gcc (GCC) 7.3.1 20180303 (Red Hat 7.3.1-5)
Copyright (C) 2017 Free Software Foundation, Inc.
This is free software; see the source for copying conditions.  There is NO
warranty; not even for MERCHANTABILITY or FITNESS FOR A PARTICULAR PURPOSE.
CUDAインストール
サイトにアクセスしてダウンロードボタンのURLをコピーします。

rpm(network)でインストールしようとするとこちらで起きたのと同じ現象が起きてインストール出来ませんでした。
なので、ホームディレクトリにrpmをダウンロードしてローカルでインストールします。パッチも同様にします。
$ cd ~
$ wget https://developer.nvidia.com/compute/cuda/9.2/Prod2/local_installers/cuda_9.2.148_396.37_linux
$ sh cuda_9.2.148_396.37_linux

Do you accept the previously read EULA?
accept/decline/quit: accept

You are attempting to install on an unsupported configuration. Do you wish to continue?
(y)es/(n)o [ default is no ]: y

Install NVIDIA Accelerated Graphics Driver for Linux-x86_64 396.37?
(y)es/(n)o/(q)uit: n

Install the CUDA 9.2 Toolkit?
(y)es/(n)o/(q)uit: y

Enter Toolkit Location
 [ default is /usr/local/cuda-9.2 ]:

Do you want to install a symbolic link at /usr/local/cuda?
(y)es/(n)o/(q)uit: y

Install the CUDA 9.2 Samples?
(y)es/(n)o/(q)uit: y

Enter CUDA Samples Location
 [ default is /root ]:

Installing the CUDA Toolkit in /usr/local/cuda-9.2 ...

Installing the CUDA Toolkit in /usr/local/cuda-9.2 ...
Missing recommended library: libGLU.so
Missing recommended library: libX11.so
Missing recommended library: libXi.so
Missing recommended library: libXmu.so
Missing recommended library: libGL.so

Installing the CUDA Samples in /root ...
Copying samples to /root/NVIDIA_CUDA-9.2_Samples now...
Finished copying samples.

===========
= Summary =
===========

Driver:   Not Selected
Toolkit:  Installed in /usr/local/cuda-9.2
Samples:  Installed in /root, but missing recommended libraries

Please make sure that
 -   PATH includes /usr/local/cuda-9.2/bin
 -   LD_LIBRARY_PATH includes /usr/local/cuda-9.2/lib64, or, add /usr/local/cuda-9.2/lib64 to /etc/ld.so.conf and run ldconfig as root

To uninstall the CUDA Toolkit, run the uninstall script in /usr/local/cuda-9.2/bin

Please see CUDA_Installation_Guide_Linux.pdf in /usr/local/cuda-9.2/doc/pdf for detailed information on setting up CUDA.

***WARNING: Incomplete installation! This installation did not install the CUDA Driver. A driver of version at least 384.00 is required for CUDA 9.2 functionality to work.
To install the driver using this installer, run the following command, replacing <CudaInstaller> with the name of this run file:
    sudo <CudaInstaller>.run -silent -driver

Logfile is /tmp/cuda_install_11273.log
$ wget https://developer.nvidia.com/compute/cuda/9.2/Prod2/patches/1/cuda_9.2.148.1_linux
$ sh cuda_9.2.148.1_linux

You may allow your Enterprise employees and Contractors to
Do you accept the previously read EULA?
accept/decline/quit: accept

Enter CUDA Toolkit installation directory
 [ default is /usr/local/cuda-9.2 ]:

Installation complete!
Installation directory: /usr/local/cuda-9.2
cudnnインストール
こちらからcuDNN Library for Linuxをダウンロードします。wgetで落とせないので、一度クライアントPCに落として、サーバにアップロードしました。
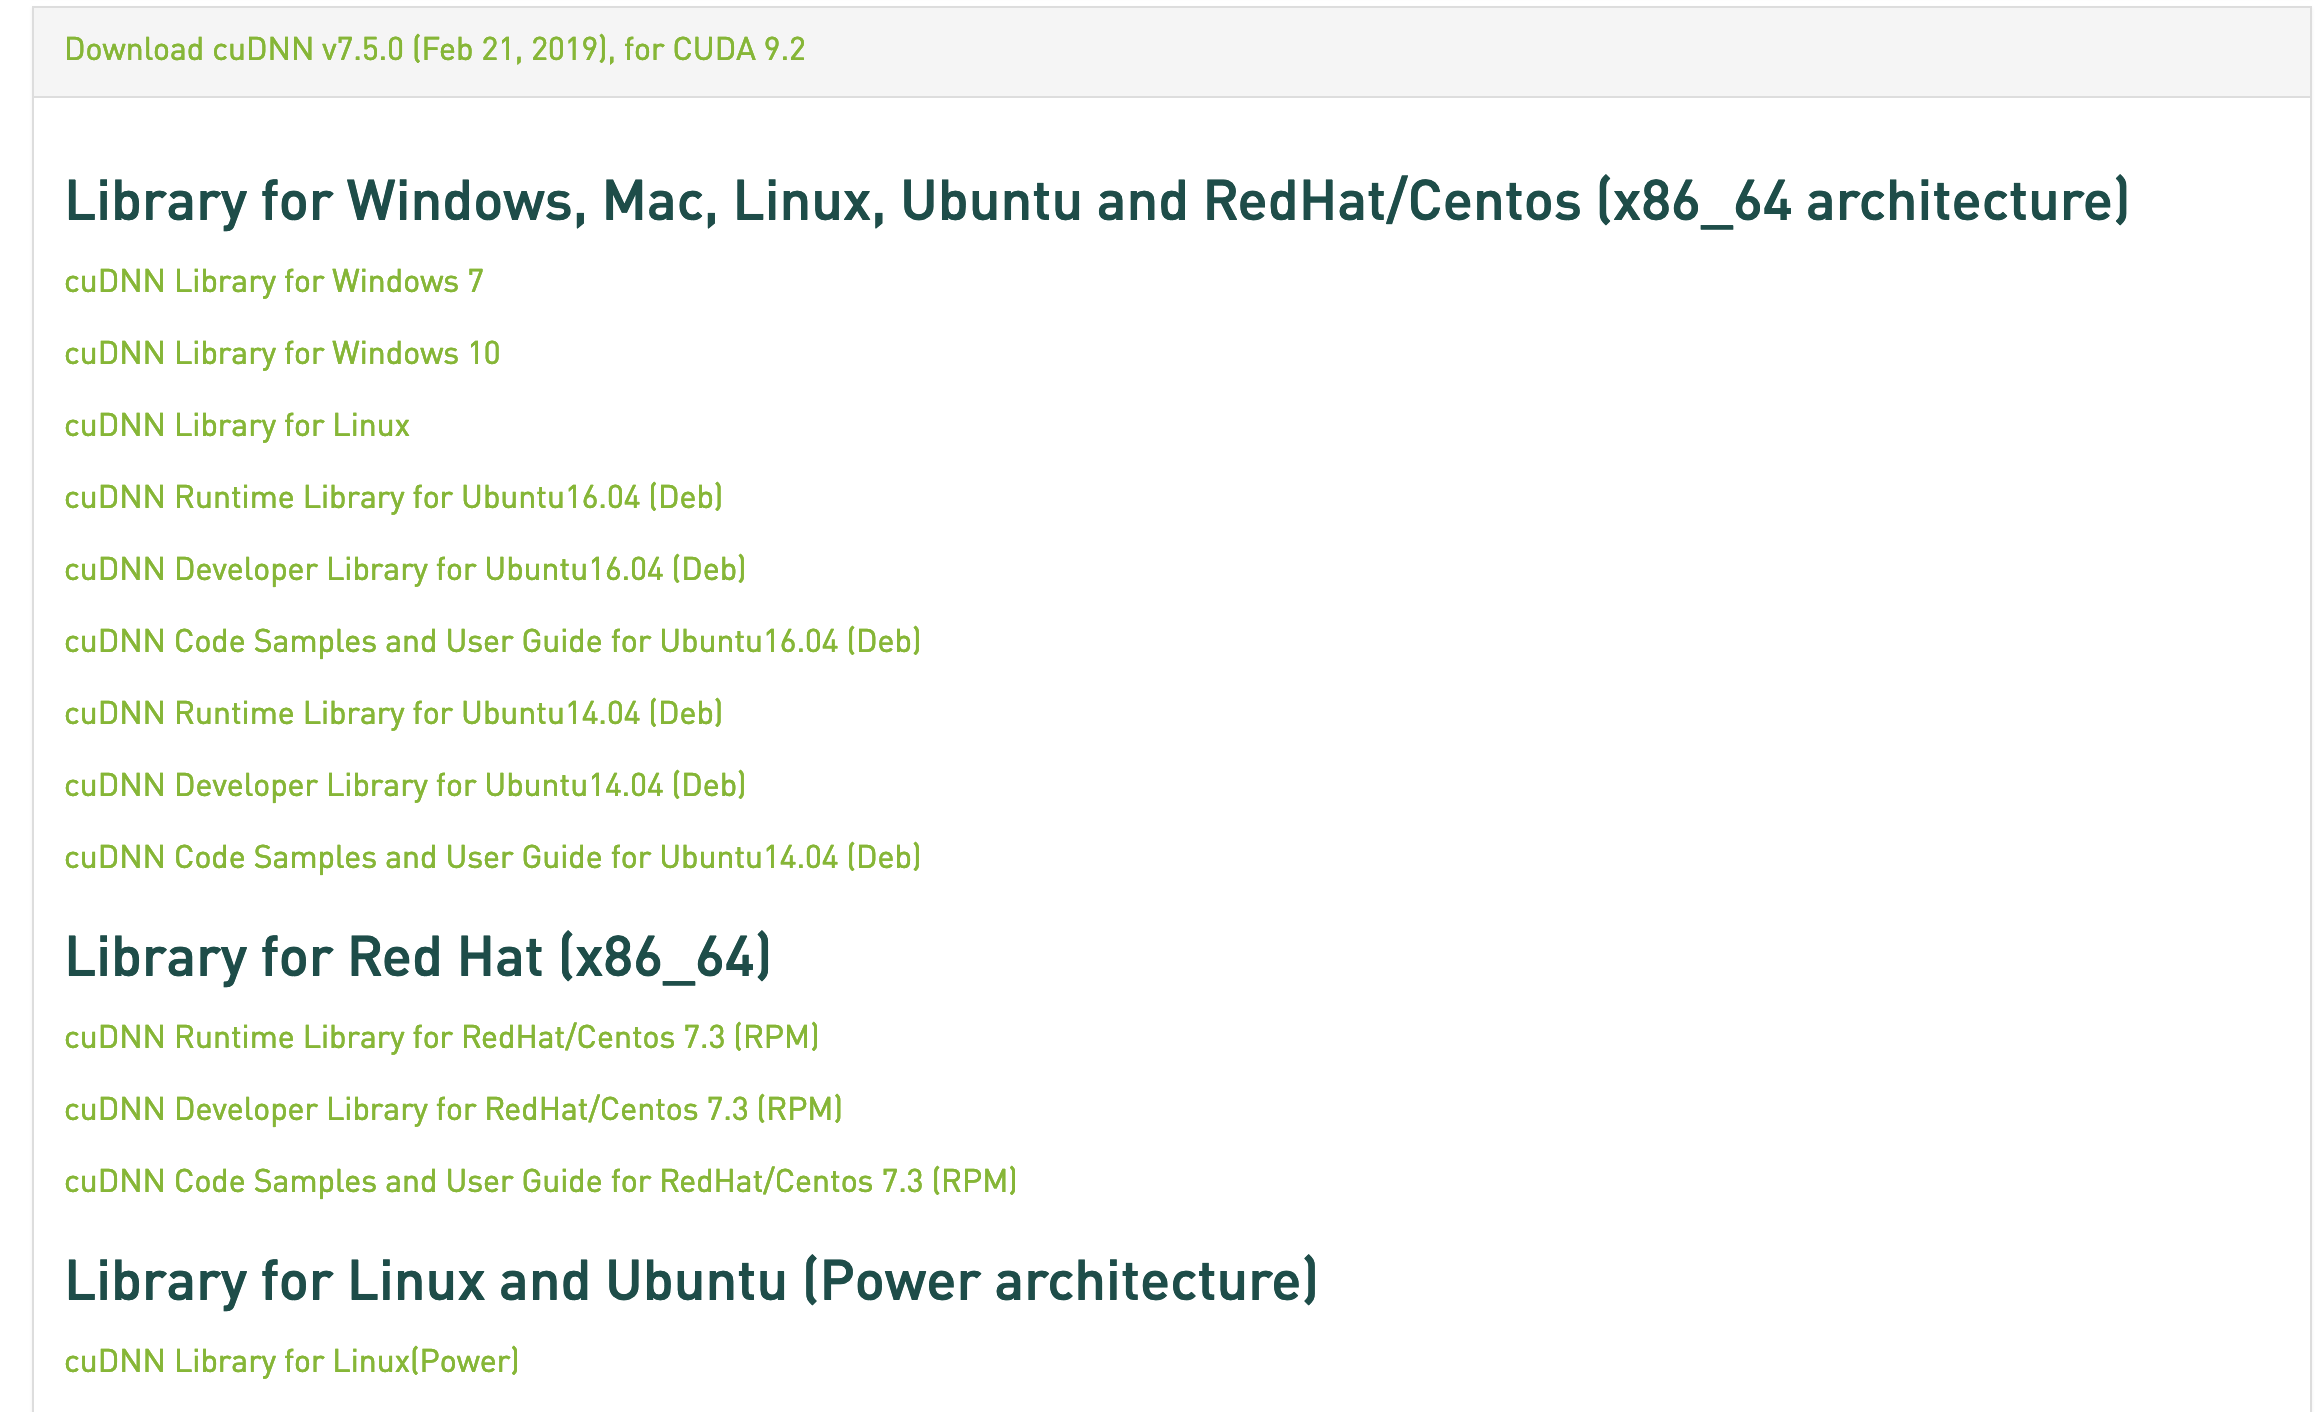
解凍してインストールします。
$ tar xzf cudnn-9.2-linux-x64-v7.5.0.56.tgz
$ cd cuda
$ cp ./include/cudnn.h /usr/local/cuda/include/
$ cp ./include/cudnn.h /usr/local/cuda-9.2/include/
$ cp ./lib64/* /usr/local/cuda/lib64
$ cp ./lib64/* /usr/local/cuda-9.2/lib64
$ vi ~/.bashrc

---下記を追記-----
# for tensorflow
export PATH=/usr/local/cuda/bin:$PATH
export LD_LIBRARY_PATH=/usr/local/cuda/lib64:$LD_LIBRARY_PATH
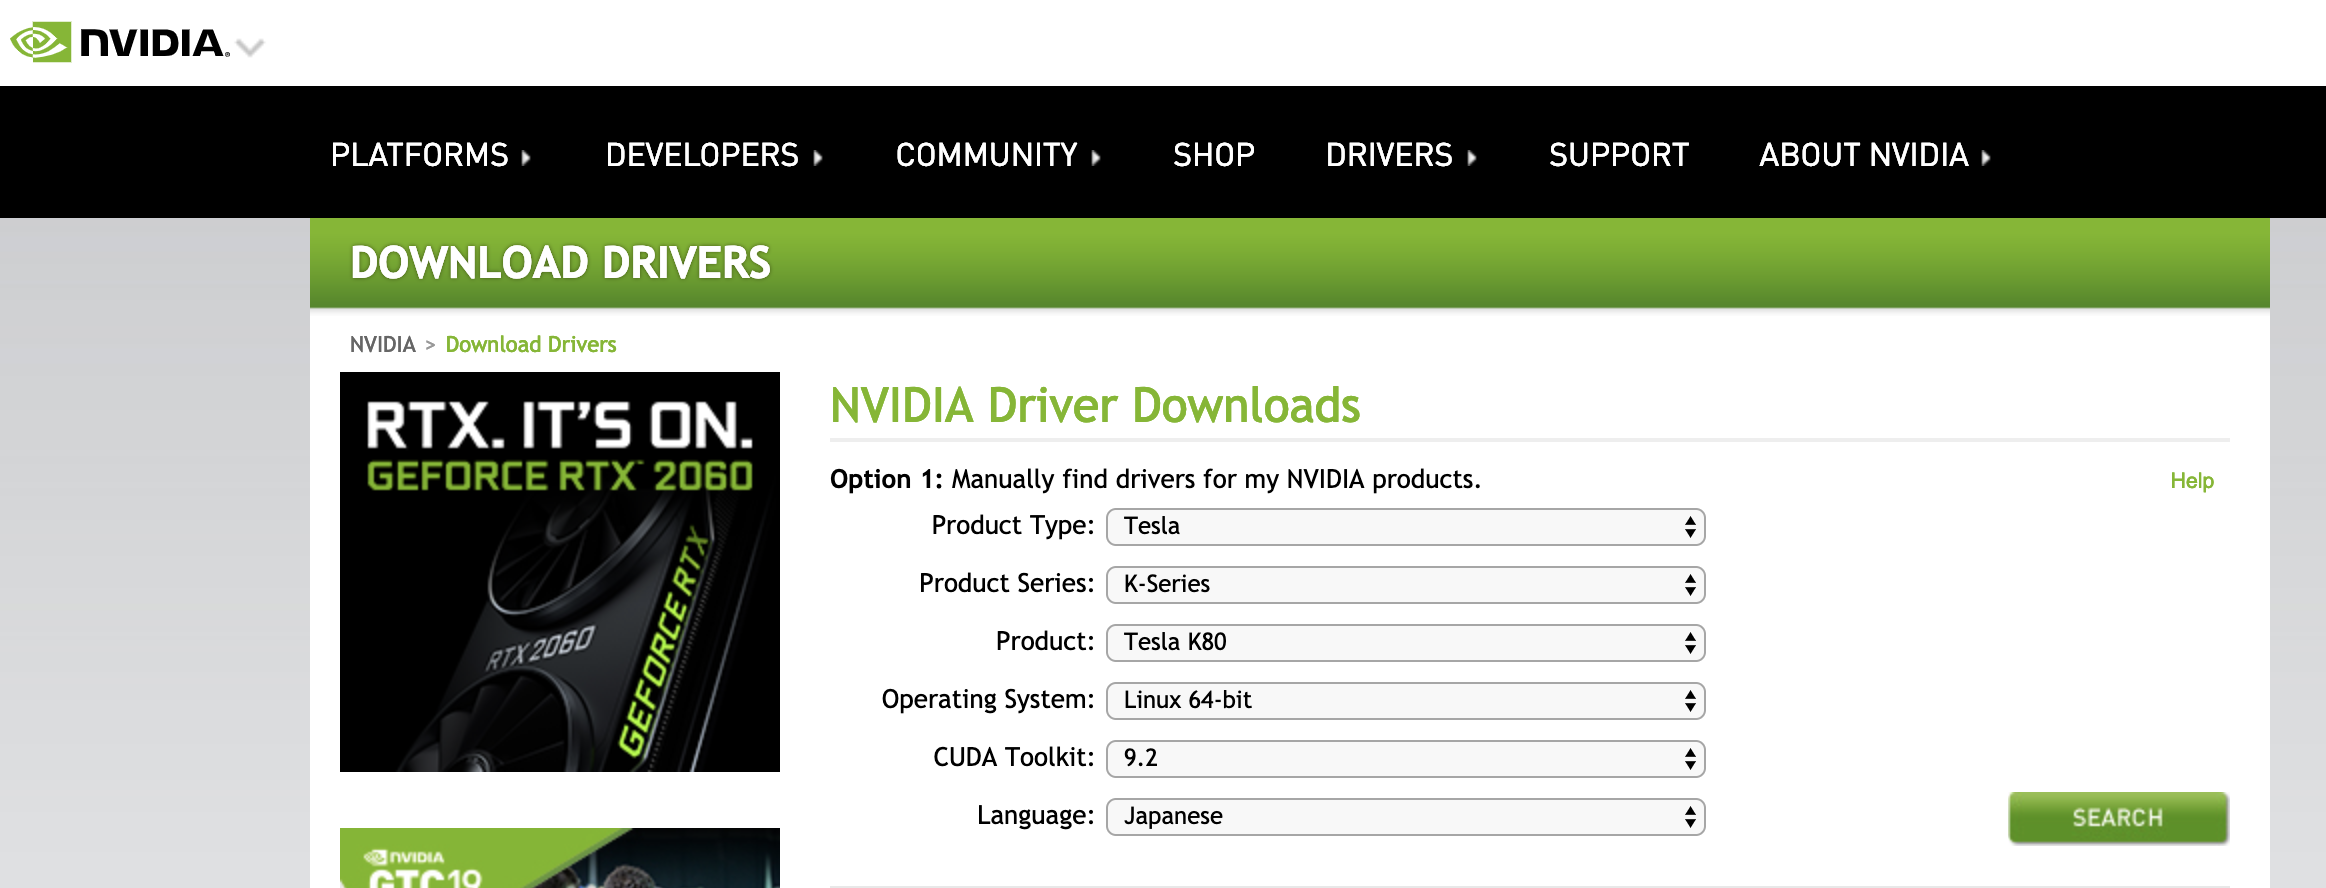
ドライバインストール
サイトからドライバをクライアントPCにダウンロードし、サーバにアップロードします。
 インストールします。
$ cd ~
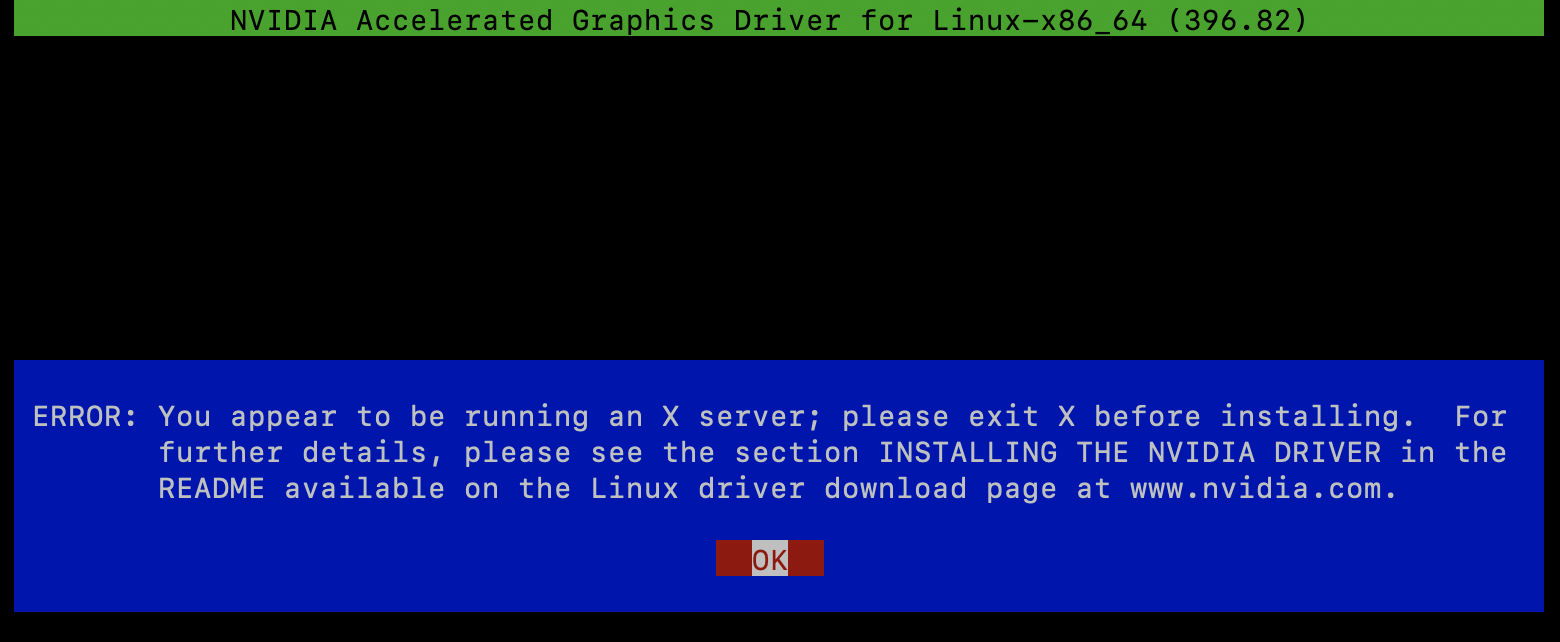
$ sh NVIDIA-Linux-x86_64-396.82.run
すると下記のようなエラーが出ました。X serverを使用しているときはドライバを更新できなようです。

ログを見てみます。
$ cat /var/log/nvidia-installer.log
nvidia-installer log file '/var/log/nvidia-installer.log'
creation time: Fri Mar 15 23:17:09 2019
installer version: 396.82

PATH: /root/anaconda3/bin:/usr/local/sbin:/usr/local/bin:/usr/sbin:/usr/bin:/root/bin

nvidia-installer command line:
    ./nvidia-installer

Using: nvidia-installer ncurses v6 user interface
-> Detected 4 CPUs online; setting concurrency level to 4.
-> The file '/tmp/.X1-lock' exists and appears to contain the process ID '4323' of a runnning X server.
ERROR: You appear to be running an X server; please exit X before installing.  For further details, please see the section INSTALLING THE NVIDIA DRIVER in the README available on the Linux driver download page at www.nvidia.com.
ERROR: Installation has failed.  Please see the file '/var/log/nvidia-installer.log' for details.  You may find suggestions on fixing installation problems in the README available on the Linux driver download page at www.nvidia.com.
X serverのプロセスIDが記載されているのでkillして再度試みます。
$ kill 4323
$ sh NVIDIA-Linux-x86_64-396.82.run

kernel-develが必要なのでインストールします。
$ yum install kernel-devel
$ ls /usr/src/kernels/
4.14.104-95.84.amzn2.x86_64
再度インストールします。
$ sh NVIDIA-Linux-x86_64-396.82.run --kernel-source-path=/usr/src/kernels/4.14.104-95.84.amzn2.x86_64
すると今度は次のようなエラーが出ます。

カーネルを調べてみると、kernel-develが一致していないのが原因のようです。
$ uname -r
4.14.88-88.73.amzn2.x86_64

$ rpm -qa|grep kernel-devel
kernel-devel-4.14.104-95.84.amzn2.x86_64
ということで入れ直します。入れ直したら再再再トライ。
# rpm -e kernel-devel-4.14.104-95.84.amzn2.x86_64
$ yum -y install kernel-devel-4.14.88-88.73.amzn2.x86_64 kernel-headers-4.14.88-88.73.amzn2.x86_64

$ sh NVIDIA-Linux-x86_64-396.82.run --kernel-source-path=/usr/src/kernels/4.14.88-88.73.amzn2.x86_64
すると次のwarningが出て続行できました。
WARNING: nvidia-installer was forced to guess the X library path '/usr/lib64' and X
           module path '/usr/lib64/xorg/modules'; these paths were not queryable from
           the system.  If X fails to find the NVIDIA X driver module, please install
           the `pkg-config` utility and the X.Org SDK/development package for your
           distribution and reinstall the driver.
32-bitライブラリは不要なのでNo、次の画面では上書きを選択。
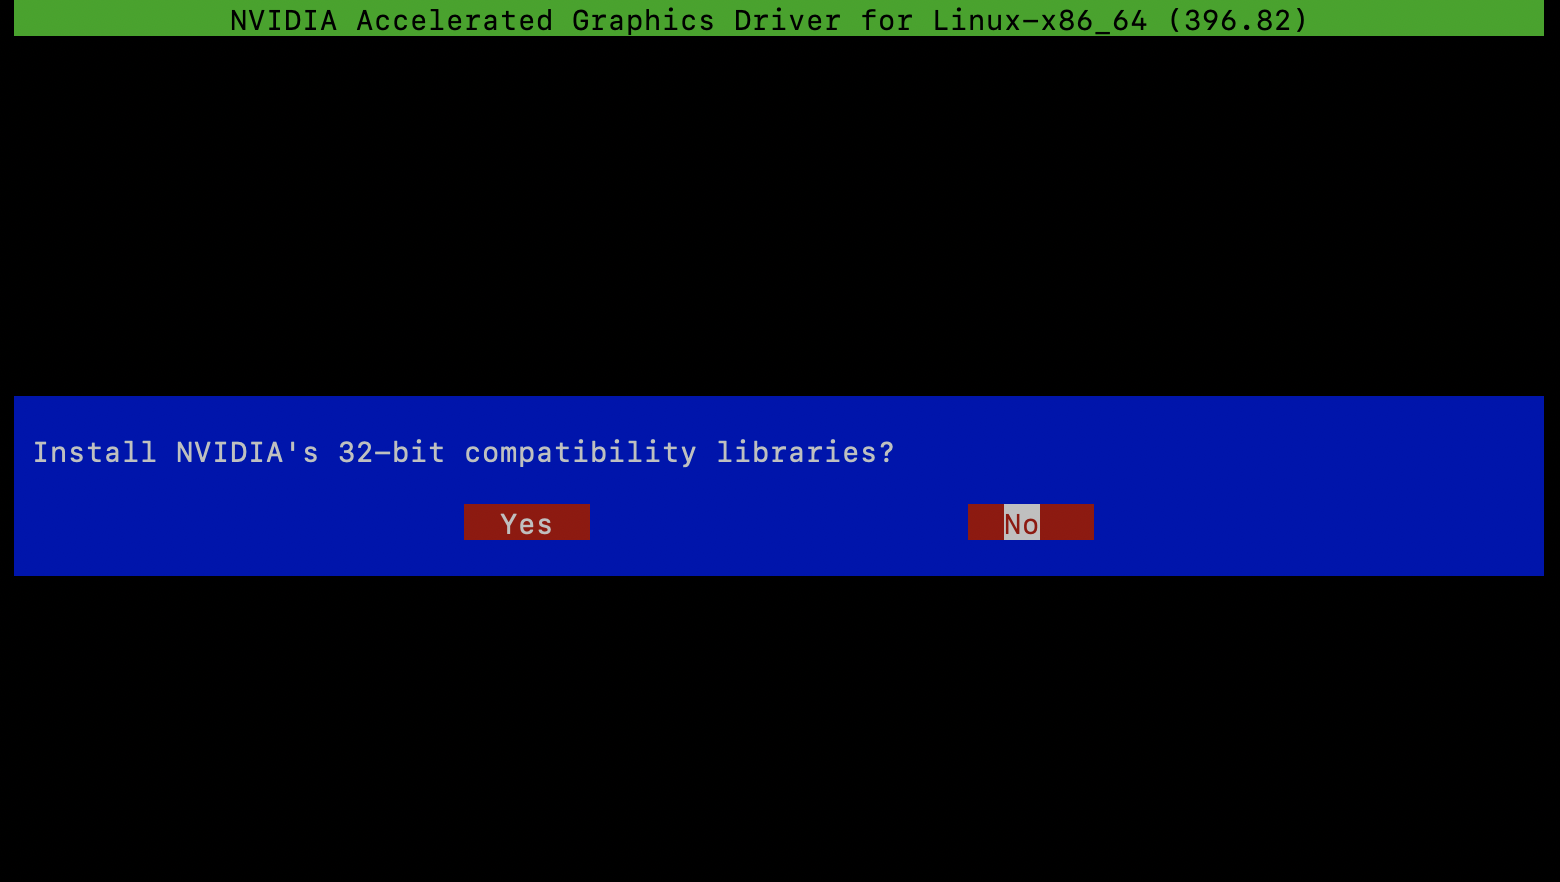
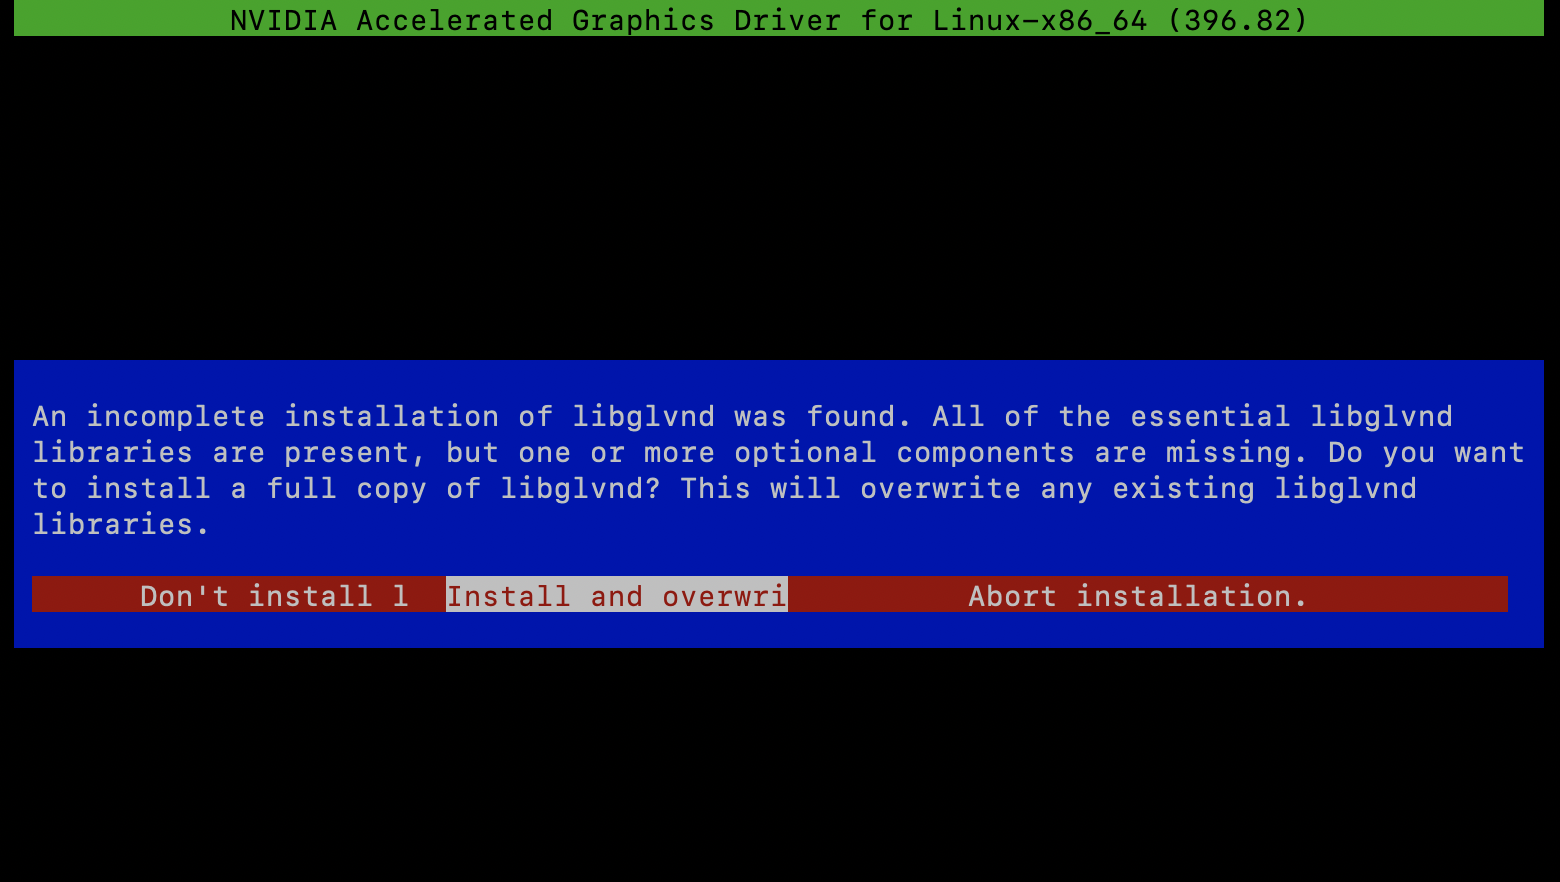
これでインストールが完了しました。

tensorflowインストール
GPU版のtensorflowをインストールします。
$ source activate py36
$ conda install tensorflow-gpu==1.12.0
GPUが使えるか確認します。
$ python
>>> import tensorflow as tf
>>> sess = tf.InteractiveSession()
2019-03-16 00:25:09.367199: I tensorflow/core/platform/cpu_feature_guard.cc:141] Your CPU supports instructions that this TensorFlow binary was not compiled to use: SSE4.1 SSE4.2 AVX AVX2 FMA
2019-03-16 00:25:12.681609: I tensorflow/stream_executor/cuda/cuda_gpu_executor.cc:964] successful NUMA node read from SysFS had negative value (-1), but there must be at least one NUMA node, so returning NUMA node zero
2019-03-16 00:25:12.682023: I tensorflow/core/common_runtime/gpu/gpu_device.cc:1432] Found device 0 with properties:
name: Tesla K80 major: 3 minor: 7 memoryClockRate(GHz): 0.8235
pciBusID: 0000:00:1e.0
totalMemory: 11.17GiB freeMemory: 11.10GiB
2019-03-16 00:25:12.682055: I tensorflow/core/common_runtime/gpu/gpu_device.cc:1511] Adding visible gpu devices: 0
2019-03-16 00:25:12.988346: I tensorflow/core/common_runtime/gpu/gpu_device.cc:982] Device interconnect StreamExecutor with strength 1 edge matrix:
2019-03-16 00:25:12.988398: I tensorflow/core/common_runtime/gpu/gpu_device.cc:988]      0
2019-03-16 00:25:12.988411: I tensorflow/core/common_runtime/gpu/gpu_device.cc:1001] 0:   N
2019-03-16 00:25:12.988684: I tensorflow/core/common_runtime/gpu/gpu_device.cc:1115] Created TensorFlow device (/job:localhost/replica:0/task:0/device:GPU:0 with 10757 MB memory) -> physical GPU (device: 0, name: Tesla K80, pci bus id: 0000:00:1e.0, compute capability: 3.7)

>>> from tensorflow.python.client import device_lib
>>> device_lib.list_local_devices()
2019-03-16 00:28:19.511946: I tensorflow/core/common_runtime/gpu/gpu_device.cc:1511] Adding visible gpu devices: 0
2019-03-16 00:28:19.512010: I tensorflow/core/common_runtime/gpu/gpu_device.cc:982] Device interconnect StreamExecutor with strength 1 edge matrix:
2019-03-16 00:28:19.512031: I tensorflow/core/common_runtime/gpu/gpu_device.cc:988]      0
2019-03-16 00:28:19.512049: I tensorflow/core/common_runtime/gpu/gpu_device.cc:1001] 0:   N
2019-03-16 00:28:19.512326: I tensorflow/core/common_runtime/gpu/gpu_device.cc:1115] Created TensorFlow device (/device:GPU:0 with 10757 MB memory) -> physical GPU (device: 0, name: Tesla K80, pci bus id: 0000:00:1e.0, compute capability: 3.7)
[name: "/device:CPU:0"
device_type: "CPU"
memory_limit: 268435456
locality {
}
incarnation: 5277329032116644780
, name: "/device:XLA_CPU:0"
device_type: "XLA_CPU"
memory_limit: 17179869184
locality {
}
incarnation: 14658544697426461399
physical_device_desc: "device: XLA_CPU device"
, name: "/device:XLA_GPU:0"
device_type: "XLA_GPU"
memory_limit: 17179869184
locality {
}
incarnation: 15185684578568899150
physical_device_desc: "device: XLA_GPU device"
, name: "/device:GPU:0"
device_type: "GPU"
memory_limit: 11280557671
locality {
  bus_id: 1
  links {
  }
}
incarnation: 6489724649713407173
physical_device_desc: "device: 0, name: Tesla K80, pci bus id: 0000:00:1e.0, compute capability: 3.7"
]
GPUを認識できているようです!
サンプルコード
チュートリアルのサンプルコードを動かしてみました。約30秒で実行できました。
%%time
import tensorflow as tf
mnist = tf.keras.datasets.mnist

(x_train, y_train),(x_test, y_test) = mnist.load_data()
x_train, x_test = x_train / 255.0, x_test / 255.0

model = tf.keras.models.Sequential([
  tf.keras.layers.Flatten(input_shape=(28, 28)),
  tf.keras.layers.Dense(512, activation=tf.nn.relu),
  tf.keras.layers.Dropout(0.2),
  tf.keras.layers.Dense(10, activation=tf.nn.softmax)
])
model.compile(optimizer='adam',
              loss='sparse_categorical_crossentropy',
              metrics=['accuracy'])

model.fit(x_train, y_train, epochs=5)
model.evaluate(x_test, y_test)

# Epoch 1/5
# 60000/60000 [==============================] - 6s 98us/step - loss: 0.2215 - acc: 0.9353
# Epoch 2/5
# 60000/60000 [==============================] - 6s 94us/step - loss: 0.0964 - acc: 0.9715
# Epoch 3/5
# 60000/60000 [==============================] - 6s 94us/step - loss: 0.0700 - acc: 0.9776
# Epoch 4/5
# 60000/60000 [==============================] - 6s 94us/step - loss: 0.0522 - acc: 0.9837
# Epoch 5/5
# 60000/60000 [==============================] - 6s 94us/step - loss: 0.0442 - acc: 0.9858
# 10000/10000 [==============================] - 0s 47us/step
# CPU times: user 44.1 s, sys: 6.33 s, total: 50.4 s
# Wall time: 30 s
同じコードをGoogle ColaboratoryのCPUランタイムで試したところ、1分10秒かかったので、早くなっていると思います。
CPU times: user 1min 48s, sys: 9.23 s, total: 1min 57s
Wall time: 1min 11s
おわりに
GPU版TensorFlowをワンライナーでインストールする方法 (Windows 10)
...
...
...
ハア? ワンライナー?(ゆっくり風)