背景
いろいろあってCloudFrontのログをAthenaとかでなくBigQueryで分析したかったので試行錯誤した話。
やったこと
CloudFrontでログを取得する
ログを保存するバケットを作成
S3に適当にバケットを作成しておく。
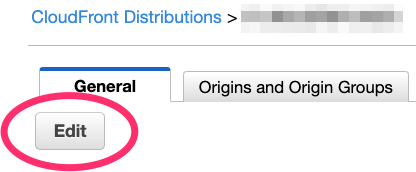
CloudFrontでログ取得の設定
-
ログを取得したいディストリビューションの設定を開く
-
ログ設定を有効にする
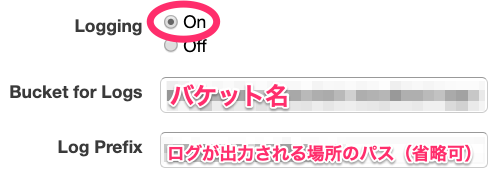
以上の設定をすることで、S3にアクセスログが保存されていく。
ログについての詳細は https://docs.aws.amazon.com/ja_jp/AmazonCloudFront/latest/DeveloperGuide/AccessLogs.html を参照。
EmbulkでS3からBigQueryにログを転送
Embulkの取得
適当なディレクトリを作成しておく
% wget https://dl.embulk.org/embulk-latest.jar
Gemのインストール
EmbulkはJava9以降に対応していないので、Java8を使うように設定しておく。
jenv等々で設定するのも可。
% export JAVA_HOME=$(/System/Library/Frameworks/JavaVM.framework/Versions/A/Commands/java_home -v 1.8)
以下のGemをインストールしておく:
- embulk-input-s3
- embulk-output-bigquery
- embulk-filter-concat
- embulk-filter-column
- embulk-filter-eval
- embulk-filter-timestamp_format
% java -jar embulk-latest.jar gem install \
    embulk-input-s3 \
    embulk-output-bigquery \
    embulk-filter-concat \
    embulk-filter-column \
    embulk-filter-eval \
    embulk-filter-timestamp_format
Config作成
config.yml
in:
  type: s3
  bucket: [バケット名]
  path_prefix: [CloudFrontで設定したプレフィックス][ディストリビューションID].2019-08-29-09  # 適宜変更すること
  decoders:
  - {type: gzip}
  endpoint: s3-ap-northeast-1.amazonaws.com
  auth_method: profile  # ほかにも認証方法はあるので embulk-input-s3 のドキュメントを参照
  profile_name: [AWSのプロファイル名]
  parser:
    charset: UTF-8
    type: csv
    delimiter: "\t"
    quote: '"'
    escape: null
    skip_header_lines: 2
    columns:
    - {name: date, type: string}
    - {name: time, type: string}
    - {name: edge_location, type: string}
    - {name: sc_bytes, type: long}
    - {name: c_ip, type: string}
    - {name: cs_method, type: string}
    - {name: cs_host, type: string}
    - {name: cs_uri_stem, type: string}
    - {name: c_status, type: string}
    - {name: cs_referer, type: string}
    - {name: cs_user_agent, type: string}
    - {name: cs_uri_query, type: string}
    - {name: cs_cookie, type: string}
    - {name: edge_result_type, type: string}
    - {name: edge_result_id, type: string}
    - {name: host_header, type: string}
    - {name: cs_protocol, type: string}
    - {name: cs_bytes, type: long}
    - {name: time_taken, type: double}
    # 以降のカラムは不要だったので書いてない
    allow_extra_columns: true

filters:
  - type: concat  # date と time が別のカラムになってるので繋げてから
    name: datetime
    columns:
    - {name: date}
    - {name: time}
  - type: timestamp_format  # string -> timestamp に変換
    columns:
    - {name: datetime, type: timestamp, from_format: ["%Y-%m-%d %H:%M:%S"]}
    timestamp_parser: auto_java
  - type: eval
    eval_columns:
      - cs_user_agent: value.gsub("%2520", " ")  # UserAgentのスペースが %2520 として記録されているため
  - type: column
    columns:
    - {name: datetime}
    - {name: sc_bytes}
    - {name: c_ip}
    - {name: cs_method}
    - {name: cs_uri_stem}
    - {name: c_status}
    - {name: cs_user_agent}
    - {name: edge_result_type, type: string}
    - {name: host_header, type: string}
    - {name: cs_protocol, type: string}
    - {name: cs_bytes, type: long}
    - {name: time_taken, type: double}

out:
  type: bigquery
  auth_method: authorized_user
  json_keyfile: [キーファイルのパス]
  project: [GCPのプロジェクト名]
  dataset: [BigQuery上のデータセット名]
  auto_create_table: true
  table: [テーブル名]
  mode: append
  formatter: {type: csv, charset: UTF-8, delimiter: ',', header_line: false}
  path_prefix: /tmp/cloudfront-logs/
  file_ext: .csv.gz
  encoders:
  - {type: gzip}
  source_format: CSV
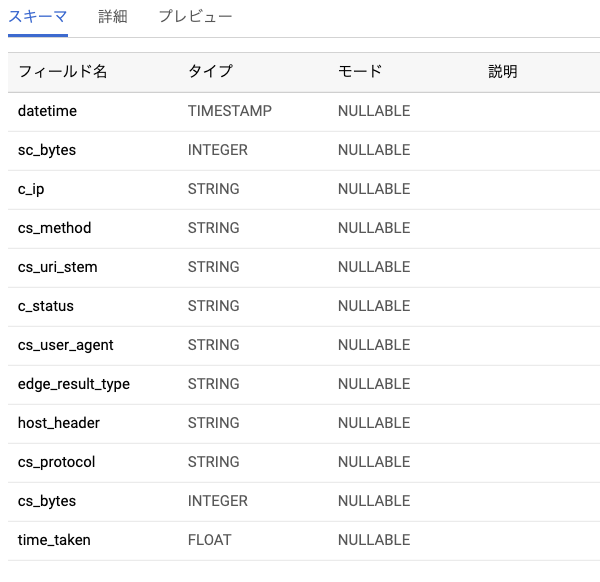
EmbulkでログをBigQueryに投入
% java -jar embulk-latest.jar run config.yml
BigQueryにこんな感じにデータが入ってればOK