はじめに
- Railsをいじったことが少しありますが、改めて勉強し直したいと思い、Railsチュートリアルをやろうとするも、開発環境構築でかなり苦戦したので、自分用のリンクメモです。先人の皆様ありがとうございます‥!
- もっと良い方法など教えていただけると嬉しいです
環境
- macOS Catalina 10.15.7
- VirtualBox 6.1
- Vagrant 2.2.18
- Ubuntu 18.04
- Ruby 2.6.8
- Ruby on Rails 6.0.3
- rbenv 1.1.2-2-g4e92322
全体像
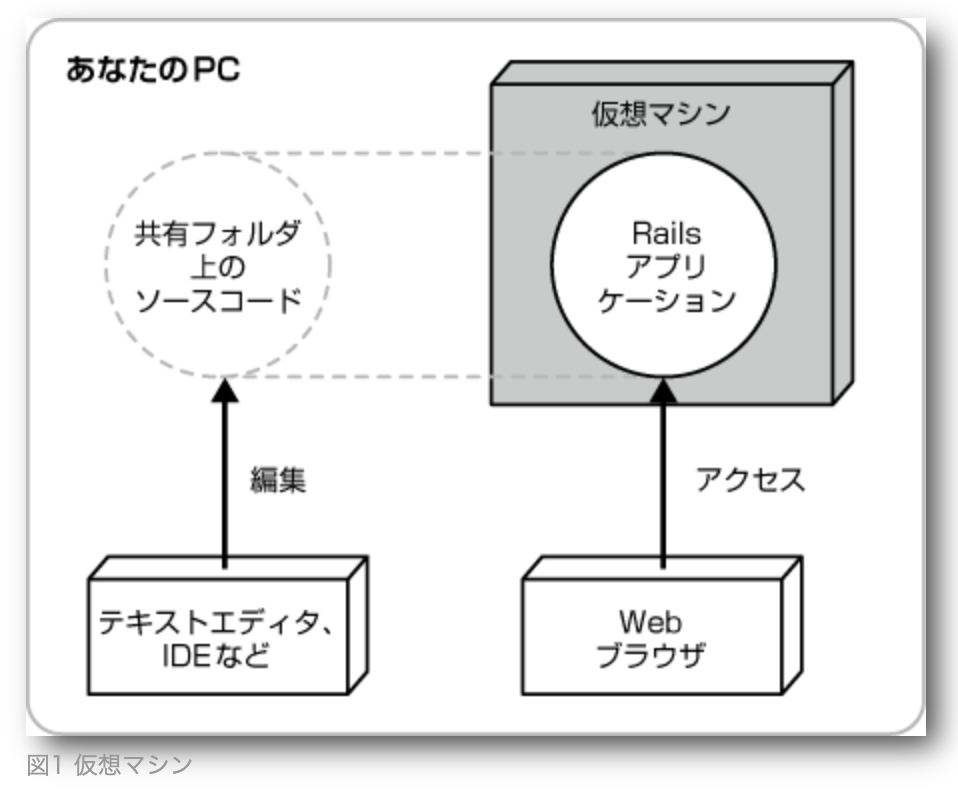
- この辺の図でやることのイメージがつきました。
- VirtualBoxやVagrantを用いたRails開発環境の構築方法(前編)に載っています。
やったこと
1. VirtualBoxとVagrantのインストール
- 公式サイトからソフトウェアをインストール
2. 作業フォルダの作成
- ディレクトリ名は任意
- 自分の場合は{User名}配下に作成
$ mkdir Vagrant
$ cd Vagrant
$ mkdir rails_dev
3. Vagrantfileの作成
- 作業フォルダでVagrantfile作成する
$ vagrant init bento/ubuntu-18.04
4. Vagrantfileの修正
- 修正ポイント①(31行目)
- ポートはrails仕様で3000番ポートが使用されるため、仮想環境の3000番ポートをローカルPCの3000番ポートに転送(ポートフォワード)を行う
- 修正ポイント②(35行目)
- ホスト側(Mac)から見れるようにIPアドレスの開放を行う
- 修正ポイント③(46行目)
- 前提として、Vagrantはホスト、ゲスト間でファイルを同期できる
- ホスト側で好みのエディタで作業できるように、ゲスト側の作業ディレクトリと同期する設定を行う
- <ホスト側(Mac)の相対パス> <ゲスト側(Ubuntu)の絶対パス> となることに注意
Vagrantfile
# -*- mode: ruby -*-
# vi: set ft=ruby :

# All Vagrant configuration is done below. The "2" in Vagrant.configure
# configures the configuration version (we support older styles for
# backwards compatibility). Please don't change it unless you know what
# you're doing.
Vagrant.configure("2") do |config|
  # The most common configuration options are documented and commented below.
  # For a complete reference, please see the online documentation at
  # https://docs.vagrantup.com.

  # Every Vagrant development environment requires a box. You can search for
  # boxes at https://vagrantcloud.com/search.
  config.vm.box = "bento/ubuntu-18.04"

  # Disable automatic box update checking. If you disable this, then
  # boxes will only be checked for updates when the user runs
  # `vagrant box outdated`. This is not recommended.
  # config.vm.box_check_update = false

  # Create a forwarded port mapping which allows access to a specific port
  # within the machine from a port on the host machine. In the example below,
  # accessing "localhost:8080" will access port 80 on the guest machine.
  # NOTE: This will enable public access to the opened port
  # config.vm.network "forwarded_port", guest: 80, host: 8080

  # Create a forwarded port mapping which allows access to a specific port
  # within the machine from a port on the host machine and only allow access
  # via 127.0.0.1 to disable public access
  config.vm.network "forwarded_port", guest: 3000, host: 3000

  # Create a private network, which allows host-only access to the machine
  # using a specific IP.
  config.vm.network "private_network", ip: "192.168.33.10"

  # Create a public network, which generally matched to bridged network.
  # Bridged networks make the machine appear as another physical device on
  # your network.
  # config.vm.network "public_network"

  # Share an additional folder to the guest VM. The first argument is
  # the path on the host to the actual folder. The second argument is
  # the path on the guest to mount the folder. And the optional third
  # argument is a set of non-required options.
  config.vm.synced_folder "./work", "/home/vagrant/work", create: "true"

  # Provider-specific configuration so you can fine-tune various
  # backing providers for Vagrant. These expose provider-specific options.
  # Example for VirtualBox:
  #
  # config.vm.provider "virtualbox" do |vb|
  #   # Display the VirtualBox GUI when booting the machine
  #   vb.gui = true
  #
  #   # Customize the amount of memory on the VM:
  #   vb.memory = "1024"
  # end
  #
  # View the documentation for the provider you are using for more
  # information on available options.

  # Enable provisioning with a shell script. Additional provisioners such as
  # Ansible, Chef, Docker, Puppet and Salt are also available. Please see the
  # documentation for more information about their specific syntax and use.
  # config.vm.provision "shell", inline: <<-SHELL
  #   apt-get update
  #   apt-get install -y apache2
  # SHELL
end
5. Vagrantを起動、接続する
- 起動して、接続します
$ vagrant up
$ vagrant ssh
6. Ruby on Railsのインストール
- versionやファイル名は変えましたが、下記サイトの「動作確認用の新規アプリケーションの作成」までを踏襲しました。
- Vagrantの共有フォルダ設定ができていれば、
rails newを実施すると、ホスト側(Mac)のディレクトリにRailsファイルができています
7. Gemfileの修正
- Railsチュートリアルの「1.3.1 Bundler」以降をたどりました
8. rails serverの実施
- ゲスト側(Ubuntu)で下記実施して、
http://localhost:3000/にアクセスできると思います
$ bundle exec rails s -b 0.0.0.0
99. エラーが出たら
- ひたすらエラーメッセージでググりましょう、、、ググっているうちに分かることも多いです
リンク
流れの全体感
【環境構築】Ruby on Rails 6 開発環境を1時間以内に手に入れる
VagrantでRailsのローカル開発環境構築する
VagrantでRuby On Rails開発環境を構築~デプロイ
Vagrant周り(Vagrantfileの修正内容など)
[Rails][Vagrant]Vagrantの rails server で起動しているアプリケーションにローカルPCからブラウザアクセスする
VirtualBoxやVagrantを用いたRails開発環境の構築方法(前編)
Vagrantで共有フォルダ設定(ファイル共有)する方法【VirtualBox】
vagrant upしようとすると「To fix this, modify your current project’s Vagrantfile to use another port. Example, where ‘1234’ would be replaced by a unique host port:」というエラーがでる。
