タイトル通り,Windows Server 2019のHyper-Vで動かすUbuntu18.04でGPU passthroughしようとした際の備忘録です.
Windows Server 2019でWSLやHyper-V上のUbuntu18.04にCUDA環境を構築しようとして断念
の,Hyper-V部分(GPU passthrough)です.
Hyper-VでUbuntu18.04を動かすまでは
Windows Server 2019でHyper-V上にUbuntu18.04をインストール
↑こちら
Hyper-V上のUbuntu18.04でPython環境を構築するまでは
Windows Server 2019でHyper-V上のUbuntu18.04にJupyterHub環境を構築
↑こちら
はじめに
本来はDDA(Discrete Device Assignment)でHyper-V上のLinuxへGPU passthrough出来るはずだったのですが,最終的に
要素が見つかりません。(Element not found.) (0x80070490)
> Start-VM -VM (Get-VM -Name 'Ubuntu_1804')
Start-VM : 'Ubuntu_1804' は起動できませんでした。
Virtual Pci Express Port (インスタンス ID xxx): 電源をオンにできませんでした。エラー '
要素が見つかりません。'。
'Ubuntu_1804' は起動できませんでした。(仮想マシン ID yyy)
'Ubuntu_1804' Virtual Pci Express Port (インスタンス ID xxx): 電源をオンにできませんで
した。エラー: '要素が見つかりません。' (0x80070490)。(仮想マシン ID yyy)
プラグ アンド プレイ デバイス インスタンス パスが 'PCIP\VEN_10DE&DEV_1E07&SUBSYS_37131462&REV_A1\6&dddddddd&0&dddddddd'
の PCI Express デバイスは、別の VM によって既に使用されているため、割り当てることができませんでした。
発生場所 行:1 文字:1
+ Start-VM -VM (Get-VM -Name 'Ubuntu_1804')
+ ~~~~~~~~~~~~~~~~~~~~~~~~~~~~~~~~~~~~~~~~~
    + CategoryInfo          : ObjectNotFound: (:) [Start-VM], VirtualizationException
    + FullyQualifiedErrorId : ObjectNotFound,Microsoft.HyperV.PowerShell.Commands.StartVM
そうこうしているうちに
完全なLinuxがWindows 10上で稼働する? 「WSL 2」とは
とかも出てきましたし,何かしらアップデートされればいけるようになるんだと思われる.
DDAでGPU passthrough
本来はこの手順でVMにPCIデバイスをスルー出来るはず,という作業メモです.
辺りを参考に作業を進めます.
Hyper-Vの下準備
とりあえず対象となるVMは落としておきます.
Windows Server 2019でHyper-V上にUbuntu18.04をインストール
の通りに入れていれば大丈夫なのですが,
-
RAMの設定

RAM=最小RAMになっているか -
自動停止アクションの設定
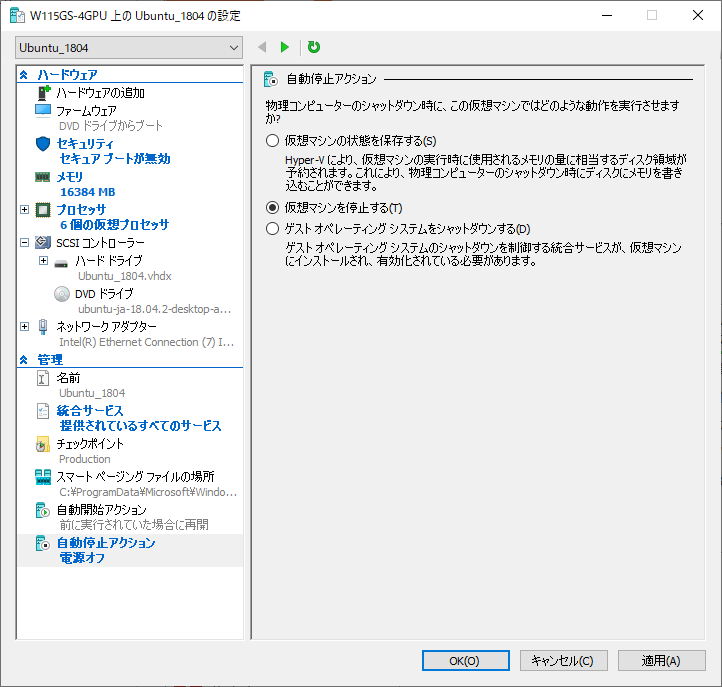
停止もしくはシャットダウンになっているか -
BIOSの設定
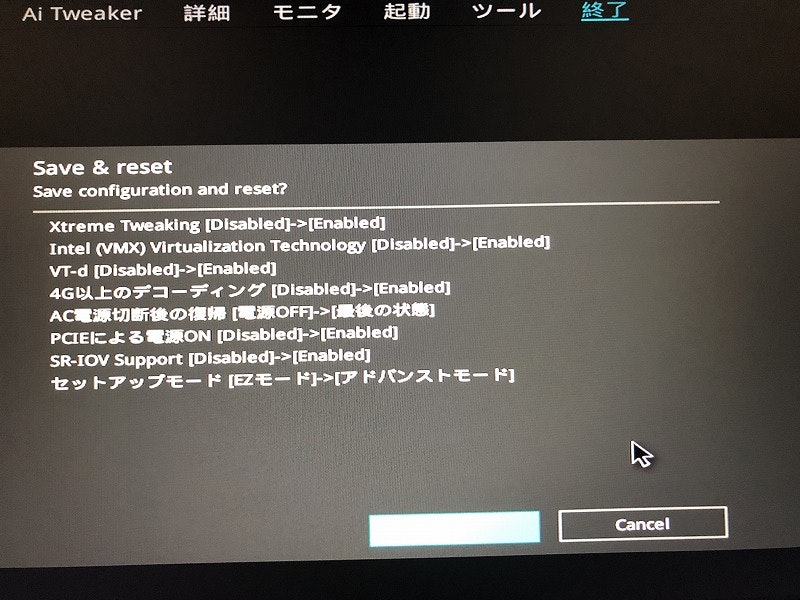
SR-IOV (Single Root I/O Virtualization)が有効になっているか
を確認しておきます.
自分はこの後のコマンドを叩きまくってる段階でSR-IOVが無効になっているのに気付いてデバイス周りの名称などが破茶滅茶になりました(´・ω・`)
GPUをWinから外してVMへ追加
ココがうまくいかない所
デバイスIDの確認
PowerShellで
> Get-PnpDevice -PresentOnly | where {$_.InstanceID -like 'PCI*'} | select InstanceID,FriendlyName | sort FriendlyName
と打つとPCI*なデバイスがリストアップされます.
この中からpassthroughしたいGPUを探してメモります.
PCI\VEN_10DE&DEV_1E07&SUBSYS_37131462&REV_A1\6&aaaaaaaa&0&aaaaaaaa NVIDIA GeForce RTX 2080 Ti
PCI\VEN_10DE&DEV_1E07&SUBSYS_37131462&REV_A1\6&bbbbbbbb&0&bbbbbbbb NVIDIA GeForce RTX 2080 Ti
PCI\VEN_10DE&DEV_1E07&SUBSYS_37131462&REV_A1\6&cccccccc&0&cccccccc NVIDIA GeForce RTX 2080 Ti
PCI\VEN_10DE&DEV_1E07&SUBSYS_37131462&REV_A1\6&dddddddd&0&dddddddd NVIDIA GeForce RTX 2080 Ti
今回はGeForce RTX 2080 Ti x4構成なので,その通り4枚出てきました.
参考記事では一般名称が出てきているのでPCI ID Repositoryから確認しています.
念の為自分も辿っていくと
https://pci-ids.ucw.cz/read/PC/10de/1e07
こうなり,確かにRTX 2080 Tiです.
VMへの割当
とりあえず試しに4枚目を割り当てようとしてみました.
なお,SR-IOVが無効だとこの過程でコケます.
まず,割り当てたいデバイスをWinから取り外す作業.
$deviceIDに長いデバイスIDを入れておき,
$locationPathにデバイスの場所を退避させ,
Disable-PnpDeviceでデバイスを無効にし,
Dismount-VMHostAssignableDeviceでデバイスを取り外します.
> $deviceID = 'PCI\VEN_10DE&DEV_1E07&SUBSYS_37131462&REV_A1\6&dddddddd&0&dddddddd'
> $locationPath = (Get-PnpDeviceProperty -KeyName DEVPKEY_Device_LocationPaths -InstanceID $deviceID).Data[0]
> Disable-PnpDevice -InstanceId $deviceID

確認
この操作を実行しますか?
対象 "Win32_PnPEntity: NVIDIA GeForce RTX 2080 Ti (DeviceID = "PCI\VEN_10DE&DEV_1E07&SUBSYS_37131462&R...")"
に対して操作 "Disable" を実行しています。
[Y] はい(Y)  [A] すべて続行(A)  [N] いいえ(N)  [L] すべて無視(L)  [S] 中断(S)  [?] ヘルプ (既定値は "Y"): Y
> Dismount-VMHostAssignableDevice -force -LocationPath $locationPath
次にVMへ割り当てる作業.
Add-VMAssignableDeviceで対象となるVMに追加します.
> Add-VMAssignableDevice -VMName 'Ubuntu_1804' -LocationPath $locationPath -Verbose
詳細: Add-VMAssignableDevice は、割り当て可能デバイスを仮想マシン "Ubuntu_1804" に追加します。
確か,SR-IOVが無効だとこの段階でこのメッセージが出ずにエラーになったと思います.
VMの起動
これで起動したVMから対象デバイスに繋がるはずなのですが,
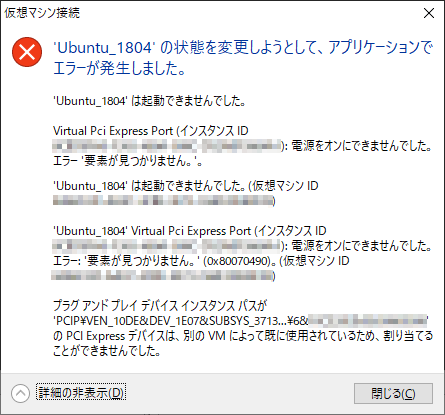
というエラーが出てそもそも起動できません.
> Start-VM -VM (Get-VM -Name 'Ubuntu_1804')
Start-VM : 'Ubuntu_1804' は起動できませんでした。
Virtual Pci Express Port (インスタンス ID xxx): 電源をオンにできませんでした。エラー '
要素が見つかりません。'。
'Ubuntu_1804' は起動できませんでした。(仮想マシン ID yyy)
'Ubuntu_1804' Virtual Pci Express Port (インスタンス ID xxx): 電源をオンにできませんで
した。エラー: '要素が見つかりません。' (0x80070490)。(仮想マシン ID yyy)
プラグ アンド プレイ デバイス インスタンス パスが 'PCIP\VEN_10DE&DEV_1E07&SUBSYS_37131462&REV_A1\6&dddddddd&0&dddddddd'
の PCI Express デバイスは、別の VM によって既に使用されているため、割り当てることができませんでした。
発生場所 行:1 文字:1
+ Start-VM -VM (Get-VM -Name 'Ubuntu_1804')
+ ~~~~~~~~~~~~~~~~~~~~~~~~~~~~~~~~~~~~~~~~~
    + CategoryInfo          : ObjectNotFound: (:) [Start-VM], VirtualizationException
    + FullyQualifiedErrorId : ObjectNotFound,Microsoft.HyperV.PowerShell.Commands.StartVM
↑CUIで叩くとこんな感じ.
成功例を知らないので他に設定が駄目な所があるのだろうかと色々調べましたが,冒頭に書いた通り
Win Server 2016 v1709 - Element not found when starting VMs with passthrough GPUs
にあるように以前それで行けていたのが駄目になったとか,Friday, June 7, 2019 9:45 PMに
tried it aigan with the latest patchlevel... still not working. What is needed that MS takes care?
と仰っていっる方がいらっしゃるので断念(T_T)
Winへの割当
使えないものを外しっぱなしにしておいても仕方がないので…
というか,このままではそもそもVMを起動できないので,
$ Remove-VMAssignableDevice -VMName 'Ubuntu_1804' -LocationPath $locationPath -Verbose
$ Mount-VMHostAssignableDevice -LocationPath $locationPath -force
でWinへ返してあげます.
とりあえずVMが起動すれば良いならRemove-VMAssignableDeviceだけでOK.
一応試したこと
一応,以下の事は試してみました.
確認したこと
> $deviceID = 'PCI\VEN_10DE&DEV_1E07&SUBSYS_37131462&REV_A1\6&dddddddd&0&dddddddd'
> $locationPath = (Get-PnpDeviceProperty -KeyName DEVPKEY_Device_LocationPaths -InstanceID $deviceID).Data[0]
> Disable-PnpDevice -InstanceId $deviceID
> $deviceID2 = 'PCI\VEN_10DE&DEV_1AD6&SUBSYS_37131462&REV_A1\6&dddddddd&0&dddddddd'
> $locationPath2 = (Get-PnpDeviceProperty -KeyName DEVPKEY_Device_LocationPaths -InstanceID $deviceID2).Data[0]
> Disable-PnpDevice -InstanceId $deviceID2
> $deviceID3 = 'PCI\VEN_10DE&DEV_1AD7&SUBSYS_37131462&REV_A1\6&dddddddd&0&dddddddd'
> $locationPath3 = (Get-PnpDeviceProperty -KeyName DEVPKEY_Device_LocationPaths -InstanceID $deviceID3).Data[0]
> Disable-PnpDevice -InstanceId $deviceID3
> Dismount-VMHostAssignableDevice -force -LocationPath $locationPath
> Dismount-VMHostAssignableDevice -force -LocationPath $locationPath2
> Dismount-VMHostAssignableDevice -force -LocationPath $locationPath3
で3つ外し,
> Add-VMAssignableDevice -VMName 'Ubuntu_1804' -LocationPath $locationPath -Verbose
> Add-VMAssignableDevice -VMName 'Ubuntu_1804' -LocationPath $locationPath2 -Verbose
> Add-VMAssignableDevice -VMName 'Ubuntu_1804' -LocationPath $locationPath3 -Verbose
3つ追加.
> Add-VMAssignableDevice -VMName 'Ubuntu_1804' -LocationPath $locationPath -Verbose
詳細: Add-VMAssignableDevice は、割り当て可能デバイスを仮想マシン "Ubuntu_1804" に追加します。
> Add-VMAssignableDevice -VMName 'Ubuntu_1804' -LocationPath $locationPath2 -Verbose
詳細: Add-VMAssignableDevice は、割り当て可能デバイスを仮想マシン "Ubuntu_1804" に追加します。
> Add-VMAssignableDevice -VMName 'Ubuntu_1804' -LocationPath $locationPath3 -Verbose
詳細: Add-VMAssignableDevice は、割り当て可能デバイスを仮想マシン "Ubuntu_1804" に追加します。
と追加までは行きますが,やはり起動は無理でした…
というわけで,
> Remove-VMAssignableDevice -VMName 'Ubuntu_1804' -LocationPath $locationPath -Verbose
> Remove-VMAssignableDevice -VMName 'Ubuntu_1804' -LocationPath $locationPath2 -Verbose
> Remove-VMAssignableDevice -VMName 'Ubuntu_1804' -LocationPath $locationPath3 -Verbose
で
> Remove-VMAssignableDevice -VMName 'Ubuntu_1804' -LocationPath $locationPath -Verbose
詳細: Remove-VMAssignableDevice は、割り当て可能なデバイス "PCI Express ポート" を仮想マシン "Ubuntu_1804"
から削除します。
> Remove-VMAssignableDevice -VMName 'Ubuntu_1804' -LocationPath $locationPath2 -Verbose
詳細: Remove-VMAssignableDevice は、割り当て可能なデバイス "PCI Express ポート" を仮想マシン "Ubuntu_1804"
から削除します。
> Remove-VMAssignableDevice -VMName 'Ubuntu_1804' -LocationPath $locationPath3 -Verbose
詳細: Remove-VMAssignableDevice は、割り当て可能なデバイス "PCI Express ポート" を仮想マシン "Ubuntu_1804"
から削除します。
全て外してとりあえずVMを起動できるように.
CUDA関連
結局パススルー出来なかったから動かないわけですが,一応CuPyを認識させるまでのメモ.
どちらもUbuntu18.04なので当然ですが,WSLとほぼ同じ手順です.
当然,パススルーが直ってくれるまでは意味をなさないです.
(もちろんCPU onlyなChainerは動きます.)
nvidiaドライバ
WSLと違って普通のUbuntuなので,
WSLでもうまくいったこの手順ですんなり入りました.
まずは既存のものが無いか確認&パージ
$ dpkg -l | grep nvidia
$ dpkg -l | grep cuda
$ sudo apt-get --purge remove nvidia-*
$ sudo apt-get --purge remove cuda-*
ここまで手順通りなら,purgeしなくても入ってません.
続いてリポジトリを追加
$ sudo add-apt-repository ppa:graphics-drivers/ppa
色々表示されるけどとりあえずEnter
[ENTER] を押すと続行します。Ctrl-c で追加をキャンセルできます。

取得:1 http://ppa.launchpad.net/graphics-drivers/ppa/ubuntu bionic InRelease [21.3 kB]
取得:2 http://security.ubuntu.com/ubuntu bionic-security InRelease [88.7 kB]
ヒット:3 http://archive.ubuntulinux.jp/ubuntu bionic InRelease
ヒット:4 http://archive.ubuntulinux.jp/ubuntu-ja-non-free bionic InRelease
取得:5 http://ppa.launchpad.net/graphics-drivers/ppa/ubuntu bionic/main i386 Packages [18.3 kB]
取得:6 http://security.ubuntu.com/ubuntu bionic-security/main amd64 DEP-11 Metadata [17.8 kB]
取得:7 http://security.ubuntu.com/ubuntu bionic-security/main DEP-11 48x48 Icons [10.4 kB]
取得:8 http://security.ubuntu.com/ubuntu bionic-security/main DEP-11 64x64 Icons [25.6 kB]
取得:9 http://security.ubuntu.com/ubuntu bionic-security/universe amd64 Packages [567 kB]
ヒット:10 http://jp.archive.ubuntu.com/ubuntu bionic InRelease
取得:11 http://jp.archive.ubuntu.com/ubuntu bionic-updates InRelease [88.7 kB]
取得:12 http://ppa.launchpad.net/graphics-drivers/ppa/ubuntu bionic/main amd64 Packages [24.0 kB]
取得:13 http://jp.archive.ubuntu.com/ubuntu bionic-backports InRelease [74.6 kB]
取得:14 http://security.ubuntu.com/ubuntu bionic-security/universe i386 Packages [561 kB]
取得:15 http://jp.archive.ubuntu.com/ubuntu bionic-updates/main amd64 Packages [656 kB]
取得:16 http://ppa.launchpad.net/graphics-drivers/ppa/ubuntu bionic/main Translation-en [6,252 B]
取得:17 http://security.ubuntu.com/ubuntu bionic-security/universe amd64 DEP-11 Metadata [36.2 kB]
取得:18 http://security.ubuntu.com/ubuntu bionic-security/universe DEP-11 48x48 Icons [16.4 kB]
取得:19 http://security.ubuntu.com/ubuntu bionic-security/universe DEP-11 64x64 Icons [99.2 kB]
取得:20 http://security.ubuntu.com/ubuntu bionic-security/multiverse amd64 DEP-11 Metadata [2,464 B]
取得:21 http://jp.archive.ubuntu.com/ubuntu bionic-updates/main i386 Packages [542 kB]
取得:22 http://jp.archive.ubuntu.com/ubuntu bionic-updates/main amd64 DEP-11 Metadata [278 kB]
取得:23 http://jp.archive.ubuntu.com/ubuntu bionic-updates/main DEP-11 48x48 Icons [66.7 kB]
取得:24 http://jp.archive.ubuntu.com/ubuntu bionic-updates/main DEP-11 64x64 Icons [127 kB]
取得:25 http://jp.archive.ubuntu.com/ubuntu bionic-updates/universe amd64 Packages [955 kB]
取得:26 http://jp.archive.ubuntu.com/ubuntu bionic-updates/universe i386 Packages [942 kB]
取得:27 http://jp.archive.ubuntu.com/ubuntu bionic-updates/universe Translation-en [282 kB]
取得:28 http://jp.archive.ubuntu.com/ubuntu bionic-updates/universe amd64 DEP-11 Metadata [245 kB]
取得:29 http://jp.archive.ubuntu.com/ubuntu bionic-updates/universe DEP-11 48x48 Icons [202 kB]
取得:30 http://jp.archive.ubuntu.com/ubuntu bionic-updates/universe DEP-11 64x64 Icons [414 kB]
取得:31 http://jp.archive.ubuntu.com/ubuntu bionic-updates/multiverse amd64 DEP-11 Metadata [2,464 B]
取得:32 http://jp.archive.ubuntu.com/ubuntu bionic-backports/universe amd64 DEP-11 Metadata [7,224 B]
6,376 kB を 22秒 で取得しました (287 kB/s)
パッケージリストを読み込んでいます... 完了
WSLのときよりかなり多いな.
で,
$ sudo apt-get update
$ apt-cache search 'nvidia-[0-9]+$'
入れられそうなバージョンを確認
$ apt-cache search 'nvidia-[0-9]+$'
nvidia-331 - Transitional package for nvidia-331
nvidia-346 - Transitional package for nvidia-346
nvidia-352 - Transitional package for nvidia-361
nvidia-361 - Transitional package for nvidia-367
nvidia-367 - Transitional package for nvidia-375
nvidia-375 - Transitional package for nvidia-384
nvidia-384 - Transitional package for nvidia-driver-390
nvidia-headless-no-dkms-390 - NVIDIA headless metapackage - no DKMS
xserver-xorg-video-nvidia-390 - NVIDIA binary Xorg driver
nvidia-340 - NVIDIA binary driver - version 340.107
nvidia-304 - NVIDIA legacy binary driver - version 304.137
nvidia-387 - Transitional package for nvidia-driver-390
nvidia-390 - Transitional package for nvidia-driver-390
nvidia-headless-no-dkms-396 - NVIDIA headless metapackage - no DKMS
nvidia-headless-no-dkms-410 - NVIDIA headless metapackage - no DKMS
nvidia-headless-no-dkms-415 - NVIDIA headless metapackage - no DKMS
nvidia-headless-no-dkms-418 - NVIDIA headless metapackage - no DKMS
nvidia-headless-no-dkms-430 - NVIDIA headless metapackage - no DKMS
xserver-xorg-video-nvidia-396 - NVIDIA binary Xorg driver
xserver-xorg-video-nvidia-410 - NVIDIA binary Xorg driver
xserver-xorg-video-nvidia-415 - NVIDIA binary Xorg driver
xserver-xorg-video-nvidia-418 - NVIDIA binary Xorg driver
xserver-xorg-video-nvidia-430 - NVIDIA binary Xorg driver
$ sudo apt install nvidia-390
で,
この操作後に追加で 760 MB のディスク容量が消費されます。
続行しますか? [Y/n] Y
にびっくりしつつインストール.
CUDA10.1, cuDNN
パススルーできるようになった頃にはバージョン上がってそうだけど,入れておく.
依存関係で少しだけ面倒なのはWSLのときと同様でした.
CUDA10.1
https://developer.nvidia.com/cuda-downloads の「Linux→x86_64→Ubuntu→18.04→deb(network)」に従い,
$ cd ~/Downloads/
$ wget http://developer.download.nvidia.com/compute/cuda/repos/ubuntu1804/x86_64/cuda-repo-ubuntu1804_10.1.168-1_amd64.deb
$ sudo dpkg -i cuda-repo-ubuntu1804_10.1.168-1_amd64.deb
$ sudo apt-key adv --fetch-keys https://developer.download.nvidia.com/compute/cuda/repos/ubuntu1804/x86_64/7fa2af80.pub
$ sudo apt update
そして入れられそうなバージョンの確認
$ apt show cuda -a
wgetしてる段階で当然ですが,6月半ば時点では
10.1.168-1
$ apt show cuda -a
Package: cuda
Version: 10.1.168-1
Priority: optional
Section: multiverse/devel
Maintainer: cudatools <cudatools@nvidia.com>
Installed-Size: 25.6 kB
Depends: cuda-10-1 (>= 10.1.168)
Download-Size: 2,512 B
APT-Sources: http://developer.download.nvidia.com/compute/cuda/repos/ubuntu1804/x86_64  Packages
Description: CUDA meta-package
 Meta-package containing all the available packages required for native CUDA
 development. Contains the toolkit, samples, driver and documentation.

Package: cuda
Version: 10.1.105-1
Priority: optional
Section: multiverse/devel
Maintainer: cudatools <cudatools@nvidia.com>
Installed-Size: 25.6 kB
Depends: cuda-10-1 (>= 10.1.105)
Download-Size: 2,514 B
APT-Sources: http://developer.download.nvidia.com/compute/cuda/repos/ubuntu1804/x86_64  Packages
Description: CUDA meta-package
 Meta-package containing all the available packages required for native CUDA
 development. Contains the toolkit, samples, driver and documentation.

Package: cuda
Version: 10.0.130-1
Priority: optional
Section: multiverse/devel
Maintainer: cudatools <cudatools@nvidia.com>
Installed-Size: 25.6 kB
Depends: cuda-10-0 (>= 10.0.130)
Download-Size: 2,514 B
APT-Sources: http://developer.download.nvidia.com/compute/cuda/repos/ubuntu1804/x86_64  Packages
Description: CUDA meta-package
 Meta-package containing all the available packages required for native CUDA
 development. Contains the toolkit, samples, driver and documentation.
$ sudo apt install cuda
…とすると,WSLのとき同様にえらく依存関係で怒られる.仕方ないので辿っていって必要そうなものを入れる.
$ sudo apt install libnvidia-encode-418
$ sudo apt install cuda
WSLの時はlibnvidia-encode-418の後にcuda-driversを入れてから進めましたが,実はlibnvidia-encode-418だけ入れれば後はcudaからちゃんと解決してくれるようです.
cuDNN
とりあえず,リポジトリを追加してキー追加してupdate,そして入れられそうなバージョンの確認
$ echo "deb https://developer.download.nvidia.com/compute/machine-learning/repos/ubuntu1804/x86_64 /" | sudo tee /etc/apt/sources.list.d/nvidia-ml.list
$ apt-key adv --keyserver keyserver.ubuntu.com --recv-keys --recv-keys F60F4B3D7FA2AF80
$ sudo apt update
$ apt show libcudnn7-dev -a
6月半ば時点では
libcudnn7-dev=7.6.0.64-1+cuda10.1
$ apt show libcudnn7-dev -a
Package: libcudnn7-dev
Version: 7.6.0.64-1+cuda10.1
Priority: optional
Section: multiverse/devel
Source: cudnn
Maintainer: cudatools <cudatools@nvidia.com>
Installed-Size: 388 MB
Depends: libcudnn7 (= 7.6.0.64-1+cuda10.1)
Download-Size: 154 MB
APT-Sources: https://developer.download.nvidia.com/compute/machine-learning/repos/ubuntu1804/x86_64  Packages
Description: cuDNN development libraries and headers
 cuDNN development libraries and headers. cuDNN provides primitives for deep
 neural networks.

Package: libcudnn7-dev
Version: 7.6.0.64-1+cuda10.0
Priority: optional
Section: multiverse/devel
Source: cudnn
Maintainer: cudatools <cudatools@nvidia.com>
Installed-Size: 375 MB
Depends: libcudnn7 (= 7.6.0.64-1+cuda10.0)
Download-Size: 145 MB
APT-Sources: https://developer.download.nvidia.com/compute/machine-learning/repos/ubuntu1804/x86_64  Packages
Description: cuDNN development libraries and headers
 cuDNN development libraries and headers. cuDNN provides primitives for deep
 neural networks.

Package: libcudnn7-dev
Version: 7.5.1.10-1+cuda10.1
Priority: optional
Section: multiverse/devel
Source: cudnn
Maintainer: cudatools <cudatools@nvidia.com>
Installed-Size: 367 MB
Depends: libcudnn7 (= 7.5.1.10-1+cuda10.1)
Download-Size: 148 MB
APT-Sources: https://developer.download.nvidia.com/compute/machine-learning/repos/ubuntu1804/x86_64  Packages
Description: cuDNN development libraries and headers
 cuDNN development libraries and headers. cuDNN provides primitives for deep
 neural networks.

Package: libcudnn7-dev
Version: 7.5.1.10-1+cuda10.0
Priority: optional
Section: multiverse/devel
Source: cudnn
Maintainer: cudatools <cudatools@nvidia.com>
Installed-Size: 354 MB
Depends: libcudnn7 (= 7.5.1.10-1+cuda10.0)
Download-Size: 140 MB
APT-Sources: https://developer.download.nvidia.com/compute/machine-learning/repos/ubuntu1804/x86_64  Packages
Description: cuDNN development libraries and headers
 cuDNN development libraries and headers. cuDNN provides primitives for deep
 neural networks.

Package: libcudnn7-dev
Version: 7.5.0.56-1+cuda10.1
Priority: optional
Section: multiverse/devel
Source: cudnn
Maintainer: cudatools <cudatools@nvidia.com>
Installed-Size: 367 MB
Depends: libcudnn7 (= 7.5.0.56-1+cuda10.1)
Download-Size: 148 MB
APT-Sources: https://developer.download.nvidia.com/compute/machine-learning/repos/ubuntu1804/x86_64  Packages
Description: cuDNN development libraries and headers
 cuDNN development libraries and headers. cuDNN provides primitives for deep
 neural networks.

Package: libcudnn7-dev
Version: 7.5.0.56-1+cuda10.0
Priority: optional
Section: multiverse/devel
Source: cudnn
Maintainer: cudatools <cudatools@nvidia.com>
Installed-Size: 354 MB
Depends: libcudnn7 (= 7.5.0.56-1+cuda10.0)
Download-Size: 140 MB
APT-Sources: https://developer.download.nvidia.com/compute/machine-learning/repos/ubuntu1804/x86_64  Packages
Description: cuDNN development libraries and headers
 cuDNN development libraries and headers. cuDNN provides primitives for deep
 neural networks.

Package: libcudnn7-dev
Version: 7.4.2.24-1+cuda10.0
Priority: optional
Section: multiverse/devel
Source: cudnn
Maintainer: cudatools <cudatools@nvidia.com>
Installed-Size: 346 MB
Depends: libcudnn7 (= 7.4.2.24-1+cuda10.0)
Download-Size: 137 MB
APT-Sources: https://developer.download.nvidia.com/compute/machine-learning/repos/ubuntu1804/x86_64  Packages
Description: cuDNN development libraries and headers
 cuDNN development libraries and headers. cuDNN provides primitives for deep
 neural networks.

Package: libcudnn7-dev
Version: 7.4.1.5-1+cuda10.0
Priority: optional
Section: multiverse/devel
Source: cudnn
Maintainer: cudatools <cudatools@nvidia.com>
Installed-Size: 348 MB
Depends: libcudnn7 (= 7.4.1.5-1+cuda10.0)
Download-Size: 137 MB
APT-Sources: https://developer.download.nvidia.com/compute/machine-learning/repos/ubuntu1804/x86_64  Packages
Description: cuDNN development libraries and headers
 cuDNN development libraries and headers. cuDNN provides primitives for deep
 neural networks.

Package: libcudnn7-dev
Version: 7.3.1.20-1+cuda10.0
Priority: optional
Section: multiverse/devel
Source: cudnn
Maintainer: cudatools <cudatools@nvidia.com>
Installed-Size: 346 MB
Depends: libcudnn7 (= 7.3.1.20-1+cuda10.0)
Download-Size: 138 MB
APT-Sources: https://developer.download.nvidia.com/compute/machine-learning/repos/ubuntu1804/x86_64  Packages
Description: cuDNN development libraries and headers
 cuDNN development libraries and headers. cuDNN provides primitives for deep
 neural networks.

Package: libcudnn7-dev
Version: 7.3.0.29-1+cuda10.0
Priority: optional
Section: multiverse/devel
Source: cudnn
Maintainer: cudatools <cudatools@nvidia.com>
Installed-Size: 330 MB
Depends: libcudnn7 (= 7.3.0.29-1+cuda10.0)
Download-Size: 136 MB
APT-Sources: https://developer.download.nvidia.com/compute/machine-learning/repos/ubuntu1804/x86_64  Packages
Description: cuDNN development libraries and headers
 cuDNN development libraries and headers. cuDNN provides primitives for deep
 neural networks.
$ sudo apt install libcudnn7-dev=7.6.0.64-1+cuda10.1
もしくは指定する必要もないので
$ sudo apt install libcudnn7-dev
で入れる.
この操作後に追加で 808 MB のディスク容量が消費されます。
続行しますか? [Y/n]
どんどん膨れ上がりますね.
CuPy, Chainer
Chainerは動くんですがねぇ…
$ sudo pip install cupy-cuda101
$ sudo pip install chainer
あとは
$ python -c 'import chainer; chainer.print_runtime_info()'
して
Platform: Linux-4.18.0-22-generic-x86_64-with-debian-buster-sid
Chainer: 6.0.0
NumPy: 1.16.2
CuPy:
  CuPy Version          : 6.0.0
  CUDA Root             : /usr/local/cuda
  CUDA Build Version    : 10010
  CUDA Driver Version   : 10010
  CUDA Runtime Version  : CUDARuntimeError('cudaErrorNoDevice: no CUDA-capable device is detected')
  cuDNN Build Version   : 7500
  cuDNN Version         : 7500
  NCCL Build Version    : 2402
  NCCL Runtime Version  : 2402
iDeep: Not Available
という結果を見て「そらそうですよね(´・ω・`)」となれば成功です.