E資格取得のためラビットチャレンジに挑戦しています。
#復習
#####確認テスト
- サイズ5×5の入力画像を、サイズ3×3のフィルタで畳み込んだ時の出力画像のサイズを答えよ。スライドは2、パディングは1とする。
=>3×3
#Section1:再起ニューラルネットワーク(RNN)の概念
##1-1Recurrent Neural Network:RNN
###ポイント
- 時系列データに対応可能な、ニューラルネットワーク
- 時系列データ:時間的順序をおって一定間隔ごとに観察され、相互に統計的依存関係が認められるようなデータの系列
- 音声データ、テキストデータetcなどの扱いが可能
- 時系列モデルを扱うには、初期状態と過去の時間t-1の状態を保持し、そこから次の時間でのtを再帰的に求める再起構造が必要。
=>中間層から次の中間層に渡される重み
###ハンズオン
3_1_simple_RNN
import sys, os
sys.path.append(os.pardir)  # 親ディレクトリのファイルをインポートするための設定
import numpy as np
from common import functions
import matplotlib.pyplot as plt

# def d_tanh(x):


# データを用意
# 2進数の桁数
binary_dim = 8
# 最大値 + 1
largest_number = pow(2, binary_dim)
# largest_numberまで2進数を用意
binary = np.unpackbits(np.array([range(largest_number)],dtype=np.uint8).T,axis=1)

input_layer_size = 2
hidden_layer_size = 16
output_layer_size = 1

weight_init_std = 1
learning_rate = 0.1

iters_num = 10000
plot_interval = 100

# ウェイト初期化 (バイアスは簡単のため省略)
W_in = weight_init_std * np.random.randn(input_layer_size, hidden_layer_size)
W_out = weight_init_std * np.random.randn(hidden_layer_size, output_layer_size)
W = weight_init_std * np.random.randn(hidden_layer_size, hidden_layer_size)

# Xavier


# He


# 勾配
W_in_grad = np.zeros_like(W_in)
W_out_grad = np.zeros_like(W_out)
W_grad = np.zeros_like(W)

u = np.zeros((hidden_layer_size, binary_dim + 1))
z = np.zeros((hidden_layer_size, binary_dim + 1))
y = np.zeros((output_layer_size, binary_dim))

delta_out = np.zeros((output_layer_size, binary_dim))
delta = np.zeros((hidden_layer_size, binary_dim + 1))

all_losses = []

for i in range(iters_num):

    # A, B初期化 (a + b = d)
    a_int = np.random.randint(largest_number/2)
    a_bin = binary[a_int] # binary encoding
    b_int = np.random.randint(largest_number/2)
    b_bin = binary[b_int] # binary encoding

    # 正解データ
    d_int = a_int + b_int
    d_bin = binary[d_int]

    # 出力バイナリ
    out_bin = np.zeros_like(d_bin)

    # 時系列全体の誤差
    all_loss = 0

    # 時系列ループ
    for t in range(binary_dim):
        # 入力値
        X = np.array([a_bin[ - t - 1], b_bin[ - t - 1]]).reshape(1, -1)
        # 時刻tにおける正解データ
        dd = np.array([d_bin[binary_dim - t - 1]])

        u[:,t+1] = np.dot(X, W_in) + np.dot(z[:,t].reshape(1, -1), W)
        z[:,t+1] = functions.sigmoid(u[:,t+1])

        y[:,t] = functions.sigmoid(np.dot(z[:,t+1].reshape(1, -1), W_out))


        #誤差
        loss = functions.mean_squared_error(dd, y[:,t])

        delta_out[:,t] = functions.d_mean_squared_error(dd, y[:,t]) * functions.d_sigmoid(y[:,t])

        all_loss += loss

        out_bin[binary_dim - t - 1] = np.round(y[:,t])


    for t in range(binary_dim)[::-1]:
        X = np.array([a_bin[-t-1],b_bin[-t-1]]).reshape(1, -1)

        delta[:,t] = (np.dot(delta[:,t+1].T, W.T) + np.dot(delta_out[:,t].T, W_out.T)) * functions.d_sigmoid(u[:,t+1])

        # 勾配更新
        W_out_grad += np.dot(z[:,t+1].reshape(-1,1), delta_out[:,t].reshape(-1,1))
        W_grad += np.dot(z[:,t].reshape(-1,1), delta[:,t].reshape(1,-1))
        W_in_grad += np.dot(X.T, delta[:,t].reshape(1,-1))

    # 勾配適用
    W_in -= learning_rate * W_in_grad
    W_out -= learning_rate * W_out_grad
    W -= learning_rate * W_grad

    W_in_grad *= 0
    W_out_grad *= 0
    W_grad *= 0


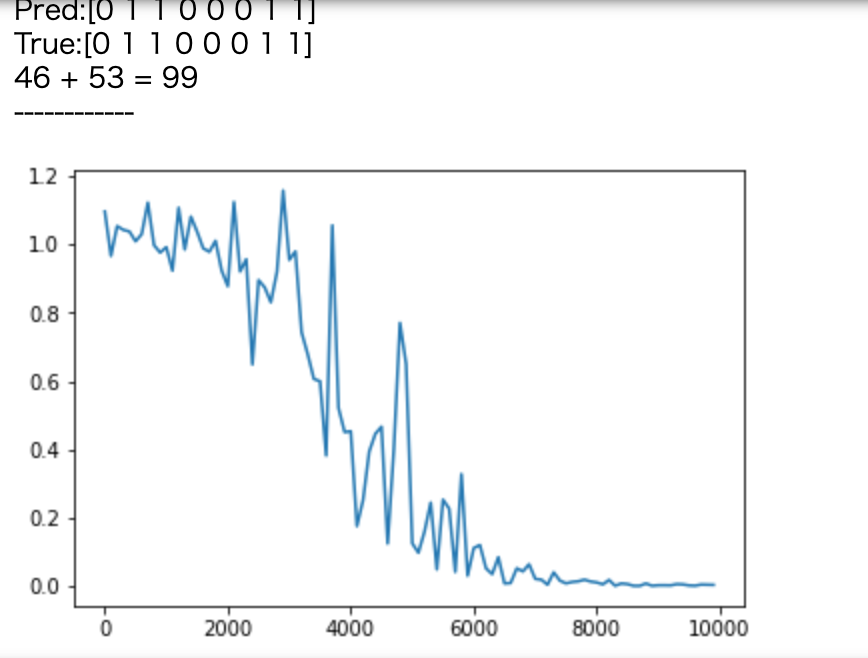
    if(i % plot_interval == 0):
        all_losses.append(all_loss)
        print("iters:" + str(i))
        print("Loss:" + str(all_loss))
        print("Pred:" + str(out_bin))
        print("True:" + str(d_bin))
        out_int = 0
        for index,x in enumerate(reversed(out_bin)):
            out_int += x * pow(2, index)
        print(str(a_int) + " + " + str(b_int) + " = " + str(out_int))
        print("------------")

lists = range(0, iters_num, plot_interval)
plt.plot(lists, all_losses, label="loss")
plt.show()
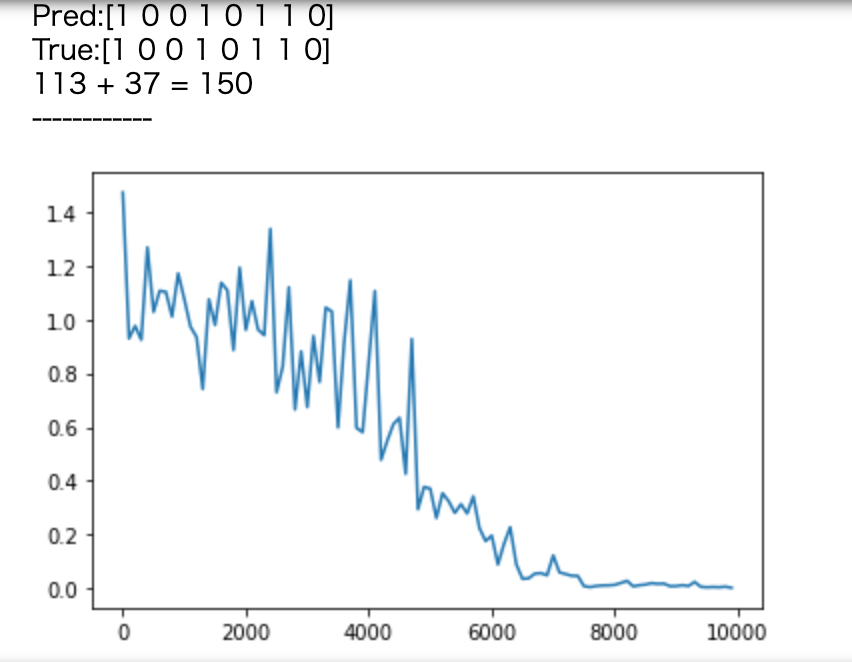
- weight_init_std=1,learning_rate=0.1,hidden_layer_size=16
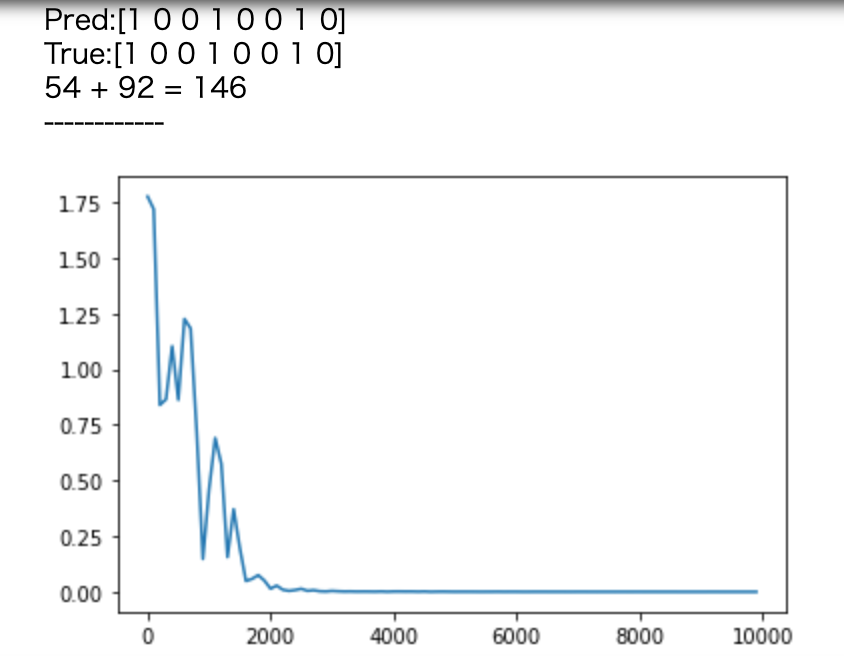
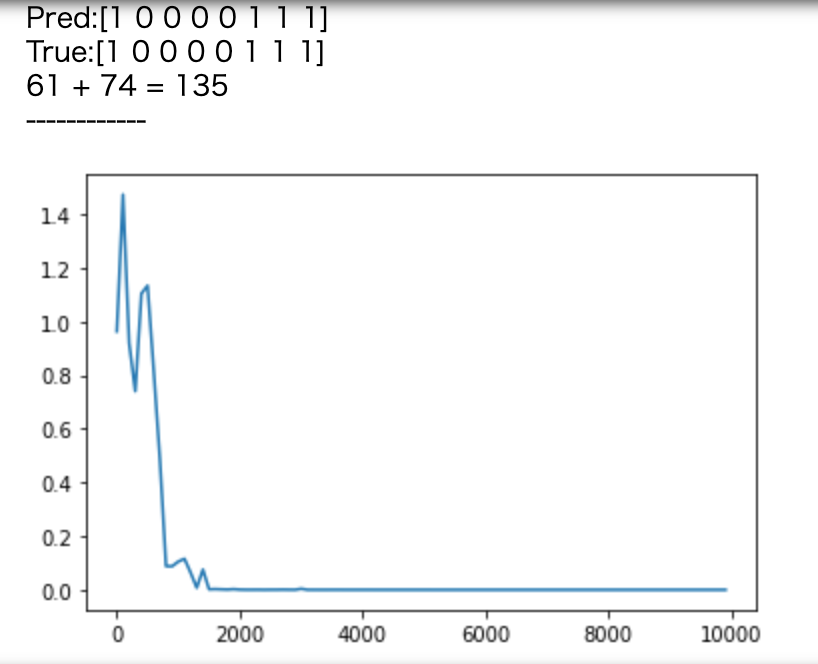
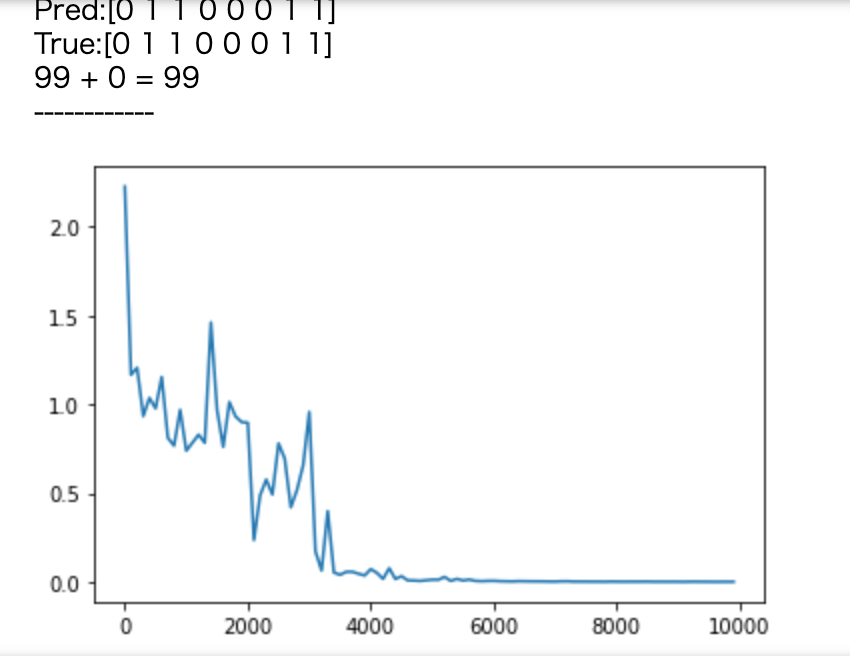
[try] weight_init_stdやlearning_rate, hidden_layer_sizeを変更してみよう
- weight_init_std=10,learning_rate=0.1,hidden_layer_size=16
- weight_init_std=1,learning_rate=0.5,hidden_layer_size=16
- weight_init_std=1,learning_rate=1,hidden_layer_size=16
- weight_init_std=1,learning_rate=0.1,hidden_layer_size=32
- weight_init_std=1,learning_rate=0.1,hidden_layer_size=100
- weight_init_std=1,learning_rate=0.5,hidden_layer_size=32
[try] 重みの初期化方法を変更してみよう
- Xavier
- He
[try] 中間層の活性化関数を変更してみよう
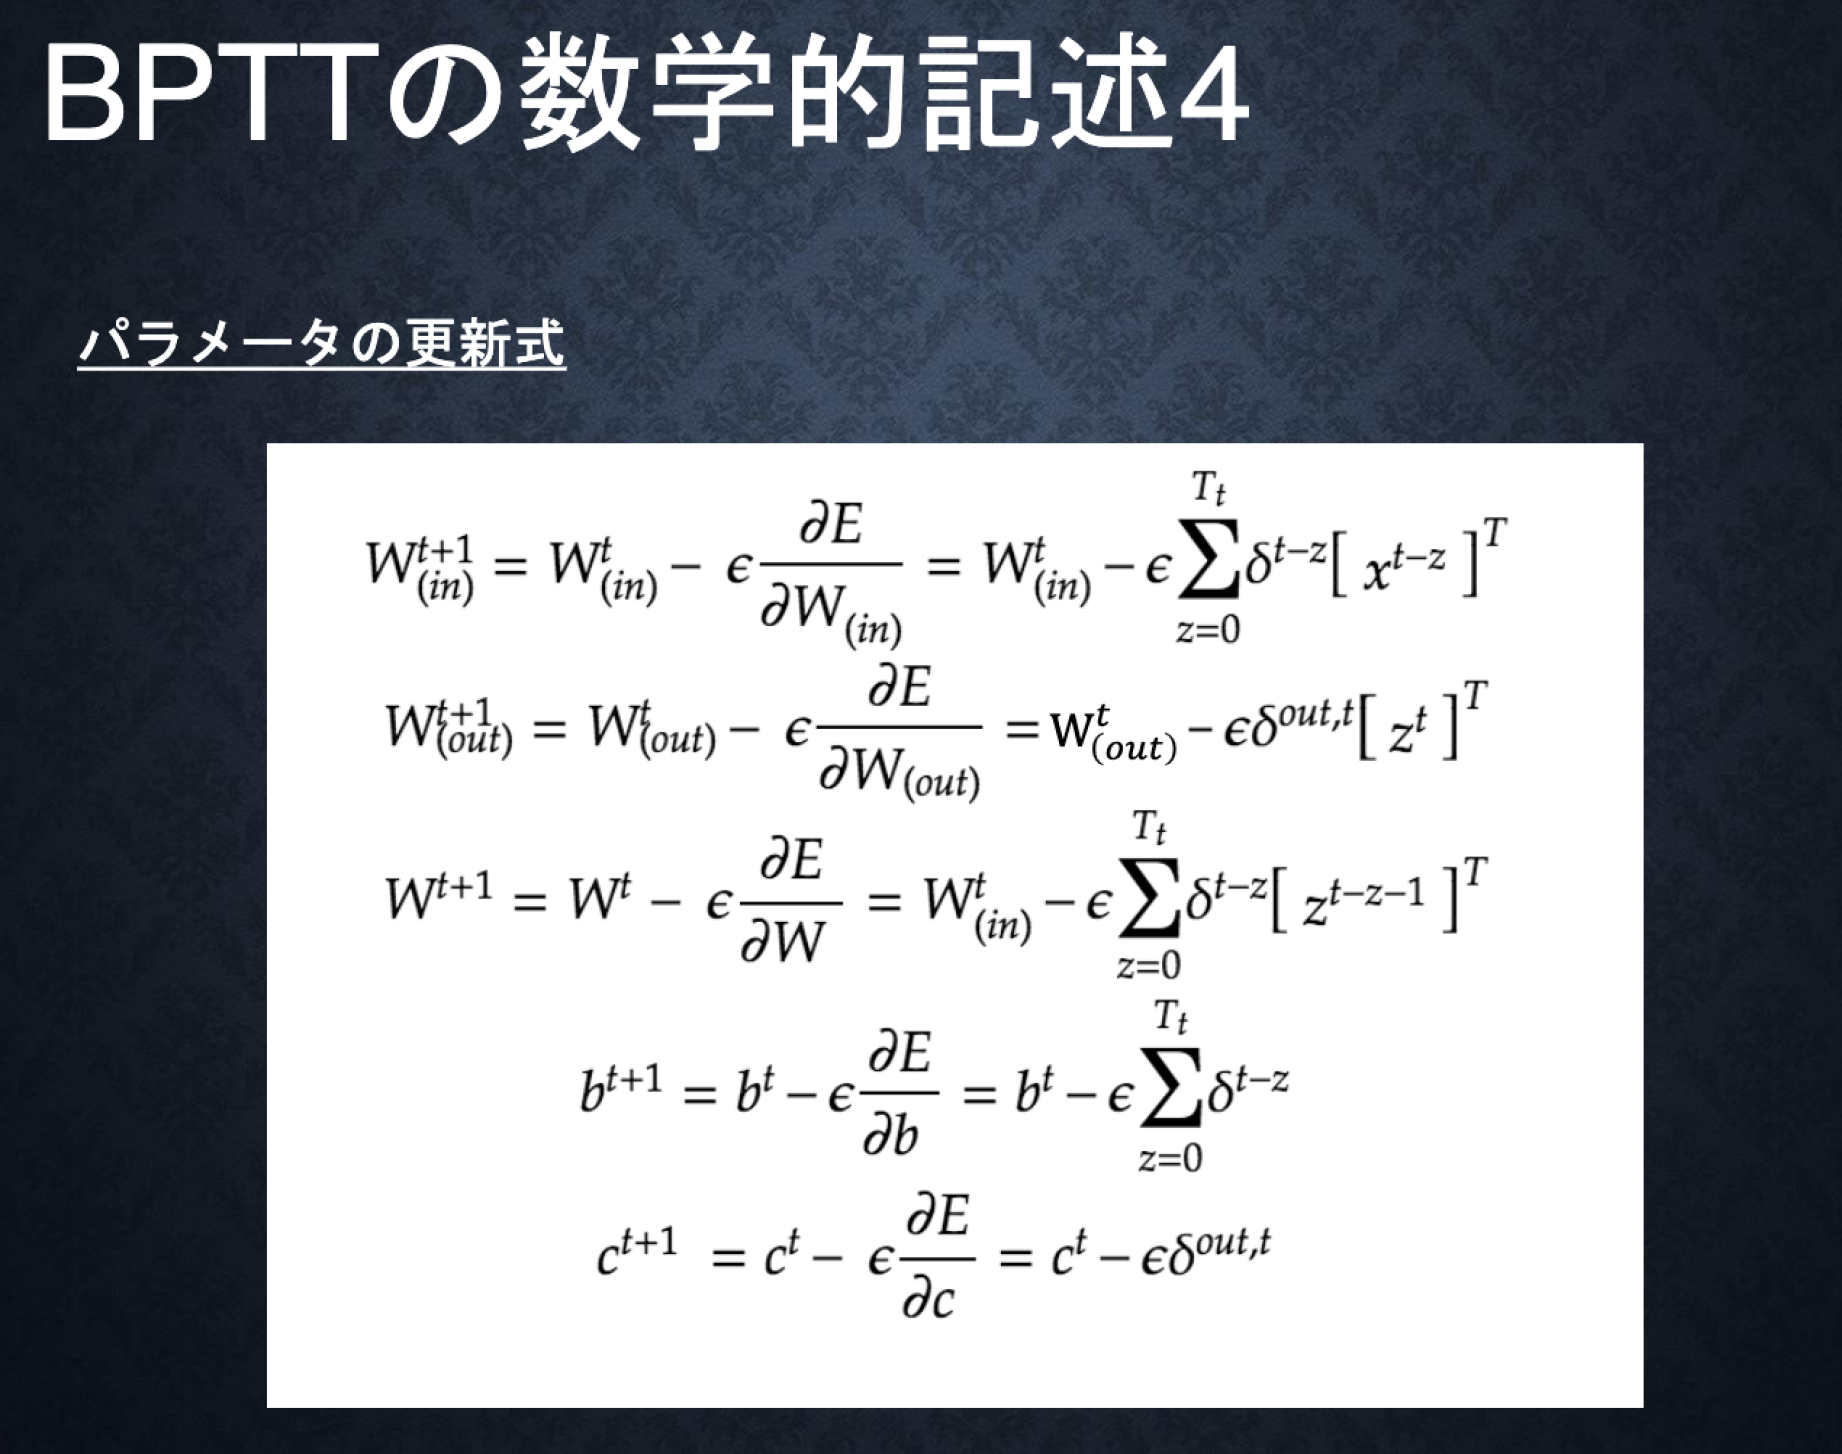
##1-2BPTT
###ポイント
- Backpropagation Through Time
- RNNにおいてのパラメータ調整方法の一種
- 誤差逆伝播の一種
#####確認テスト
- 連鎖率の原理を使いdz/dxを求めよ
z= t^2
\\
t=x+y
\\
\frac{dz}{dx}=\frac{dz}{dt}\frac{dt}{dx}=2t=2(x+y)
z_1 = g(z_0w + x_1w_{(in)}+b)
\\
y_1 = g(z_1w_{(out)}+c)
\\
#####コード演習問題
=>(2)
####考察
パラメータを変更することによって大きく結果が異なる。RELUに関してはoverflowした。
####参考
https://qiita.com/kiminaka/items/87afd4a433dc655d8cfd
https://www.youtube.com/watch?v=yvqgQZIUAKg
https://masamunetogetoge.com/gradient-vanish
#Section2:LSTM
###ポイント
- RNNの課題として時系列が遡れば遡るほど、勾配が消失していく
- 長い時系列の学習が困難=>LSTMが解決策
- LSTMはパラメータ数が多く、計算負荷が高くなる問題がある。
=>(2)
#####演習チャレンジ
=>(1)
##2-1 CEC
- 勾配消失および勾配爆発の解決方法として、勾配が、1であれば解決できる。
- 課題
- 入力データについて、時間依存度に関係なく重みが一律である
- ニューラルネットワークの学習特性がない
- 入力層->隠れ層への重み
- 入力重みの衝突
- 隠れ層->出力層への重み
- 出力重みの衝突
- 入力データについて、時間依存度に関係なく重みが一律である
\delta^{t-z-1}= \delta^{t-z}\{ Wf^{\prime}(u^{t-z-1}) \}=1
\\

\frac{\partial E}{\partial c^{t-1}}=\frac{\partial E}{\partial c^t}\frac{\partial c^t}{\partial c^{t-1}} = \frac{\partial E}{\partial c^t}\frac{\partial }{\partial c^{t-1}} \{ a^t-c^{t-1}\}=\frac{\partial E}{\partial c^t}
##2-2 入力・出力ゲート
- 入力・出力ゲートを追加することで、それぞれのゲートへの入力値の重みを、重み行列W,Uで可変可能とする
- CECの重みが一律である課題を解決
##2-3 忘却ゲート
- 過去の情報がいらなくなった場合そのタイミングで情報を忘却する機能
- CECは過去の情報を全部保管しており、削除ができないため
=>忘却ゲート
#####演習チャレンジ
=>(2)×
=>(3)
##2-4 覗き穴結合
- CEC自身の値に、重み行列を介して伝播可能にした構造
- CECの保存されている過去の情報を任意のタイミングで他のノードに伝播させたり、任意のタイミングで忘却可能
- CEC自身はゲート制御に影響を与えていない課題を解決
- CECの保存されている過去の情報を任意のタイミングで他のノードに伝播させたり、任意のタイミングで忘却可能
####考察
ゲートなどを用いることによって課題やニーズを解決している。
####参考
https://www.youtube.com/watch?v=unE_hofrYrk
https://qiita.com/KojiOhki/items/89cd7b69a8a6239d67ca
https://www.hellocybernetics.tech/entry/2017/05/06/182757
https://qiita.com/t_Signull/items/21b82be280b46f467d1b
#Section3:GRU
###ポイント
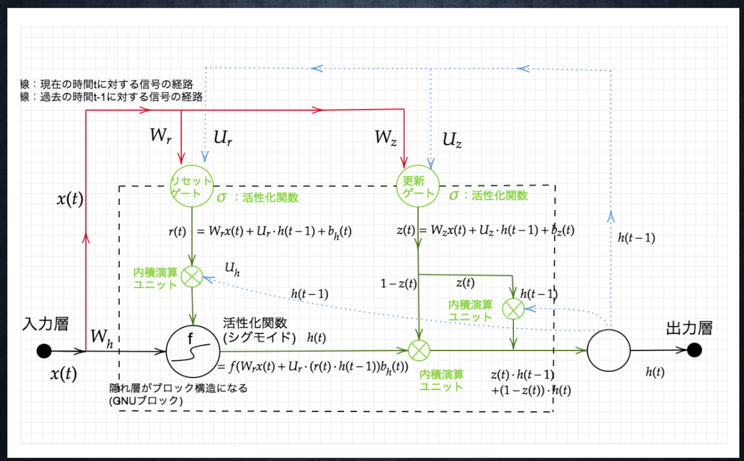
- Gated recurrent unit
- LSTMの弱点だった、パラメータ数を大幅に削減し、精度は同等またはそれ以上が望めるようになった構造
- 計算負荷が低い
#####確認テスト
- LSTMとCECが抱える課題について、それぞれ簡潔に述べよ
=> LSTM: パラメータが多く計算コストが高い
CEC:入力データについて、時間依存度に関係なく重みが一律であるためニューラルネットワークの学習特性がなくなってしまうため学習が行えない。
#####演習チャレンジ
=>(4)
###ハンズオン
####考察
####参考


