PAY.JPとは?
はじめにどんな機能なのかをざっくりと。
PAY.JPを使うと、シンプルなAPIでクレジットカード決済機能を導入できます。
ApplePayに対応していたり、cronを使わず定期課金を組み込むことができたりと
お客様にとっても事業者にとっても便利なサービスです🙆♀️
事前準備
-
まずはPAY.JPのアカウントを取得しましょう。
ログインすると、下記のような画面が表示されると思います。
このダッシュボードでテストモードでの売上データや金額も確認できます。
(これ確認するの、ちょっと楽しい)

実装にまず必要なのは、左側のメニューバーの中にある**「API」**の部分です。

このテスト秘密鍵とテスト公開鍵を使って、実装を進めていきます。 -
Rails側ではgemをインストールします。
gem 'payjp'
超簡単・シンプルな決済機能の実装
Checkoutという便利なライブラリが用意されており、なんと1行で決済機能が実装できちゃいます。
公式の説明も下記の通り!
チェックアウトは<script>タグを1行で、 デザインされた決済フォーム、カード情報のバリデーション、カード情報のトークン化を行うフォームを生成するライブラリです。
とにかく練習がてら、サクッと実装してみましょう。
1. ビューを作成
scriptタグ1行書くだけ!!
hamlで書いてるのでplainオプションを使って挿入しました。
= form_with url: purchase_item_path do
  :plain
    <script type="text/javascript" src="https://checkout.pay.jp" class="payjp-button" data-key="公開鍵"></script>
このコードでピンクで囲ったボタンが出現します。

押すとPayjp側で用意してくれているフォームがモーダルで開きます。
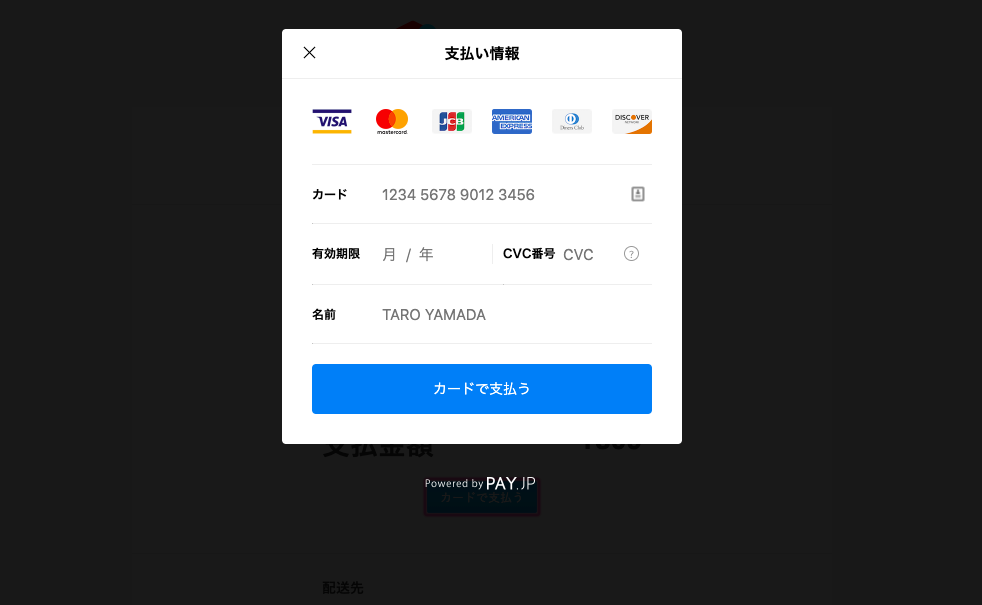
このチェックアウトで生成されたフォームにカード情報を入力し、送信します。
⚠️テストの場合はテストカードが用意されているのでそちらの情報を使います。
2. コントローラーにアクションを記述
フォームからカード情報を送信すると、PAY.JPサーバーに情報が送られ、PAY.JPから一意のトークンが返されます。
サーバーサイドでトークンを受け取り、その情報を使ってコントローラーで支払い処理を記述します。
  require 'payjp'

  def purchase
    Payjp.api_key = "秘密鍵"
    Payjp::Charge.create(
      amount: 809, # 決済する値段
      card: params['payjp-token'], # フォームを送信すると作成・送信されてくるトークン
      currency: 'jpy'
    )
  end
これで、支払いボタンを押すと決済が完了するようになりました!
メニューの「売上」を押すと、売上が立ったのが確認できます。

実際、運用したい方法に当てはめる
今回はフリマサイトを想定しているので、
✔︎ ログインしているユーザーに紐づけてカード情報を登録する
✔︎ 登録したユーザーのカード情報で出品されている商品を購入できるようにする
✔︎ クレジットカードの登録フォームは独自で作成したものを使う
という内容で実装を行います。
顧客情報・カード情報を登録する
1. Cardsテーブルを作成
PAY.JPの情報を保存+ユーザーに紐づけるためのテーブルです。
class CreateCards < ActiveRecord::Migration[5.2]
  def change
    create_table :cards do |t|
      t.references :user, foreign_key: true, null: false
      t.string :customer_id, null: false
      t.string :card_id, null: false
      t.timestamps
    end
  end
end
2. モデルを作成・編集
*今回、ユーザーは1枚のカードのみ登録できるように設定しています。
class Card < ApplicationRecord
  belongs_to :user
end
class User < ApplicationRecord
  devise :database_authenticatable, :registerable,
         :recoverable, :rememberable, :validatable
  # 追記 ---------
  has_many :cards
  # -------------
  has_many :items
end
3. コントローラーを編集
class CardsController < ApplicationController
  require "payjp"
  before_action :set_card

  def new # カードの登録画面。送信ボタンを押すとcreateアクションへ。
    card = Card.where(user_id: current_user.id).first
    redirect_to action: "index" if card.present?
  end

 # indexアクションはここでは省略

  def create #PayjpとCardのデータベースを作成
    Payjp.api_key = '秘密鍵'

    if params['payjp-token'].blank?
      redirect_to action: "new"
    else
      # トークンが正常に発行されていたら、顧客情報をPAY.JPに登録します。
      customer = Payjp::Customer.create(
        description: 'test', # 無くてもOK。PAY.JPの顧客情報に表示する概要です。
        email: current_user.email,
        card: params['payjp-token'], # 直前のnewアクションで発行され、送られてくるトークンをここで顧客に紐付けて永久保存します。
        metadata: {user_id: current_user.id} # 無くてもOK。
      )
      @card = Card.new(user_id: current_user.id, customer_id: customer.id, card_id: customer.default_card)
      if @card.save
        redirect_to action: "index"
      else
        redirect_to action: "create"
      end
    end
  end

  private

  def set_card
    @card = Card.where(user_id: current_user.id).first if Card.where(user_id: current_user.id).present?
  end
end
4. カード新規登録のビューを作成
余計なコードはなるべく省いて載せてるので、適宜デザイン等加えてください。
私のチームが作った某フリマサイトの登録フォームを真似たものがこちらです。

.content__title
  %h2 クレジットカード情報入力
.content__credit-card
  .content__credit-card__inner
    = form_with url: cards_path, method: :post, html: { name: "inputForm" } do |f| -# createアクションのパスを指定
      = f.label :カード番号, class: 'label'
      %span 必須
      = f.text_field :card_number, type: 'text', class: 'input-number', placeholder: '半角数字のみ', maxlength: "16"
      .cards-expire
        = f.label :有効期限, class: 'label'
        %span 必須
        %br
        .cards-expire__wrap
          = f.select :exp_month, [["01",1],["02",2],["03",3],["04",4],["05",5],["06",6],["07",7],["08",8],["09",9],["10",10],["11",11],["12",12]],{} , class: 'input-expire'
          %span.expire-text 月
          %br
        .cards-expire__wrap
          = f.select :exp_year, [["19",2019],["20",2020],["21",2021],["22",2022],["23",2023],["24",2024],["25",2025],["26",2026],["27",2027],["28",2028],["29",2029]],{} , class: 'input-expire'
          %span.expire-text 年
      .cards-expire
        = f.label :セキュリティコード, class: 'label'
        %span 必須
        = f.text_field :cvc, type: 'text', class: 'input-number', placeholder: 'カード背面4桁もしくは3桁の番号', maxlength: "4"
      .content-bottom#card_token
        = f.submit '追加する', class: 'content-bottom--add-btn', id: 'token_submit'

-# ↓↓↓ submitボタンを押された時にトークンを作成する処理
:javascript
  document.addEventListener(
  "DOMContentLoaded", (e) => {
    Payjp.setPublicKey("公開鍵");
    const btn = document.getElementById('token_submit'); //IDがtoken_submitの場合に取得されます
    btn.addEventListener("click", (e) => { //ボタンが押されたときに作動します
      e.preventDefault(); //ボタンを一旦無効化します

      //カード情報生成
      const card = {
        number: document.getElementById("card_number").value,
        cvc: document.getElementById("cvc").value,
        exp_month: document.getElementById("exp_month").value,
        exp_year: document.getElementById("exp_year").value
      }; //入力されたデータを取得します。

      //トークン生成
      Payjp.createToken(card, (status, response) => {
        if (status === 200) { //成功した場合
          $("#card_number").removeAttr("name");
          $("#cvc").removeAttr("name");
          $("#exp_month").removeAttr("name");
          $("#exp_year").removeAttr("name"); //カード情報を自分のサーバにpostせず削除します
          $("#card_token").append(
            $('<input type="hidden" name="payjp-token">').val(response.id)
          ); //トークンを送信できるように隠しタグを生成
          document.inputForm.submit();
          alert("登録が完了しました"); //確認用
        } else {
          alert("カード情報が正しくありません。"); //確認用
        }
      });
    });
  },false);
* JSのコードは、JSファイルに記入して登録ページにだけ発火するように処理をする方が綺麗かもです。。お好みで!
カードと顧客の登録機能完成!
実際にフォームにテストカードの情報を入れて登録してみましょう。

無事に登録できたらこのメッセージが表示されるはず!
では、PAY.JP側でも顧客を登録できているか確認してみましょう。

先ほど入力したテストカードが顧客と紐づいて登録出来ているのが確認できます。
顧客情報を表示する + 削除機能をつける
カードの登録後、なんのカードを登録しているか確認画面等で表示してあげたいですよね。
PAY.JPからカード情報を取得してビューに表示させることができます。
1. コントローラーを編集
indexアクションを追加し、PAY.JPからカード情報を取得してビューに表示できるようにします。
  def index #CardのデータをPayjpに送って情報を取り出す
    if @card.present?
      Payjp.api_key = "秘密鍵"
      customer = Payjp::Customer.retrieve(@card.customer_id)
      @card_information = customer.cards.retrieve(@card.card_id)

      # 《+α》 登録しているカード会社のブランドアイコンを表示するためのコードです。---------
      @card_brand = @card_information.brand
      case @card_brand
      when "Visa"
        @card_src = "visa.svg"
      when "JCB"
        @card_src = "jcb.svg"
      when "MasterCard"
        @card_src = "master-card.svg"
      when "American Express"
        @card_src = "american_express.svg"
      when "Diners Club"
        @card_src = "dinersclub.svg"
      when "Discover"
        @card_src = "discover.svg"
      end
      # ---------------------------------------------------------------
    end
  end

  def destroy #PayjpとCardのデータベースを削除
    Payjp.api_key = "秘密鍵"
    customer = Payjp::Customer.retrieve(@card.customer_id)
    customer.delete
    if @card.destroy #削除に成功した時にポップアップを表示します。
      redirect_to action: "index", notice: "削除しました"
    else #削除に失敗した時にアラートを表示します。
      redirect_to action: "index", alert: "削除できませんでした"
    end
  end
* カード会社のアイコンはimagesに保存しているのを使っています。
2. カード登録情報を表示するビューを作成
余計なコードはなるべく省いて載せてるので、適宜デザイン等加えてください。
.content__title
  %h2 支払い方法
.content__credit-cards
  %h3 クレジットカード一覧
  - if @card.present?
    %ul.content__credit-cards__list
      %li
        = form_with url: card_path(@card.id), method: :delete, local: true, id: 'charge-form' do |f|
          -# カードブランドのアイコンを表示する場合-----
          %figure
            = image_tag "credit-cards/#{@card_src}", width: '26', height: '20', alt: @card_brand, id: "card_image"
          -#----------------------------------
          .content__credit-cards__list--pay-num
            = "**** **** **** " + @card_information.last4
          .content__credit-cards__list--pay-num
            - exp_month = @card_information.exp_month.to_s
            - exp_year = @card_information.exp_year.to_s.slice(2,3)
            = exp_month + " / " + exp_year
          %input{type: "hidden", name: "card_id", value: ""}
          = f.submit "削除する", {class: "content__credit-cards__list__remove"}
          - if flash[:notice]
            .alert.alert-success
            = flash[:notice]
          - if flash[:alert]
            .alert.alert-dange
            = flash[:alert]
  - else
    = render 'add-card' -# カードが登録されていない場合は登録ボタンを表示するようにしています。
カード情報確認画面と削除機能完成!
登録したカード情報が表示できました。

PAY.JPの顧客情報を確認すると、前回作成したものが消えています。
同時に削除できているのが確認できました。

きちんとリファレンスを理解すると、これ以外にも定期課金など様々活用できるようなのでぜひ使ってみてください!