はじめに
この記事は2019年はじめにTECHCAMPで勉強していたときに書いたものですが
おかげさまで未だに多くの方に観ていただいています。
いくつか情報が古いものがあるかもしれませんが、
もしお気づきの点があればご指摘いただければ修正しますので
コメント欄か編集リクエストに記載ください!![]()
(今後見てくださる方の時間の節約にもなりますので)
実装する機能と前提条件
今回、Payjp(Pay.jp)を利用して入力フォームを直接ページ内に設置します。
実装するものとしては下記のとおりです。
- 自作のカード情報入力フォーム
- カード情報とユーザーの紐づけ
- ユーザーとカードの登録と削除
- 商品の購入(次回の記事参照)
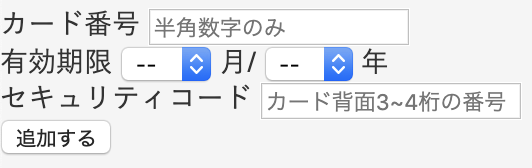
イメージとしてはこんな感じの入力フォームです。
もしSDKを使う場合は別記事をご覧いただくかPAY.JP API 利用ガイド | PAY.JPを触るとイメージをつかみやすいと思います。
バージョン情報
- ruby 2.3.1
- Rails 5.0.7
前提条件
- hamlでの記載(gem 'haml-rails')
- deviseが導入済みでログインができている
→Devise未導入や何もない状態からスタートする場合は、
『Devise導入の設定手順 ~haml使用/pay.jp導入の前準備~ (Rails)』を先に実施ください。
1.Payjpのアカウントを作成しよう
Payjpのサイトでアカウントを作成します。
2.APIを確認しよう
ダッシュボードのAPIより確認ができます。
今回はテストモードでの実装なので、__テスト秘密鍵__と__テスト公開鍵__を使用します。

3.payjpのgemを設置しよう
下記をgemfileに記載しbundle installを実施します。
gem 'payjp'
4.payjp.jsを読み込めるようにしよう
%script{src: "https://js.pay.jp/", type: "text/javascript"}を下記の通り追記します。
%html
  %head
    %meta{:content => "text/html; charset=UTF-8", "http-equiv" => "Content-Type"}/
    %title payjptest
    %script{src: "https://js.pay.jp/", type: "text/javascript"}
    -# このscriptを記載
    = csrf_meta_tags
    = stylesheet_link_tag    'application', media: 'all', 'data-turbolinks-track': 'reload'
    = javascript_include_tag 'application', 'data-turbolinks-track': 'reload'
  %body
    = yield
5.テーブルを作成しよう
下記コマンドでpayjpのデータを保管するテーブルを作成します。
rails g model Card user_id:integer customer_id:string card_id:string
テーブルのカラムの紐づけは下記の通りです。
- user_id ... Userテーブルのid
- customer_id ... payjpの顧客id
- card_id ... payjpのデフォルトカードid
(デフォルトカードidはトークンとは違います。ここの理解で結構時間をとってしまいました…)
作成したマイグレーションファイルは下記のとおりです。nullはお好みでつけてください。
class CreateCards < ActiveRecord::Migration[5.0]
  def change
    create_table :cards do |t|
      t.integer :user_id, null: false
      t.string :customer_id, null: false
      t.string :card_id, null: false
      t.timestamps
    end
  end
end
マイグレーションを実施します。
$ rails db:migrate
ちなみにカード情報そのものを保存することは禁止されていますので、
payjpに保管されている情報を顧客idやカードidで呼び出すことで情報取得や支払いなどに対応します。
カード情報非通過化対応のお願い
6.コントローラーを作成しよう
下記コマンドでコントローラーを作成します。
後ほどビューも2つ(new,show)作るのでそれも付け加えておきます。
$ rails g controller card new show
作成したコントローラーの内容を変更します。
class CardController < ApplicationController

  require "payjp"

  def new
    card = Card.where(user_id: current_user.id)
    redirect_to action: "show" if card.exists?
  end

  def pay #payjpとCardのデータベース作成を実施します。
    Payjp.api_key = ENV["PAYJP_PRIVATE_KEY"]
    if params['payjp-token'].blank?
      redirect_to action: "new"
    else
      customer = Payjp::Customer.create(
      description: '登録テスト', #なくてもOK
      email: current_user.email, #なくてもOK
      card: params['payjp-token'],
      metadata: {user_id: current_user.id}
      ) #念の為metadataにuser_idを入れましたがなくてもOK
      @card = Card.new(user_id: current_user.id, customer_id: customer.id, card_id: customer.default_card)
      if @card.save
        redirect_to action: "show"
      else
        redirect_to action: "pay"
      end
    end
  end

  def delete #PayjpとCardデータベースを削除します
    card = Card.where(user_id: current_user.id).first
    if card.blank?
    else
      Payjp.api_key = ENV["PAYJP_PRIVATE_KEY"]
      customer = Payjp::Customer.retrieve(card.customer_id)
      customer.delete
      card.delete
    end
      redirect_to action: "new"
  end

  def show #Cardのデータpayjpに送り情報を取り出します
    card = Card.where(user_id: current_user.id).first
    if card.blank?
      redirect_to action: "new"
    else
      Payjp.api_key = ENV["PAYJP_PRIVATE_KEY"]
      customer = Payjp::Customer.retrieve(card.customer_id)
      @default_card_information = customer.cards.retrieve(card.card_id)
    end
  end
end
コントローラ内のENV["PAYJP_PRIVATE_KEY"]は環境変数で__テスト秘密鍵__を設定し読み込みます。
私はdotenvを利用していますので、下記のような形で記載しました。
PAYJP_PRIVATE_KEY = 'sk_test_000000000000000000000000'
PAYJP_KEY = 'pk_test_00000000000000000000000'
7.カードの登録画面を作成しよう
今回は登録画面と確認兼削除画面の2つを作成します。デザインはアレンジしてください。
尚、ルーティングがまだなので画面の表示は『10.カードを登録してみよう』までお待ち下さい。
登録画面
= form_tag(pay_card_index_path, method: :post, id: 'charge-form',  name: "inputForm") do
  %label カード番号
  = text_field_tag "number", "", class: "number", placeholder: "半角数字のみ" ,maxlength: "16", type: "text", id: "card_number"
  %br
  %label 有効期限
  %select#exp_month{name: "exp_month", type: "text"}
    %option{value: ""} --
    %option{value: "1"}01
    %option{value: "2"}02
    %option{value: "3"}03
    %option{value: "4"}04
    %option{value: "5"}05
    %option{value: "6"}06
    %option{value: "7"}07
    %option{value: "8"}08
    %option{value: "9"}09
    %option{value: "10"}10
    %option{value: "11"}11
    %option{value: "12"}12
  %span 月/
  %select#exp_year{name: "exp_year", type: "text"}
    %option{value: ""} --
    %option{value: "2019"}19
    %option{value: "2020"}20
    %option{value: "2021"}21
    %option{value: "2022"}22
    %option{value: "2023"}23
    %option{value: "2024"}24
    %option{value: "2025"}25
    %option{value: "2026"}26
    %option{value: "2027"}27
    %option{value: "2028"}28
    %option{value: "2029"}29
  %span 年
  %br
  %label セキュリティコード
  = text_field_tag "cvc", "", class: "cvc", placeholder: "カード背面3~4桁の番号", maxlength: "4", id: "cvc"
  #card_token
  = submit_tag "追加する", id: "token_submit"
最初、= sectionを使っていたのですがうまく行かなかったため
%optionが連続発生し駄長なコードになっているのはご了承ください…
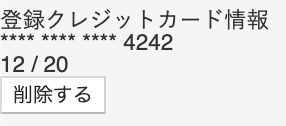
確認兼削除画面
%label 登録クレジットカード情報
%br
= "**** **** **** " + @default_card_information.last4
%br
- exp_month = @default_card_information.exp_month.to_s
- exp_year = @default_card_information.exp_year.to_s.slice(2,3)
= exp_month + " / " + exp_year
= form_tag(card_delete_path, method: :post, id: 'charge-form',  name: "inputForm") do
  %input{ type: "hidden", name: "card_id", value: "" }
  %button 削除する
8.Payjpにデータを送りトークンを取得しよう
提供されているpay.jpのサンプルを参照し一部アレンジしております。
jQueryを使用するので、railsに未設定の場合は設定をしてください。
設定方法はこちら!
document.addEventListener(
  "DOMContentLoaded", e => {
    if (document.getElementById("token_submit") != null) { //token_submitというidがnullの場合、下記コードを実行しない
      Payjp.setPublicKey("pk_test_79ae2d2743199a76f3eb36aa"); //ここに公開鍵を直書き
      let btn = document.getElementById("token_submit"); //IDがtoken_submitの場合に取得されます
      btn.addEventListener("click", e => { //ボタンが押されたときに作動します
        e.preventDefault(); //ボタンを一旦無効化します
        let card = {
          number: document.getElementById("card_number").value,
          cvc: document.getElementById("cvc").value,
          exp_month: document.getElementById("exp_month").value,
          exp_year: document.getElementById("exp_year").value
        }; //入力されたデータを取得します。
        Payjp.createToken(card, (status, response) => {
          if (status === 200) { //成功した場合
            $("#card_number").removeAttr("name");
            $("#cvc").removeAttr("name");
            $("#exp_month").removeAttr("name");
            $("#exp_year").removeAttr("name"); //データを自サーバにpostしないように削除
            $("#card_token").append(
              $('<input type="hidden" name="payjp-token">').val(response.id)
            ); //取得したトークンを送信できる状態にします
            document.inputForm.submit();
            alert("登録が完了しました"); //確認用
          } else {
            alert("カード情報が正しくありません。"); //確認用
          }
        });
      });
    }
  },
  false
);
9.ルートを作成しよう
今回はshow,pay,new,deleteの4つのメゾットがあるので下記の通り追記します。
一部はresoursesで設定してもよいかと思います。
resources :card, only: [:new, :show] do
  collection do
    post 'show', to: 'card#show'
    post 'pay', to: 'card#pay'
    post 'delete', to: 'card#delete'
  end
end
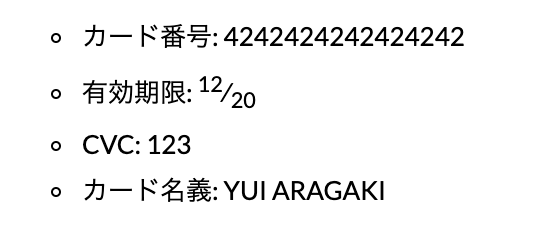
10.カードを登録してみよう
http://localhost:3000/card/new にアクセスして登録できるか確認してみましょう。
その時、下記のテストカードで登録するようにしてください。
それ以外を打ち込んだ場合はトークンが発行できずはねられてしまいます。
以上でカード登録から削除まで一通り実装できました。
次回はこれを使って商品支払いを実装します。