Rubyを触り始めて半年以上経ちました……
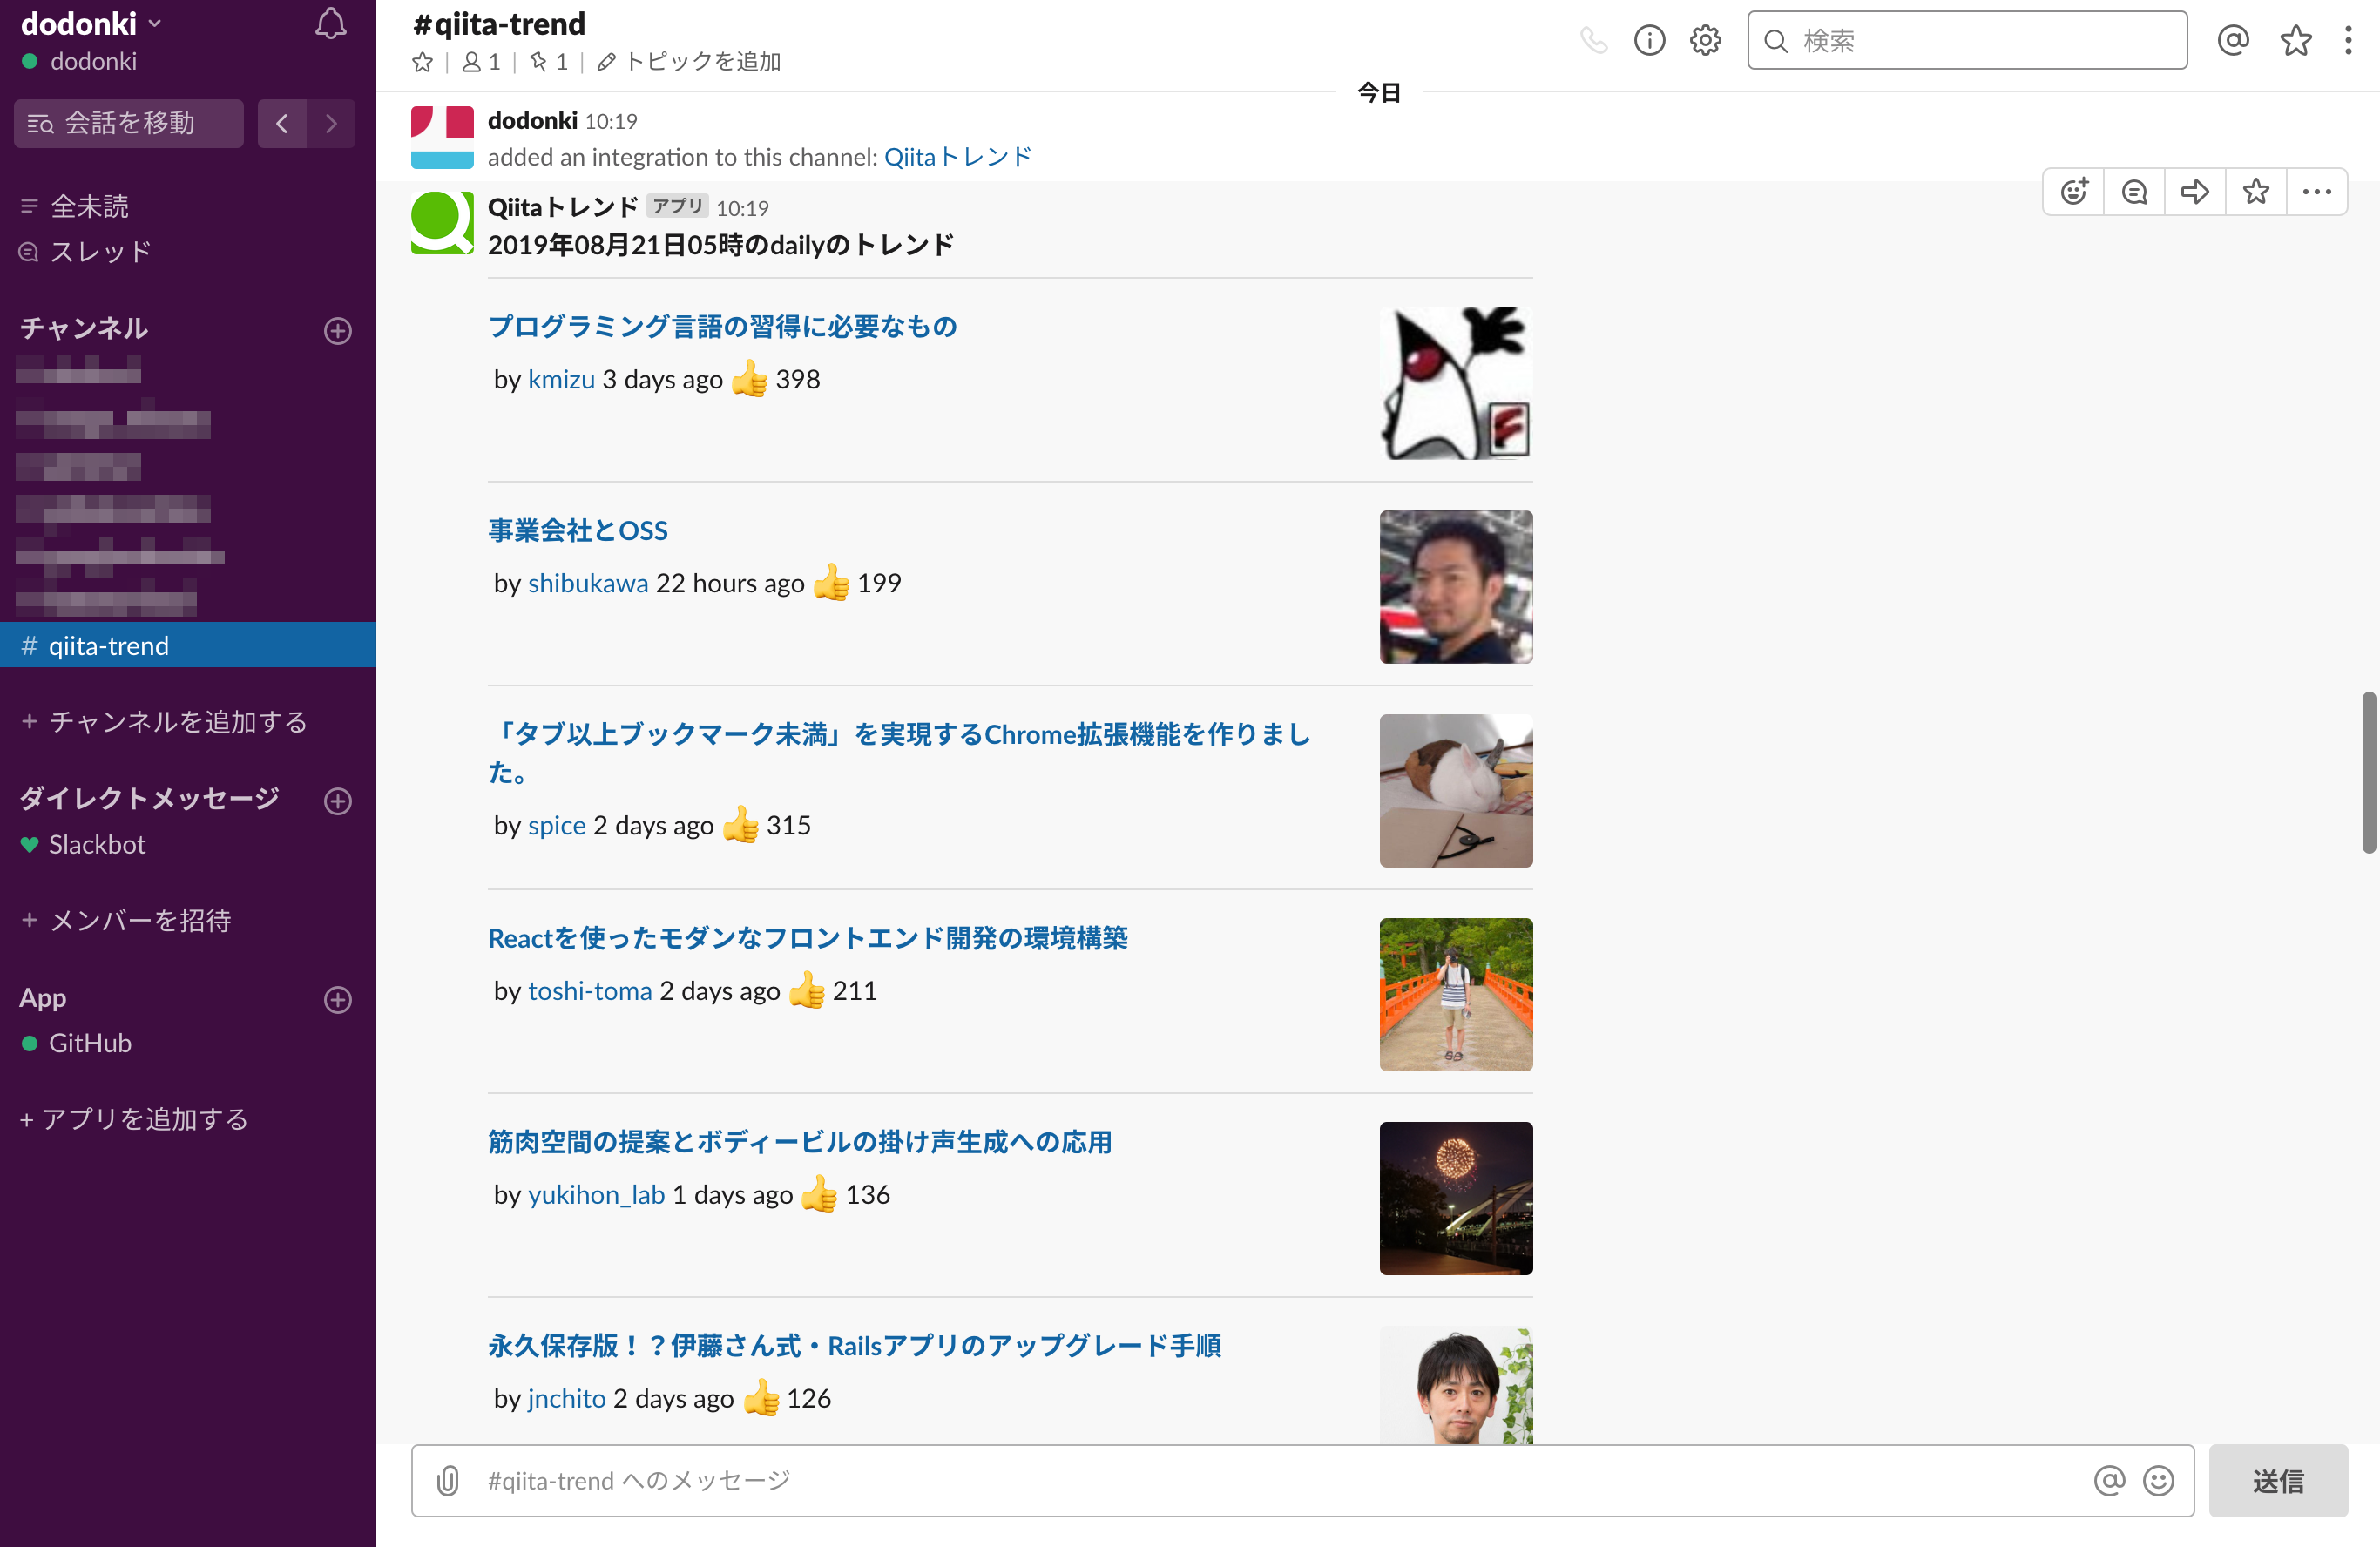
半年以上経った記念としてqiita_trend(Qiitaのトレンドをたったの10秒で取得できるgem)を作成し公開しました。この記事はqiita_trendを作る過程で手に入れた知見をまとめたものになります
qiita_trendのgemを使用してSlackにQiitaのトレンドを通知するスクリプトを作成したのでもし良かったら使ってください
dodonki1223/qiita_trend_slack_notifier: qiita_trendを使用したslack通知スクリプト
gemを一から作成する方法、CI/CD(継続的インティグレーション/継続的デリバリー)を体験することを目的とした記事になります
具体的にはgemを作成しそのgemのブランチのコードに変更があるたび、CircleCIが実行され、RuboCop(静的解析ツール)、RSpec(テスト)が実行されるようになります
masterブランチに限ってはRuboCop(静的解析ツール)、RSpec(テスト)が成功したらRubyGemsに自動デプロイする
また失敗した時はデプロイされない状態を作っていきます
gemを公開する
CircleCIの凄さを確認するためにまずはgemを公開します
gemの公開方法についてはいろいろな方が記事にしています
上記記事も参考にしつつgemを作成していきます
gemの雛形を作成する
前準備
前準備としてgemのアップデート、Bundlerのアップデートを行う
gem自体をアップデートする
$ gem update --system
Latest version already installed. Done.
Bundler自体をインストールする(インストールしていない場合)
$ gem install bundler
Successfully installed bundler-2.0.2
Parsing documentation for bundler-2.0.2
Done installing documentation for bundler after 2 seconds
1 gem installed
Bundlerのアップデート
$ gem update bundler
Updating installed gems
Nothing to update
gemの雛形を作成する
今回はdodonki_sampleというgemを作成していきます。-tオプションはテスト関連のファイルを作成してくれます。
$ bundle gem dodonki_sample -t
Creating gem 'dodonki_sample'...
      create  dodonki_sample/Gemfile
      create  dodonki_sample/lib/dodonki_sample.rb
      create  dodonki_sample/lib/dodonki_sample/version.rb
      create  dodonki_sample/dodonki_sample.gemspec
      create  dodonki_sample/Rakefile
      create  dodonki_sample/README.md
      create  dodonki_sample/bin/console
      create  dodonki_sample/bin/setup
      create  dodonki_sample/.gitignore
      create  dodonki_sample/.travis.yml
      create  dodonki_sample/.rspec
      create  dodonki_sample/spec/spec_helper.rb
      create  dodonki_sample/spec/dodonki_sample_spec.rb
Initializing git repo in /Users/dodonki/Project/dodonki_sample
Gem 'dodonki_sample' was successfully created. For more information on making a RubyGem visit https://bundler.io/guides/creating_gem.html
-tオプションを指定しないで実行した場合は下記の結果になります
 bundle gem dodonki_sample
Creating gem 'dodonki_sample'...
      create  dodonki_sample/Gemfile
      create  dodonki_sample/lib/dodonki_sample.rb
      create  dodonki_sample/lib/dodonki_sample/version.rb
      create  dodonki_sample/dodonki_sample.gemspec
      create  dodonki_sample/Rakefile
      create  dodonki_sample/README.md
      create  dodonki_sample/bin/console
      create  dodonki_sample/bin/setup
      create  dodonki_sample/.gitignore
Initializing git repo in /Users/dodonki/Project/dodonki_sample
Gem 'dodonki_sample' was successfully created. For more information on making a RubyGem visit https://bundler.io/guides/creating_gem.html
今回はRSpecを実行してテストを自動化するので-tオプションを付けてください
作成されるファイルについて
詳しくはBundlerのドキュメントを確認してください
gem名について
gem名は既存のgemとかぶらないようにRubyGemsとgem searchコマンドを使用して確認しましょう
RubyGemsにて検索
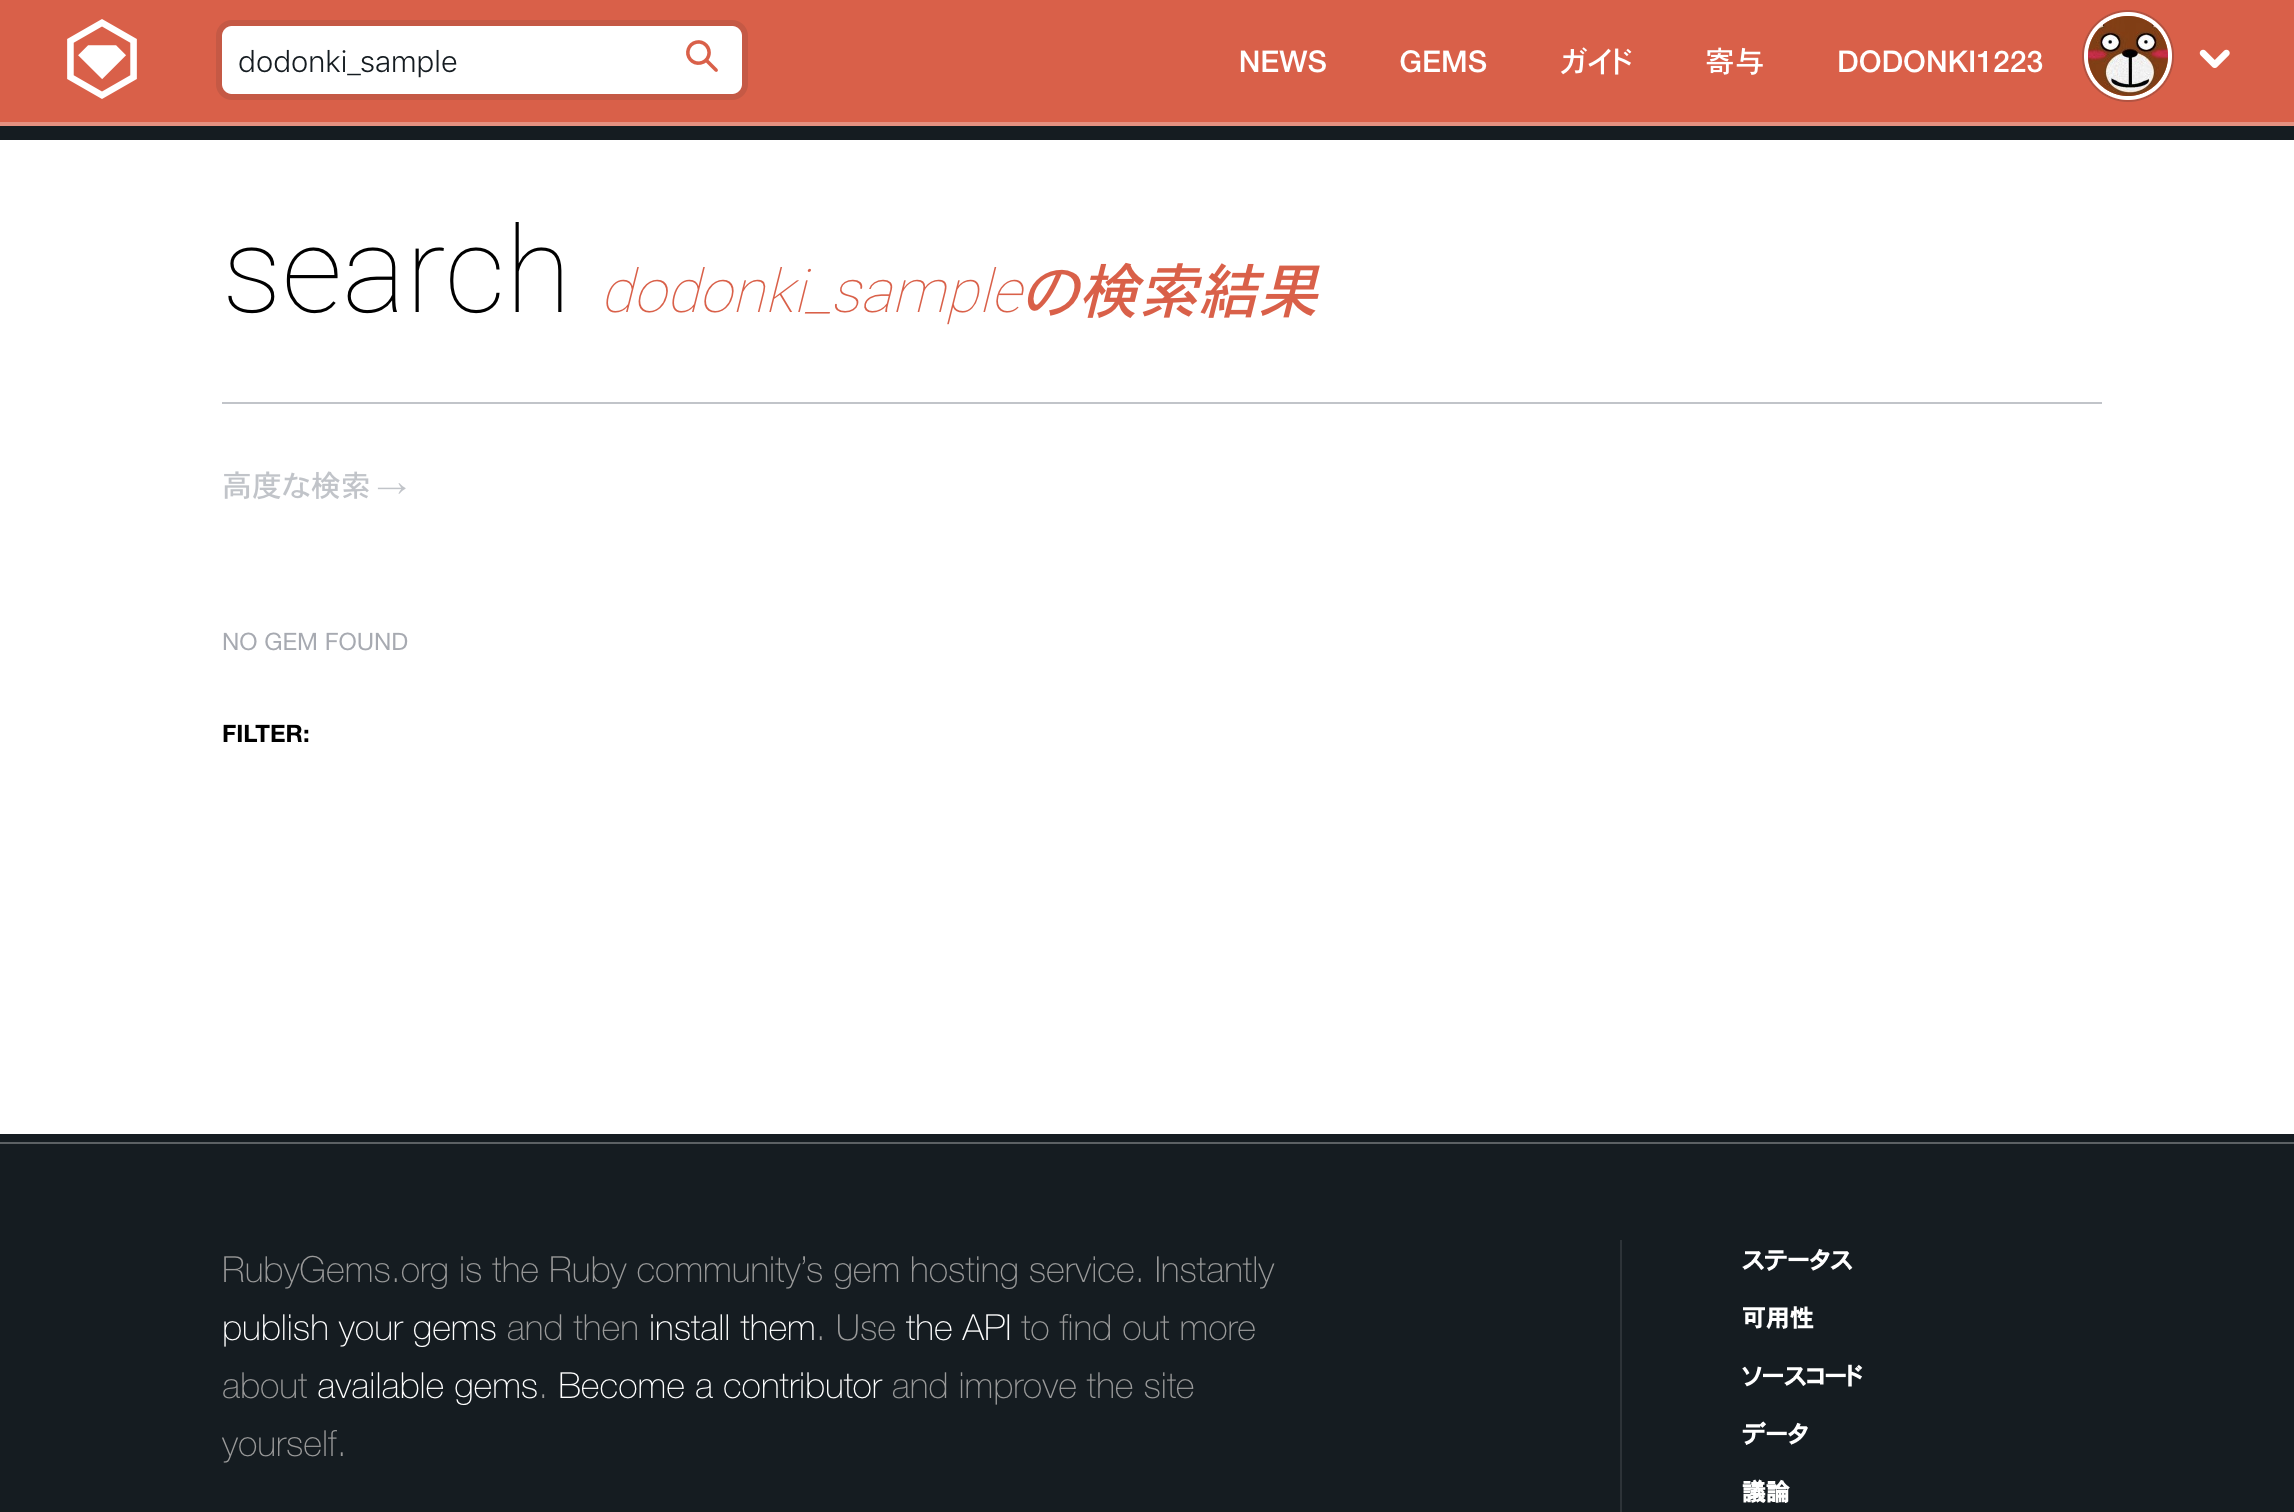
gem searchコマンド検索
$ gem search dodonki_sample

*** REMOTE GEMS ***
【Ruby】gemの作り方から公開までの記事のgemの名付けにおける注意1を参考にさせていただきました
gem名で使用する-(ハイフン)と_(アンダーバー)の違い
-(ハイフン)で作成した場合
$ bundle gem dodonki-sample -t
Creating gem 'dodonki-sample'...
      create  dodonki-sample/Gemfile
      create  dodonki-sample/lib/dodonki/sample.rb
      create  dodonki-sample/lib/dodonki/sample/version.rb
      create  dodonki-sample/dodonki-sample.gemspec
      create  dodonki-sample/Rakefile
      create  dodonki-sample/README.md
      create  dodonki-sample/bin/console
      create  dodonki-sample/bin/setup
      create  dodonki-sample/.gitignore
      create  dodonki-sample/.travis.yml
      create  dodonki-sample/.rspec
      create  dodonki-sample/spec/spec_helper.rb
      create  dodonki-sample/spec/dodonki/sample_spec.rb
Initializing git repo in /Users/dodonki/Project/dodonki-sample
Gem 'dodonki-sample' was successfully created. For more information on making a RubyGem visit https://bundler.io/guides/creating_gem.html
_(アンダーバー)で作成した場合
$ bundle gem dodonki_sample -t
Creating gem 'dodonki_sample'...
      create  dodonki_sample/Gemfile
      create  dodonki_sample/lib/dodonki_sample.rb
      create  dodonki_sample/lib/dodonki_sample/version.rb
      create  dodonki_sample/dodonki_sample.gemspec
      create  dodonki_sample/Rakefile
      create  dodonki_sample/README.md
      create  dodonki_sample/bin/console
      create  dodonki_sample/bin/setup
      create  dodonki_sample/.gitignore
      create  dodonki_sample/.travis.yml
      create  dodonki_sample/.rspec
      create  dodonki_sample/spec/spec_helper.rb
      create  dodonki_sample/spec/dodonki_sample_spec.rb
Initializing git repo in /Users/dodonki/Project/dodonki_sample
Gem 'dodonki_sample' was successfully created. For more information on making a RubyGem visit https://bundler.io/guides/creating_gem.html
作成されるディレクトリ構造が違うことに気づくでしょう
これはrequireでgemを呼び出す時の呼び出し方法が変わることを意味しています
RubyGemsのドキュメントよりgem名とrequiereの関係とクラスとモジュールの関係については以下のようになるようです
| GEM NAME | REQUIRE STATEMENT | MAIN CLASS OR MODULE |
|---|---|---|
| ruby_parser | require 'ruby_parser' | RubyParser |
| rdoc-data | require 'rdoc/data' | RDoc::Data |
| net-http-persistent | require 'net/http/persistent' | Net::HTTP::Persistent |
| net-http-persistent | require 'net/http/persistent' | Net::HTTP::Persistent |
【Ruby】gemの作り方から公開までの記事のgemの名付けにおける注意2を参考にさせていただきました
.gemspecファイルの変更
ディレクトリ直下にあるgem名.gemspecファイルを編集します。基本的にはTODOと書かれている箇所の修正を行います。今回は詳しいことはあまり説明しません。
修正前ソース
lib = File.expand_path("lib", __dir__)
$LOAD_PATH.unshift(lib) unless $LOAD_PATH.include?(lib)
require "dodonki_sample/version"

Gem::Specification.new do |spec|
  spec.name          = "dodonki_sample"
  spec.version       = DodonkiSample::VERSION
  spec.authors       = ["dodonki1223"]
  spec.email         = ["自分のemailが設定されています"]

  spec.summary       = %q{TODO: Write a short summary, because RubyGems requires one.}
  spec.description   = %q{TODO: Write a longer description or delete this line.}
  spec.homepage      = "TODO: Put your gem's website or public repo URL here."

  spec.metadata["allowed_push_host"] = "TODO: Set to 'http://mygemserver.com'"

  spec.metadata["homepage_uri"] = spec.homepage
  spec.metadata["source_code_uri"] = "TODO: Put your gem's public repo URL here."
  spec.metadata["changelog_uri"] = "TODO: Put your gem's CHANGELOG.md URL here."

  # Specify which files should be added to the gem when it is released.
  # The `git ls-files -z` loads the files in the RubyGem that have been added into git.
  spec.files         = Dir.chdir(File.expand_path('..', __FILE__)) do
    `git ls-files -z`.split("\x0").reject { |f| f.match(%r{^(test|spec|features)/}) }
  end
  spec.bindir        = "exe"
  spec.executables   = spec.files.grep(%r{^exe/}) { |f| File.basename(f) }
  spec.require_paths = ["lib"]

  spec.add_development_dependency "bundler", "~> 2.0"
  spec.add_development_dependency "rake", "~> 10.0"
  spec.add_development_dependency "rspec", "~> 3.0"
end
gemの説明情報をセット
僕の作成したqiita_trendの場合は下記のようになっています
  spec.summary       = 'Easy to get trend for Qiita in 10 seconds'
  spec.description   = 'Easy to get trend for Qiita in 10 seconds'
  spec.homepage      = 'https://github.com/dodonki1223/qiita_trend'
必要のない箇所をコメントアウト
下記のTODOの部分はコメントアウトします。gemの追加情報なのでコメントアウトしてしまっても問題ありません
詳しくは公式ドキュメントを確認してください
  # spec.metadata["allowed_push_host"] = "TODO: Set to 'http://mygemserver.com'"

  # spec.metadata["homepage_uri"] = spec.homepage
  # spec.metadata["source_code_uri"] = "TODO: Put your gem's public repo URL here."
  # spec.metadata["changelog_uri"] = "TODO: Put your gem's CHANGELOG.md URL here."
ライセンス情報をセット
spec.homepageの下にライセンス情報を追加します。
MITライセンスについてはこちらを確認ください
spec.license = 'MIT'
gem内で使用するgemを追加する
追加形式は下記のようになっています
# プログラム内で使用するgemの場合は
spec.add_dependency 'gem名'

# 開発時に使用するgemの場合
spec.add_development_dependency 'gem名'
今回はCircleCIでCIの凄さを試すために下記gemを追加します
-
RSpec JUnit Formatter(JUnit形式でテスト結果を出力してくれるツール)
- CircleCIでテストを実行する時に必要なため(CircleCIのドキュメントにかかれています)
- RuboCop(静的解析ツール)
- SimpleCov(テストカバレッジ確認ツール)
- YARD(ドキュメント自動生成ツール)
  spec.add_development_dependency 'rspec_junit_formatter'
  spec.add_development_dependency 'rubocop', '~> 0.62'
  spec.add_development_dependency 'rubocop-rspec'
  spec.add_development_dependency 'simplecov'
  spec.add_development_dependency 'yard'
.gemspecファイルの修正結果
lib = File.expand_path("lib", __dir__)
$LOAD_PATH.unshift(lib) unless $LOAD_PATH.include?(lib)
require "dodonki_sample/version"

Gem::Specification.new do |spec|
  spec.name          = "dodonki_sample"
  spec.version       = DodonkiSample::VERSION
  spec.authors       = ["dodonki1223"]
  spec.email         = ["自分のemailが設定されています"]

  spec.summary       = 'dodonki sample gem file'
  spec.description   = 'dodonki sample gem file'
  spec.homepage      = 'https://github.com/dodonki1223/dodonki_sample'
  spec.license       = 'MIT'

  # spec.metadata["allowed_push_host"] = "TODO: Set to 'http://mygemserver.com'"

  # spec.metadata["homepage_uri"] = spec.homepage
  # spec.metadata["source_code_uri"] = "TODO: Put your gem's public repo URL here."
  # spec.metadata["changelog_uri"] = "TODO: Put your gem's CHANGELOG.md URL here."

  # Specify which files should be added to the gem when it is released.
  # The `git ls-files -z` loads the files in the RubyGem that have been added into git.
  spec.files         = Dir.chdir(File.expand_path('..', __FILE__)) do
    `git ls-files -z`.split("\x0").reject { |f| f.match(%r{^(test|spec|features)/}) }
  end
  spec.bindir        = "exe"
  spec.executables   = spec.files.grep(%r{^exe/}) { |f| File.basename(f) }
  spec.require_paths = ["lib"]

  spec.add_development_dependency "bundler", "~> 2.0"
  spec.add_development_dependency "rake", "~> 10.0"
  spec.add_development_dependency "rspec", "~> 3.0"
  spec.add_development_dependency 'rspec_junit_formatter'
  spec.add_development_dependency 'rubocop', '~> 0.62'
  spec.add_development_dependency 'rubocop-rspec'
  spec.add_development_dependency 'simplecov'
  spec.add_development_dependency 'yard'
end
.gemspecファイルの設定項目について
公式のドキュメントに詳しく書かれているので参照すること
gemをインストールする
$ bundle install --path vendor/bundle
.gitignoreにvendorディレクトリを除外する設定を追加(/vendor/の記述を追加)
/.bundle/
/.yardoc
/_yardoc/
/coverage/
/doc/
/pkg/
/spec/reports/
/tmp/
/vendor/

# rspec failure tracking
.rspec_status

/cache/
/spec/vcr/
MITのライセンスファイルを追加する
下記コマンドを実行してLICENSE.txtファイルを作成してください
$ touch LICENSE.txt
MIT Licenseの原文をコピーし作成したLICENSE.txtに貼り付けて<YEAR>、<COPYRIGHT HOLDER>をいい感じに変更してください
「Hello World」を出力するプログラムを作成する
lib/dodonki_sample.rbの修正
lib/dodonki_sample.rbのファイルを編集します
修正前ソース
require "dodonki_sample/version"

module DodonkiSample
  class Error < StandardError; end
  # Your code goes here...
end
修正後ソース
require "dodonki_sample/version"

module DodonkiSample
  def self.test
    'Hello World'
  end
end
動作確認
bin/consoleコマンドを実行するとirbが立ち上がるのでDodonkiSample.testを実行しHello Worldが表示されればOKです
$ bin/console
irb(main):001:0> DodonkiSample.test
=> "Hello World"
Githubにpushする
$ git add .

$ git commit -m 'first commit'

# リモートリポジトリの設定を追加する
# 「https://github.com/dodonki1223/dodonki_sample.git」ここは適宜変更してください
$ git remote add origin https://github.com/dodonki1223/dodonki_sample.git

$ git push -u origin master
RubyGemsに登録しデプロイする
RubyGemsにアカウントを作成する
- 新規登録ページにアクセスしアカウントを作成してください
Gemコマンドを使うための設定
プロフィール編集画面にアクセスし下記コマンドをローカルで実行してください
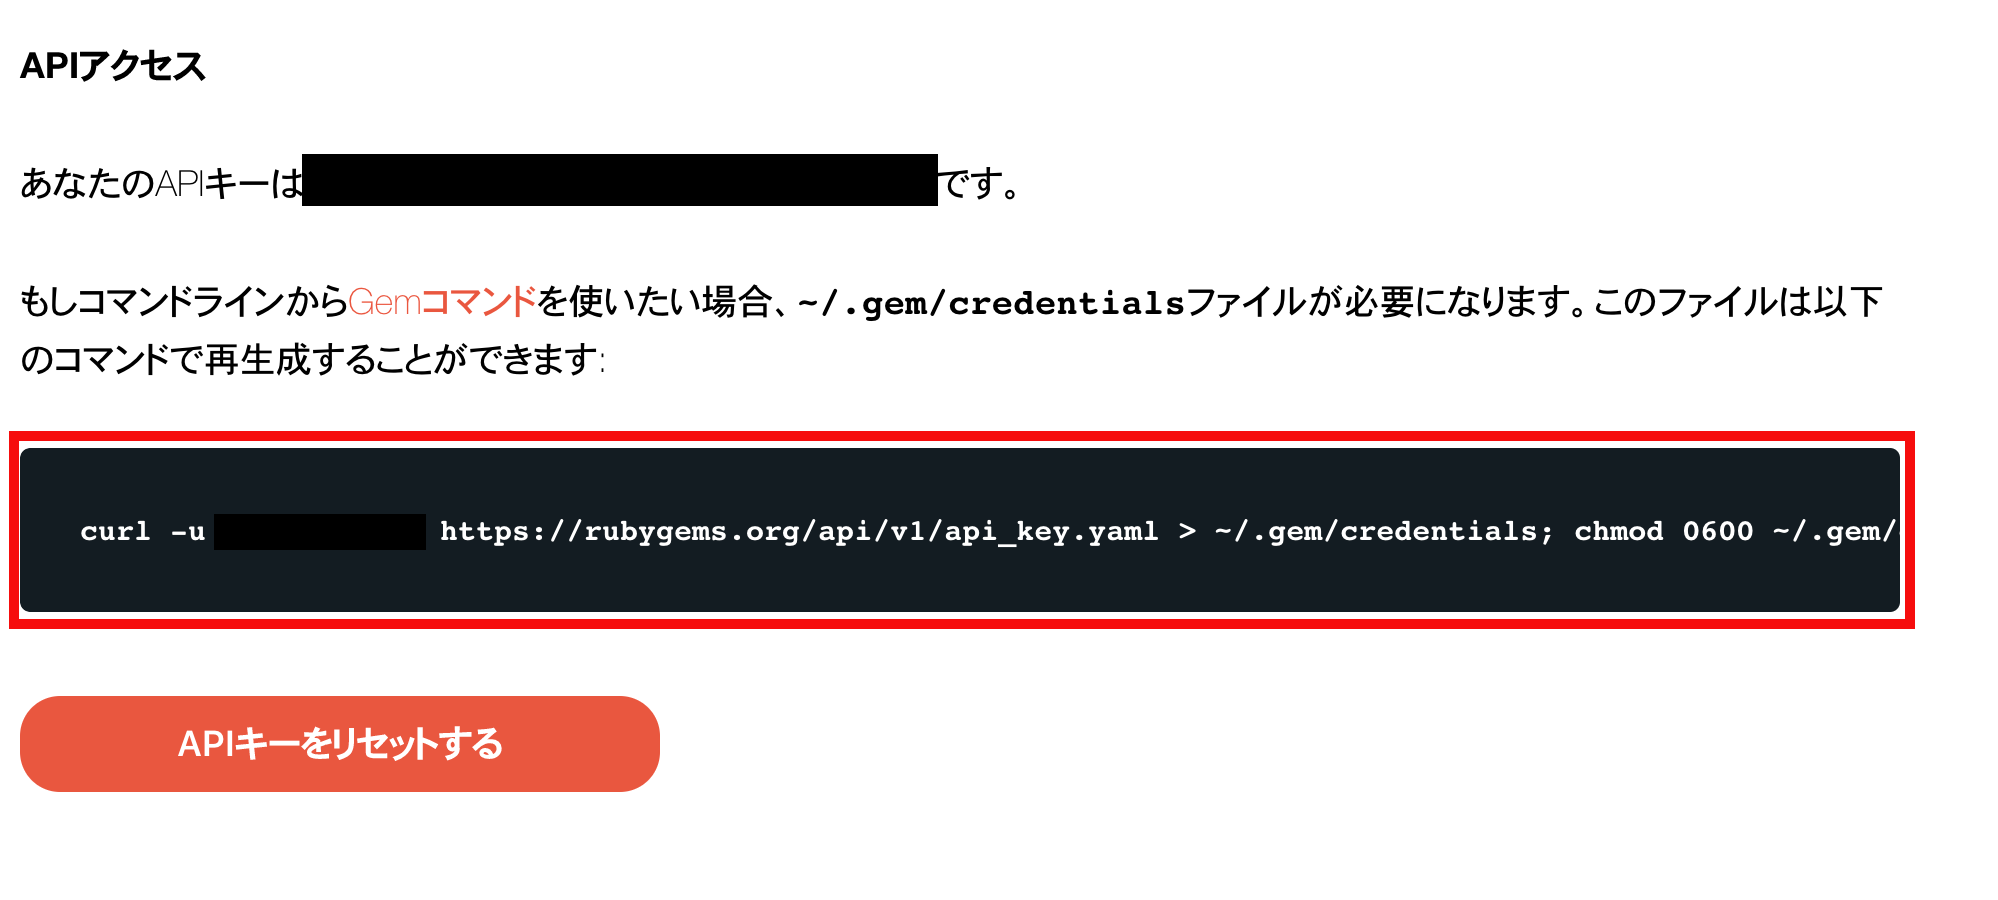
$ curl -u user_name https://rubygems.org/api/v1/api_key.yaml > ~/.gem/credentials; chmod 0600 ~/.gem/credentials
この作業はなくても良いかも知れません……
RubyGemsにデプロイする
Bundlerを使ってビルドとデプロイを行います
gemをビルド
フォルダ直下のpkgフォルダの中に作成されます
$ bundle exec rake build
dodonki_sample 0.1.1 built to pkg/dodonki_sample-0.1.1.gem.
gemのデプロイ
$ bundle exec rake release
dodonki_sample 0.1.1 built to pkg/dodonki_sample-0.1.1.gem.
Tagged v0.1.1.
Pushed git commits and tags.
Pushing gem to https://rubygems.org...
Successfully registered gem: dodonki_sample (0.1.1)
Pushed dodonki_sample 0.1.1 to rubygems.org
エラーがでる場合
変更ファイルがある場合に下記のようなエラーが出ます
$ bundle exec rake release
dodonki_sample 0.1.1 built to pkg/dodonki_sample-0.1.1.gem.
rake aborted!
There are files that need to be committed first.
/Users/dodonki/.anyenv/envs/rbenv/versions/2.6.2/bin/bundle:23:in `load'
/Users/dodonki/.anyenv/envs/rbenv/versions/2.6.2/bin/bundle:23:in `<main>'
Tasks: TOP => release => release:guard_clean
(See full trace by running task with --trace)
git statusで確認できる変更ファイルがあるのでcommitしてpushしてからもう一度デプロイ作業をしましょう
version.rbファイルのバージョンを上げた時bundle installし忘れてよくこのエラーが出ました……
その他のビルド方法
Gemコマンドを使用してビルドする方法もあります
gemのビルド
bundle exec rake buildとの違いはフォルダ直下に出来上がることです
$ gem build gem_name.gemspec
ビルドについて
The best way to build a gem is to use a Rakefile and the Gem::PackageTask which ships with RubyGems.
と書かれています。
bundle exec rake buildはRakefileでGem::PackageTaskを使用しているのでbundle exec rake buildを使うのが良さそうです
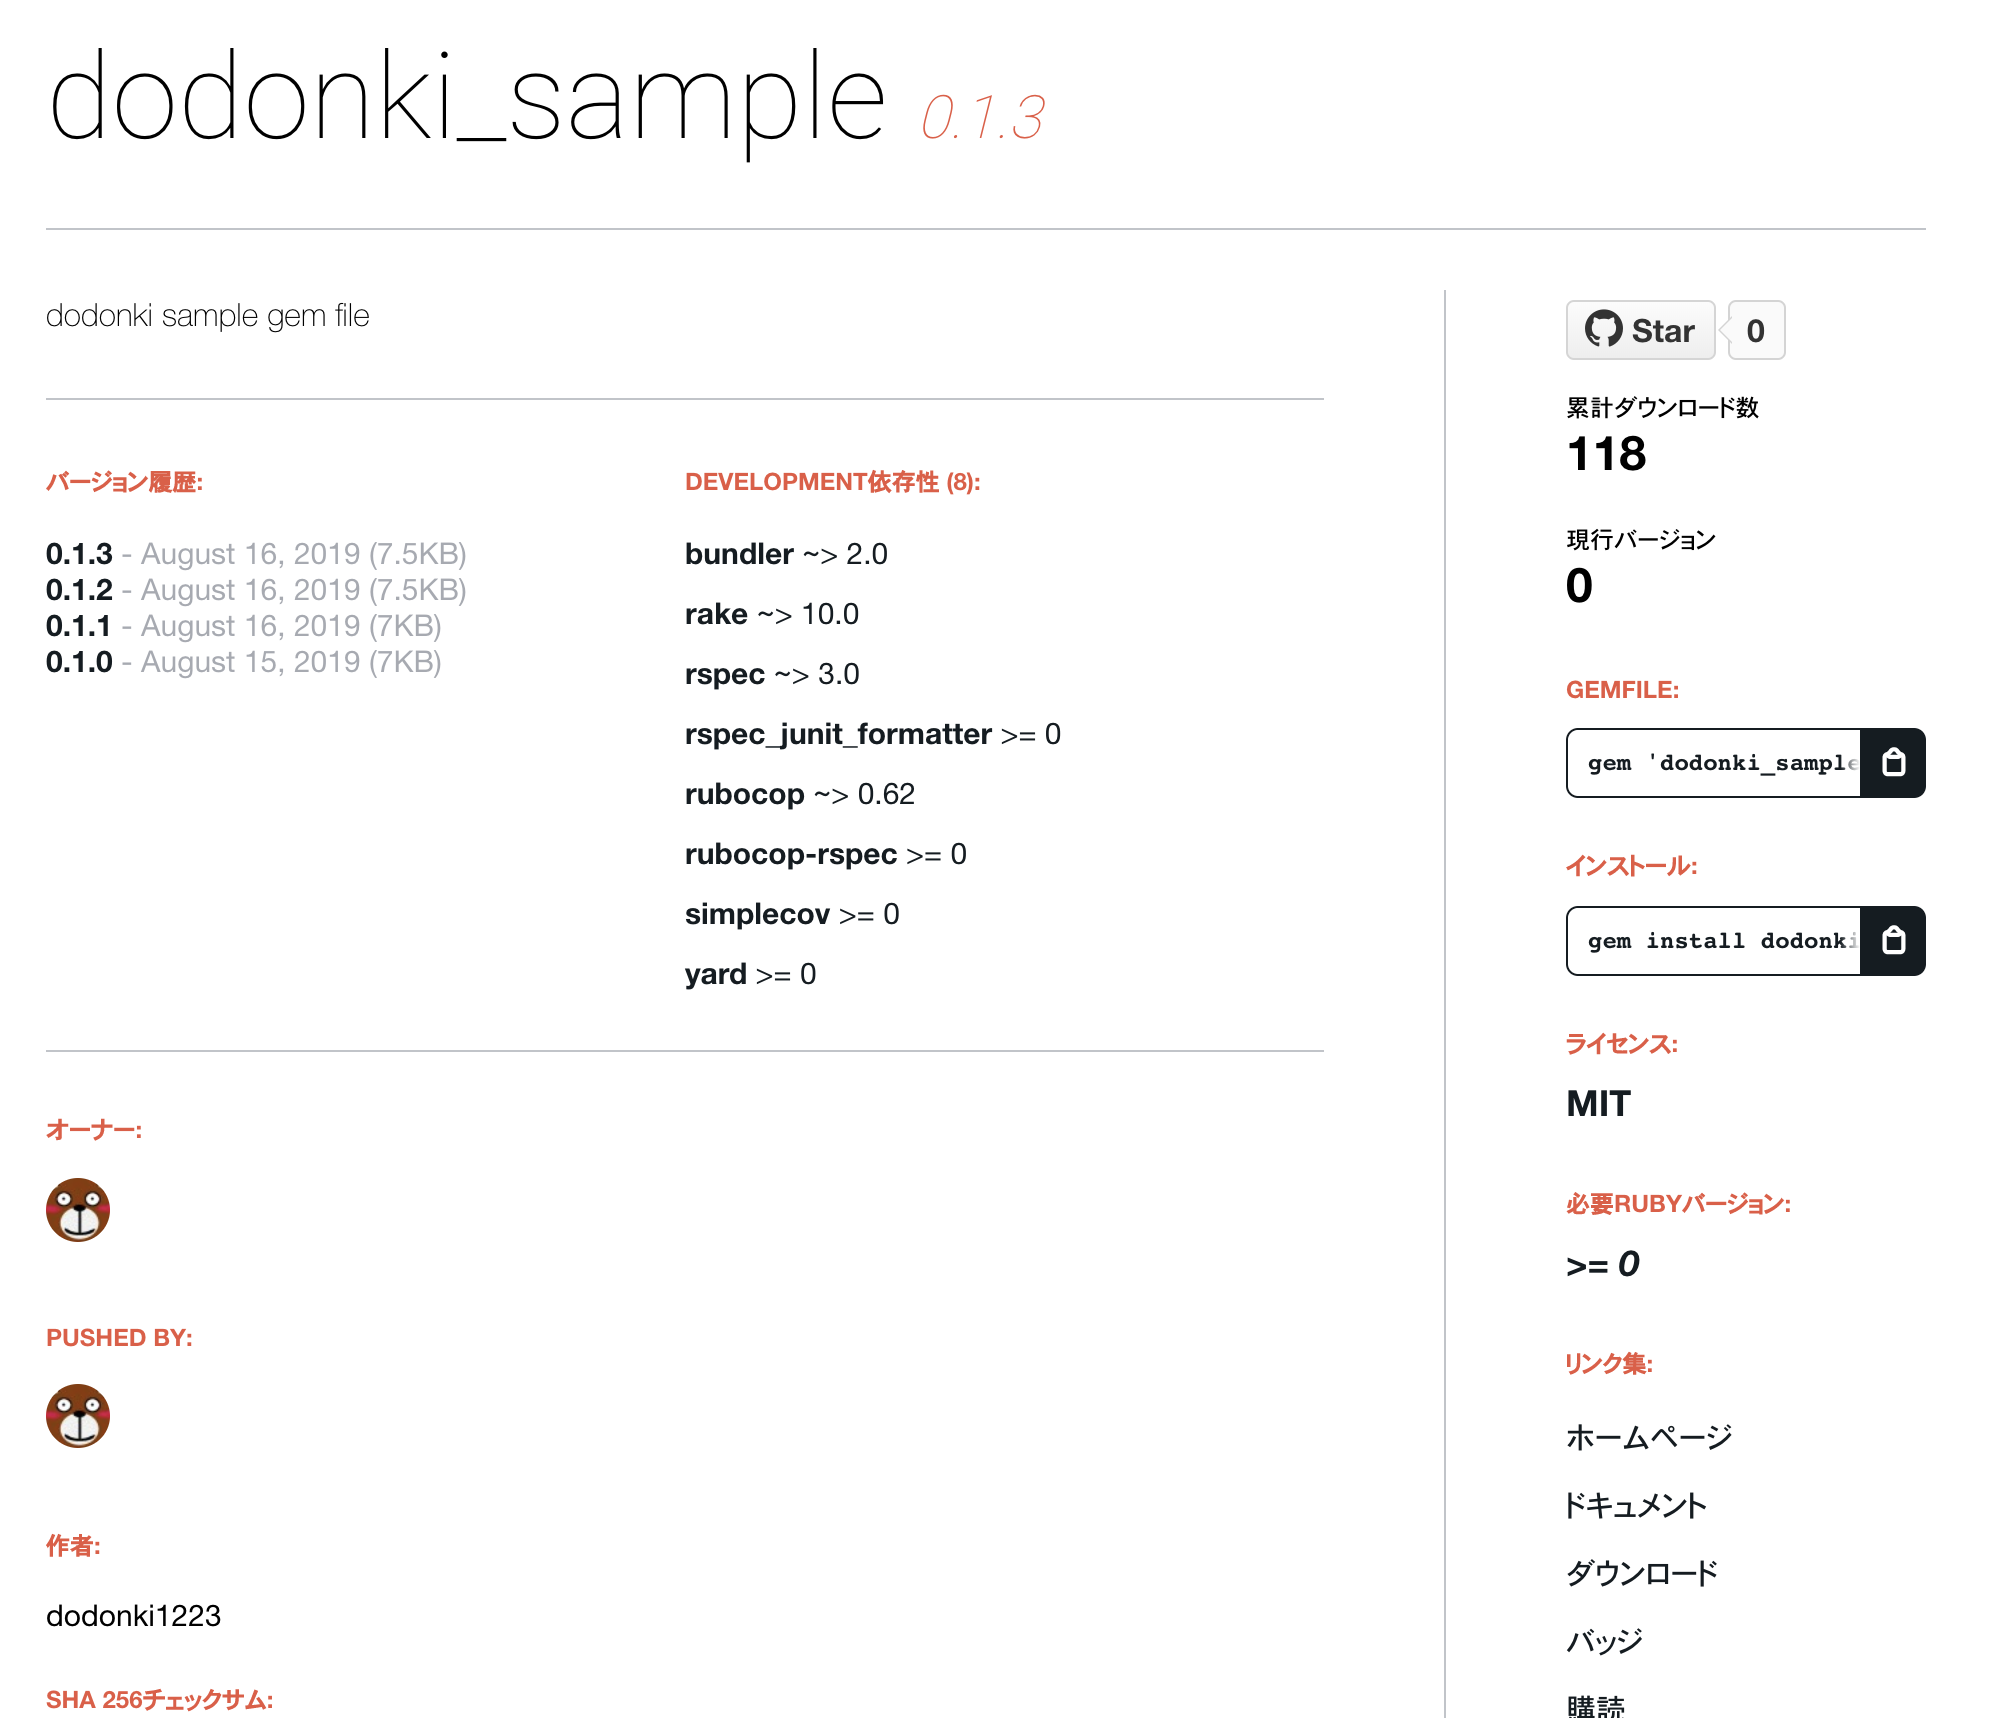
デプロイ完了
こんな感じで表示されていればgemの公開完了です!!
CircleCIを導入しテストを自動化(CI/継続的インティグレーション)する
基本的にはCircleCIのドキュメント通りに導入していきます
CircleCIのconfig.ymlファイルを作成する
ディレクトリ直下に.circleci/config.ymlを作成します
$ mkdir .circleci
$ touch .circleci/config.yml
Rubyプロジェクト用のCircleCIを設定する
公式ドキュメントのRubyプロジェクトのサンプル設定を作成したconfig.ymlに貼り付けます
version: 2 # use CircleCI 2.0
jobs: # a collection of steps
  build: # runs not using Workflows must have a `build` job as entry point
    parallelism: 3 # run three instances of this job in parallel
    docker: # run the steps with Docker
      - image: circleci/ruby:2.4.2-jessie-node # ...with this image as the primary container; this is where all `steps` will run
        environment: # environment variables for primary container
          BUNDLE_JOBS: 3
          BUNDLE_RETRY: 3
          BUNDLE_PATH: vendor/bundle
          PGHOST: 127.0.0.1
          PGUSER: circleci-demo-ruby
          RAILS_ENV: test
      - image: circleci/postgres:9.5-alpine # database image
        environment: # environment variables for database
          POSTGRES_USER: circleci-demo-ruby
          POSTGRES_DB: rails_blog
          POSTGRES_PASSWORD: ""
    steps: # a collection of executable commands
      - checkout # special step to check out source code to working directory

      # Which version of bundler?
      - run:
          name: Which bundler?
          command: bundle -v

      # Restore bundle cache
      # Read about caching dependencies: https://circleci.com/docs/2.0/caching/
      - restore_cache:
          keys:
            - rails-demo-bundle-v2-{{ checksum "Gemfile.lock" }}
            - rails-demo-bundle-v2-

      - run: # Install Ruby dependencies
          name: Bundle Install
          command: bundle check --path vendor/bundle || bundle install --deployment

      # Store bundle cache for Ruby dependencies
      - save_cache:
          key: rails-demo-bundle-v2-{{ checksum "Gemfile.lock" }}
          paths:
            - vendor/bundle

      # Only necessary if app uses webpacker or yarn in some other way
      - restore_cache:
          keys:
            - rails-demo-yarn-{{ checksum "yarn.lock" }}
            - rails-demo-yarn-

      - run:
          name: Yarn Install
          command: yarn install --cache-folder ~/.cache/yarn

      # Store yarn / webpacker cache
      - save_cache:
          key: rails-demo-yarn-{{ checksum "yarn.lock" }}
          paths:
            - ~/.cache/yarn

      - run:
          name: Wait for DB
          command: dockerize -wait tcp://localhost:5432 -timeout 1m

      - run:
          name: Database setup
          command: bin/rails db:schema:load --trace

      - run:
          name: Run rspec in parallel
          command: |
            bundle exec rspec --profile 10 \
                              --format RspecJunitFormatter \
                              --out test_results/rspec.xml \
                              --format progress \
                              $(circleci tests glob "spec/**/*_spec.rb" | circleci tests split --split-by=timings)

      # Save test results for timing analysis
      - store_test_results: # Upload test results for display in Test Summary: https://circleci.com/docs/2.0/collect-test-data/
          path: test_results
      # See https://circleci.com/docs/2.0/deployment-integrations/ for example deploy configs
ローカル環境でCircleCIを実行する
CircleCIはローカルでも実行することができます。いくつかのインストール方法がありますが今回は簡単にインストールできるHomebrewを使ってインストールします
他のインストール方法は公式ドキュメントに書かれているので確認してください。下記、記事でも別のインストール方法を行って実施しています
$ brew install circleci
インストールが終わったら早速、実行してみましょう
$ circleci build
Docker image digest: sha256:b26ca9419c2baff5af2c92ab9dc93d91c8d7343ae2a32375d9d6c2f105c92e5a
====>> Spin up Environment
Build-agent version 1.0.13832-2ab6edfd (2019-08-16T10:37:19+0000)
Docker Engine Version: 19.03.1
Kernel Version: Linux c52c55bd6b64 4.9.184-linuxkit #1 SMP Tue Jul 2 22:58:16 UTC 2019 x86_64 Linux
Starting container circleci/ruby:2.4.2-jessie-node
  using image circleci/ruby@sha256:61e67a20f4411e80456599db160a0df736f70d539e372d06f2e24ccc90366703
Starting container circleci/postgres:9.5-alpine
  using image circleci/postgres@sha256:762188fcc7d0e00179c18479db6b604c9939c81082d7d057dfaf37d18ee1908e
====>> Container circleci/postgres:9.5-alpine
Service containers logs streaming is disabled for local builds
You can manually monitor container 956455e71253772001459050ad93da34d190b76dfbcc620cc306062a7bbb6bbb
====>> Checkout code
  #!/bin/bash -eo pipefail
mkdir -p /home/circleci/project && cd /tmp/_circleci_local_build_repo && git ls-files | tar -T - -c | tar -x -C /home/circleci/project && cp -a /tmp/_circleci_local_build_repo/.git /home/circleci/project
====>> Which bundler?
  #!/bin/bash -eo pipefail
bundle -v
Bundler version 1.16.0
====>> Restoring Cache
Error:
Skipping cache - error checking storage: not supported

Step failed
====>> Bundle Install
  #!/bin/bash -eo pipefail
bundle check --path vendor/bundle || bundle install --deployment
You must use Bundler 2 or greater with this lockfile.
You must use Bundler 2 or greater with this lockfile.
Error: Exited with code 20
Step failed
====>> Uploading test results
Error: Unable to save test results from /home/circleci/project/test_results
Error stat /home/circleci/project/test_results: no such file or directory

Error: Found no path with test results, skipping
Error: runner failed (exited with 101)
Task failed
Error: task failed
おそらくエラーになったでしょう。
このサンプルがRailsプロジェクトのものなので今回のgemで実行した場合はエラーになってしまいます。それでは修正していきましょう
Railsプロジェクトで使用しているものを削除する
必要のない環境変数の設定を削除する
          PGHOST: 127.0.0.1
          PGUSER: circleci-demo-ruby
          RAILS_ENV: test
DBの設定を削除する
      - image: circleci/postgres:9.5-alpine # database image
        environment: # environment variables for database
          POSTGRES_USER: circleci-demo-ruby
          POSTGRES_DB: rails_blog
          POSTGRES_PASSWORD: ""
webpackerの設定を削除する
      # Only necessary if app uses webpacker or yarn in some other way
      - restore_cache:
          keys:
            - rails-demo-yarn-{{ checksum "yarn.lock" }}
            - rails-demo-yarn-

      - run:
          name: Yarn Install
          command: yarn install --cache-folder ~/.cache/yarn

      # Store yarn / webpacker cache
      - save_cache:
          key: rails-demo-yarn-{{ checksum "yarn.lock" }}
          paths:
            - ~/.cache/yarn
DBのセットアップ系の設定を削除する
      - run:
          name: Wait for DB
          command: dockerize -wait tcp://localhost:5432 -timeout 1m

      - run:
          name: Database setup
          command: bin/rails db:schema:load --trace
この状態で実行してもBundlerでエラーが出るため今度はBundlerのエラーを修正していきます
bundle check --path vendor/bundle || bundle install --deployment
You must use Bundler 2 or greater with this lockfile.
You must use Bundler 2 or greater with this lockfile.
Error: Exited with code 20
Step failed
Bundlerのエラーを解消する
こちらの記事を参考にBundlerのインストール処理を追加します
- checkoutの後にBundlerのインストール処理を追加します
Gemfile.lockから使用しているBundlerのバージョンからインストールするようにする
      - run:
          name: install Bundler
          command: |
            echo 'export BUNDLER_VERSION=$(cat Gemfile.lock | tail -1 | tr -d " ")' >> $BASH_ENV
            source $BASH_ENV
            gem install bundler
RSpecで出ているエラーを解消する
デフォルトで追加されているRSpecのテストで落ちている部分をコメントアウトします
====>> Run rspec in parallel
  #!/bin/bash -eo pipefail
bundle exec rspec --profile 10 \
                  --format RspecJunitFormatter \
                  --out test_results/rspec.xml \
                  --format progress \
                  $(circleci tests glob "spec/**/*_spec.rb" | circleci tests split --split-by=timings)

Requested historical based timing, but they are not present.  Falling back to name based sorting
.F

Failures:

  1) DodonkiSample does something useful
     Failure/Error: expect(false).to eq(true)

       expected: true
            got: false

       (compared using ==)

       Diff:
       @@ -1,2 +1,2 @@
       -true
       +false

     # ./spec/dodonki_sample_spec.rb:7:in `block (2 levels) in <top (required)>'

Top 2 slowest examples (0.00955 seconds, 84.0% of total time):
  DodonkiSample does something useful
    0.00907 seconds ./spec/dodonki_sample_spec.rb:6
  DodonkiSample has a version number
    0.00047 seconds ./spec/dodonki_sample_spec.rb:2

Finished in 0.01137 seconds (files took 0.08332 seconds to load)
2 examples, 1 failure

Failed examples:

rspec ./spec/dodonki_sample_spec.rb:6 # DodonkiSample does something useful

Error: Exited with code 1
spec/gem名_spec.rbのファイル内の下記部分をコメントアウトしてください
  it "does something useful" do
    expect(false).to eq(true)
  end
その他のエラーについて
ローカル実行の時は使用できない機能なのでこのエラーは無視します
====>> Restoring Cache
Error:
Skipping cache - error checking storage: not supported

Step failed

...

====>> Saving Cache
Error:
Skipping cache - error checking storage: not supported

Step failed

...

====>> Uploading test results
Archiving the following test results
  * /home/circleci/project/test_results

Error: Failed uploading test results directory
Error &errors.errorString{s:"not supported"}
気持ち悪い部分を修正する
- キャッシュファイルのキー名(
rails-demo-bundle-v2-)をいい感じに変更する
修正後のconfig.yml
version: 2 # use CircleCI 2.0
jobs: # a collection of steps
  build: # runs not using Workflows must have a `build` job as entry point
    parallelism: 3 # run three instances of this job in parallel
    docker: # run the steps with Docker
      - image: circleci/ruby:2.4.2-jessie-node # ...with this image as the primary container; this is where all `steps` will run
        environment: # environment variables for primary container
          BUNDLE_JOBS: 3
          BUNDLE_RETRY: 3
          BUNDLE_PATH: vendor/bundle
    steps: # a collection of executable commands
      - checkout # special step to check out source code to working directory

      - run:
          name: install Bundler
          command: |
            echo 'export BUNDLER_VERSION=$(cat Gemfile.lock | tail -1 | tr -d " ")' >> $BASH_ENV
            source $BASH_ENV
            gem install bundler

      # Which version of bundler?
      - run:
          name: Which bundler?
          command: bundle -v

      # Restore bundle cache
      # Read about caching dependencies: https://circleci.com/docs/2.0/caching/
      - restore_cache:
          keys:
            - gem-sample-{{ checksum "Gemfile.lock" }}
            - gem-sample-

      - run: # Install Ruby dependencies
          name: Bundle Install
          command: bundle check --path vendor/bundle || bundle install --deployment

      # Store bundle cache for Ruby dependencies
      - save_cache:
          key: gem-sample-{{ checksum "Gemfile.lock" }}
          paths:
            - vendor/bundle

      - run:
          name: Run rspec in parallel
          command: |
            bundle exec rspec --profile 10 \
                              --format RspecJunitFormatter \
                              --out test_results/rspec.xml \
                              --format progress \
                              $(circleci tests glob "spec/**/*_spec.rb" | circleci tests split --split-by=timings)

      # Save test results for timing analysis
      - store_test_results: # Upload test results for display in Test Summary: https://circleci.com/docs/2.0/collect-test-data/
          path: test_results
      # See https://circleci.com/docs/2.0/deployment-integrations/ for example deploy configs
CircleCIでプロジェクトをセットアップする
CircleCIのアカウントが必要なので作成していない人はSignupページにアクセスしアカウントを作成してください
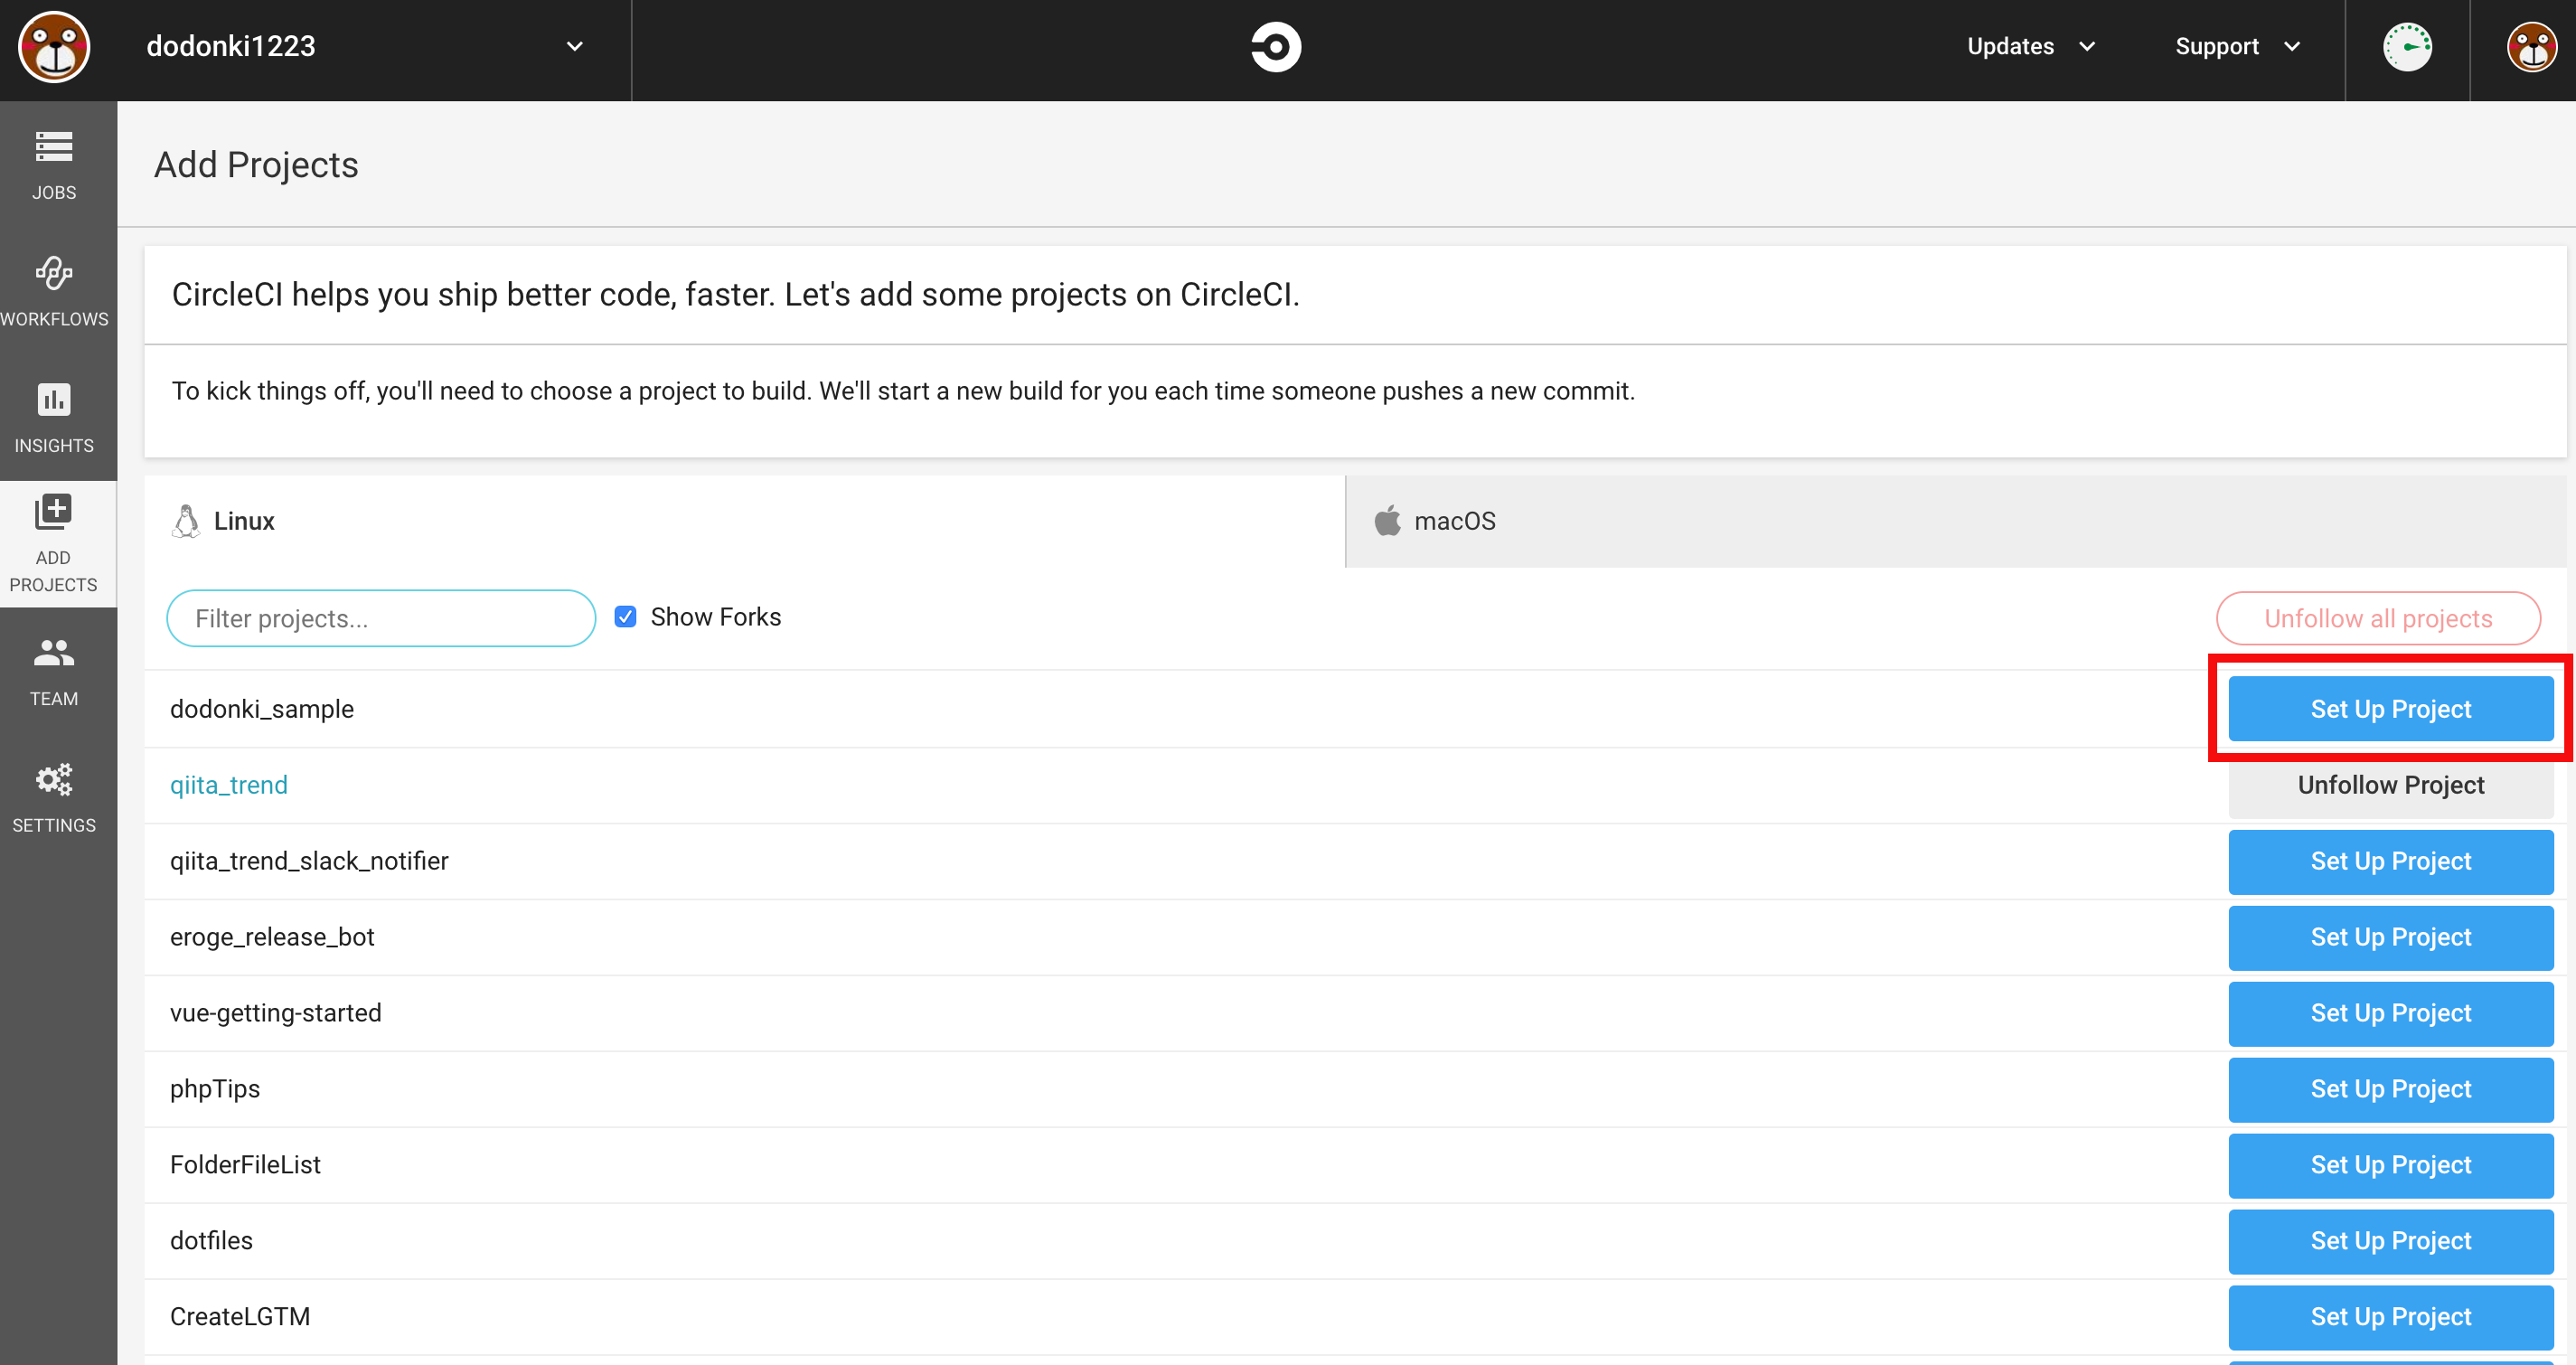
プロジェクトの追加を行う
Add ProjectsページにアクセスしSet Up Projectをクリックします
Start buildingをクリックします
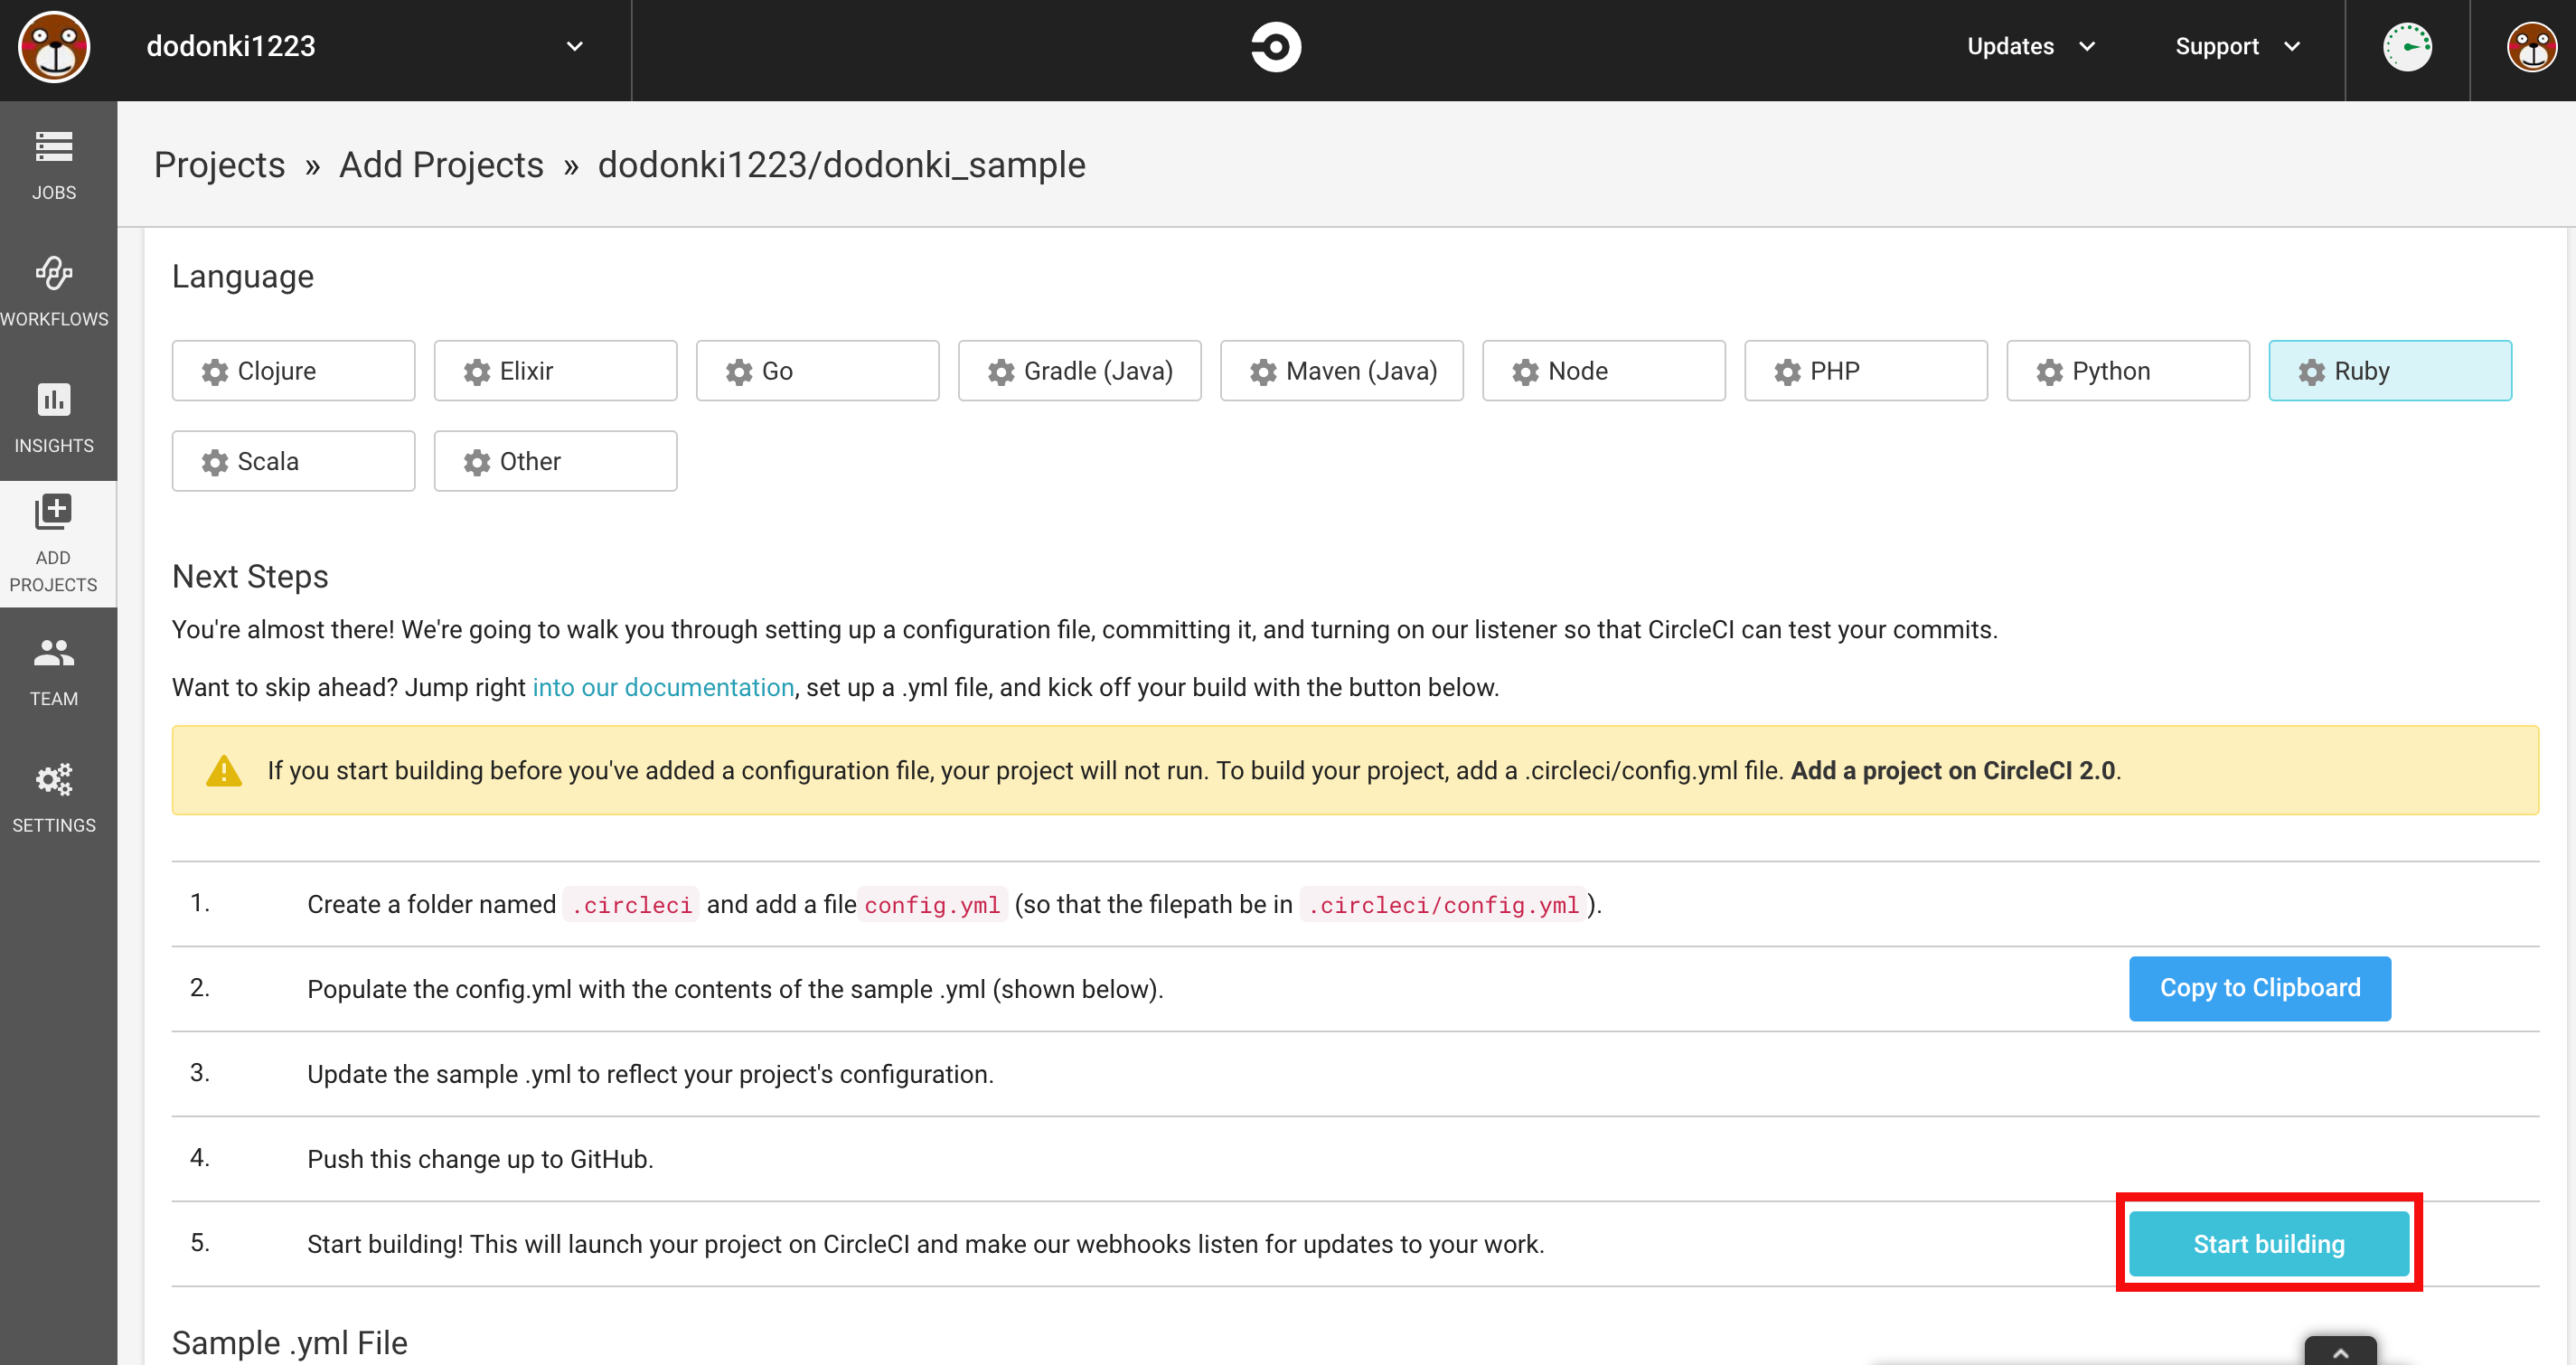
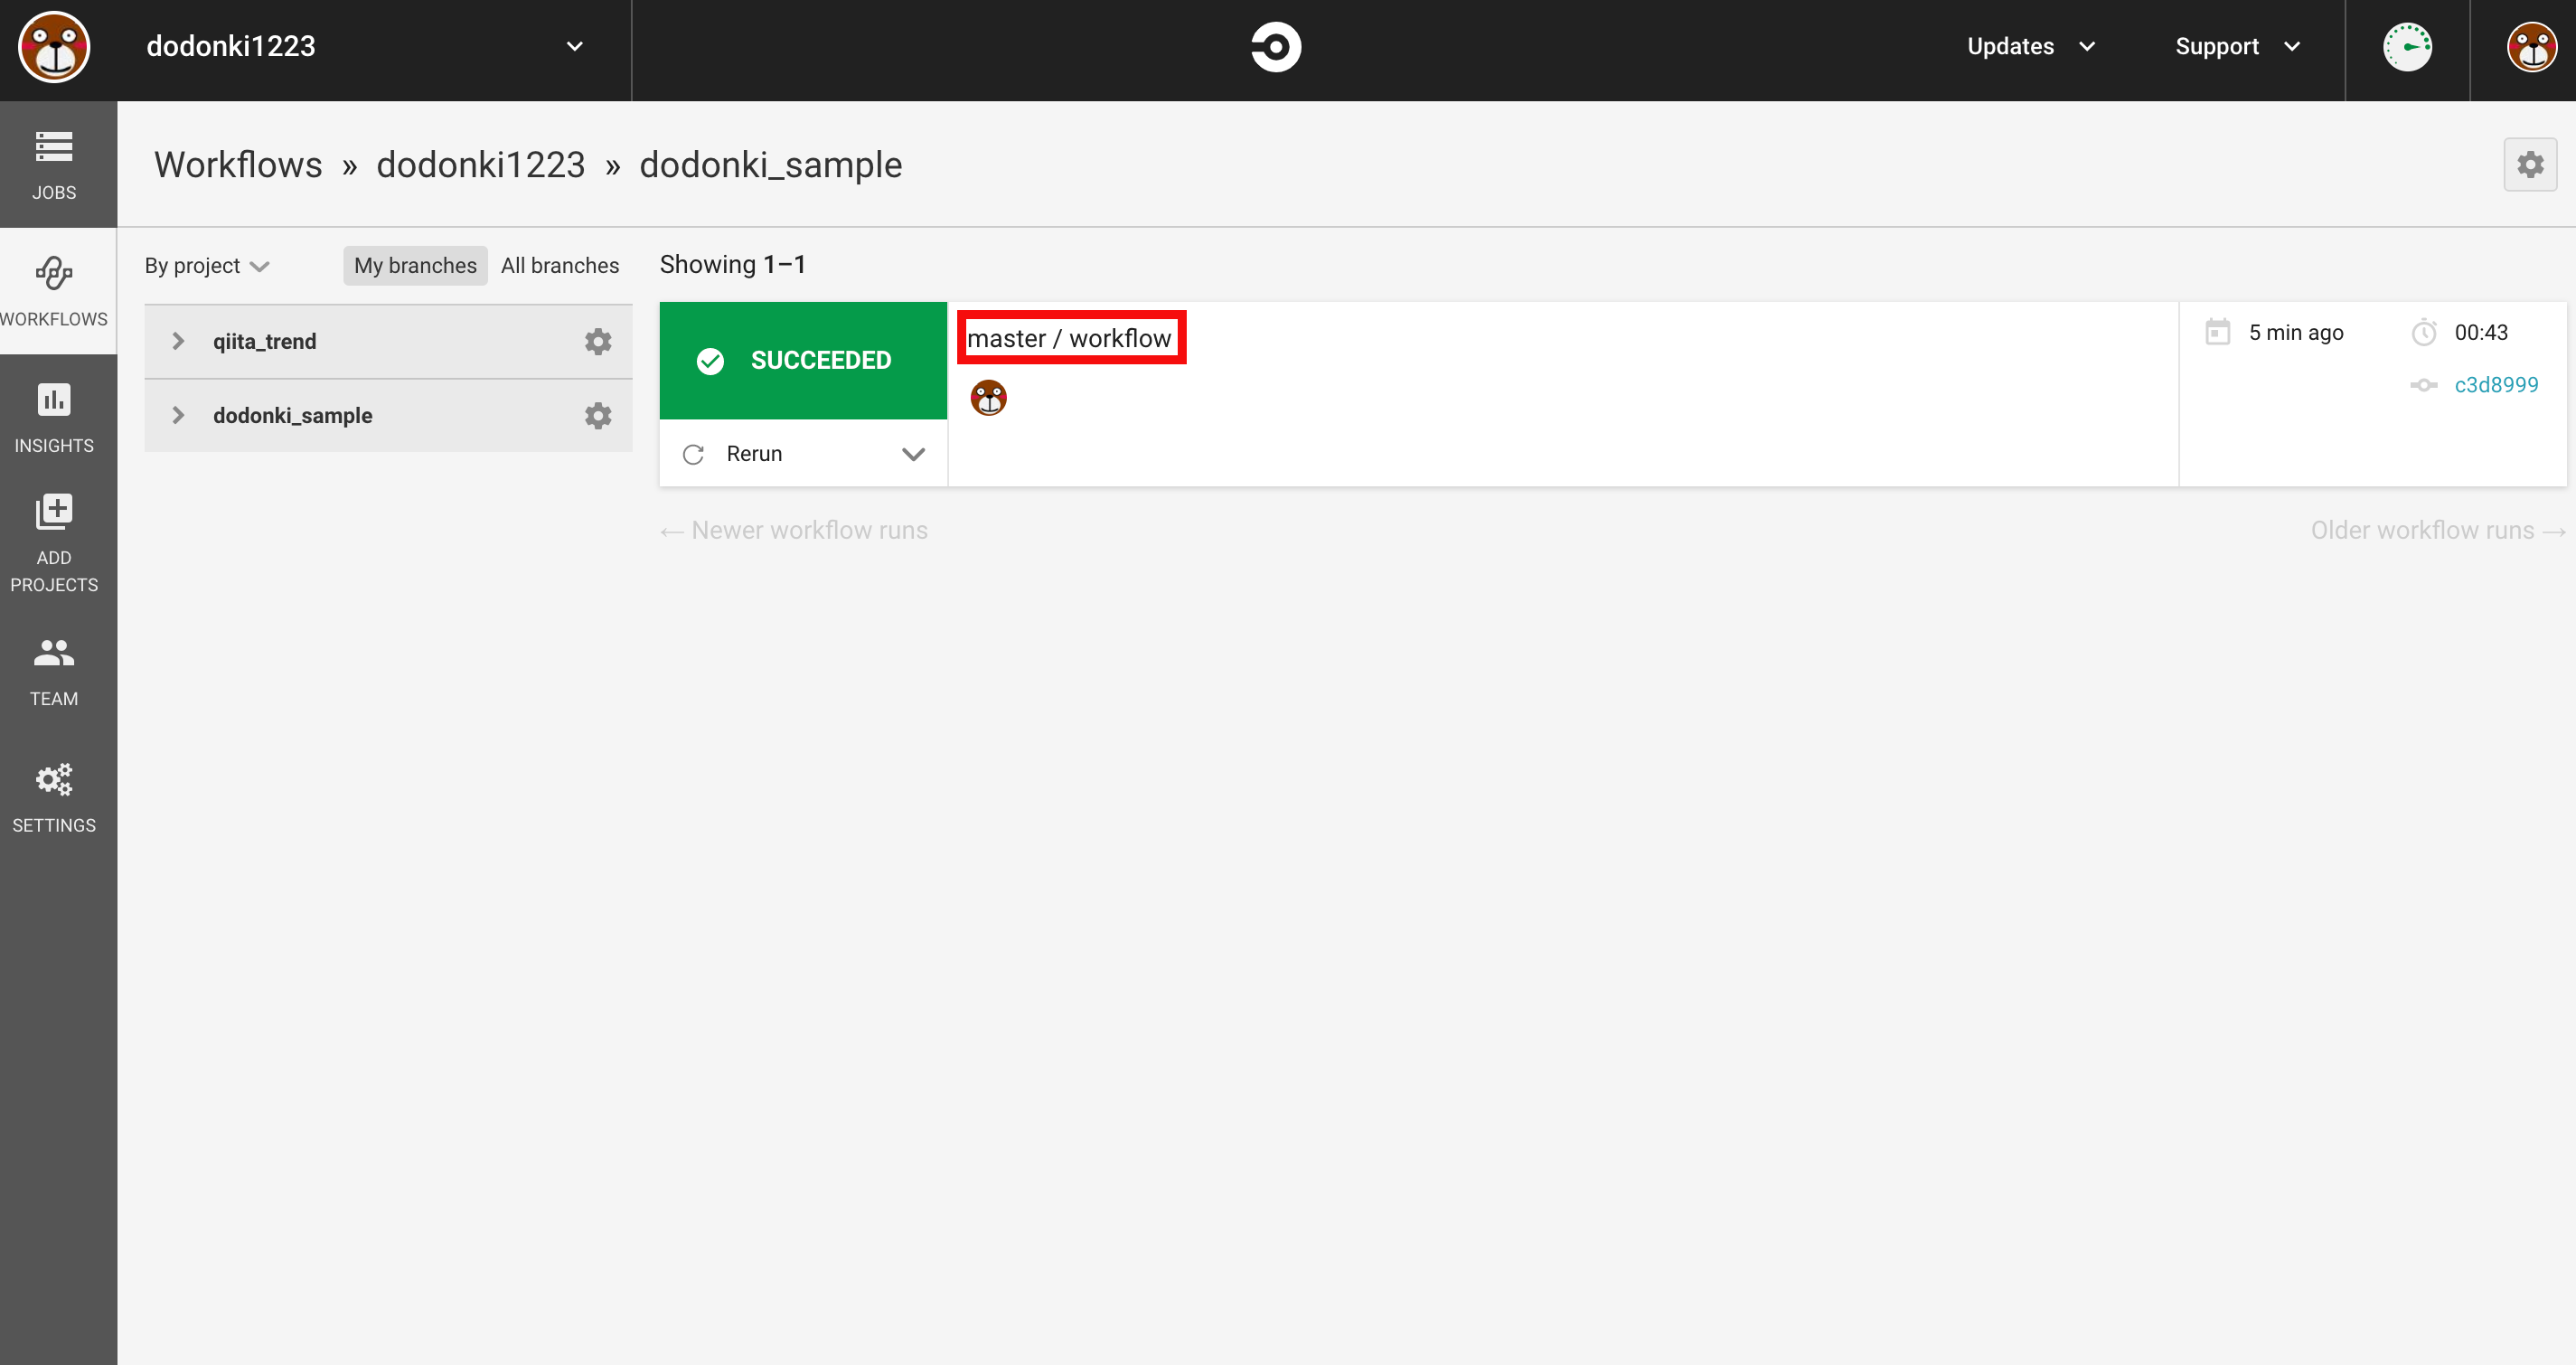
結果を確認する
Start buildingをクリックすることで初めてCircleCIが実行されます
master / workflowをクリックします
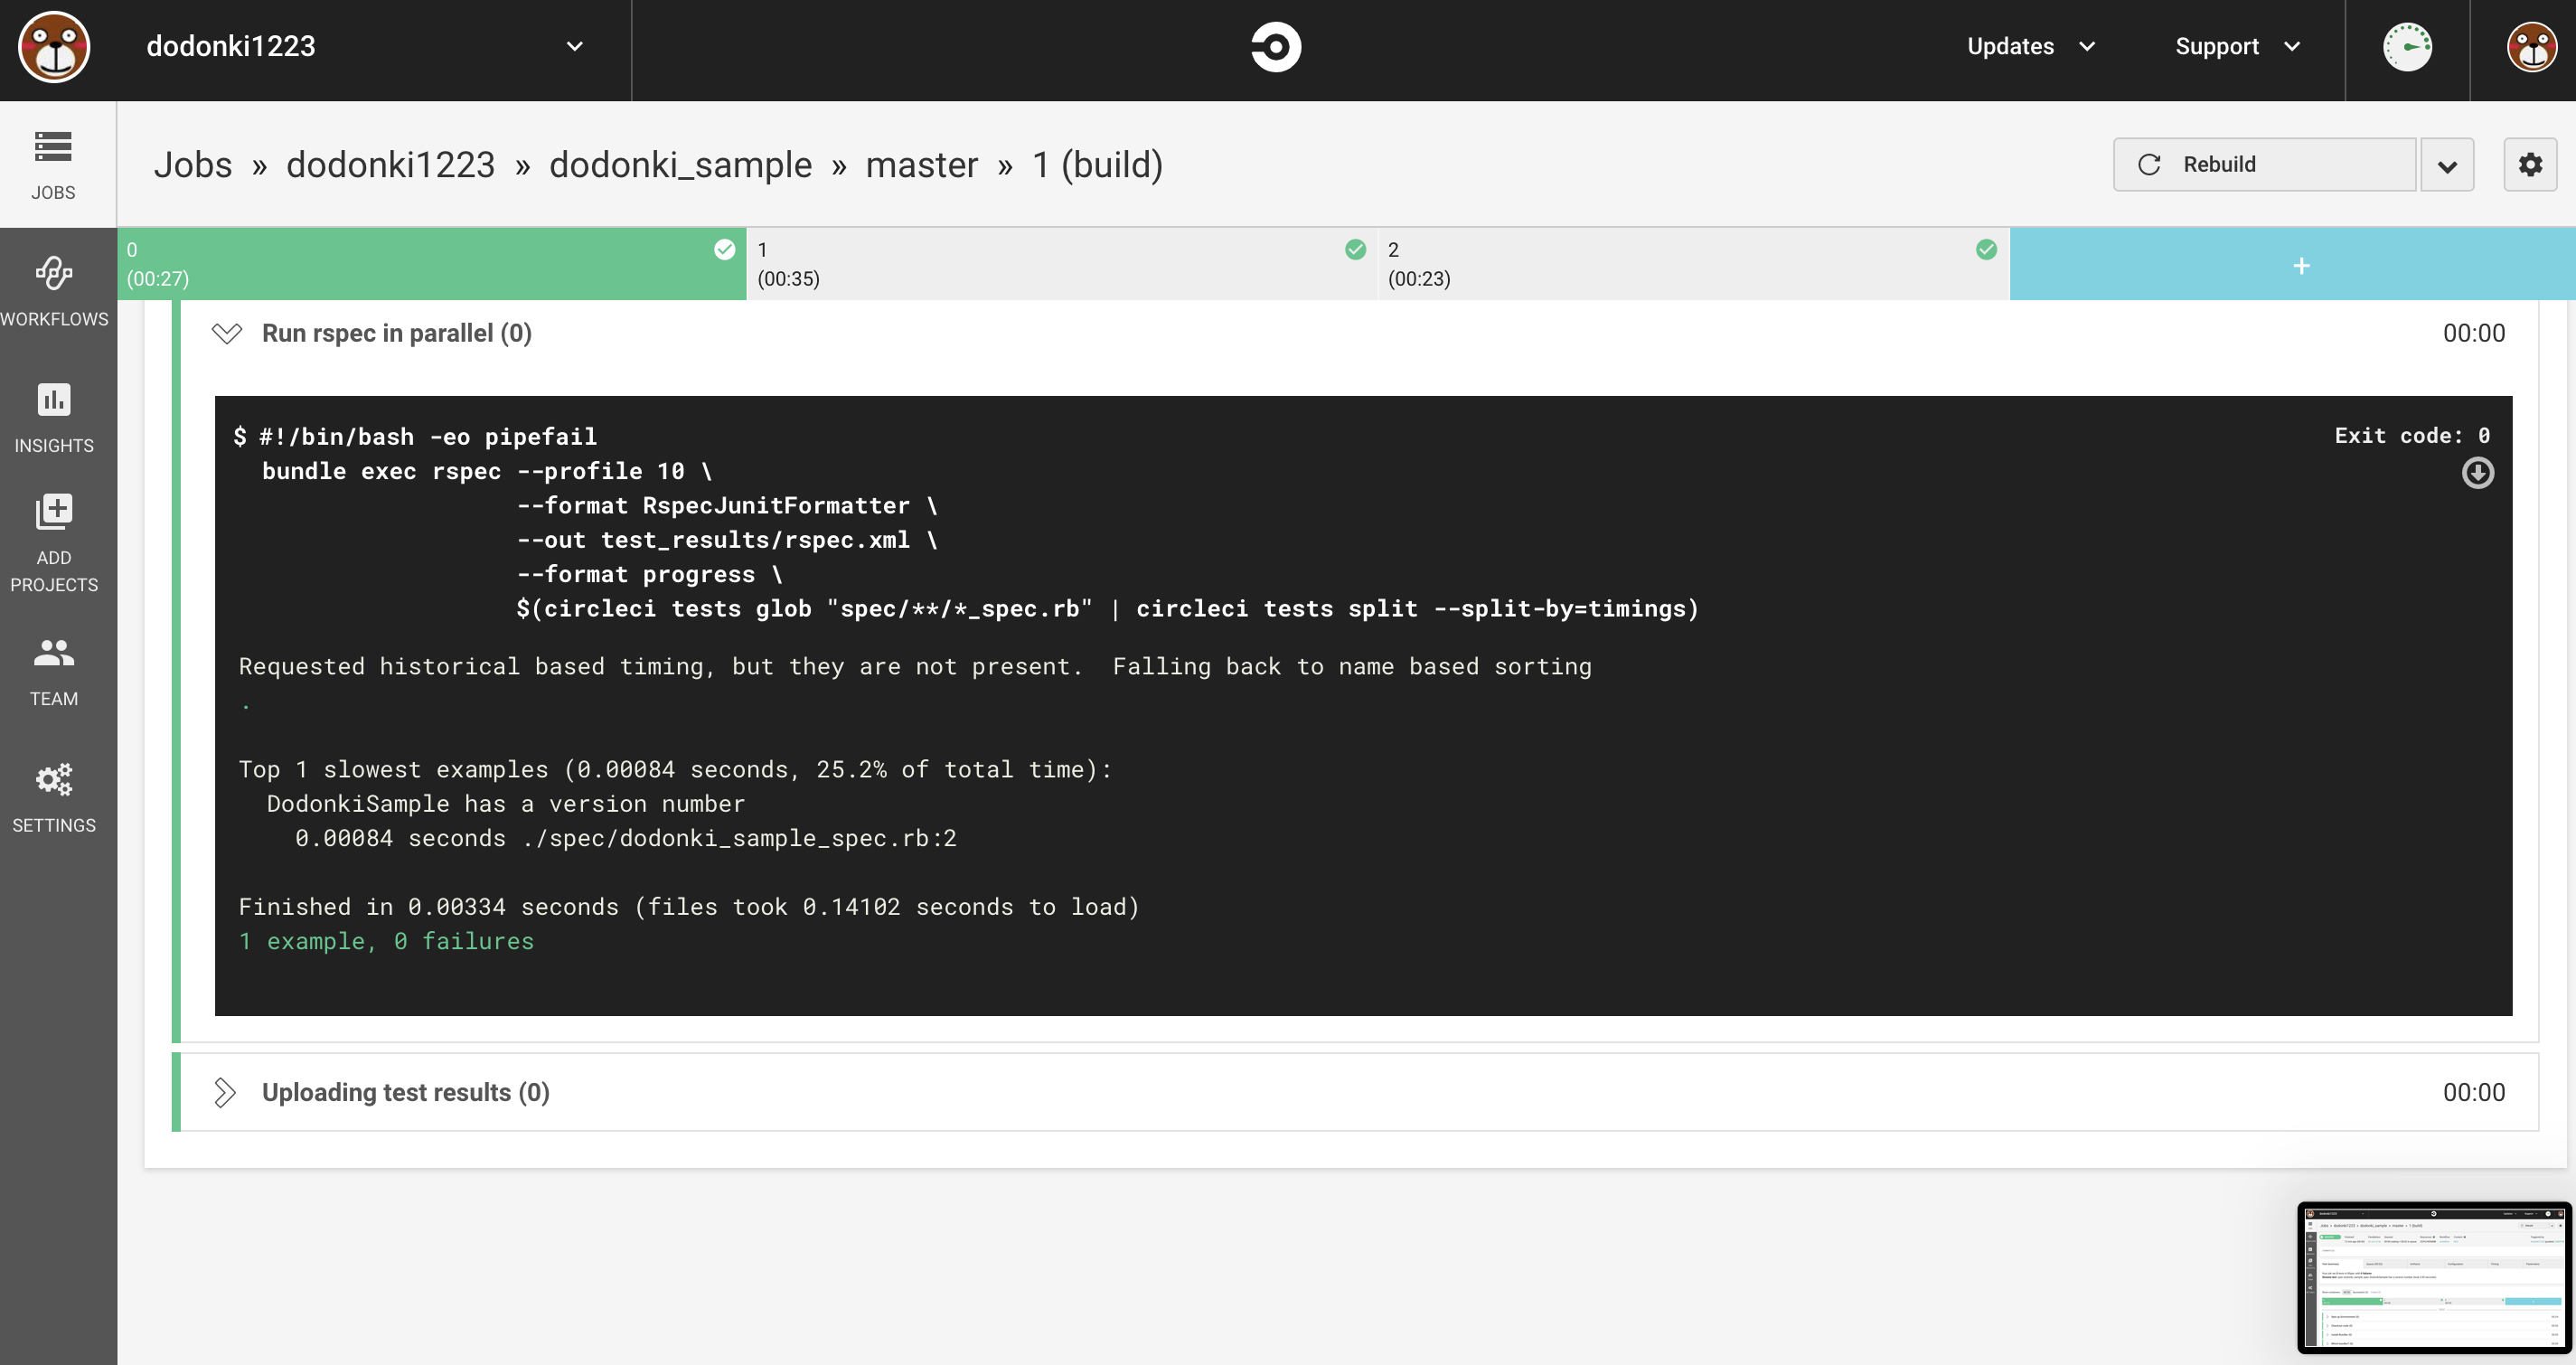
buildをクリックすることでCircleCIの実行結果を確認することができます
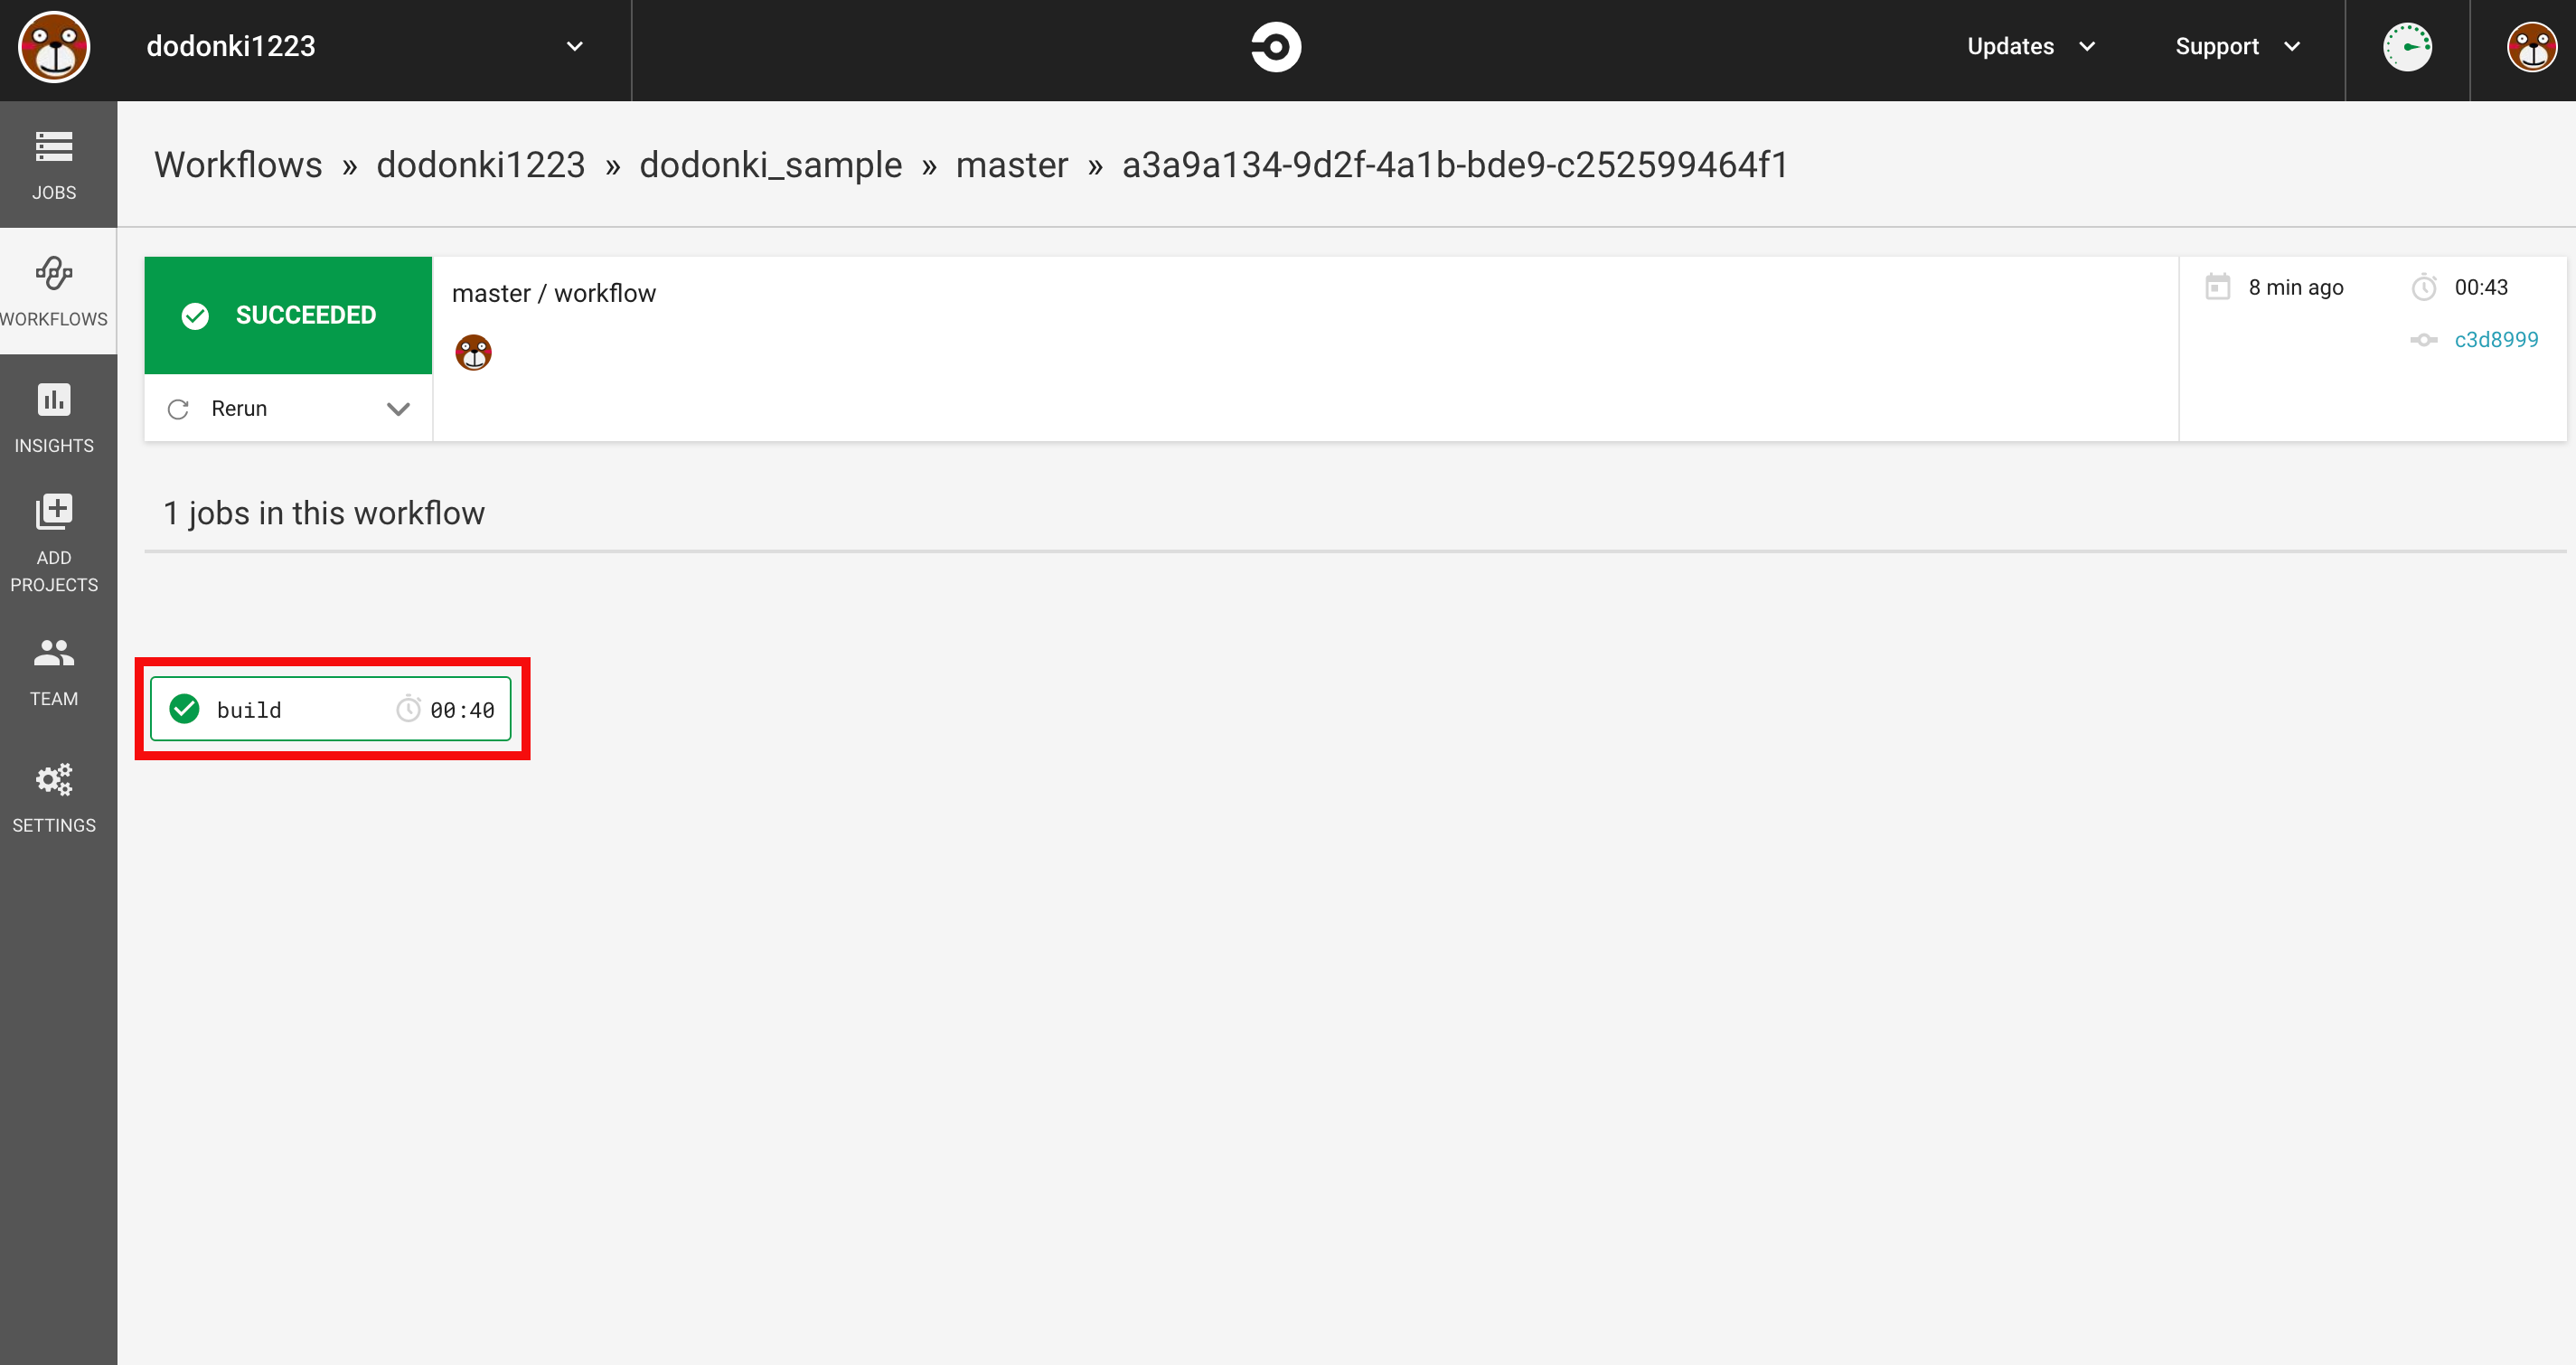
テストが実行されていることを確認できます
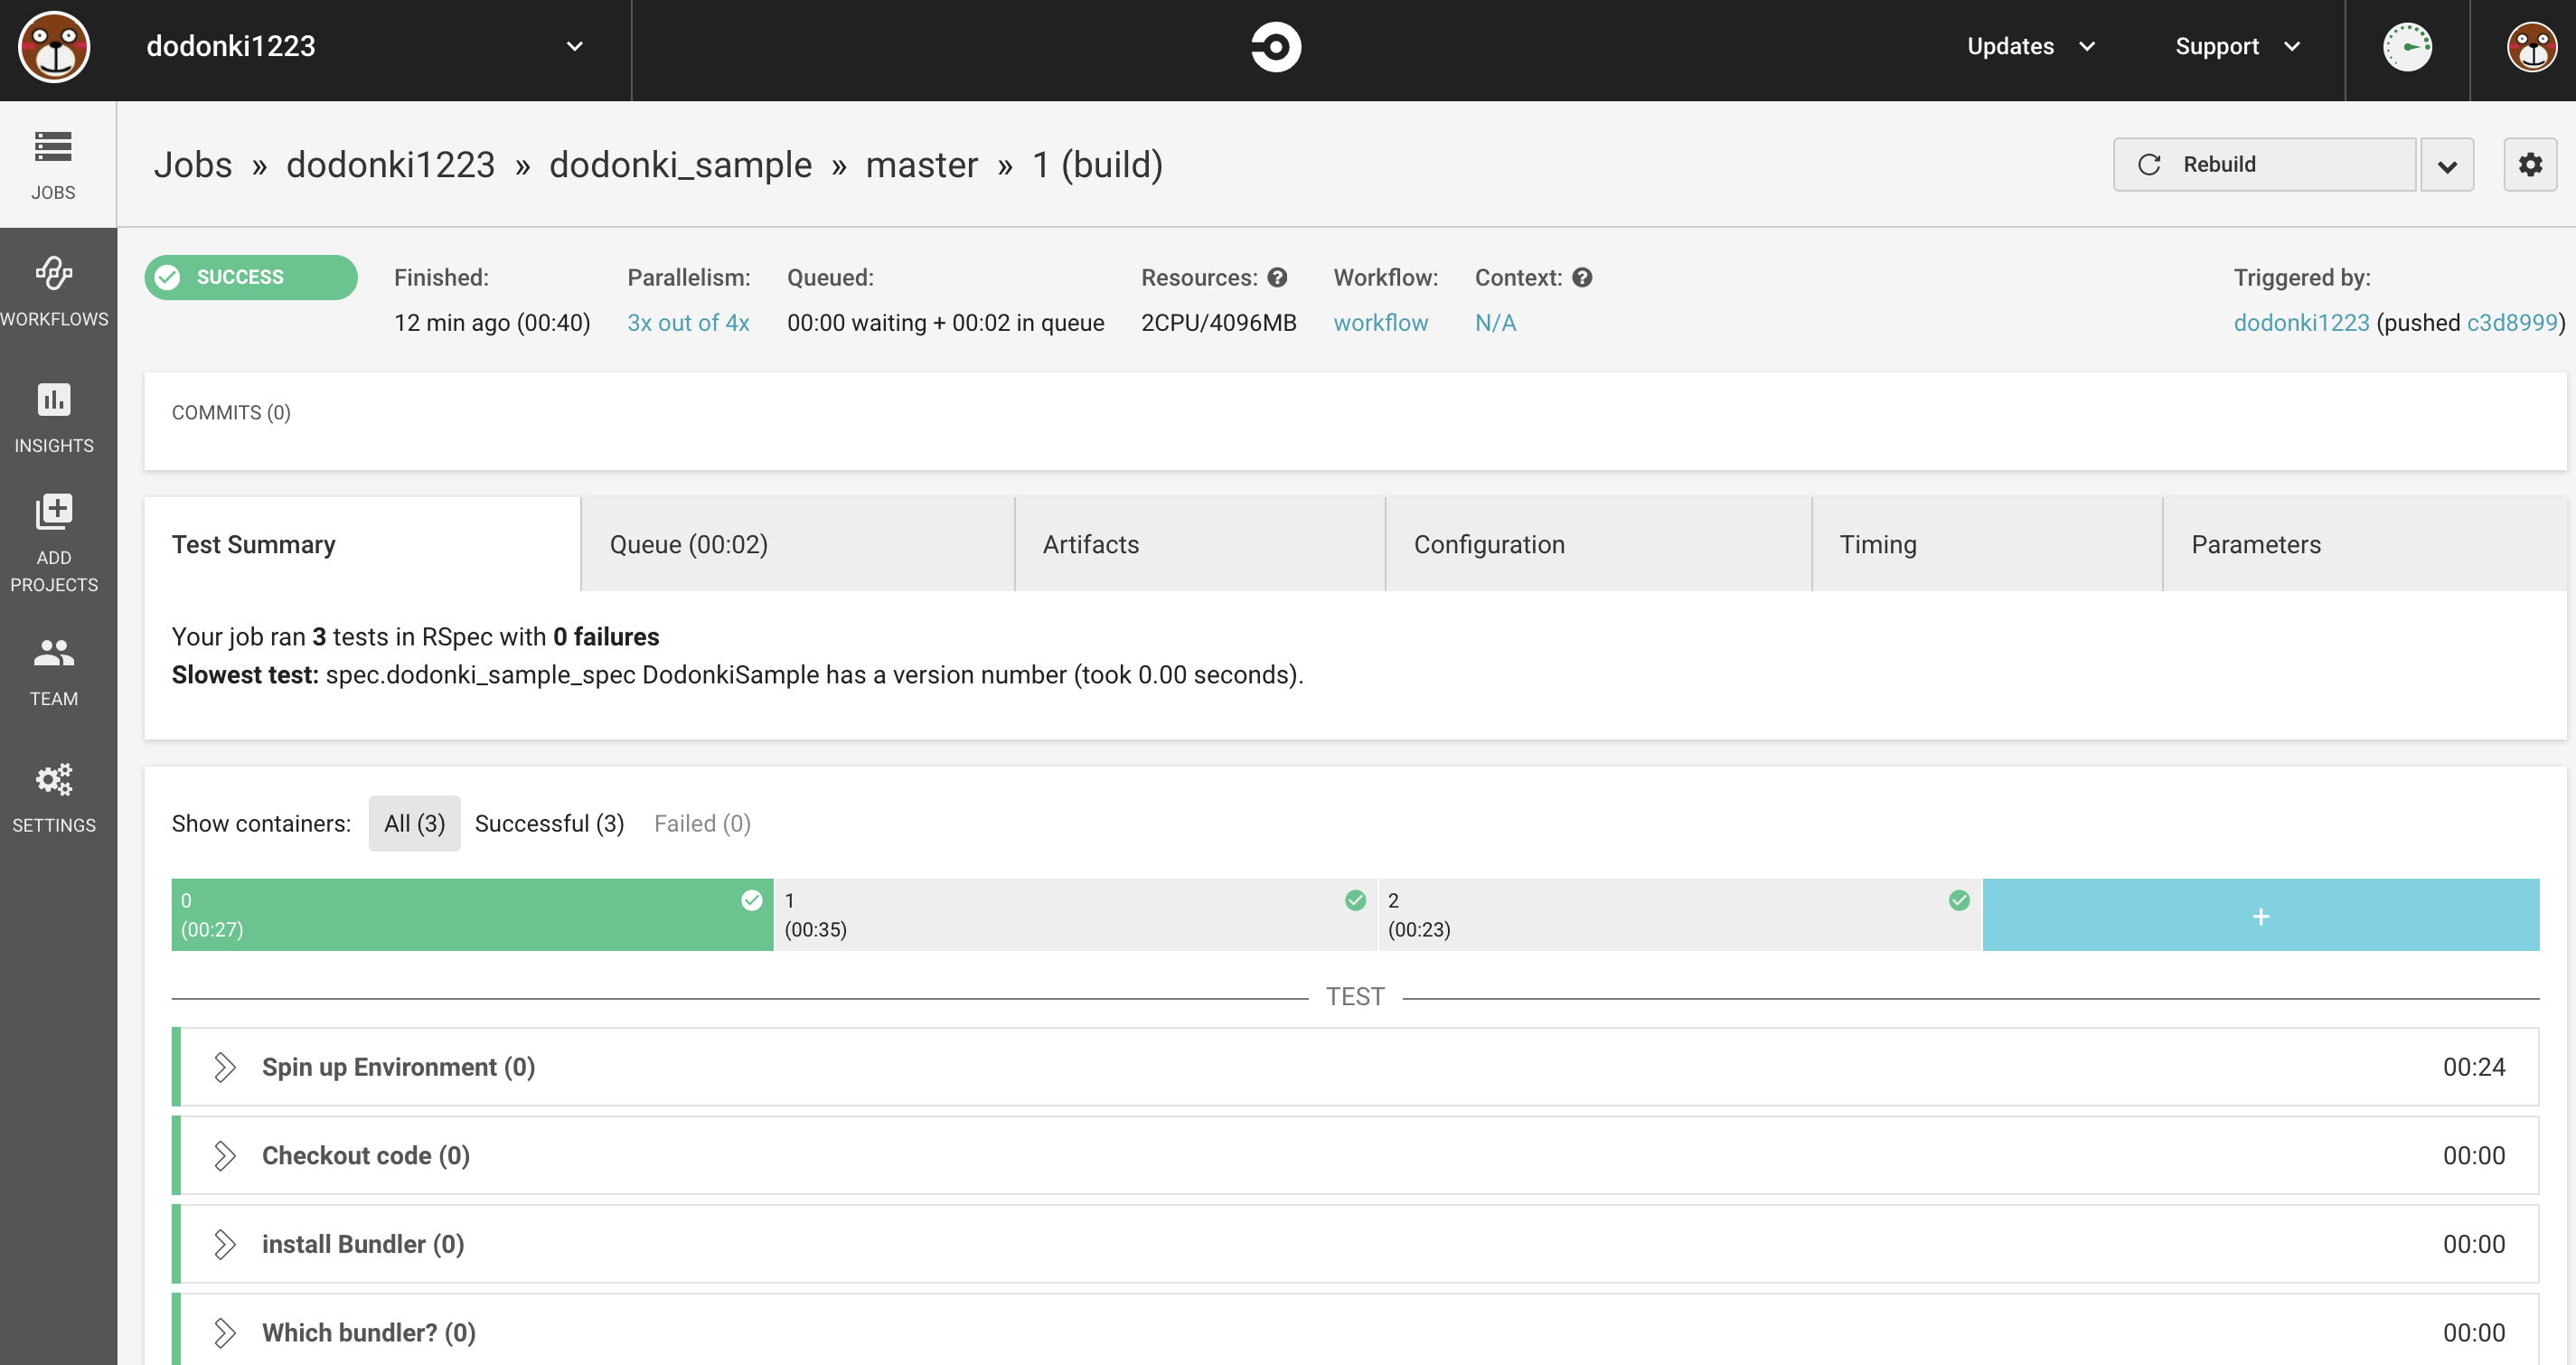
これでGithubにpush、mergeするたびにCircleCIが実行され自動テストされるようになりました
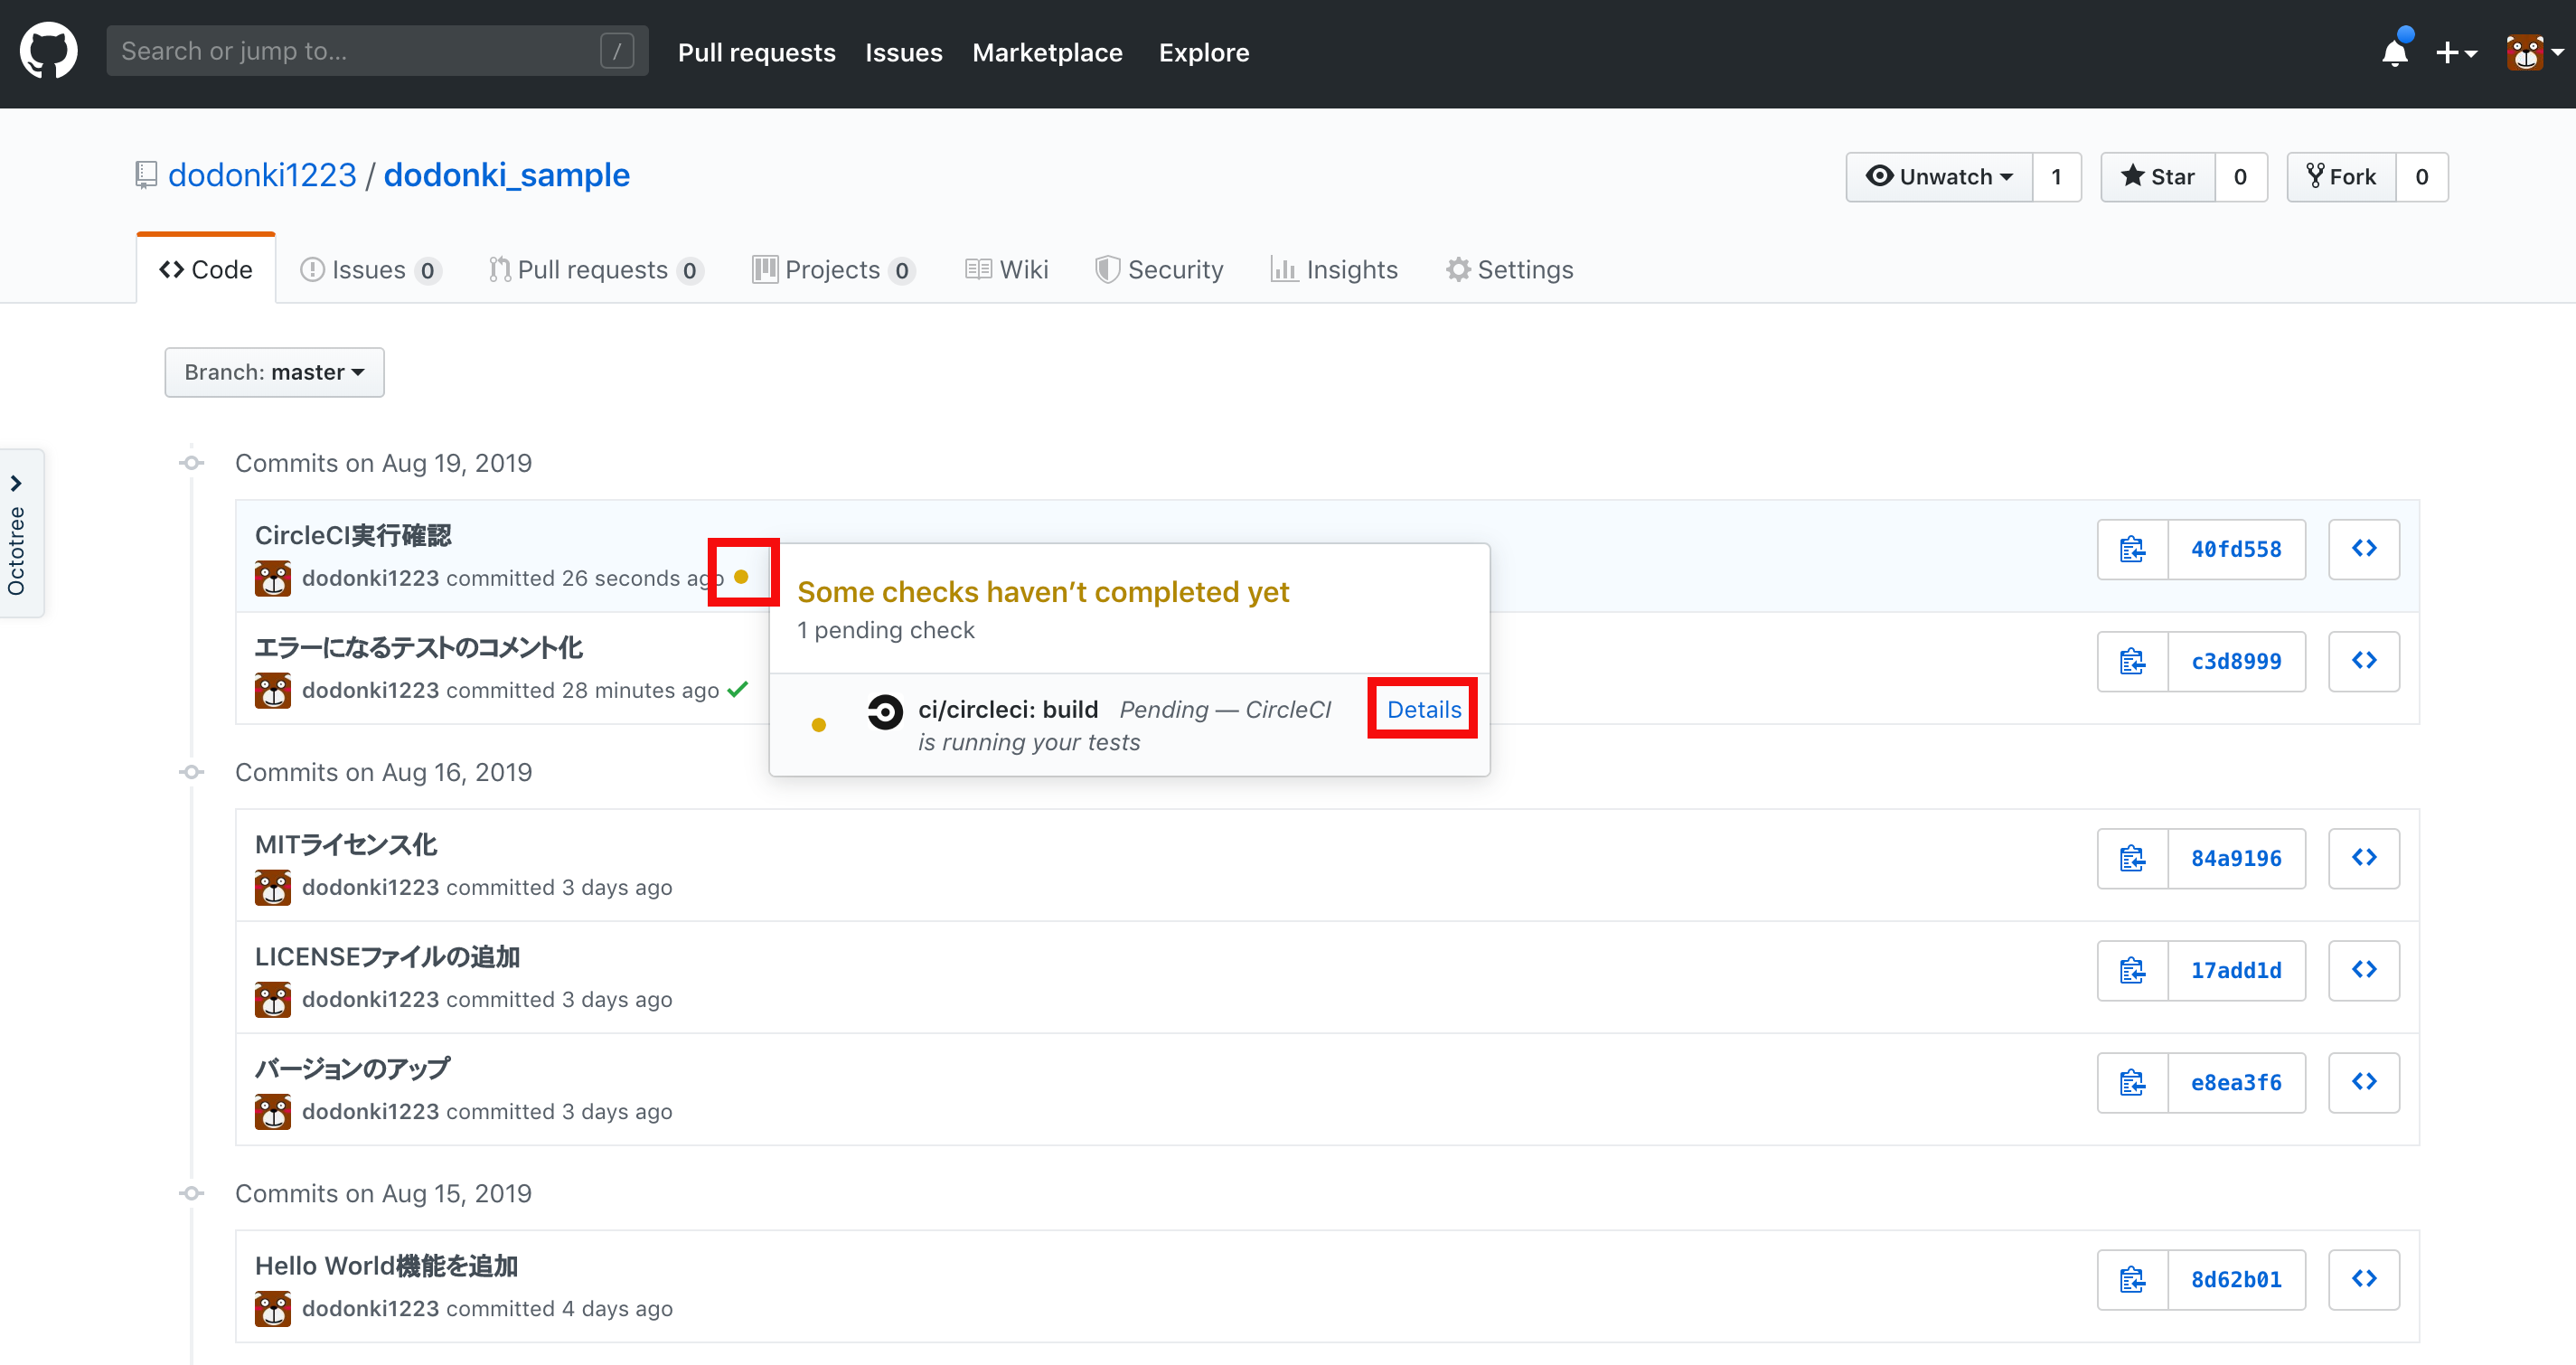
実際に試してみる
何でもいいのでファイルを修正してGithubにpushしてみましょう。push後、commit履歴から実行されたCircleCIを確認できます
CircleCIのテストを充実させテスト結果を確認しやすくしよう
RuboCopの導入
CircleCIにRuboCop(静的解析ツール)を追加し一定のコード品質を保てるようにします
CircleCIの実行時にRuboCopが実行されるようにする
下記の設定をconfig.ymlにRSpecの前に追加してください
      # run rubocop!
      - run:
          name: run rubocop
          command: |
            bundle exec rubocop
追加後のconfig.yml
version: 2 # use CircleCI 2.0
jobs: # a collection of steps
  build: # runs not using Workflows must have a `build` job as entry point
    parallelism: 3 # run three instances of this job in parallel
    docker: # run the steps with Docker
      - image: circleci/ruby:2.4.2-jessie-node # ...with this image as the primary container; this is where all `steps` will run
        environment: # environment variables for primary container
          BUNDLE_JOBS: 3
          BUNDLE_RETRY: 3
          BUNDLE_PATH: vendor/bundle

    steps: # a collection of executable commands
      - checkout # special step to check out source code to working directory

      - run:
          name: install Bundler
          command: |
            echo 'export BUNDLER_VERSION=$(cat Gemfile.lock | tail -1 | tr -d " ")' >> $BASH_ENV
            source $BASH_ENV
            gem install bundler

      # Which version of bundler?
      - run:
          name: Which bundler?
          command: bundle -v

      # Restore bundle cache
      # Read about caching dependencies: https://circleci.com/docs/2.0/caching/
      - restore_cache:
          keys:
            - gem-sample-{{ checksum "Gemfile.lock" }}
            - gem-sample-

      - run: # Install Ruby dependencies
          name: Bundle Install
          command: bundle check --path vendor/bundle || bundle install --deployment

      # Store bundle cache for Ruby dependencies
      - save_cache:
          key: gem-sample-{{ checksum "Gemfile.lock" }}
          paths:
            - vendor/bundle

      # run rubocop!
      - run:
          name: run rubocop
          command: |
            bundle exec rubocop
      - run:
          name: Run rspec in parallel
          command: |
            bundle exec rspec --profile 10 \
                              --format RspecJunitFormatter \
                              --out test_results/rspec.xml \
                              --format progress \
                              $(circleci tests glob "spec/**/*_spec.rb" | circleci tests split --split-by=timings)

      # Save test results for timing analysis
      - store_test_results: # Upload test results for display in Test Summary: https://circleci.com/docs/2.0/collect-test-data/
          path: test_results
      # See https://circleci.com/docs/2.0/deployment-integrations/ for example deploy configs
RuboCopが成功するようにする
circleci buildを実行すると大量にエラーが出ていると思います
今回の記事ではRuboCopについては詳しくは説明しないので私のRuboCop導入時のCommit履歴と同じように修正すればRuboCopでエラーがでなくなります
RuboCopの動作確認
circleci buildを実行し下記のような表示があれば導入OKです
$ circleci build

......

====>> run rubocop
  #!/bin/bash -eo pipefail
bundle exec rubocop

Inspecting 8 files
........
修正した内容をpushしてCircleCIの動作を確認します
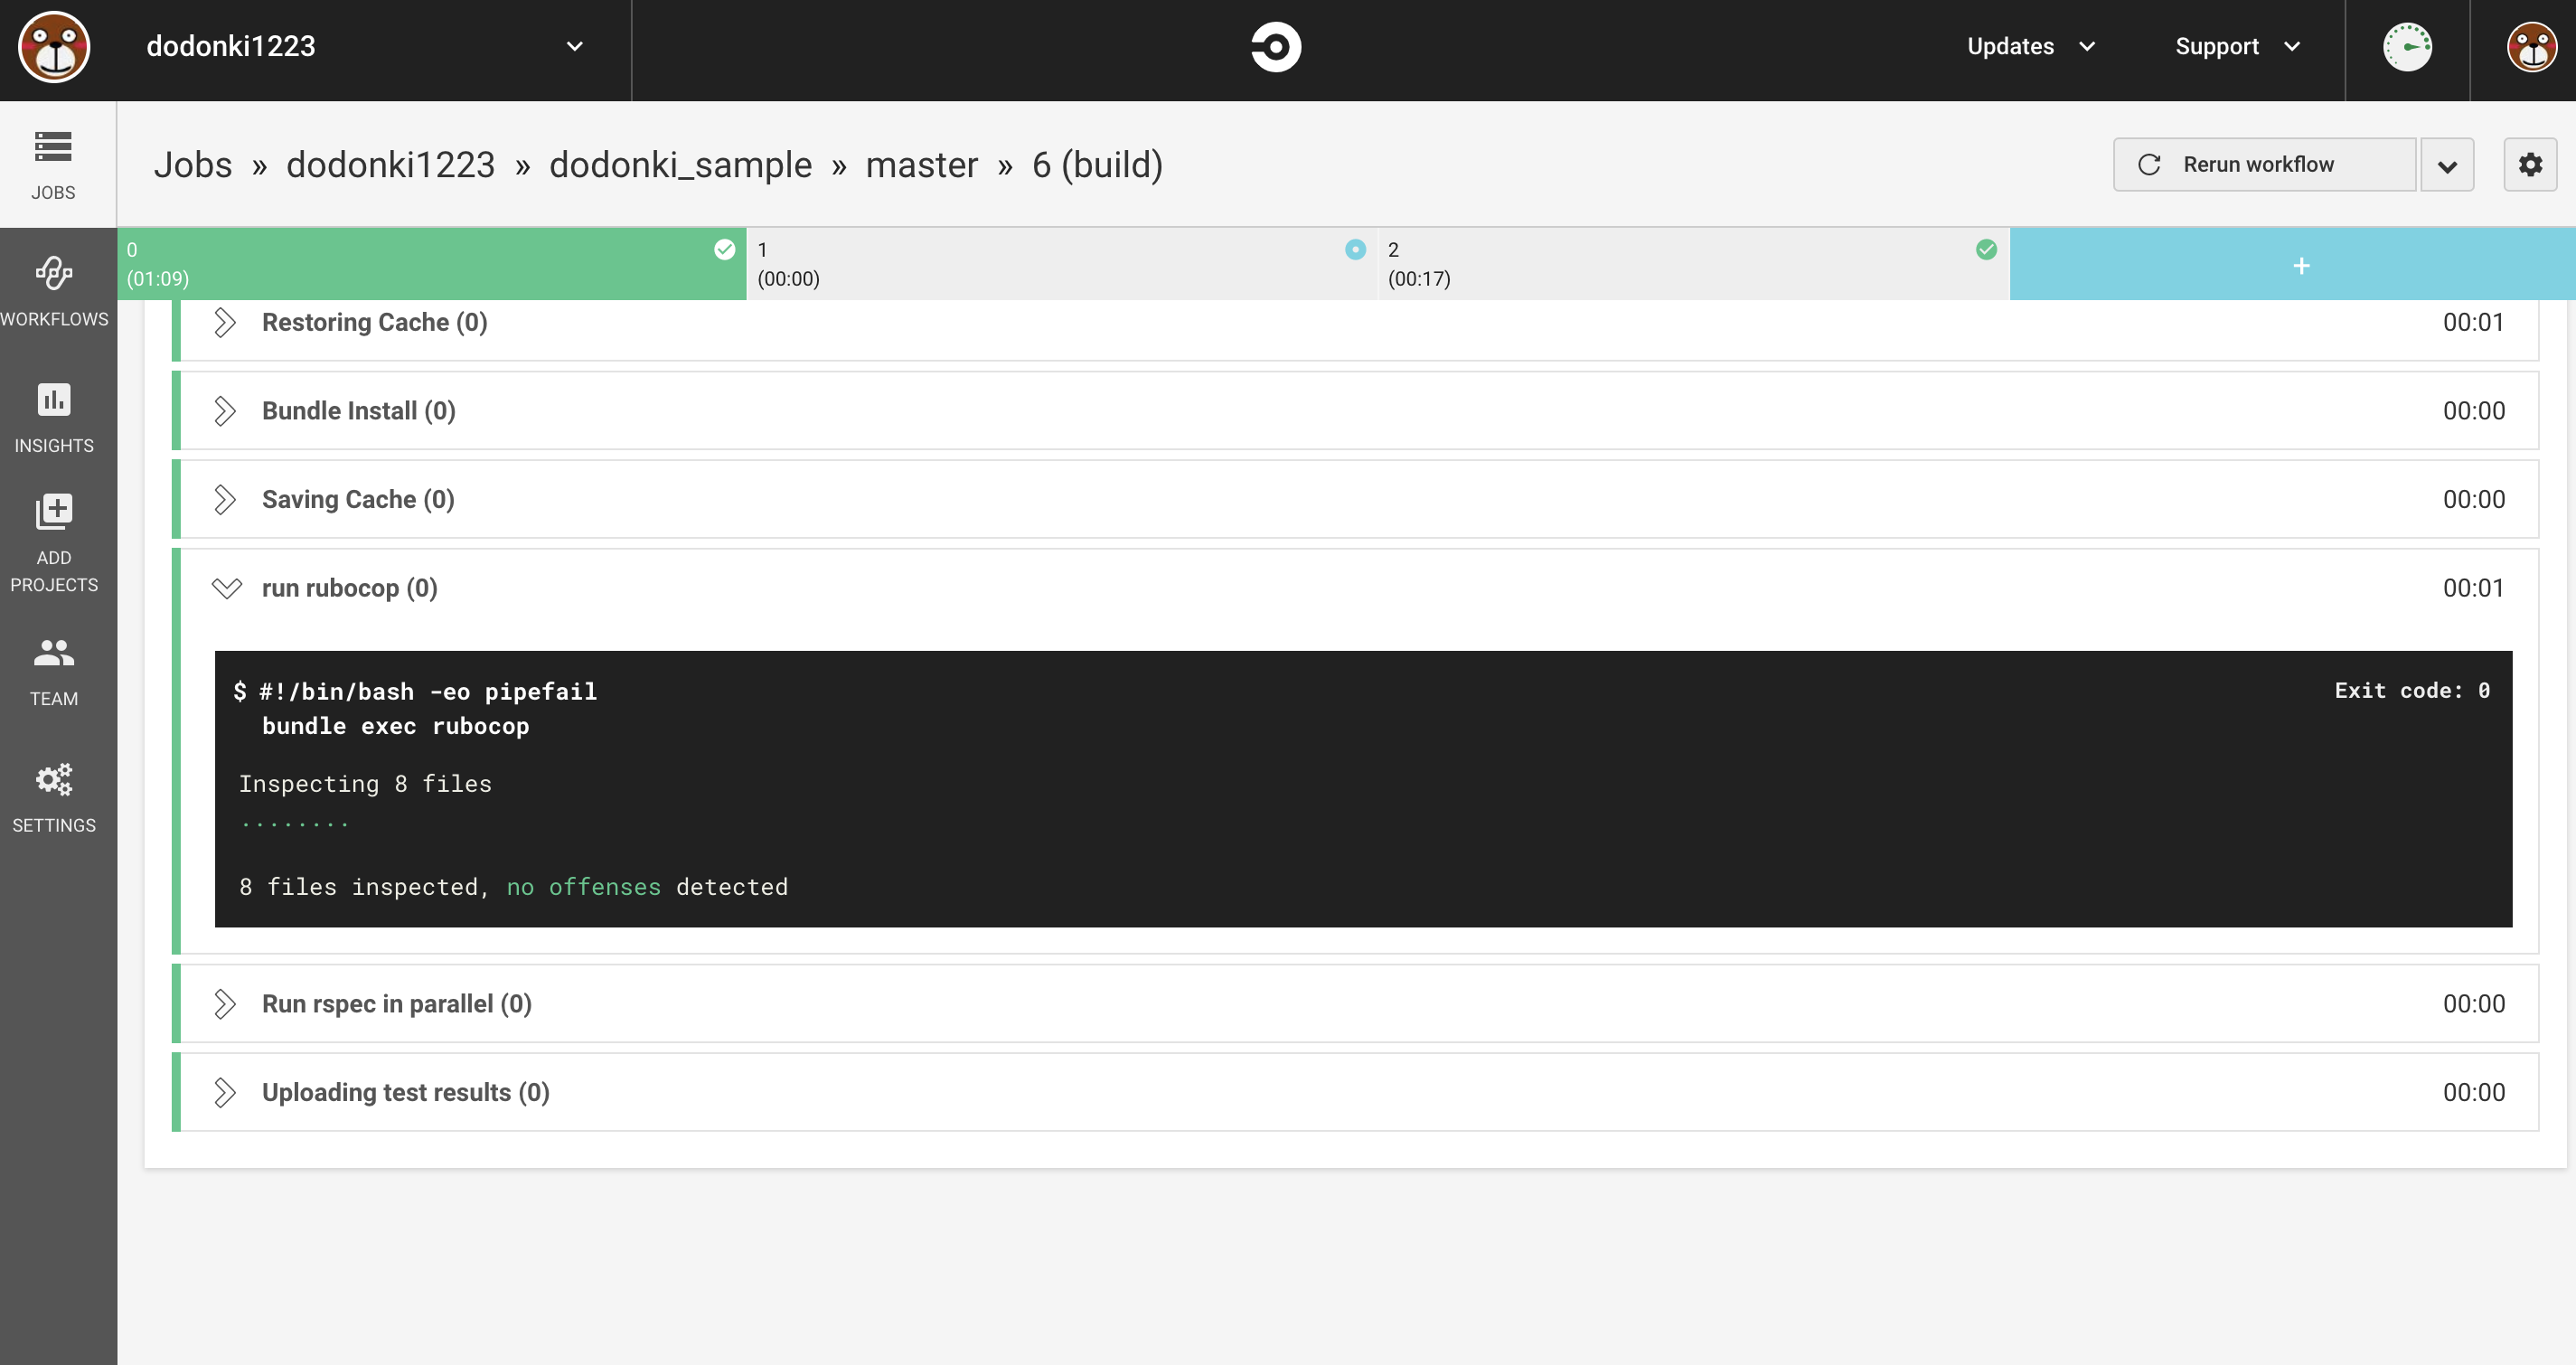
RuboCopの導入完了です
SimpleCovの導入
CircleCIにSimpleCov(テストカバレッジ確認ツール)を追加しテストカバレッジを確認できるようにします
CircleCIの実行時にSimpleCovが実行されるようにする
spec/spec_helper.rbに下記コードを追加します
require 'simplecov'

# SimpleCovのロード処理(RSpecのファイルは除外する)
SimpleCov.start do
  add_filter '/spec/'
end
CircleCI上でカバレッジを確認できるようにする
CircleCIのArtifactsにSimpleCovのファイルが出力されるようにします
ついでにRSpecのテスト結果も出力されるようにします
CircleCIの公式のドキュメントにも導入方法が記載されています
下記の設定をstore_test_resultsの後に記述します
      - store_artifacts:
          # テスト結果をtest-resultsディレクトリに吐き出す
          path: test_results
          destination: test-results
      - store_artifacts:
          # カバレッジの結果をcoverage-resultsディレクトリに吐き出す
          path: coverage
          destination: coverage-results
追加後のconfig.yml
version: 2 # use CircleCI 2.0
jobs: # a collection of steps
  build: # runs not using Workflows must have a `build` job as entry point
    parallelism: 3 # run three instances of this job in parallel
    docker: # run the steps with Docker
      - image: circleci/ruby:2.4.2-jessie-node # ...with this image as the primary container; this is where all `steps` will run
        environment: # environment variables for primary container
          BUNDLE_JOBS: 3
          BUNDLE_RETRY: 3
          BUNDLE_PATH: vendor/bundle

    steps: # a collection of executable commands
      - checkout # special step to check out source code to working directory

      - run:
          name: install Bundler
          command: |
            echo 'export BUNDLER_VERSION=$(cat Gemfile.lock | tail -1 | tr -d " ")' >> $BASH_ENV
            source $BASH_ENV
            gem install bundler

      # Which version of bundler?
      - run:
          name: Which bundler?
          command: bundle -v

      # Restore bundle cache
      # Read about caching dependencies: https://circleci.com/docs/2.0/caching/
      - restore_cache:
          keys:
            - gem-sample-{{ checksum "Gemfile.lock" }}
            - gem-sample-

      - run: # Install Ruby dependencies
          name: Bundle Install
          command: bundle check --path vendor/bundle || bundle install --deployment

      # Store bundle cache for Ruby dependencies
      - save_cache:
          key: gem-sample-{{ checksum "Gemfile.lock" }}
          paths:
            - vendor/bundle

      # run rubocop!
      - run:
          name: run rubocop
          command: |
            bundle exec rubocop
      - run:
          name: Run rspec in parallel
          command: |
            bundle exec rspec --profile 10 \
                              --format RspecJunitFormatter \
                              --out test_results/rspec.xml \
                              --format progress \
                              $(circleci tests glob "spec/**/*_spec.rb" | circleci tests split --split-by=timings)

      # Save test results for timing analysis
      - store_test_results: # Upload test results for display in Test Summary: https://circleci.com/docs/2.0/collect-test-data/
          path: test_results
      - store_artifacts:
          # テスト結果をtest-resultsディレクトリに吐き出す
          path: test_results
          destination: test-results
      - store_artifacts:
          # カバレッジの結果をcoverage-resultsディレクトリに吐き出す
          path: coverage
          destination: coverage-results
      # See https://circleci.com/docs/2.0/deployment-integrations/ for example deploy configs
修正した内容はこちらのコミット履歴を参照してください
SimpleCov・RSpecのテスト結果が出力されているかの動作確認
circleci buildを実行し下記のような表示があれば導入OKです
$ circleci build

......

====>> Uploading artifacts
Uploading /home/circleci/project/test_results to test-results
Uploading /home/circleci/project/test_results/rspec.xml (420 B): Error: FAILED with error not supported

====>> Uploading artifacts
Uploading /home/circleci/project/coverage to coverage-results
Uploading /home/circleci/project/coverage/.last_run.json (50 B): Error: FAILED with error not supported

......
修正した内容をpushしCircleCIの動作を確認します
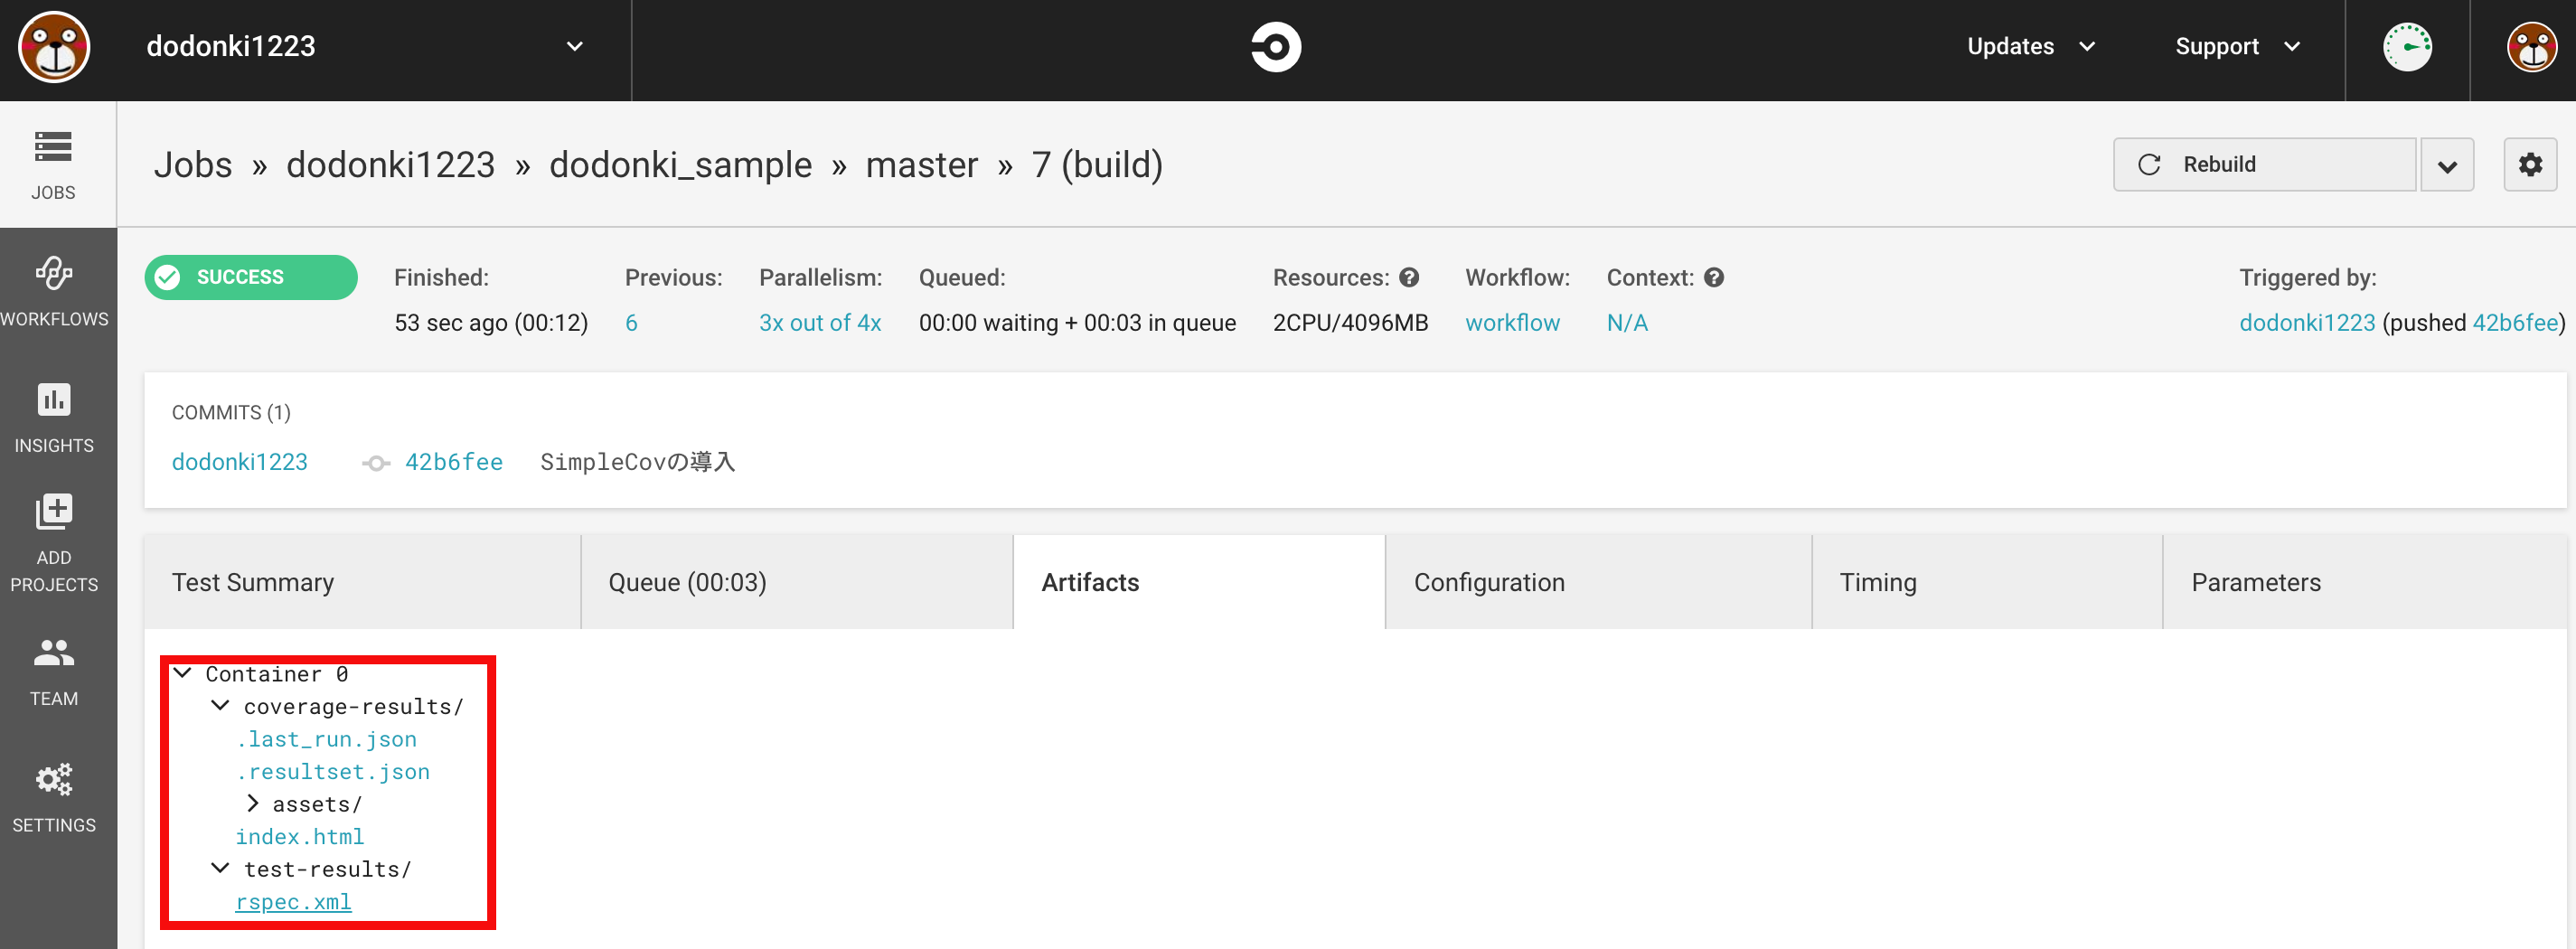
Artifactsの画面で画像のように出力されていれば導入完了です
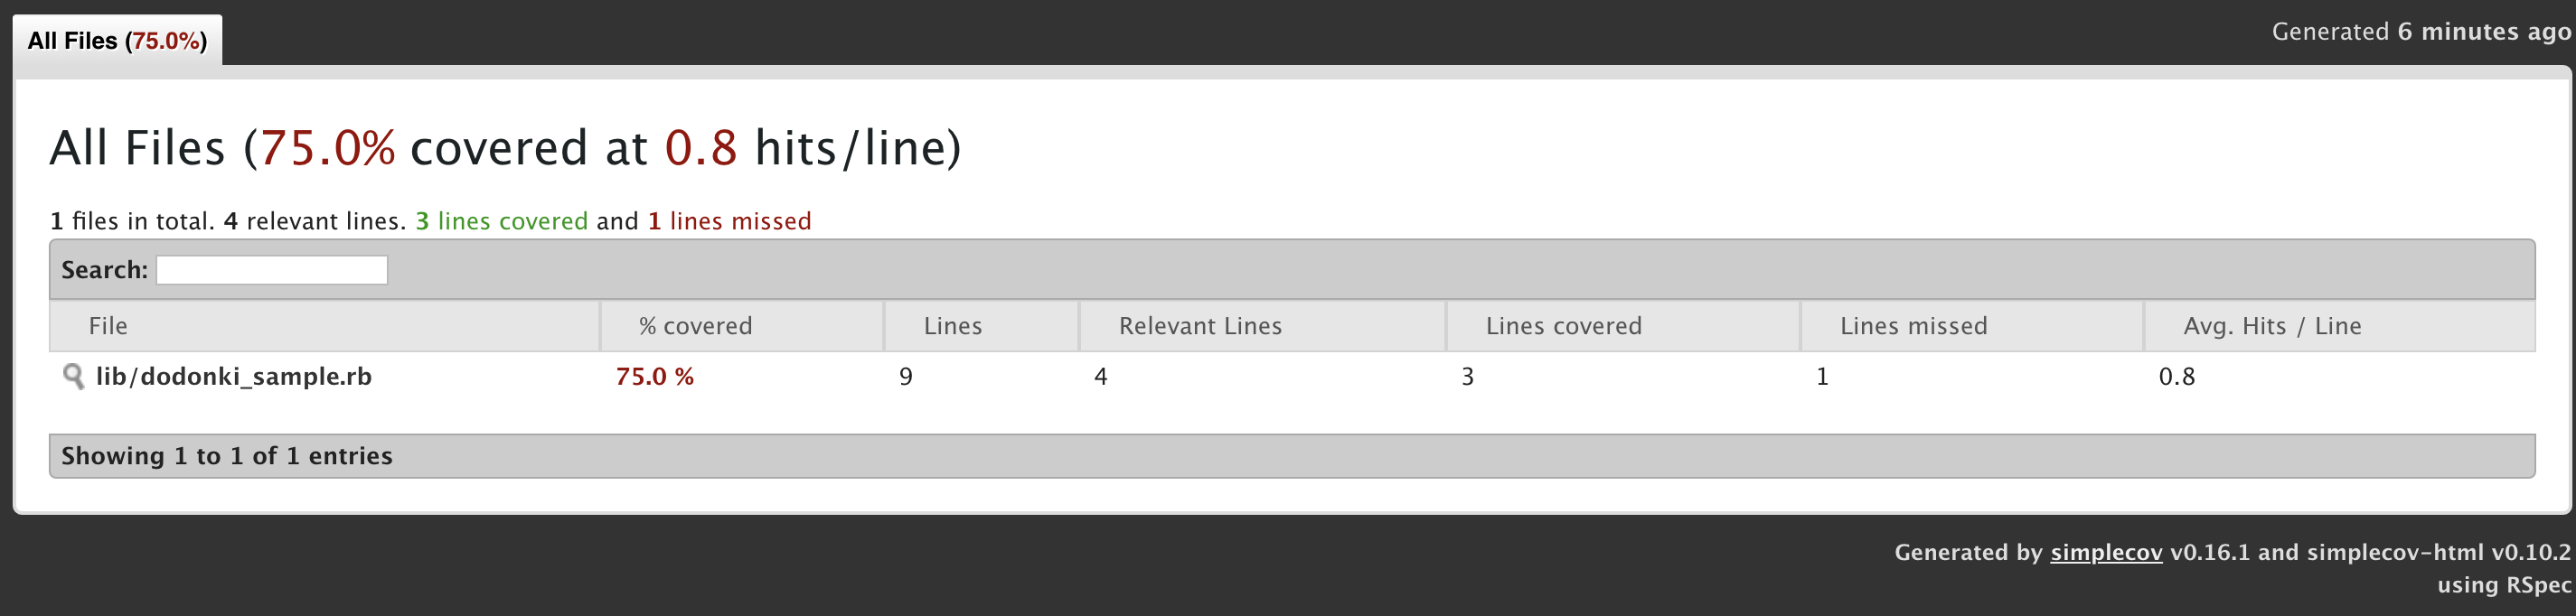
index.htmlをクリックすることでテストのカバレッジを確認できるようになります
CircleCIでドキュメントが自動生成されるようにする
YARDの導入
YARD(ドキュメント自動生成ツール)を追加し自動でドキュメントが作成されるようにします
必要のない人はYARDの導入は飛ばしてもらって構いません
CircleCIの実行時にドキュメントが自動生成されるようにする
下記の設定をRSpecの処理の後に追加してください
      # create document
      - run:
          name: create document
          command: |
            bundle exec yard
下記の設定をカバレッジの結果の吐き出す処理の後に追加してください
      - store_artifacts:
          # ドキュメントの結果をyard-resultsディレクトリに吐き出す
          path: ./doc
          destination: yard-results
追加後のconfig.yml
version: 2 # use CircleCI 2.0
jobs: # a collection of steps
  build: # runs not using Workflows must have a `build` job as entry point
    parallelism: 3 # run three instances of this job in parallel
    docker: # run the steps with Docker
      - image: circleci/ruby:2.4.2-jessie-node # ...with this image as the primary container; this is where all `steps` will run
        environment: # environment variables for primary container
          BUNDLE_JOBS: 3
          BUNDLE_RETRY: 3
          BUNDLE_PATH: vendor/bundle

    steps: # a collection of executable commands
      - checkout # special step to check out source code to working directory

      - run:
          name: install Bundler
          command: |
            echo 'export BUNDLER_VERSION=$(cat Gemfile.lock | tail -1 | tr -d " ")' >> $BASH_ENV
            source $BASH_ENV
            gem install bundler

      # Which version of bundler?
      - run:
          name: Which bundler?
          command: bundle -v

      # Restore bundle cache
      # Read about caching dependencies: https://circleci.com/docs/2.0/caching/
      - restore_cache:
          keys:
            - gem-sample-{{ checksum "Gemfile.lock" }}
            - gem-sample-

      - run: # Install Ruby dependencies
          name: Bundle Install
          command: bundle check --path vendor/bundle || bundle install --deployment

      # Store bundle cache for Ruby dependencies
      - save_cache:
          key: gem-sample-{{ checksum "Gemfile.lock" }}
          paths:
            - vendor/bundle

      # run rubocop!
      - run:
          name: run rubocop
          command: |
            bundle exec rubocop
      - run:
          name: Run rspec in parallel
          command: |
            bundle exec rspec --profile 10 \
                              --format RspecJunitFormatter \
                              --out test_results/rspec.xml \
                              --format progress \
                              $(circleci tests glob "spec/**/*_spec.rb" | circleci tests split --split-by=timings)
      # create document
      - run:
          name: create document
          command: |
            bundle exec yard

      # Save test results for timing analysis
      - store_test_results: # Upload test results for display in Test Summary: https://circleci.com/docs/2.0/collect-test-data/
          path: test_results
      - store_artifacts:
          # テスト結果をtest-resultsディレクトリに吐き出す
          path: test_results
          destination: test-results
      - store_artifacts:
          # カバレッジの結果をcoverage-resultsディレクトリに吐き出す
          path: coverage
          destination: coverage-results
      - store_artifacts:
          # ドキュメントの結果をyard-resultsディレクトリに吐き出す
          path: ./doc
          destination: yard-results
      # See https://circleci.com/docs/2.0/deployment-integrations/ for example deploy configs
修正した内容はこちらのコミット履歴を参照してください
YARDの動作確認
circleci buildを実行し下記のような表示があれば導入OKです
......

====>> create document
  #!/bin/bash -eo pipefail
bundle exec yard

Files:           2
Modules:         1 (    1 undocumented)
Classes:         0 (    0 undocumented)
Constants:       1 (    1 undocumented)
Attributes:      0 (    0 undocumented)
Methods:         1 (    1 undocumented)
 0.00% documented

 ......

 ====>> Uploading artifacts
Uploading /home/circleci/project/doc to yard-results
Uploading /home/circleci/project/doc/DodonkiSample.html (3.7 kB): Error: FAILED with error not supported

......
修正した内容をpushしCircleCIの動作を確認します
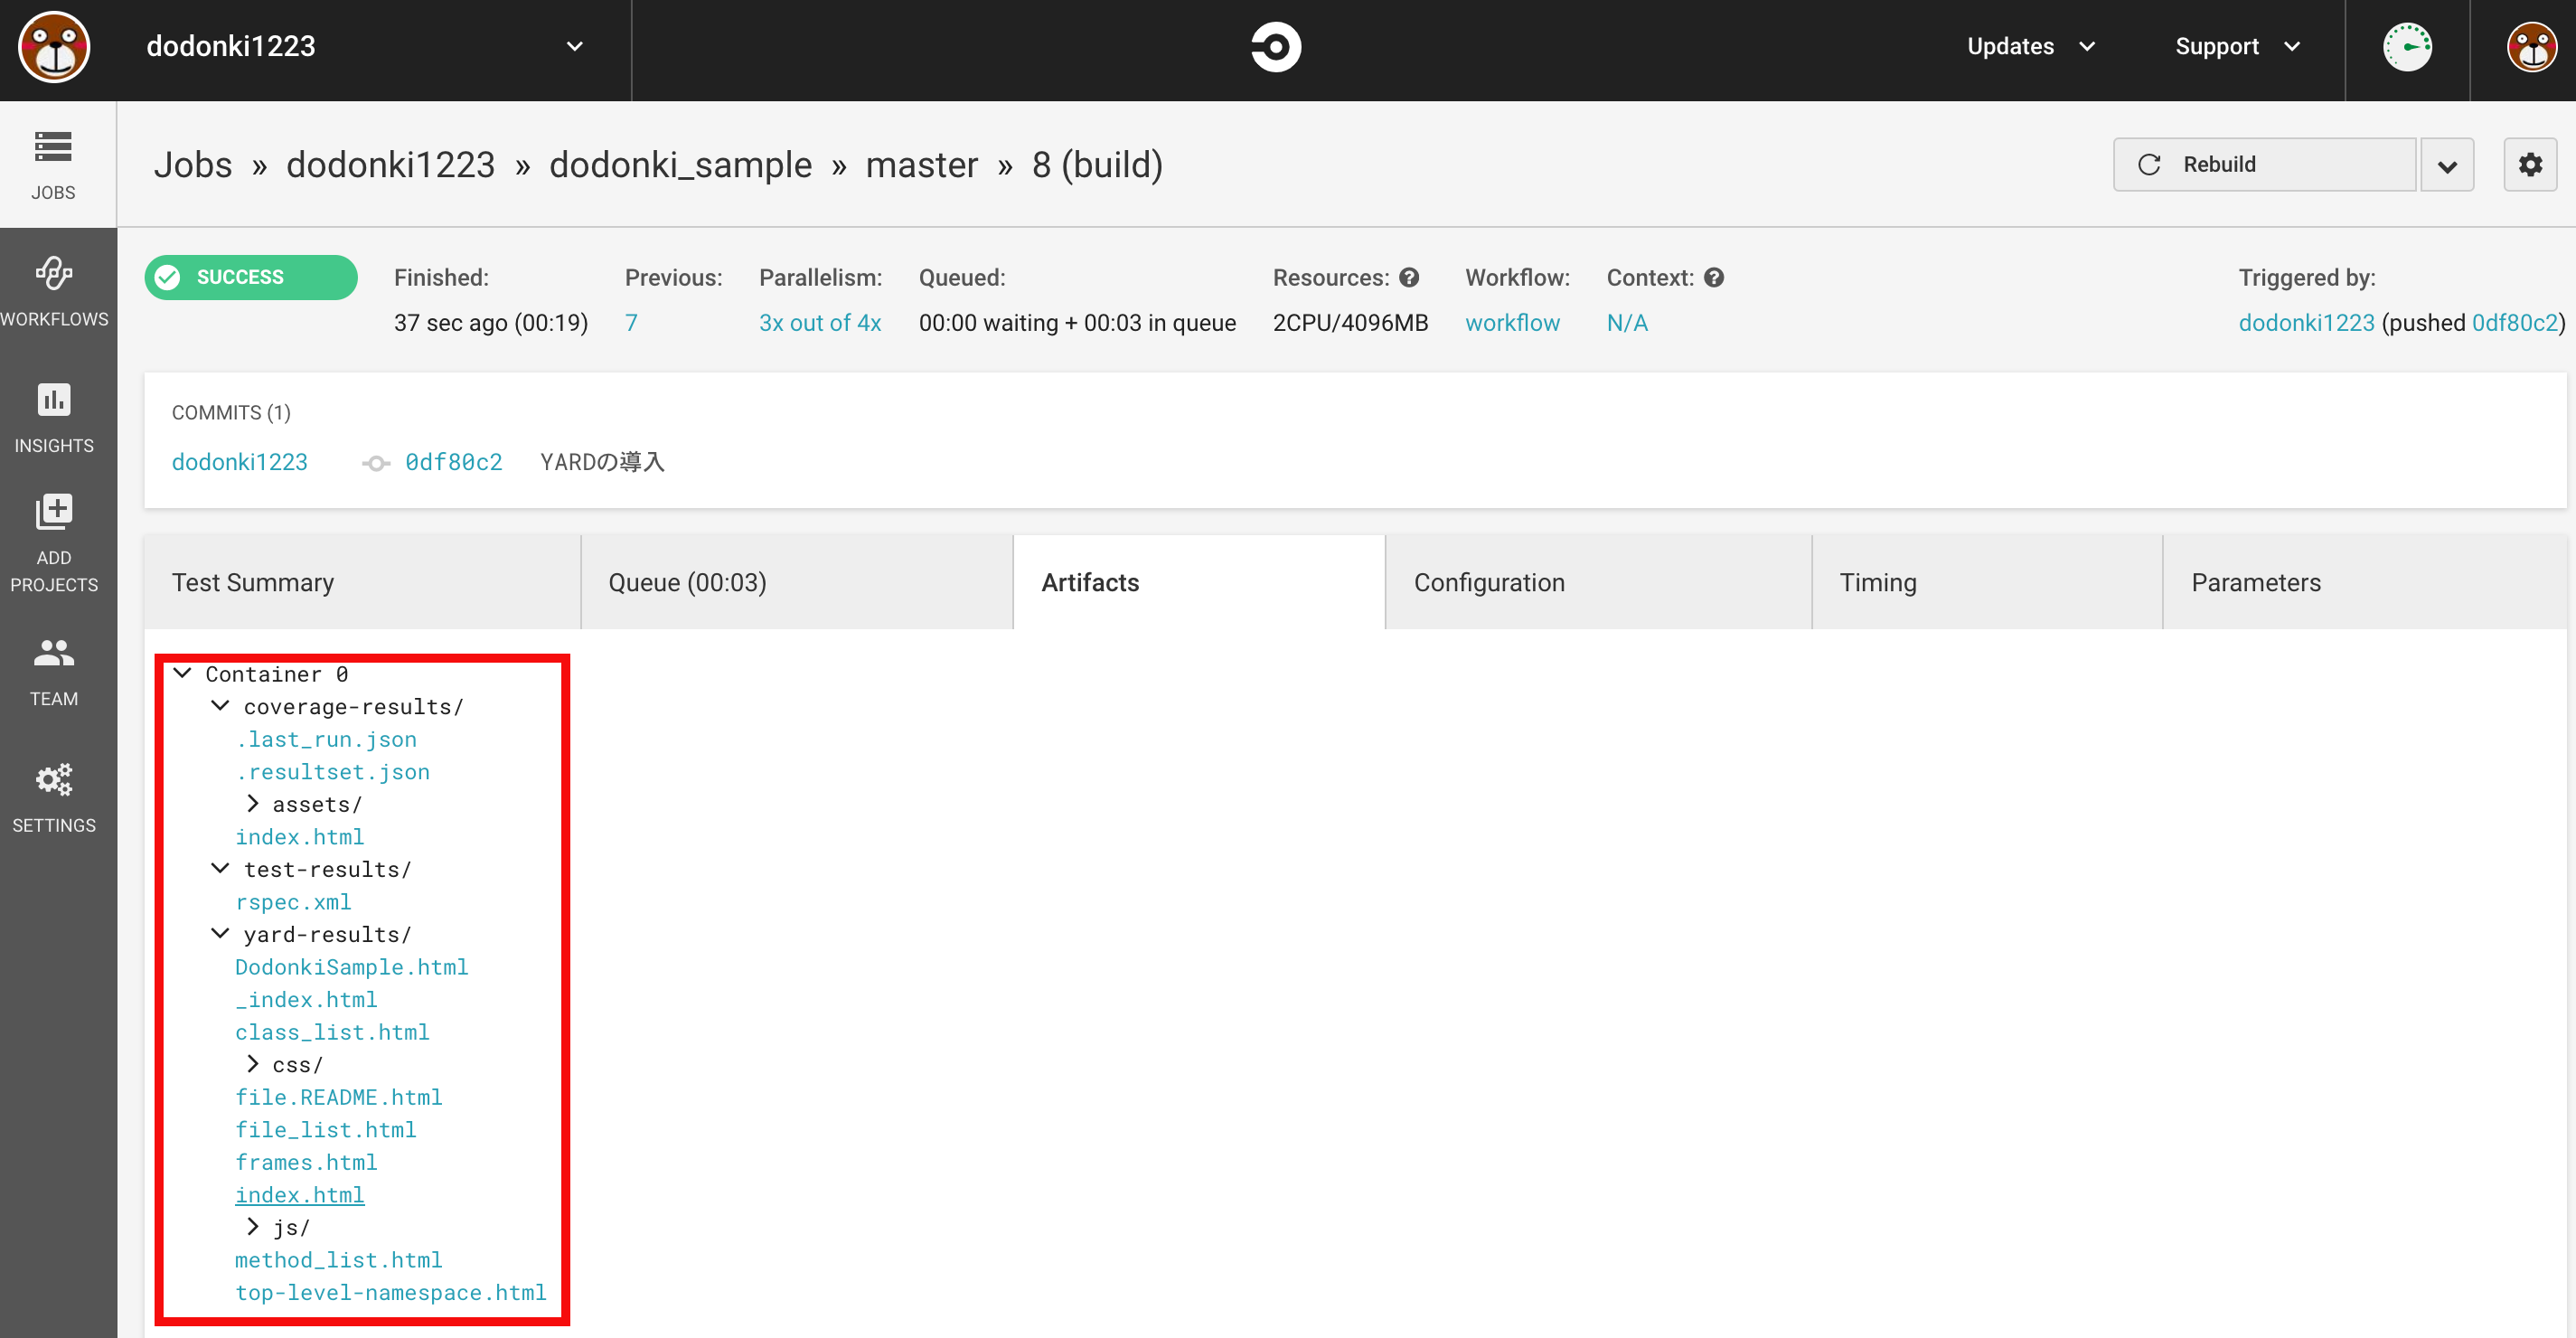
yard-resultsディレクトリができていれば導入完了です
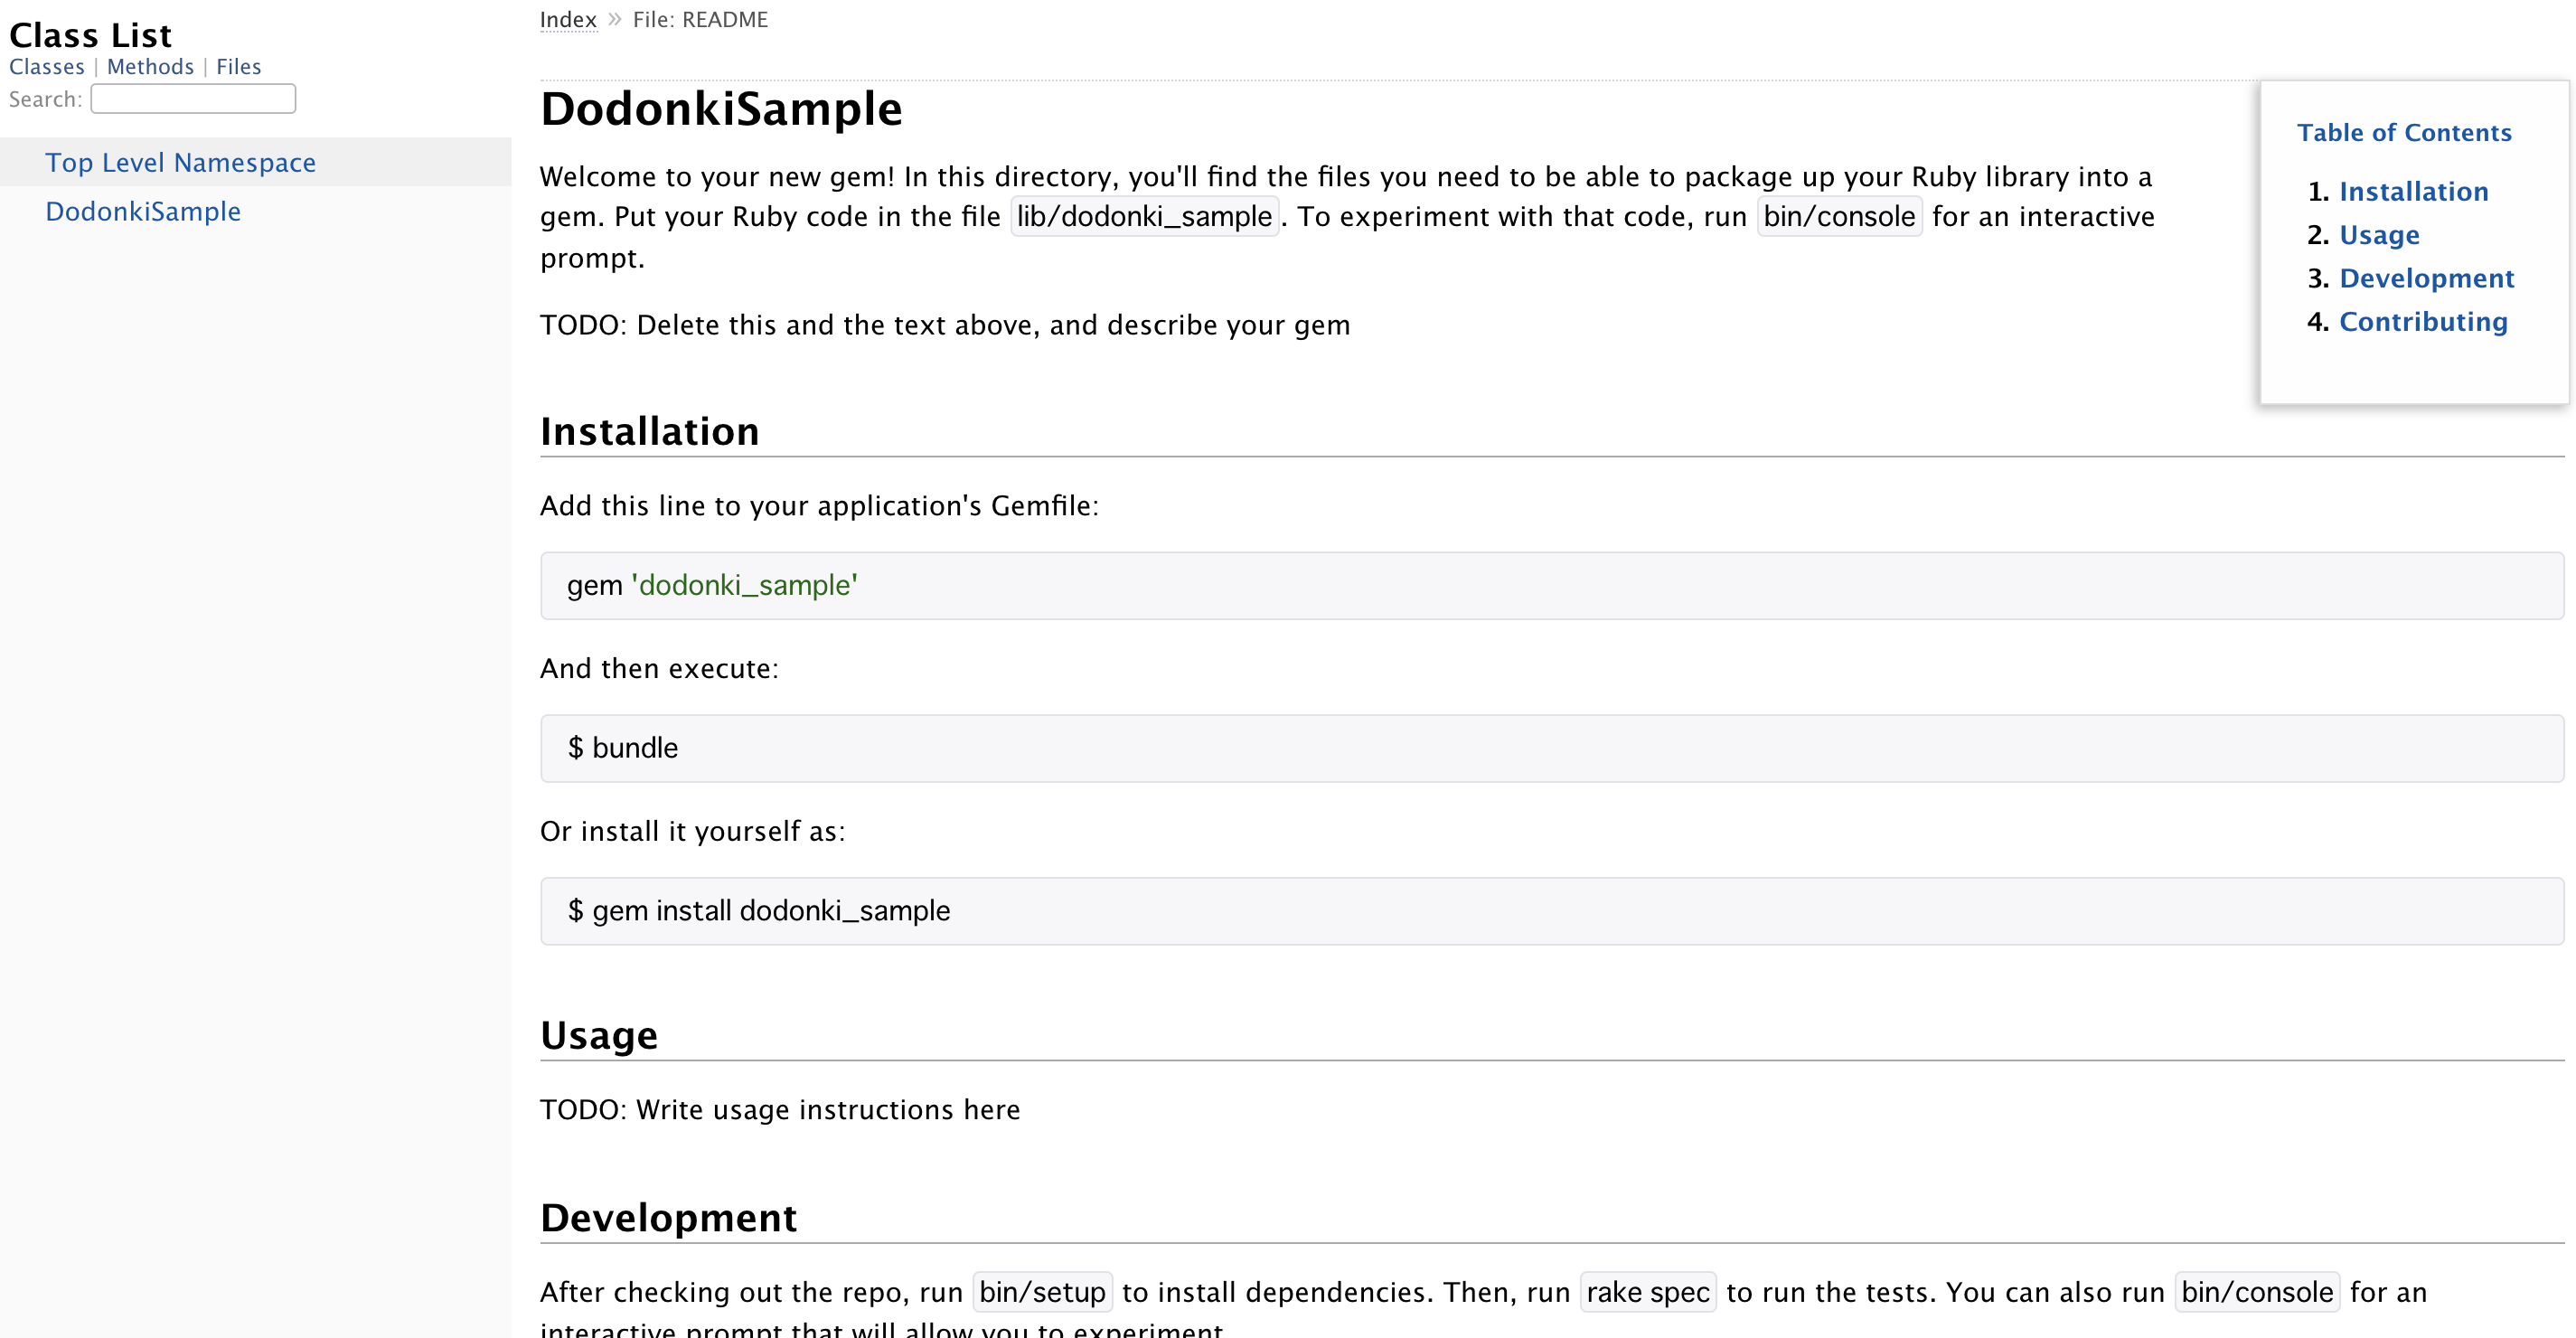
yard-results/index.htmlをクリックすることでドキュメントを見ることができます
RubyGemsへ自動デプロイ機能(CD/継続的デリバリー)を追加する
RubyGemsのデプロイで使用する環境変数をCircleCIに登録する
プロジェクトページのEnvironment Variablesをクリックします
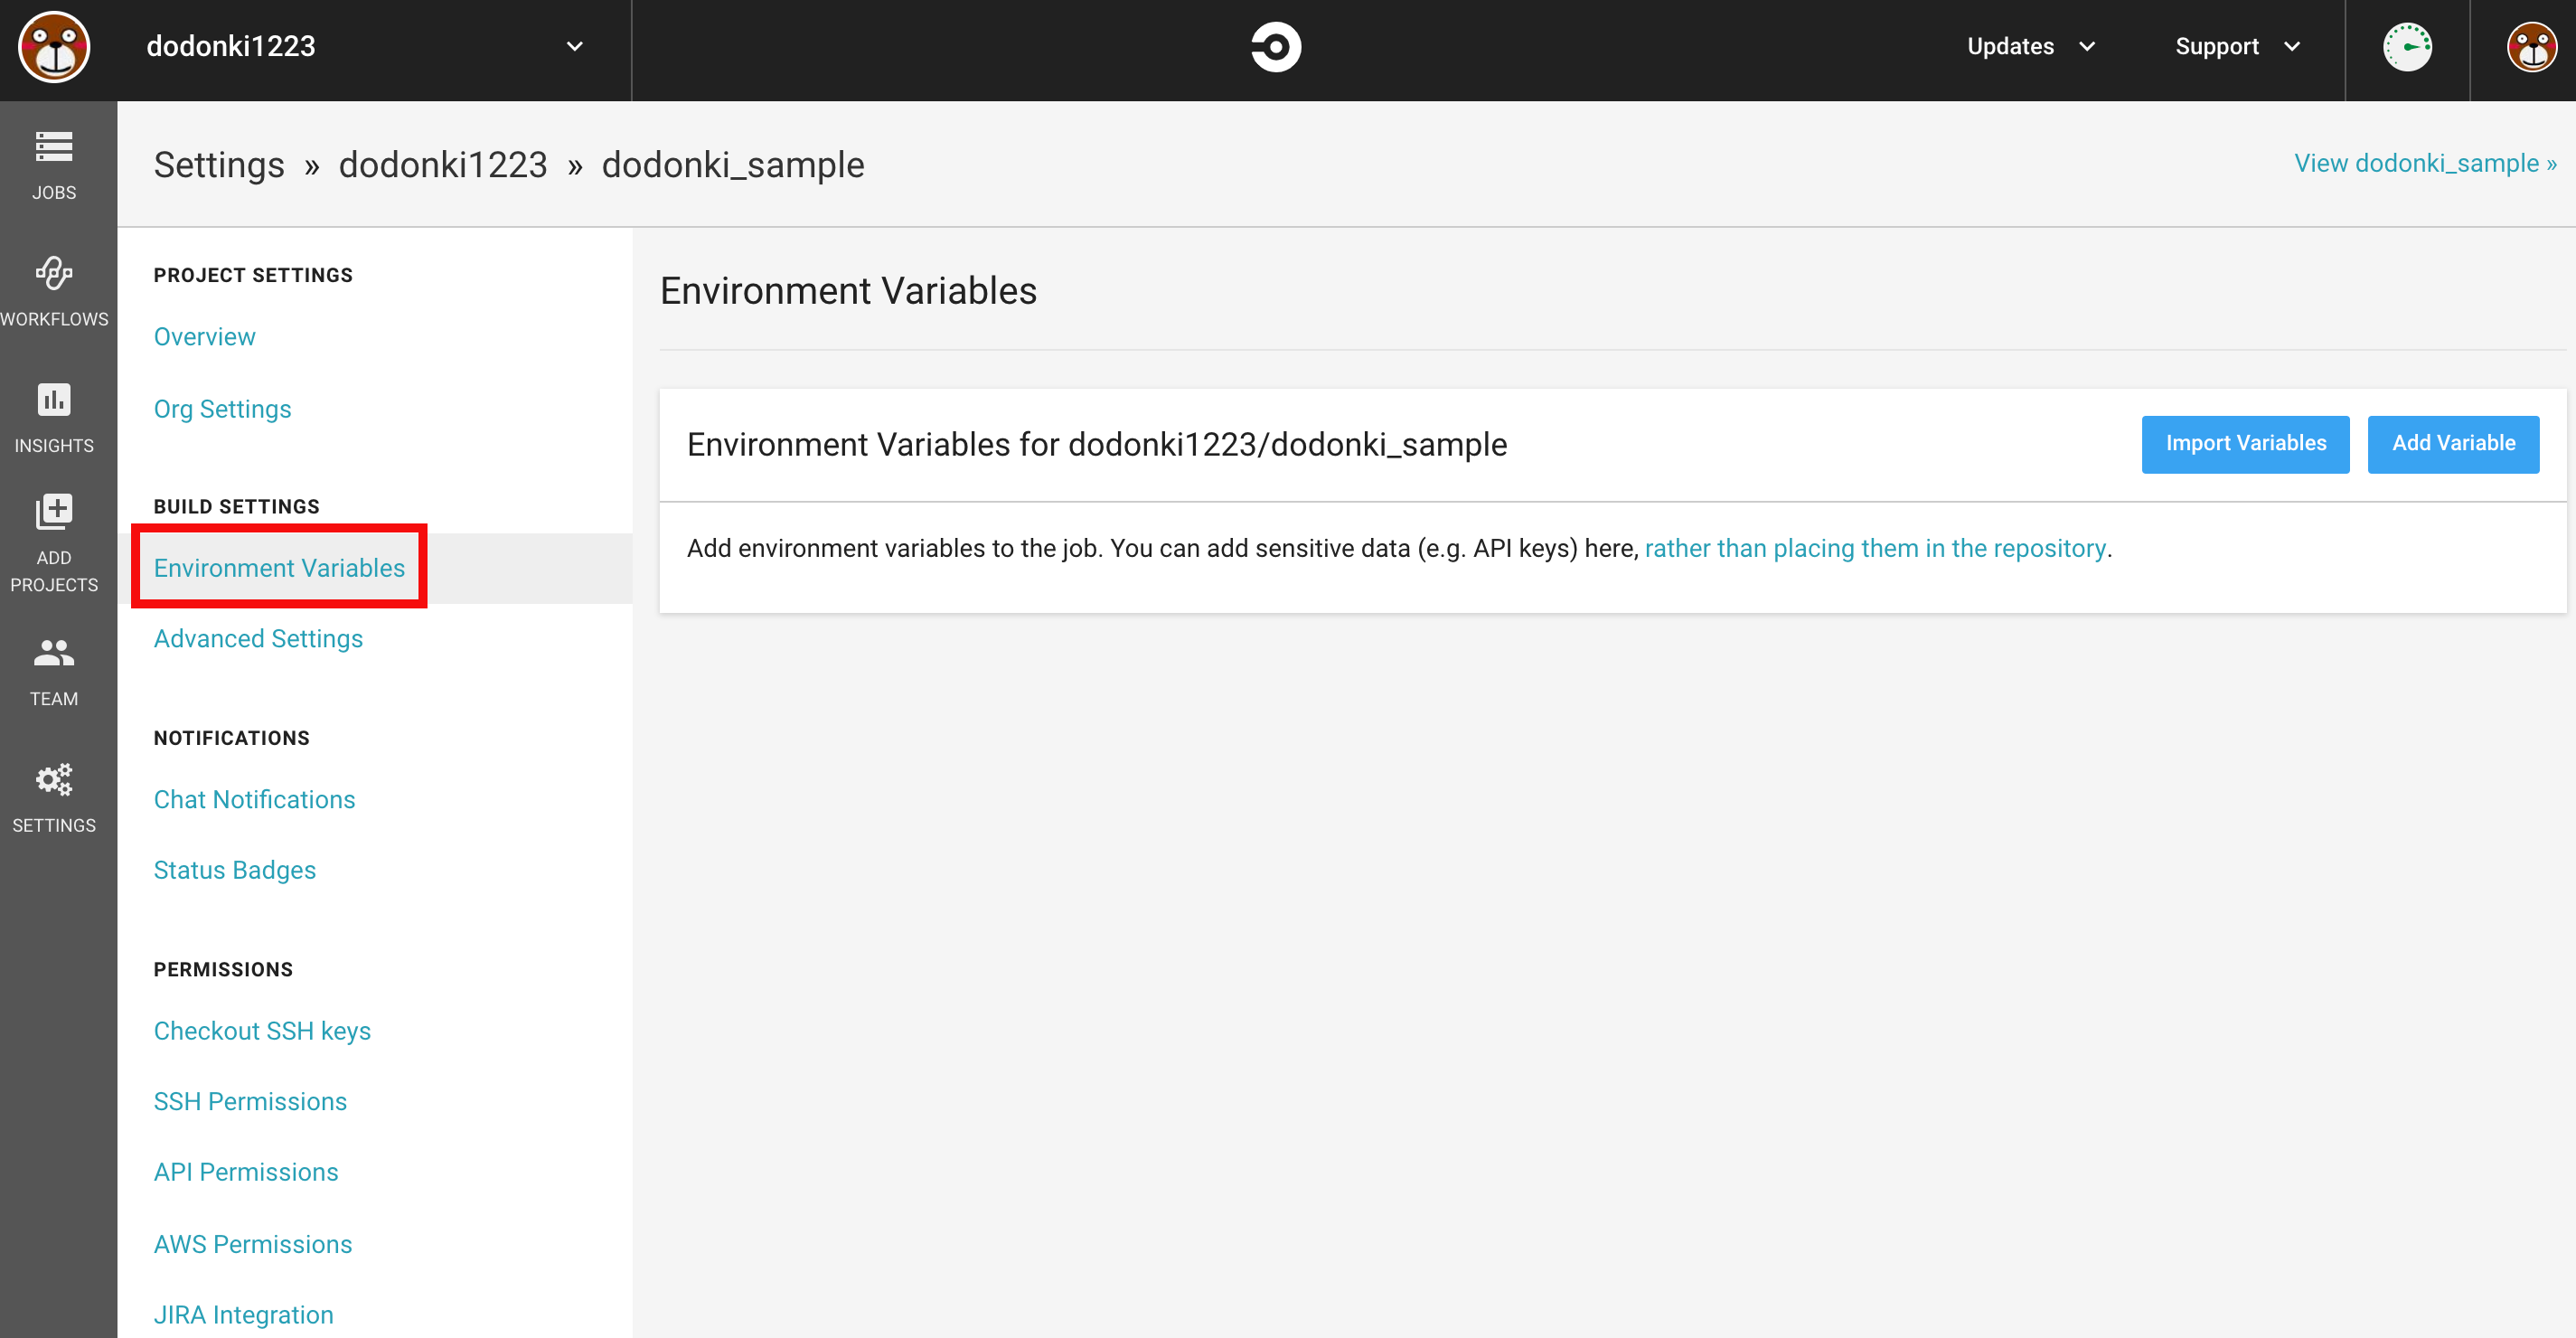
Add VariableをクリックしNameとValueに値をセットしAdd Variableをクリックします
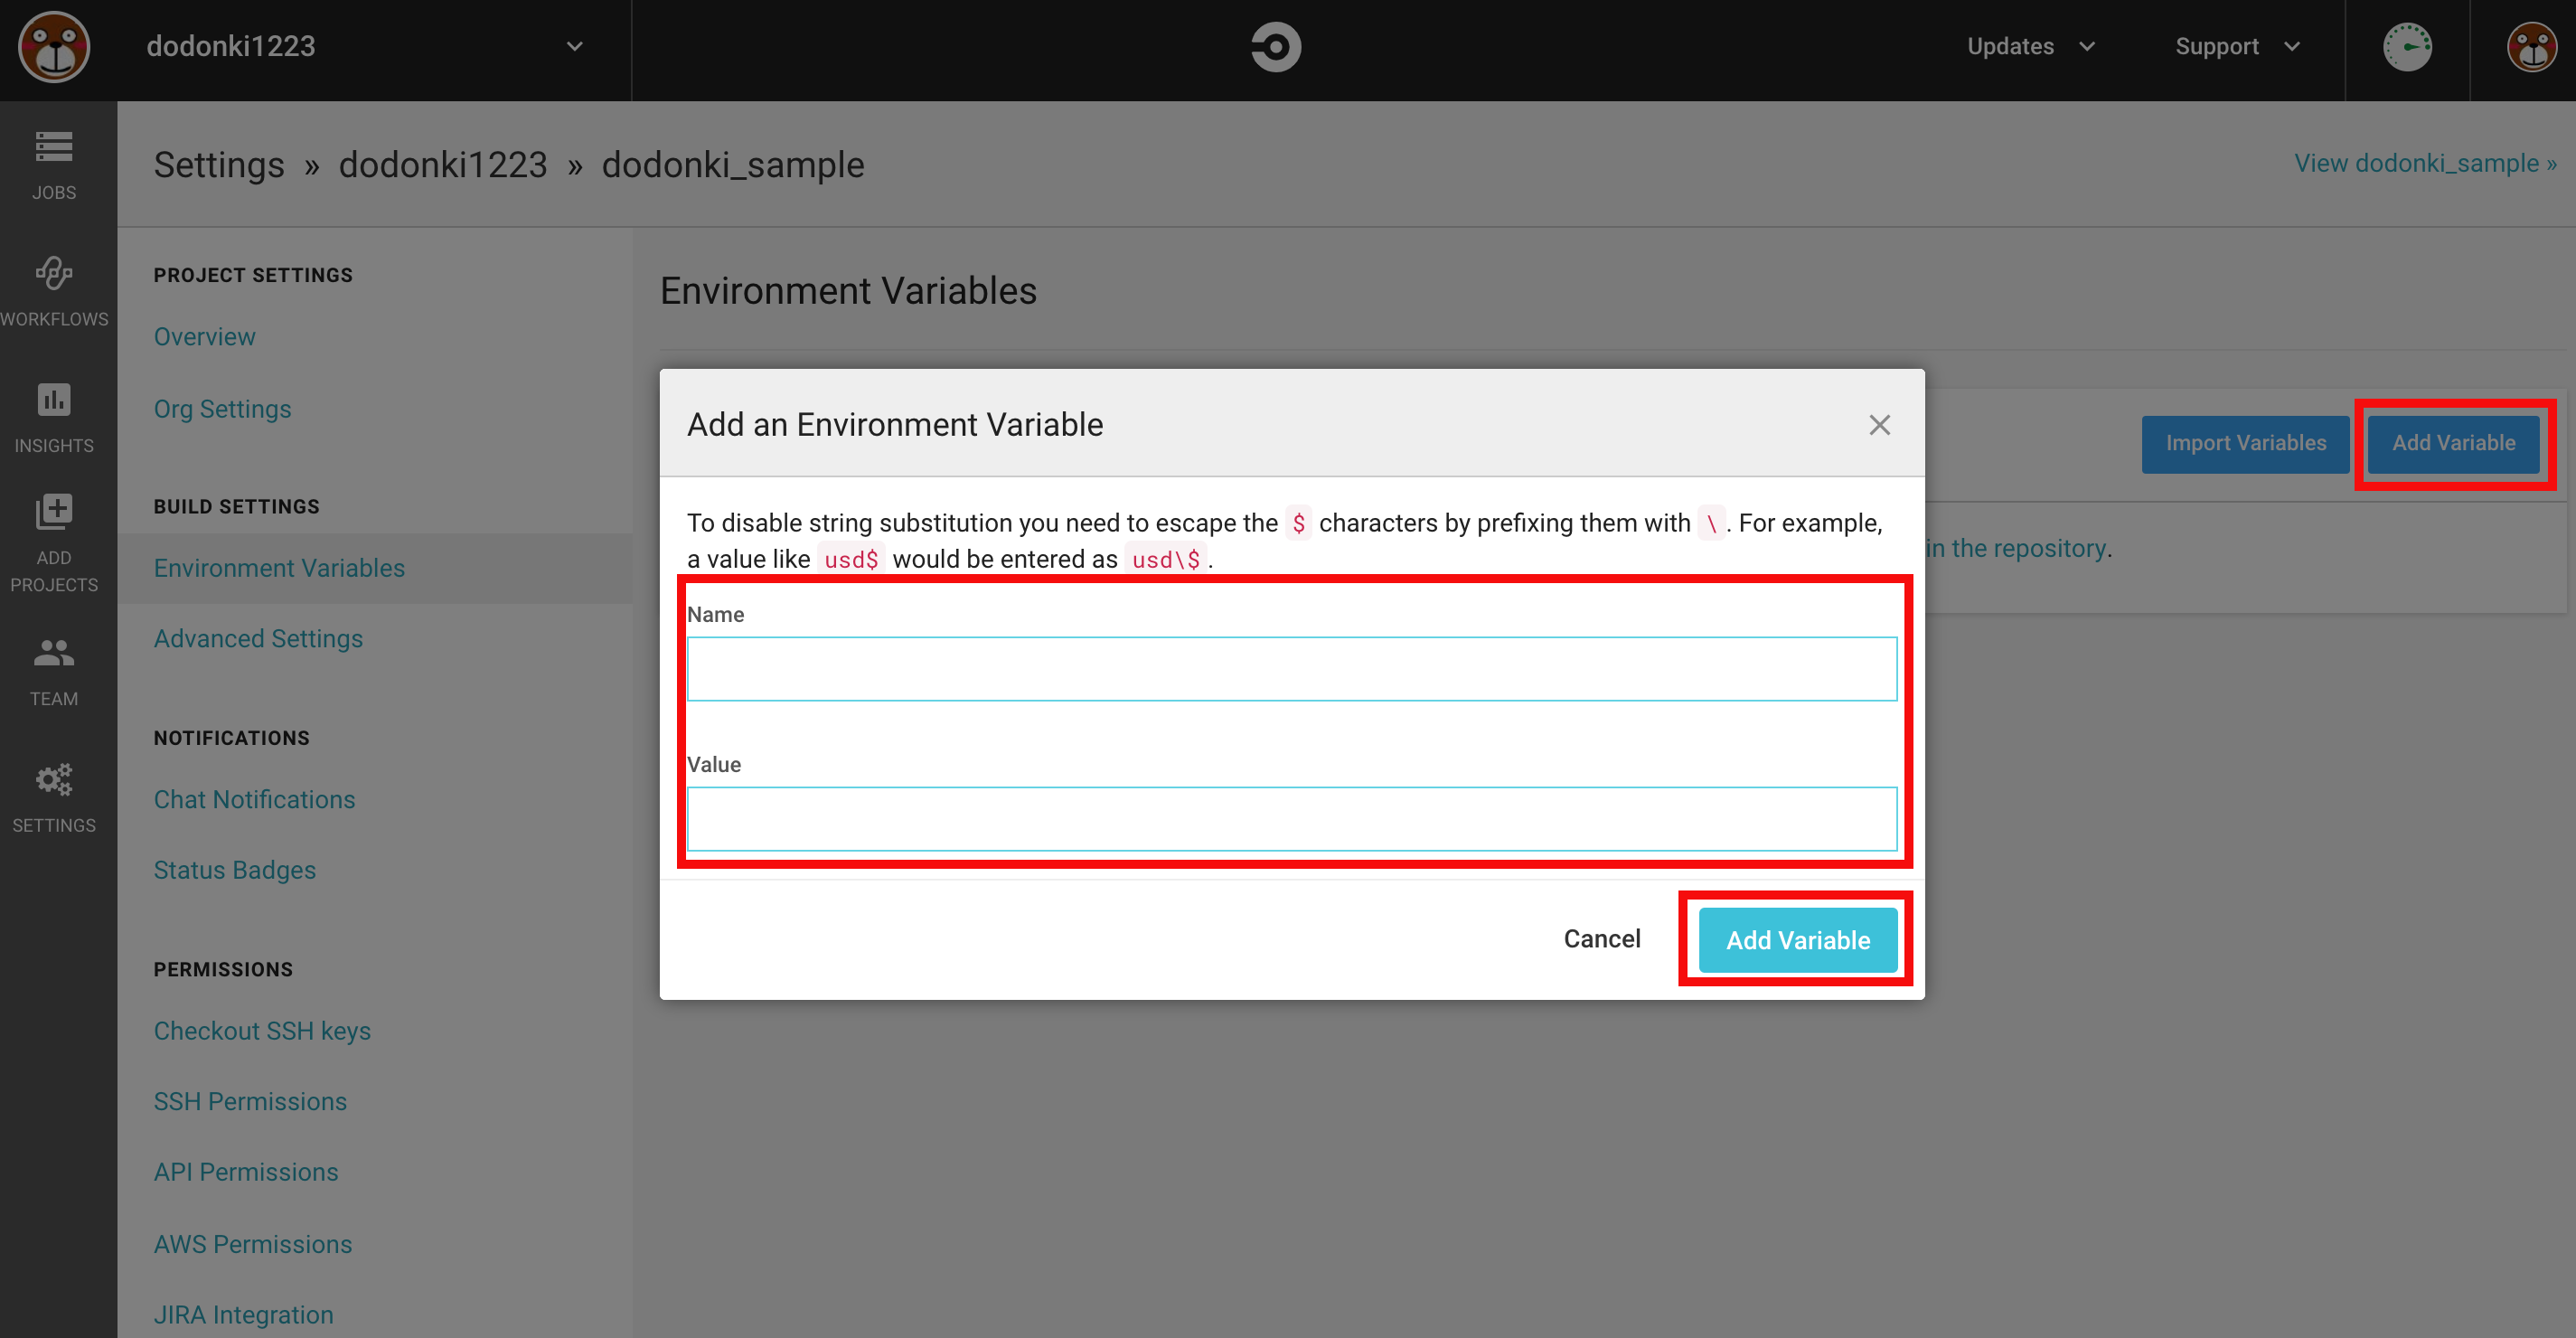
RUBYGEMS_PASSWORD、RUBYGEMS_EMAILという環境変数を追加してください
| Name | Value |
|---|---|
| RUBYGEMS_PASSWORD | RubyGemsにログインするパスワード |
| RUBYGEMS_EMAIL | GitHubに登録しているメールアドレス |
デプロイ機能を追加する
様々な環境へのデプロイ方法が公式のドキュメントに書かれているので参考にしましょう
Configuring Deploys - CircleCI
デプロイ用のjobを追加する
config.ymlの一番下に下記コードを追加してください
  deploy:
    docker: # run the steps with Docker
      - image: circleci/ruby:2.4.2-jessie-node # ...with this image as the primary container; this is where all `steps` will run

    steps: # a collection of executable commands
      - checkout # special step to check out source code to working directory

      - run:
          name: install Bundler
          command: |
            echo 'export BUNDLER_VERSION=$(cat Gemfile.lock | tail -1 | tr -d " ")' >> $BASH_ENV
            source $BASH_ENV
            gem install bundler

      # Which version of bundler?
      - run:
          name: Which bundler?
          command: bundle -v

      # Restore bundle cache
      # Read about caching dependencies: https://circleci.com/docs/2.0/caching/
      - restore_cache:
          keys:
            - gem-deploy-{{ checksum "Gemfile.lock" }}
            - gem-deploy-

      - run: # Install Ruby dependencies
          name: Bundle Install
          command: bundle check --path vendor/bundle || bundle install

      # Store bundle cache for Ruby dependencies
      - save_cache:
          key: gem-deploy-{{ checksum "Gemfile.lock" }}
          paths:
            - vendor/bundle

      - run:
          name: deploy
          command: |
            curl -u dodonki1223:$RUBYGEMS_PASSWORD https://rubygems.org/api/v1/api_key.yaml > ~/.gem/credentials; chmod 0600 ~/.gem/credentials
            git config user.name dodonki1223
            git config user.email $RUBYGEMS_EMAIL
            bundle exec rake build
            bundle exec rake release
nameがdeployのところが実際のデプロイ処理になります
それより前がデプロイコマンドを実行するための準備です
gemコマンドが使えるようにするため、下記コマンドを実行します(ここでRUBYGEMS_PASSWORDの環境変数を使用しています)
curl -u dodonki1223:$RUBYGEMS_PASSWORD https://rubygems.org/api/v1/api_key.yaml > ~/.gem/credentials; chmod 0600 ~/.gem/credentials
連携先のGitの情報をセットします(ここでRUBYGEMS_EMAILを使用しています)
git config user.name dodonki1223
git config user.email $RUBYGEMS_EMAIL
RubyGemsのデプロイコマンドを実行します
git tagの情報がpushされるためデプロイコマンドの前でGit情報をセットしています
bundle exec rake build
bundle exec rake release
デプロイのjobがmasterブランチでのみ実行されるようWorkflowで制御する
Workflowについては下記の記事を参考にしてください
config.ymlの一番下に下記コードを追加してください
workflows:
  version: 2
  build-and-deploy:
    jobs:
      - build
      - deploy:
          requires:
            - build
          filters:
            branches:
              only: master
最終的なconfig.yml
version: 2 # use CircleCI 2.0
jobs: # a collection of steps
  build: # runs not using Workflows must have a `build` job as entry point
    parallelism: 3 # run three instances of this job in parallel
    docker: # run the steps with Docker
      - image: circleci/ruby:2.4.2-jessie-node # ...with this image as the primary container; this is where all `steps` will run
        environment: # environment variables for primary container
          BUNDLE_JOBS: 3
          BUNDLE_RETRY: 3
          BUNDLE_PATH: vendor/bundle

    steps: # a collection of executable commands
      - checkout # special step to check out source code to working directory

      - run:
          name: install Bundler
          command: |
            echo 'export BUNDLER_VERSION=$(cat Gemfile.lock | tail -1 | tr -d " ")' >> $BASH_ENV
            source $BASH_ENV
            gem install bundler

      # Which version of bundler?
      - run:
          name: Which bundler?
          command: bundle -v

      # Restore bundle cache
      # Read about caching dependencies: https://circleci.com/docs/2.0/caching/
      - restore_cache:
          keys:
            - gem-sample-{{ checksum "Gemfile.lock" }}
            - gem-sample-

      - run: # Install Ruby dependencies
          name: Bundle Install
          command: bundle check --path vendor/bundle || bundle install --deployment

      # Store bundle cache for Ruby dependencies
      - save_cache:
          key: gem-sample-{{ checksum "Gemfile.lock" }}
          paths:
            - vendor/bundle

      # run rubocop!
      - run:
          name: run rubocop
          command: |
            bundle exec rubocop
      - run:
          name: Run rspec in parallel
          command: |
            bundle exec rspec --profile 10 \
                              --format RspecJunitFormatter \
                              --out test_results/rspec.xml \
                              --format progress \
                              $(circleci tests glob "spec/**/*_spec.rb" | circleci tests split --split-by=timings)
      # create document
      - run:
          name: create document
          command: |
            bundle exec yard

      # Save test results for timing analysis
      - store_test_results: # Upload test results for display in Test Summary: https://circleci.com/docs/2.0/collect-test-data/
          path: test_results
      - store_artifacts:
          # テスト結果をtest-resultsディレクトリに吐き出す
          path: test_results
          destination: test-results
      - store_artifacts:
          # カバレッジの結果をcoverage-resultsディレクトリに吐き出す
          path: coverage
          destination: coverage-results
      - store_artifacts:
          # ドキュメントの結果をyard-resultsディレクトリに吐き出す
          path: ./doc
          destination: yard-results
      # See https://circleci.com/docs/2.0/deployment-integrations/ for example deploy configs

  deploy:
    docker: # run the steps with Docker
      - image: circleci/ruby:2.4.2-jessie-node # ...with this image as the primary container; this is where all `steps` will run
      # - image: circleci/ruby:2.6.0-node-browsers

    steps: # a collection of executable commands
      - checkout # special step to check out source code to working directory

      - run:
          name: install Bundler
          command: |
            echo 'export BUNDLER_VERSION=$(cat Gemfile.lock | tail -1 | tr -d " ")' >> $BASH_ENV
            source $BASH_ENV
            gem install bundler

      # Which version of bundler?
      - run:
          name: Which bundler?
          command: bundle -v

      # Restore bundle cache
      # Read about caching dependencies: https://circleci.com/docs/2.0/caching/
      - restore_cache:
          keys:
            - gem-deploy-{{ checksum "Gemfile.lock" }}
            - gem-deploy-

      - run: # Install Ruby dependencies
          name: Bundle Install
          command: bundle check --path vendor/bundle || bundle install

      # Store bundle cache for Ruby dependencies
      - save_cache:
          key: gem-deploy-{{ checksum "Gemfile.lock" }}
          paths:
            - vendor/bundle

      - run:
          name: deploy
          command: |
            curl -u dodonki1223:$RUBYGEMS_PASSWORD https://rubygems.org/api/v1/api_key.yaml > ~/.gem/credentials; chmod 0600 ~/.gem/credentials
            git config user.name dodonki1223
            git config user.email $RUBYGEMS_EMAIL
            bundle exec rake build
            bundle exec rake release

workflows:
  version: 2
  build-and-deploy:
    jobs:
      - build
      - deploy:
          requires:
            - build
          filters:
            branches:
              only: master
circleci buildコマンドがWorkflowに対応していないので今回はローカルでの実行はしません
CircleCIからGitHubに連携できるようにする
RubyGemsへのデプロイコマンドでgit tagの情報がpushされるためCircleCIからGitHubに連携できるようにする必要があります
設定していないと下記のようなエラーが出てデプロイができません

dodonki_sample 0.1.5 built to pkg/dodonki_sample-0.1.5.gem.
dodonki_sample 0.1.5 built to pkg/dodonki_sample-0.1.5.gem.
Tagged v0.1.5.
Untagging v0.1.5 due to error.
rake aborted!
Couldn't git push. `git push ' failed with the following output:

warning: push.default is unset; its implicit value has changed in
Git 2.0 from 'matching' to 'simple'. To squelch this message
and maintain the traditional behavior, use:

  git config --global push.default matching

To squelch this message and adopt the new behavior now, use:

  git config --global push.default simple

When push.default is set to 'matching', git will push local branches
to the remote branches that already exist with the same name.

Since Git 2.0, Git defaults to the more conservative 'simple'
behavior, which only pushes the current branch to the corresponding
remote branch that 'git pull' uses to update the current branch.

See 'git help config' and search for 'push.default' for further information.
(the 'simple' mode was introduced in Git 1.7.11. Use the similar mode
'current' instead of 'simple' if you sometimes use older versions of Git)

ERROR: The key you are authenticating with has been marked as read only.
fatal: Could not read from remote repository.

Please make sure you have the correct access rights
and the repository exists.
SETTINGSの画面からProjectsをクリックします
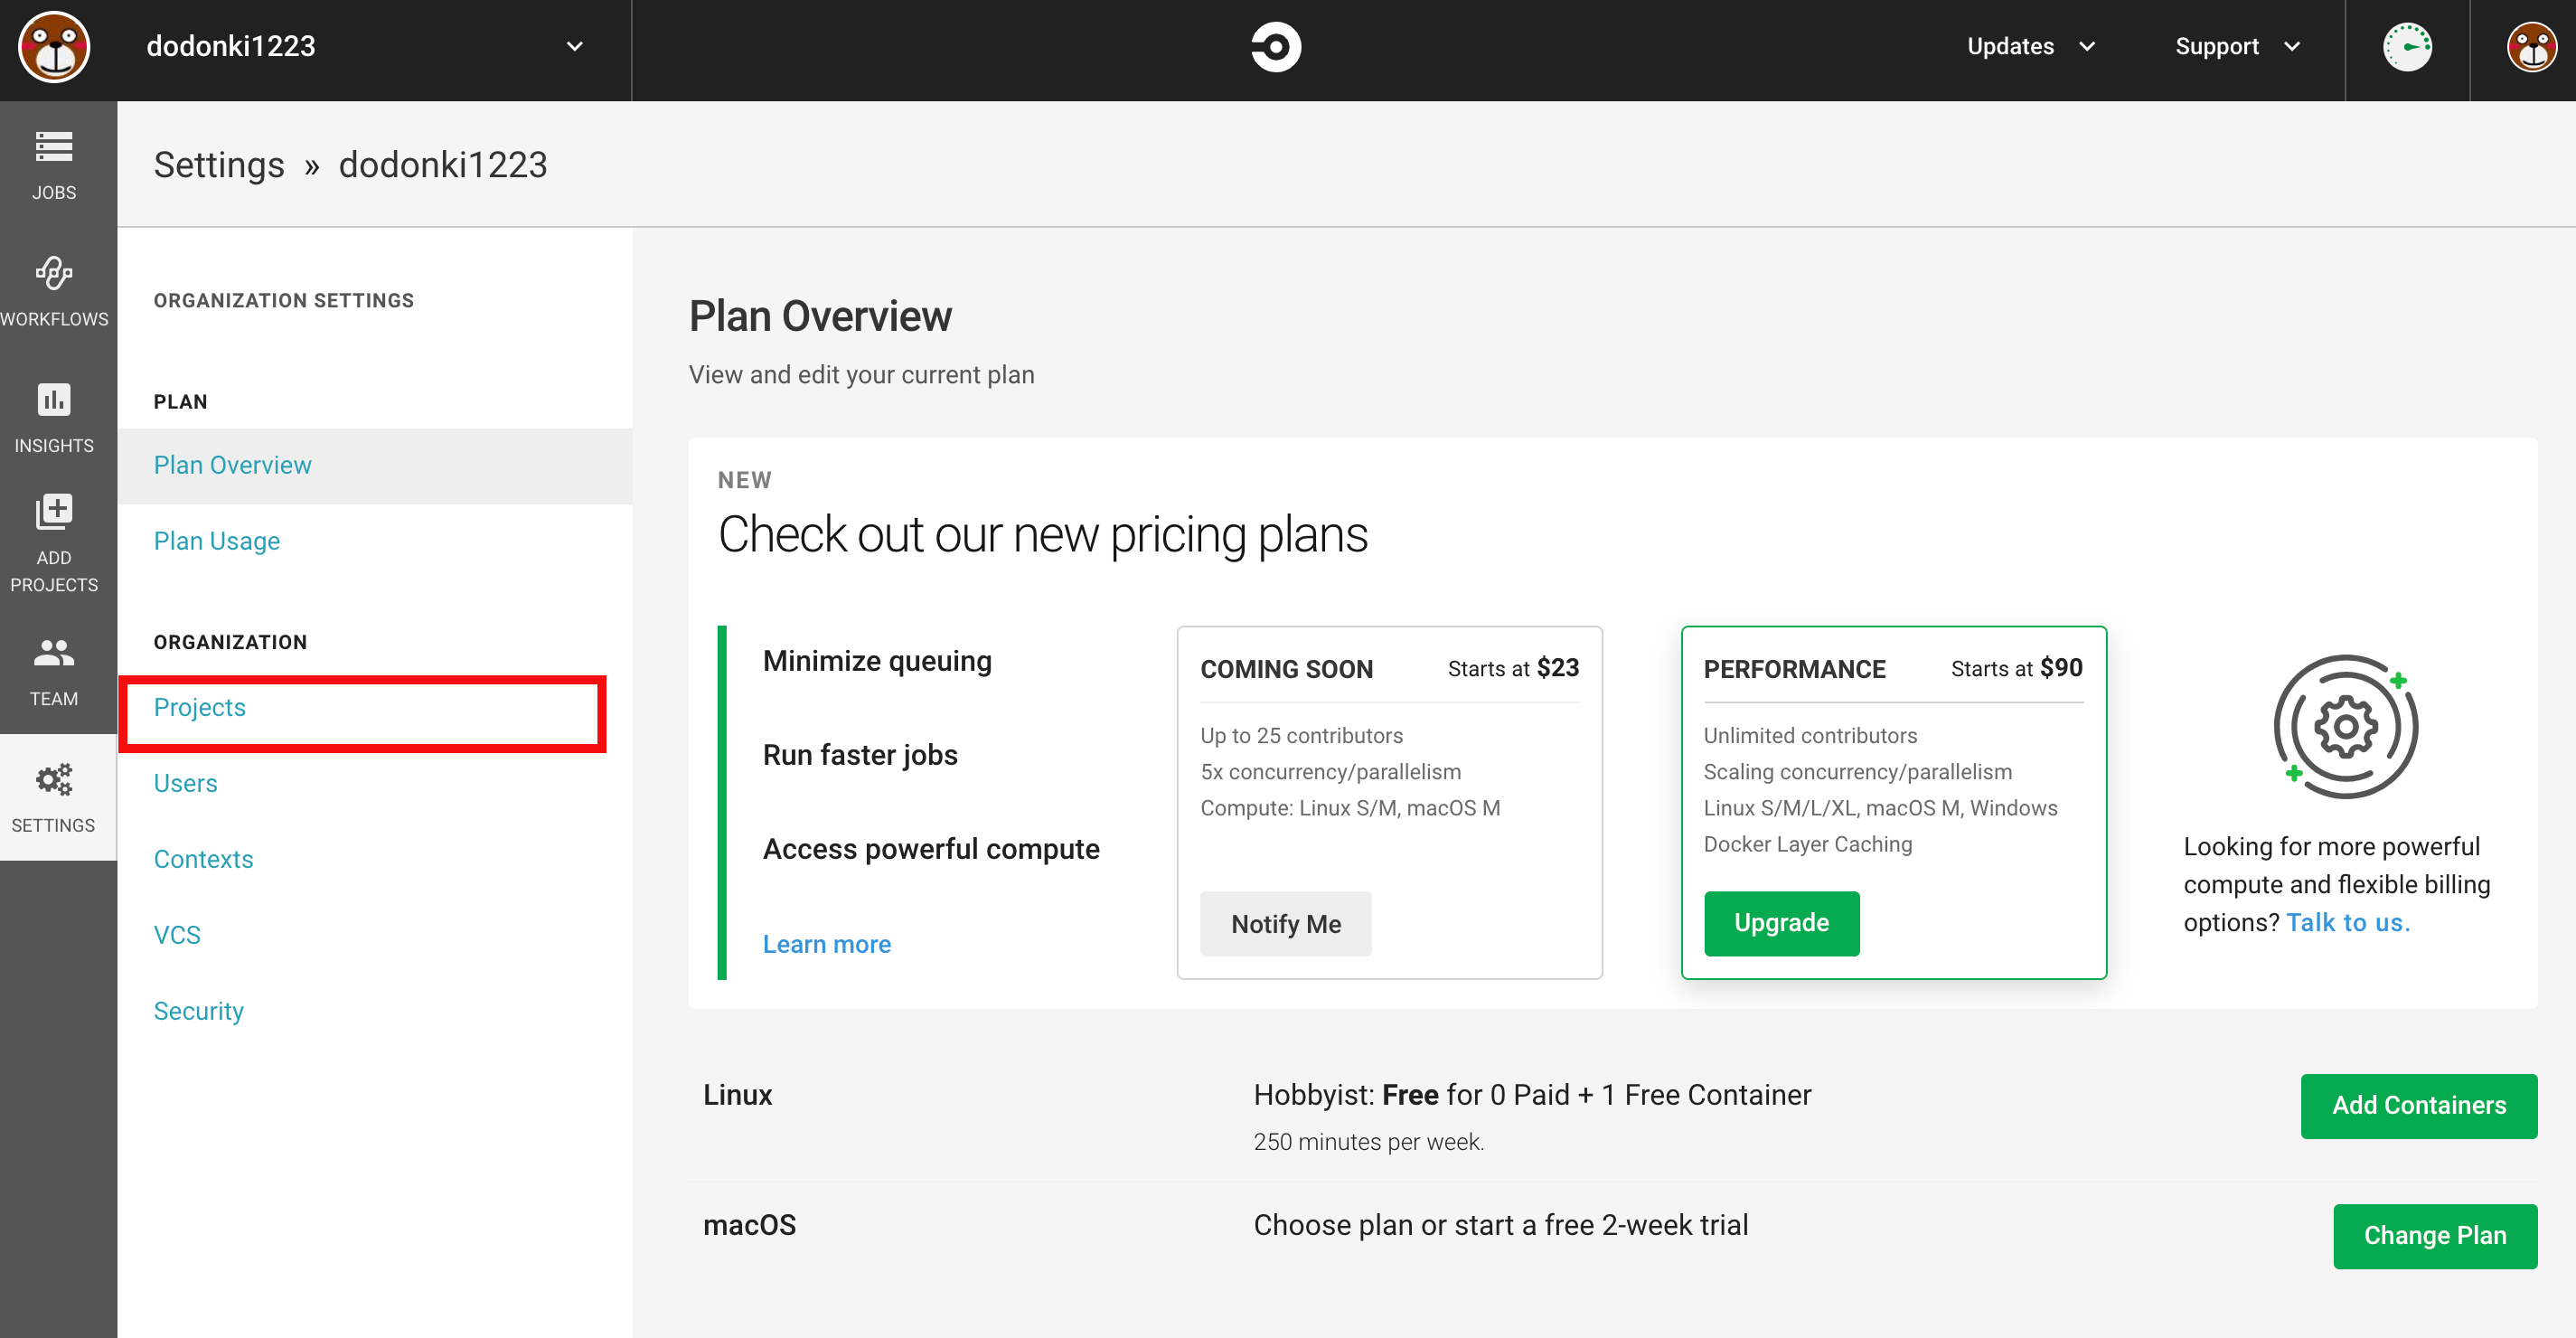
対象のプロジェクトの設定ボタンをクリックします
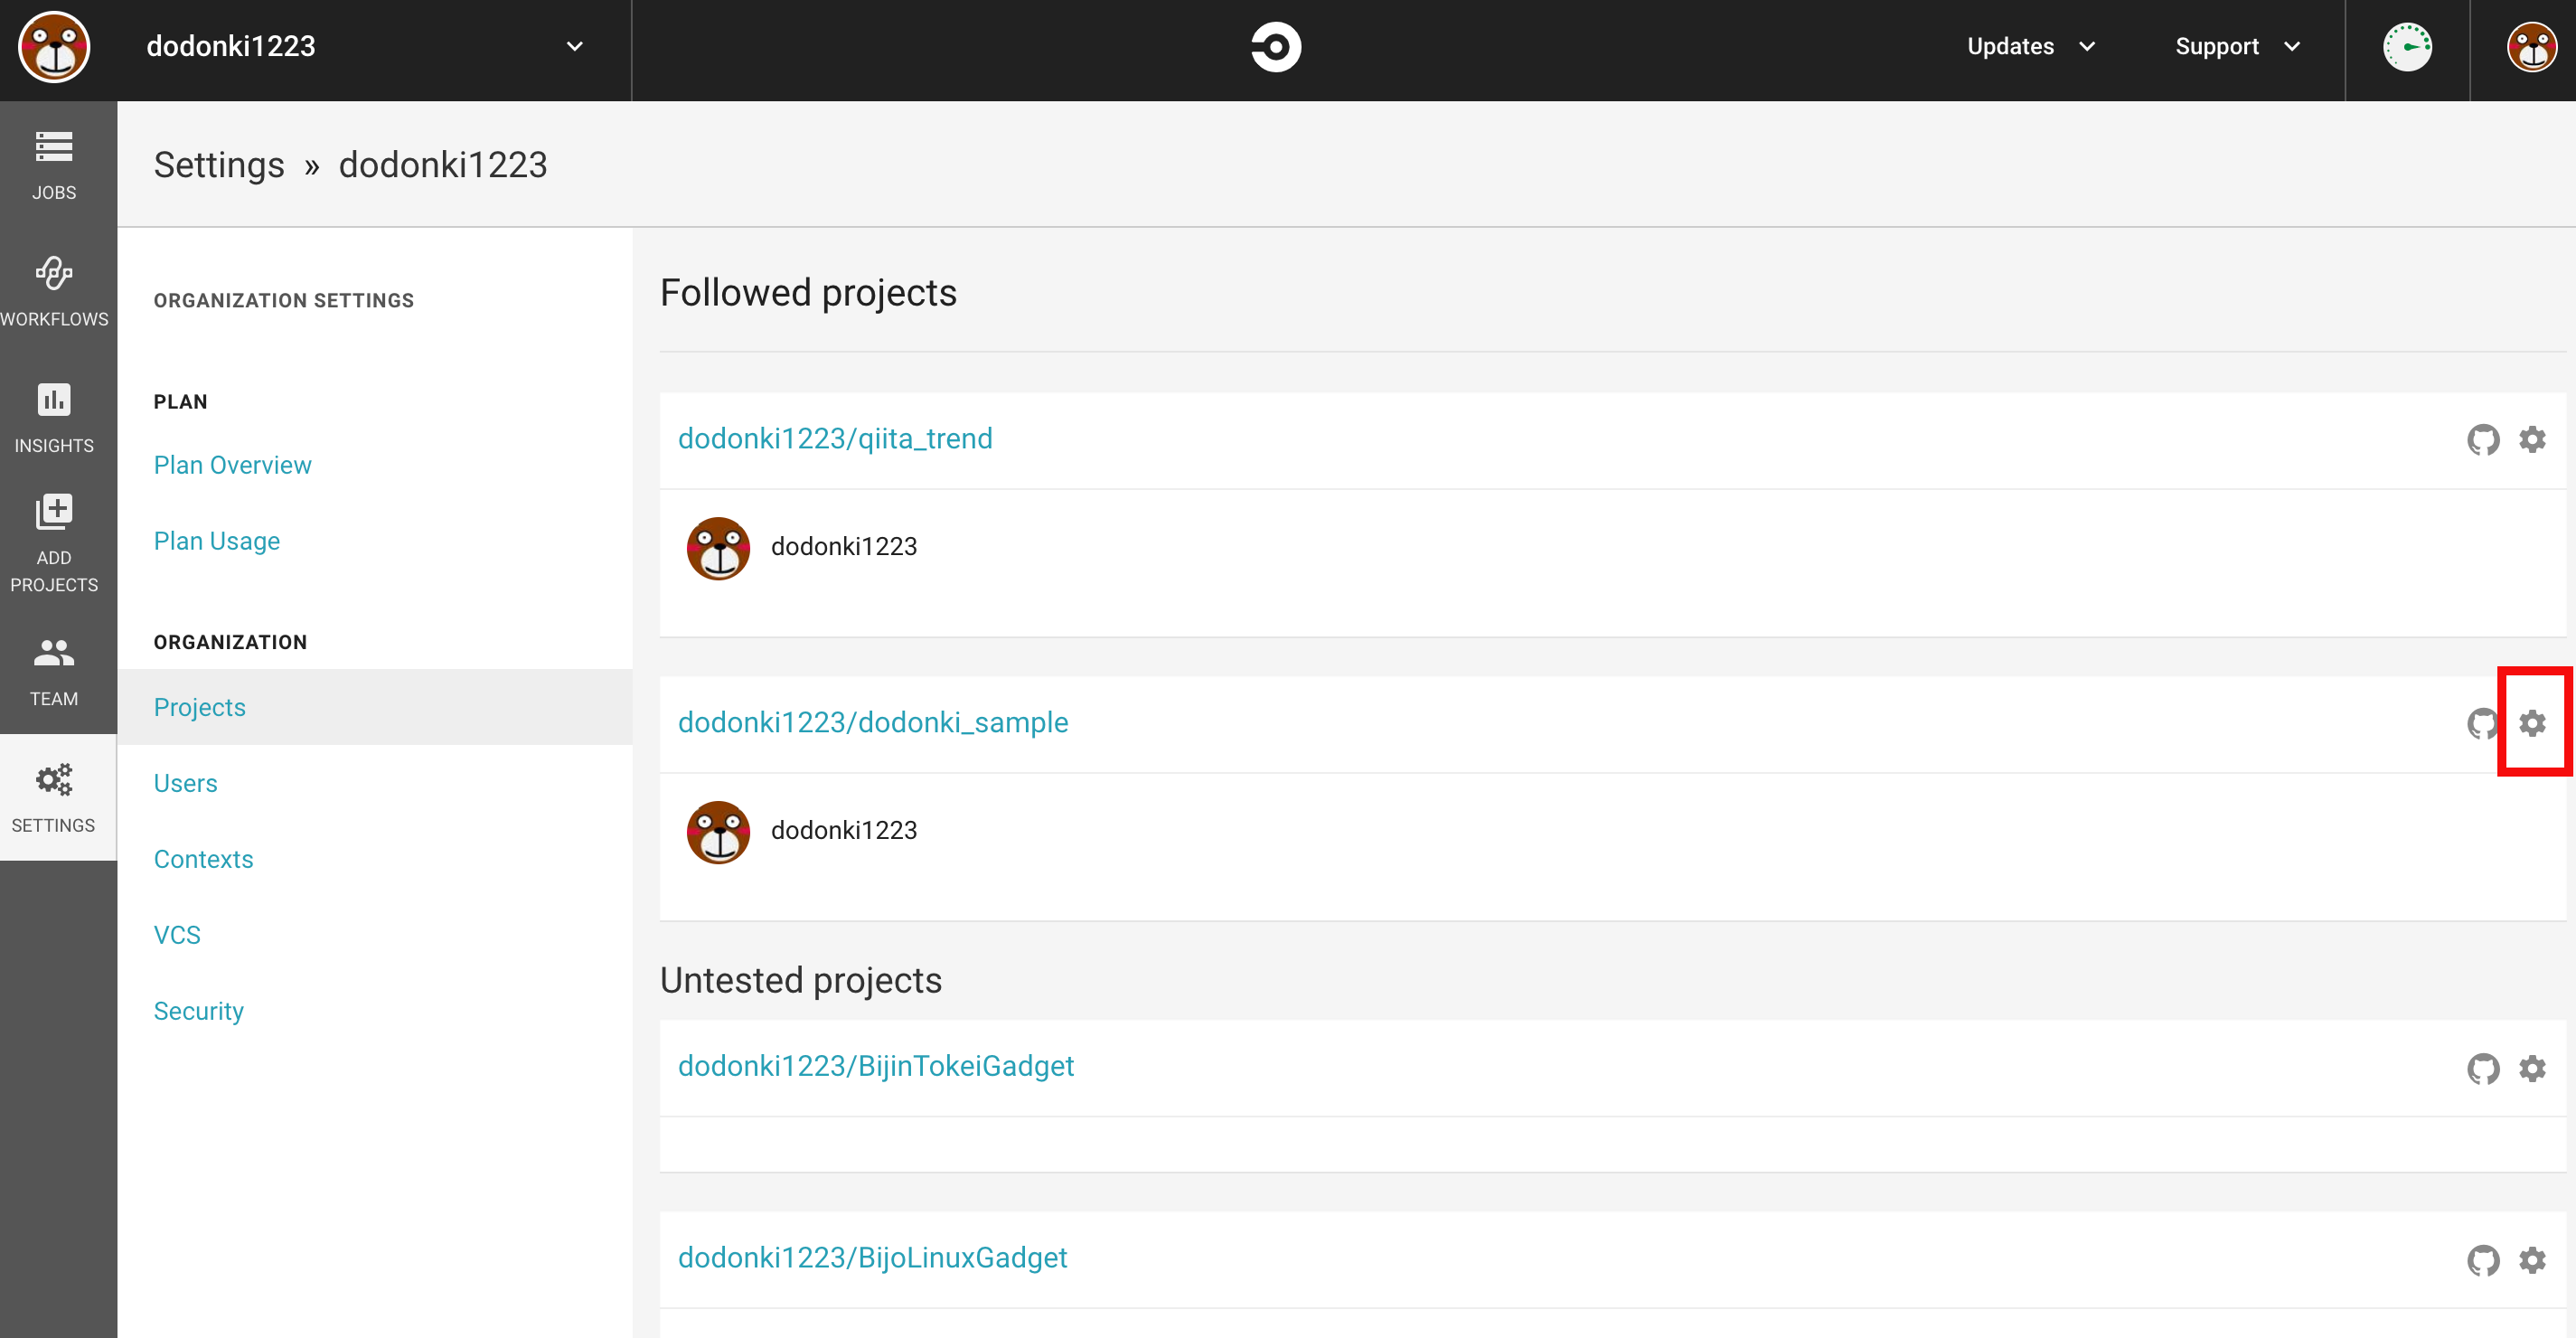
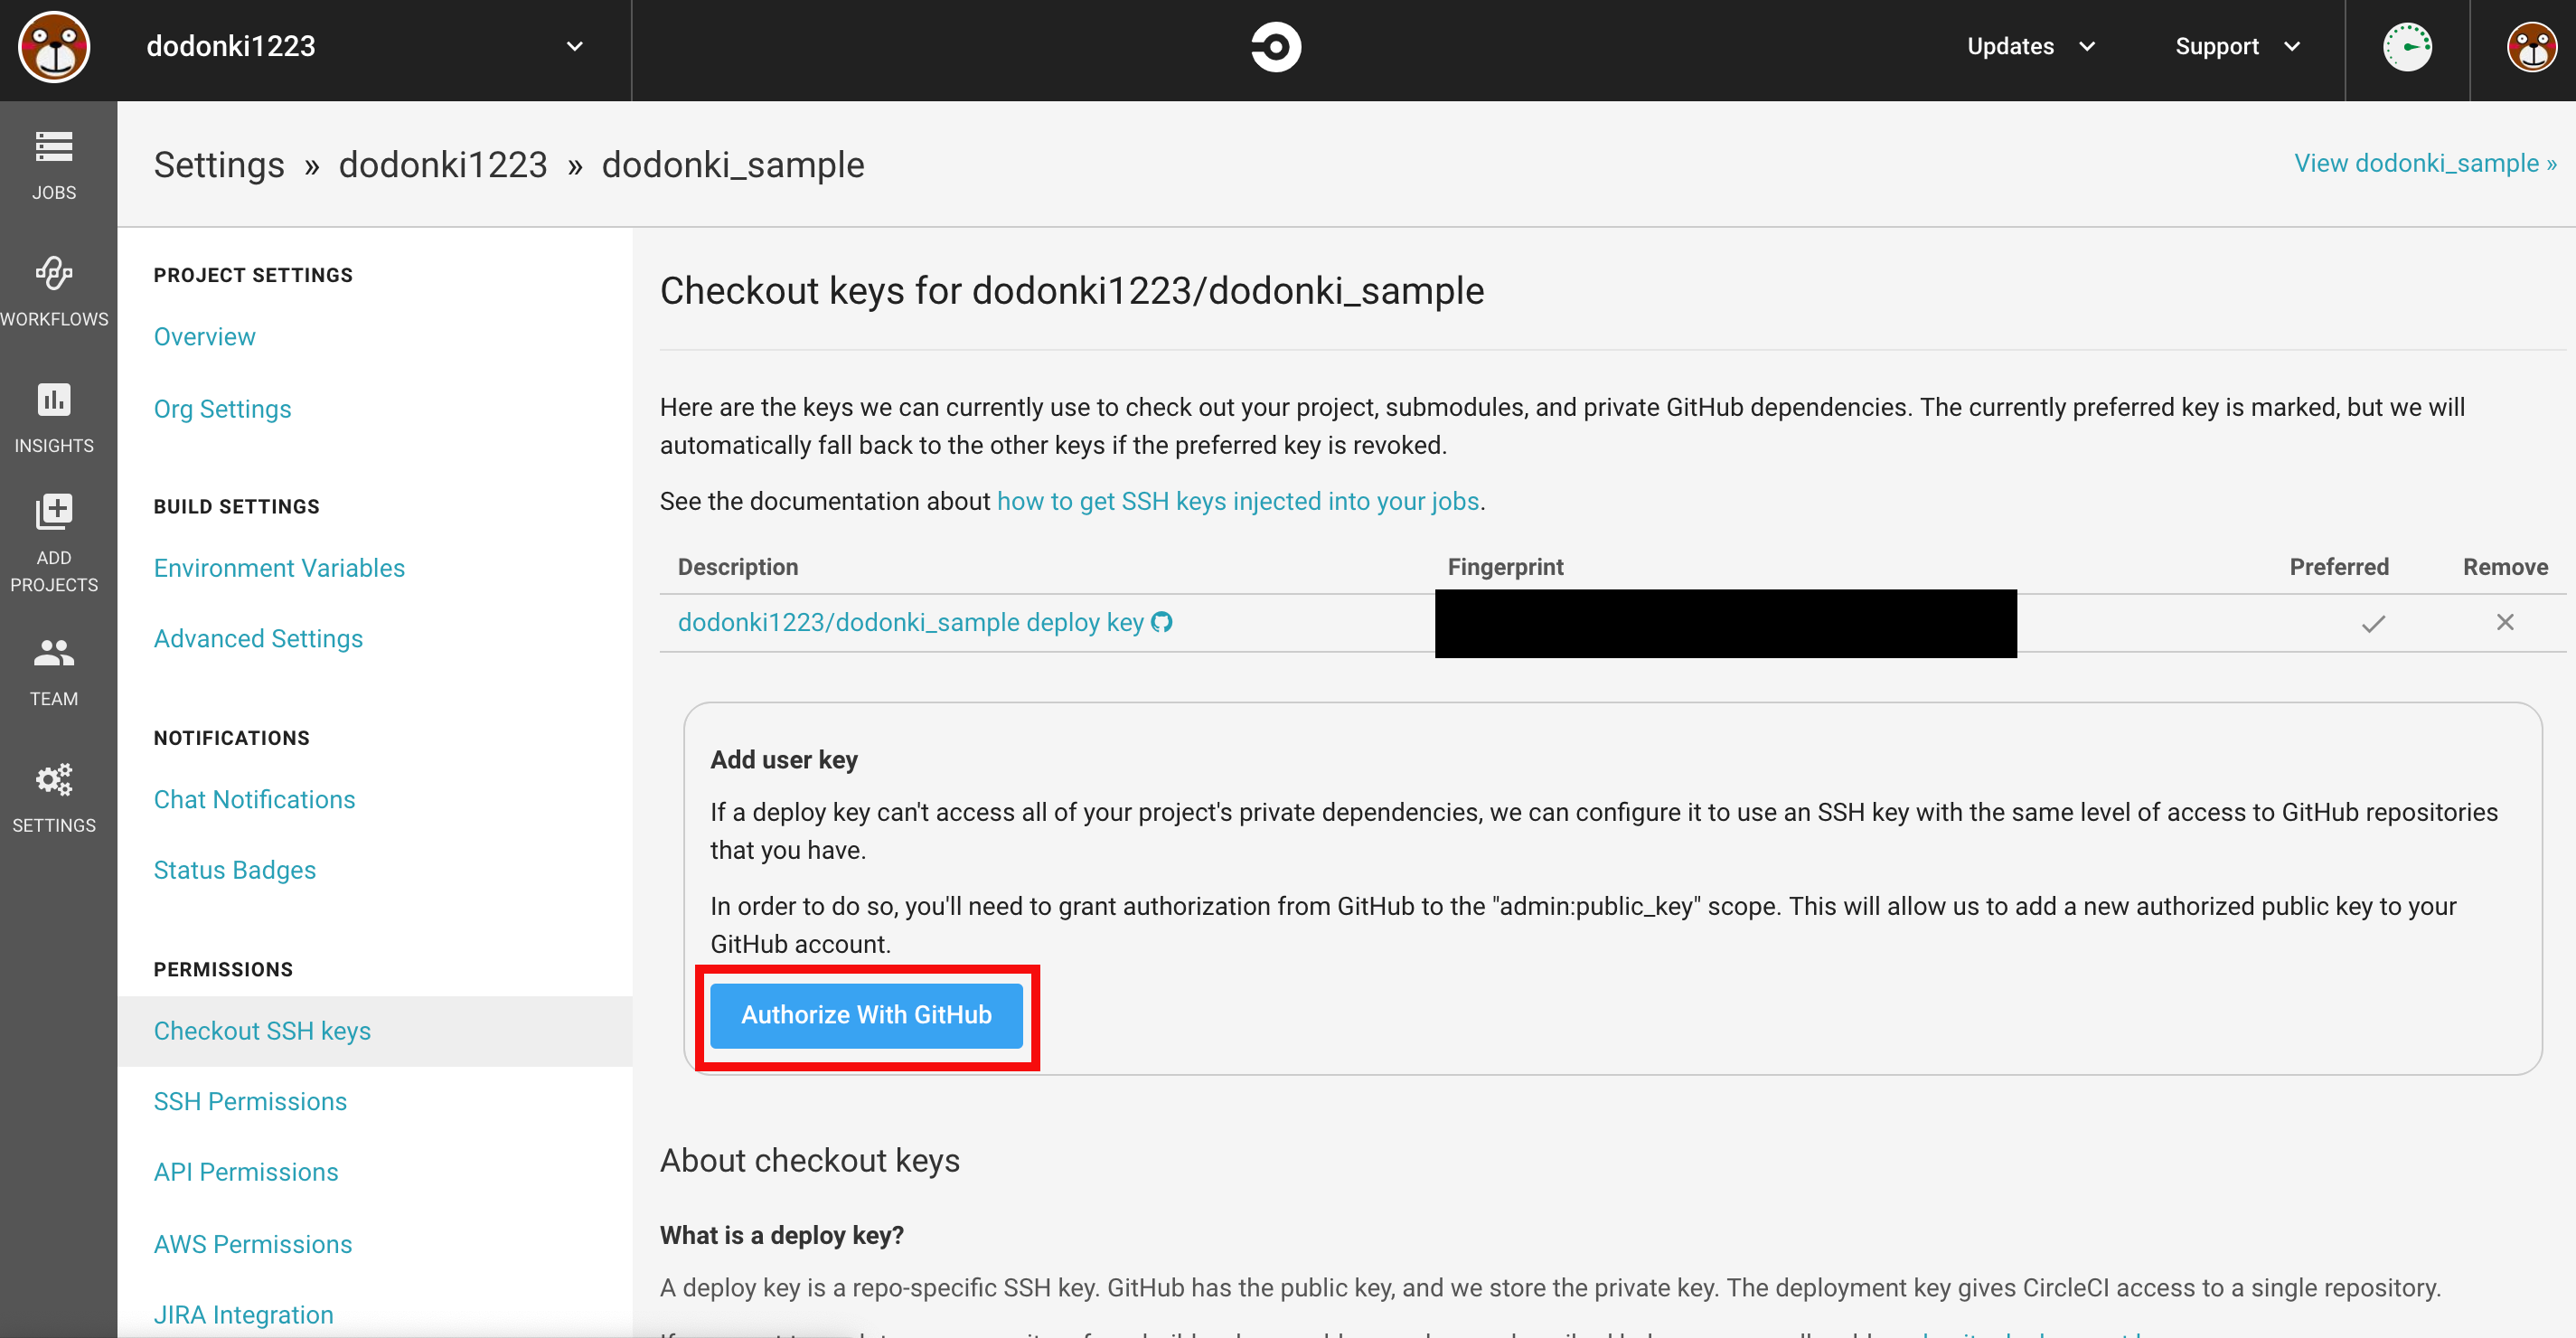
Checkout SSH keysの画面からAuthorize With GitHubをクリックします
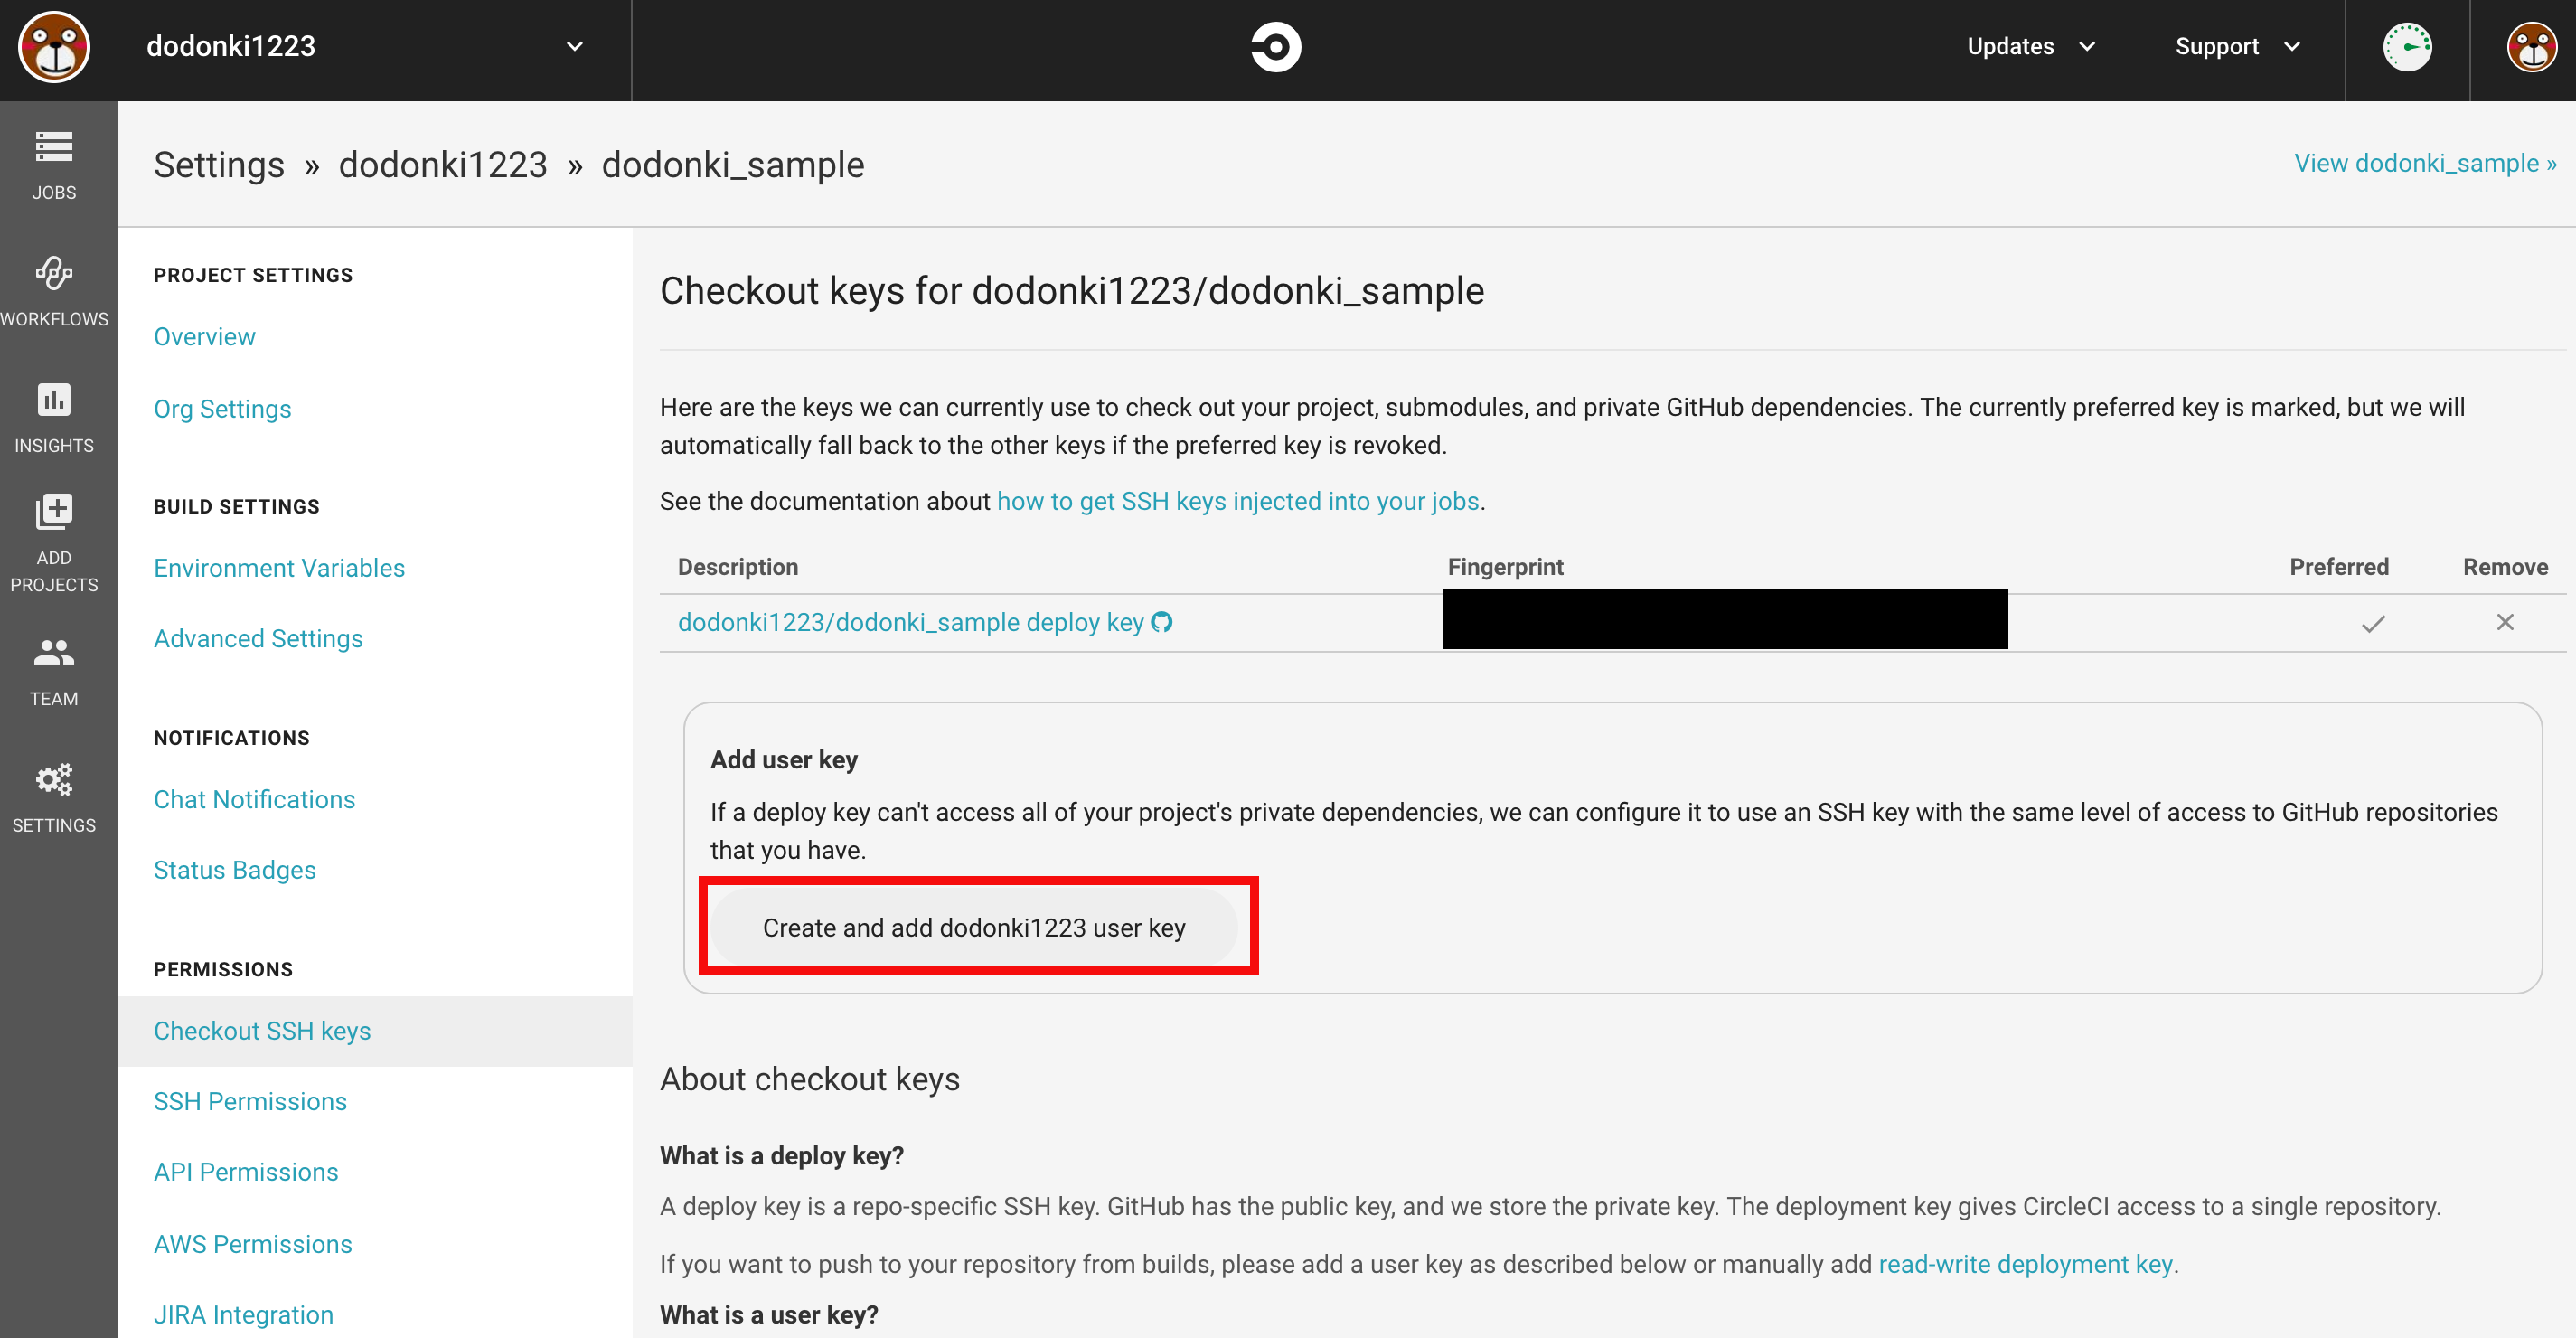
Create and add ユーザー名 user_keyをクリックします
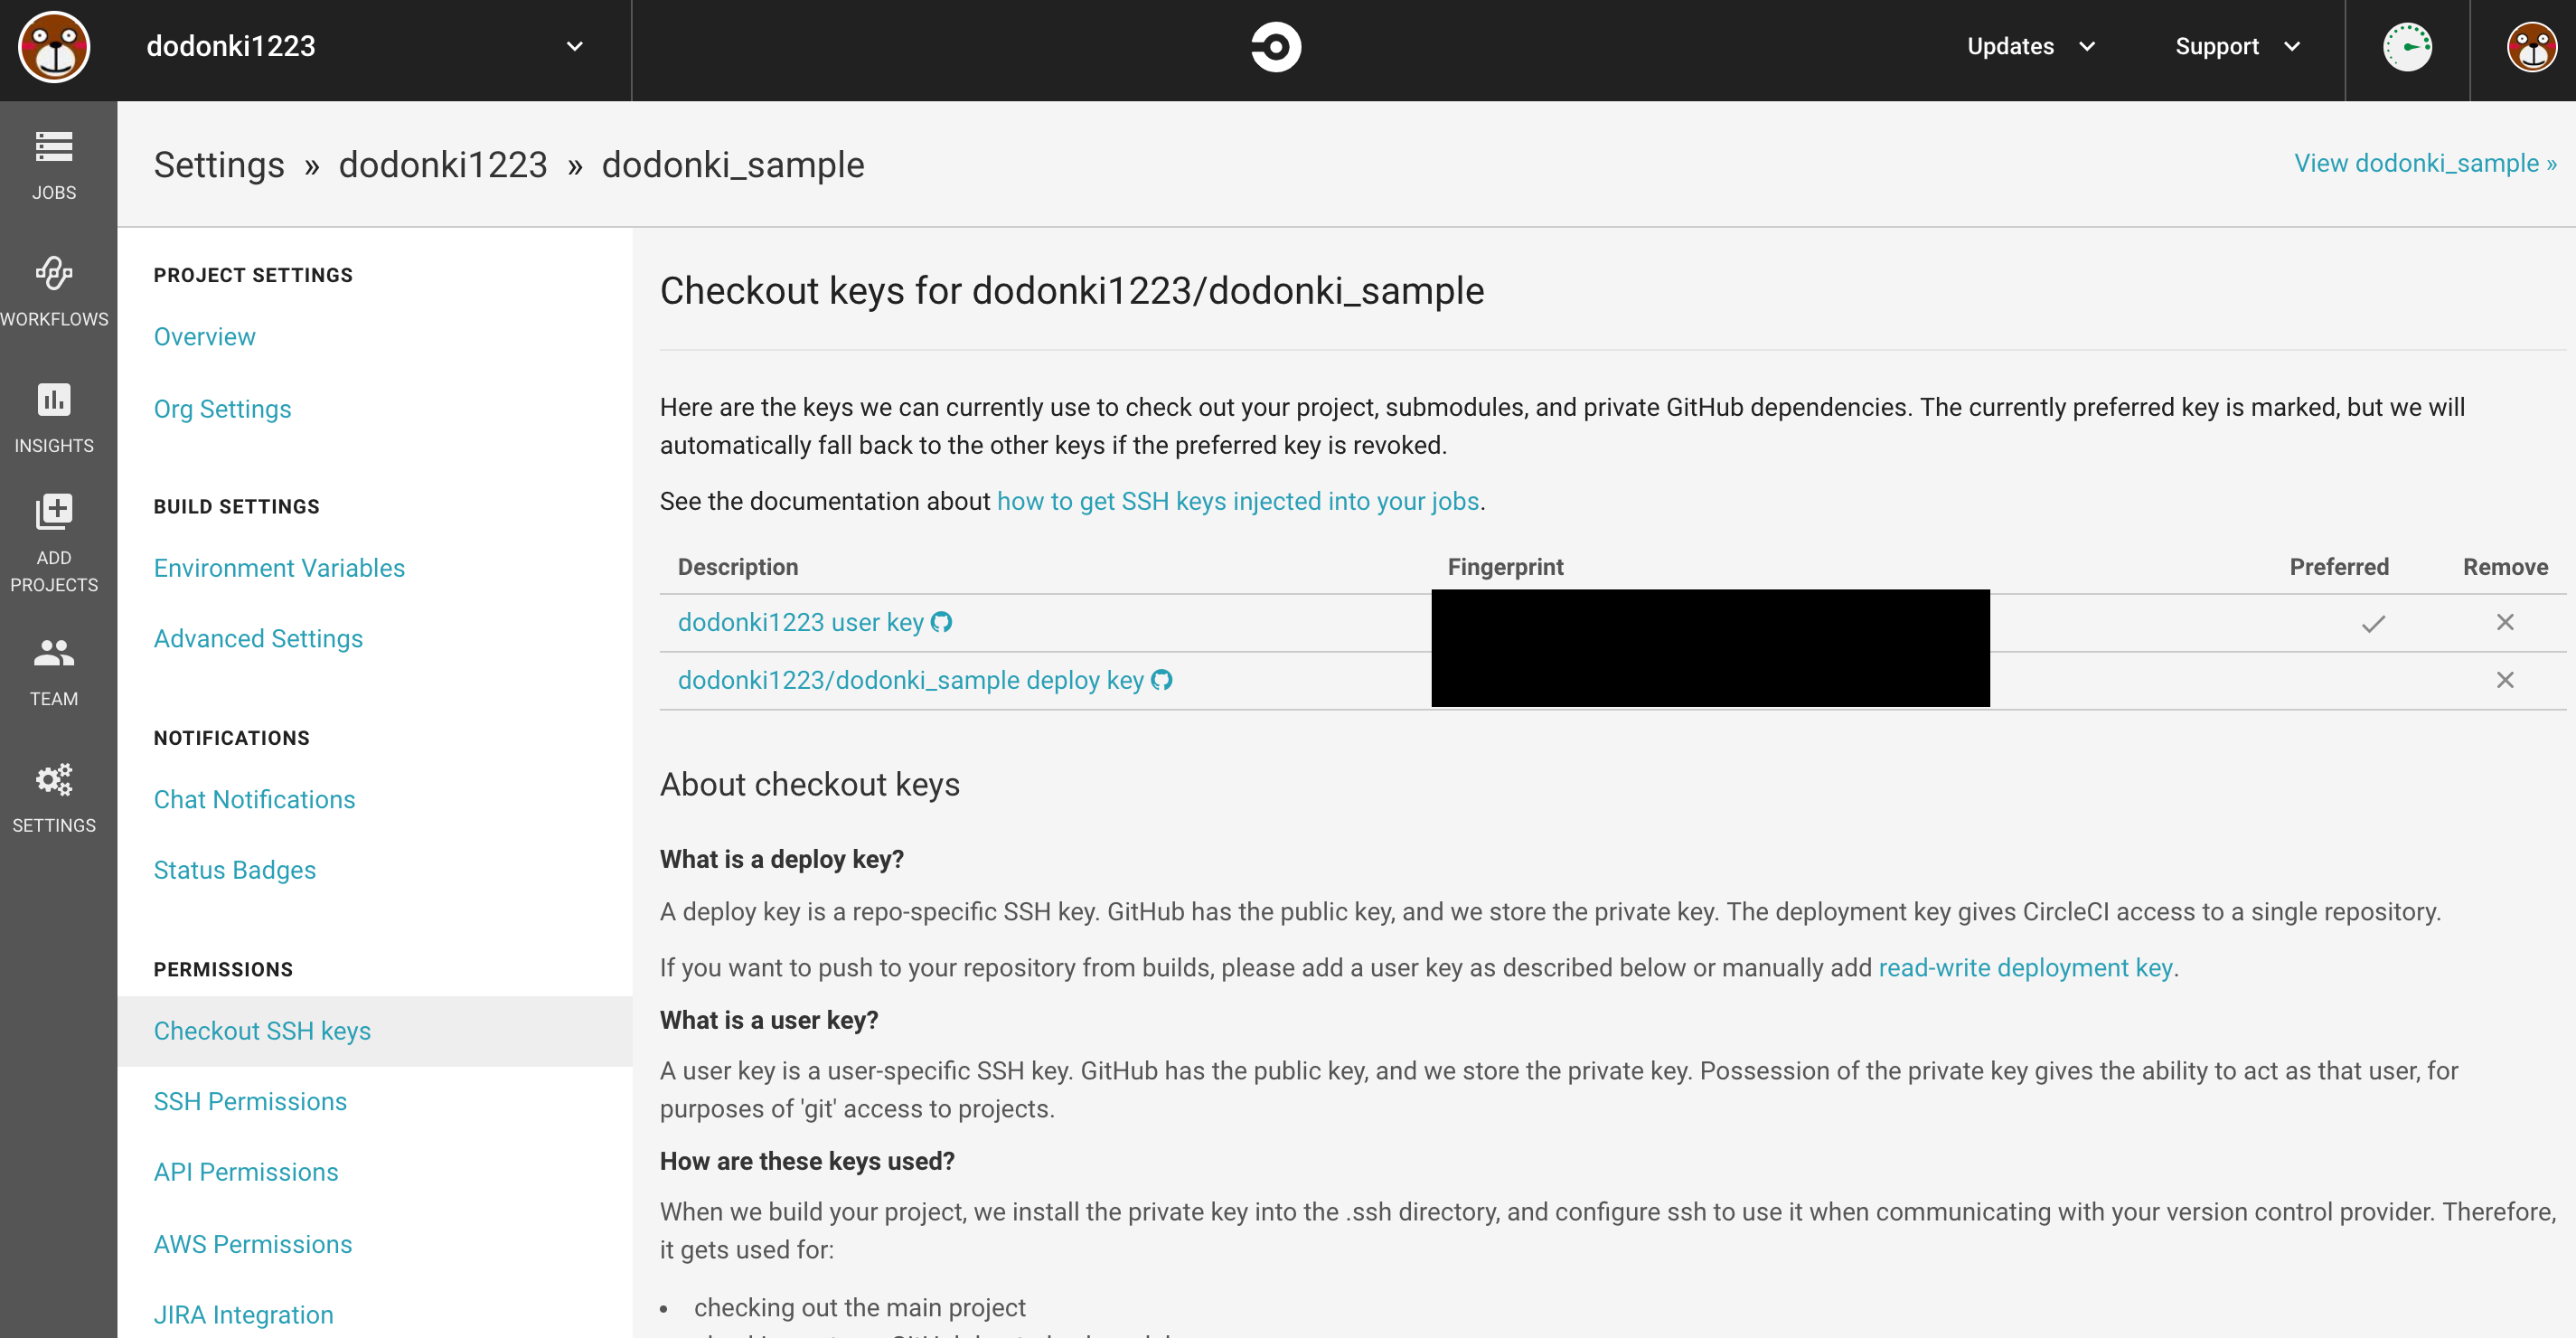
下記のようにKeyが追加されていれば準備OKです
自動デプロイ動作確認
バージョンをアップする
lib/dodonki_sample/version.rbのファイルを修正します
バージョンを0.1.0から0.1.1に上げます
VERSION = '0.1.1'
bundle installする
バージョンを上げることによりbundle installするとGemfile.loackに変更がかかります
自動デプロイの動作確認
masterブランチで今までの変更をcommitしpushしてみましょう
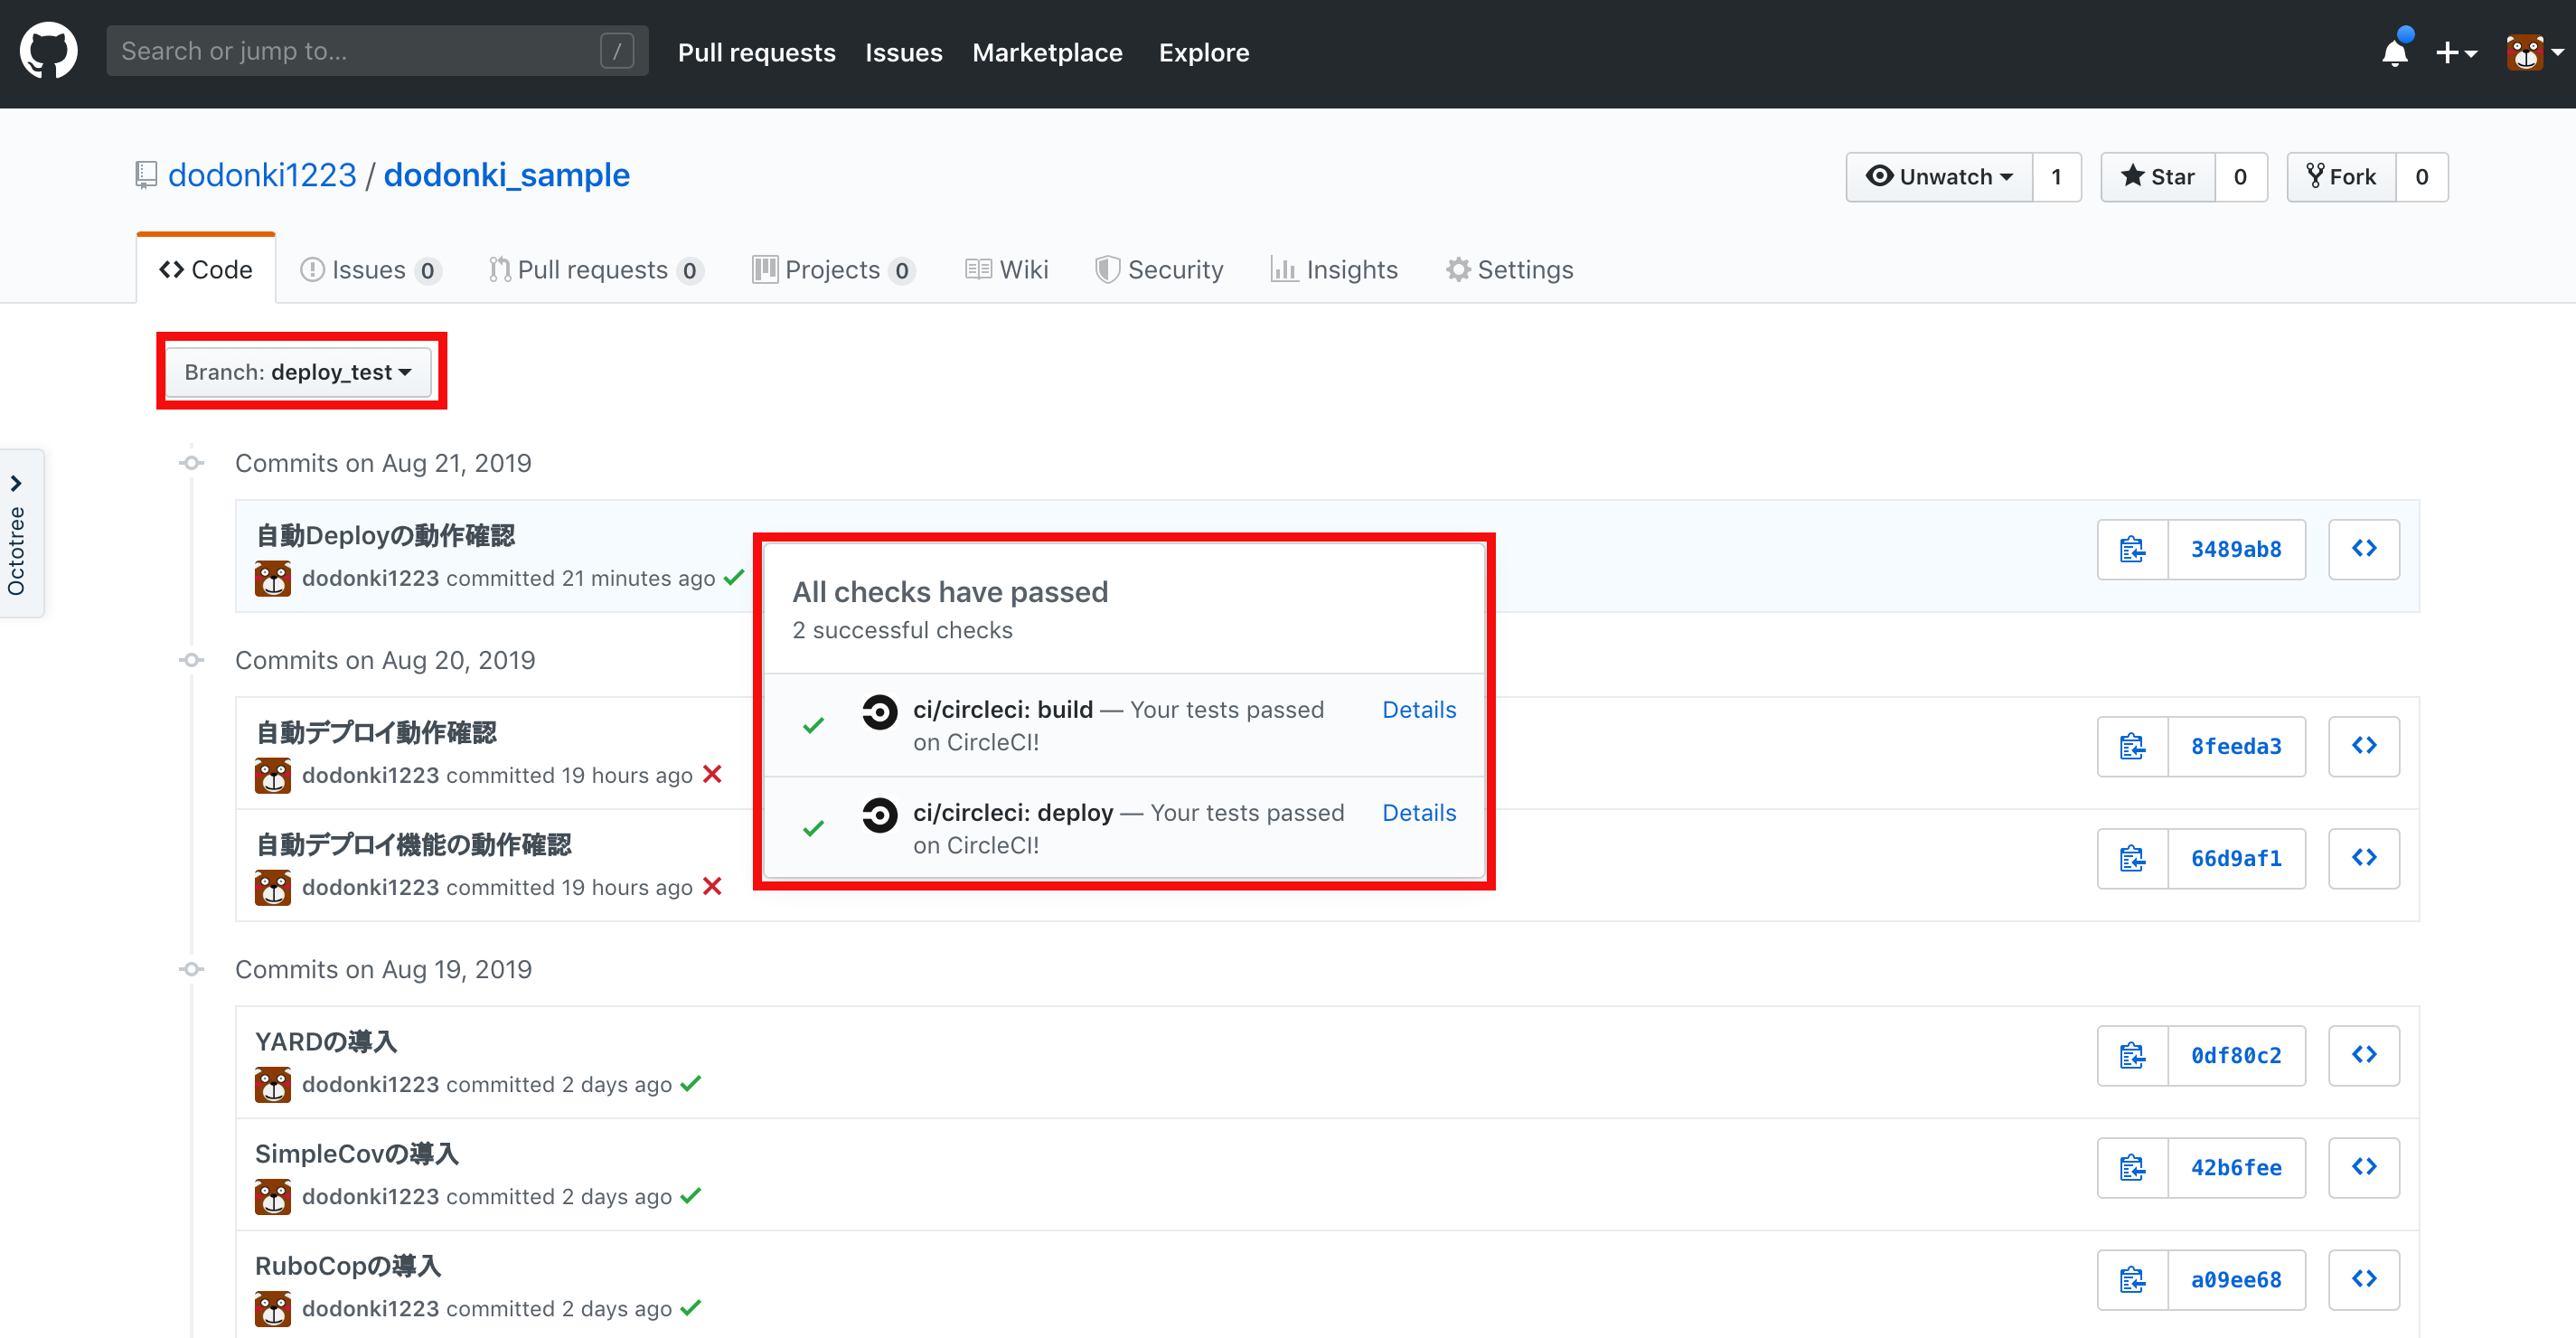
GitHubのCommit履歴を確認するとCircleCIのjobが2つ表示されていることが確認できます
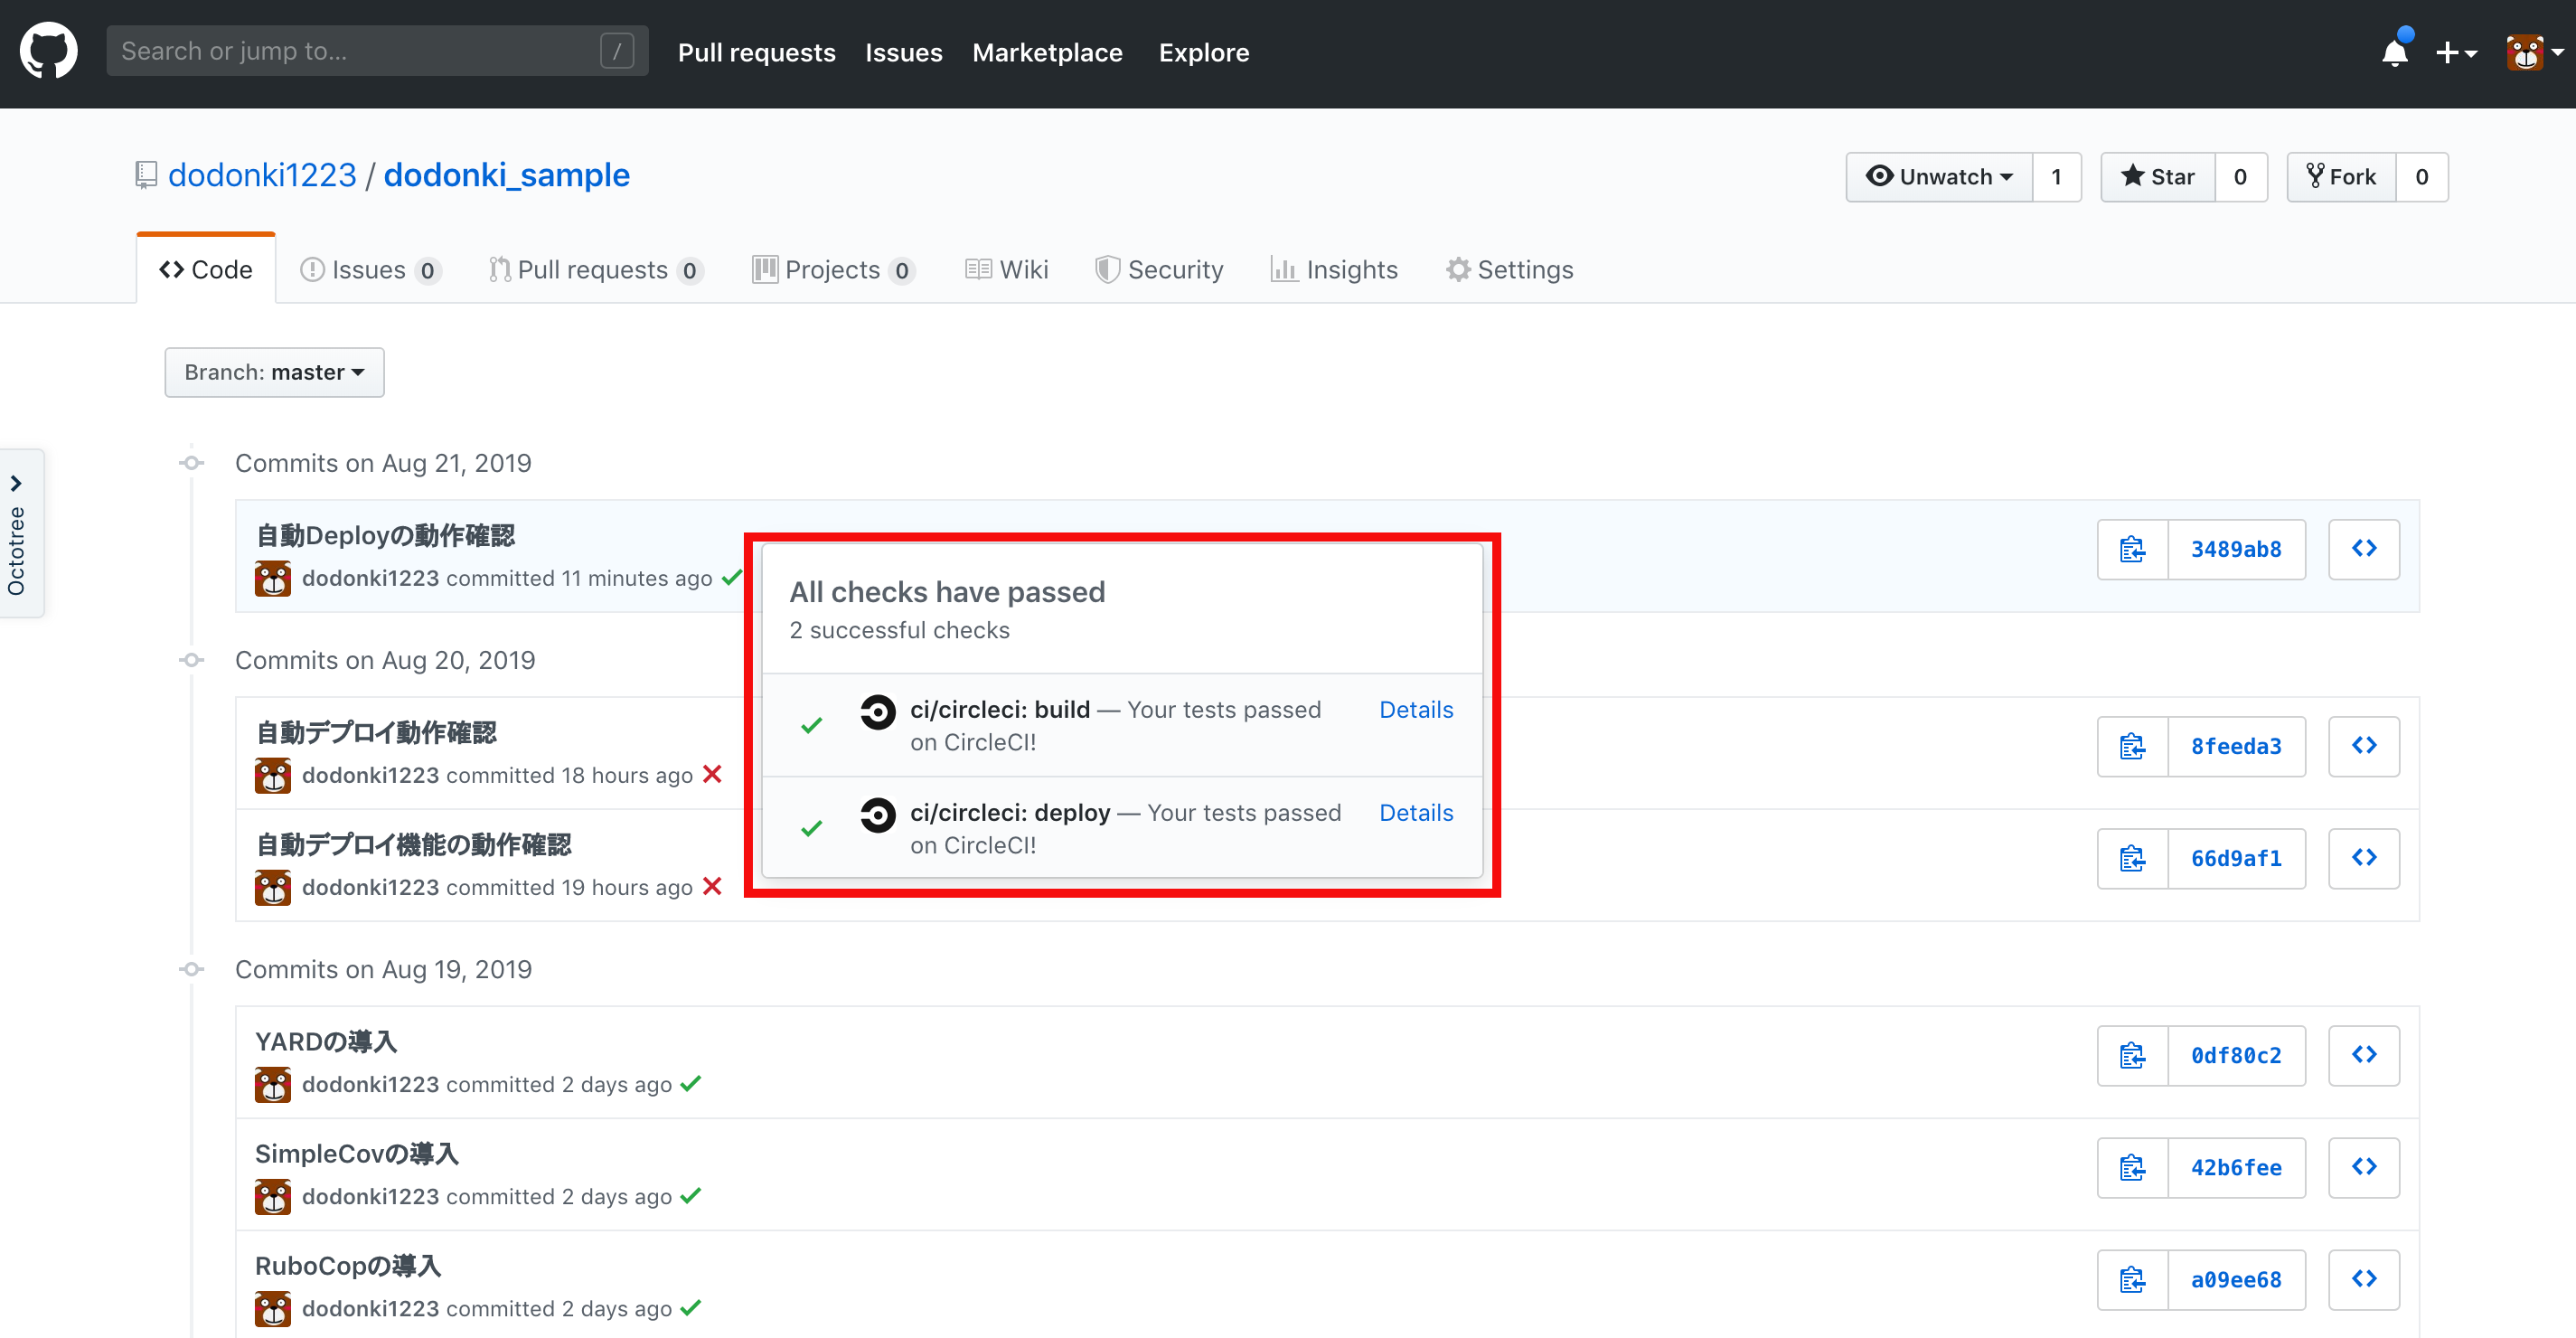
CircleCI上でログを確認しましょう
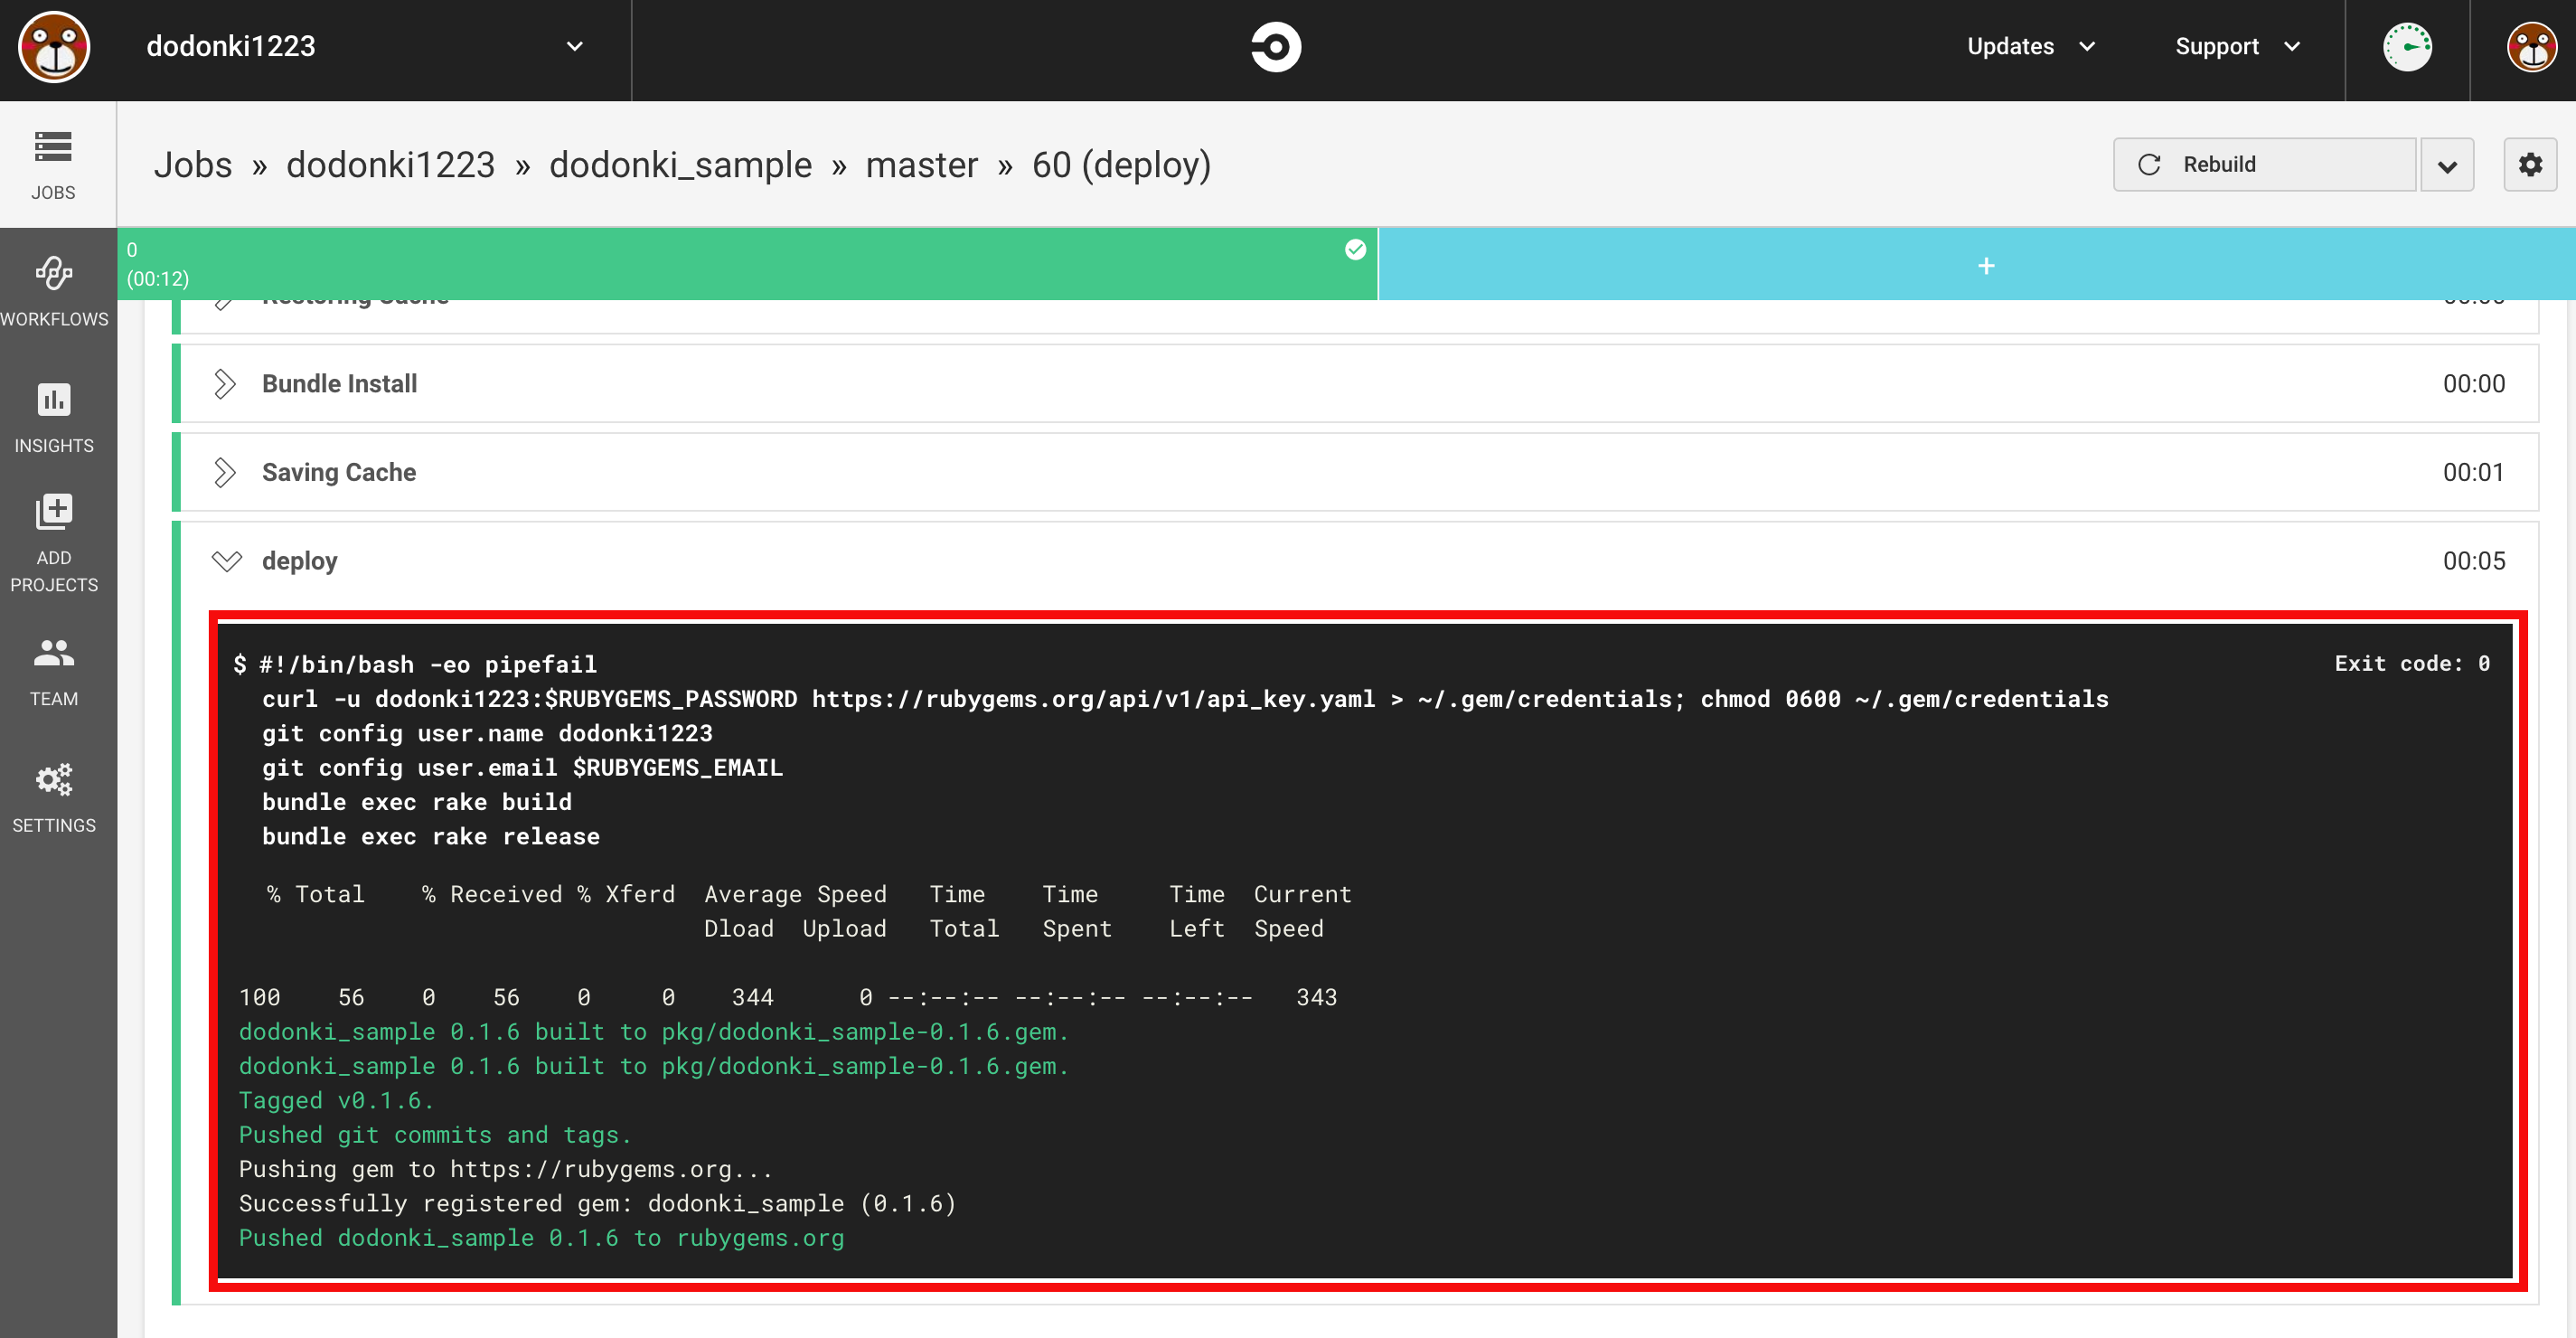
無事、デプロイされたことを確認できました
master以外のブランチの時デプロイされないことの動作確認
別のブランチを作成しpushしてみましょう
GitHubのCommit履歴を確認するとなぜかjobが2つ表示されています。謎です……
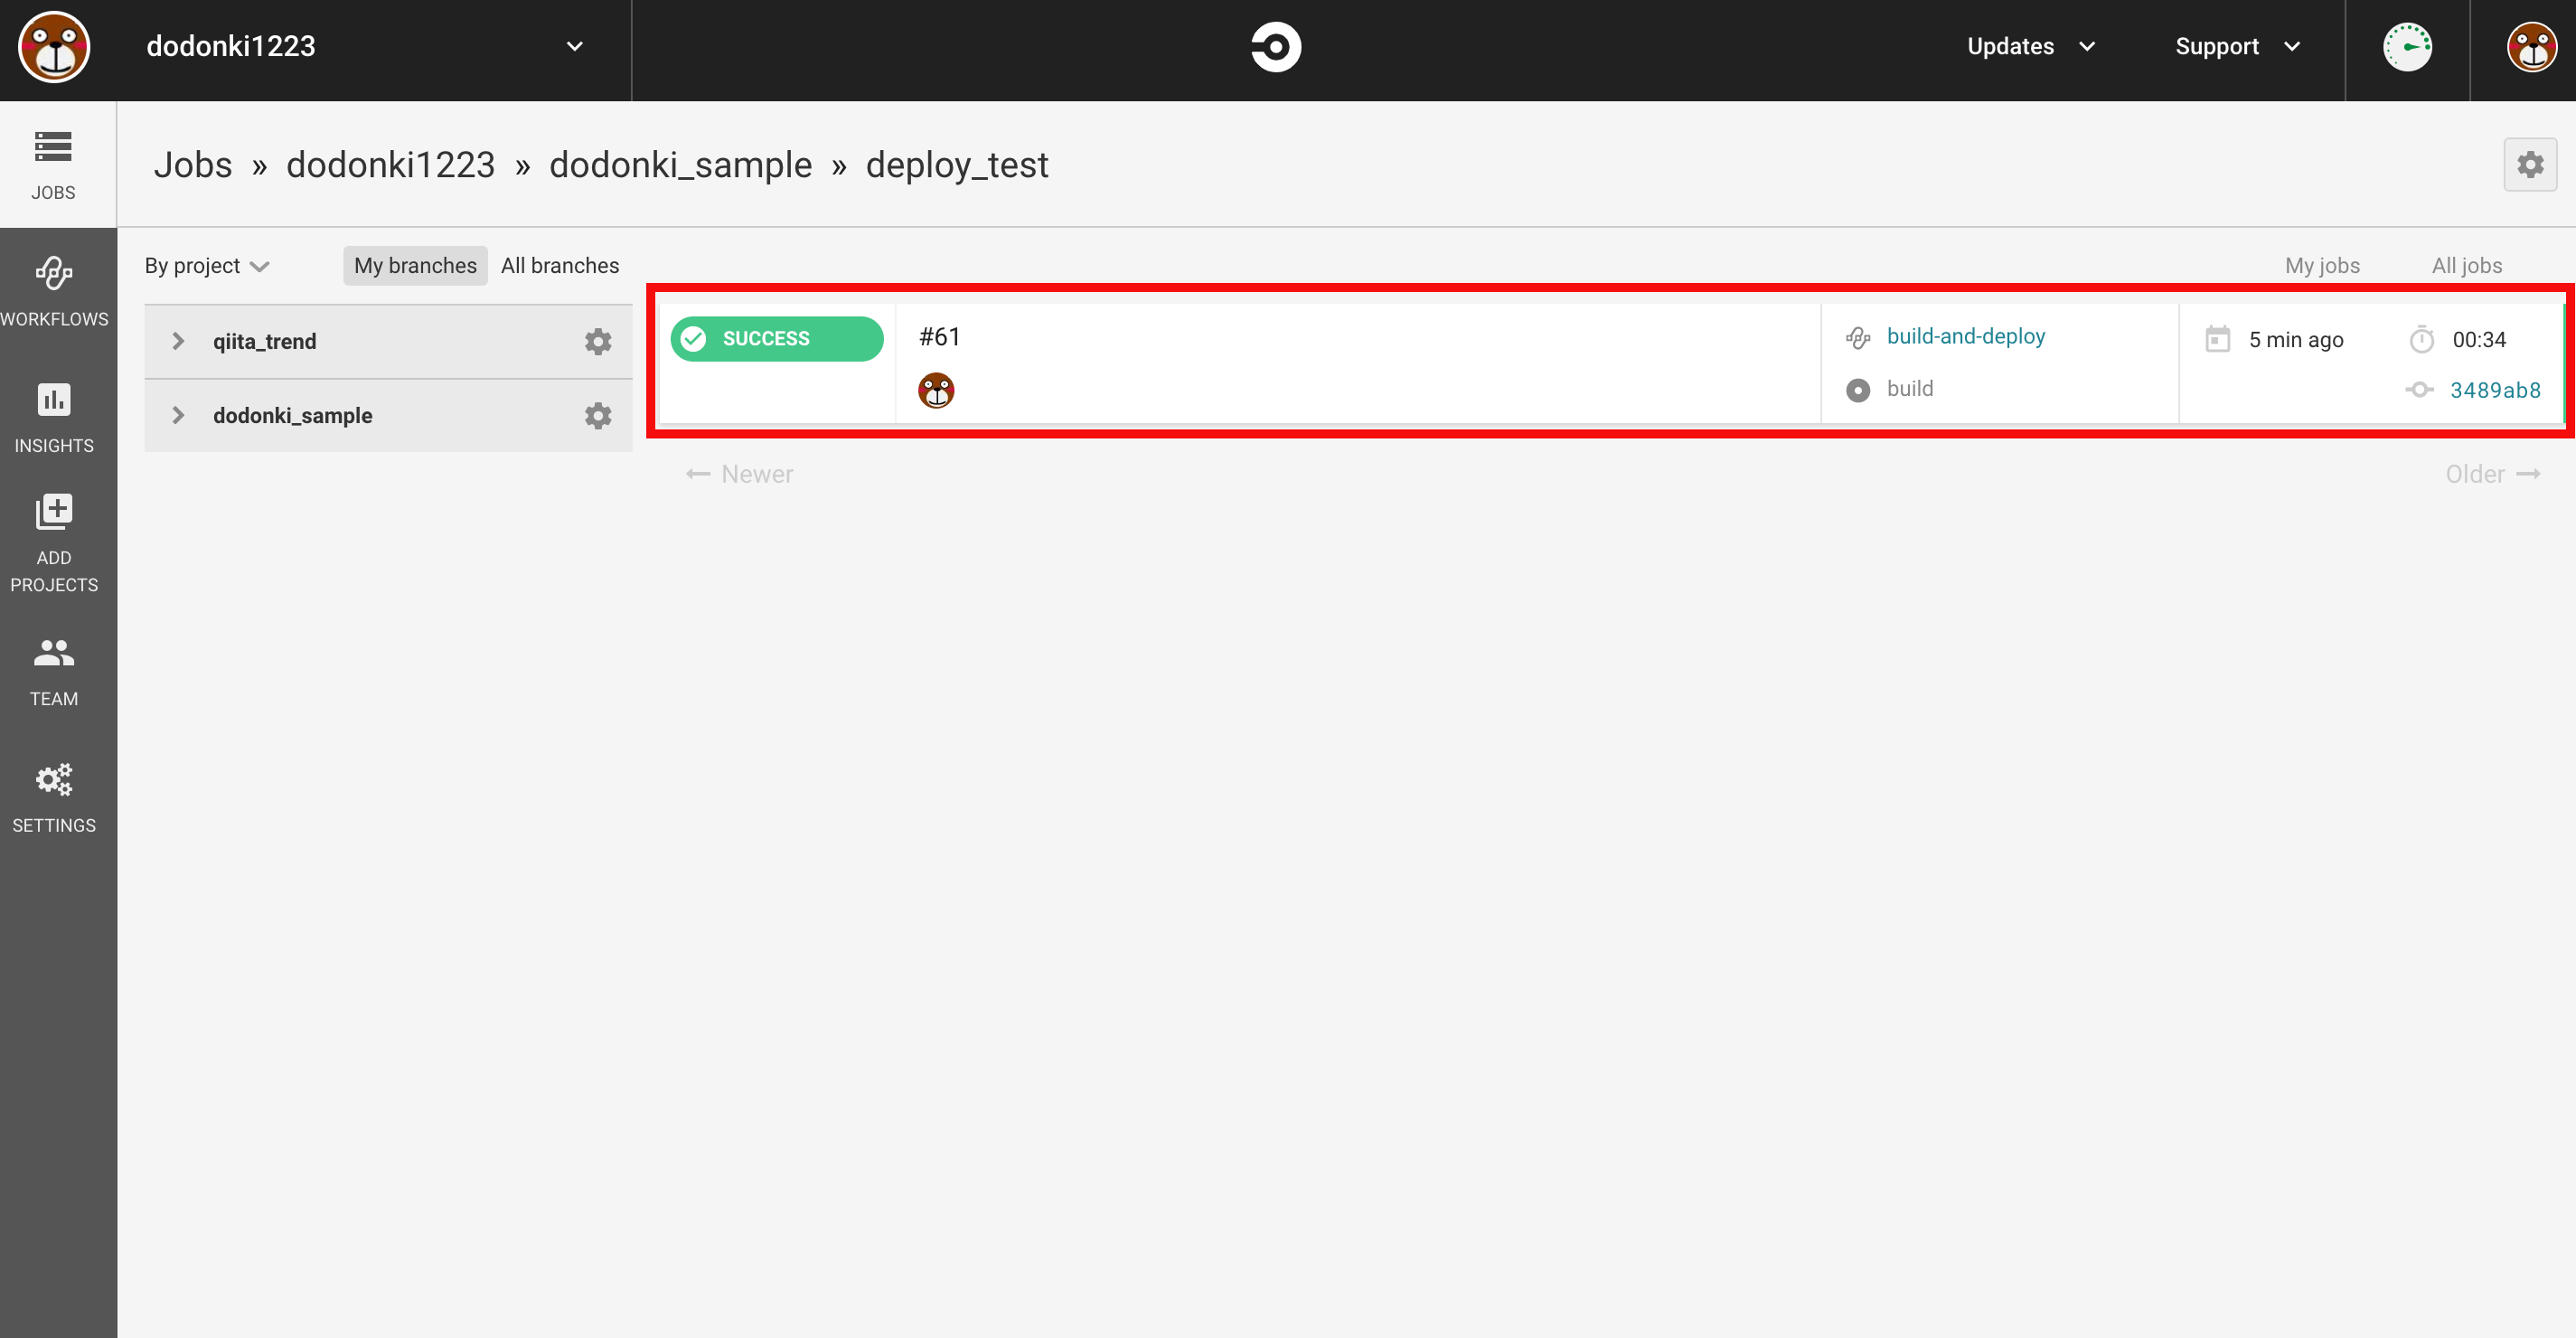
CircleCIのjob一覧を確認するとbuildのjobのみ実行されていてdeployのjobは実行されていないことが確認できます
CircleCIでなんだかエラーになるぞエラーを特定しよう
CircleCIでエラーになった時はsshでCircleCIのコンテナに接続し直接コマンドを叩いて確認した方が効率が良いです
いちいちpushして確認するのはアホらしいので……
CircleCIのコンテナに接続するための準備
こちらの記事を参考にSSHキーをGitHubアカウントに追加しておいてください
CircleCIのコンテナに接続する
SSH を使用したデバッグ - CircleCIに詳しく書かれています
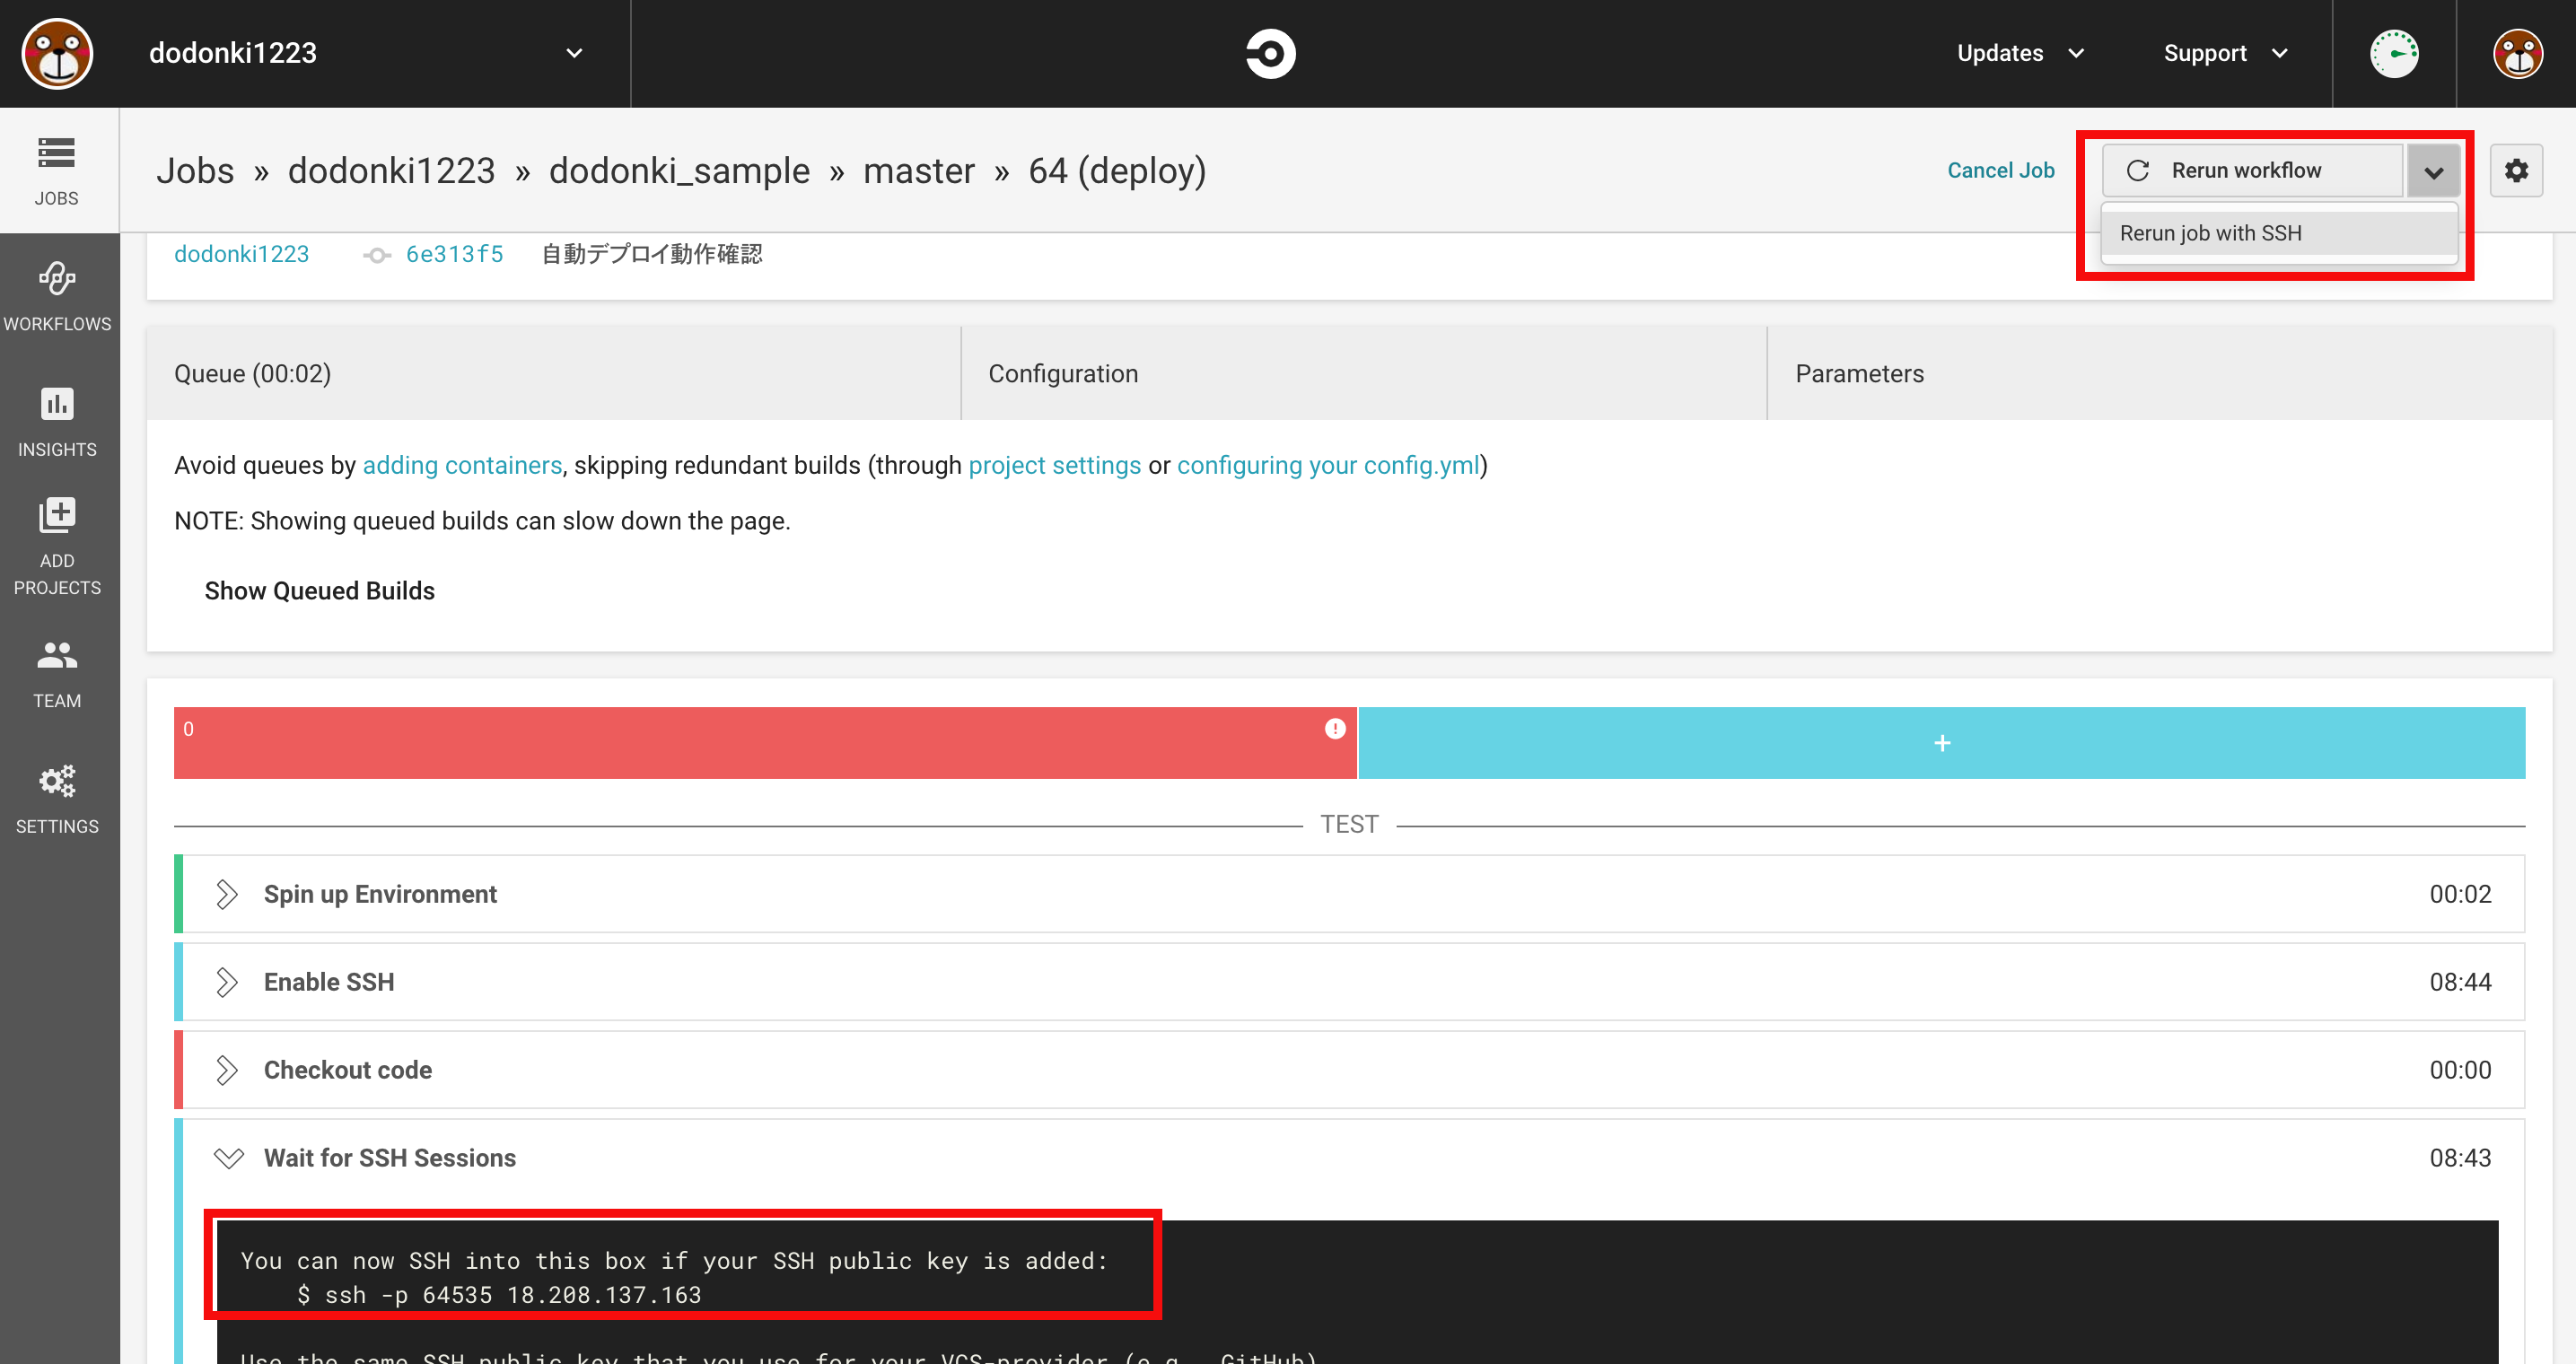
基本的に失敗したjobの画面の右上のReturn job with SShをクリックするだけです
一番下にsshで接続するためのコマンドが出てくるのでこれを実行すればログインできます
$ ssh -p 64535 18.208.137.163
私の場合は秘密鍵ファイル名を変更しているので上記コマンドではコンテナに入ることができません
秘密鍵のファイルを直接指定して入るようにしています
$ ssh -i ~/.ssh/github_rsa -p 64535 18.208.137.163
SlackとCircleCI、GitHubを連携させ開発しやすくしよう
CircleCIを導入したことによりCircleCIのページやGitHubのページを頻繁に見に行く必要が出てきました……なんかいろいろとめんどくさいですよね
私はGitHubへのcommit履歴やCircleCIの結果をSlackに通知するように設定しています
テストが成功したかどうかはSlackに通知されるのでいちいちCircleCIにアクセスしたりしないで済む様になりました
GitHubとSlackを連携させる
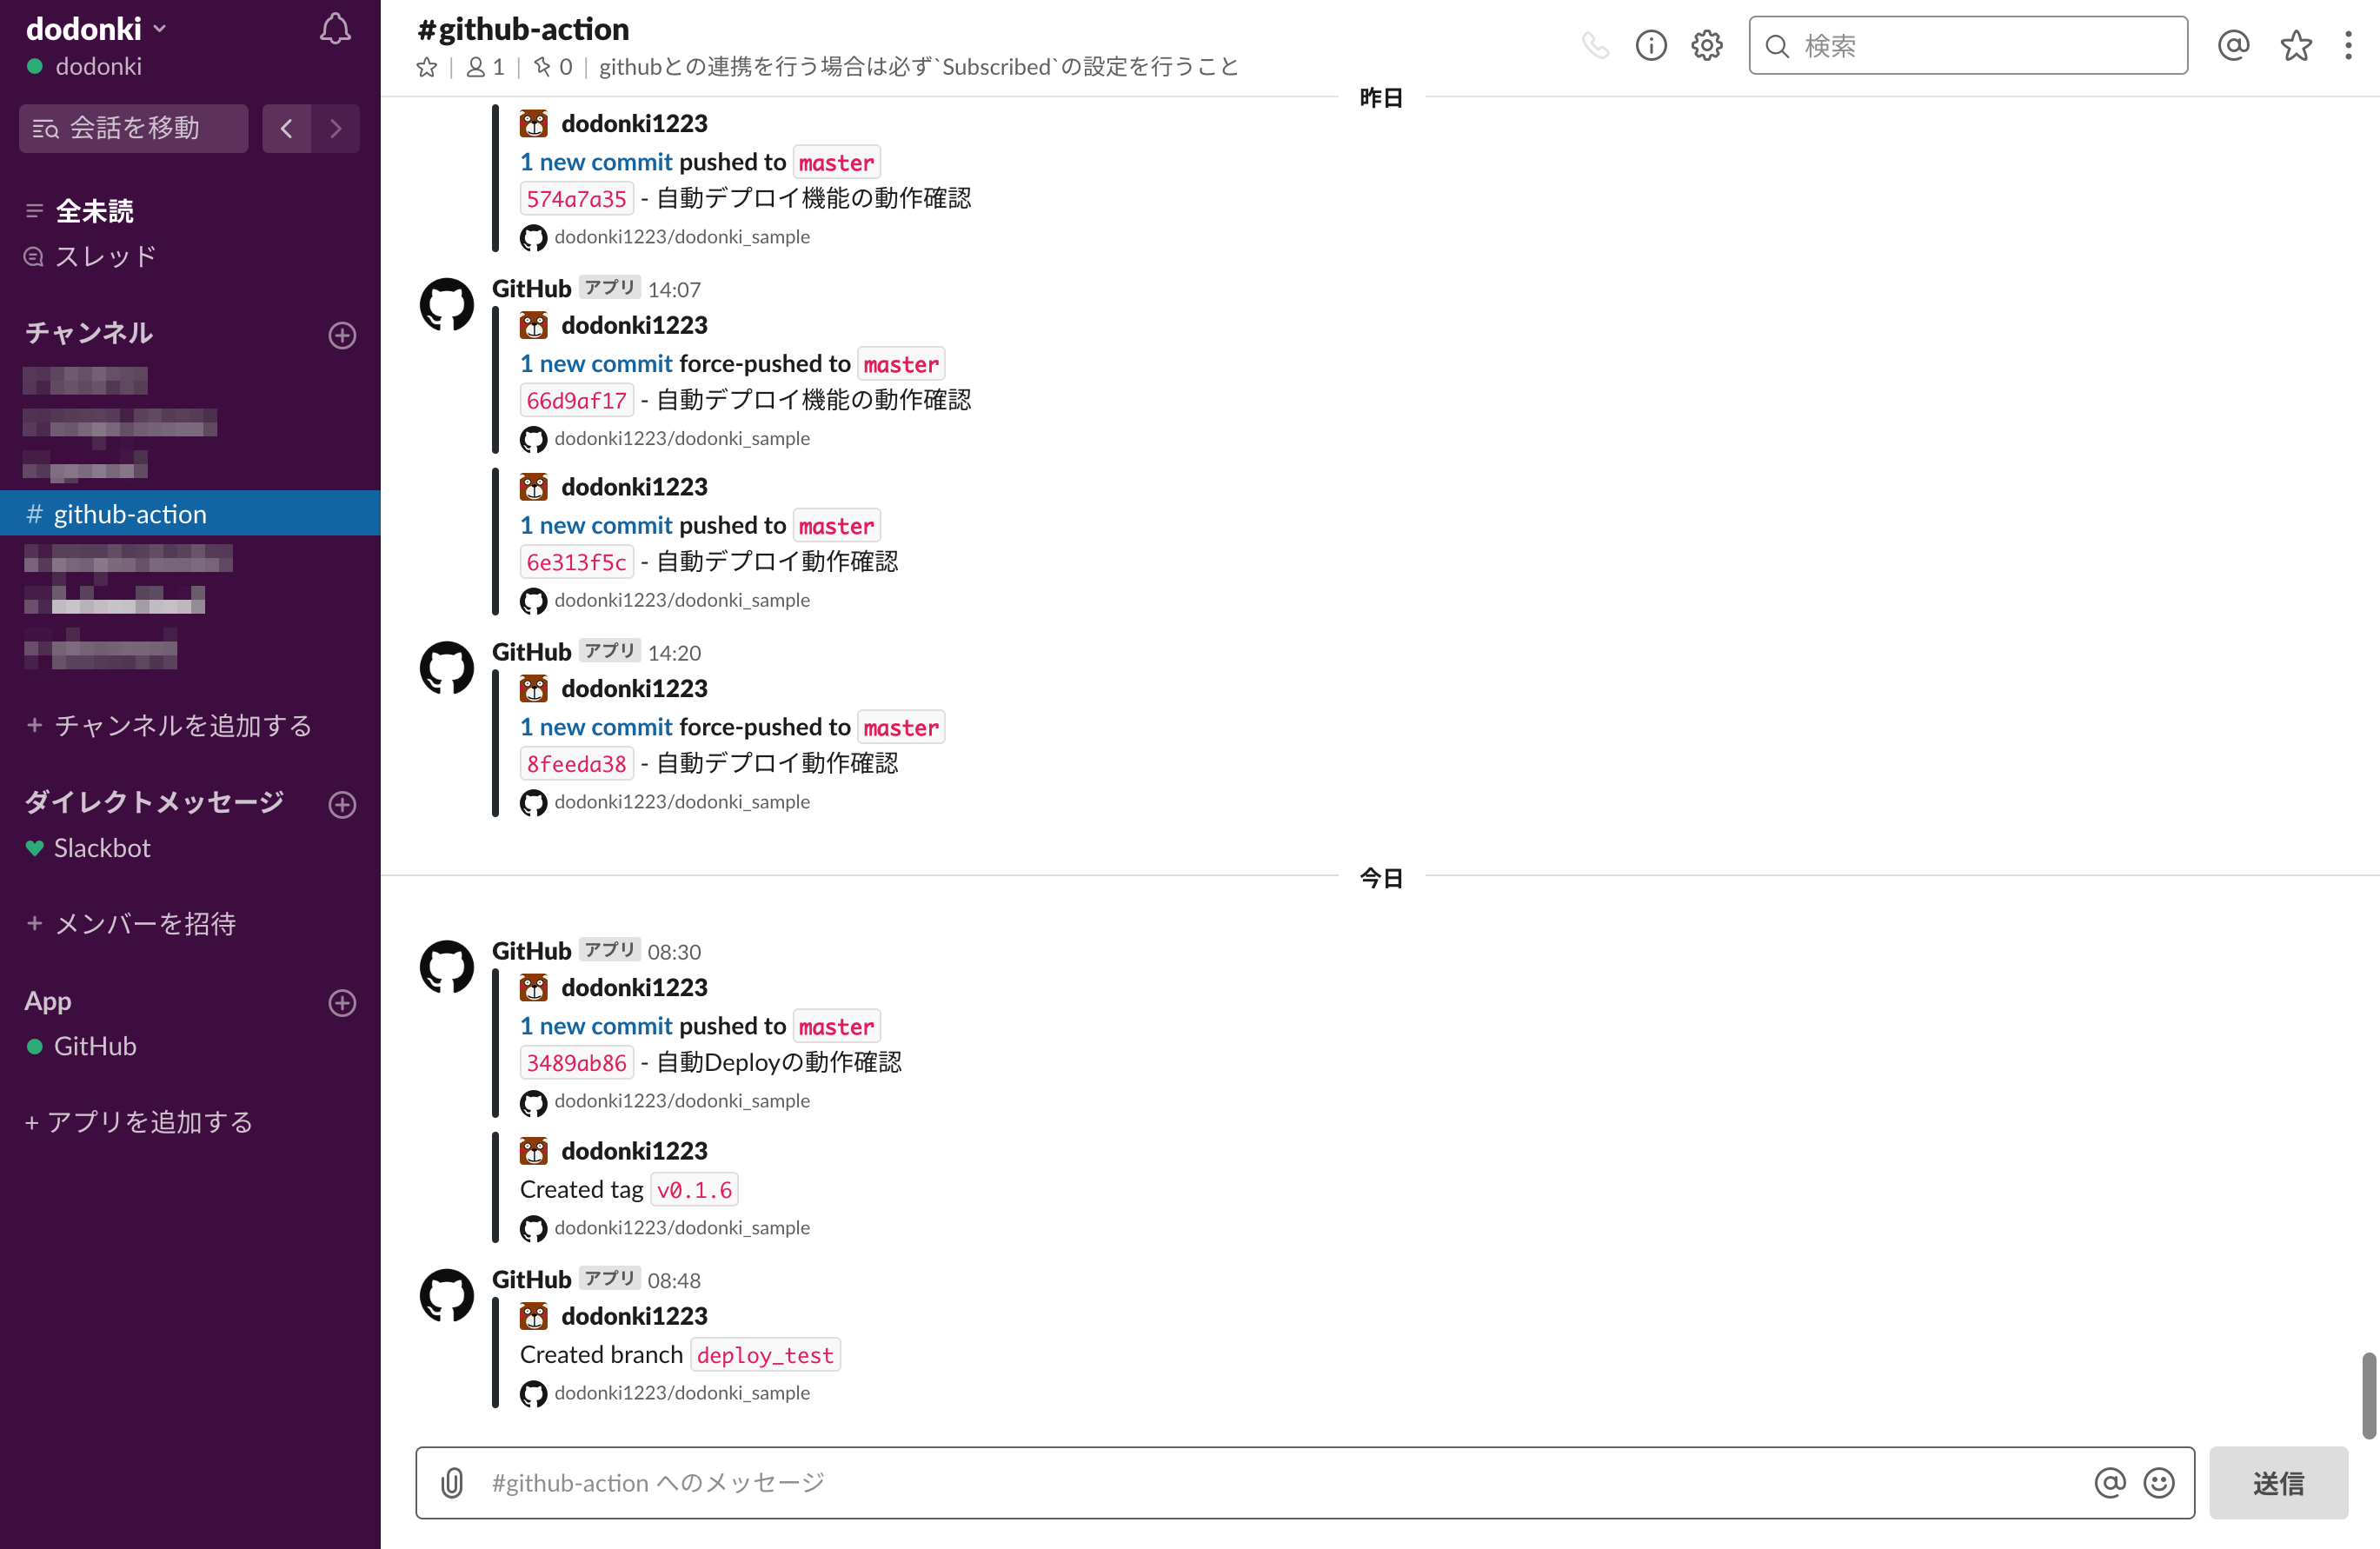
slackにgithub-actionのチャンネルを作り、そこに履歴が残るように設定しています
Slackの公式ページに連携方法が書かれているので参考にすると良いでしょう
CirleCIとSlackを連携させる
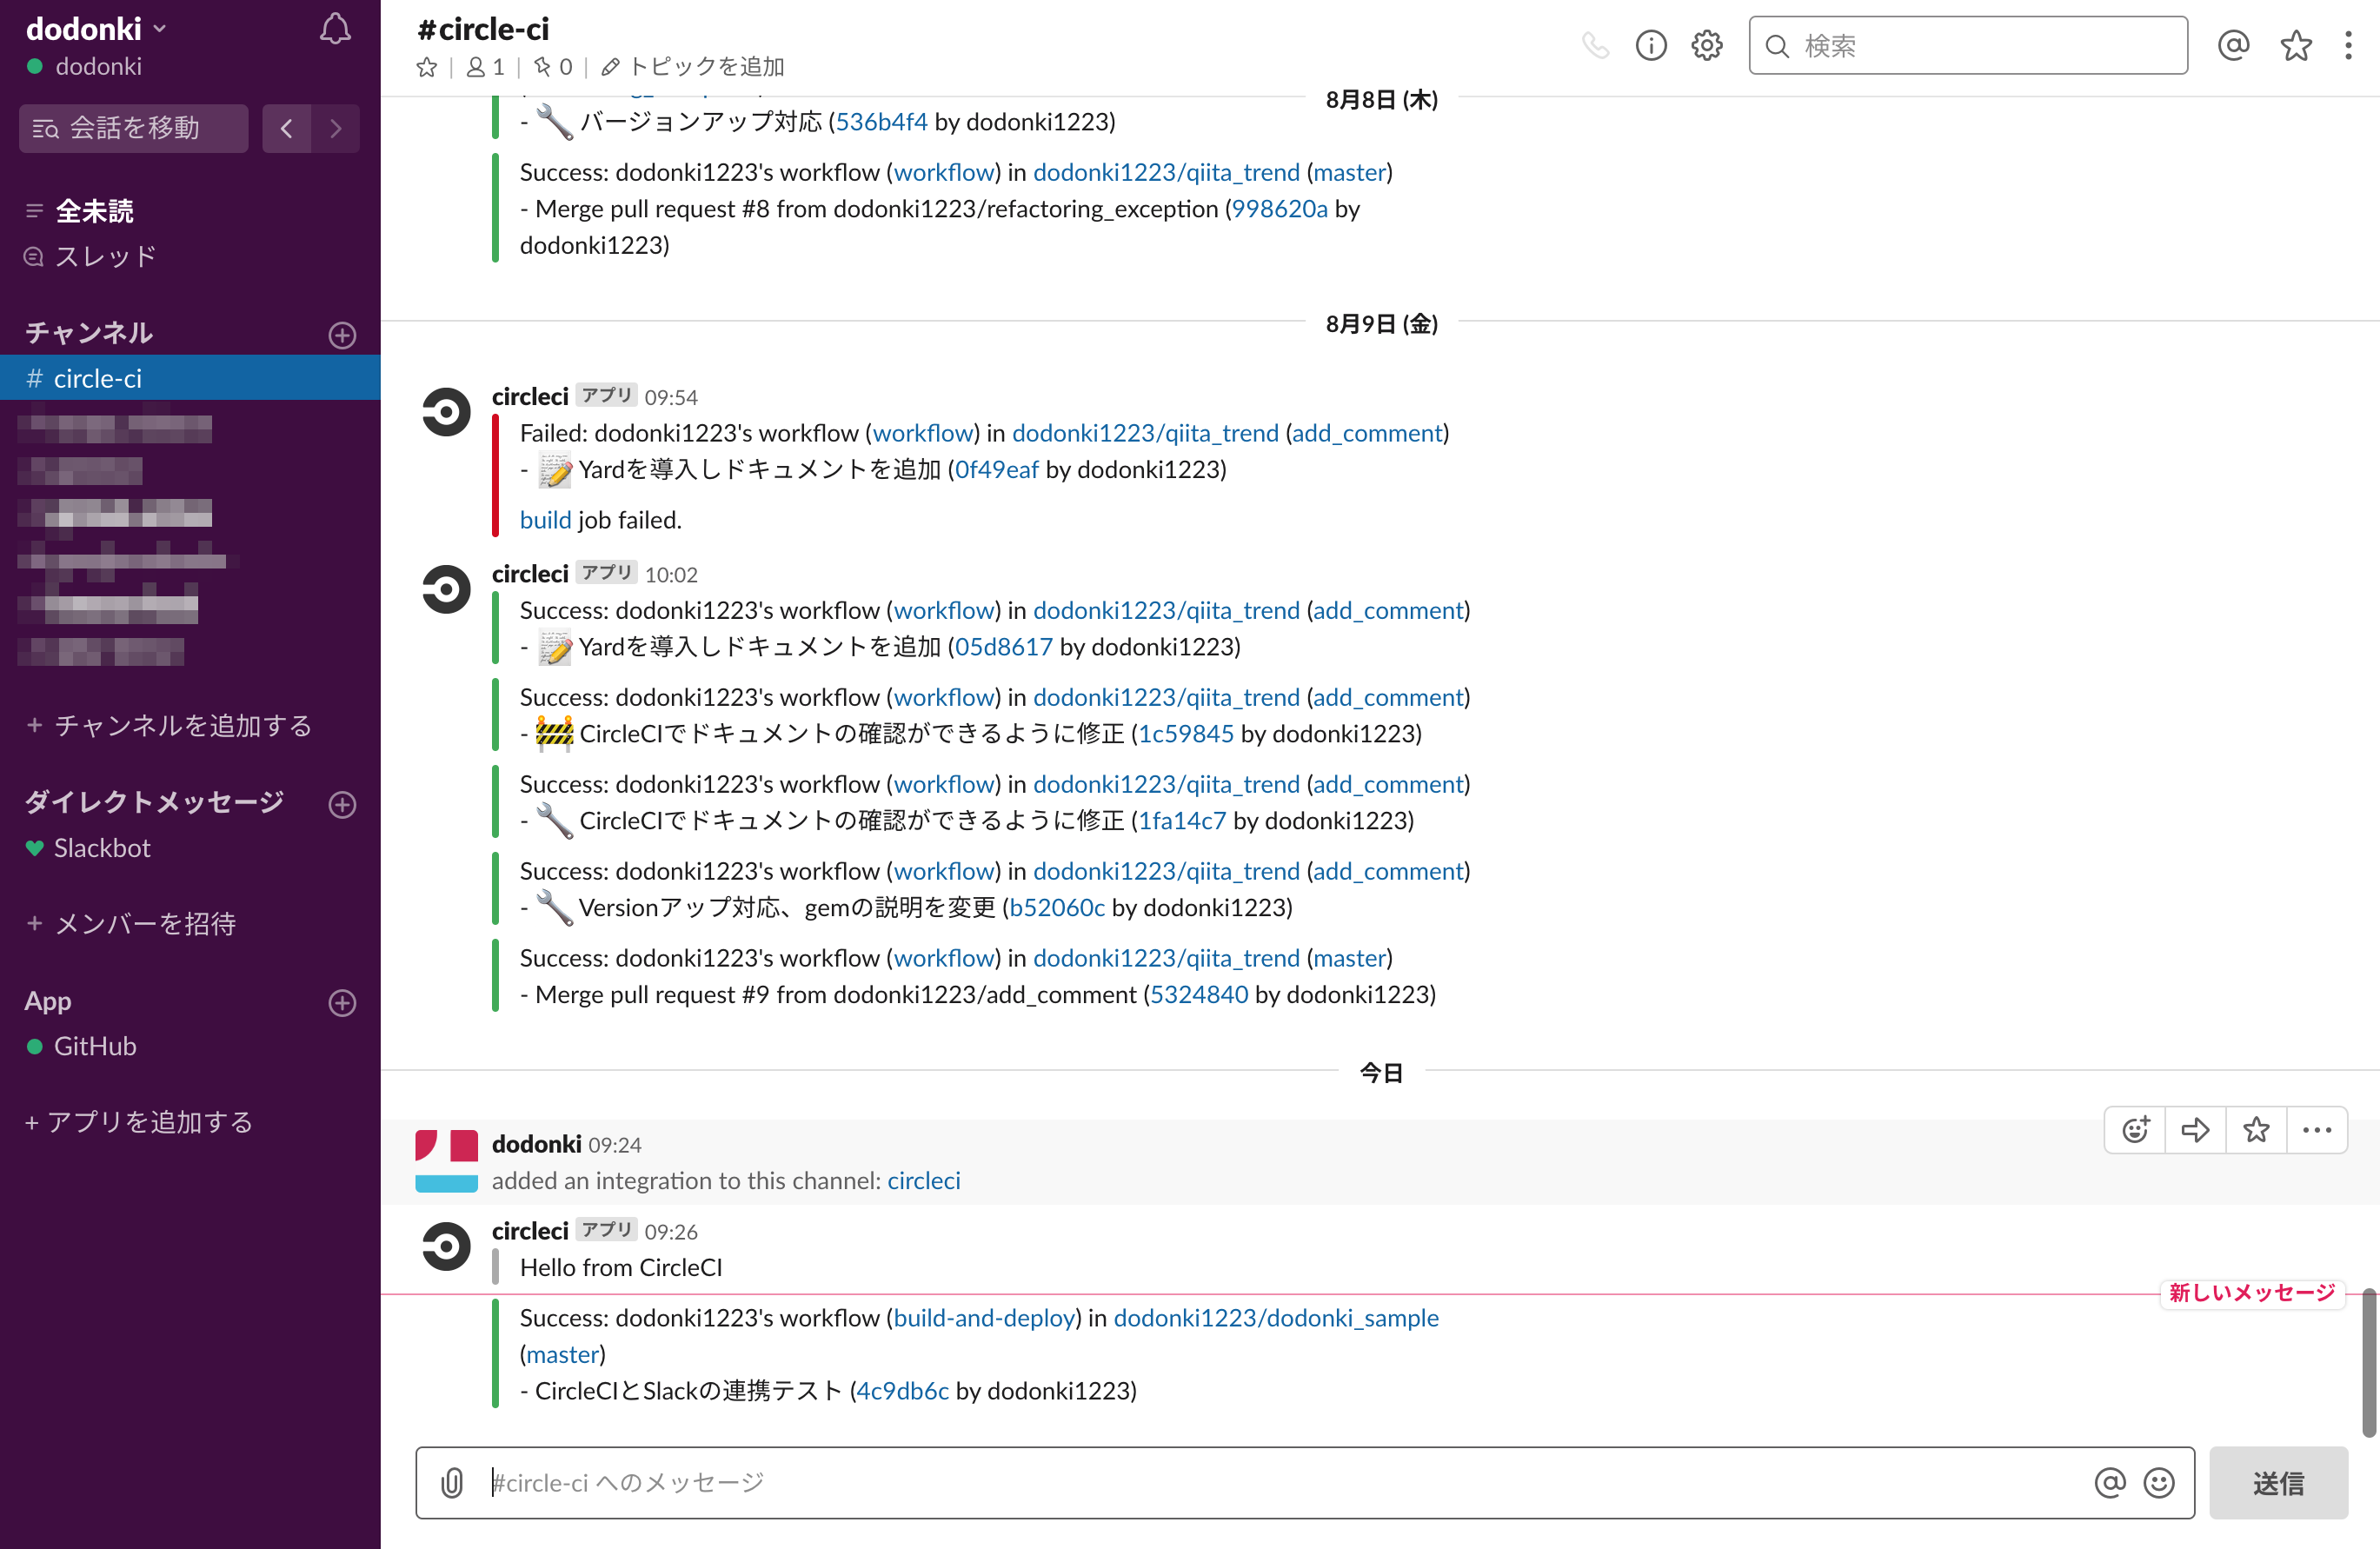
slackにcircle-ciのチャンネルを作りそこにCirlceCIの実行結果が通知されるようにしています
下記の記事にわかりやすく書かれているので参考にすると良いでしょう
RubyDoc.infoに作成したgemのリファレンスを公開する
今回のタイトルとはあまり関係ないですがgemのリファレンスを簡単に公開できるので紹介します
RubyDoc.infoに公開
RubyDoc.infoにアクセスしAdd Projectボタンをクリックしgemのリポジトリを指定してGoのボタンをクリックするだけで簡単に公開できます
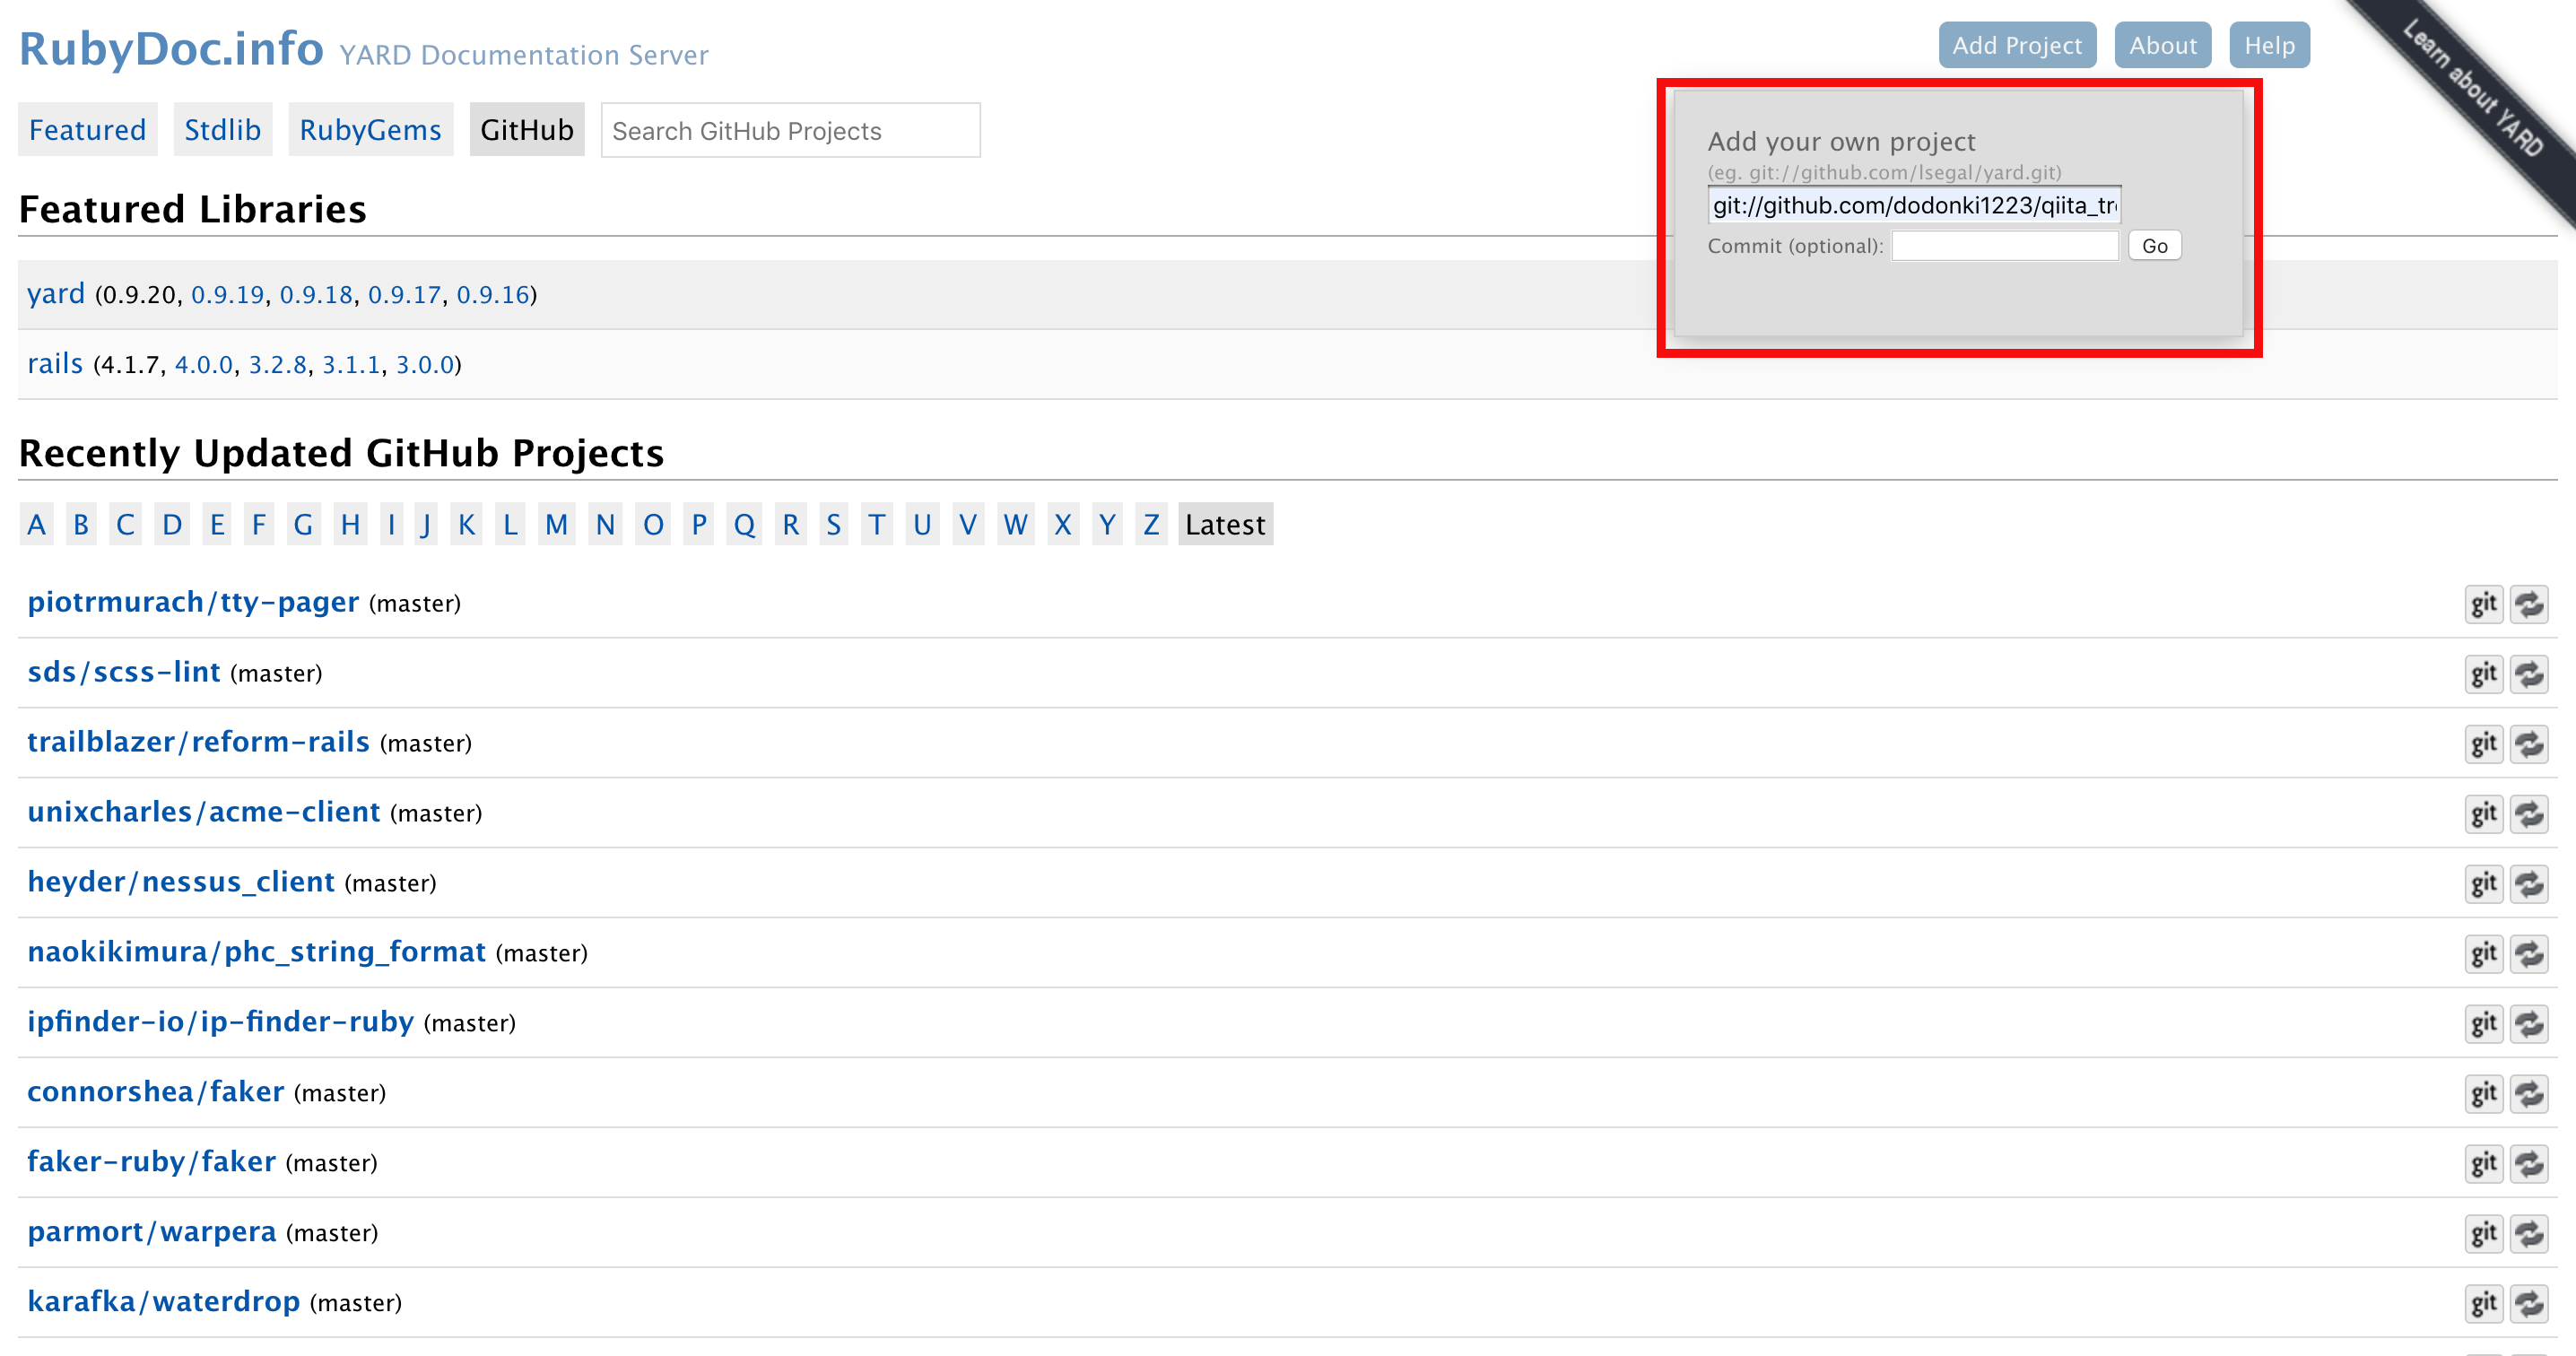
公開すると下記の画像のようになります
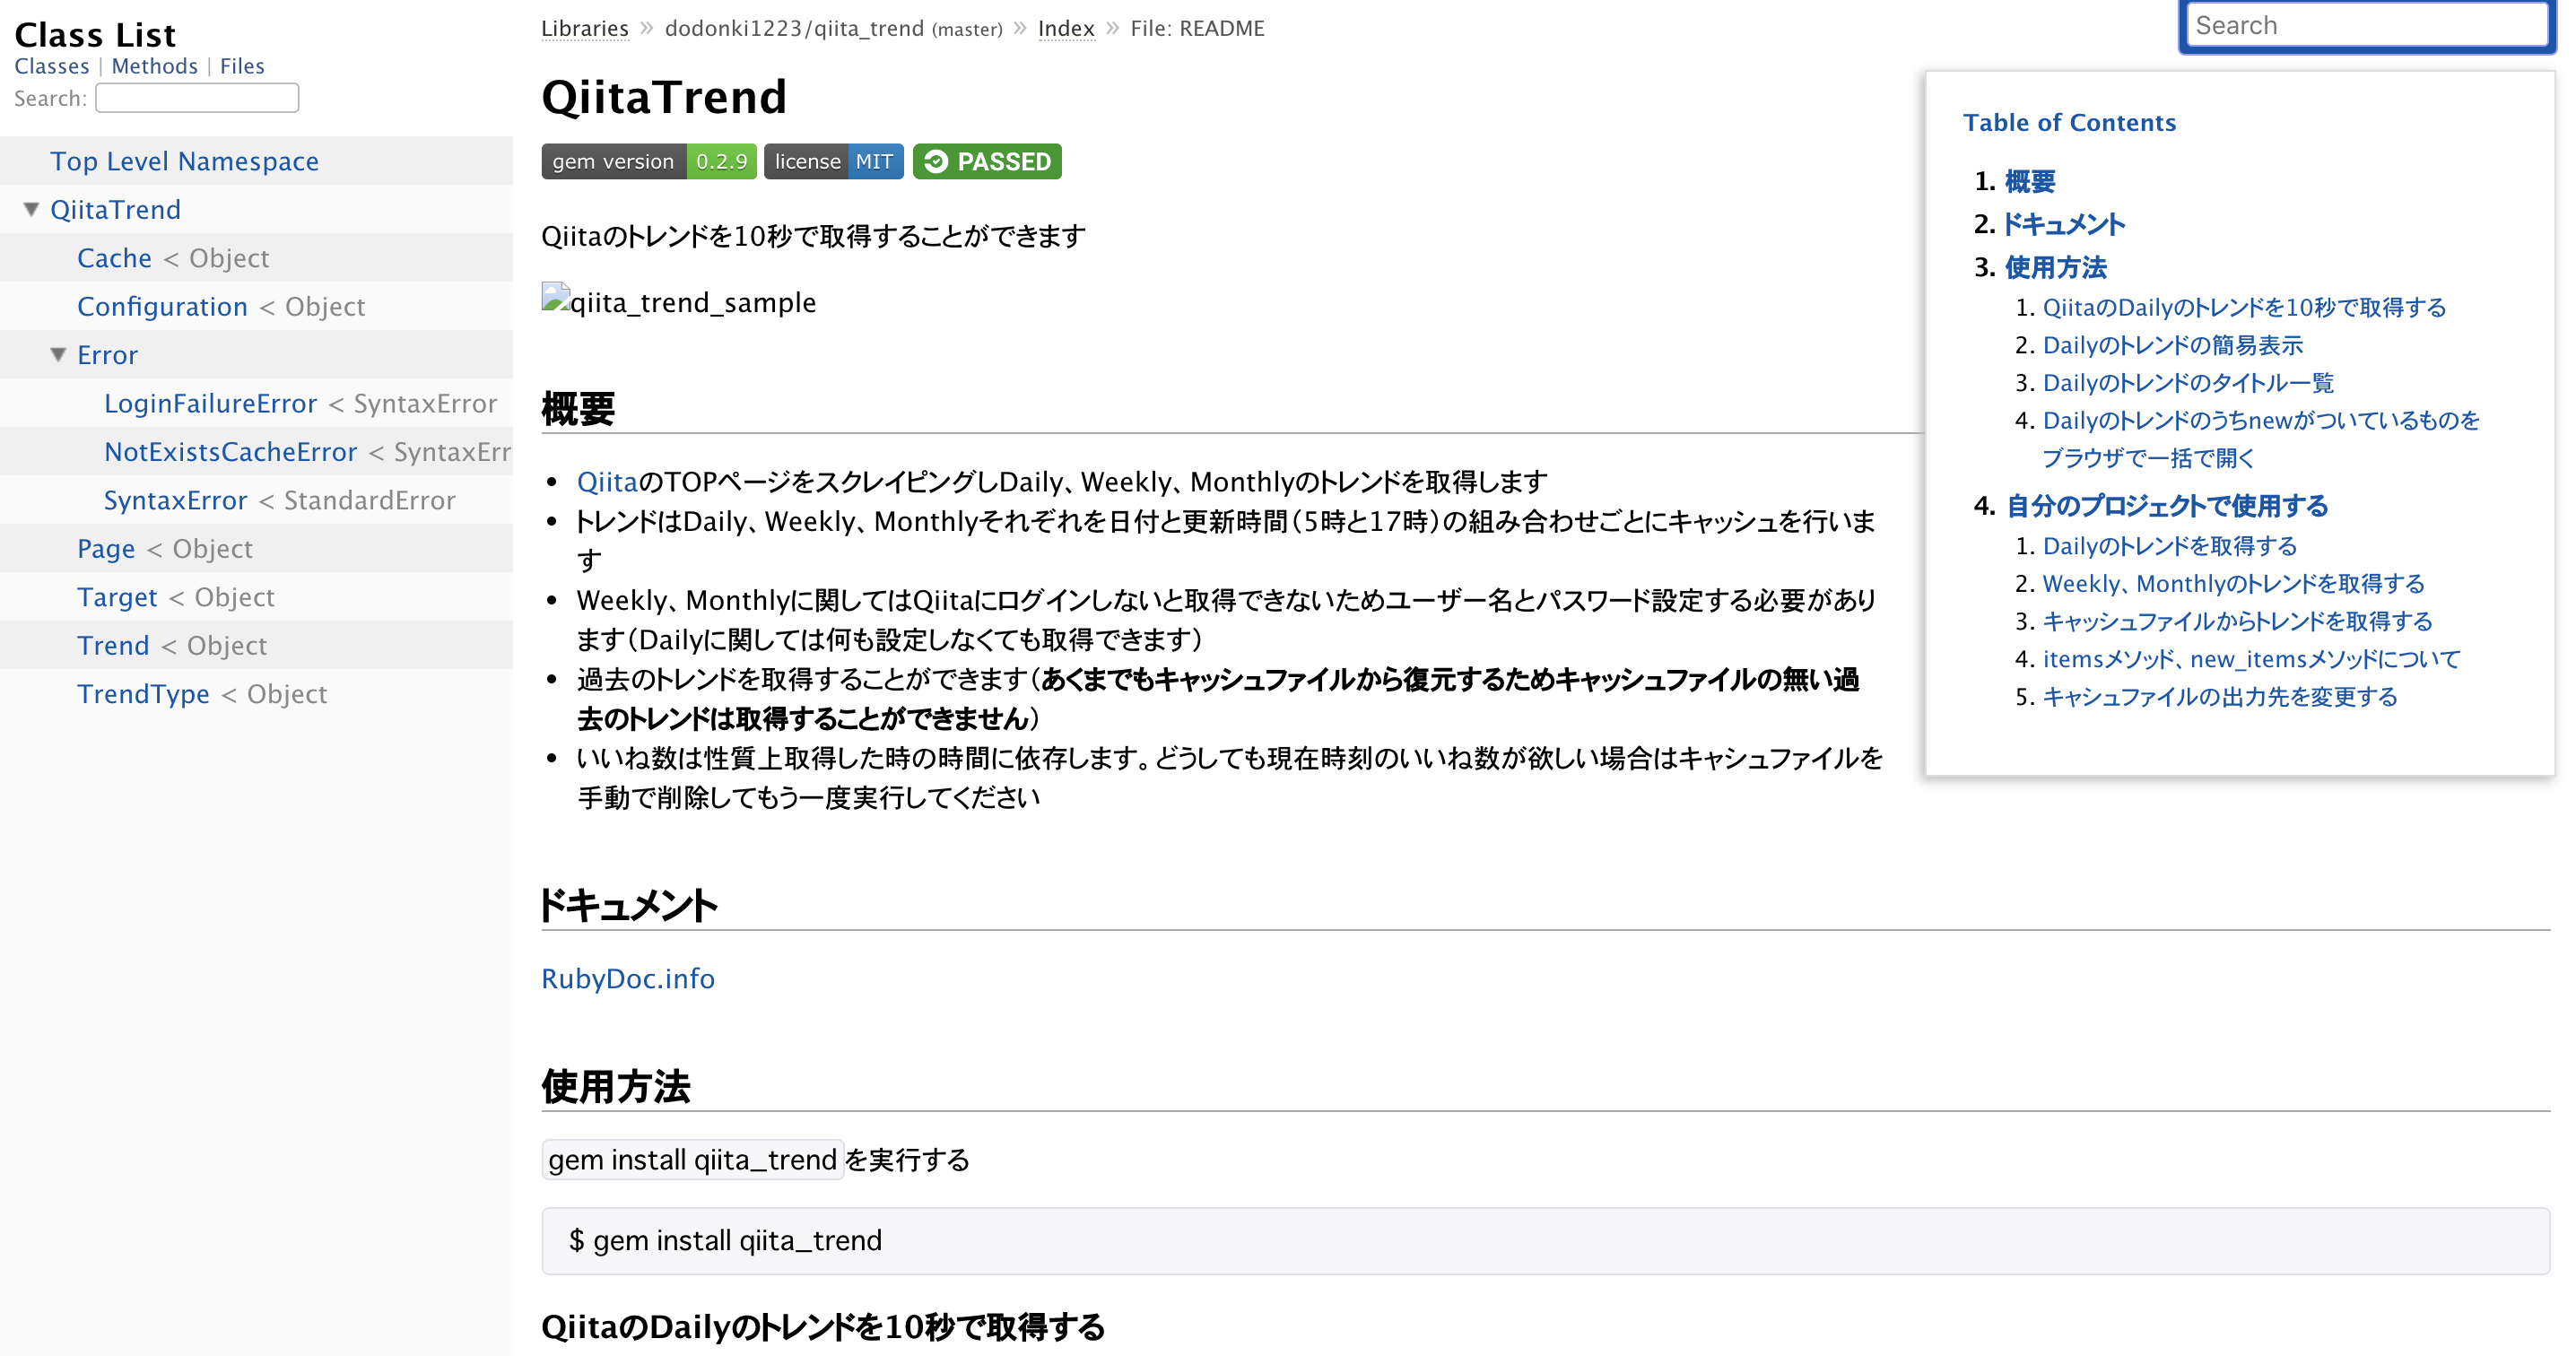
公開しているドキュメントはこちら
最後に
自動テスト、自動デプロイ最高ですね!!
今回の作成したプログラムはdodonki1223/dodonki_sample: RubyのgemをCirlcleCiでデプロイするサンプル用プログラムこちらで公開しています
AWSのCodeDploy、CodeBuild、CodePipelineやGitHubのGitHub ActionsなどCircleCIの代替もあるので今後はどうなっていくのでしょうか……