![]() 2018/08/15に投稿された記事です。現在のbundlerの挙動とは異なる可能性があります。
2018/08/15に投稿された記事です。現在のbundlerの挙動とは異なる可能性があります。
Rubyのライブラリであるgemを作成し、RubyGems.orgで公開するまでの流れです。
What is a gem?
gemはRubyのライブラリです。もう少し言うと、RubyGemsというデファクトスタンダードなRubyのパッケージ管理システムがあり、そこではアプリケーションやライブラリをgemという単位で管理しています。gemはRubyGems.orgで公開されています。
gemをインストールするには、gem install [gem]を使います。
インストールしたgemをRubyプログラム内で使うには、requireを使います。
require 'nokogiri'

Nokogiri.XML('<h1>Hello World</h1>')
本題へ
本記事では、例として以下のgemを作ります。
実行すると標準出力にHelloを出力する非常に単純なgemです。
$ gem install sample_gem
$ sample_gem
Hello
本記事ではgemを管理するライブラリであるbundlerを使ってgemを作成します。bundlerを用いずにgemを作成する方法もあり、RubyGems公式サイトのMake your own gem - RubyGems Guidesで詳しく解説されています。
ただ、bundlerを使うとgem作成に必要なファイル群をコマンド一発で作成できて便利です。ですので、本記事ではbundlerを使ってgemを作る方法を説明します。
環境
- Ruby 2.4.1
- Bundler 1.16.1
gemを作る
0. 前準備
bundlerをインストールorアップデートしておきます。
$ gem install bundler # インストール済なら不要
$ gem update bundler
1. 雛形を作る
bundle gem hoge -tで必要なファイル群を自動で作成できます。
が、上記コマンドを実行して雛形を作成する前に注意してほしいことが2点あります。
### gemの名付けにおける注意1 作ったgemを公開するのであれば、既存のgemと名前が被っていないか確認しましょう。 既存のgemの名前を確認する方法は2つあります。
- https://rubygems.org/で検索
-
searchコマンドを使う
searchコマンドを使えば、下記のように正規表現を用いて既存のgemを検索できます。
$ gem search ^rails

*** REMOTE GEMS ***

rails (4.0.0)
rails-3-settings (0.1.1)
rails-action-args (0.1.1)
rails-admin (0.0.0)
rails-ajax (0.2.0.20130731)
[...]
gemの名付けにおける注意2
名前にハイフン-を含めると、ディレクトリが階層化されます。
- sample_gemの場合:できあがるファイルは
lib/sample_gem.rb - sample-gemの場合:できあがるファイルは
lib/sample/gem.rb
階層化したくない場合は、ハイフン-を避けましょう。
gemの名前が決まったら、bundle gem hoge -tを実行します。
$ bundle gem sample_gem -t
Creating gem 'sample_gem'...
MIT License enabled in config
Code of conduct enabled in config
      create  sample_gem/Gemfile
      create  sample_gem/lib/work/timer.rb
      create  sample_gem/lib/work/timer/version.rb
      create  sample_gem/sample-gem.gemspec
      create  sample_gem/Rakefile
      create  sample_gem/README.md
      create  sample_gem/bin/console
      create  sample_gem/bin/setup
      create  sample_gem/.gitignore
      create  sample_gem/.travis.yml
      create  sample_gem/.rspec
      create  sample_gem/spec/spec_helper.rb
      create  sample_gem/spec/work/timer_spec.rb
      create  sample_gem/LICENSE.txt
      create  sample_gem/CODE_OF_CONDUCT.md
Initializing git repo in /Users/hoge/sample_gem
Gem 'sample-gem' was successfully created. For more information on making a RubyGem visit https://bundler.io/guides/creating_gem.html
初めてgemを作る場合、
- MIT Licenseを使用するかどうか
- Code of Conductを含めるかどうか
聞かれます。今回はどちらもyesにしました。
MIT Licenseとは:
要約すると、MIT Licenseとは次のようなライセンスである。
このソフトウェアを誰でも無償で無制限に扱って良い。ただし、著作権表示および本許諾表示をソフトウェアのすべての複製または重要な部分に記載しなければならない。
作者または著作権者は、ソフトウェアに関してなんら責任を負わない。
MIT Licenseのコードを使用利用する場合、使用利用者はその旨をコード内かその他のファイルに記載する必要があります。詳細はこちらを参考にしてください。
Code of Conductについてはこちらを参考にしてください。
2. gemspecを編集
gemspecを編集します。
必須項目(編集しないとbuildできない項目)
最初に編集するのはTODOと書いてある5箇所です。これをやらないと後でbuildできません。
メールアドレス、gemの説明x2、ホームページのurlを記入します。
  spec.email         = ["TODO: Write your email address"]
  spec.summary       = %q{TODO: Write a short summary, because RubyGems requires one.}
  spec.description   = %q{TODO: Write a longer description or delete this line.}
  spec.homepage      = "TODO: Put your gem's website or public repo URL here."
変更後、以下のようになりました。
lib = File.expand_path("../lib", __FILE__)
$LOAD_PATH.unshift(lib) unless $LOAD_PATH.include?(lib)
require "sample_gem/version"

Gem::Specification.new do |spec|
  spec.name          = "sample_gem"
  spec.version       = SampleGem::VERSION
  spec.authors       = ["9sako6"]
-  spec.email         = ["TODO: Write your email address"]
-  spec.summary       = %q{TODO: Write a short summary, because RubyGems requires one.}
-  spec.description   = %q{TODO: Write a longer description or delete this line.}
-  spec.homepage      = "TODO: Put your gem's website or public repo URL here."
+  spec.email         = ["hogehoge+9sako6@users.noreply.github.com"]
+  spec.summary       = %q{sample gem}                  # あんまり短いと警告がでるかも
+  spec.description   = %q{sample gem to greet someone} # あんまり短いと警告がでるかも
+  spec.homepage      = "https://github.com/9sako6/sample_gem"
  spec.license       = "MIT"

  # Specify which files should be added to the gem when it is released.
  # The `git ls-files -z` loads the files in the RubyGem that have been added into git.
  spec.files         = Dir.chdir(File.expand_path('..', __FILE__)) do
    `git ls-files -z`.split("\x0").reject { |f| f.match(%r{^(test|spec|features)/}) }
  end
  spec.bindir        = "exe"
  spec.executables   = spec.files.grep(%r{^exe/}) { |f| File.basename(f) }
  spec.require_paths = ["lib"]
end
次に、開発に必要なgemのインストールをします。bundle installを実行すればインストールされます。
今回のgem開発では、最初からGemfileに書かれているgem以外のgemは使いませんが、もし必要な場合はGemfileに書いて同様にbundle installを実行すればインストールされます。
$ bundle install
### (追記: 2020-06-01) gem開発において`Gemfile.lock`をコミットするかどうか [コメント](https://qiita.com/9sako6/items/72994b8b1c00af4e61fe#comment-6befa3a4462babcac618)にてご指摘を受けたため追記しました。@yukihirop さんありがとうございました。
Gemfile.lockは、Gemfile.lockがないリポジトリでbundle installした際に自動生成されるファイルです(Bundler: bundle install)。
Gemfile.lockは依存解決のためのファイルですが、これによって依存gemのバージョンが固定されることにより、環境によってはバグが生じることがあるようです。そういった理由もあり、Gemfile.lockをコミットするかどうかについて議論されてきたようです。
- git - Should Gemfile.lock be included in .gitignore? - Stack Overflow
- GemfileとGemfile.lockの簡単なお話 - 雑草SEの備忘録
- bundlerとGemfile.lockの取り扱い - DesignAssembler
本記事では、コミットしない立場をとることにします。bundle gem <gemname> -tによって自動生成される.gitignoreにはGemfile.lockが含まれていないので、追記します。
/.bundle/
/.yardoc
/_yardoc/
/coverage/
/doc/
/pkg/
/spec/reports/
/tmp/
+ Gemfile.lock

# rspec failure tracking
.rspec_status
一方、Railsアプリケーション(Railsで作ったWebアプリケーション)等の場合は、今回とは異なりGemfile.lockをコミットすべきだと思います。これは、異なる開発者・異なる環境の間で用いるgemに差を付けないためです。
3. 実装
3.1. gemの実装
lib/sample_gem.rbに処理を書きます。自動作成した時点ではこんな感じです。
require "sample_gem/version"

module SampleGem
  # Your code goes here...
end
あとはゴリゴリ処理を書きましょう。
(以下はサンプルです。)
require "sample_gem/version"

module SampleGem
  # 適当な処理
  def self.greet
    "Hello"
  end
end
3.2. 動作確認
bin/consoleで起動するirbで、gemを動かすことができます。
$ ./bin/console
irb(main):001:0> SampleGem.greet
=> "Hello"
irb(main):002:0>
3.3. テストの実装
spec/sample_gem_spec.rbにテストを書きます。
自動作成した時点ではこんな感じです。
RSpec.describe SampleGem do
  it "has a version number" do
    expect(SampleGem::VERSION).not_to be nil
  end

  it "does something useful" do
    expect(false).to eq(true)
  end
end
あとはゴリゴリテストを書きましょう。
(以下はサンプルです。)
RSpec.describe SampleGem do
  it "has a version number" do
    expect(SampleGem::VERSION).not_to be nil
  end

  it "greet test" do
    expect(SampleGem.greet).to eq("Hello")
  end
end
3.4. テストの実行
bundle exec rake specでテストできます。
$ bundle exec rake spec
/System/hogehoge

SampleGem
  has a version number
  greet test

Finished in 0.00247 seconds (files took 0.10583 seconds to load)
2 examples, 0 failures
4. 実行コマンド作成
どうせならコマンドライン上で動くようにしたいので、実行コマンドを作ります。
exeディレクトリを作り、その中に実行ファイルを作ります。
$ mkdir exe
$ touch exe/sample_gem
以下はサンプルです。
# !/usr/bin/env ruby

require 'sample_gem'

puts SampleGem.greet
実行ファイルに権限を与えます。
$ chmod 755 exe/sample_gem
bundle exec exe/hogeで実行できます。
$ bundle exec exe/sample_gem
Hello
公開
RrubyGems.orgでアカウントを作ります。
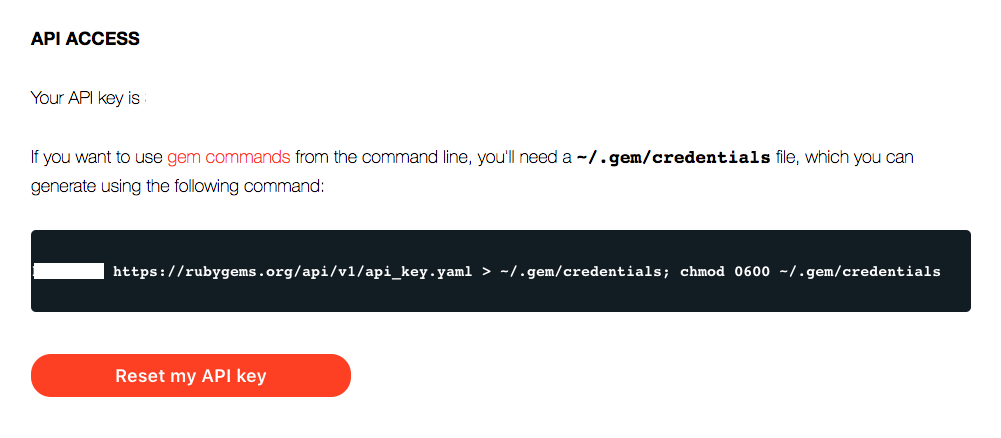
アカウントを作ったら、https://rubygems.org/profile/editでAPI keyを取得します。
curl -u hogehoge https://rubygems.org/api/v1/api_key.yaml > ~/.gem/credentials; chmod 0600 ~/.gem/credentialsというやつです。
これを実行し、RugeGems.orgにログインします。
$ curl -u hogehoge https://rubygems.org/api/v1/api_key.yaml > ~/.gem/credentials; chmod 0600 ~/.gem/credentials
buildする
$ rake build
sample_gem 0.1.0 built to pkg/sample_gem-0.1.0.gem.
Gitにpush
GitHubなどでリポジトリを作っておきます。
この時点ではもうREADME.mdに必要事項を書いておきましょう。
$ git init
$ git add -A
$ git commit -m "initial commit"
$ git git remote add origin https://github.com/UserName/GemName.git
$ git push -u origin master
releaseする
いよいよ作ったgemを公開します。
$ rake release
sample_gem 0.1.0 built to pkg/sample_gem-0.1.0.gem.
Tagged v0.1.0.
Pushed git commits and tags.
Pushed sample_gem 0.1.0 to rubygems.org
![]() 成功です。自分の作ったgemが世に羽ばたいて行きました。
成功です。自分の作ったgemが世に羽ばたいて行きました。
gemをインストール
自分で作ったgemをインストールし、動かしてみます。
$ gem install sample_gem
$ sample_gem
Hello
おまけ: 自作gemのアップデート
一度gemを公開すると、rake releaseしても自動ではバージョンアップしてくれません。
$ rake release
sample_gem 0.1.0 built to pkg/sample_gem-0.1.0.gem.
Tag v0.1.0 has already been created.
rake aborted!
Pushing gem to https://rubygems.org...
Repushing of gem versions is not allowed.
Please use `gem yank` to remove bad gem releases.

Tasks: TOP => release => release:rubygem_push
(See full trace by running task with --trace)
Repushing of gem versions is not allowed.とあるように、同じバージョンのgemをリリースすることはできません。gemに変更を加えた場合は、バージョンを変更する必要があります。
バージョンを変更する際は、lib/sample_gem/version.rbを書き換えます。(バージョンを下げられるかどうかはわかりません。)
module SampleGem
  VERSION = "0.1.1" # 0.1.0 -> 0.1.1に変更
end
変更点をcommitし、rake buildしてrake releaseすればバージョンアップできます。
$ git add .
$ git commit -m "Version 0.1.1"
$ rake build
sample_gem 0.1.1 built to pkg/sample_gem-0.1.1.gem.
$ rake release
sample_gem 0.1.1 built to pkg/sample_gem-0.1.1.gem.
Tagged v0.1.1.
Pushed git commits and tags.
Pushed sample_gem 0.1.1 to rubygems.org
![]()
rake releaseするにはログインが必要です。ログインがまだならhttps://rubygems.org/profile/editから確認できるcurl -u hogehoge https://rubygems.org/api/v1/api_key.yaml > ~/.gem/credentials; chmod 0600 ~/.gem/credentialsを実行してログインしてください。
Bye ![]()
参考
-
[はじめての Ruby gem 作成が死ぬほど簡単で笑えた件 (失敗談もあるよ) - Qiita]
(https://qiita.com/YumaInaura/items/90a3d02342486a62da43)
