Ruby歴3年ではじめてgemを作ってみた。
改めてRubyの仕組みすげえなって思ったのでその記録。
感想
- gem のひな形を作ってくれるコマンドがあるのでめちゃくちゃ楽。
- Rubygems に登録するのにも審査とかない。一瞬で公開できる。
- 手元から gem install でインストールできるようになる。
gem の名前を決めて Generate する
bundle gem textile2md
なんか色々とファイルが作成される。
Gemfile
gemが使うgemをインストールしたい。
Gemfileを見ると gemspec を読むようになっているのが分かる。
source "https://rubygems.org"

- git_source(:github) {|repo_name| "https://github.com/#{repo_name}" }

# Specify your gem's dependencies in textile2md.gemspec

gemspec
Github から取ってくる gem もないので、 github のレポジトリ設定は消してしまう。
bundle install
何が起こるかやってみる。いつもどおりのノリで。
エラー
なんか出た。
You have one or more invalid gemspecs that need to be fixed.
The gemspec at /Users/yuma/projects/textile2md/textile2md.gemspec is not valid. Please fix this gemspec.
The validation error was '"FIXME" or "TODO" is not a description'
gemspec の TODO や FIXME を書き換える必要があるっぽい。
gemspec の書き換え
-
spec.summaryspec.descriptionにこの gem の説明を書く。 -
spec.homepageには適当に GithubのURLを書いてみる -
spec.add_dependencyに依存gemを書く。 -
add_development_dependencyに開発用gemを書く。(で良いはず。ここではpryを追加してみた) -
allowed_push_hostの部分はプライベートでgemを使いたい場合の設定らしいので、がさっと削除した。 -
spec.license = "MIT"はかなりゆるいライセンスっぽい。特に何の権利もなくて良いのでこのままにしておく。
lib = File.expand_path("../lib", __FILE__)
$LOAD_PATH.unshift(lib) unless $LOAD_PATH.include?(lib)
require "textile2md/version"

Gem::Specification.new do |spec|
  spec.name          = "textile2md"
  spec.version       = Textile2md::VERSION
  spec.authors       = ["Yumainaura"]
  spec.email         = ["yu-ma.in-au-ra@gmail.com"]

-  spec.summary       = %q{TODO: Write a short summary, because RubyGems requires one.}
-  spec.description   = %q{TODO: Write a longer description or delete this line.}
+  spec.summary       = %q{Convert textile to markdown.}
+  spec.description   = %q{Convert textile to markdown.}
+  spec.homepage      = "https://github.com/YumaInaura/textile2md"
  spec.license       = "MIT"

-  # Prevent pushing this gem to RubyGems.org. To allow pushes either set the 'allowed_push_host'
-  # to allow pushing to a single host or delete this section to allow pushing to any host.
-  if spec.respond_to?(:metadata)
-    spec.metadata["allowed_push_host"] = "TODO: Set to 'http://mygemserver.com'"
-  else
-    raise "RubyGems 2.0 or newer is required to protect against " \
-      "public gem pushes."
-  end

  # Specify which files should be added to the gem when it is released.
  # The `git ls-files -z` loads the files in the RubyGem that have been added into git.
  spec.files         = Dir.chdir(File.expand_path('..', __FILE__)) do
    `git ls-files -z`.split("\x0").reject { |f| f.match(%r{^(test|spec|features)/}) }
  end
  spec.bindir        = "exe"
  spec.executables   = spec.files.grep(%r{^exe/}) { |f| File.basename(f) }
  spec.require_paths = ["lib"]

+  spec.add_dependency "Redcloth"
+  spec.add_dependency "reverse_markdown"

  spec.add_development_dependency "bundler", "~> 1.16"
  spec.add_development_dependency "rake", "~> 10.0"
  spec.add_development_dependency "rspec", "~> 3.0"
+  spec.add_development_dependency "pry"
end
依存gemのバージョン固定すると使い勝手が悪くなりそうだし、かといってどのバージョン以上で動くかという保証を取るのも大変そう。
ここではバージョン無指定のノーガード戦法で行く。(あとで考える)
ふたたび bundle install すると‥
通った。
モジュールにメソッドを追加
- 依存gemをrequire する
- メソッドを生やす
require "textile2md/version"
+require "RedCloth"
+require "reverse_markdown"

module Textile2md
+  def self.convert(textile)
+    html = RedCloth.new(textile).to_html
+    markdown = ReverseMarkdown.convert(html)
+
+    markdown
+  end
end
モジュールに直接メソッドを生やすのは行儀が良くないらしいが、とりあえずあとで考えることにする。
pry で動作確認
$ bundle exec pry
とりあえず動いた。
[2] pry(main)> require 'textile2md'
# => true

[3] pry(main)> Textile2md.convert('h1. header')
=> "# header\n"
Rubygemsへのリリース
動いたしリリースしてみよう!
アカウント作成
RubyGems.org でアカウント作成しておく。
RugeGemsにログインする
curl -u yumainaura https://rubygems.org/api/v1/api_key.yaml > ~/.gem/credentials; chmod 0600 ~/.gem/credentials
ビルドする
$ bundle exec rake build
textile2md 0.1.0 built to pkg/textile2md-0.1.0.gem.
リリースする
$ bundle exec rake release

textile2md 0.1.0 built to pkg/textile2md-0.1.0.gem.
自作gemを使ってみる
Rubygemsからインストール
早速インストールできる。すごいね。
$ gem install textile2md
$ gem install textile2md

Fetching: textile2md-0.1.1.gem (100%)
Successfully installed textile2md-0.1.1
Parsing documentation for textile2md-0.1.1
Installing ri documentation for textile2md-0.1.1
Done installing documentation for textile2md after 0 seconds
1 gem installed
pry で動作確認
一般環境からの利用なので bundler は使わず素の pry を使う。
$ gem install pry
$ pry
[1] pry(main)> require 'textile2md'
=> true

[4] pry(main)> puts Textile2md.convert('h1. header')
# # header
使えてる。
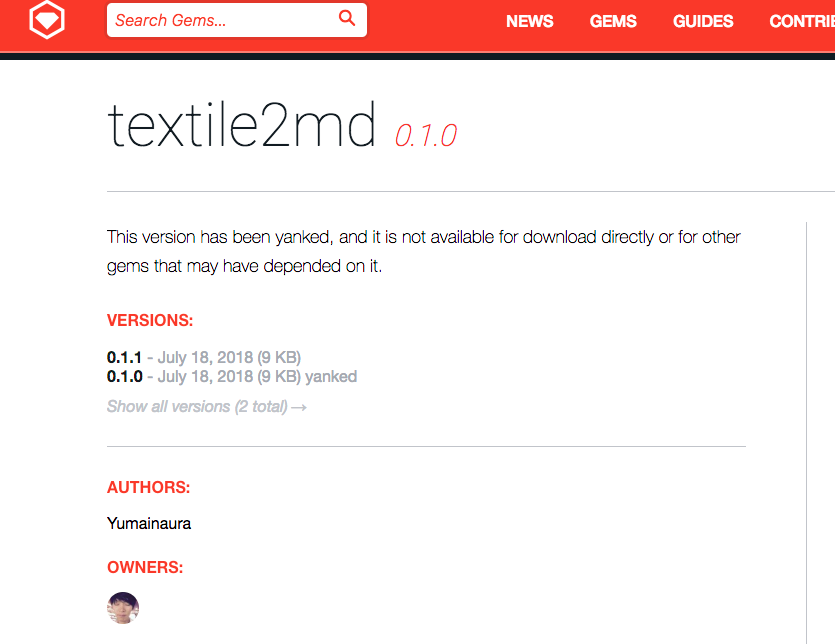
Rubygems.org
Webサイトにも登録されてる。
その他
- READMEや簡単なspecも書いた
- Githubで公開されているgemって「皆よくREADMEとか手厚く用意してるな」とか思っていたけど、こうやってテンプレで作られていたことが分かり勉強になった。
- ほとんど意識していなかったがgit管理は必須のはず
- Rubygemsへのリリース時に、gitに自動でバージョン番号のタグを作成してくれる模様。
- これは悪い子のやり方なので、良い子は ドキュメント を読もう! (リリース前に手元でgem install を試したり)
失敗談
- 最初 Gemfile に依存gemを書いたままで Rubygems にリリースしていた。
-
gem installで自作gemをインストールした後に、依存gemが入っていなくて使えないことに気付いた。 - gemspecに書く必要があるのがわかったのは
0.1.0のリリース後。
-
-
gem yankで Rubyems から「悪いバージョン」を削除することが出来た。- だが再び同じバージョンでのリリースし直しは出来なかった。(正しい)
-
0.1.1にバージョンを上げてリリースし直した。
Github
環境
- ruby 2.5.1p57 (2018-03-29 revision 63029) [x86_64-darwin17]
参考
チャットメンバー募集
何か質問、悩み事、相談などあればLINEオープンチャットもご利用ください。

