概要
この記事は、Youtubeチャンネル『トラハックのエンジニア学習ゼミ【とらゼミ】』の『日本一わかりやすいReact入門【実践編】』の自分用学習備忘録です。
#1~5までの記事はこちら。
#6...条件分岐とコールバック関数のbind
続いて、チャット部分のコンポーネントを作成します。
- Chats
- Chat
- Chat
- Chat
- ...
AnswersList -> Answer と同じ構造。
これと並行して、Answerコンポーネントをクリックすることで、次の回答に遷移するよう、App.jsxで定義した selectAnswer()関数を、bindによってAnswerコンポーネントへ渡していきます。
修正ファイルは、
- src/App.jsx
- components/Chats.jsx
- components/Chat.jsx
- components/AnswersList.jsx
- components/Answer.jsx
- components/index.js
import React from 'react';
import './assets/styles/style.css';
import defaultDataset from "./dataset"
import {AnswersList, Chats} from "./components/index"

export default class App extends React.Component {
  constructor(props) {
    super(props);
    this.state = {
      answers: [],
      chats: [],
      currentId: "init",
      dataset: defaultDataset,
      open: false
    }
    this.selectAnswer = this.selectAnswer.bind(this)
  }

  displayNextQuestion = (nextQuestionId) => {
    const chats = this.state.chats
    console.log(nextQuestionId)
    chats.push({
      text: this.state.dataset[nextQuestionId].question,
      type: 'question'
    })

    this.setState({
      answers: this.state.dataset[nextQuestionId].answers,
      chats: chats,
      currentId: nextQuestionId
    })
  }

  selectAnswer = (selectedAnswer, nextQuestionId) => {
    switch(true) {
      case (nextQuestionId === 'init'):
        this.displayNextQuestion(nextQuestionId)
        break;
      default:
        const chats = this.state.chats;
        chats.push({
          text: selectedAnswer,
          type: 'answer'
        })

        this.setState({
          chats: chats
        })

        this.displayNextQuestion(nextQuestionId)
        break;
    }
  }

  componentDidMount() {
    const initAnswer = "";
    this.selectAnswer(initAnswer, this.state.currentId)
  }

  render() {
    return (
      <section className="c-section">
        <div className="c-box">
          <Chats chats={this.state.chats}/>
          <AnswersList
            answers={this.state.answers}
            select={this.selectAnswer}
          />
        </div>
      </section>
    );
  }
}
ここは実行順序が少し複雑なので、文字で書き起こして整理してみる。
-
初回render時の挙動
- componentDidMount()により、selectAnswer()に初期の引数が渡される。第1引数は空の文字列、第2引数は'init'
- selectAnswer()において、
case (nextQuestionId === 'init'):が実行され、this.displayNextQuestion()に'init'が渡される。 - displayNextQuestion()で、
this.state.dataset['init'].questionが呼び出され、空っぽのchatsに最初のchatが入る(typeはquestion)。 - answers対しても、nextQuestionId='init'に対応する値が、datasetから呼び出され代入される。
- currentIdの更新がこのタイミングで入る。今回はcurrentId='init'が代入される。
- これらの
chats、answersが、それぞれChatsコンポーネントとAnswersコンポーネントに渡される。
-
チャット欄が更新されていく流れ
- AnswersListコンポーネントに渡しているselectAnswer()関数は、最終的にAnswerコンポーネントに渡り、onClickイベントにより実行されることになる。その際、Answerコンポーネントが保有している
props.contentとprops.nextIdが、selectAnswer(props.content,props.nextId)の形で渡される - selectAnswer()のswitch分岐のうち、defaultの方が実行される。まず、selectedAnswer引数に渡された
props.contentがchatsに追加される(typeはanswer)。その後、nextQuestionId引数に渡されたprops.nextIdがdisplayNextQuestion()に渡り、answers、currentIdが更新される - 更新された
chats、answersが、それぞれChatsコンポーネントとAnswersコンポーネントに渡される。
- AnswersListコンポーネントに渡しているselectAnswer()関数は、最終的にAnswerコンポーネントに渡り、onClickイベントにより実行されることになる。その際、Answerコンポーネントが保有している
import React from 'react';
import { makeStyles } from '@material-ui/core/styles';
import List from '@material-ui/core/List';
import {Chat} from "./index"

const useStyles = makeStyles((theme) => ({
  root: {
    width: '100%',
    maxWidth: '36ch',
    backgroundColor: theme.palette.background.paper,
  },
}));

const Chats = (props) => {
  const classes = useStyles();

  return (
    <List className={classes.root}>
      {props.chats.map((chat,index) => {
        return <Chat text={chat.text} type={chat.type} key={index.toString()} />
      })}
    </List>
  );
}

export default Chats
- Material-UIのList React Componentを一部使用。
- App.jsxよりもらった
props.chatsは、AnswersListコンポーネントと同様に、map関数で繰り返し処理。
import React from 'react';
import ListItem from '@material-ui/core/ListItem';
import ListItemAvatar from '@material-ui/core/ListItemAvatar';
import Avatar from '@material-ui/core/Avatar';
import UserIcon from '../assets/img/no-profile.png'
import BotIcon from '../assets/img/ai_computer_sousa_robot.png'

const Chat = (props) => {
  const isQuestion = (props.type === 'question');
  const classes = isQuestion ? 'p-chat__row' : 'p-chat__reverse';

  return (
    <ListItem className={classes}>
      <ListItemAvatar>
        {isQuestion ? (
          <Avatar alt="icon" src={BotIcon} />
          ) : (
          <Avatar alt="icon" src={UserIcon} />
        )}
      </ListItemAvatar>
      <div className="p-chat__bubble">{props.text}</div>
    </ListItem>
  )
}

export default Chat
- Material-UIのList React Componentを一部使用。
- chatの種類(type)が「question」か「answer」かで条件分岐を行っている。
import React from 'react'
import {Answer} from './index'

const AnswersList = (props) => {
  return (
    <div className="c-grid__answer">
      {props.answers.map((value, index) => {
        return <Answer content={value.content} nextId={value.nextId} key={index.toString()} select={props.select} />
      })}
    </div>
  )
}

export default AnswersList
- 新たにnextIdとselect(selectAnswer関数のこと)を、Answerコンポーネントに渡している
import React from 'react';
import { makeStyles } from '@material-ui/core/styles';
import Button from '@material-ui/core/Button';

const useStyles = makeStyles((theme) => ({
  root: {
  },
}));

const Answer = (props) => {
  return (
    <Button variant="contained" color="primary" onClick={() => props.select(props.content,props.nextId)} >
      {props.content}
    </Button>
  )
}

export default Answer
-
onClickにより、select(=selectAnswer関数)が実行される。
export {default as AnswersList} from './AnswersList'
export {default as Answer} from './Answer'
export {default as Chats} from './Chats'
export {default as Chat} from './Chat'
- コンポーネントが増え次第、ここに追記する。
上手く行けば、質問をクリックするたびチャット欄が更新され、また新たな質問が表示されます。
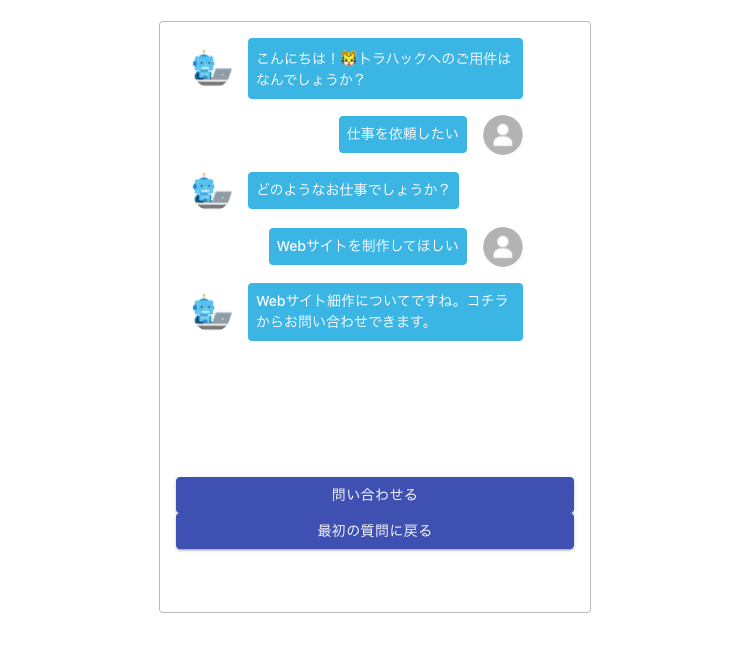
ここまでで、チャットボットとしての最低限の機能は実装できました!
#7...Material-UIのスタイルをカスタマイズしよう
Hook APIを用いて、Material-UIのスタイルを変更する。まずはHook APIをインストールする。
$ npm install --save @material-ui/styles
Answerコンポーネント、Chatsコンポーネントにstyleを定義します。
import React from 'react';
import { makeStyles, createStyles } from '@material-ui/core/styles';
import Button from '@material-ui/core/Button';

const useStyles = makeStyles(() => (
  createStyles({
    "button": {
      borderColor: '#FFB549',
      color: '#FFB549',
      fontWeight: 600,
      marginBottom: '8px',
      "&:hover": {
        backgroundColor: '#FFB549',
        color: '#fff'
      }
    }
  })
));

const Answer = (props) => {
  const classes = useStyles();

  return (
    <Button className={classes.button} variant="outlined" onClick={() => props.select(props.content,props.nextId)} >
      {props.content}
    </Button>
  )
}

export default Answer
- @material-ui/core/stylesから
createStylesをimportする。 - Material-UIでは、この
createStyles()の中にstyleを定義する -
const classes = useStyles();で定義したclassを、styleを適用させたいタグに入れる
import React from 'react';
import { makeStyles, createStyles } from '@material-ui/core/styles';
import List from '@material-ui/core/List';
import {Chat} from "./index"

const useStyles = makeStyles(() => (
  createStyles({
    "chats": {
      height: 400,
      padding: '0',
      overflow: 'auto'
    }
  })
));

const Chats = (props) => {
  const classes = useStyles();

  return (
    <List className={classes.chats}>
      {props.chats.map((chat,index) => {
        return <Chat text={chat.text} type={chat.type} key={index.toString()} />
      })}
    </List>
  );
}

export default Chats
-
overflow: 'auto'により、<List>タグの子要素がheight:400を超えると、スクロールバーが表示される
styleが上手く当てられていると、
- 選択肢ボタンについて、通常時は白背景の黄色文字、マウスホバー時は黄色背景の白文字に。
- チャットを何度か繰り返すと、スクロールバーが表示される
のようになっているはず。
#8...ライフサイクルの活用
自動スクロール機能
チャットが更新されたときに、スクロールが自動で下まで移動する仕様を実装する。ライフサイクルメソッドのうち、componentDidUpdate()を用いる。
...

<List className={classes.chats} id={"scroll-area"} >

...
スクロールをさせる<List>タグにidを持たせる。
...

componentDidUpdate(){
  const scrollArea = document.getElementById("scroll-area")
  if (scrollArea) {
    scrollArea.scrollTop = scrollArea.scrollHeight
  }
}

...
Chatsコンポーネントの値が更新されるたびにcomponentDidUpdate()が実行され、自動スクロールが実行される。
ディレイ機能
チャットボット側の返信を意図的に遅らせる。setTimeout()関数を使用する。
...

  selectAnswer = (selectedAnswer, nextQuestionId) => {
    switch(true) {
      case (nextQuestionId === 'init'):
        // this.displayNextQuestion(nextQuestionId)
        setTimeout(() => this.displayNextQuestion(nextQuestionId), 500);
        break;
      default:
        const chats = this.state.chats;
        chats.push({
          text: selectedAnswer,
          type: 'answer'
        })

        this.setState({
          chats: chats
        })
        // this.displayNextQuestion(nextQuestionId)
        setTimeout(() => this.displayNextQuestion(nextQuestionId), 1000);
        break;
    }
  }

...
displayNextQuestion()の実行にディレイをかける。setTimeoutの単位はms(ミリセカンド)。・
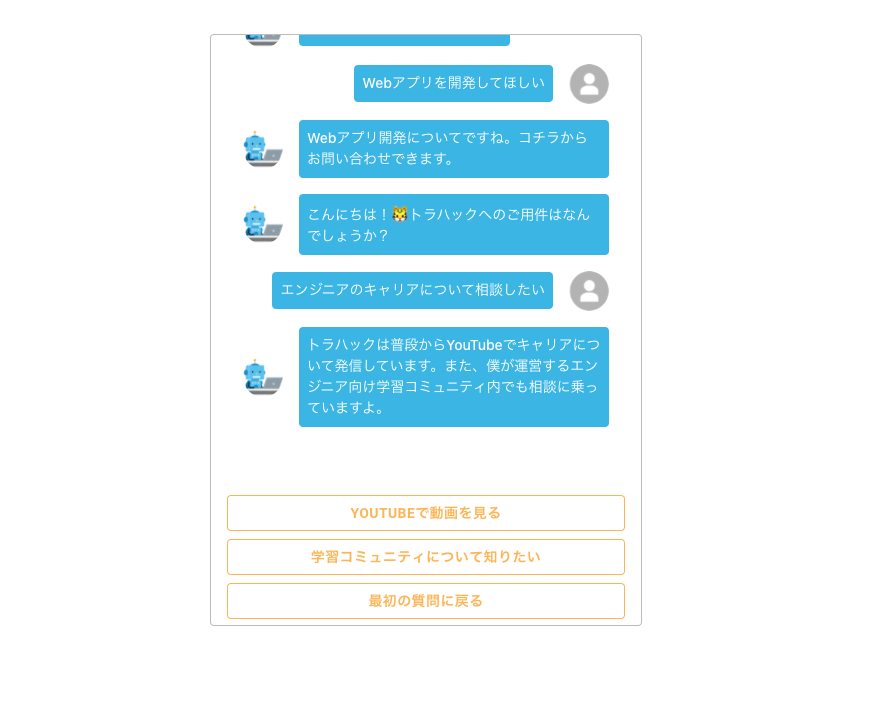
外部サイトへの転送
selectedAnswer()に渡されたnextQuestionIdがhttp:~から始まるURL文字列の時、datasetから値を取り出すのではなく、該当するURLへページを転送させるように実装します。
selectAnswer = (selectedAnswer, nextQuestionId) => {
    switch(true) {
      case (nextQuestionId === 'init'):
        setTimeout(() => this.displayNextQuestion(nextQuestionId), 500);
        break;

      // ここから追記
      case (/^https:*/.test(nextQuestionId)):
        const a = document.createElement('a');
        a.href = nextQuestionId;
        a.target = '_blank';
        a.click();
        break;
      // ここまで追記

      default:
      ...

    }
  }
- 正規表現の
/^https:*/を用いて、nextQuestionIdの先頭文字列がhttp:~で始めるかどうかをチェック -
<a>タグを生成し、クリック処理をすることで転送させる
ここまでで「問い合わせる」(nextQuestionId=‘contact’)以外の選択肢については、エラーを出さなくなりました
#9...問い合わせ用モーダルとSlack通知を実装しよう
問い合わせ用モーダル
FormDialogコンポーネントと、TextInputコンポーネントを新たに作ります。
FormDialogコンポーネントが問合せモーダル自体の表し、その中に入力スペースの部分のみを、TextInputコンポーネントが担当するイメージです。
新規作成or修正ファイルは以下の通り。
- src/App.jsx
- component/Form/FormDialog.jsx
- component/Form/TextInput/jsx
- component/index.js
import React from 'react';
import './assets/styles/style.css';
import defaultDataset from "./dataset"
// FormDialogコンポーネントを追加
import {AnswersList, Chats, FormDialog} from "./components/index"

export default class App extends React.Component {
  constructor(props) {
    super(props);
    this.state = {
      answers: [],
      chats: [],
      currentId: "init",
      dataset: defaultDataset,
      open: false
    }
    this.selectAnswer = this.selectAnswer.bind(this)

    // FormDialogコンポーネントに渡す関数をバインド
    this.handleClickOpen = this.handleClickOpen.bind(this)
    this.handleClose = this.handleClose.bind(this)
  }

  displayNextQuestion = (nextQuestionId) => {
    const chats = this.state.chats
    chats.push({
      text: this.state.dataset[nextQuestionId].question,
      type: 'question'
    })

    this.setState({
      answers: this.state.dataset[nextQuestionId].answers,
      chats: chats,
      currentId: nextQuestionId
    })
  }

  selectAnswer = (selectedAnswer, nextQuestionId) => {
    switch(true) {
      case (nextQuestionId === 'init'):
        setTimeout(() => this.displayNextQuestion(nextQuestionId), 500);
        break;

      // ユーザーが'問合せたい'をクリックした時に、this.handleClickOpen()が実行される
      case (nextQuestionId === 'contact'):
        this.handleClickOpen()
        break;

      case (/^https:*/.test(nextQuestionId)):
        const a = document.createElement('a');
        a.href = nextQuestionId;
        a.target = '_blank';
        a.click();
        break;

      default:
        const chats = this.state.chats;
        chats.push({
          text: selectedAnswer,
          type: 'answer'
        })

        this.setState({
          chats: chats
        })
        setTimeout(() => this.displayNextQuestion(nextQuestionId), 1000);
        break;
    }
  }

  // openの値でモーダルの開閉を制御
  handleClickOpen = () => {
    this.setState({
      open: true
    });
  };

  // openの値でモーダルの開閉を制御
  handleClose = () => {
    this.setState({
      open: false
    });
  };

  componentDidMount() {
    const initAnswer = "";
    this.selectAnswer(initAnswer, this.state.currentId)
  }


  componentDidUpdate(){
    const scrollArea = document.getElementById("scroll-area")
    if (scrollArea) {
      scrollArea.scrollTop = scrollArea.scrollHeight
    }
  }

  render() {
    return (
      <section className="c-section">
        <div className="c-box">
          <Chats chats={this.state.chats}/>
          <AnswersList answers={this.state.answers} select={this.selectAnswer} />

          // openの値と、openの値を変更する関数を渡す
          <FormDialog open={this.state.open} handleClose={this.handleClose} />
        </div>
      </section>
    );
  }
}
- 問合せモーダルを開くタイミングは、ユーザーが「問い合わせる」の選択肢を選んだときのみなので、
handleClickOpen関数はApp.jsxのみで使用する - 一方、問合せモーダルを閉じるタイミングは、①情報が送信されたとき、と②問合せモーダル内の「キャンセル」を押したときであり、②を実装するためには、
handleClose関数をFormDialogコンポーネントに渡しておく必要がある。
import React from 'react'
import Button from '@material-ui/core/Button';
import Dialog from '@material-ui/core/Dialog';
import DialogActions from '@material-ui/core/DialogActions';
import DialogContent from '@material-ui/core/DialogContent';
import DialogTitle from '@material-ui/core/DialogTitle';
import {TextInput} from "../index"

export default class FormDialog extends React.Component {
  constructor(props) {
    super(props);
    this.state = {
      name: "",
      email: "",
      description: ""
    }
    this.inputName = this.inputName.bind(this)
    this.inputEmail = this.inputEmail.bind(this)
    this.inputDescription = this.inputDescription.bind(this)
  }

  inputName = (event) => {
    this.setState({ name: event.target.value })
  }

  inputEmail = (event) => {
    this.setState({ email: event.target.value })
  }
  inputDescription = (event) => {
    this.setState({ description: event.target.value })
  }

  render() {
    return (
      <Dialog
        open={this.props.open}
        onClose={this.props.handleClose}
        aria-labelledby="alert-dialog-title"
        aria-describedby="alert-dialog-description"
      >
        <DialogTitle id="alert-dialog-title">{"問い合せフォーム"}</DialogTitle>
        <DialogContent>

          <TextInput
            label={"お名前"}
            multiline={false}
            rows={1}
            value={this.state.name}
            type={"text"}
            onChange={this.inputName}
          />

          <TextInput
            label={"メールアドレス"}
            multiline={false}
            rows={1}
            value={this.state.email}
            type={"email"}
            onChange={this.inputEmail}
          />

          <TextInput
            label={"お問い合わせ内容"}
            multiline={true}
            rows={5}
            value={this.state.description}
            type={"text"}
            onChange={this.inputDescription}
          />

        </DialogContent>
        <DialogActions>
          <Button onClick={this.props.handleClose} color="primary">
            キャンセル
          </Button>
          <Button onClick={this.props.handleClose} color="primary" autoFocus>
            送信する
          </Button>
        </DialogActions>
      </Dialog>
    )
  }
}
- reactでは、inputで送信する値に関しても、stateとして定義・管理する必要がある。
- inputName()、inputEmail()、inputDescription()を定義して、テキストフィールドに入力された内容を逐次stateとして保存する処理を行う。
- この時点では、「送信する」ボタンを押しても、情報は送信されずに問合せモーダルが閉じる処理だけが行われる
import React from 'react';
import TextField from '@material-ui/core/TextField';

const TextInput = (props) => {
  console.log(props.multiline)
  console.log(props.rows)
  return (
    <TextField
      fullWidth={true}
      label={props.label}
      margin={"dense"}
      multiline={props.multiline}
      rows={props.rows}
      value={props.value}
      type={props.type}
      onChange={props.onChange}
    />
  )
}

export default TextInput
- Material-UIの『Text Field』を使用。
export {default as AnswersList} from './AnswersList'
export {default as Answer} from './Answer'
export {default as Chats} from './Chats'
export {default as Chat} from './Chat'
export {default as FormDialog} from './Forms/FormDialog'
export {default as TextInput} from './Forms/TextInput'
- FormDialigコンポーネント、TextInputコンポーネントを作成したので、追記。
Slack通知機能
モーダルに入力された内容を、Slackまで通知させます。まず、Slack側の設定を行い、WebhookURLを取得します。流れとしては、
- (未作成なら)自分一人だけのワークスペースを新たに作る
- 作成したワークスペースに対して、Slackアプリを作成する
- Incoming Webhooksを有効にし、WebhookURLを取得する
詳細は『slackのIncoming webhookが新しくなっていたのでまとめてみた』というQiita記事が参考になりました。
WebhookURLを取得できたら、FormDialog.jsxに、Slackに通知させる関数を定義します。
...

submitForm = () => {
    const name = this.state.name
    const email = this.state.email
    const description = this.state.description

    const payload = {
      text: 'お問い合わせがありました\n' +
            'お名前: ' + name + '\n' +
            'Email: ' + email + '\n' +
            'お問い合わせ内容:\n' + description
    }

    const url = 'ここにWebhookURLを記述'

    fetch(url, {
      method: 'POST',
      body: JSON.stringify(payload)
    }).then(() => {
      alert('送信が完了しました!しばらくお待ちください')
      this.setState({
        name: "",
        email: "",
        description: ""
      })
      return this.props.handleClose()
    })
  }

...

// <Button onClick={this.props.handleClose} color="primary" autoFocus>
<Button onClick={this.submitForm} color="primary" autoFocus>
  送信する
</Button>

...
「送信する」ボタンのonClickイベントに、定義したsubmitForm()関数を設定します。
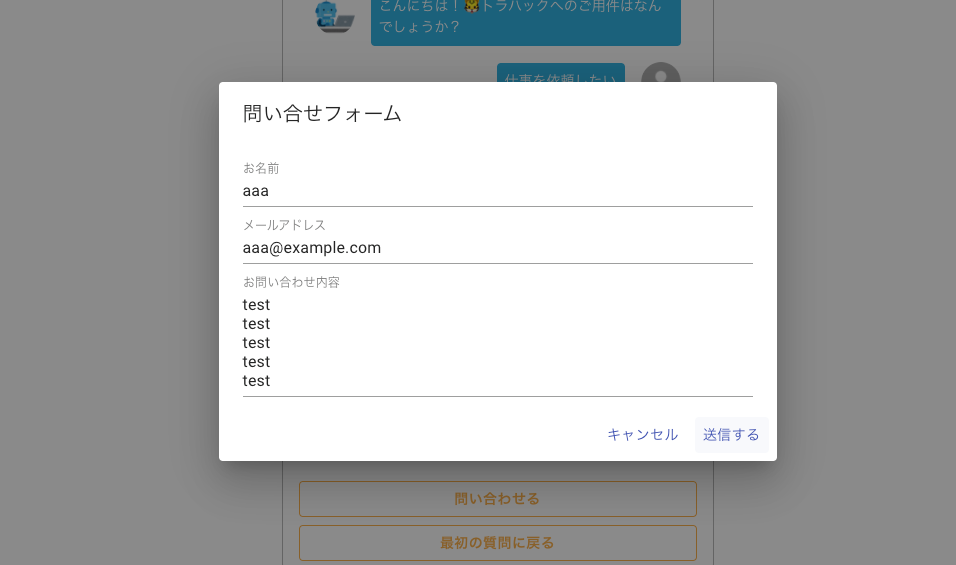
お問い合わせフォームに適切な値を入力し送信すると、、、
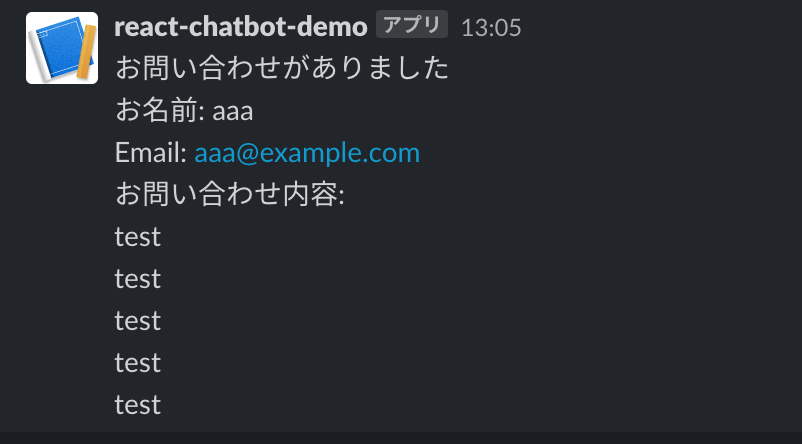
無事、通知が届きました!
Slackへの通知は初実装でしたが、意外と簡単にできました!
記事が長くなったのでいったんここまで!続きはこちら。