はじめに
OpenShift Do( odo )は、OpenShift Container PlatformおよびKubernetesでアプリケーションを作成するためのコマンドラインインターフェース(CLI)ツールです。
本投稿では、前半は、OpenShift Do (odo 2.0) と周辺技術の概要についての備忘録、
後半は、実際に手を動かして OpenShift Do(odo 2.0)を使ってOpenShiftとKubernetes環境へOpenLibertyのJavaアプリケーションをデプロイした手順を書いています。
次の図は、スーパーショートカットで手っ取り早く、理解したい人向けに、私が想像したOpenShift Do(odo 2.0)を使ってアプリケーション開発をする時のイメージ図です。
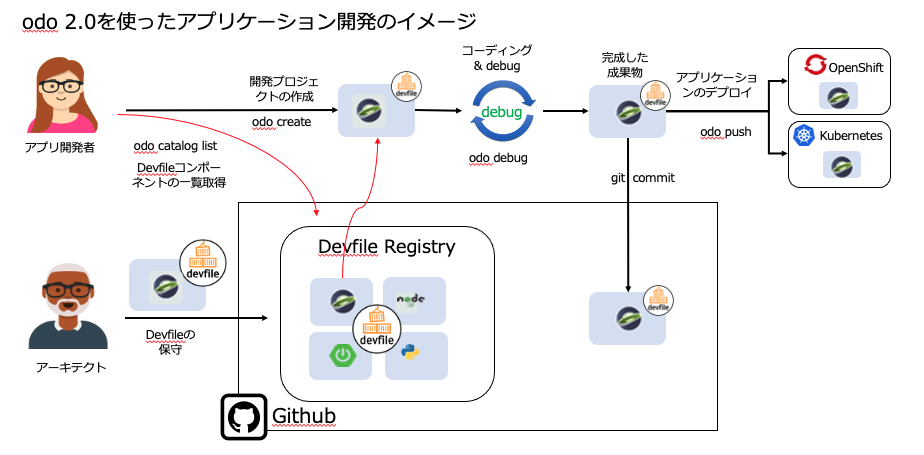
図の説明を読みたくなったら内部リンクの 「 OpenShift Do(odo2.0) を使ったアプリケーション開発のユースケース 」へ遷移してもらうのもよいですし、そのまま流れのままに読んでいただけると励みになります!
OpenShift Do( odo ) Version 2.0 の登場
OpenShift Do ( odo )の Version 2.0が 2020年9月27日にリリースされました。
odo.dev : https://odo.dev
Version 2.0での目立った変更点はバクッと以下の2点です。
- サポートするプラットフォームが、OpenShiftだけでなく、Kubernetesが追加された
- アプリケーションのデプロイするメカニズム(エンジン?)がs2i(source2image)からDevfileに変わった。
Version 2.0では、odoからOpenShift独自のリソース(routeとかs2iとか)が標準から取り除かれたので、 Kubernetesも操作できるようになりました。( オプションをつける事で、s2iも利用できる。)
また、 Devfileに変わって共通のYamlを odo と Code Ready Workspace、Eclipse Cheで使えるようになり、各ツール間での横のつながりができるようになりました。(Version 1.0ではできなかったので、結構大きな話だと思います。)
Version 2.0 で さらに、odoのロードマップによると、今後、InnerLoop開発だけでなく、OuterLoop開発のサポート、OuterLoopからGitOpsやOpenShfit Pipelinesへの連携など来年以降も活発に開発が進むと思われます。
- Roadmap for odo : https://github.com/openshift/odo#roadmap-for-odo
OpenShift Do ( odo ) とは
RedHat OpenShift Do( odo )は、OpenShift Container PlatformおよびKubernetesでアプリケーションを作成するためのコマンドラインインターフェース(CLI)ツールです。
これまで、OpenShiftやKubernetes上でアプリケーションを動かすためには、 " oc " や " kubectl " のコマンドを使って クラスターを操作してOpenShiftやKubernetesのオブジェクト(Namespace, Deployment、service、routeなど)を作成する必要がありましたが、OpenShift Do ( odo )は、 OpenShift, Kubernetesのオブジェクト、概念自体を抽象化します。
そのため、odoを使う事で、以下の5ステップで、OpenShift/Kubernetesにアプリケーションをデプロイできるので、
- openshift/kubernetesにログイン
- odo catalog list components
- odo create xxx
- ゴリゴリアプリ開発
- odo push
開発者は、OpenShiftやKubernetesを最小限の学習コストで、その分、アプリケーション開発に集中する事ができるのです。
OpenShift Do ( odo )の最近の動向
OpenShift Do ( odo )自体は、以前からあるツールで、現時点では Version 1.x と Version 2.xがあります。
Version 1.x と Version 2.xの違いは下記の通りです。
-
Version 1.x
-
OpenShiftのみをサポート
-
アプリケーションを作成するメカニズム(エンジン)は、s2i ( source2image )をサポート
-
最新リリースは v1.2.6 (2020年09月1日)
-
Version 2.x
-
Kubernetesも使えるようになった( Minikube, Vanilla KubernetesやManaged Kubernetesまで操作できるようになった)
-
アプリケーションを作成するメカニズム(エンジン)が、s2i( source2image ) から Devfile(Version 2.0)に変更になった。
-
- Version 2.0.0 が2020年9月23日にリリース
-
最新リリースはv2.0.3 ( 2020年12月9日 )
Release of v2.0.3 : https://github.com/openshift/odo/releases/tag/v2.0.3
そして、 OpenShift Container Platform 4.6 では、odo 2.0 と Devfile( Version2.0) を使ったアプリケーションの作成が、Tech Previewが外れサポートが受けれるようになりました。
- odo release notes by OpenShift Container Platform 4.6 :
https://docs.openshift.com/container-platform/4.6/cli_reference/developer_cli_odo/odo-release-notes.html
さらに、 Red Hat以外の動向として、2020年11月にリリースされた IBM の Cloud Pak for Aplications v4.3 では、 クラウドネイティブな開発を支援するフレームワークであるAccelerators for Teamsの一部機能として、 odo が Tech Previewとして追加されました。
-
Technology preview: OpenShift Do (IBM Cloud Pak for Applications)
https://www.ibm.com/support/knowledgecenter/en/SSCSJL_4.3.x/techpreview/welcome-techpreview-odo.html -
画像は、 Cloud Pak for Applicationsを odo モードで動かした時のキャプチャ

このことから、今後、IBMも OpenShift Do ( odo )を担いでいくのね と 私個人としては想像しています。
ここまでで OpenShift Do ( odo )については なんとなくわかっていただけたでしょうか
次に、 odo 2.0と一緒に重要なコンポーネントである Devfile と Devfile Registryについて触れていきます。
Devfileとは
今回は、ざっくりと説明しますが、 Devfileはアプリ開発用のアプリケーションのテンプレートです。
注) Documentではテンプレートではなく、コンポーネントと書かれてる。
Devfileコンポーネントには、Yamlで書かれており、以下の様な内容が記載されています。
- 開発で必要なコンポーネントが記載: 例) コンテナ向けのツール、runtimes、フレームワーク
- build,debug,run,testなどのPre-buildコマンド
Devfileのサンプルは、 odo-devfiles の GitHubリポジトリにあるnodejsのdevfile.yamlを参照するとイメージがわくと思います。下記URL参照してください。
https://github.com/odo-devfiles/registry/blob/master/devfiles/nodejs/devfile.yaml
再度書きますが、Devfile 2.0 になってから、 Kubernetes対応と odoと CodeReady Works、Eclipse Cheと共通Yaml形式になって互換性が生まれて便利になりました。
そして、現在、提供されるDevfileコンポーネントの一覧は下記になります。
- java-maven - Upstream Maven and OpenJDK 11
- java-openliberty - Open Liberty microservice in Java
- java-quarkus - Upstream Quarkus with Java+GraalVM
- java-springboot - Spring Boot® using Java
- java-vertx - Upstream Vert.x using Java
- nodejs - Stack with NodeJS 12
- python - Python Stack with Python 3.7
- python-django - Python3.7 with Django
IBM Power, IBM Zは、現時点では、nodejsのみサポートになっています。 Devfileコンポーネントの詳細は、Official Devfiles を確認してください。
Devfile Registryとは
こちらもざっくりと説明しますが、 Devfileを保存管理するためのリポジトリです。
リポジトリの役割なので、 Devfile Registryは Devfileコンポーネントの一覧(Catalog View)を出力するのが役割の一つです。
そして、それぞれのDevfileコンポーネントの管理自体はJSONファイルで構成しています。
- Devfile Registryのサンプル:
https://github.com/odo-devfiles/registry/blob/master/devfiles/index.json
下記コマンドの出力は、odoがインストールされた後に出力されるデフォルトのリポジトリです。
$ odo registry list
NAME                       URL                                          SECURE
DefaultDevfileRegistry     https://github.com/odo-devfiles/registry     No
デフォルトでは、Publicのコミュニティリポジトリを参照しています。ですので実際に、商用で利用する場合は、プライベートリポジトリを作成して利用することになります。
なお、Devfile Registryでは、 Devfileコンポーネントの集合体を Catalogと表現しており、 Devfileを出力するためには下記の様にodo catalog コマンドを使用します。
odo catalog list components
odo catalog describe component nodejs
OpenShift Do(odo2.0) を使ったアプリケーション開発のユースケース
ここまでで、 odo と Devfile と Devfile Registryについて、イメージが沸いたでしょうか
次の図は、私個人が想像したodo 2.0を使ってアプリケーション開発をする時のイメージ図です。
odo2.0を使ったアプリケーション開発のイメージ図
上図では、以下の内容ができるのではないかと表現しています。
- アーキテクトが、Devfile Registryや Devfileコンポーネントの保守を行う。
- 開発者は、 Devfile Registryから必要なDevfileコンポーネントを取得してアプリケーション開発を行う。
- 開発者は、ローカル環境で、コーディング、debug、testなどイテレーションを回した開発ができる。
- 開発者は、成果物を OpenShiftやKubernetesに デプロイする事ができる。
現在は、まだ実装できていない、odo deploy、 odo pipelinesコマンドなどができたならば、 GitOpsや OpenShift Pipelinesの使った図も加える事ができることでしょう。 今後の展開に期待します。
OpenShift Do ( odo ) を実際に使ってみよう
それでは、実際にOpenShift Do ( odo )を使って、 Open LibertyのJavaアプリケーションをOpenShift / Kubernetesクラスターにデプロイしてみたいと思います。
今回は、 以下の2つの環境で試してみました。
- Minikube ( Kubernetes )
- OpenShiftのマネージドサービスである 「 Red Hat OpenShift on IBM Cloud 」
- odo のインストール
odo のドキュメント 「 Installing Odo 」 より、 odoをインストールします。
1. Minikube ( Kubernetes環境)へのデプロイ
では、OpenShift Do(odo)を使ってMinikubeに、OpenLibertyのJavaアプリケーションをデプロイしてみます。
- Minikubeの起動とingressアドオンを有効にします。
$ minikube start --driver=docker

$ minikube addons enable ingress
- odo project コマンドを使用して、プロジェクトを作成します。コマンドを実行すると任意の名前を入力したnamespaceが Kubernetesに作成されます。
$ odo project create sample
 ✓  Project 'sample' is ready for use
 ✓  New project created and now using project: sample
- Devfileコンポーネントの一覧を出力し、java-openlibertyを探します。
$ odo catalog list components
Odo Devfile Components:
NAME                 DESCRIPTION                            REGISTRY
java-maven           Upstream Maven and OpenJDK 11          DefaultDevfileRegistry
java-openliberty     Open Liberty microservice in Java      DefaultDevfileRegistry
java-quarkus         Upstream Quarkus with Java+GraalVM     DefaultDevfileRegistry
java-springboot      Spring Boot® using Java                DefaultDevfileRegistry
java-vertx           Upstream Vert.x using Java             DefaultDevfileRegistry
nodejs               Stack with NodeJS 12                   DefaultDevfileRegistry
python               Python Stack with Python 3.7           DefaultDevfileRegistry
python-django        Python3.7 with Django                  DefaultDevfileRegistry
- アプリ開発用のフォルダを作成し、java-openliverty使って、appsという名前でアプリケーションを作成します。
--starterオプションは、すでに、サンプルアプリを呼び出すオプションです。
$ mkdir apps
$ cd apps
$ odo create java-openliberty apps --starter
Validation
 ✓  Checking devfile existence [37248ns]
 ✓  Creating a devfile component from registry: DefaultDevfileRegistry [40209ns]
 ✓  Validating devfile component [44938ns]

Starter Project
 ✓  Downloading starter project user-app from https://github.com/OpenLiberty/application-stack-starters.git [1s]

Please use `odo push` command to create the component with source deployed
- ls コマンドを実行すると下記のファイルが出力されます。このファイルを元にアプリケーション開発を進めます。
% ls
LICENSE		README.md	devfile.yaml	pom.xml		src
- 次にアプリケーションをKubernetesにデプロイする前に、 KubernetesにはOpenShiftのRouterの機能がないため、 Kubernetesの場合は、odo url create コマンドで --hostオプションで、 kubernetesのドメイン名を指定して、urlを作成します。
$ odo url create --host $(minikube ip).nip.io
 ✓  URL apps-9080 created for component: apps

To apply the URL configuration changes, please use `odo push`
- それでは、 odo pushコマンドを実行して、KubernetesにOpenLibertyのJavaアプリケーションをデプロイします。
$ odo push

Validation
 ✓  Validating the devfile [58379ns]

Creating Kubernetes resources for component apps
 ✓  Waiting for component to start [1ms]
 ⚠  Unable to create ingress, missing host information for Endpoint ep1, please check instructions on URL creation (refer `odo url create --help`)

Applying URL changes
 ✓  URL apps-9080: http://apps-9080.192.168.49.2.nip.io/ created

Syncing to component apps
 ✓  Checking file changes for pushing [2ms]
 ✓  Syncing files to the component [168ms]

Executing devfile commands for component apps
 ✓  Executing build command "if [ -e /projects/.disable-bld-cmd ]; then echo \"found the disable file\" && echo \"devBuild command will not run\" && exit 0; else echo \"will run the devBuild command\" && mkdir -p /projects/target/liberty && if [ ! -d /projects/target/liberty/wlp ]; then echo \"...moving liberty\"; mv /opt/ol/wlp /projects/target/liberty; touch ./.liberty-mv; elif [[ -d /projects/target/liberty/wlp && ! -e /projects/.liberty-mv ]]; then echo \"STACK WARNING - LIBERTY RUNTIME WAS LOADED FROM HOST\"; fi && mvn -Dliberty.runtime.version=20.0.0.12 package && touch ./.disable-bld-cmd; fi" [191ms]
 ✓  Executing run command "mvn -Dliberty.runtime.version=20.0.0.12 -Ddebug=false -DhotTests=true -DcompileWait=3 liberty:dev", if not running [106ms]

Pushing devfile component apps
 ✓  Changes successfully pushed to component
- odo pushが成功した時のkubectl get all を実行した時の内容は下記の通りです。
一般的に アプリケーションをデプロイした時の内容と変わりがありません。
$ kubectl get all
NAME                        READY   STATUS    RESTARTS   AGE
pod/apps-58c6bb5f98-lsbw6   1/1     Running   0          3h59m

NAME           TYPE        CLUSTER-IP       EXTERNAL-IP   PORT(S)    AGE
service/apps   ClusterIP   10.xxx.xxx.xxx   <none>        9080/TCP   3h59m

NAME                   READY   UP-TO-DATE   AVAILABLE   AGE
deployment.apps/apps   1/1     1            1           3h59m

NAME                              DESIRED   CURRENT   READY   AGE
replicaset.apps/apps-58c6bb5f98   1         1         1       3h59m
- 次にアプリケーションにアクセスするために ingressのURLを取得します。
$ odo url list
Found the following URLs for component apps
NAME          STATE      URL                                      PORT     SECURE     KIND
apps-9080     Pushed     http://apps-9080.192.168.49.2.nip.io     9080     false      ingress
- 最後に、 curlで OpenLibertyのHealth Check APIを実行すると、 応答が帰ってきているので正常にOpenLibertyが起動できました。
$ curl http://apps-9080.192.168.49.2.nip.io/health
{"checks":[],"status":"UP"}
これで、odoを使ったKubernetesのデプロイ手順は終わりになりますが、Deployment、Serviceなど意識しなくてもアプリのデプロイができてしますので、とても簡単ですよね。
では、次にOpenShiftに進みたいと思います。
2. OpenShiftのマネージドサービスである 「 Red Hat OpenShift on IBM Cloud 」へOpenLibertyのアプリケーションをデプロイする
- まず OpenShiftにログインして、任意の名前のプロジェクトを作成します。
% oc login --token=xxx --server=https://xxx.jp-tok.containers.cloud.ibm.com:30854

% odo project create ta
- 次に、今回は、Devfile Registryを使わずに、ローカル環境にDevfileを使ってアプリケーションを作成する方法を試します。
GitHubからDevfileをcloneし、取得したファイルの一覧が下記の通りです。
$ git clone https://github.com/OpenLiberty/application-stack-intro.git && cd application-stack-intro

$ ls
LICENSE		README.md	devfile.yaml	pom.xml		src
参考) devfile.yamlの中身
- odo create 任意の名前 を実行すると 出力されたログからわかる様に、ローカル環境のDevfileを読み込んでいるのがわかると思います。
 % odo create my-component
Validation
 ✓  Creating a devfile component from devfile path: /Users/xxx/Documents/application-stack-intro/devfile.yaml [431685ns]
 ✓  Validating devfile component [351568ns]

Please use `odo push` command to create the component with source deployed
- この状態でアプリケーション開発を行い、 そして、OpenShiftへデプロイするために odo push コマンドを実行します。
% odo push

Validation
 ✓  Validating the devfile [2ms]

Creating Kubernetes resources for component my-component
 ✓  Waiting for component to start [1m]

Applying URL changes
 ✓  URL ep1: http://ep1-my-component-ta.xxx-yyy.jp-tok.containers.appdomain.cloud/ created

Syncing to component my-component
 ✓  Checking files for pushing [19ms]
 ✓  Syncing files to the component [425ms]

Executing devfile commands for component my-component
 ✓  Executing build command "if [ -e /projects/.disable-bld-cmd ]; then echo \"found the disable file\" && echo \"devBuild command will not run\" && exit 0; else echo \"will run the devBuild command\" && mkdir -p /projects/target/liberty && if [ ! -d /projects/target/liberty/wlp ]; then echo \"...moving liberty\"; mv /opt/ol/wlp /projects/target/liberty; touch ./.liberty-mv; elif [[ -d /projects/target/liberty/wlp && ! -e /projects/.liberty-mv ]]; then echo \"STACK WARNING - LIBERTY RUNTIME WAS LOADED FROM HOST\"; fi && mvn -Dliberty.runtime.version=20.0.0.12 package && touch ./.disable-bld-cmd; fi" [10s]
 ✓  Executing run command "mvn -Dliberty.runtime.version=20.0.0.12 -Ddebug=false -DhotTests=true -DcompileWait=3 liberty:dev", if not running [1s]

Pushing devfile component my-component
 ✓  Changes successfully pushed to component
-
odo push が成功すると、下図の様に OpenShiftのWebコンソールの Topology Viewに my-componentのDeploymentから,Pod, Service,Routeが作成されているのがわかります。
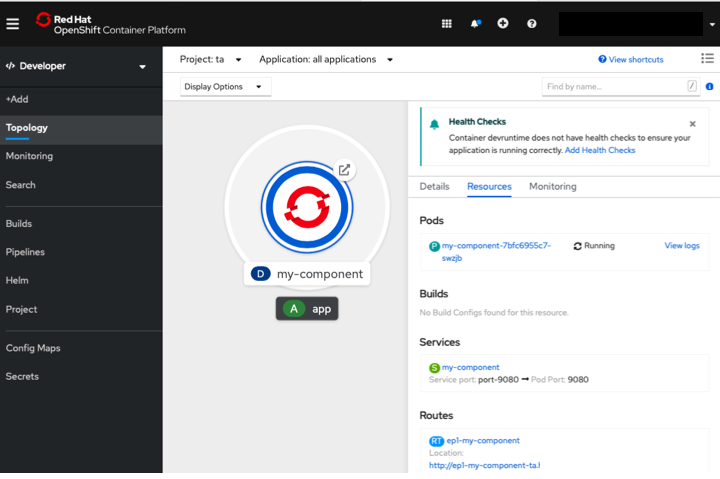
-
最後にブラウザに routeで生成されたURLを実行すると OpenLibertyの初期ページが出力されます。
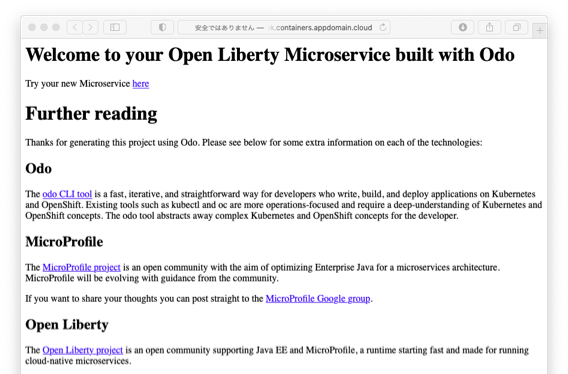
OpenShiftもKubernetesと同様に、概念が抽象化されていて、Deploymentなど各オブジェクトを知らなくても、アプリケーションをデプロイできるのはとても便利ですね。
最後に
OpenShift Do(odo)は、OpenShiftやKubenetesの概念が抽象化されていて、簡単にアプリケーションをデプロイできます。
これから始める方でOpenShiftや Kubernetesに簡単にデプロイしてみたいには最適だと思います。
そして、個人的な印象ですが、現時点では、実戦の現場で使うにはまだまだかなって感じですが、今後のロードマップで予定されている OuterLoop開発、GitOpsやOpenShift Pipelines対応がGAされると十分実戦で使えるようになります。
これから伸びていくということはodoのGitHubリポジトリをウォッチするのも面白いですが、 PRしてコントリビュートするチャンスもあると思います。
今後の展開が楽しみなodoのGitHubのリポジトリを一度覗いてみませんか?
https://github.com/openshift/odo/issues
参考資料
-
odo - Developer-focused CLI for Kubernetes and OpenShift
https://github.com/openshift/odo -
devfiles registry
https://github.com/odo-devfiles/registry -
Devfile
https://github.com/devfile -
Understanding odo by OCPドキュメント 注)後日、日本語版が作成される事でしょう
https://docs.openshift.com/container-platform/4.6/cli_reference/developer_cli_odo/understanding-odo.html -
Kubernetes integration and more in odo 2.0 ( Red Hat Developer Blog)
https://developers.redhat.com/blog/2020/10/06/kubernetes-integration-and-more-in-odo-2-0/ -
From code to Kubernetes the fast way with odo 2.0 | DevNation Tech Talk
https://www.youtube.com/watch?v=G__DxamRoEc