更新履歴
| 日付 | 内容 |
|---|---|
| 2021/10/14 | - EnterpriseEdtion 削除 - Drop Row 追加 |
| 2020/7/20 | .amlignore について追記 |
| 2020/7/14 | onnx について追記 |
背景
Azure Machine Learning には、ハイパーパラメーターチューニングや、クラウド上の仮想マシンの起動・停止、そして、諸々の学習うジョブの管理をまとめてやってくれる AutoML という機能があります。クラウドを使わない学習もサポートしています。
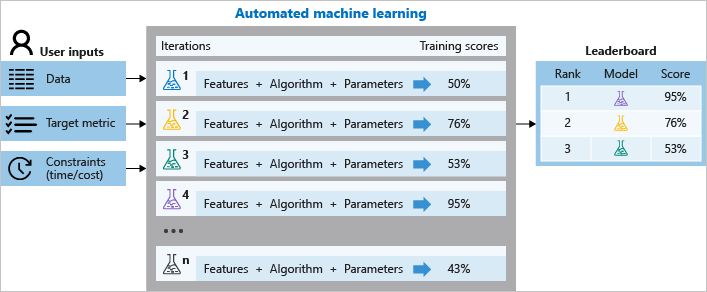
その中で、テキストのデータがあった場合に、Embedded Featurization をしてくれる機能があります。
この記事は熟読ください。
自動機械学習による特徴量化:
https://docs.microsoft.com/ja-jp/azure/machine-learning/how-to-configure-auto-features
なんと賢い事に、学習環境のGPUの有無を判断して:
- CPU のみ: Bidirectional Long-Short Term neural network (BiLSTM)
- GPU あり: Bidirectional Encoder Representations from Transformers (BERT)
を自動的に選択して処理をしてくれます。
BERT は、機械学習における様々な自然言語処理のタスクで、SoTA (State of The Art) = いろいろな記録 を更新したこともあり、注目を集めて、既にその応用編も出ています。
深層学習を用いた文生成モデルの歴史と研究動向:
https://www.slideshare.net/ssuser3b2d02/ss-236525444
その BERT を AutoML のタスクの中の特徴量の抽出に利用したものが、Azure Machine Learning に組み込まれたのです。
How BERT is integrated into Azure automated machine learning:
https://techcommunity.microsoft.com/t5/azure-ai/how-bert-is-integrated-into-azure-automated-machine-learning/ba-p/1194657
日本語だけでない、多言語対応のおさらい
ところが、この機能は日本語では使い物になりませんでした。実質、英語のみでした。
ですが、最近の Azure Machine Learning SDK の 1.7.0 で、日本語を含む多言語対応をしました!
Azure Machine Learning 1.0.7 Release Note:
https://docs.microsoft.com/en-us/azure/machine-learning/azure-machine-learning-release-notes#2020-06-08
- 執筆時点の最新バージョンは 1.34.0 です
実体としては Multilingual BERT + HuggingFace の Transformer を採用しています。今後より良いものが出たら更新されるでしょう。
API のドキュメントに記載があるところは、透明性が高くて良いですよね。ご自分で同じ実装をするかもしれませんし😊
PretrainedTextDNNTransformer class:
https://docs.microsoft.com/en-us/python/api/azureml-automl-runtime/azureml.automl.runtime.featurizer.transformer.text.pretrained_text_dnn_transformer.pretrainedtextdnntransformer?view=azure-ml-py
Multilingual BERT:
https://github.com/google-research/bert/blob/master/multilingual.md
Multilingual BERT の日本語実装は、Tokenizer に問題があります。日本語の Tokenizer には、WordpieceTokenizer が使われています。
  def __init__(self, vocab_file, do_lower_case=True):
    self.vocab = load_vocab(vocab_file)
    self.inv_vocab = {v: k for k, v in self.vocab.items()}
    self.basic_tokenizer = BasicTokenizer(do_lower_case=do_lower_case)
    self.wordpiece_tokenizer = WordpieceTokenizer(vocab=self.vocab)
source:
https://github.com/google-research/bert/blob/master/multilingual.md#tokenization
Multilingual BERT の説明:
https://github.com/google-research/bert/blob/master/tokenization.py#L161
このまま実装するとどうなるかというと...
"鶏肉は包丁を入れて均等に開き、両面にフォークで穴を開け塩コショウする。"
というテキストは
['鶏', '肉', 'は', '包', '丁', 'を', '入', 'れて', '均', '等', 'に', '開', 'き', '、', '両', '面', 'に', '##フ', '##ォ', '##ーク', '##で', '穴', 'を', '開', 'け', '塩', 'コ', '##シ', '##ョ', '##ウ', '##する', '。']
という様に処理されてしまいます😭
そのため、様々な方が、Juman++ や、kuromoji 、MeCab などを使って Tokenize をして、Pre-Trainned のモデルを開発・公開されています。
Azure Machine Learning の AutoML では、PyTorch とも相性の良い HuggingFace の実装を用いています。
huggingface:
https://github.com/huggingface/transformers
Huggingface の日本語タスクでは、MeCab を使っていますね。だいぶマシになっていますね。
制限
執筆時点は、以下の制限があります。
- 扱える文字列は 128単語 まで (主にBERTの制限)。文字列長ではないので注意
- Classification のみ
- ONNX への変換が出来ない。これは BERT が ONNX 対応していないため。ドキュメント上は、Classification 対応のモデルだけ指定したら出来そうに思えますが、テキストデータについては出来ません。
必要なもの
- Azure の Subscription
- Jupyter Notebook
ちなみに、私の環境は、Microsoft Windows [Version 10.0.20161.1000] です。
データセット: サクッと試すために
Livedoor のニュースコーパスを利用します。クリエイティブコモンズライセンスと明確にしていただいているため、試しやすいです。
サンプルコードとデータ
以下の GitHub にあります。適時 Fork や Clone をしてください。
Text classification using AutoML with BERT featurization
https://github.com/dahatake/Azure-Machine-Learning-sample/tree/master/3.classification-text-dnn-jpn
実行手順
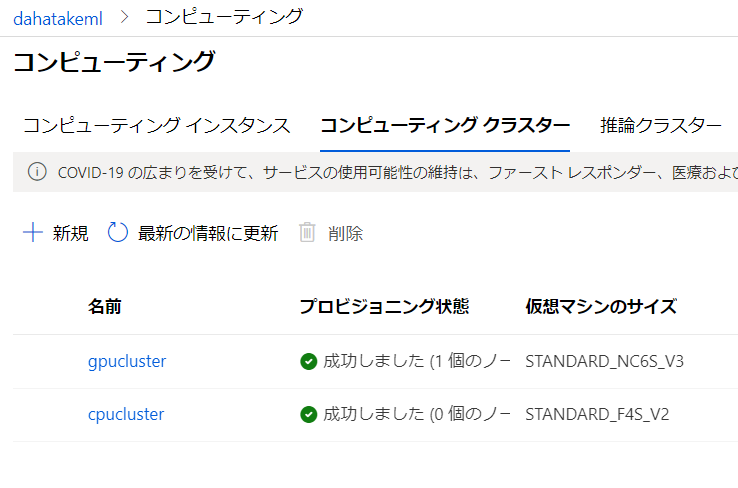
1. 学習ジョブ実行用 Computer の作成
Azure Machine Learning ではスケーラブルな学習ジョブをやってくれる Azure Machine Learning コンピューティング が用意されています。内部は Azure Batchです。とても容易に使えるようになっています。
Azure Machine Learning コンピューティング:
https://docs.microsoft.com/ja-jp/azure/machine-learning/how-to-set-up-training-targets#amlcompute
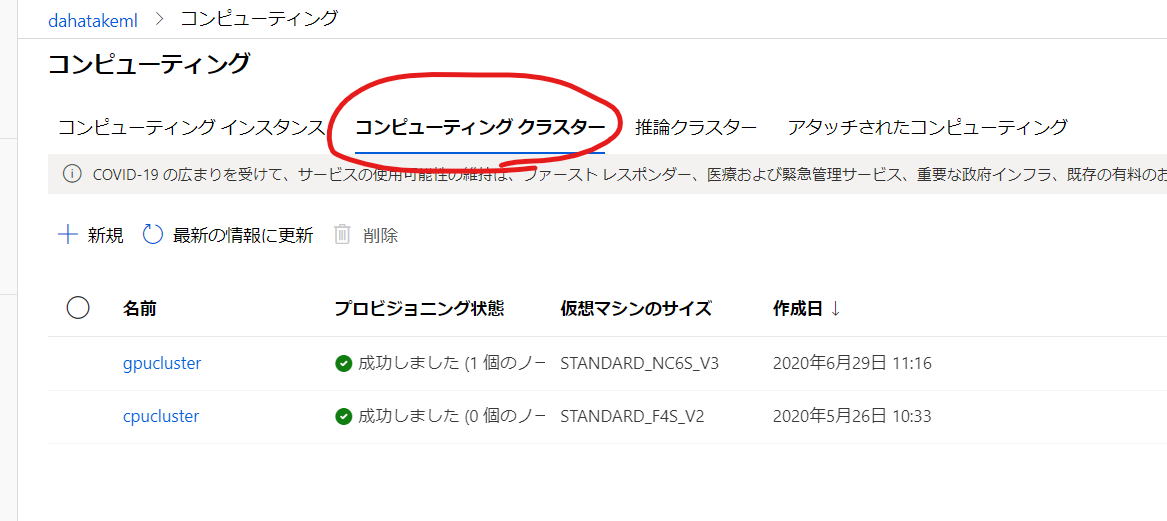
Azure Machine Learning Studio (ml.azure.com) からの作成で、あまり迷う事は無いと思います。以下だけご注意ください。
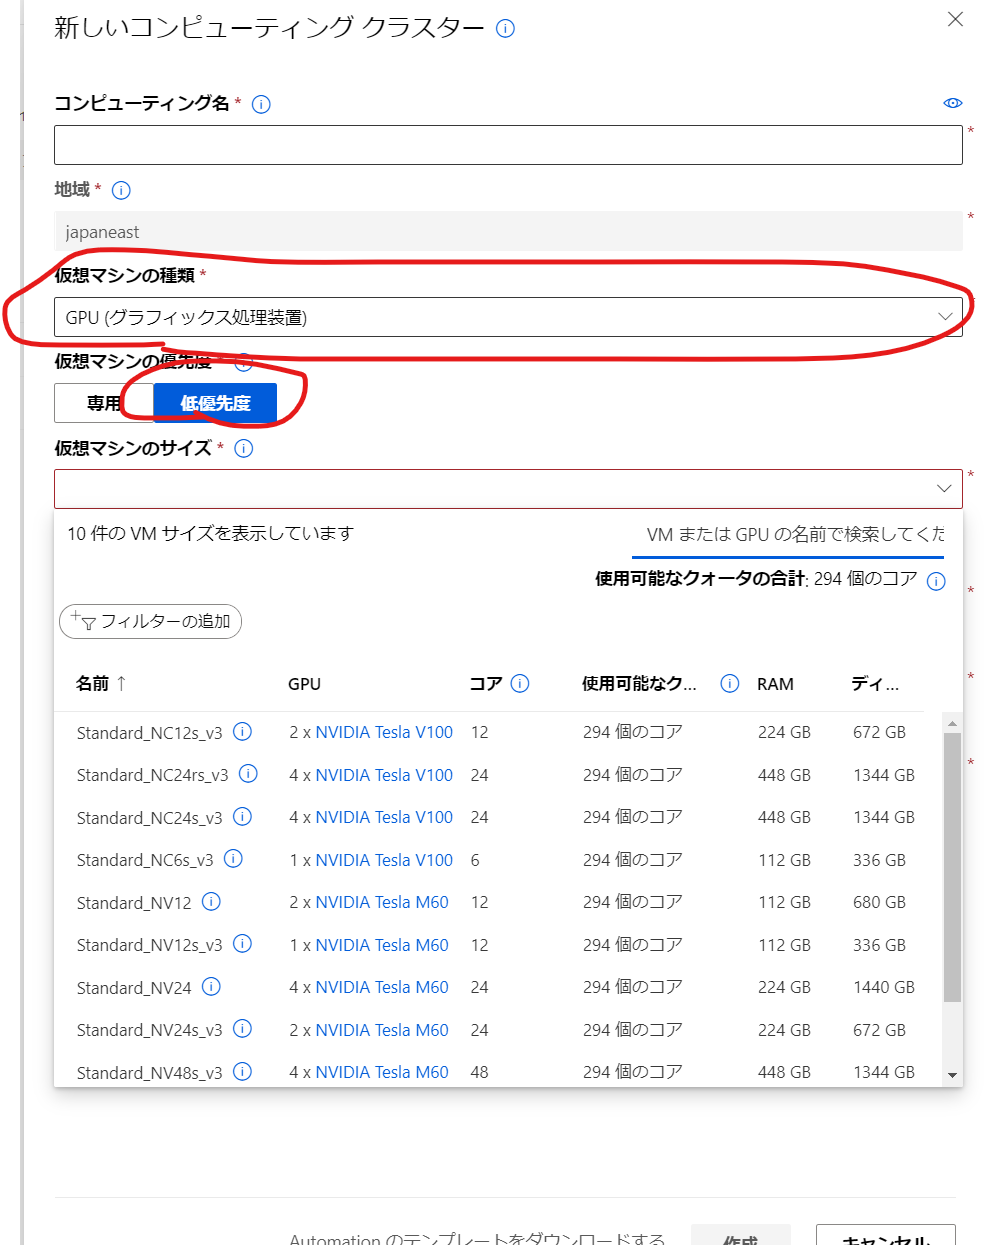
| 項目 | 値 | 補足 |
|---|---|---|
| 仮想マシンの種類 | GPU | BERTの処理に必須です |
| 仮想マシンの優先度 | 低優先度 | 急がない場合は、料金の安いこの選択肢にします |
| 最小ノード数 | 0 | 0 にすると、学習ジョブが終わった際に、全ての仮想マシンを停止させ、コストの最適化が図れます。ただし、仮想マシンの起動とPython/Anaconda/Dockerの設定には5分程度時間を要します。何度も学習させる場合は、1以上にしてください。後で変更できます |
| スケールダウンする前のアイドル時間 | 120 (コードが安定したら) - 600 (開発初期) | 起動後に、指定時間アイドルになると自動的に仮想マシンが削除されます。開発初期は10分程度にした方がいいです |
[ノード数] と [スケールダウンする前のアイドル時間] は、作成後に変更できます。
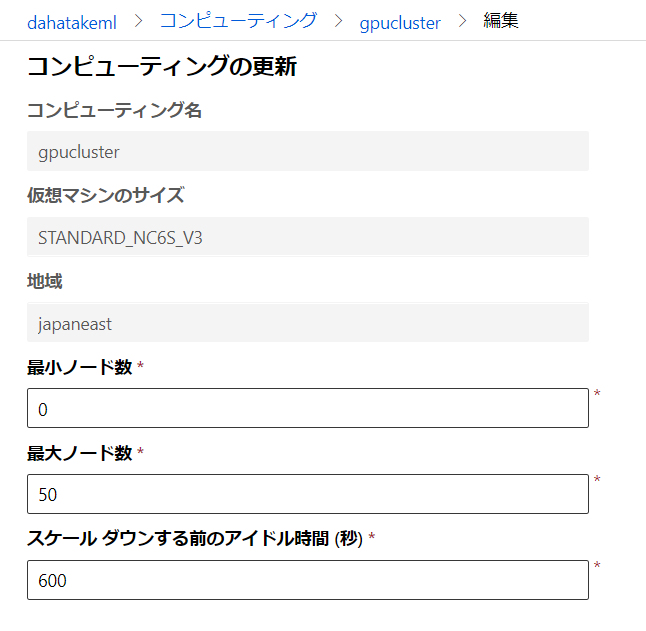
私は、CPUのみと GPUありの2つのClusterを作成しています。
2. Dataset の作成
Azure Machine Learning は、機械学習のためのデータセットを抽象化してくれる Dataset というAPIが存在しています。これが超絶便利で😍...
- 同じタスク (text classification) であれば、Dataset 名と Label 名 を変えるだけで動く!
- バージョン管理されている! データの列や内容を変えても、動く!
- AutoMLの
FeaturizationConfigAPIとの連携抜群!
Dataset を作成すると、以下のサンプルコードまでついてきます。めっちゃ便利!
# azureml-core のバージョン 1.0.72 以上が必要です
# バージョン 1.1.34 以降の azureml-dataprep[pandas] が必要です
from azureml.core import Workspace, Dataset

subscription_id = '<<sub_id>>'
resource_group = 'dahatakem'
workspace_name = 'dahatakeml'

workspace = Workspace(subscription_id, resource_group, workspace_name)

dataset = Dataset.get_by_name(workspace, name='livedoor-news')
下の図ですと、[livedoor-news] が、今回作成した Dataset になります。
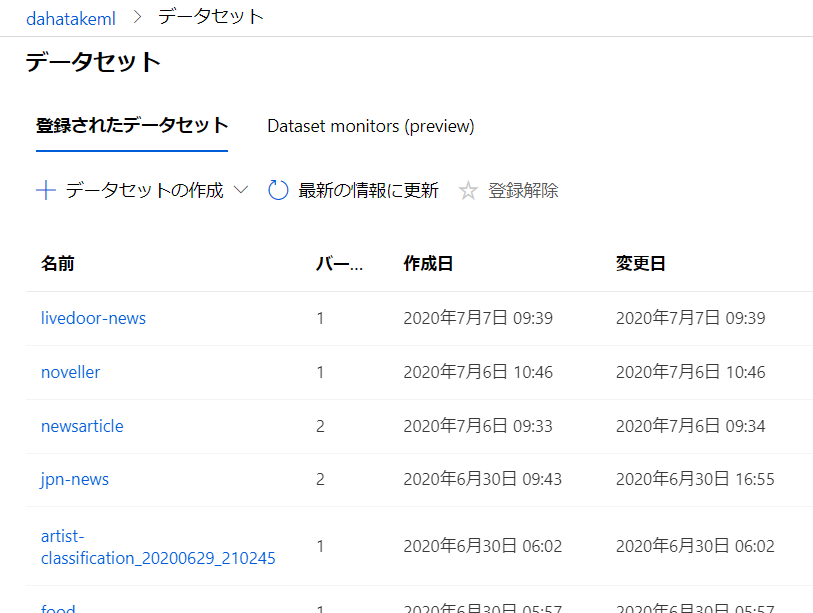
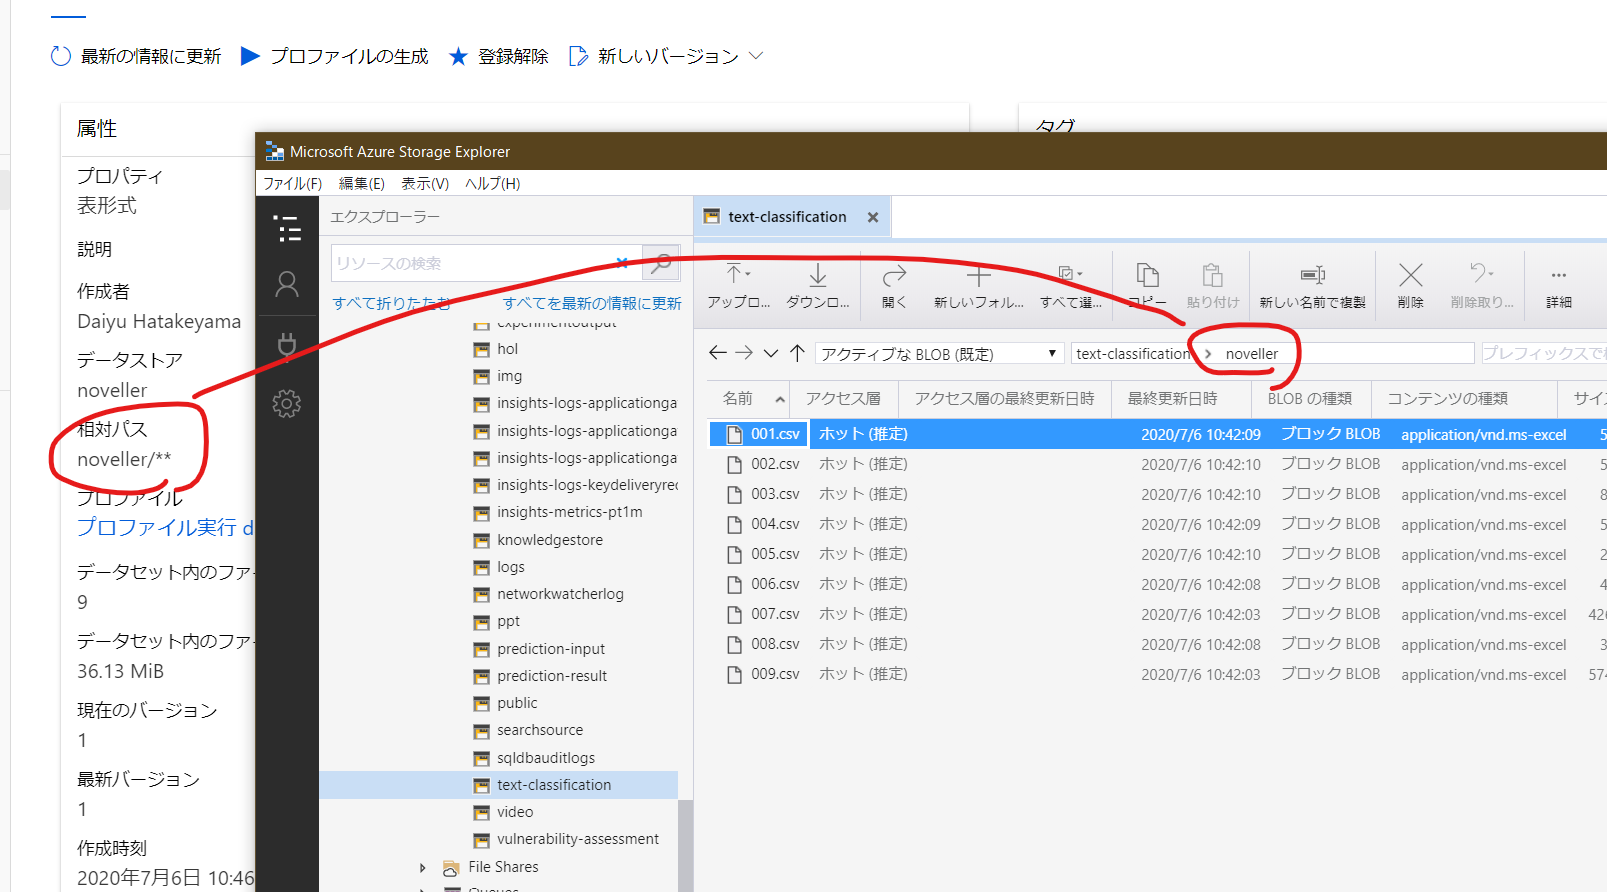
そして、物理的には Blob Storage などに保存されています。ファイルを Dataset として保存すると、別フォルダ(コンテナ)に保存されています。どこに保存されているかも、Azure Machine Learning Studio (ml.azure.com) の画面から確認できます。
こちらは複数ファイルの場合です。複数ファイルも一つのデータセットとして扱えるのが便利です。
2.1. livedoor-news の Dataset 作成
単一のファイルなので、Azure Machine Learning Studio (ml.azure.com) から直接 Dataset として登録します。
- [データセットの作成] の中で [ローカルファイルから] を選択します。
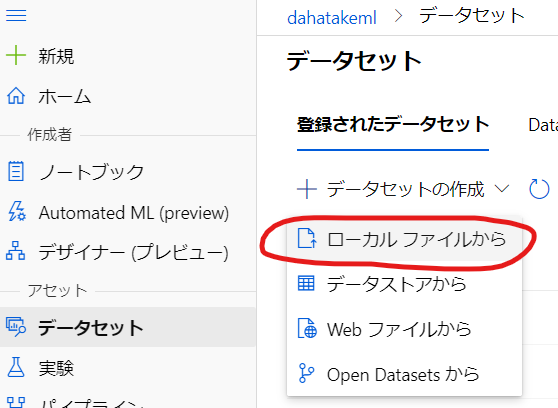
- [名前] を付けます。この文字列でクエリします。
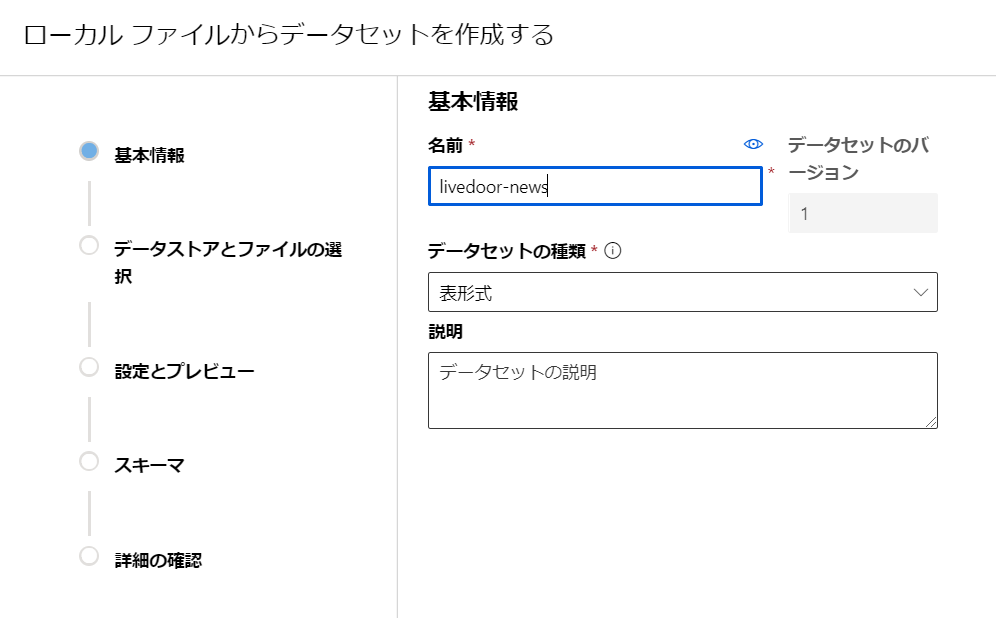
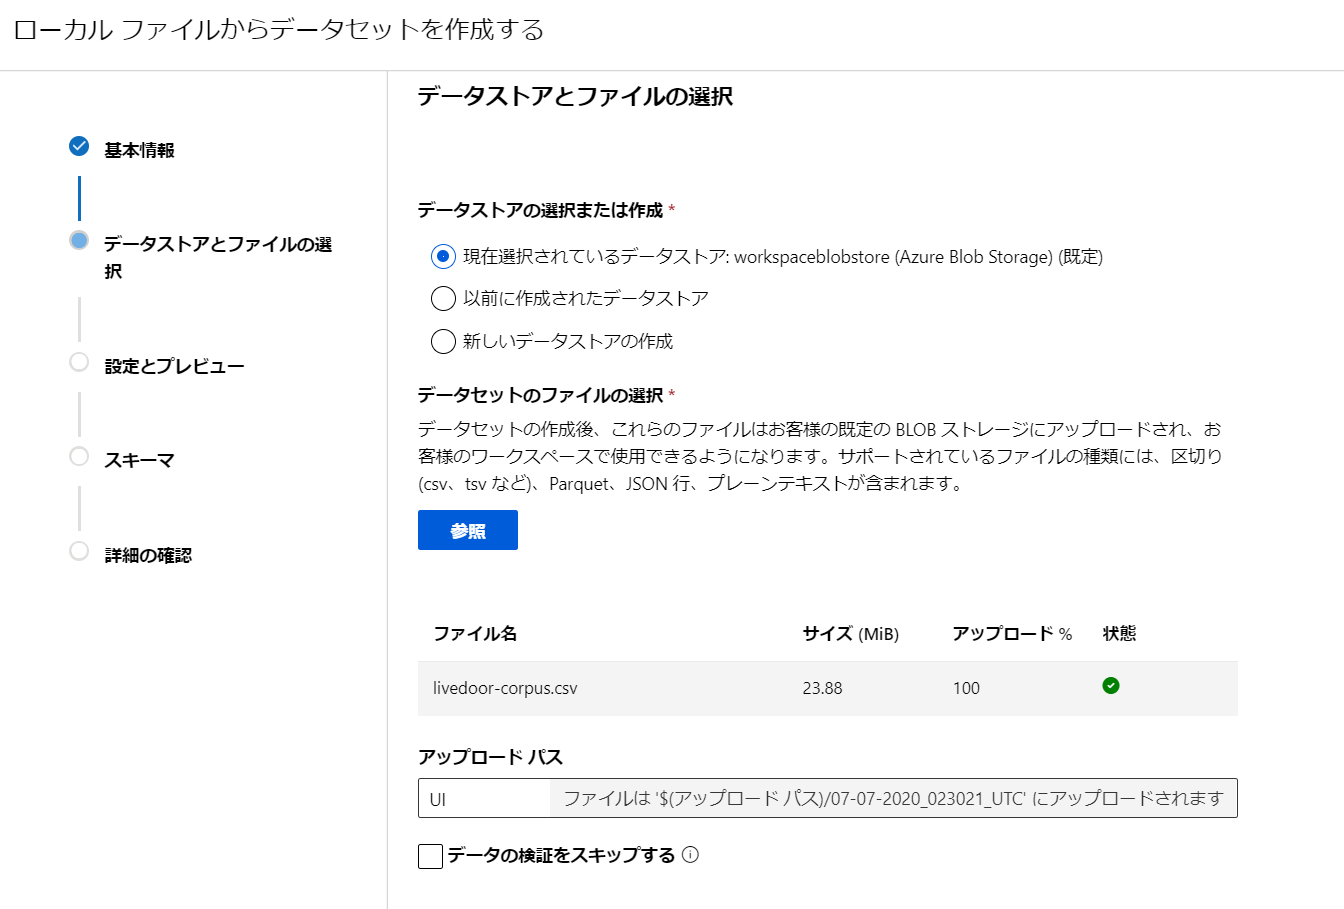
- [データセットのファイルの選択] の [参照] を選んで、ローカルにあるcsvファイルをアップロードします。
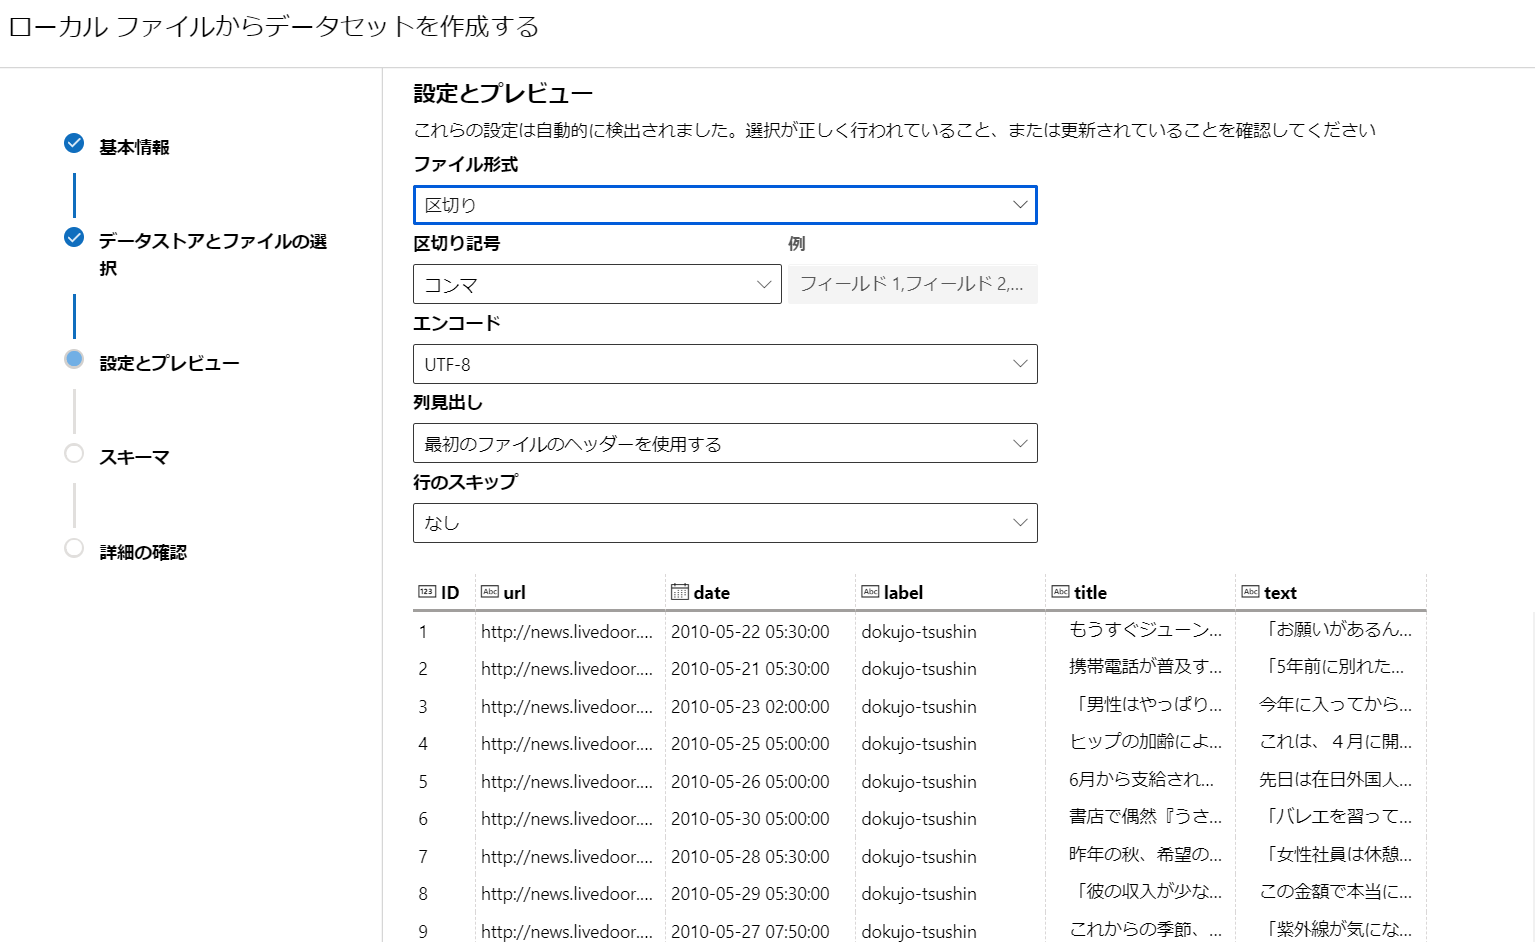
- csvファイルと自動的に判定してくれます。[列見出し]で[最初のファイルのヘッダーを利用する]を選択します。
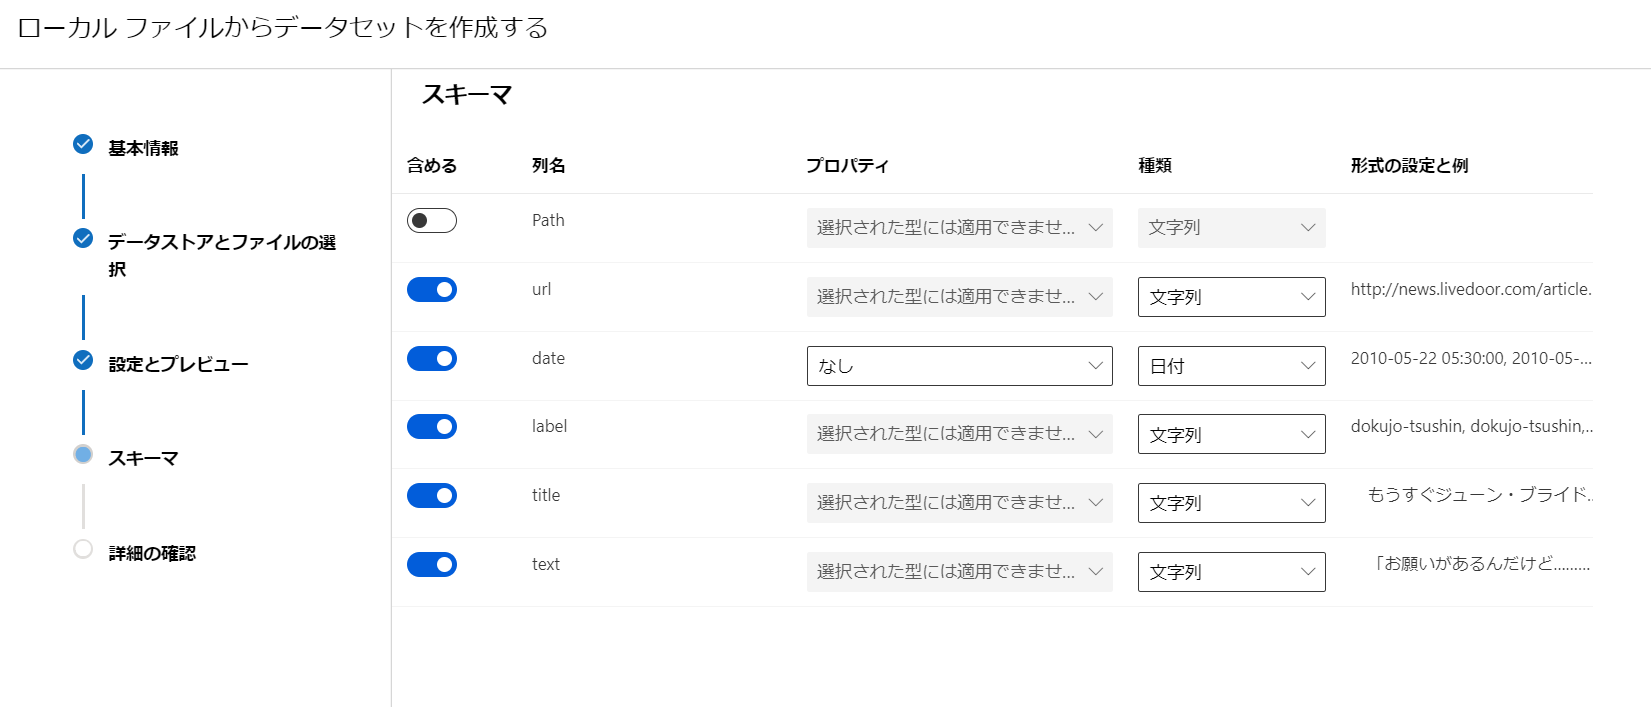
- [スキーマ]はそのままで。
- [作成後にこのデータセットのプロファイルを作成する] はしなくても大丈夫です。後でも実行できますので。
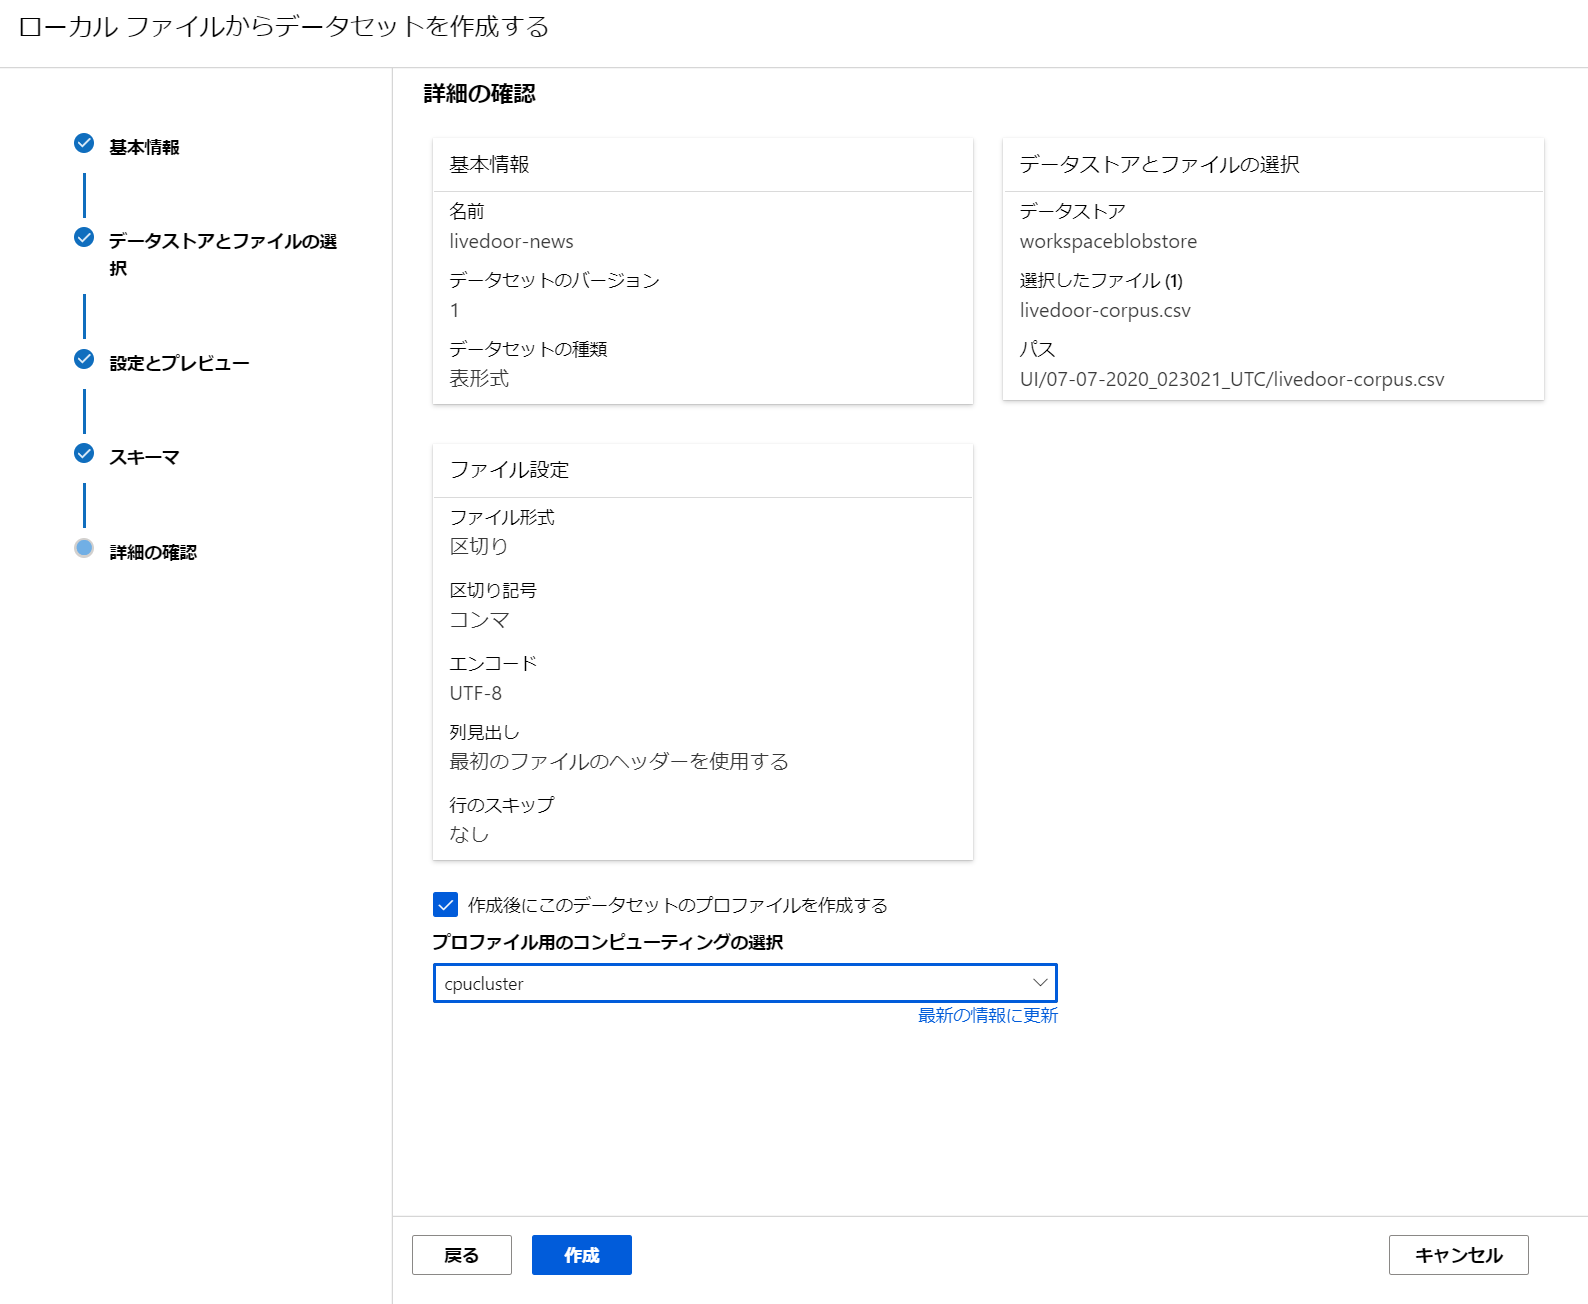
これで、データセットが出来ました。
3. Jupyter Notebook 起動
お好きな方法で使ってください。
私はコストの最適化と時間の節約のため、自分のPCでの実行とします。どうせ AutoML のジョブ実行さえ出来てしまえば、後は Azure にジョブ完了までお任せですし😊。その後 Visual Studio Code の Python Extensionで、python script 化しちゃえば、もっとAzure側で自動的に実行しやすくなりますね。
3.0. 開発環境をセットアップ (オプション)
Azure Machine Learning には、SDK セットアップ済みの コンピューティング インスタンス があります。そちらを使う場合は、この手順をスキップできます。コンピューティングインスタンスはフルマネージドの仮想マシンなので、主に時間課金となります。使わない場合は手動で「止める」事をお忘れなく。
Azure Machine Learning コンピューティング インスタンスとは:
https://docs.microsoft.com/ja-jp/azure/machine-learning/concept-compute-instance
こちらの手順に沿って、ローカルの環境に Azure Machine Learning の開発環境をセットアップする事も出来ます。
開発環境をセットアップする - ローカルコンピューター:
https://docs.microsoft.com/ja-jp/azure/machine-learning/how-to-configure-environment
Windows であれば、WSL へのインストールも選択肢ですよね。Pythonの実行では特に😅....
こちら、ご参考にしていただければ思います。
Jupyter NotebookをWSLに構築:
https://qiita.com/hiiragi1104/items/c2e9042bc6170873a859
3.1. パッケージのインストール
以下インストールします。今後のパッケージングの改善などでこの作業が不要になるかもしれません。
pip install -U azureml-sdk[automl]
pip install -U xgboost
3.2. Jupyter Nootebook 起動
ここではローカル、かつ、Windows ユーザーらしい(!?)方法で JupyterNotebook を起動させます。
この AutoML を使う場合は、Azure Machine Learning コンピューティング がほぼ必須です。
使用可能な機能:
https://docs.microsoft.com/ja-jp/azure/machine-learning/concept-automated-ml#feature-availability
- ファイルのある場所まで移動します。
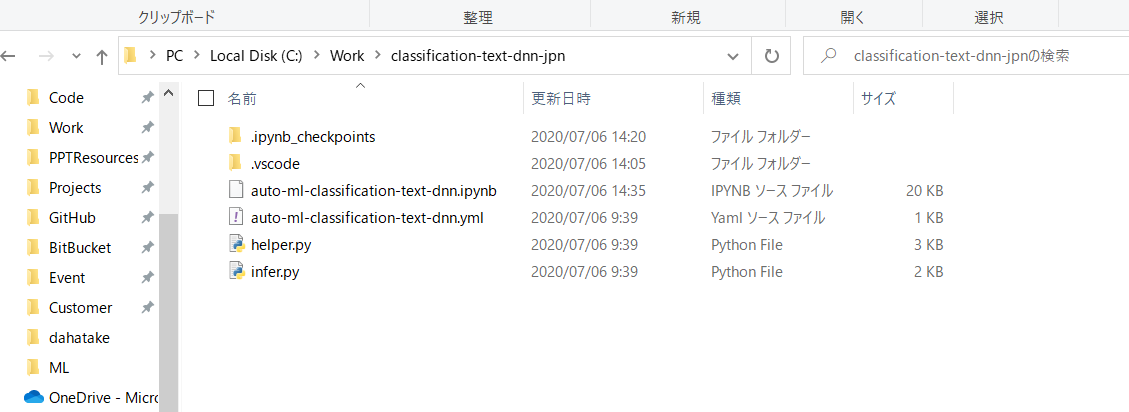
- [ファイルパス]の場所に
cmdと入力し、[エンターキー]を押します。
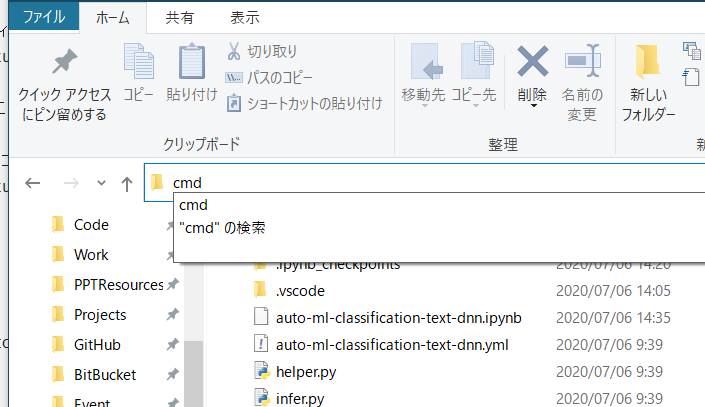
- 当該フォルダで、コマンドプロンプトが起動します。
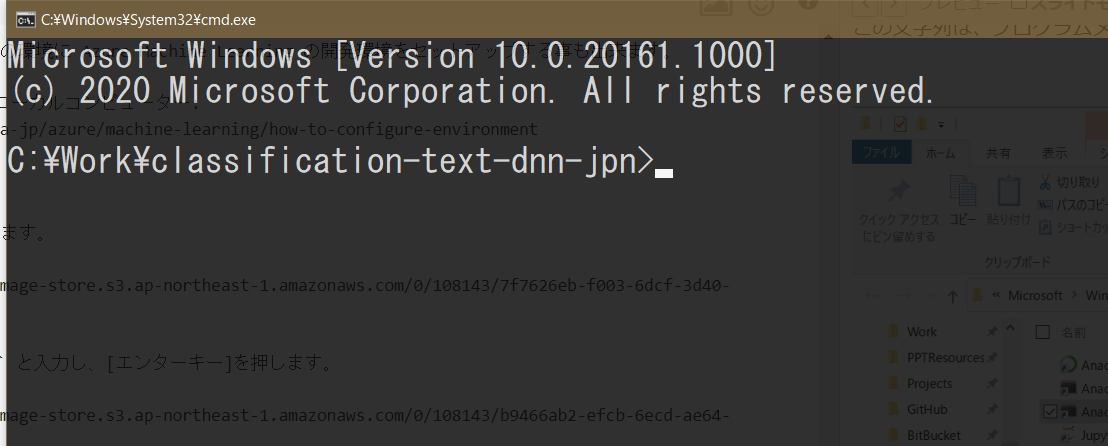
- Anaconda で作成した環境を起動します。下の文字列をコピーして、実行します。
%windir%\System32\cmd.exe "/K" C:\ProgramData\Anaconda3\Scripts\activate.bat C:\ProgramData\Anaconda3
この文字列は、プログラムメニューから参照したものです。
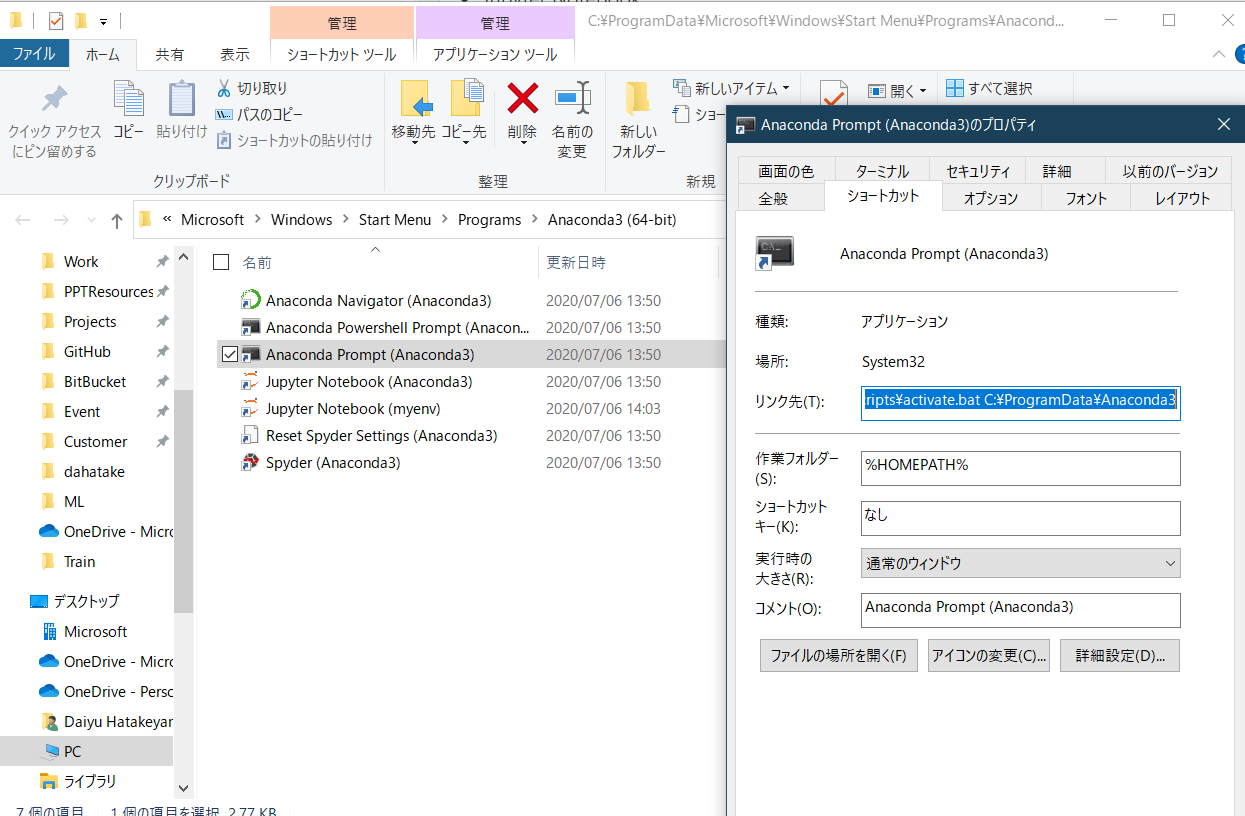
- その後は、開発環境作成のドキュメントの通り、個別作成した Anaconda 環境から Jupyter NoteBook を起動します。
conda activate myenv
jupyter notebook
Jupyter Notebooks - Python 開発環境をセットアップする
https://docs.microsoft.com/ja-jp/azure/machine-learning/how-to-configure-environment#jupyter-notebooks
これで、作業フォルダから、JupyterNotebook が起動します。

4. AutoML ジョブ実行
JupyterNotebook 内のセルを逐次実行していきます。
ポイントとなる部分のみ説明します。
4.1. データセットの設定
こちらのスニペットになります。ここで、Dataset の名前とバージョンを変えます。
学習に不要な列は dataframe.drop() で削除しましょう。
data_dir = "train-data" # Local directory to store data
blobstore_datadir = data_dir # Blob store directory to store data in

## Easy to switch other dataset
target_column_name = 'label'
df = Dataset.get_by_name(ws, name='livedoor-news')
df = df.to_pandas_dataframe()
df.drop(labels=['url'], axis=1, inplace=True)

data_train, data_test = train_test_split(df, test_size=0.25, random_state=0)
4.2. AutoML の設定
このパラメーターを何度も変更すると思います😊。
動作確認後は 'iterations': 2 は必ず変更ください。
featurization_config = FeaturizationConfig(dataset_language='jpn')
# featurization_config.blocked_transformers = ['TfIdf','CountVectorizer']

automl_settings = {
    'experiment_timeout_minutes': 60,
    'primary_metric': 'AUC_weighted', # 'AUC_weighted', 'accuracy'
    'experiment_exit_score': 0.95,
    'max_concurrent_iterations': 4,
    'max_cores_per_iteration': -1,
    'enable_dnn': True,
    'enable_early_stopping': True,
    'force_text_dnn': True, # enable BERT featurization
    'validation_size': 0.2,
    'verbosity': logging.INFO,
    'featurization': featurization_config,
    'enable_voting_ensemble': False, # this cut the final ensumble job
    'enable_stack_ensemble': False,  # this cut the final ensumble job
    'iterations': 2 ## mainly for DEBUG: Test purpose to stop job earlier to undestand AutoMLConfig parameters behavior or so.
}

automl_config = AutoMLConfig(task              = 'classification',
                             debug_log         = 'automl_debug.log',
                             compute_target    = compute_target,
                             training_data     = train_dataset,
                             label_column_name = target_column_name,
                             **automl_settings
                            )
| 項目 | 値 | 補足 |
|---|---|---|
| FeaturizationConfig(dataset_language='jpn') | 'jpn' | ISO 639-3 で定義されている テキストの Featurization の言語指定です。 |
| force_text_dnn | True | これを指定しないと BERT を使わない事があります(調査中) |
| iterations | 開発初期は 2-4 | 開発初期は、設定データの結果を見るために小さくします。設定がほぼOKになったら削除します |
get_supported_dataset_languages() method:
https://docs.microsoft.com/en-us/python/api/azureml-train-automl-client/azureml.train.automl.automlconfig.automlconfig?view=azure-ml-py#get-supported-dataset-languages-use-gpu--bool-----typing-dict-typing-any--typing-any-
Classification class:
https://docs.microsoft.com/en-us/python/api/azureml-train-automl-client/azureml.train.automl.constants.supportedmodels.classification?view=azure-ml-py
SupportedTransformers class:
https://docs.microsoft.com/en-us/python/api/azureml-automl-core/azureml.automl.core.constants.supportedtransformers?view=azure-ml-py
4.3. 学習状況
以下の実行後に 逐次状況が表示されます。NC6s_v3 の上記 AutoML 設定で、30 分くらいかかります。
ドキュメントにもありますが、そんなに待てない場合は STANDARD_NC24r" または "STANDARD_NC24rs_V3" を使ってください。
自動 ML での BERT 統合
https://docs.microsoft.com/ja-jp/azure/machine-learning/how-to-configure-auto-features#bert-integration-in-automated-ml
automl_run = experiment.submit(automl_config, show_output=True)
以下、出力例です。
Running on remote or ADB.
Running on remote compute: gpucluster
Parent Run ID: AutoML_4e17b53a-ff29-4e98-a098-5dcc79def043

Current status: FeaturesGeneration. Generating features for the dataset.
Current status: DatasetFeaturization. Beginning to fit featurizers and featurize the dataset.
Current status: TextDNNTraining. Training a deep learning text model, this may take a while.
Current status: TextDNNTrainingCompleted. Completed training a deep learning text model.
Current status: DatasetFeaturizationCompleted. Completed fit featurizers and featurizing the dataset.
Current status: ModelSelection. Beginning model selection.

****************************************************************************************************
DATA GUARDRAILS:

TYPE:         Class balancing detection
STATUS:       PASSED
DESCRIPTION:  Your inputs were analyzed, and all classes are balanced in your training data.
              Learn more about imbalanced data: https://aka.ms/AutomatedMLImbalancedData

****************************************************************************************************

TYPE:         Missing feature values imputation
STATUS:       DONE
DESCRIPTION:  If the missing values are expected, let the run complete. Otherwise cancel the current run and use a script to customize the handling of missing feature values that may be more appropriate based on the data type and business requirement.
              Learn more about missing value imputation: https://aka.ms/AutomatedMLFeaturization
DETAILS:
+---------------------------------+---------------------------------+
|Column name                      |Missing value count              |
+=================================+=================================+
|date                             |6                                |
|text                             |10                               |
+---------------------------------+---------------------------------+

****************************************************************************************************

TYPE:         High cardinality feature detection
STATUS:       DONE
DESCRIPTION:  High cardinality features were detected in your inputs and handled.
              Learn more about high cardinality feature handling: https://aka.ms/AutomatedMLFeaturization
DETAILS:      High cardinality features refer to columns that contain a large percentage of unique values.
+---------------------------------+---------------------------------+
|Column name                      |Column Content Type              |
+=================================+=================================+
|title                            |text                             |
|text                             |text                             |
+---------------------------------+---------------------------------+

****************************************************************************************************

****************************************************************************************************
ITERATION: The iteration being evaluated.
PIPELINE: A summary description of the pipeline being evaluated.
DURATION: Time taken for the current iteration.
METRIC: The result of computing score on the fitted pipeline.
BEST: The best observed score thus far.
****************************************************************************************************

 ITERATION   PIPELINE                                       DURATION      METRIC      BEST
         0   MaxAbsScaler LightGBM                          0:04:47       0.9250    0.9250
         1   MaxAbsScaler XGBoostClassifier                 0:04:56          nan    0.9250
大事な点を。
- BERT による Featurization の実施が確認できます。
Current status: TextDNNTraining. Training a deep learning text model, this may take a while.
4.4. 利用された Transformer の確認
以下のコードで、確認できます。
text_transformations_used = []
for column_group in fitted_model.named_steps['datatransformer'].get_featurization_summary():
    text_transformations_used.extend(column_group['Transformations'])
text_transformations_used
以下が出力例になります。
['',
 'ModeCatImputer-StringCast-DateTimeTransformer',
 'StringCast-CharGramTfIdf',
 'StringCast-WordGramTfIdf',
 'StringCast-CharGramTfIdf',
 'StringCast-WordGramTfIdf',
 'StringCast-StringConcatTransformer-PretrainedTextDNNTransformer']
また、ML Studio の [データ変換(プレビュー)] にて、確認する事も出来ます。
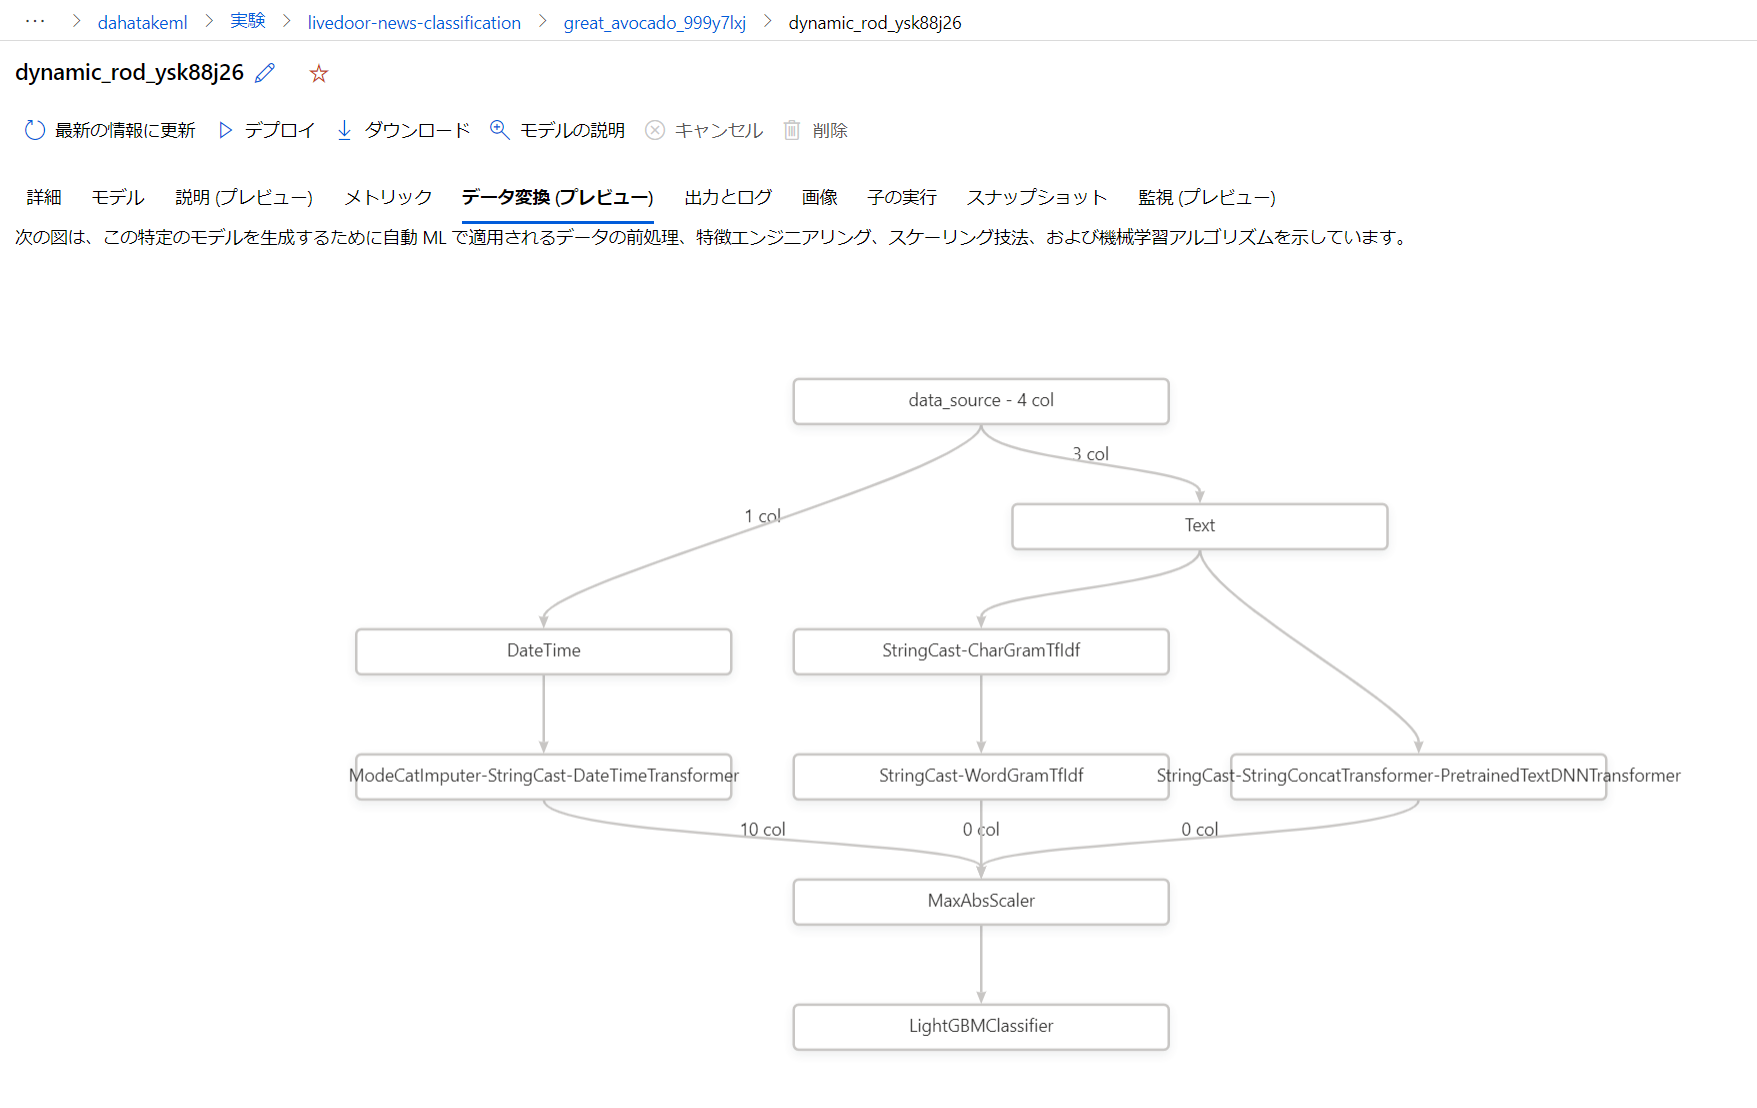
この結果を見ると DateTime 型のデータが特徴ありすぎて、せっかくの BERT 処理が使われていない事がわかります😅。学習対象からは外しましょう!
それぞれ、定義済みの Transformer が使われています。データ型毎に利用できる Transformer が決まっています。
テキストの場合はこちらに一覧があります。
例えば:
- StringCast: 文字列を全て小文字に
- TfIdf: TF-IDF のアルゴリズムで、カウント行列を変換
- StringConcat: これを知っておくのは大事です。複数の列を結合します。BERTを使う場合には、必ず実施されます。
- PretrainedTextDNNTransformer: BERT による処理です
- WordEmbeddingTransformer:テキスト トークンのベクターを文ベクトルに変換します
SupportedTransformers class:
https://docs.microsoft.com/en-us/python/api/azureml-automl-core/azureml.automl.core.constants.supportedtransformers?view=azure-ml-py
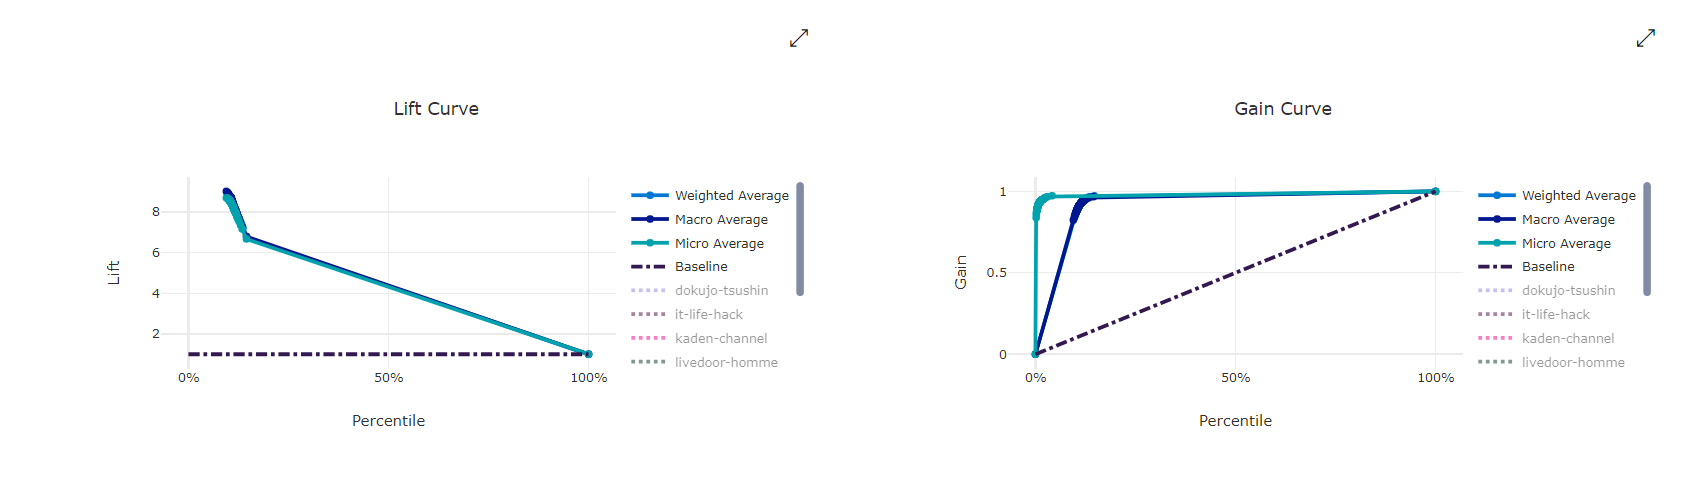
4.5. 実験結果を確認
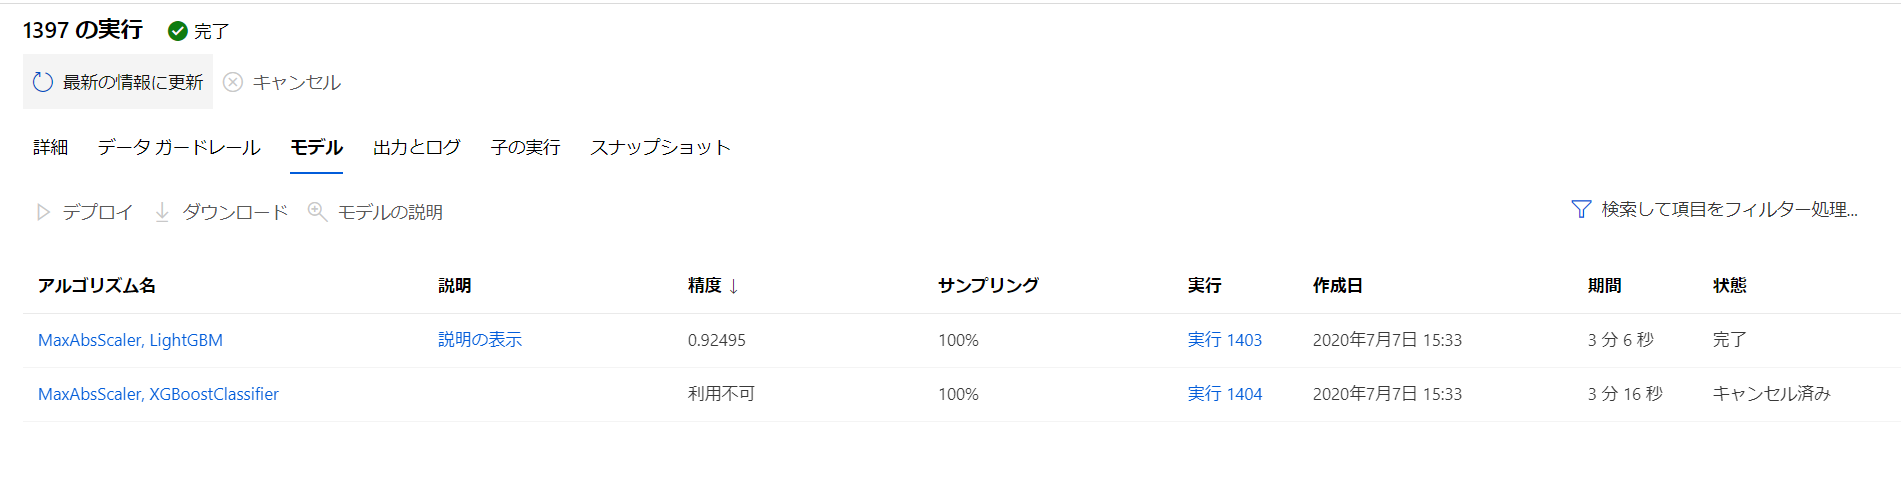
AutoML の良い点ですが、諸々の評価用のデータを取得してくれ、Confusion matrix などを自動的に作成してくれることです。データが保存されているので、Azure Machine Learning Studio (ml.azure.com) でいつでも確認ができます。このためのコードを書く必要はありません。
AutoML のジョブです。Iteration として 2回設定していましたので、2つのジョブが見えています。
[メトリック] から、様々な学習中の状況を可視化できます。
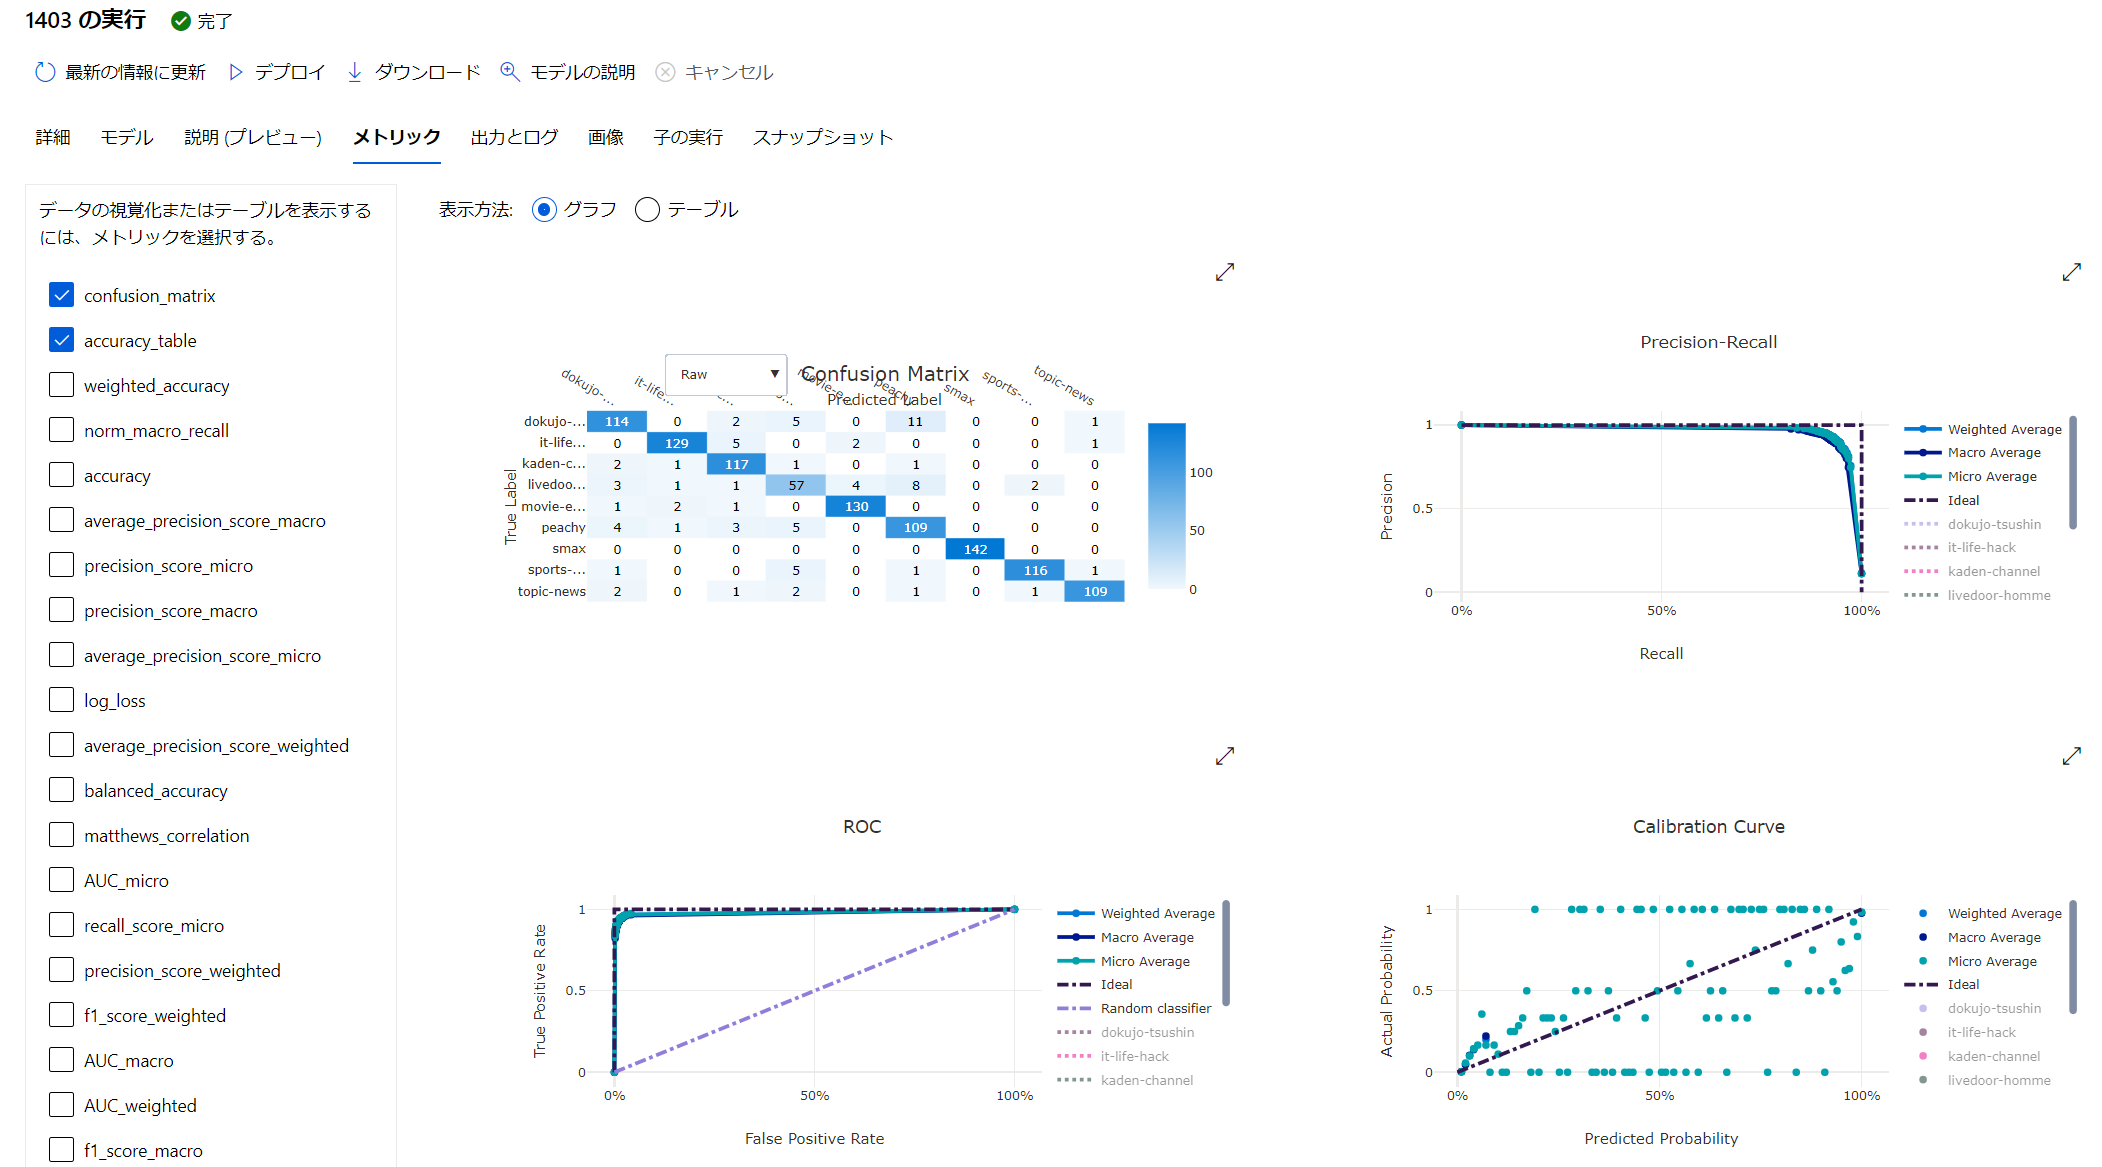
Model Explanation - [説明の表示] から参照できます!
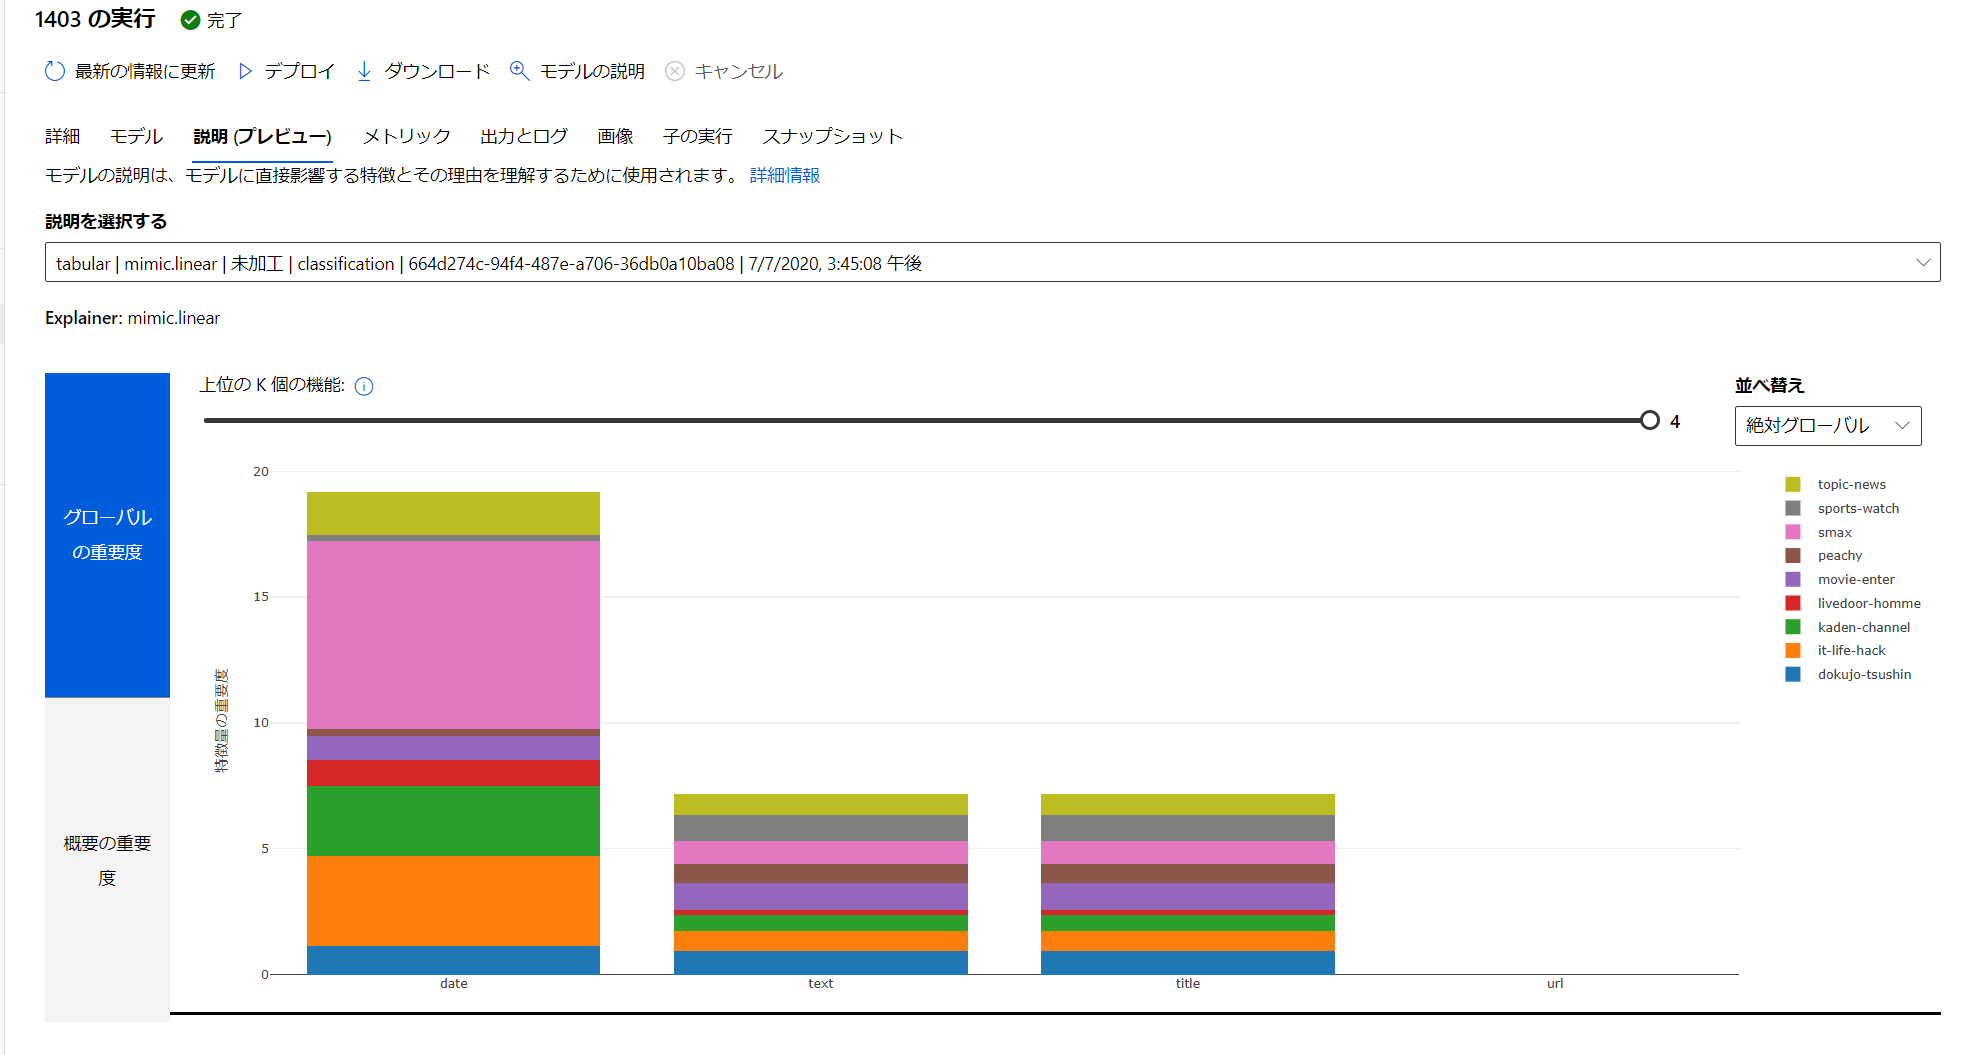
Azure Machine Learning でのモデルの解釈可能性:
https://docs.microsoft.com/ja-jp/azure/machine-learning/how-to-machine-learning-interpretability
Tips
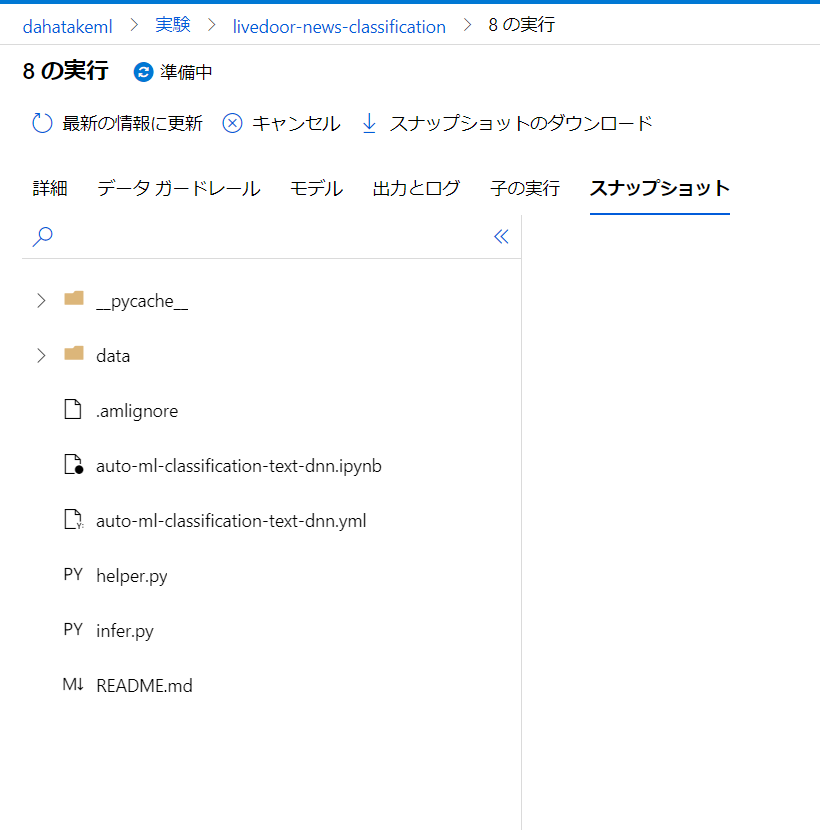
1. 実験スナップショットのストレージ制限
この JupyterNotebook のサンプルを全て実行すると、モデルのファイルをローカルにダウンロードしてきてから、登録を行います。モデルのファイルサイズが大きくなりがちで、2-3回目の実行で、こちらにひっかかる事があります。
エラーメッセージ:
While attempting to take snapshot of .
Your total snapshot size exceeds the limit of 300.0 MB
原因:
学習用のための環境として、特に指定をしていない場合、作業しているディレクトリのフォルダやファイルをスナップショットとして履歴管理をしています。つまり、余分なものは対象外としたいですね。
- 対応策
複数ありますが。
.amlignore ファイルを作成します。書式は .gitignore と同じです。
.amlignore ファイルの例:
*.log
*.pkl
.*/*
実験スナップショットのストレージ制限:
https://docs.microsoft.com/ja-jp/azure/machine-learning/how-to-save-write-experiment-files#limits
.gitignore ファイルの書式:
https://git-scm.com/docs/gitignore
まとめ
やりたい事は、BERT でベクトル化する事ではなく、その先にあります。テキストの分類は、それだけでも大変なタスクでした。BERTやBiLSTMがAutoMLの中に組み込まれただけで、テキストを扱う敷居が大分下がったのではないでしょうか?
GUIでの対応も今後予定されていますので、「まずは機械学習のアプローチで良いのか?」という初期フェーズでは大変役に立ちます。勿論、その後の Many Model への対応や、MLOpsを考えた際には、AutoMLはその一部を成す機能として重宝すると思います。
参考
自然言語処理の王様「BERT」の論文を徹底解説:
https://qiita.com/omiita/items/72998858efc19a368e50
AutoML のBERT モデルによるテキスト分類
https://medium.com/@konabuta/automl-%E3%81%AE-bert-%E3%83%A2%E3%83%87%E3%83%AB%E3%81%AB%E3%82%88%E3%82%8B%E3%83%86%E3%82%AD%E3%82%B9%E3%83%88%E5%88%86%E9%A1%9E-5758d4456975