□ はじめに
いつかネイティブアプリを作ってみたいと思っていて、やっと手を出せました。今回はiOSアプリをとにかく作ってみるのに注力しました。
Firebaseも触ってみたい気持ちもあったので、Firebaseで1時間で簡単なWebチャットアプリが作れるハンズオンのサンプルアプリとして作ったwebアプリをiOSネイティブアプリにしてみようと思います。
本当に初めてなので色々苦戦しました。初心者の方の参考になればと。
□ 環境
- Swift version 5.1
- Xcode version 11.1
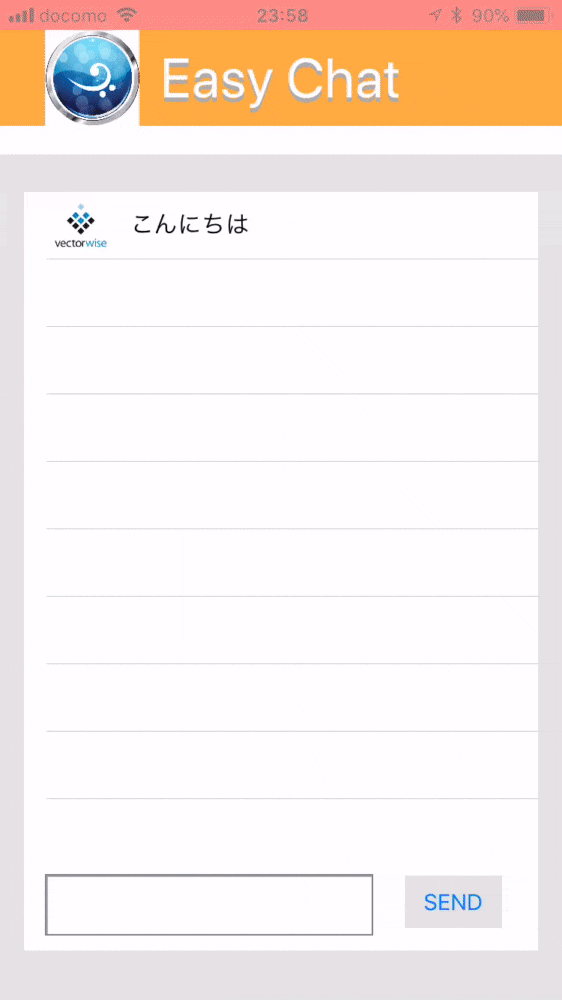
□ 完成アプリ
最初はサンプルのchatアプリにするつもりだったんですが、結果todoアプリみたいなものになりました。
□ アウトライン
本編の流れとしては下記のようにします。
- 配置する部品
- コードとの紐付け
- cloud firestoreとの接続
- 実機テスト
技術ポイントとしては既出のものばかりですが下記の要素をまとめていこうと思います。
- swiftの基本動作
- tableViewCellのカスタマイズ
- キーボード出現時の画面スライド
- firestoreへの追加/更新/削除
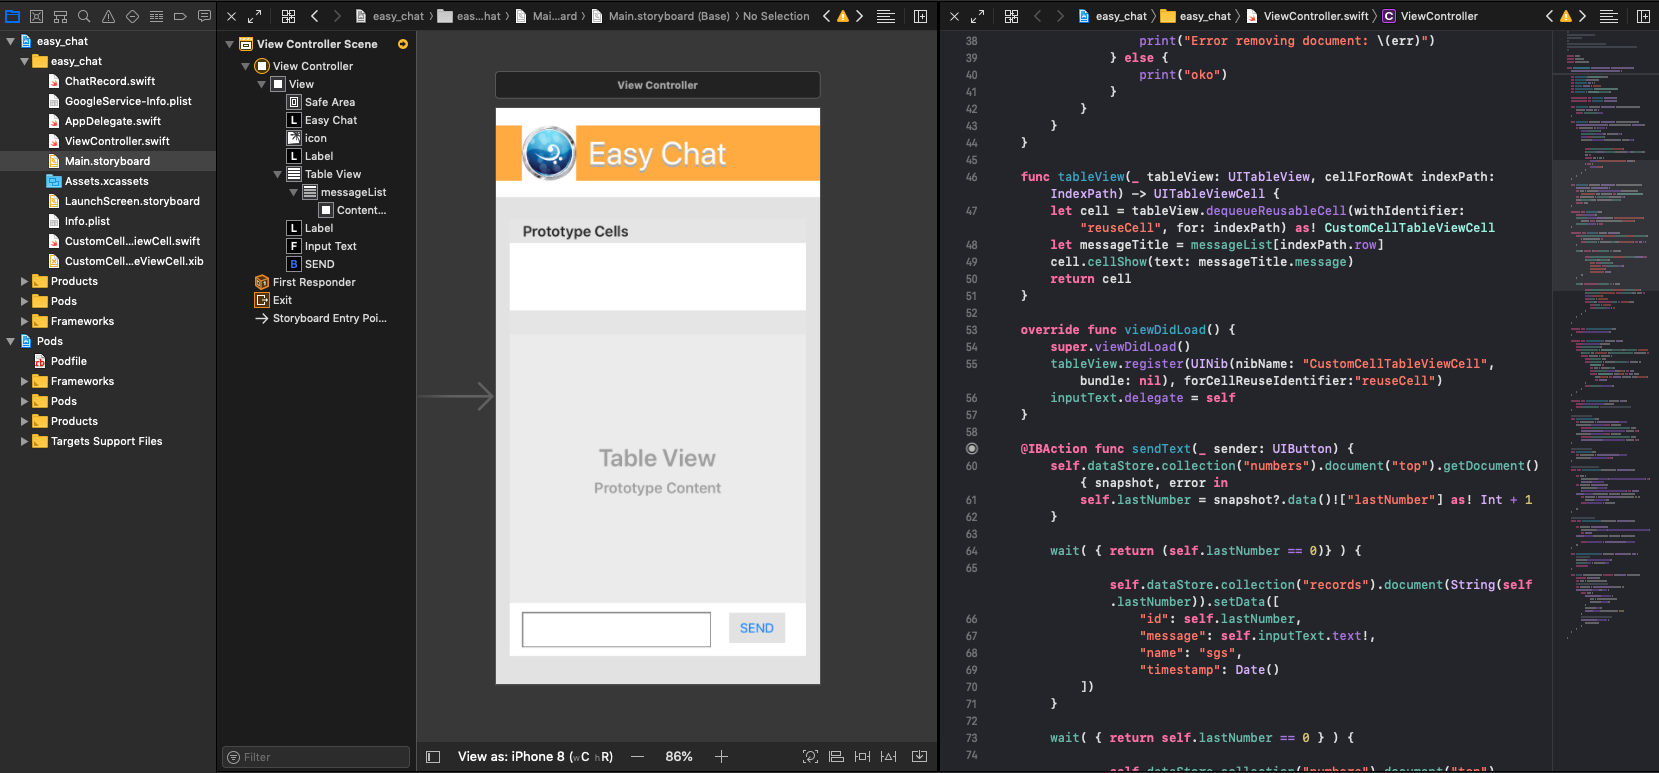
1. 配置する部品
Main.storybord
storybordはこんな感じです。
inputTextはメッセージ入力用,SENDはメッセージ送信用,TableViewはメッセージをスタックする用, meesageListはスタックするセルリスト用に準備しました。
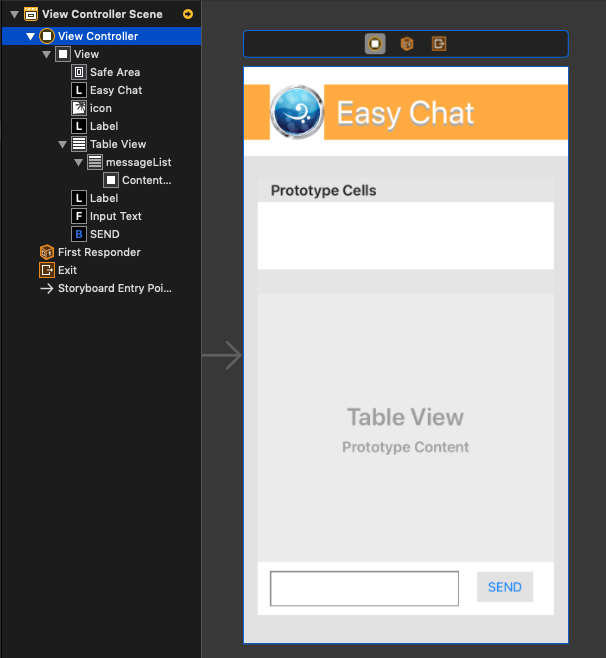
TableViewCellのstyleはCustomで作成しました。
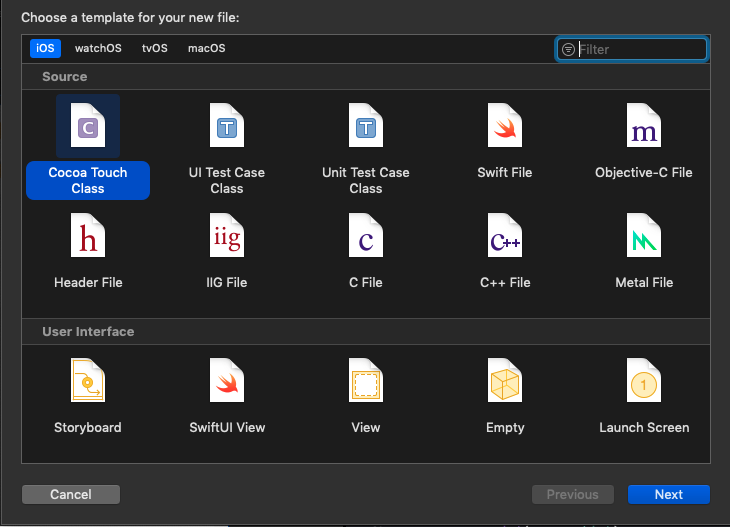
「File」 → 「new」 → 「iOS」の「Cocoa Touch Class」 → 「class:クラス名, subclass of:UITableViewClass, Also create XIB fileにチェックを入れる」 → 「Next」
これでクラス名.swiftとクラス名.xibの2つのファイルが作成されます。この2つのファイルを使ってスタックするセルを作成します。
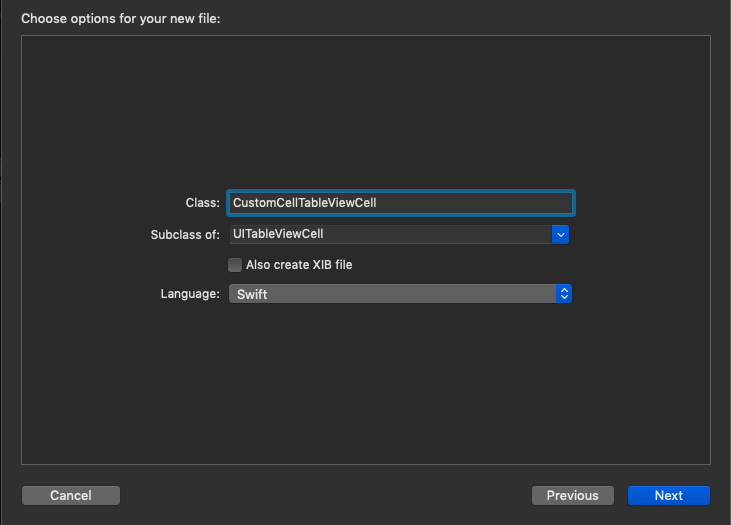
今回はクラス名はCustomCellTableViewCellです。
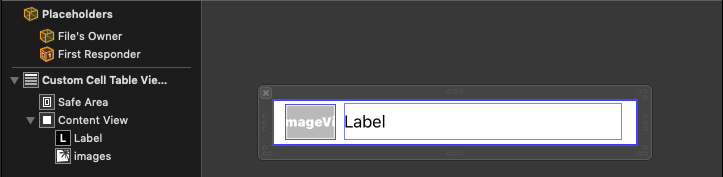
CustomCellTableViewCell.xib
CustomCellTableViewCell.xibはシンプルにアイコン用のimageViewとメッセージ用のlabelを配置します。
サンプルアプリのように1ユーザーが1メッセージを反映する用です。
配置する部品については以上です。
2. コードとの紐付け
作業がしやすいようにstoryboardとコードが1画面に分割されるように表示させます。
(storyboardを表示させた状態でoption押しながらViewController.swiftをクリック)
メッセージ入力と出力
inputTextをOutlet,SENDをActionとして紐付けます。
(controlを押しながら部品名をコードへドラッグ&ドロップ)
ひとまず、メッセージを入力してSENDボタンを押下することで入力したメッセージをコンソールに出力します。
import UIKit

class ViewController: UIViewController {

    @IBOutlet weak var inputText: UITextField!

    @IBAction func sendText(_ sender: UIButton) {
        print(inputText.text!)
    }

    override func viewDidLoad() {
        super.viewDidLoad()
        // Do any additional setup after loading the view.
    }
}
しかし、これだとキーボードが出現したら入力フィールドが隠れてしまうし、キーボードが閉じません。
キーボード出現時の画面スライドとクローズ
このサイトを参考にしながら下記のように実装しました。
https://note.mu/ichirou_okada/n/n630563aea246
ほぼ転記ですが、fixしないと動かない点がありましたので一応コードを載せておきます。
import UIKit

class ViewController: UIViewController, UITextFieldDelegate {

    @IBOutlet weak var inputText: UITextField!

    @IBAction func sendText(_ sender: UIButton) {
        print(inputText.text!)
    }

    override func viewDidLoad() {
        super.viewDidLoad()
        inputText.delegate = self
    }

    override func viewWillAppear(_ animated: Bool) {
        super.viewWillAppear(animated)
        self.configureObserver()
    }

    override func viewWillDisappear(_ animated: Bool) {
        super.viewWillDisappear(animated)
        self.removeObserver() // Notificationを画面が消えるときに削除
    }

    // Notificationを設定
    // 名称が変わっているのに加えて,fixが2箇所必要でした
    func configureObserver() {
        let notification = NotificationCenter.default
        notification.addObserver(self,
        selector: #selector(keyboardWillShow(notification:)),
        name: UIResponder.keyboardWillShowNotification,
        object: nil)
        notification.addObserver(self,
        selector: #selector(keyboardWillHide(notification:)),
        name: UIResponder.keyboardWillHideNotification,
        object: nil)
    }

    // Notificationを削除
    func removeObserver() {
        let notification = NotificationCenter.default
        notification.removeObserver(self)
    }

    // キーボードが現れた時に、画面全体をずらす。
    // @objcを加える
    @objc func keyboardWillShow(notification: Notification?) {
        let rect = (notification?.userInfo?[UIResponder.keyboardFrameBeginUserInfoKey] as? NSValue)?.cgRectValue
        let duration: TimeInterval? = notification?.userInfo?[UIResponder.keyboardAnimationDurationUserInfoKey] as? Double
        UIView.animate(withDuration: duration!, animations: { () in
            let transform = CGAffineTransform(translationX: 0, y: -(rect?.size.height)!)
            self.view.transform = transform
        })
    }

    // キーボードが消えたときに、画面を戻す
    // @objcを加える
    @objc func keyboardWillHide(notification: Notification?) {
        let duration: TimeInterval? = notification?.userInfo?[UIResponder.keyboardAnimationCurveUserInfoKey] as? Double
        UIView.animate(withDuration: duration!, animations: { () in
            self.view.transform = CGAffineTransform.identity
        })
    }

    func textFieldShouldReturn(_ textField: UITextField) -> Bool {
        textField.resignFirstResponder() // Returnキーを押したときにキーボードを下げる
        return true
    }
}
これでキーボード出現と同時に画面がスライドして、returnを押すとキーボードが閉じます。
これでinputTextにキーボードがかぶらず入力できるかと思います。
CustomセルのViewへの反映
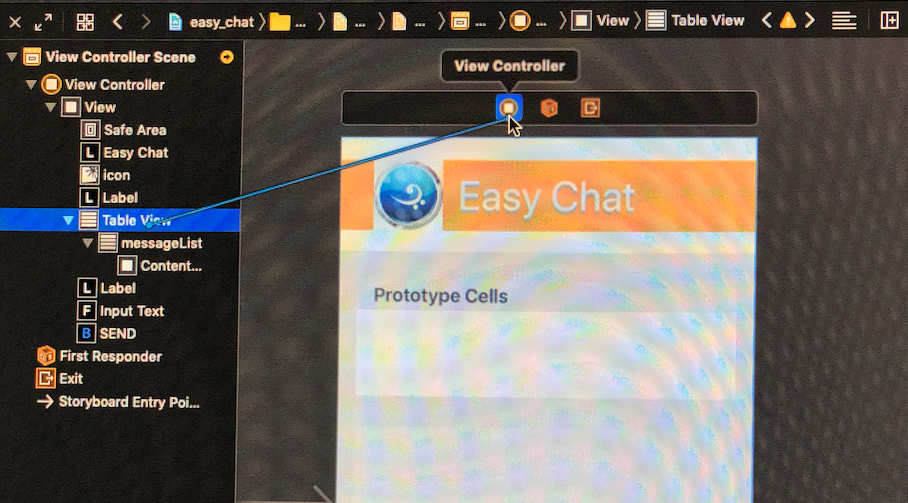
まずTableViewをstoryboard上ViewControllerのdataSource,delegateと紐付け、さらにコード上にtableViewとして紐付けします。
下記のようにUITableViewDeletegateとUITableViewDataSourceを継承させます。すると、エラーが出ると思うのfixをクリックしてください。tableViewメソッドを実装しろって感じになるので以下のように実装します。
同時に表示するメッセージ情報を格納しておくString配列messageListも宣言しておきます。
また、sendTextメソッドを書き換えます。tableViewはmessageListの内容を反映しているため、sendTextメソッドでmessageListに情報を追加します。これでmessageList.countで返すcell数がmessageListの長さになります。さらにtableView.reloadDataでリロードします。
import UIKit

// UITableViewDelegate, UITableViewDataSourceを追加する
class ViewController: UIViewController, UITextFieldDelegate, UITableViewDelegate, UITableViewDataSource {

    // メッセージ格納用のString配列を宣言
    var messageList: [String] = []
    @IBOutlet weak var inputText: UITextField!
    // TableViewを紐付け
    @IBOutlet weak var tableView: UITableView!

    override func viewDidLoad() {
        super.viewDidLoad()
        // tableViewに自分で定義したCustomCellをreuseCellという名前で登録します
        tableView.register(UINib(nibName: "CustomCellTableViewCell", bundle: nil), forCellReuseIdentifier:"reuseCell")
        inputText.delegate = self
    }

    func tableView(_ tableView: UITableView, numberOfRowsInSection section: Int) -> Int {
        // TableViewにいくつCellを表示させるかの数値を返します
        return messageList.count
    }

    func tableView(_ tableView: UITableView, cellForRowAt indexPath: IndexPath) -> UITableViewCell {
        // 表示させるcellをreuseCellにします, CustomCellTableViewCell型にキャストします
        let cell = tableView.dequeueReusableCell(withIdentifier: "reuseCell", for: indexPath) as!
        CustomCellTableViewCell
        let message = messageList[indexPath.row]
        // CustomCellで実装した表示用のメソッドを呼び出します(この後、実装します)
        cell.cellShow(text: message)
        return cell
    }

    @IBAction func sendText(_ sender: UIButton) {
        // SENDボタンを押したらmessageListに入力したmessageを追加
        // self.tableView.reloadData()でtableViewをリロードするとmessageListの内容が反映されます
        messageList.append(inputText.text!)
        self.tableView.reloadData()
    }
次にCustomCellTableViewCell.swiftを実装します。labelとimageViewをコード上に紐付けて、それぞれのフィールドに値を代入するメソッドを実装します。今回はcellShowメソッドとします。String型のmessageを受け取り、label.textに入れてimages.imageに表示する画像名を指定します。今回はiconとします(下記で画像の追加方法を説明します。)
import UIKit

class CustomCellTableViewCell: UITableViewCell {

    @IBOutlet weak var label: UILabel!
    @IBOutlet weak var images: UIImageView!

    func cellShow(message: String) {
        self.label.text = message
        self.images.image = UIImage(named: "icon")
    }
}
画像の追加
Assets.xcassetsを開きます。下部にある+ボタンを押して、「new Image Set」を選択します。AppIconの下に「image」ができるので名前を「icon」に変更します。
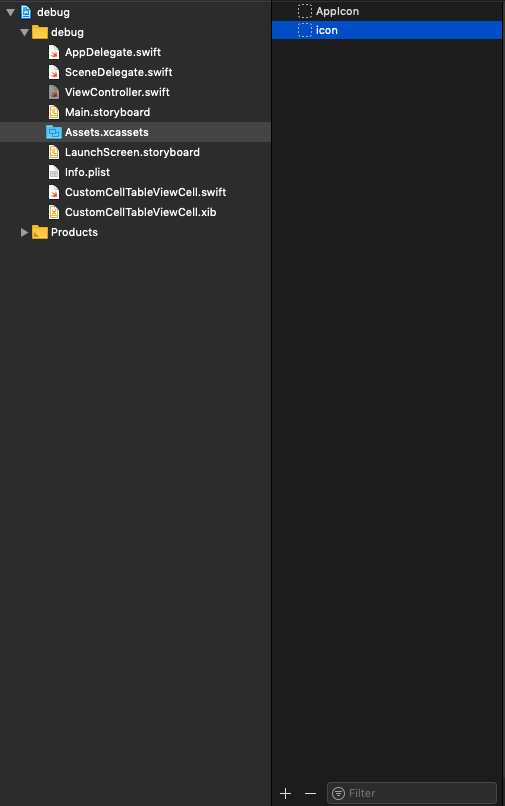
次にAssets.cassetsフォルダを開きます。すると、icon.imagesetができるのでそこにiconとして使用する画像を移します。
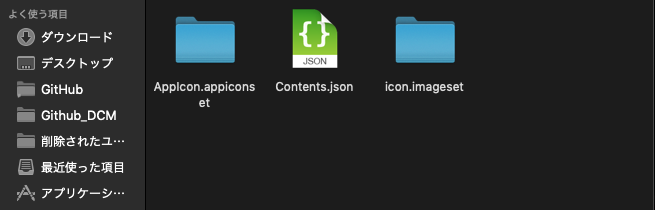
最後にxcodeに戻り、Assets.xcassetsを開きiconをクリックします。先ほどフォルダに移した画像がUnssignedになっていると思うので1xに移動します。これで画像をiconとして登録することができました。

シミュレーション
ここでシミュレーションをすると以下のような挙動になるかと思います。
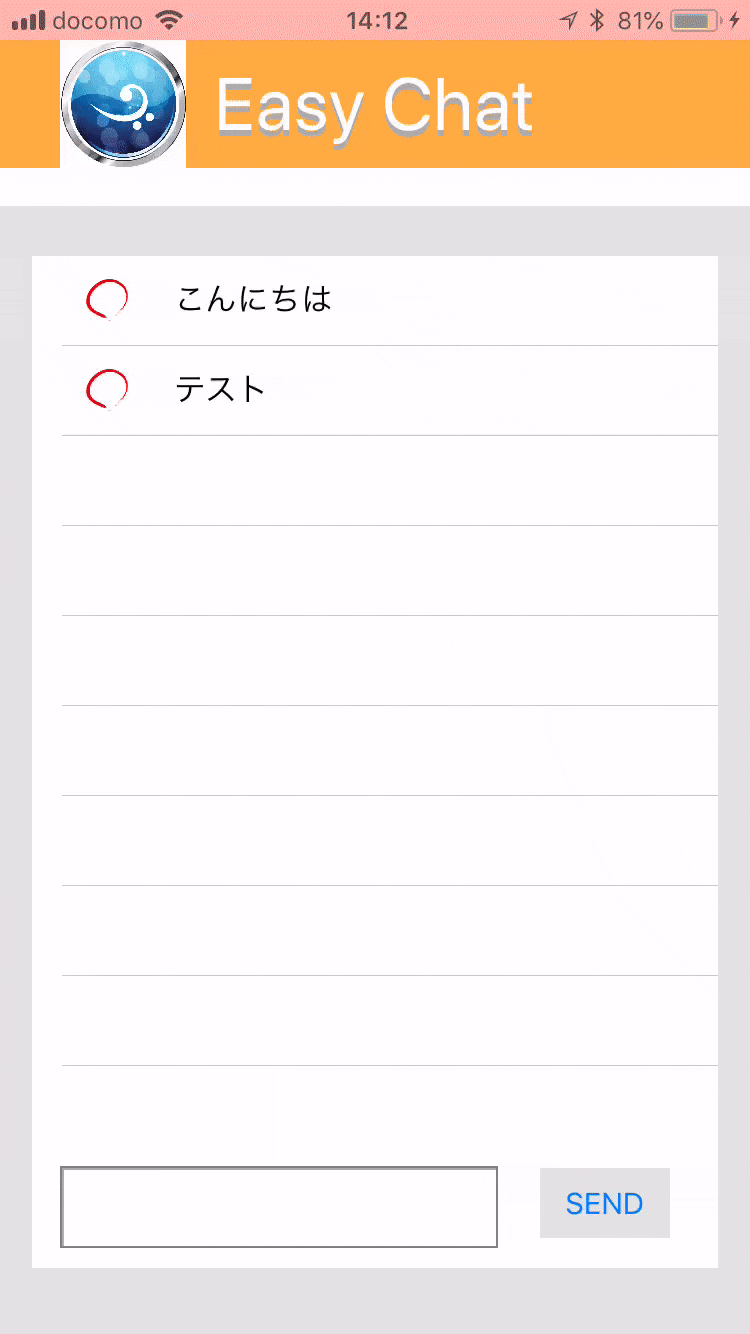
SENDボタンを押すと入力したメッセージがmessageListに入り、tableView.reloadDataによって画面に反映されます。
ありきたりなサンプルアプリですが、webアプリをiOSネイティブアプリで作り直すはだいたい達成できたかと思います。
□ 最後に
長くなってしまったので次の記事でバックエンドにfirebaseを利用した実装を書こうと思います。
まずはswiftを触ってみるという目標は達成できたので良かったです。
書いてみると思ったよりも簡単で食わず嫌いしていた期間がもったいなかったです(笑)
今後はswift-uiがデフォルトになるらしいのでそちらの書き方も学んでいきたいです。
ここまでの実装も載せておきます。
import UIKit

class ViewController: UIViewController, UITextFieldDelegate, UITableViewDelegate, UITableViewDataSource {
    func tableView(_ tableView: UITableView, numberOfRowsInSection section: Int) -> Int {
        return messageList.count
    }

    func tableView(_ tableView: UITableView, cellForRowAt indexPath: IndexPath) -> UITableViewCell {
        let cell = tableView.dequeueReusableCell(withIdentifier: "reuseCell", for: indexPath) as!
        CustomCellTableViewCell
        let messageTitle = messageList[indexPath.row]
        cell.cellShow(text: messageTitle)
        return cell
    }

    var messageList: [String] = []
    @IBOutlet weak var inputText: UITextField!
    @IBOutlet weak var tableView: UITableView!


    @IBAction func sendText(_ sender: UIButton) {
        messageList.append(inputText.text!)
        print(messageList)
        self.tableView.reloadData()
    }

    override func viewDidLoad() {
        super.viewDidLoad()
        tableView.register(UINib(nibName: "CustomCellTableViewCell", bundle: nil), forCellReuseIdentifier:"reuseCell")
        inputText.delegate = self
    }


    override func viewWillAppear(_ animated: Bool) {
        super.viewWillAppear(animated)
        self.configureObserver()
    }

    override func viewWillDisappear(_ animated: Bool) {
        super.viewWillDisappear(animated)
        self.removeObserver() // Notificationを画面が消えるときに削除
    }

    // Notificationを設定
    func configureObserver() {
        let notification = NotificationCenter.default
        notification.addObserver(self,
        selector: #selector(keyboardWillShow(notification:)),
        name: UIResponder.keyboardWillShowNotification,
        object: nil)

        NotificationCenter.default.addObserver(self,
        selector: #selector(keyboardWillHide(notification:)),
        name: UIResponder.keyboardWillHideNotification,
        object: nil)
    }

    // Notificationを削除
    func removeObserver() {

        let notification = NotificationCenter.default
        notification.removeObserver(self)
    }

    // キーボードが現れた時に、画面全体をずらす。
    @objc func keyboardWillShow(notification: Notification?) {

        let rect = (notification?.userInfo?[UIResponder.keyboardFrameBeginUserInfoKey] as? NSValue)?.cgRectValue
        let duration: TimeInterval? = notification?.userInfo?[UIResponder.keyboardAnimationDurationUserInfoKey] as? Double
        UIView.animate(withDuration: duration!, animations: { () in
            let transform = CGAffineTransform(translationX: 0, y: -(rect?.size.height)!)
            self.view.transform = transform

        })
    }

    // キーボードが消えたときに、画面を戻す
    @objc func keyboardWillHide(notification: Notification?) {

        let duration: TimeInterval? = notification?.userInfo?[UIResponder.keyboardAnimationCurveUserInfoKey] as? Double
        UIView.animate(withDuration: duration!, animations: { () in

            self.view.transform = CGAffineTransform.identity
        })
    }

    func textFieldShouldReturn(_ textField: UITextField) -> Bool {

        textField.resignFirstResponder() // Returnキーを押したときにキーボードを下げる
        return true
    }
}
□ 参考
Swiftで始めるFirebase入門
Firebaseで1時間で簡単なWebチャットアプリが作れるハンズオン
SwiftでTableViewを使ってみよう