スキーマ駆動開発とは
簡単に言うと、先にAPIのスキーマ (request, responseの型やフィールド名の定義)を決め、それに伴ったドキュメントとモックの生成をシステマティックに行った上で内部の実装を行う開発手法です。(参考: チームのWeb API開発を最適化するSchema Driven Developmentの解説&実装例)
pythonのwebフレームワークであるresponderでスキーマ駆動開発をやってみたいと思います。
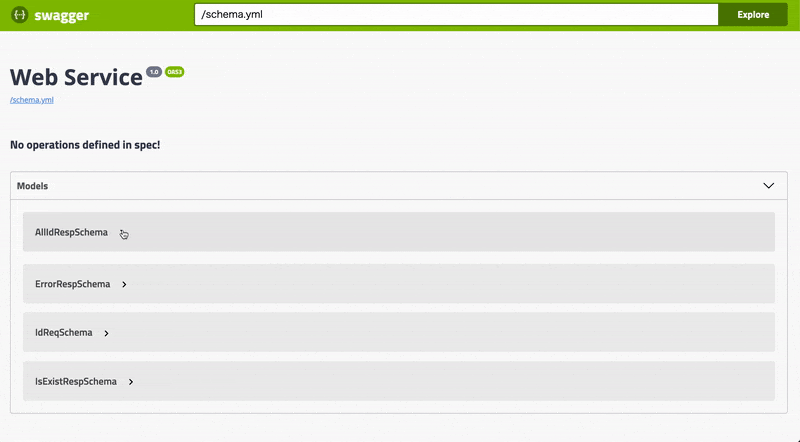
以下の様なSwaggerが見れるようになるのがゴールです。

responder
PythonのモダンなWeb フレームワークです。
ボリューム感的にはflaskやbottleのようなマイクロフレームワークです。
以下の様に書いて、$ python xxx.py のように実行するだけで、JSONを返すAPI serverが起動します。
import responder

api = responder.API()

@api.route("/")
async def view(req, resp):
    resp.media = {'success': True}

if __name__ == "__main__":
    api.run()
また、非同期web server (ASGI)やwebsocket、GraphQL、OpenAPI schemaの自動生成などモダンな機能を備えている点も注目度が高いです。
公開から1年ぐらいでgithubのStar数3300超え (2019年11月時点)の化け物で、コミットの頻度も高いので将来性も十分だと思います。
参考:
- responder documentations
- Python responder 入門のために… 下調べ
- はじめての Responder(Python の次世代 Web フレームワーク)
- Responder使ってみた際のポイント・注意点(Pytestも書いてみたよ)
本記事のスコープ
responderでの以下の開発手法をまとめます。
- スキーマ定義&モック作成: (mashmallowによるシリアライズ)
- モック&ドキュメント提供: (apispecによるOpenAPI 3.0 (swagger)への変換)
responderのFeature tourのOpenAPI Schema SupportとInteractive Documentationという章の内容に相当しますが、ささやかな紹介程度しか記載がないので実践的な解説ができたらと思います。
構成
説明のために以下の様な簡単なAPIをたてていきます。
| method | 機能 |
|---|---|
| get | 存在するidをすべて返す |
| post | 入力されたidが存在するかを返す |
また、postでは、validation errorがおきたらerror内容を返すことにします。
version
responder: v2.0.3
python: v3.6.5
Schema定義&モック作成 by mashmallow
mashmallowはオブジェトのシリアライズをサポートしてくれるライブラリです。
schema classを定義し、requestやresponseをschema class経由でload/dumpするとvalidationをかけてくれます。流れは以下の様になります。
from marshmallow import Schema, fields

class AllIdRespSchema(Schema):
    # Schema定義 (intのlist)
    exist_ids = fields.List(fields.Int())

class AllExistIDModel():
    # responseのmock
    # この中身を後で本番用に置き換える
    def __init__(self):
        self.exist_ids = [1, 2, 3, 4, 5]

@api.route("/schema_driven")
async def schema_driven_view(req, resp):
    if req.method == "get":
        # validate response data
        resp.media = AllIdRespSchema().dump(AllExistIDModel())
この流れに沿って、今回の例で必要なSchema classとmock用classを以下の様に定義します。AllIdRespSchema, AllExistIDModelは上記の例で定義したものです。
| Schema名 | mock | 用途 |
|---|---|---|
| AllIdRespSchema | AllExistIDModel | getのレスポンス |
| IdReqSchema | なし | postのリクエスト |
| IsExistRespSchema | IsExistIDModel | postのレスポンス |
| ErrorRespSchema | ErrorModel | validation error時のレスポンス |
class IdReqSchema(Schema):
    # if required=True, the field must exist
    id = fields.Int(required=True)

class IsExistRespSchema(Schema):
    is_exist = fields.Bool()

class ErrorRespSchema(Schema):
    error = fields.Str()
    errorDate = fields.Date()
class IsExistIDModel():
    def __init__(self, data):
        id = data.get('id')
        self.is_exist = id in [1, 2, 3, 4, 5]

class ErrorModel():
    def __init__(self, error):
        self.error = str(error)
        self.errorDate = datetime.datetime.now()
このようにSchemaを定義しておけば、viewは処理の流れだけ書けばよくなります。
from marshmallow import ValidationError

@api.route("/schema_driven")
async def schema_driven_view(req, resp):
    if req.method == "get":
        # validate response data
        resp.media = AllIdRespSchema().dump(AllExistIDModel())

    elif req.method == "post":
        request = await req.media()
        try:
            # validate request data using Schema
            data = IdReqSchema().load(request)

        except ValidationError as error:
            # raise ValidationError
            resp.status_code = api.status_codes.HTTP_400
            # validate response data
            resp.media = ErrorRespSchema().dump(ErrorModel(error))
            return

        # validate response data
        resp.media = IsExistRespSchema().dump(IsExistIDModel(data))
見るとわかるようにviewの中身は抽象的な処理の流れとSchema class, mock用のclass名だけで書かれています。なので、少々の変更 (型やjsonのfield名の変更)などではviewの中身を変更することはなくなると思います。
次は、このschemaからドキュメントを生成し、フィードバックを得られるようにしたいと思います。
モック&ドキュメント提供 by apispec
ここからはresponderの機能を使います。とはいえ実際はapispecというライブラリのラッパーになっています。やっていることは、docstringやSchema定義をほぼそのままapispecに流しているだけです。なので、細かいカスタマイズをしたい場合は、apispecやOpenAPI 3.0の定義を参照する必要があります。
apispecは、marshmallowのSchema定義やdocstringsをパースし、Open APIの形式に変形しSwagger UIを生成してくれます。
参考:
まず、apiの宣言時に以下のようにargumentを追加する必要があります。
api = responder.API(
    openapi='3.0.0',  # OpenAPI version
    docs_route='/docs',  # endpoint for interactive documentation by swagger UI. if None, this is not available.
)
Schema
次に、Schema定義への設定は、api.schemaデコレータを使います。ただし、メインのviewにSchema定義を書くのはあまりにも煩雑になりそうなので、schema定義は別ファイルからimportする形をとりたいです。なので、以下の様に多少無理やり宣言します。
api.schema("IdReqSchema")(IdReqSchema)
api.schema("ErrorRespSchema")(ErrorRespSchema)
api.schema("IsExistRespSchema")(IsExistRespSchema)
api.schema("AllIdRespSchema")(AllIdRespSchema)
serverを起動して以下にアクセスすると、以下の様にSwagger UIでSchema定義が確認できます。
127.0.0.1:5042/docs
API
GET
上述のview定義に以下の様にyaml形式のdocstringを追加します。
descriptionでapiの説明が記述できます。また、ステータスコード毎にレスポンスのschemaを指定できます。なお、以下の様にschemaを定義するとresponseのSchema定義とサンプルレスポンスがSwagger UIから参照できるようになります。サンプルレスポンスの参照時には実際にAPIを叩くので、Internal Server Errorが起きないかの確認にもなります。
@api.route("/schema_driven")
async def schema_driven_view(req, resp):
    """exist id checker endpoint.
    ---
    name: is_exist
    get:
        description: Get the all exist id
        responses:
            200:
                description: All exist_id to be returned
                content:
                    application/json:
                        schema:
                            $ref: "#/components/schemas/AllIdRespSchema"
    """
    ...
*注: Schema指定あたりがresponderの公式ドキュメントと書き方が異なっています。公式の書き方も試しましたが、そちらではSchema定義は表示されませんでした。testコードを見てもhtmlへの変換までしか確認しておらず、内容までは見ていない可能性があります。
同様にSwaggerを確認すると、
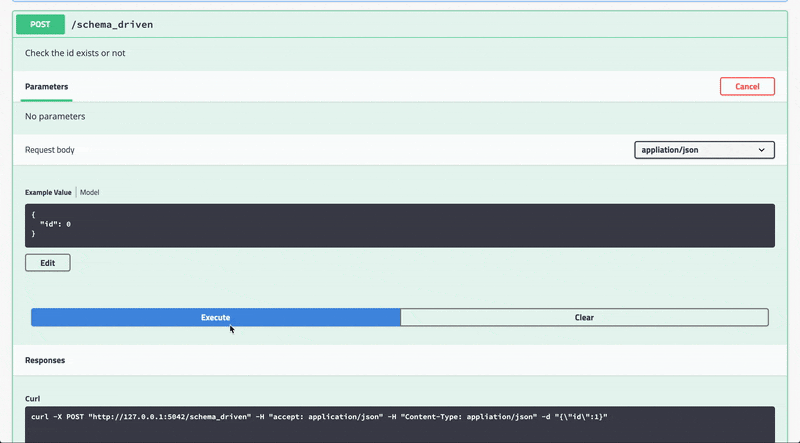
POST
さらにpost用のdocstringを追記します。こちらは公式ドキュメントには載っていません。
詳細はOpen APIの定義書を参照する必要があります。
responseについてはgetと同様に書けます。ステータスコードを200 (正常)と400 (validation error)の2つ分書いてみます。また、requestBodyでリクエストのSchemaを指定します。リクエストのbodyを変更して実際にAPIをたたけるようになります。
@api.route("/schema_driven")
async def schema_driven_view(req, resp):
    """exist id checker endpoint.
    ...
    ---
    post:
        description: Check the id exists or not
        requestBody:
            content:
                appliation/json:
                    schema:
                        $ref: "#/components/schemas/IdReqSchema"
        responses:
            200:
                description: true/false whether id exists to be returned
                content:
                    application/json:
                        schema:
                            $ref: "#/components/schemas/IsExistRespSchema"
            400:
                description: validation error
                content:
                    application/json:
                        schema:
                            $ref: "#/components/schemas/ErrorRespSchema"
    """
まとめ
responderでスキーマ駆動開発を行う手順を紹介しました。これだけでSwaggerが見られるようになるのは非常にありがたいことだと思います。これ以外にもresponderは非常におもしろい機能がたくさんあるので色々試していきたいです!
refs
- チームのWeb API開発を最適化するSchema Driven Developmentの解説&実装例
- responder documentations
- Python responder 入門のために… 下調べ
- はじめての Responder(Python の次世代 Web フレームワーク)
- Responder使ってみた際のポイント・注意点(Pytestも書いてみたよ)
- 【超初心者向け】5分で試せる!OpenAPI(Swagger3.0)ドキュメント作成〜API自動生成
- https://swagger.io/docs/specification/describing-request-body/
- https://github.com/OAI/OpenAPI-Specification/blob/master/versions/3.0.0.md#requestBodyObject
- Add Swagger UI to your Python Flask API