まえがき
サンプルコードを GitHub にアップロードしています。
記事中では一部 Terraform コードを省略していますので、詳細を知りたい方はコードをご覧ください。
対象読者
- Datastream for BigQuery って何?という人
- Datastream を実務に導入するか悩んでいる人
- Datastream を Terraform で実装したい人
Datastream for BigQuery とは
DB のデータを、BigQuery にストリーミング転送するサービスです。
2023/4/4 に GA(Generally Available) になりました 🎉
Datastream の背景技術には、 CDC(Change Data Capture) が使われています。
通常、データベースは、各種 SQL を実行するごとに変更ログを吐き出します。
この変更ログを他のデータベースに反映させる考え方が CDC です。
Datastream は、 DB のログを取得して BigQuery に反映することになります。
Datastream(CDC) を使うメリット
ニアリアルタイム
バッチ処理の場合、バッチ処理の完了まで BigQuery のデータは更新されません。
Datastream だと、データベースの変更をニアリアルタイムでキャプチャして BigQuery に反映できます。
Pull 型の取得になるため、完全なリアルタイムとはなりません。
差分更新に対応
バッチ処理の場合、定期的に全データの転送を行うため、大量のリソースが必要な場合があります。
また、大規模なテーブルでバッチ処理をする場合、新しく増えたレコードのみを転送する増分更新方式がとられていることも多いです。
CDC の場合、変更があったデータのみを処理するため、必要なリソースが少なく済みます。
加えて、レコードの更新(UPDATE文)も処理できるため、より最新のデータを分析に使用できます。
対応するデータソース
対応している DBMS は以下の3種類です。
- Oracle
- MySQL
- PostgreSQL
- Datastream for BigQuery と同時に GA になりました
実行基盤としては、以下に対応しています。
- オンプレミス
- Google Cloud の DB サービス
- Cloud SQL
- AlloyDB
- AWS の DB サービス
- Amazon RDS
- Amazon Aurora
構成
今回は、データソースに AlloyDB for PostgreSQL を使用してみます。
また、より実務に近い形として、プライベート接続を使用します。
構成は以下のようになります。
AlloyDB や CloudSQL などの、Google のフルマネージドサービスは、Google's Global Network と呼ばれる Google 管理下のネットワーク内にあり、直接 VPC ピアリングすることはできません。
そのため、Datastream から AlloyDB への接続は、GCE に一度接続し、リバースプロキシすることで通信します。
制限事項
Datastream のデータソースに PostgreSQL を用いる場合、制限事項がいくつか存在します。
特に影響が大きそうなものをいくつか列挙してみます。
一部のスキーマ変更に対応していない
以下の変更には対応していません。別途バッチ処理や手動対応が必要になります。
- 列の削除
- テーブルの途中にカラムを追加する
- 列のデータ型を変更する
- 列の並び替え
- テーブルの削除(同じテーブルに新しいデータを追加して再作成する場合に関連)
一部のデータ型に対応していない
- geometric 型のカラム
- ENUM 型のカラム
他にも制限事項はあるので、詳しくはドキュメントを読んでみてください。
Terraform
以下では、各リソースを Terraform で作成していきます。
VPC/BigQuery のコードに関しては、記事が冗長になるため割愛しています。サンプルコードを参照してください。
環境
$ terraform --version
Terraform v1.5.2
on darwin_amd64
AlloyDB
AlloyDB をデータソースとして利用する上では、以下の記事にある設定が必要になります。
具体的には、以下が必要です。
新しい用語が出てきますが、富士通さんの記事がわかりやすいのでこちらを読んでみてください。
- 論理レプリケーション(
logical_decoding)の有効化 - PostgreSQL ユーザーにレプリケーション権限を付与
- パブリケーションの作成
- レプリケーションスロットの作成
うち、Terraform 上で設定する項目は 1 の logical_decoding の有効化のみです。
2~4 に関しては SQL を実行して設定します。(試してみるを参考にしてください)
AlloyDB の terraform documentを参考に実装していきます。
resource "google_compute_global_address" "private_ip_alloydb" {
  name          = "${var.project_id}-alloydb-cluster-ip"
  address_type  = "INTERNAL"
  purpose       = "VPC_PEERING"
  prefix_length = 16
  network       = google_compute_network.vpc_network.id
}

resource "google_service_networking_connection" "vpc_connection" {
  network                 = google_compute_network.vpc_network.id
  service                 = "servicenetworking.googleapis.com"
  reserved_peering_ranges = [google_compute_global_address.private_ip_alloydb.name]
}

// https://registry.terraform.io/providers/hashicorp/google/latest/docs/resources/alloydb_cluster
resource "google_alloydb_cluster" "main" {
  cluster_id = "${var.project_id}-alloydb-cluster"
  location   = var.default_region
  network    = google_compute_network.vpc_network.id

  initial_user {
    user     = sensitive(var.alloydb.username)
    password = sensitive(var.alloydb.password)
  }
}

// https://registry.terraform.io/providers/hashicorp/google/latest/docs/resources/alloydb_instance
resource "google_alloydb_instance" "main" {
  cluster       = google_alloydb_cluster.main.name
  instance_id   = "${var.project_id}-alloydb-instance"
  instance_type = "PRIMARY"

  # 論理レプリケーションを有効化
  database_flags = {
    "alloydb.logical_decoding" = "on"
  }

  depends_on = [google_service_networking_connection.vpc_connection]
}
GCE(TCP proxy) が AlloyDB にアクセスする際、 IP アドレスを指定する必要があります。
そのため、google_compute_global_address と google_service_networking_connection で AlloyDB の静的 IP アドレスを作成します。
TCP proxy on GCE
今回は公式のドキュメントに従って、TCP proxy を行う Docker コンテナを GCE 内に作成します。
Google の提供する container-vm module を使用すると、GCE 内で Docker コンテナを簡単に立てられるため、そちらを使用してみます。
module "gce-container" {
  source  = "terraform-google-modules/container-vm/google"
  version = "~> 2.0"

  container = {
    image = "gcr.io/dms-images/tcp-proxy"
    env = [
      {
        name  = "SOURCE_CONFIG"

        # AlloyDB に通信を転送する
        value = "${google_alloydb_instance.main.ip_address}:5432"
      }
    ],
  }
}

resource "google_compute_instance" "ds-tcp-proxy" {
  project                   = var.project_id
  name                      = "ds-tcp-proxy"
  machine_type              = "e2-micro"
  zone                      = var.default_zone
  allow_stopping_for_update = true

  tags = ["ds-tcp-proxy"]

  boot_disk {
    initialize_params {
      image = module.gce-container.source_image
    }
  }

  network_interface {
    network    = google_compute_network.vpc_network.id
    subnetwork = google_compute_subnetwork.tcp_proxy_datastream.id
    access_config {

    }
  }

  can_ip_forward = true

  metadata = {
    gce-container-declaration = module.gce-container.metadata_value
    google-logging-enabled    = "true"
    google-monitoring-enabled = "true"
  }

  labels = {
    container-vm = module.gce-container.vm_container_label
  }

  service_account {
    email  = data.google_service_account.gce_default.email
    scopes = ["cloud-platform"]
  }
}

resource "google_compute_firewall" "ds_proxy" {
  name    = "ds-proxy"
  project = var.project_id
  network = google_compute_network.vpc_network.id

  allow {
    protocol = "tcp"
    ports    = ["5432"]
  }

  # Datastream のある IP 範囲からのトラフィックのみ firewall が適用される
  # Datastream private connection の設定で IP 範囲を確保する
  source_ranges = ["10.1.0.0/29"]

  direction = "INGRESS"
  priority  = 1000

  # この tags がついた GCE にのみ firewall が適用される
  target_tags = ["ds-tcp-proxy"]
}
PostgreSQL Client on GCE
AlloyDB はプライベート IP しか持たないため、SQL を実行するためには VPC 内の GCE などから AlloyDB に接続する必要があります。そこで、今回は psql を実行する GCE を別途立てます。
resource "google_compute_instance" "ds-psql-client" {
  project                   = var.project_id
  name                      = "ds-psql-client"
  machine_type              = "e2-small"
  zone                      = var.default_zone
  allow_stopping_for_update = true

  tags = ["ds-psql-client"]

  boot_disk {
    initialize_params {
      image = "ubuntu-os-cloud/ubuntu-2304-amd64"
    }
  }

  network_interface {
    network    = google_compute_network.vpc_network.id
    subnetwork = google_compute_subnetwork.tcp_proxy_datastream.id

    access_config {
      // Ephemeral IP
    }
  }

  service_account {
    email  = data.google_service_account.gce_default.email
    scopes = ["cloud-platform"]
  }

  metadata_startup_script = <<EOF
#!/bin/bash
sudo apt -y update && sudo apt upgrade
sudo apt install -y postgresql-client
EOF
}

// ブラウザ経由で SSH 接続するための firewall 設定
resource "google_compute_firewall" "allow_ssh" {
  name    = "ds-allow-ssh"
  project = var.project_id
  network = google_compute_network.vpc_network.id

  allow {
    protocol = "tcp"
    ports    = ["22"]
  }

  # IAP 経由での ssh を許可する
  source_ranges = ["35.235.240.0/20"]

  direction = "INGRESS"
  priority  = 1000

  # この tags がついた GCE にのみ firewall が適用される
  target_tags = ["ds-psql-client"]
}
Datastream
Datastream サービスは、profile, private connection, stream リソースから構成されています。
Datastream private connection
Datastream-VPC 間のプライベート接続を設定するリソースです。
resource "google_datastream_private_connection" "main" {
  display_name          = "Datastream Private Connection"
  location              = var.default_region
  private_connection_id = "ds-private-connection"
  project               = var.project_id

  vpc_peering_config {
    vpc    = google_compute_network.vpc_network.id
    subnet = "10.1.0.0/29" // Datastream が配置されるサブネット範囲
  }
}
Datastream profile
Datastream の接続先を設定するリソースです。
AlloyDB と BigQuery に接続するため、それぞれ設定します。
AlloyDB への接続に関しては、今回は TCP proxy を経由します。
従って、hostname には GCE のプライベート IP を使用します。
resource "google_datastream_connection_profile" "alloydb" {
  display_name          = "AlloyDB Connection profile"
  location              = var.default_region
  connection_profile_id = "alloydb-connection-profile"
  project               = var.project_id

  postgresql_profile {
    # AlloyDB の IP ではなく TCP proxy の IP にする
    hostname = google_compute_instance.ds-tcp-proxy.network_interface.0.network_ip

    port     = "5432"
    username = sensitive(var.alloydb_datastream.username)
    password = sensitive(var.alloydb_datastream.password)
    database = "postgres"
  }

  private_connectivity {
    private_connection = google_datastream_private_connection.main.id
  }
}

resource "google_datastream_connection_profile" "bigquery" {
  display_name          = "BigQuery Connection profile"
  location              = var.default_region
  connection_profile_id = "bigquery-connection-profile"
  project               = var.project_id

  bigquery_profile {}

  private_connectivity {
    private_connection = google_datastream_private_connection.main.id
  }
}
Datastream stream
実際のストリーミングの設定を行うリソースです。
スキーマ・テーブル・カラム単位でストリーミング実行を指定することが可能です。
また、バックフィル(初回のデータ同期)の有無も指定可能です。
resource "google_datastream_stream" "main" {
  display_name  = "AlloyDB to BigQuery Datastream"
  location      = var.default_region
  stream_id     = "ds-alloydb-to-bigquery"
  desired_state = "RUNNING"
  project       = var.project_id

  source_config {
    source_connection_profile = google_datastream_connection_profile.alloydb.id

    postgresql_source_config {
      publication      = "datastream_publication"
      replication_slot = "datastream_replication_slot"
      include_objects {
        postgresql_schemas {
          schema = "public"

          # テーブル・カラム指定も可能
          /* postgresql_tables {
            table = "users"
            postgresql_columns {
              column = "name"
              data_type = "text"
            }
            postgresql_columns {
              column = "type"
              data_type = "user_type"
            }
          } */
        }
      }
    }
  }

  destination_config {
    destination_connection_profile = google_datastream_connection_profile.bigquery.id

    bigquery_destination_config {
      data_freshness = "900s"
      single_target_dataset {
        dataset_id = google_bigquery_dataset.dataset.id
      }

      # postgreSQL の構造に合わせてデータセットを作成する
      # 1スキーマ = 1データセットになる
      /* source_hierarchy_datasets {
        dataset_template {
          location = var.default_region
          dataset_id_prefix = "ds_"
        }
      } */
    }

  }

  backfill_all {

  }
}
試してみる
事前にデータベースにレコードを挿入したいため、 事前に AlloyDB と postgreSQL クライアントのみ terraform apply してデプロイしておきます。
AlloyDB のスキーマ作成
users テーブルを作成し、以下のようなスキーマを用意してみます。
| カラム名 | 型 |
|---|---|
| user_id | int64 PRIMARY KEY |
| name | string |
| type | ENUM |
| created_at | DATE |
まず wal_level が logical なことを確認してみます。
username はご自身の設定したものに置き換えてログインしてください。
psql -h {AlloyDBのプライベートIP} -U ds_admin -d postgres
Password for user ds_admin:
psql (15.3 (Ubuntu 15.3-0ubuntu0.23.04.1), server 14.5)
SSL connection (protocol: TLSv1.3, cipher: TLS_AES_256_GCM_SHA384, compression: off)
Type "help" for help.

postgres=> SELECT name, setting FROM pg_settings WHERE name='wal_level';
   name    | setting
-----------+---------
 wal_level | logical
(1 row)
ENUM として user_type を作成、users テーブルを作成し、レコードを挿入します。
CREATE TYPE user_type AS ENUM ('viewer', 'editor', 'admin', 'owner');
CREATE TABLE users (
  user_id bigint PRIMARY KEY,
  name text,
  type user_type,
  created_at date
);

INSERT INTO users (user_id, name, type, created_at)
VALUES
  (1, 'John Doe', 'viewer', '2023-07-01'),
  (2, 'Jane Smith', 'editor', '2023-07-02'),
  (3, 'Michael Johnson', 'admin', '2023-07-03'),
  (4, 'Emily Williams', 'owner', '2023-07-04'),
  (5, 'David Brown', 'viewer', '2023-07-05'),
  (6, 'Sarah Davis', 'editor', '2023-07-06'),
  (7, 'Robert Taylor', 'admin', '2023-07-07'),
  (8, 'Jennifer Anderson', 'viewer', '2023-07-08'),
  (9, 'William Martinez', 'editor', '2023-07-09'),
  (10, 'Olivia Wilson', 'admin', '2023-07-10');
また、AlloyDB の設定で触れたように、以下の作業も行います。
- PostgreSQL ユーザーにレプリケーション権限を付与
- パブリケーションの作成
- レプリケーションスロットの作成
ALTER USER ds_admin WITH REPLICATION;

-- datastream.tf で設定したパブリケーション名
CREATE PUBLICATION datastream_publication FOR ALL TABLES;

-- datastream.tf で設定したレプリケーションスロット名
SELECT PG_CREATE_LOGICAL_REPLICATION_SLOT('datastream_replication_slot', 'pgoutput');
合わせて、datastream 用にユーザーも用意してあげましょう。
今回は適当に username, pass ともに datastream のユーザーを作成してみます。
CREATE USER datastream WITH REPLICATION LOGIN PASSWORD 'datastream';
ALTER USER datastream createdb;

-- WARNING が出ますが無視して問題ないです
-- https://cloud.google.com/datastream/docs/configure-your-source-postgresql-database#create_a_user
GRANT SELECT ON ALL TABLES IN SCHEMA public TO datastream;

GRANT USAGE ON SCHEMA public TO datastream;
ALTER DEFAULT PRIVILEGES IN SCHEMA public GRANT SELECT ON TABLES TO datastream;
デプロイ
$ terraform apply
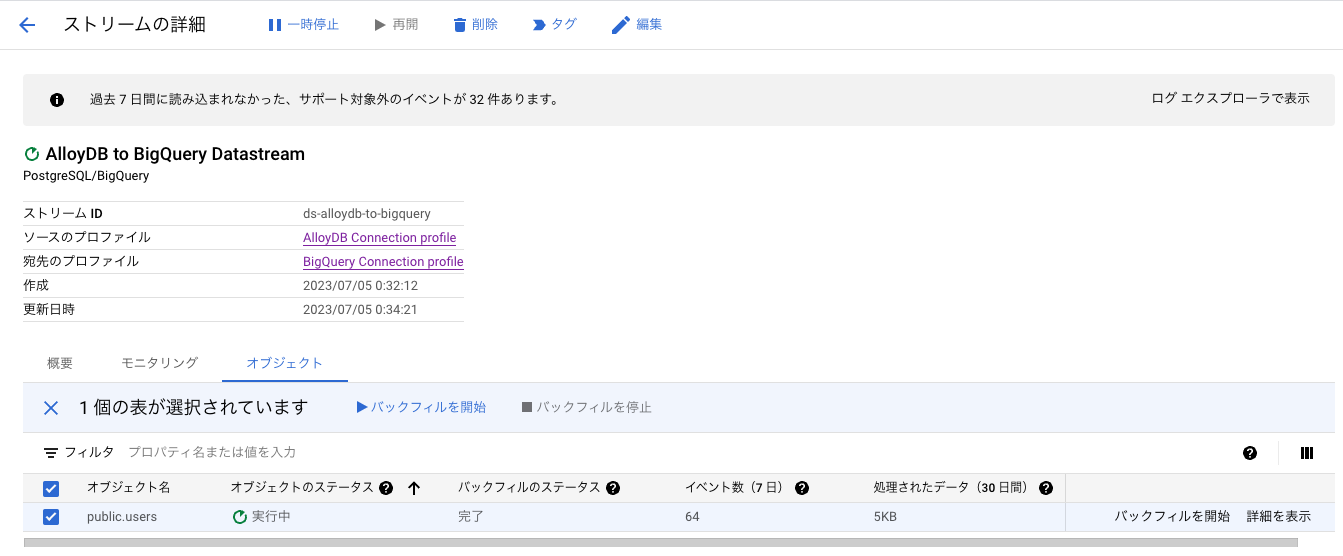
Datastreamを開くと、以下のようにストリームが作成されています。

BigQuery を確認
BigQuery にテーブルが作成されました。
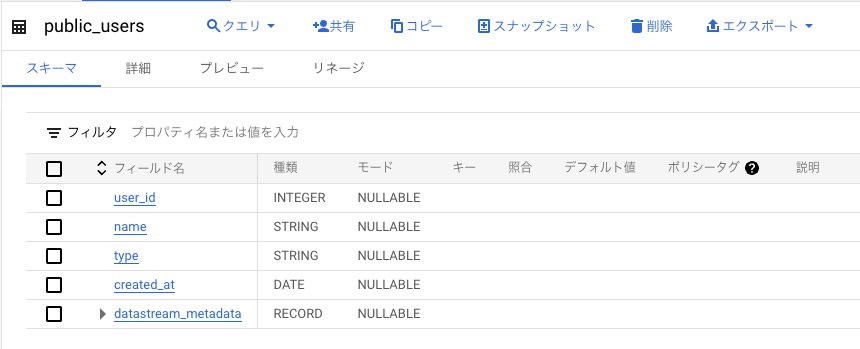
ENUM 型は string 型に変換されていますね。
データ型の対応づけに関しては、こちらのドキュメントを参照してください。
テーブル名は Datastream によって自動的に設定されるため、実運用で導入する場合は注意が必要です。
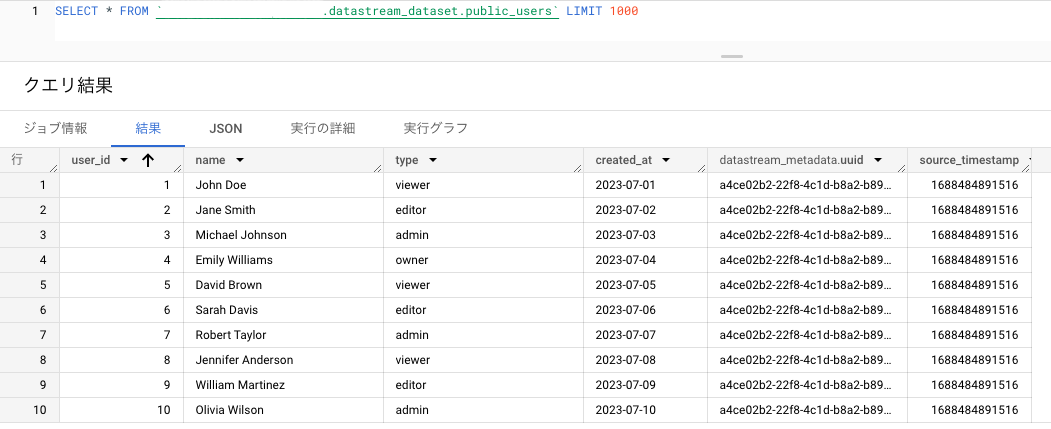
初回バックフィルを有効にしていると、既にDBに存在するレコードが Datastream の作成時に同期されます。
プレビューへの反映は遅れがちなので、クエリを使う方が確実にレコードを確認できます。
新しいデータを INSERT してみましょう。
INSERT INTO users (user_id, name, type, created_at)
VALUES
  (11, 'Michaela Thompson', 'viewer', '2023-07-11');
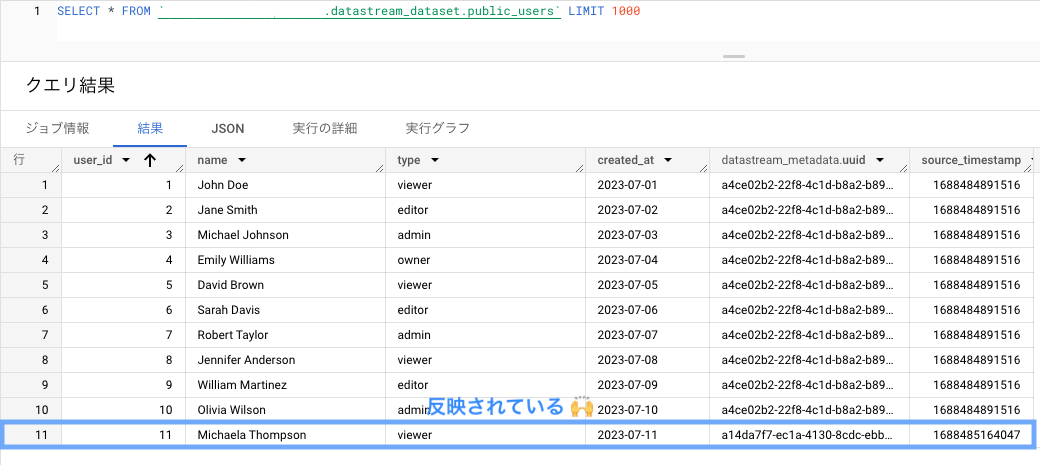
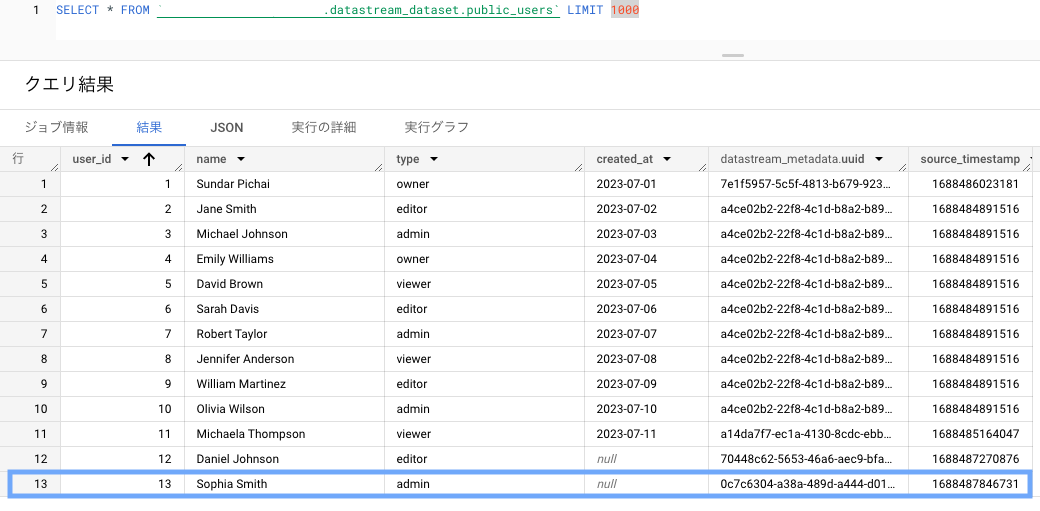
確かに新規レコードが登録されています。
datastream_metadata.uuid が異なることから、バックフィルとは別にデータが転送されたとわかります。
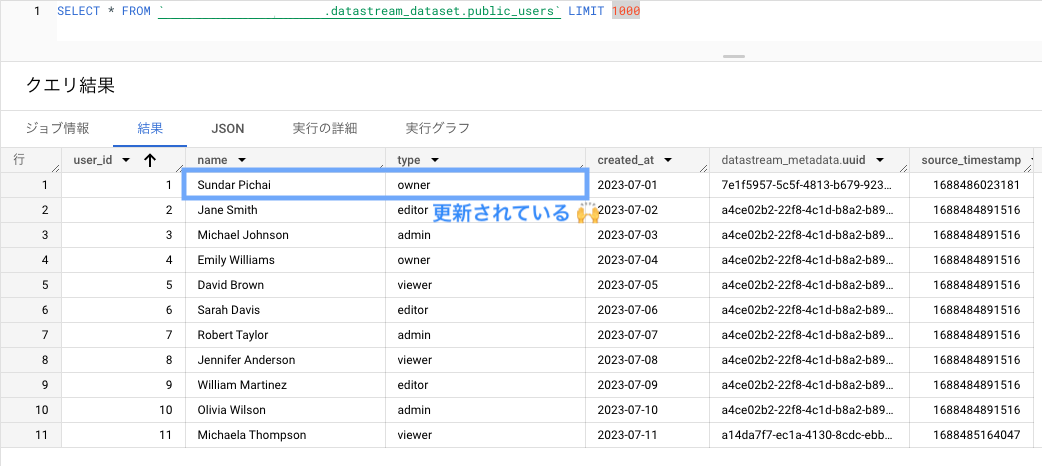
次に、name と type を更新してみます。
UPDATE users SET name='Sundar Pichai', type='owner' where user_id=1;
カラムを削除してみる
カラムの削除に関しては非対応ですが、実際に削除して確認してみます。
試しに created_at を削除してみます。
ALTER TABLE users DROP COLUMN created_at;
続けて、INSERT してみます。
INSERT INTO users (user_id, name, type)
VALUES
  (12, 'Daniel Johnson', 'editor');
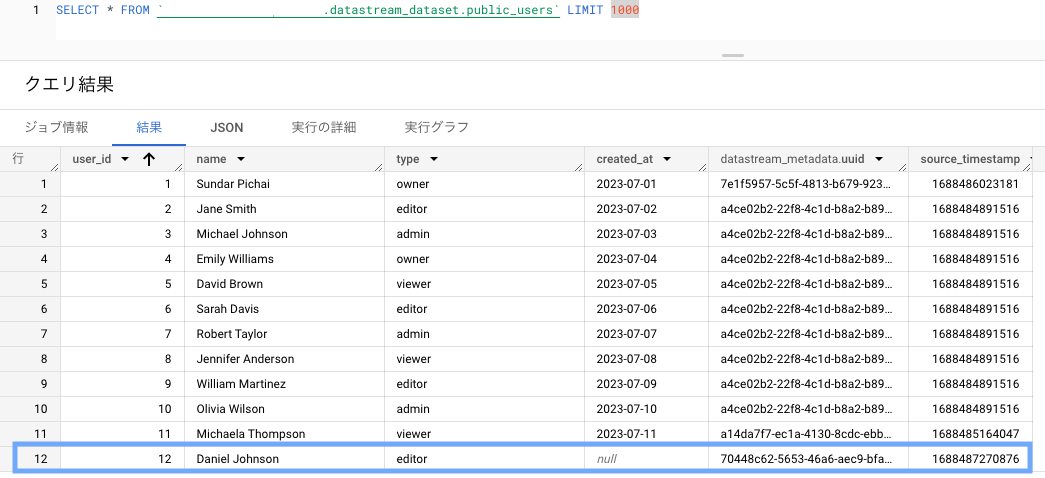
BigQuery 側には、created_at のカラムが残りました。
また、挿入したレコードの created_at は null になっています。
データ型を変更してみる
enum 型 を string に変更してみましょう。
ALTER TABLE users ALTER COLUMN type TYPE text;
同様に INSERT します。
INSERT INTO users (user_id, name, type)
VALUES
  (13, 'Sophia Smith', 'admin');
BigQuery 側にはそのままレコードが反映されています。
では、PRIMARY KEY 制約を削除してみます。
削除したところ、それ以降のストリーミングが処理されませんでした。
ALTER TABLE users DROP CONSTRAINT users_pkey;

INSERT INTO users (user_id, name, type)
VALUES
  (14, 'Matthew Davis', 'viewer');
このように、対応しないスキーマ変更などが生じた場合、サポート対象外のイベントが n 件あります と表示されます。
BigQuery 側でテーブルを削除し、バックフィルを実行することで再同期が可能になります。
メトリクス・ログを確認してみる
メトリクス
データストリームの詳細画面から、以下のメトリクスを確認することができます。
- スループット
- サポートされていないイベント
- カラム削除など、Datastream が対応していないイベントの件数
- データの鮮度
- 送信元と送信先の間の時間差
- システムレイテンシ
- DataStream がイベントの処理にかかる時間
- 合計レイテンシ
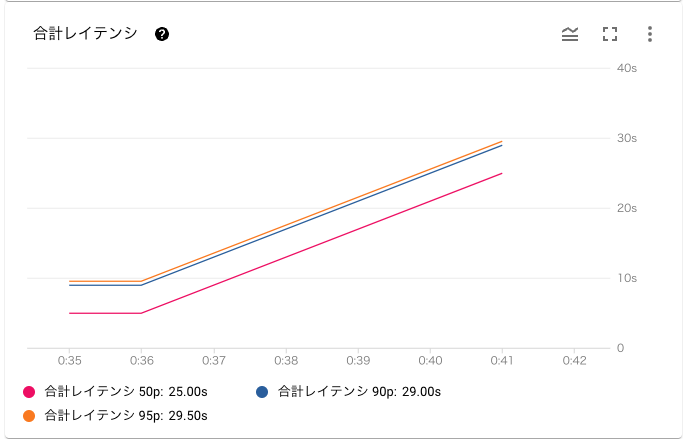
- AlloyDB に変更があってから、BigQuery に変更が反映されるまでの時間
今回はレコード数が少ないこともあり、合計レイテンシは 95 パーセンタイルが 29.500s でした。
おおよそ 30s ほどで同期できており、リアルタイム分析などにも有効に使えそうです。
ログ
ログエクスプローラ(CloudLogging) で、ログを確認することができます。
ここでは、先ほどのカラム削除時のログを確認してみましょう。
このように、対応できないイベントが生じた場合は警告ログが吐かれます。
イベントが無視されていることがわかります。
ログルーターを用いれば、Datadog などの監視 SaaS にも転送できますね。
詰まったところ
BigQuery 側でパーティション分割テーブルを使いたい
パーティションテーブルを使用したい場合、こちらの記事のように一度 BigQuery テーブルを削除して差し替える方法があるようです。
AlloyDB の datastream profile を作成時に接続で失敗する
いくつか原因が考えられます。
- Datastream から GCE に接続できていない
- ファイアウォールの設定を確認
- Datastream プライベート接続設定が作成されているか確認
- GCE(TCP proxy) から AlloyDB に接続できていない
- Docker コンテナが起動しているか
docker psで確認- Docker イメージを pull できる必要があります
- サービスアカウントの設定
- GCE がインターネットに接続できるよう設定
- 本番であれば Cloud NAT が良いです
- Docker イメージを pull できる必要があります
- AlloyDB に TCP 通信できるか
ncで確認- VPC 内リソースからの tcp 通信を許可しているか確認
- Docker コンテナが起動しているか
Network Intelligence Center を用いて疎通確認するのも便利です。
AlloyDB の設定変更 を Terraform でどう書くか
google_alloydb_instance の database_flags で、alloydb.logical_decoding を on にする必要がありますが、この引数の型構造は、map of string のようです。
// list of map(string) にしてみると失敗する
│ Error: Incorrect attribute value type
│
│   on alloydb.tf line 33, in resource "google_alloydb_instance" "main":
│   33:   database_flags = [{
│   34:     name  = "alloydb.logical_decoding"
│   35:     value = "on"
│   36:   }]
│
│ Inappropriate value for attribute "database_flags": map of string required.
Terraform document を見ても、具体的なデータ構造が書いてありません。
このような場合は AlloyDB API reference も読むと良いです。
PostgreSQL クライアントの作り方
AlloyDB の PostgreSQL バージョンは 14 です。
ubuntu-os-cloud/ubuntu-2304-amd64 マシンイメージを使うと、apt-get install postgresql-client でクライアントのインストールができます。
まとめ
- Datastream を使えば、フルマネージドで簡単に CDC を実装できる
- GCP は Terraform のコード例が少ないので、困ったら API reference も見ると良い
- 通信できない場合は各要素を分割して原因分析する
余談
日本語英語を問わずなかなか情報がなく、また Terraform を書くのが初めてだったためなかなか苦戦しました。
誰かの役に立てば幸いです。

