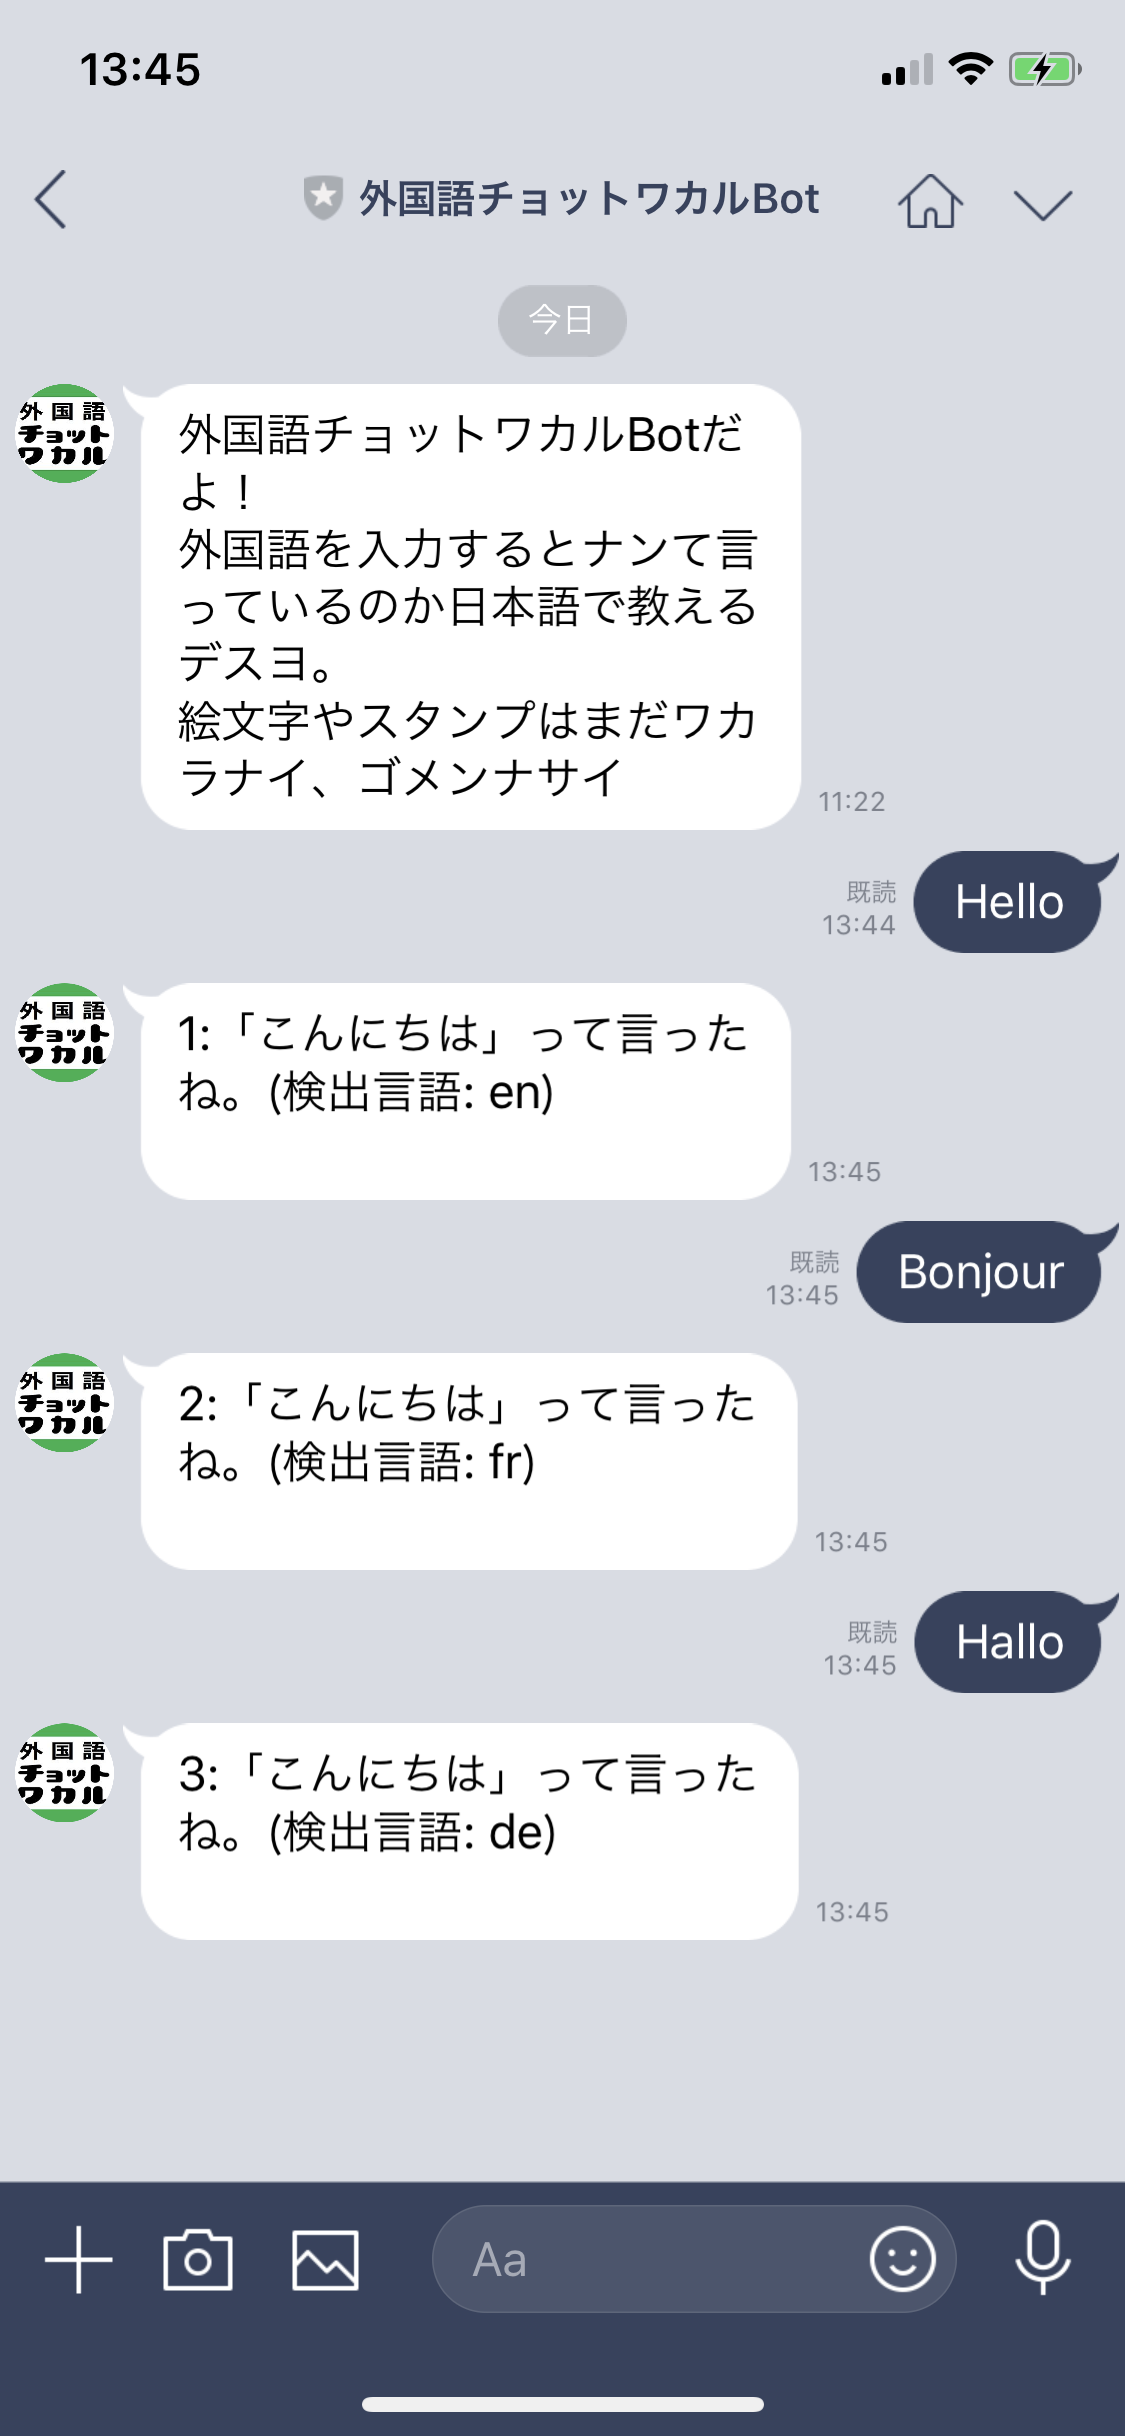
Azure Bot Service で作成した (または Bot Registration されている Bot Framework ベースの) チャットボットアプリ には、Skype や Microsoft Teams、Slack などへノンコーディングで接続できるチャンネルが用意されています。この度 Azure Bot Service に追加された LINE チャンネルを活用して、入力した言葉を翻訳してくれるチャットボットを作成して LINE から使うまでのプロセスを紹介します。
-
Azure Bot Service について (※別のページに飛びます)
-
Azure Bot Service で LINE 対応チャットボット作成シリーズ
- Azure Bot Service の作成から LINE 接続まで
- Azure Bot Service × Translator Text API で翻訳チャットボット作成 (※このページ)
- Azure Bot Service × QnAMaker で FAQ (一問一答) チャットボット作成
-
手順
-
- Azure Bot Service から LINE 接続編 (※別のページに飛びます)
-
- Cognitive Services Translator API で翻訳編
-
2. Cognitive Services Translator API で翻訳編
準備
Microsoft アカウント & Azure サブスクリプション
- Microsoft アカウント
- Azure サブスクリプション申し込みに必要です。
- Microsoft アカウント登録手続き
- Azure サブスクリプション
- 無料試用版で充分です。上記↑で取得した Microsoft アカウントで申し込みを行います。(無料のプランがあるので、従量課金プランでも大丈夫ですが念のため。)
- Azure 無料アカウントを今すぐ作成
Azure Bot Service から LINE 接続編 で作成した Azure Web App Bot
チャットボットアプリのベースとして 1. で作成した Azure Web App Bot を利用します。
2.1. Cognitive Services Translator Text API を利用する
Cognitive Services Translator Text API は、翻訳 機能を提供する API で 60 カ国以上の言語に対応しています。
2.1.1. Translator Text API のサブスクリプション作成
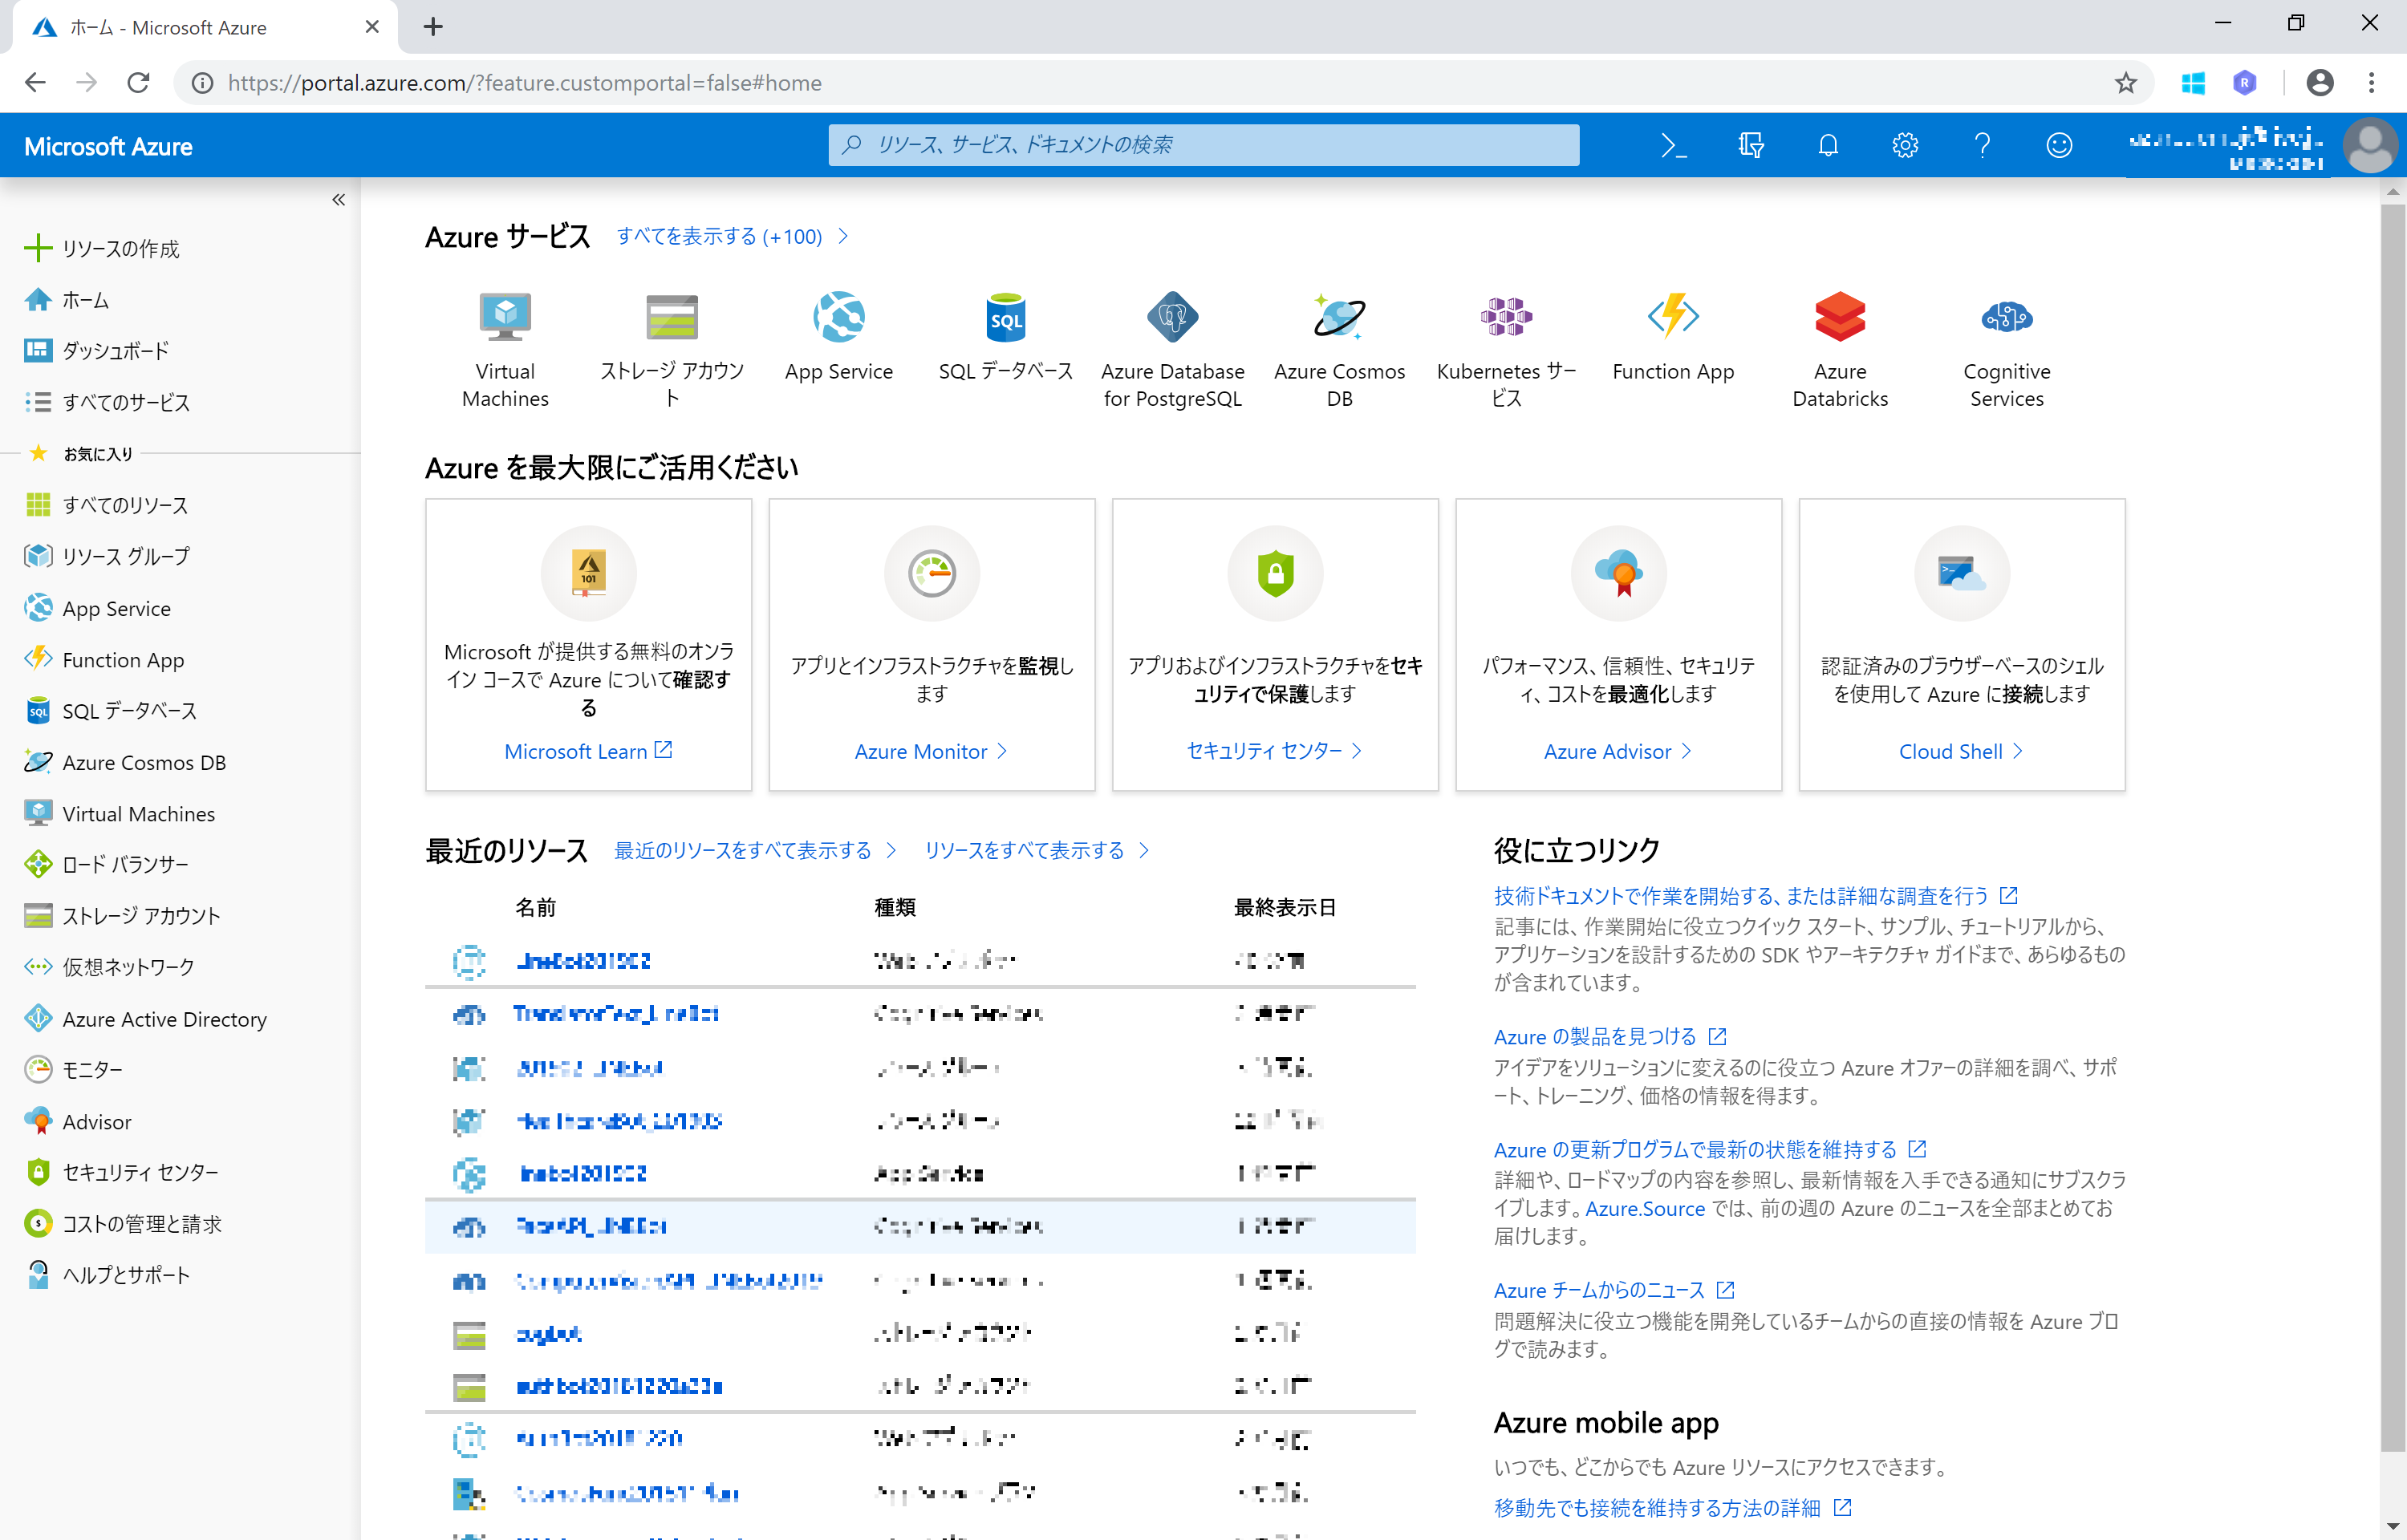
ブラウザーで Azure Portal (https://portal.azure.com) を開き、Azure サブスクリプションが紐づいている Microsoft アカウントでサインインします。
Azure Portal から左端ナビゲーションバーから [+リソースの作成] をクリックします。
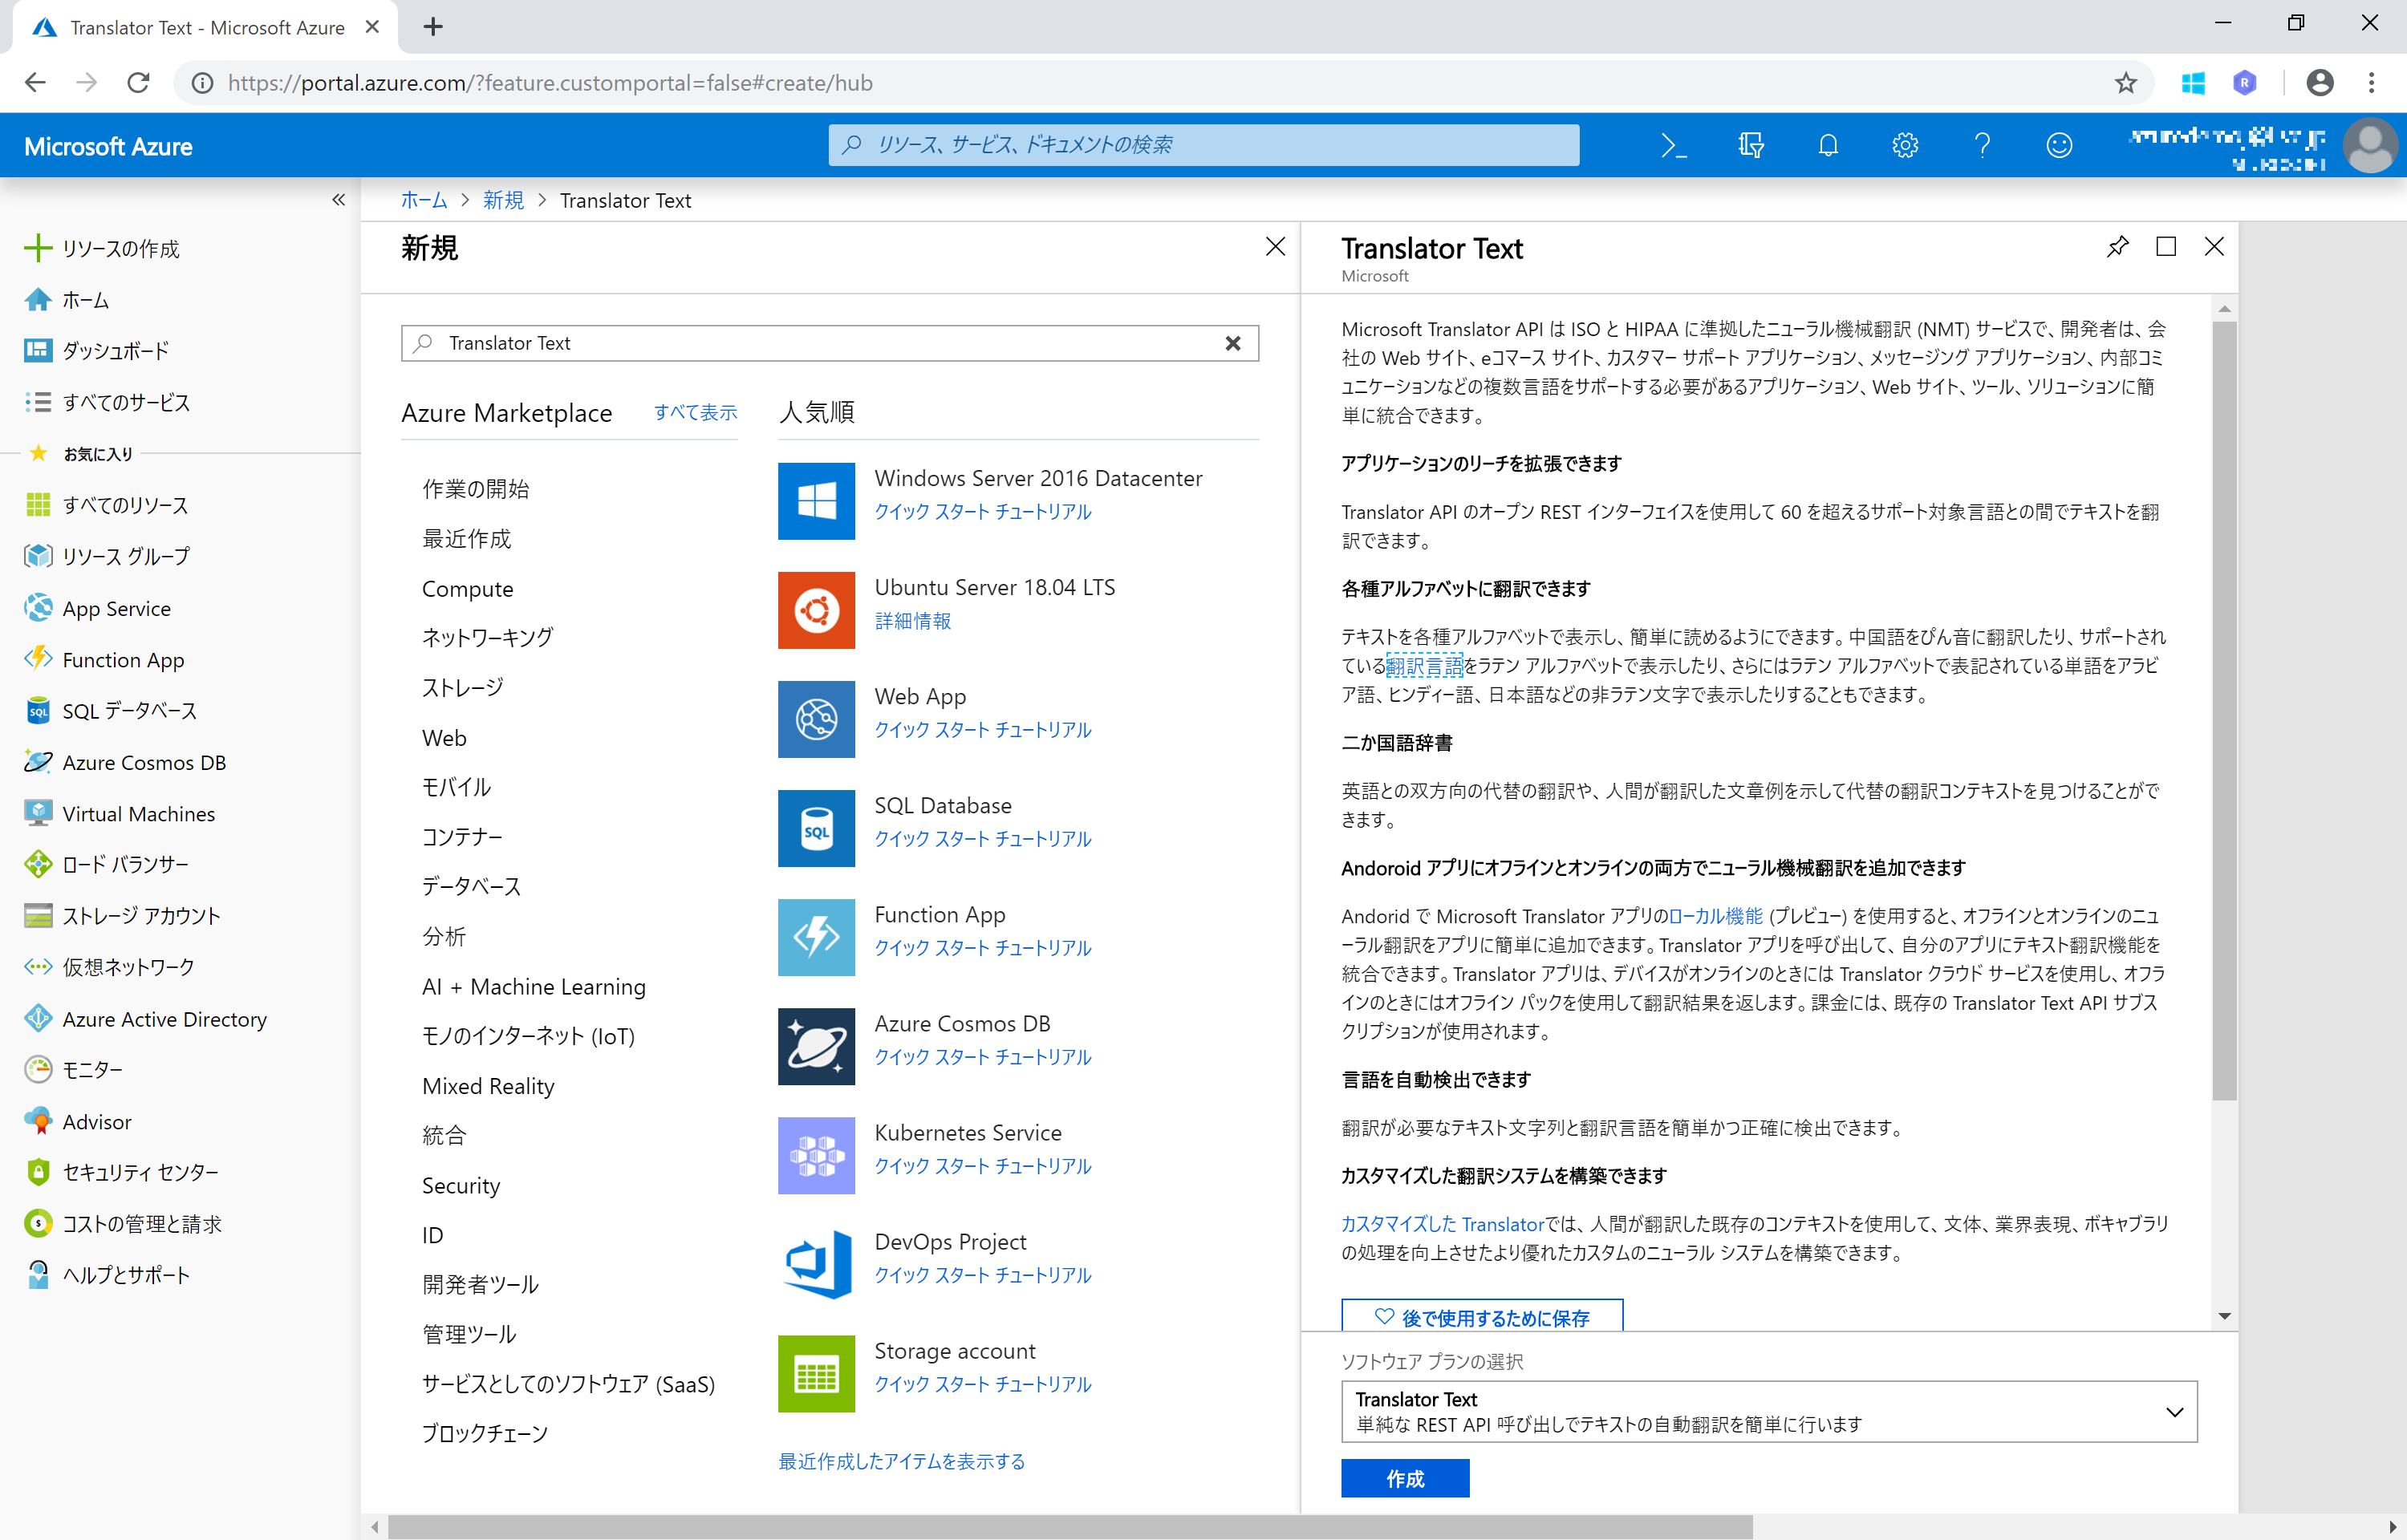
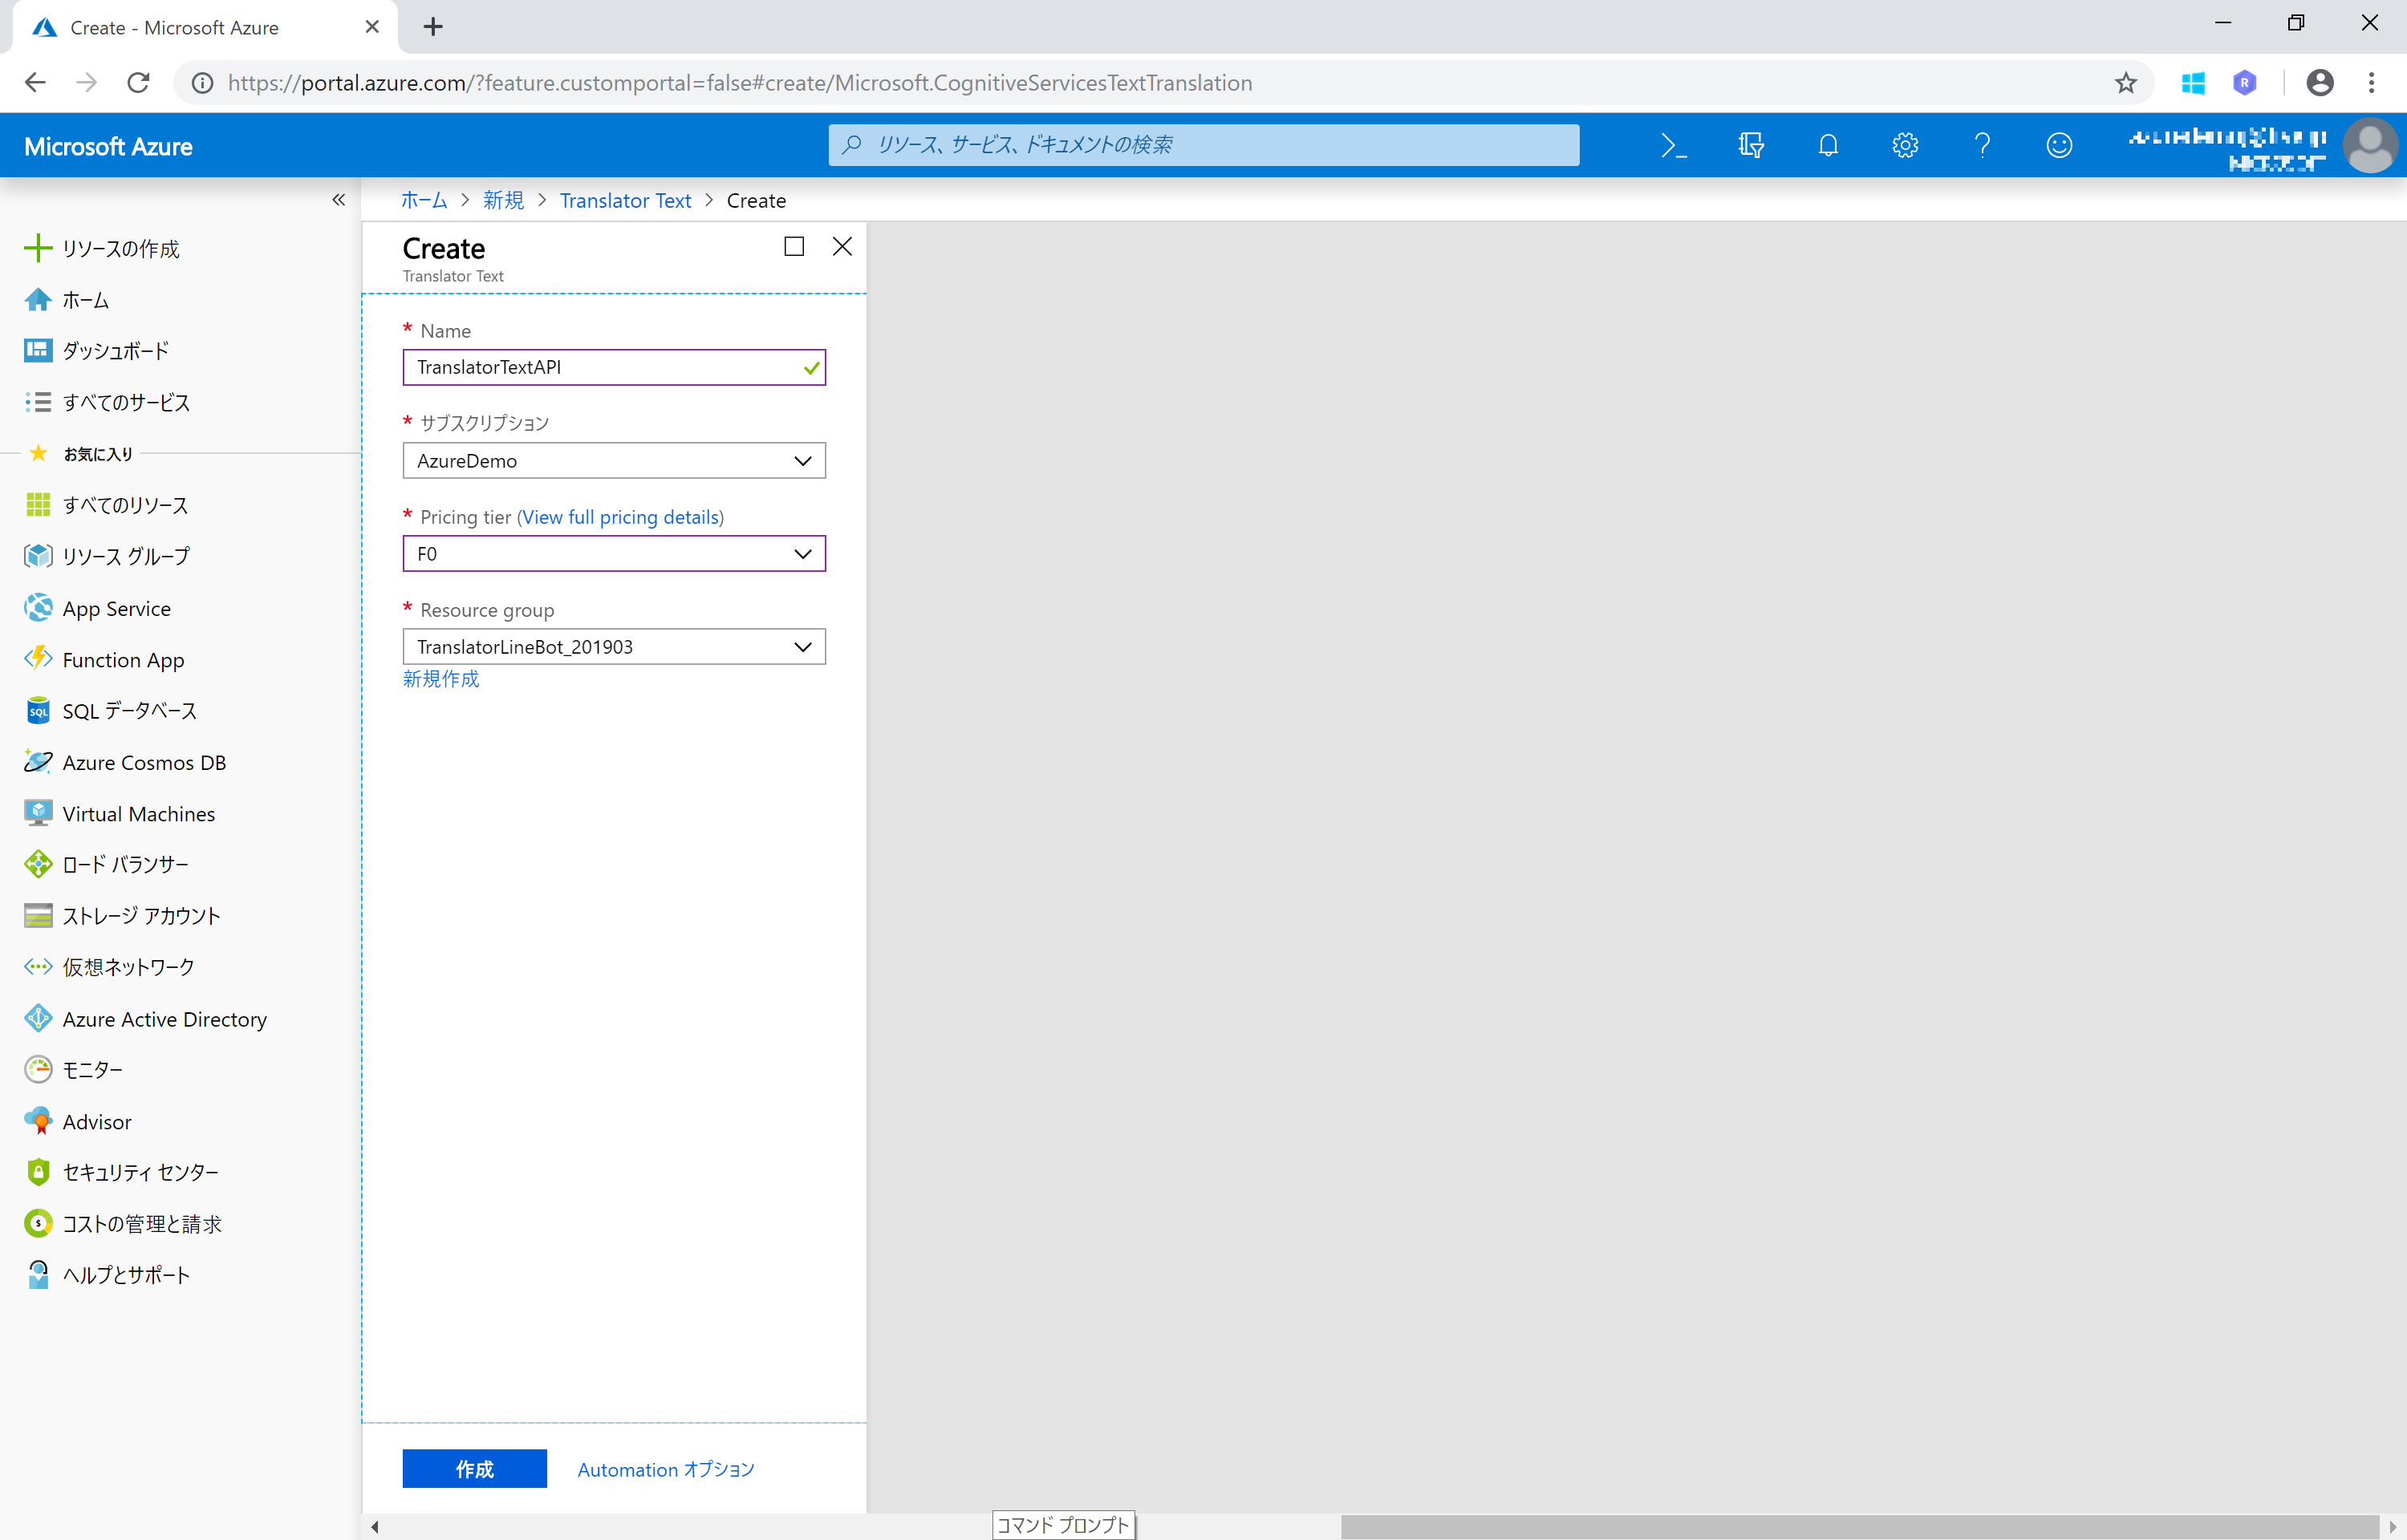
新規 ペインの検索欄に **Translator Text" と入力し、表示される Translator Text をクリックします。Translator Text ペインで [作成] をクリックして作成に進みます。
Translator Text ペインで必要事項を設定します。
- Name : 識別できるものを (ここでは Translator Text API としています)
- サブスクリプション : (自動入力)
- Pricing Tier : F0 の無償版でOKです
- Resource Group : (1)Azure Bot Service から LINE 接続 編 と同じにしておくと分かりやすいかと思います
Translator Text ペイン の一番下にある [作成] をクリックするとサブスクリプションが作成されます。
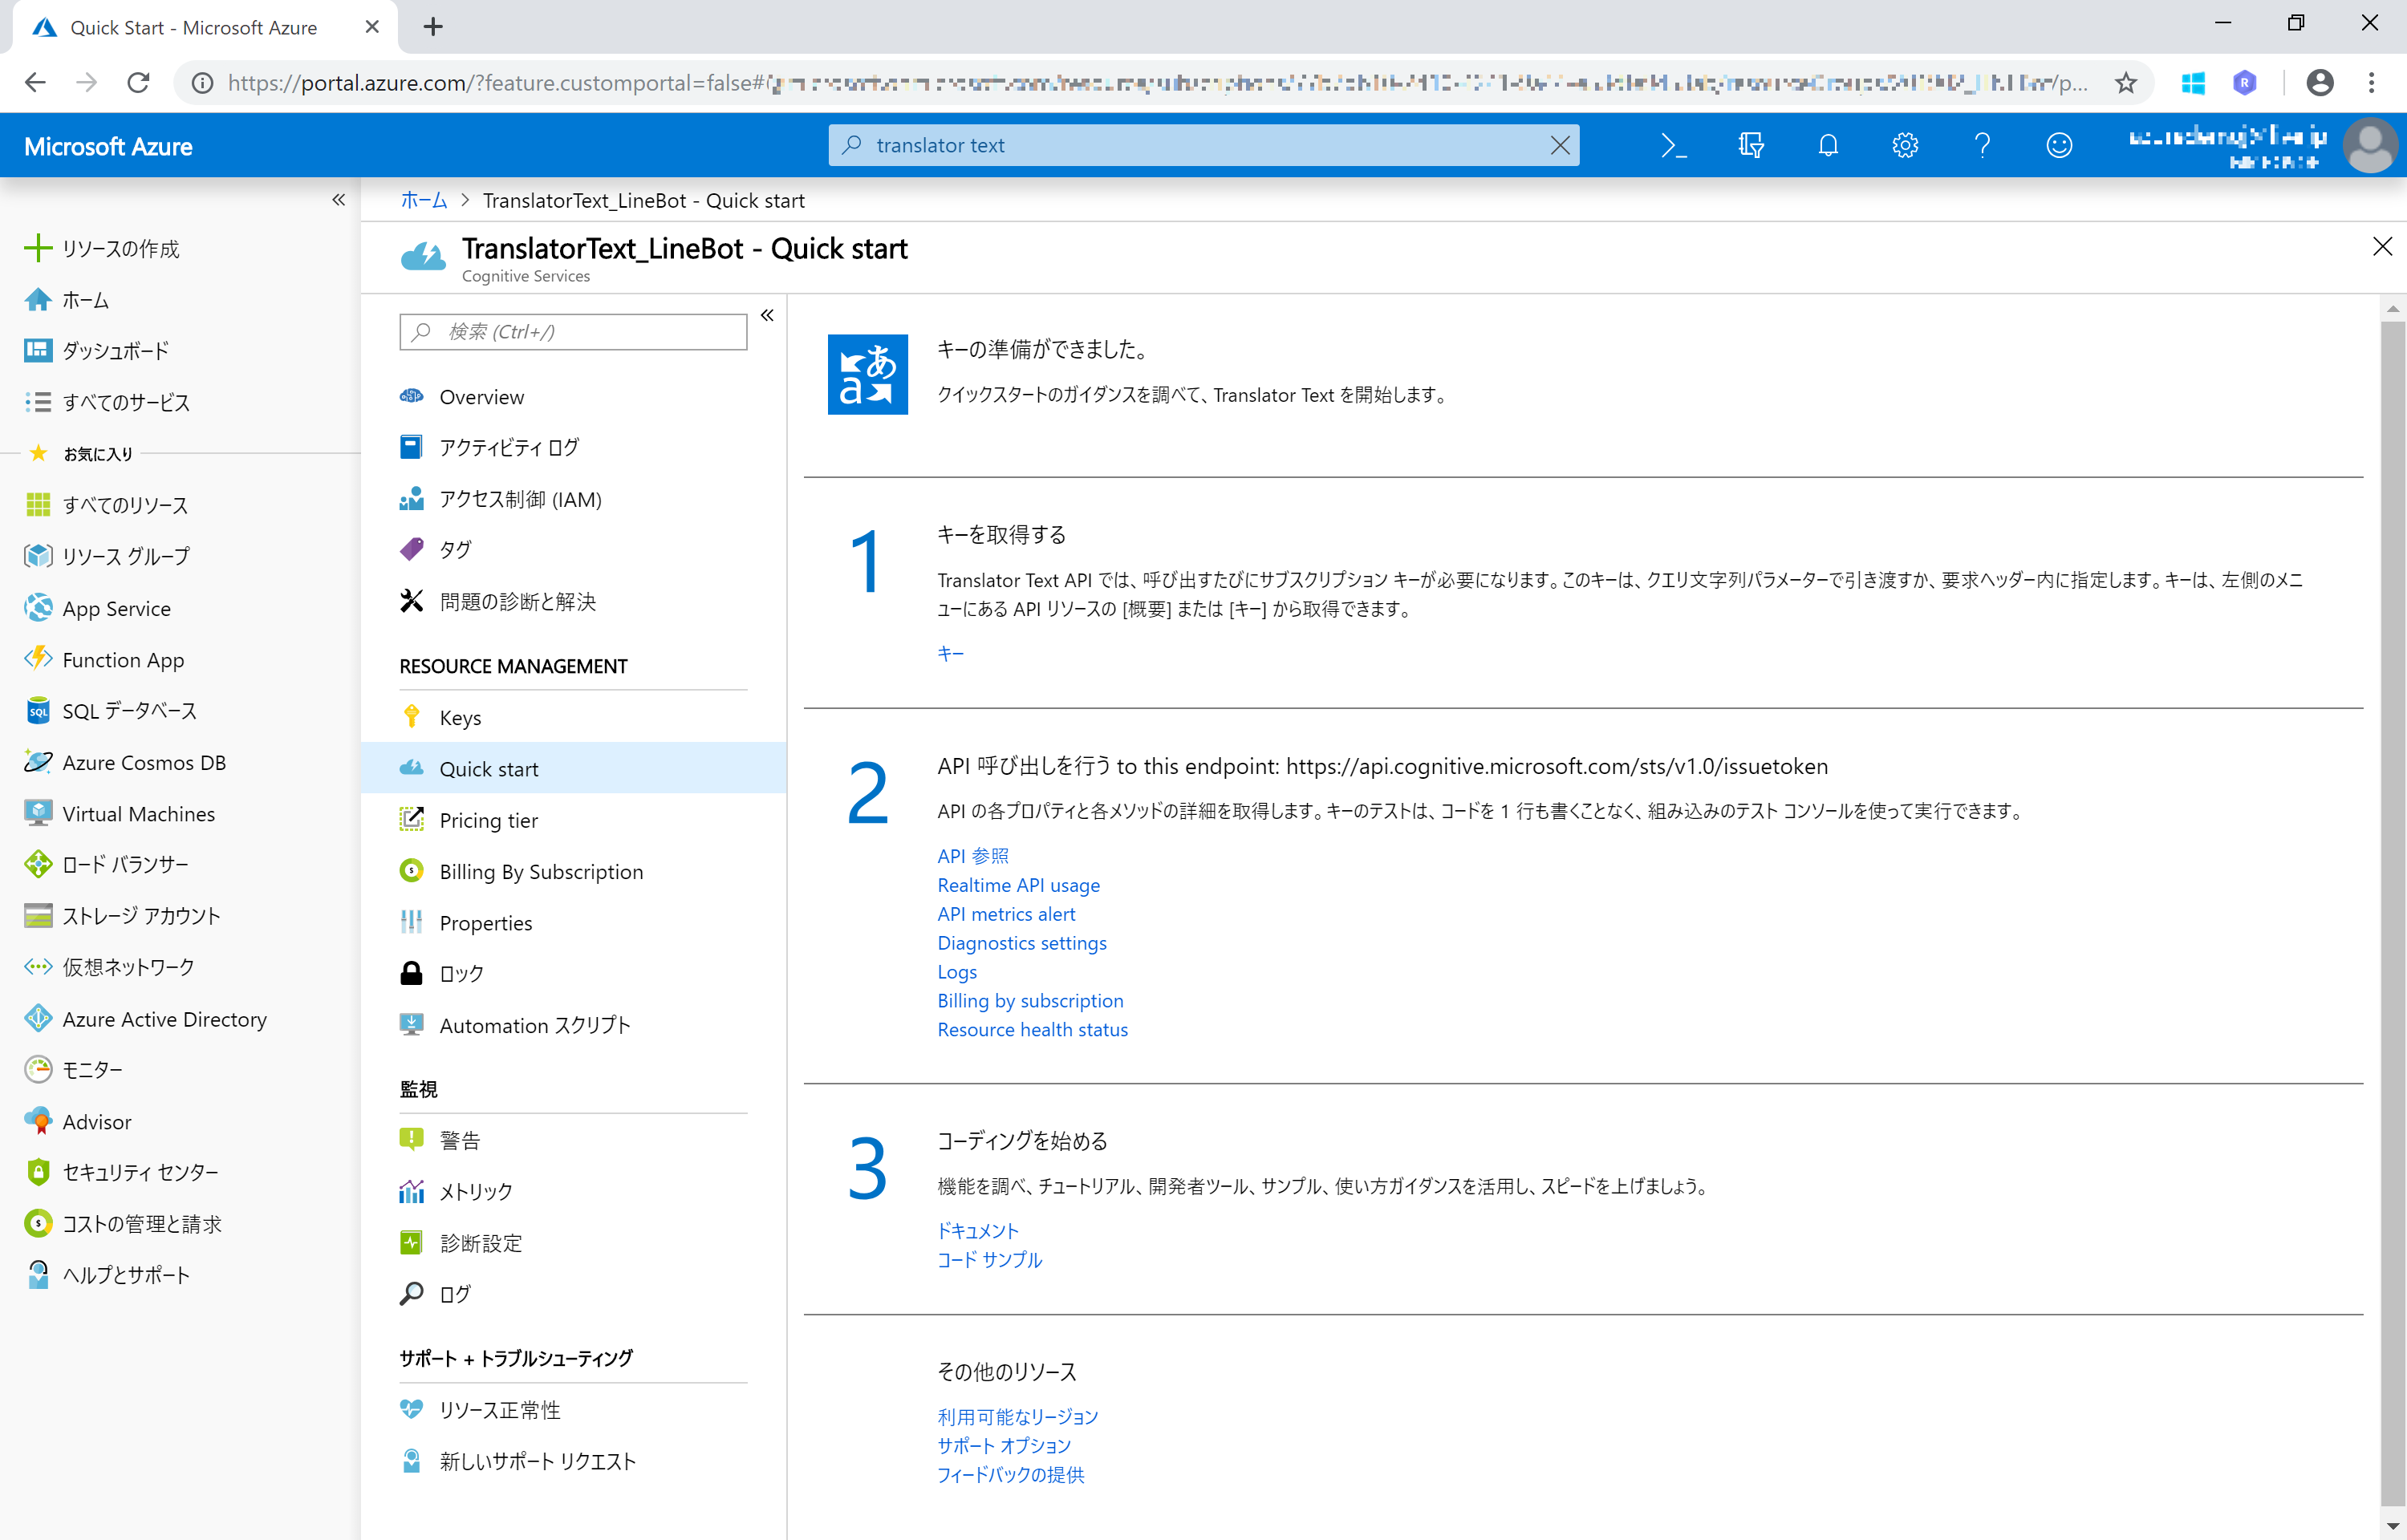
サブスクリプションの作成(デプロイ)が成功した旨のメッセージが表示されたら、[リソースに移動] をクリックして、作成した Translator Text API を表示します。
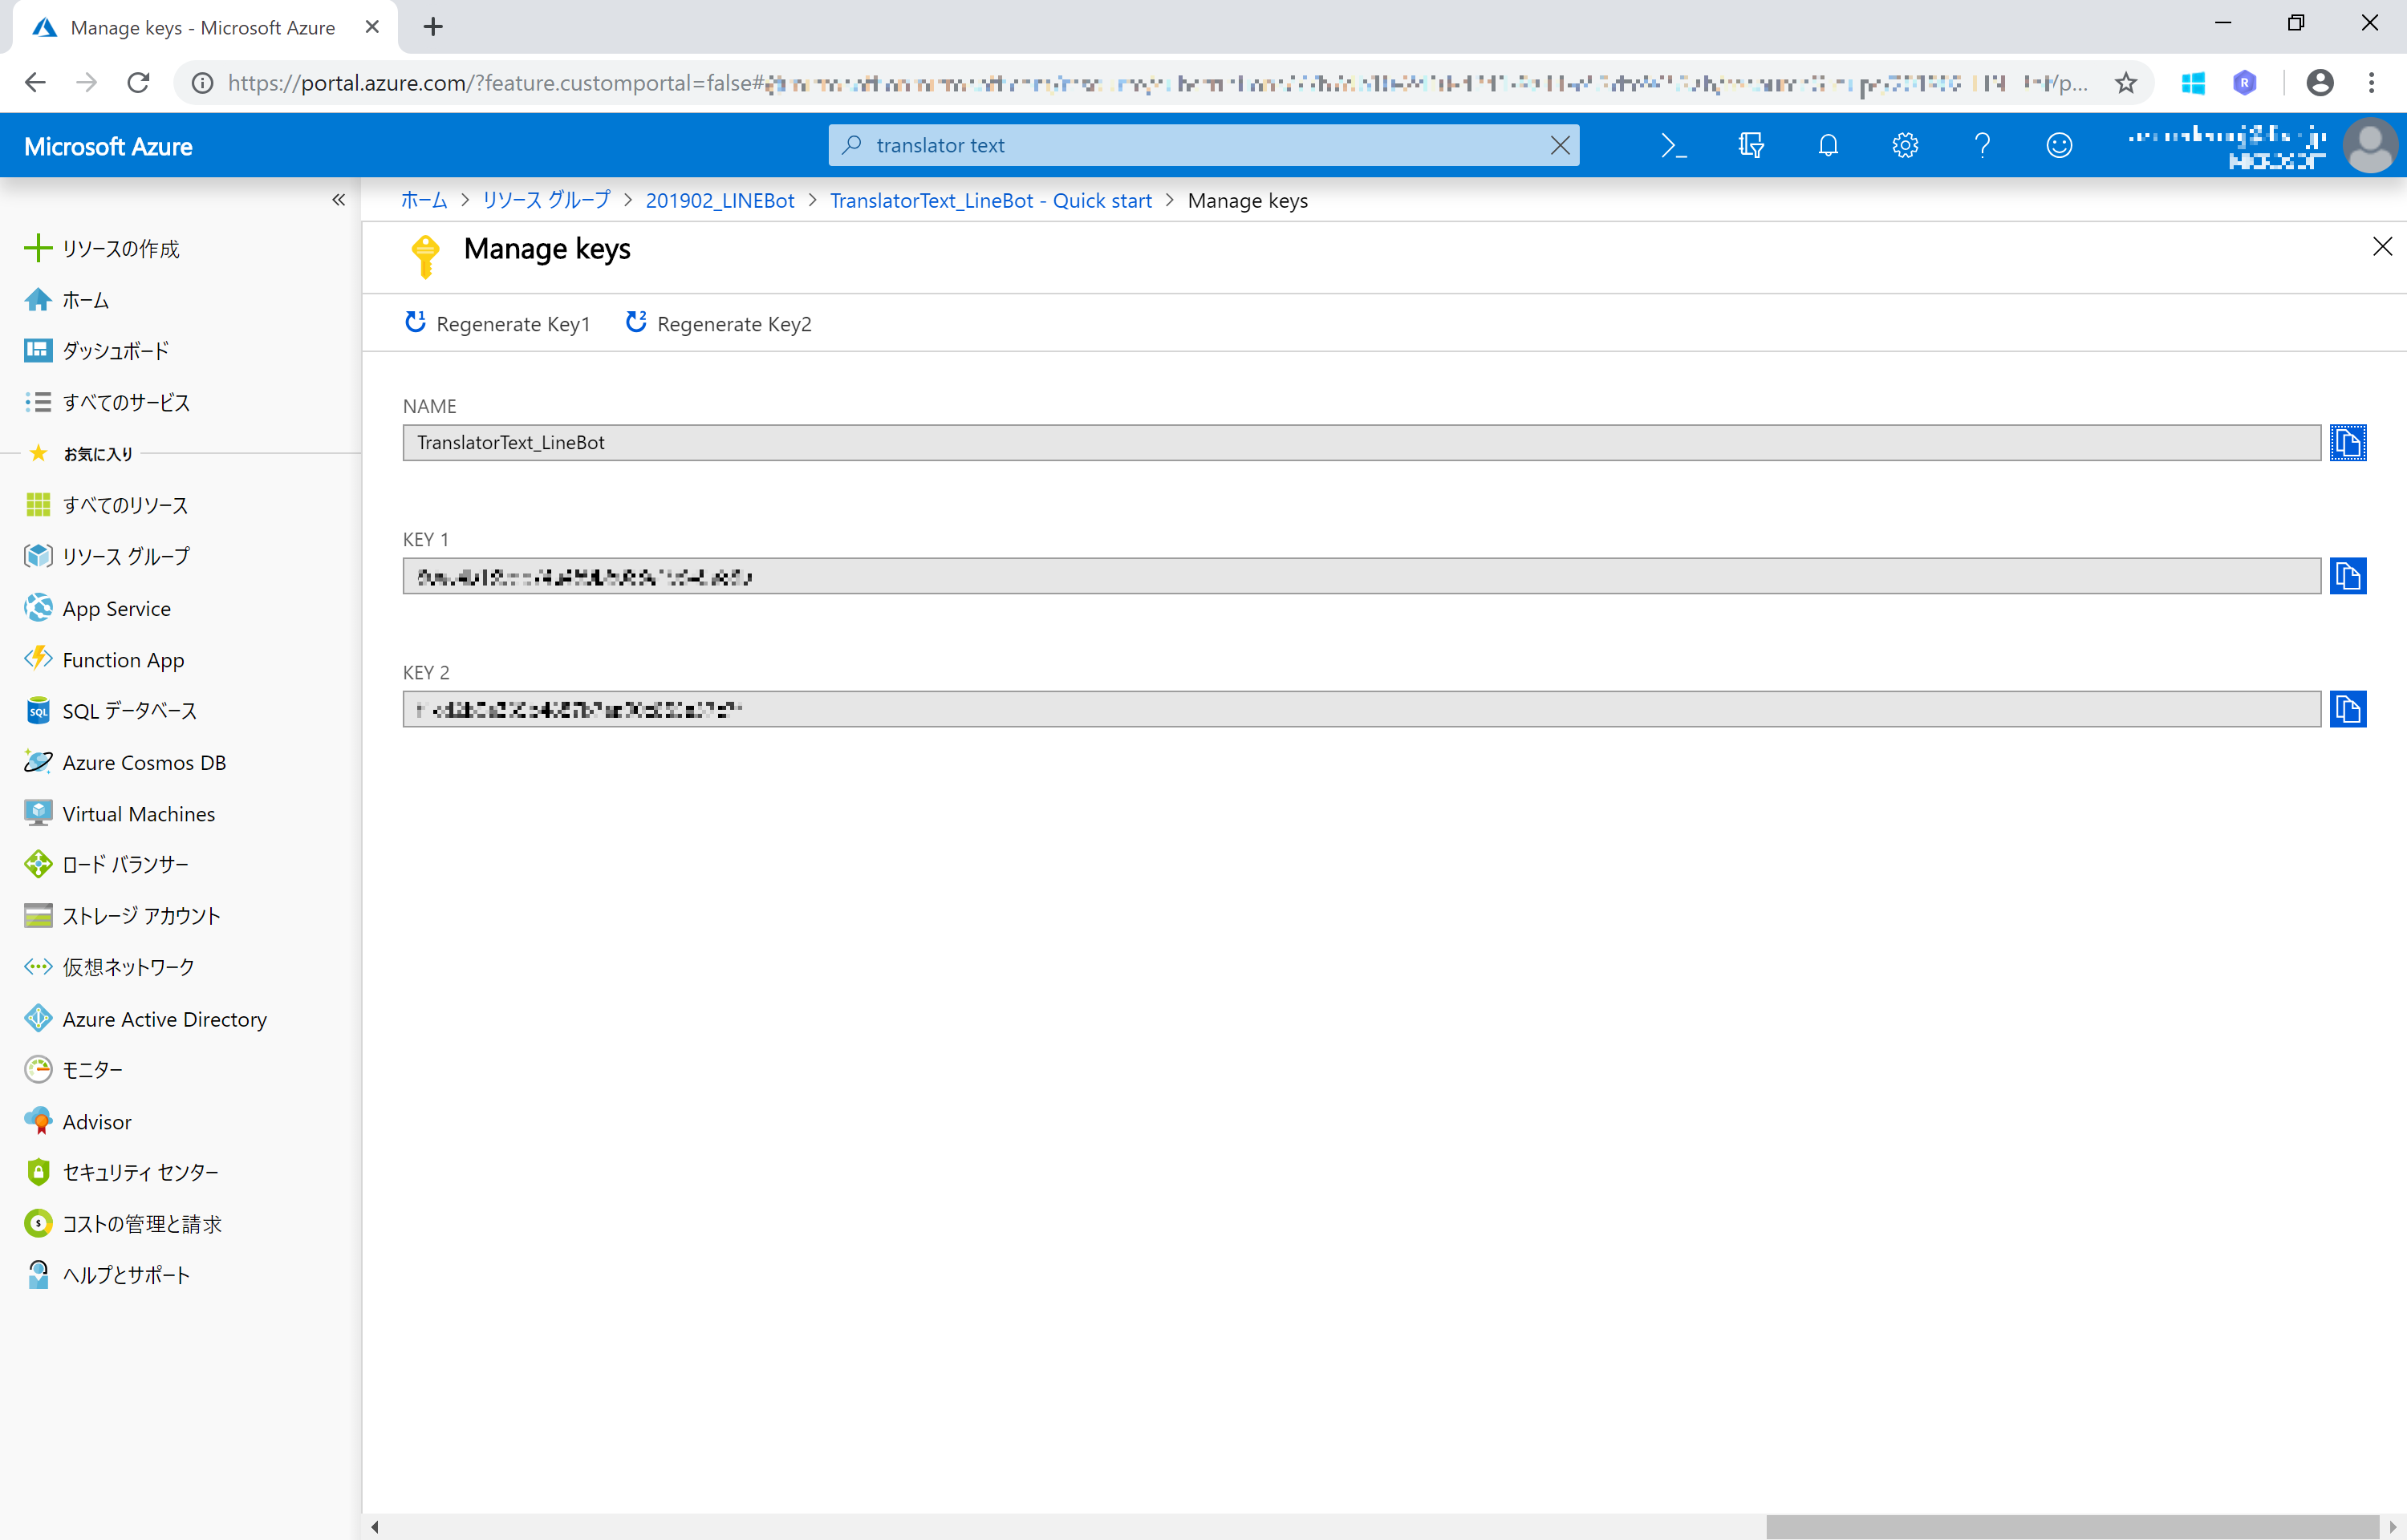
Cognitive Services のペインメニューで RESOURCE MANAGEMENT にある Keys をクリックします。
表示される Key1 の文字列をコピーしてローカルに保存しておきます。
2.1.2. Translator Text API の動作確認
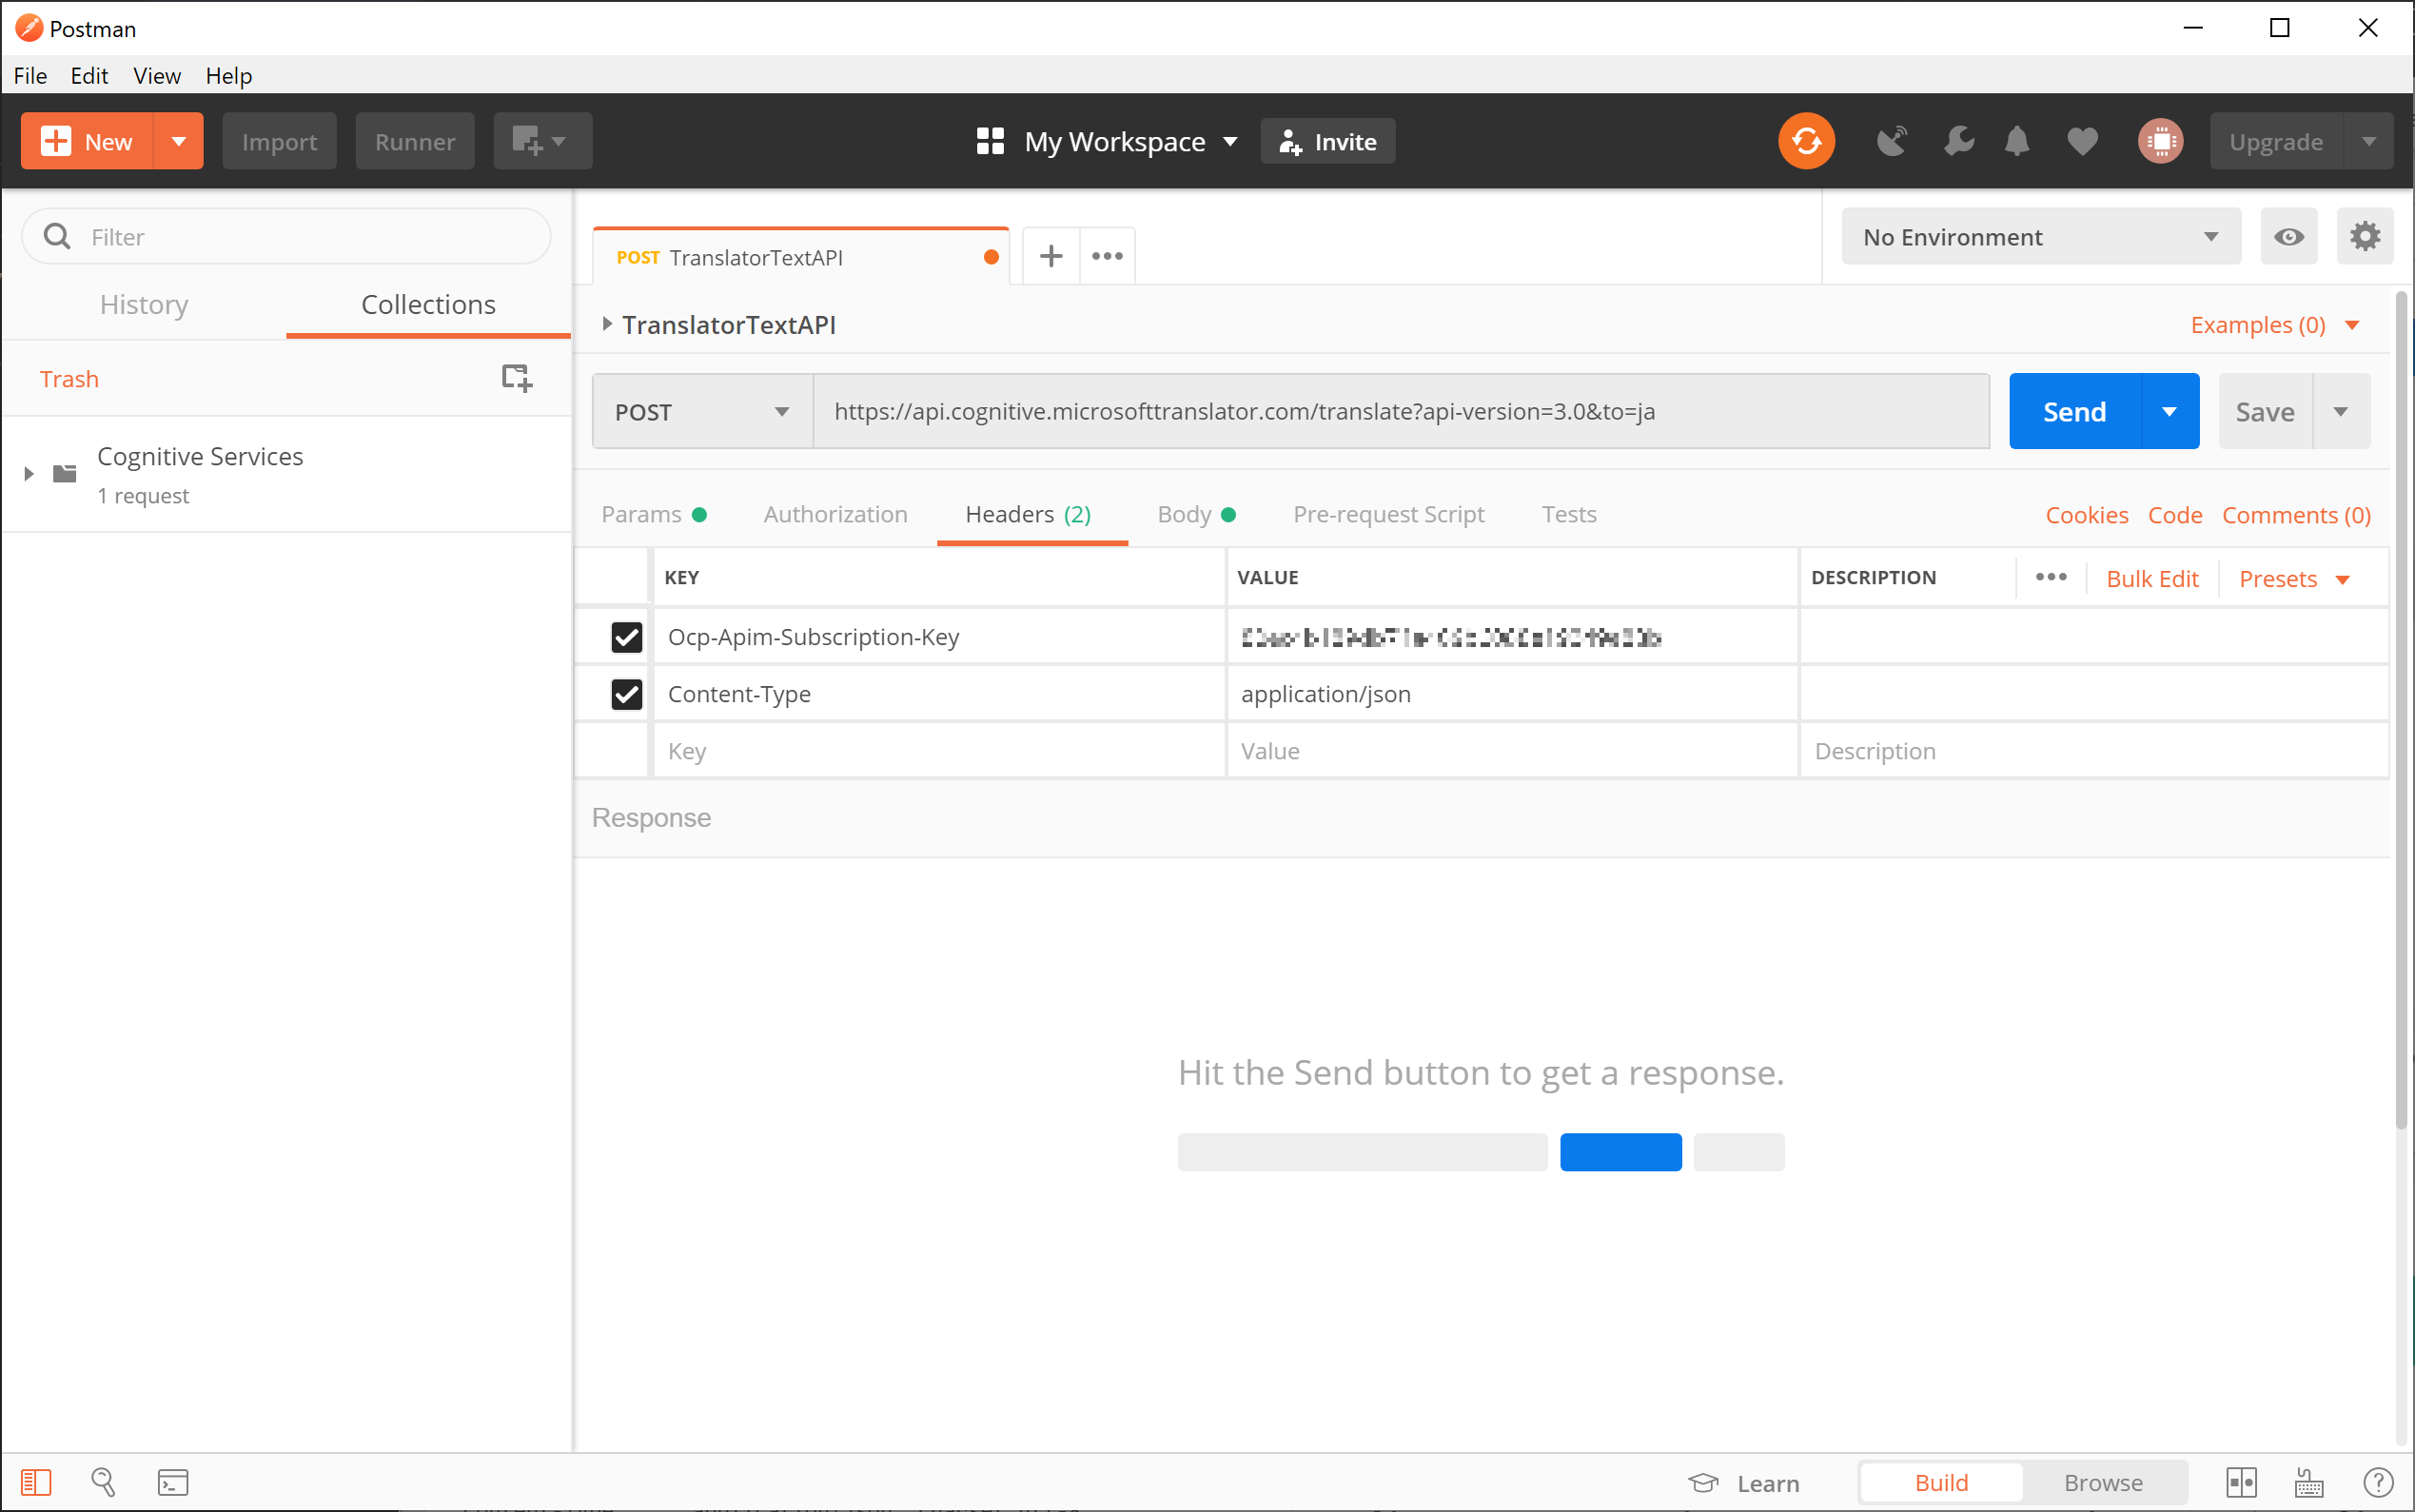
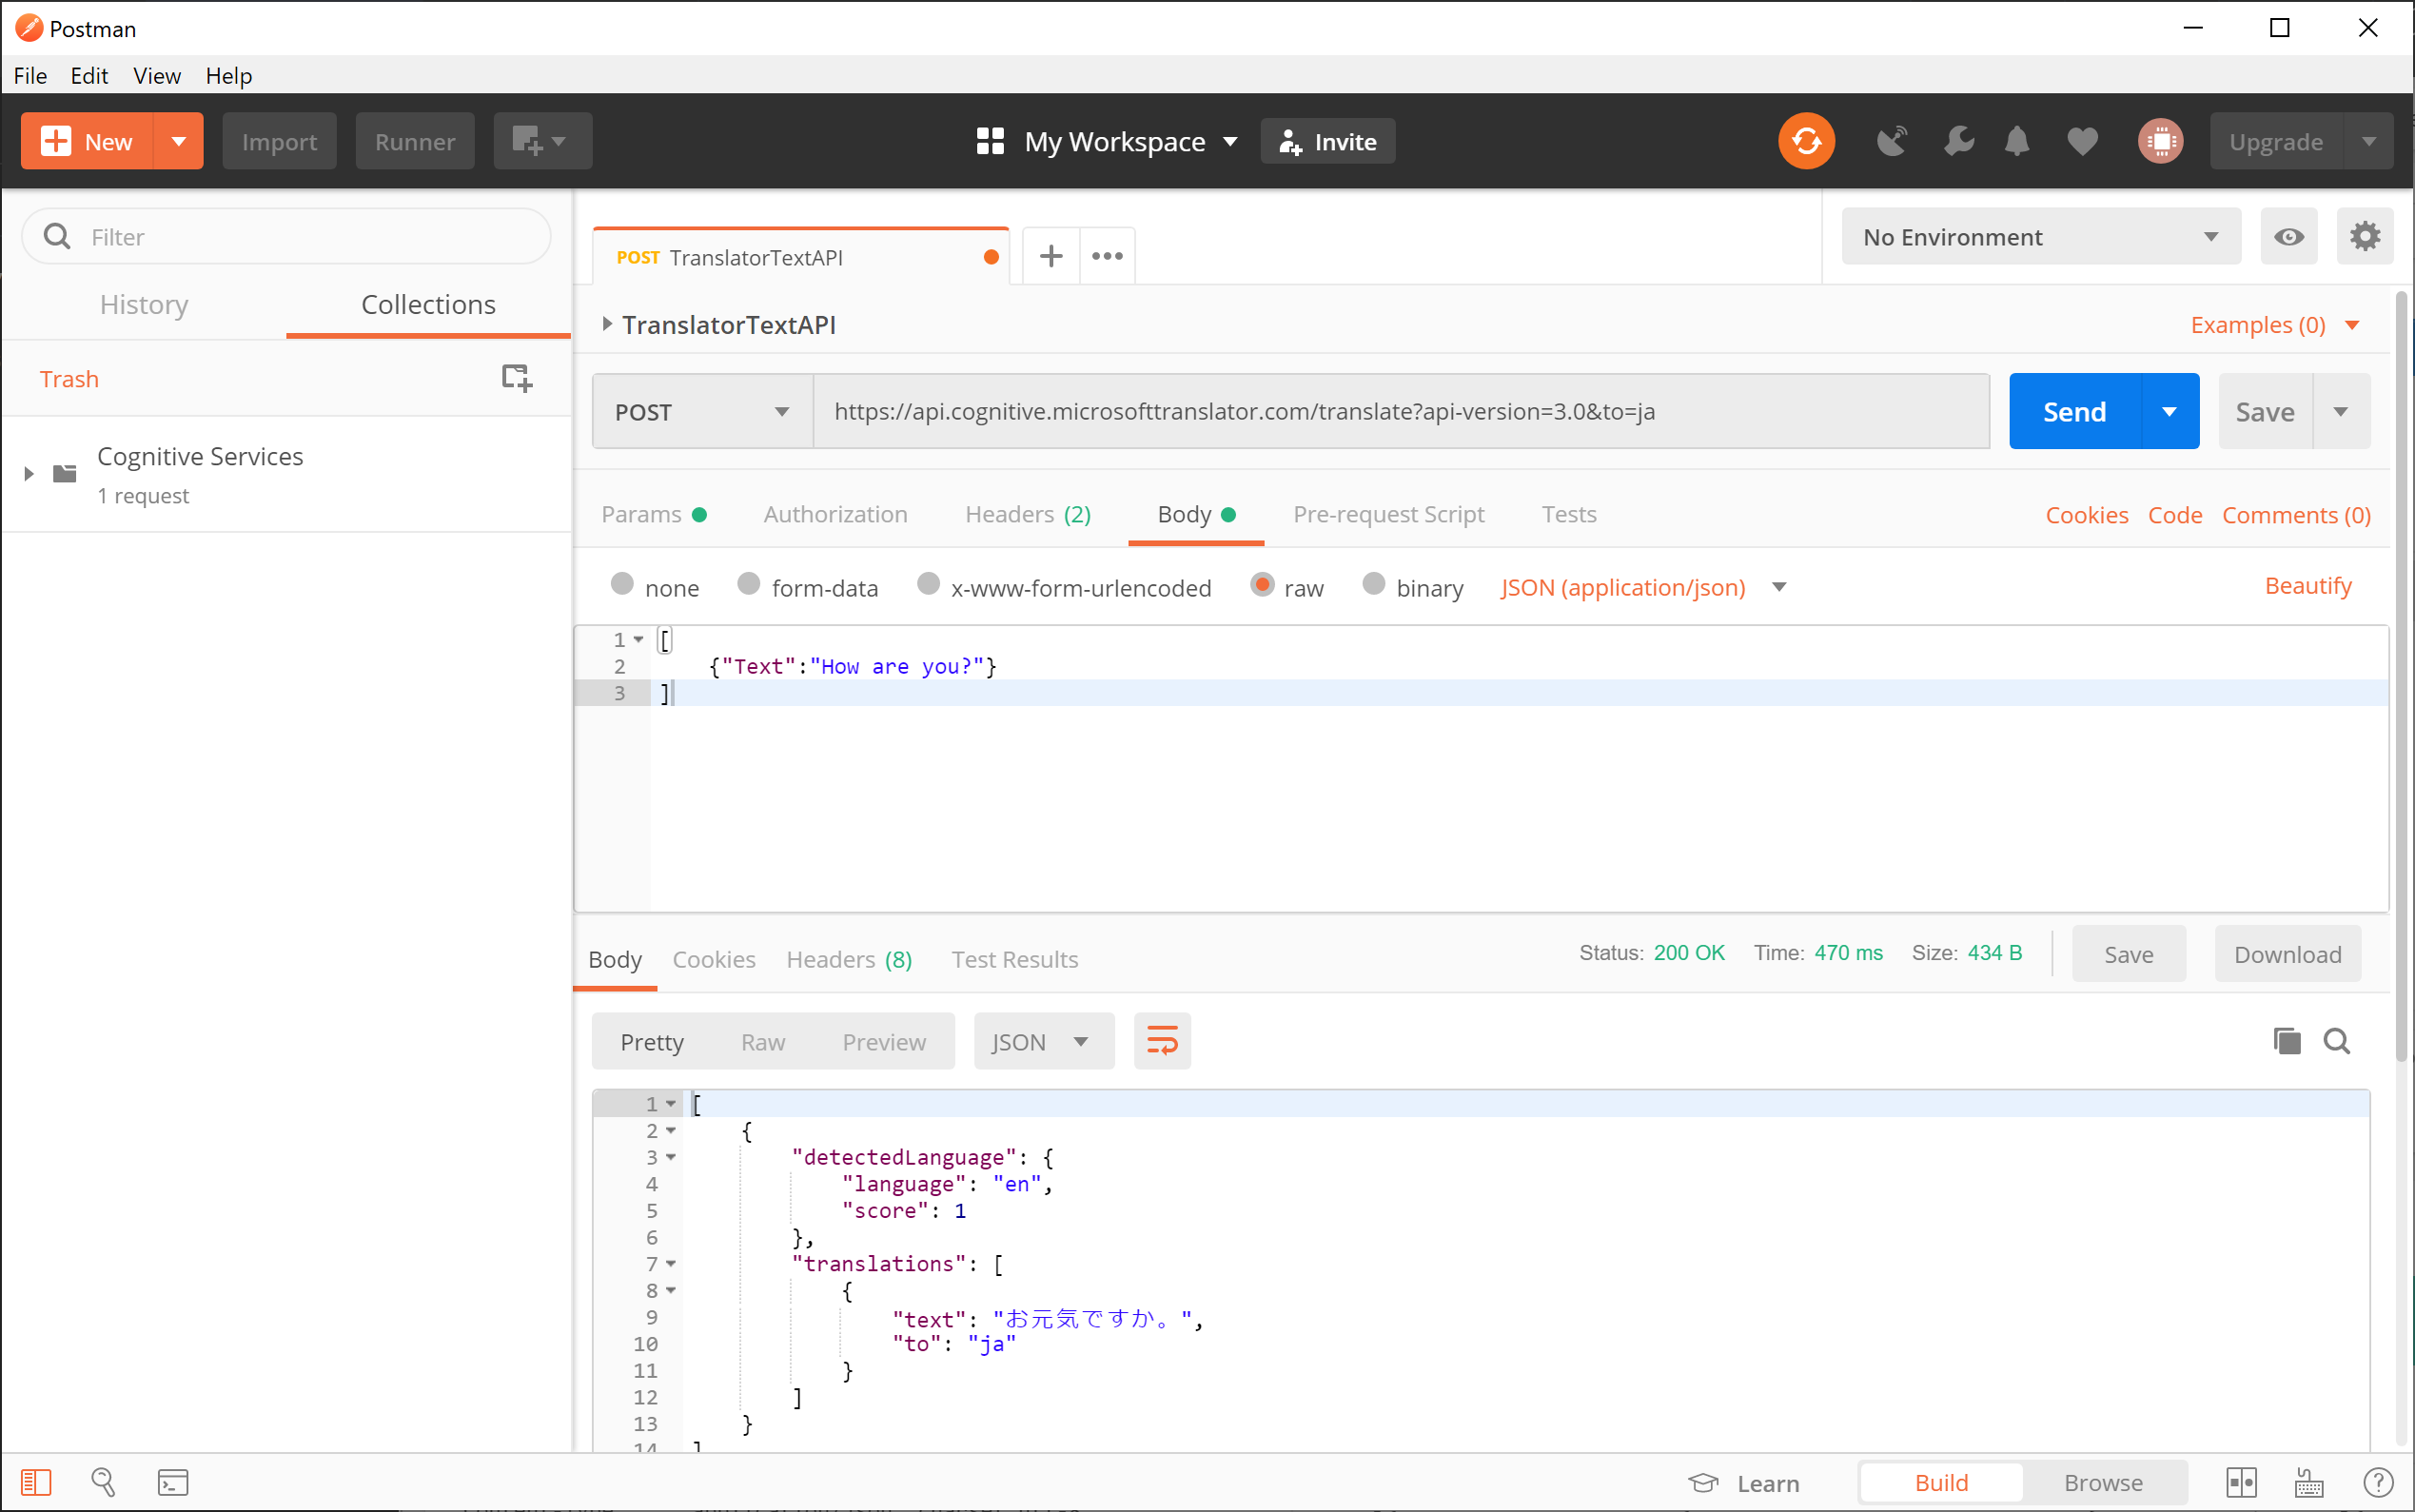
Postman などの Web API ツールを使って Translator Text API の動作を確認します。
Web API ツールの使い方 は 補足: Web API ツールの使用方法 をご覧ください。
今回は翻訳を行う Translate を利用します。
docs.microsoft.com > Translator Text API V3 Reference : Translate
- Method: Post
- Base URL: https://api.cognitive.microsofttranslator.com/translate
- Parameter:
- api-version=3.0
- to=ja
- 翻訳する言語を設定します(今回は日本語)。翻訳元の言語は from で指定できます(今回は未指定=auto)
- Header:
- Ocp-Apim-Subscription-Key= AzurePortalから取得したKey1
- Content-Type=application/json
- Body:
- [{"Text":"How are you?"}] というフォーマット(Json)に構成します
Web API リクエストを送信して、Response 200、Body から日本語に翻訳された文章が取得できれば OK です。
2.2. Azure Web App Bot から Translator Text API を利用する
2.2.1. Azure App Service Editor の起動
Translator Text API を Azure Web App Bot に組み込んでいきます。
今回は、開発ツールなしでアプリを編集、ビルド、デプロイできる App Service Editor を使用します。
Azure Portal(https://portal.azure.com) にサインインして、1. Azure Bot Service から LINE 接続編 で作成した Web App Bot を表示します。
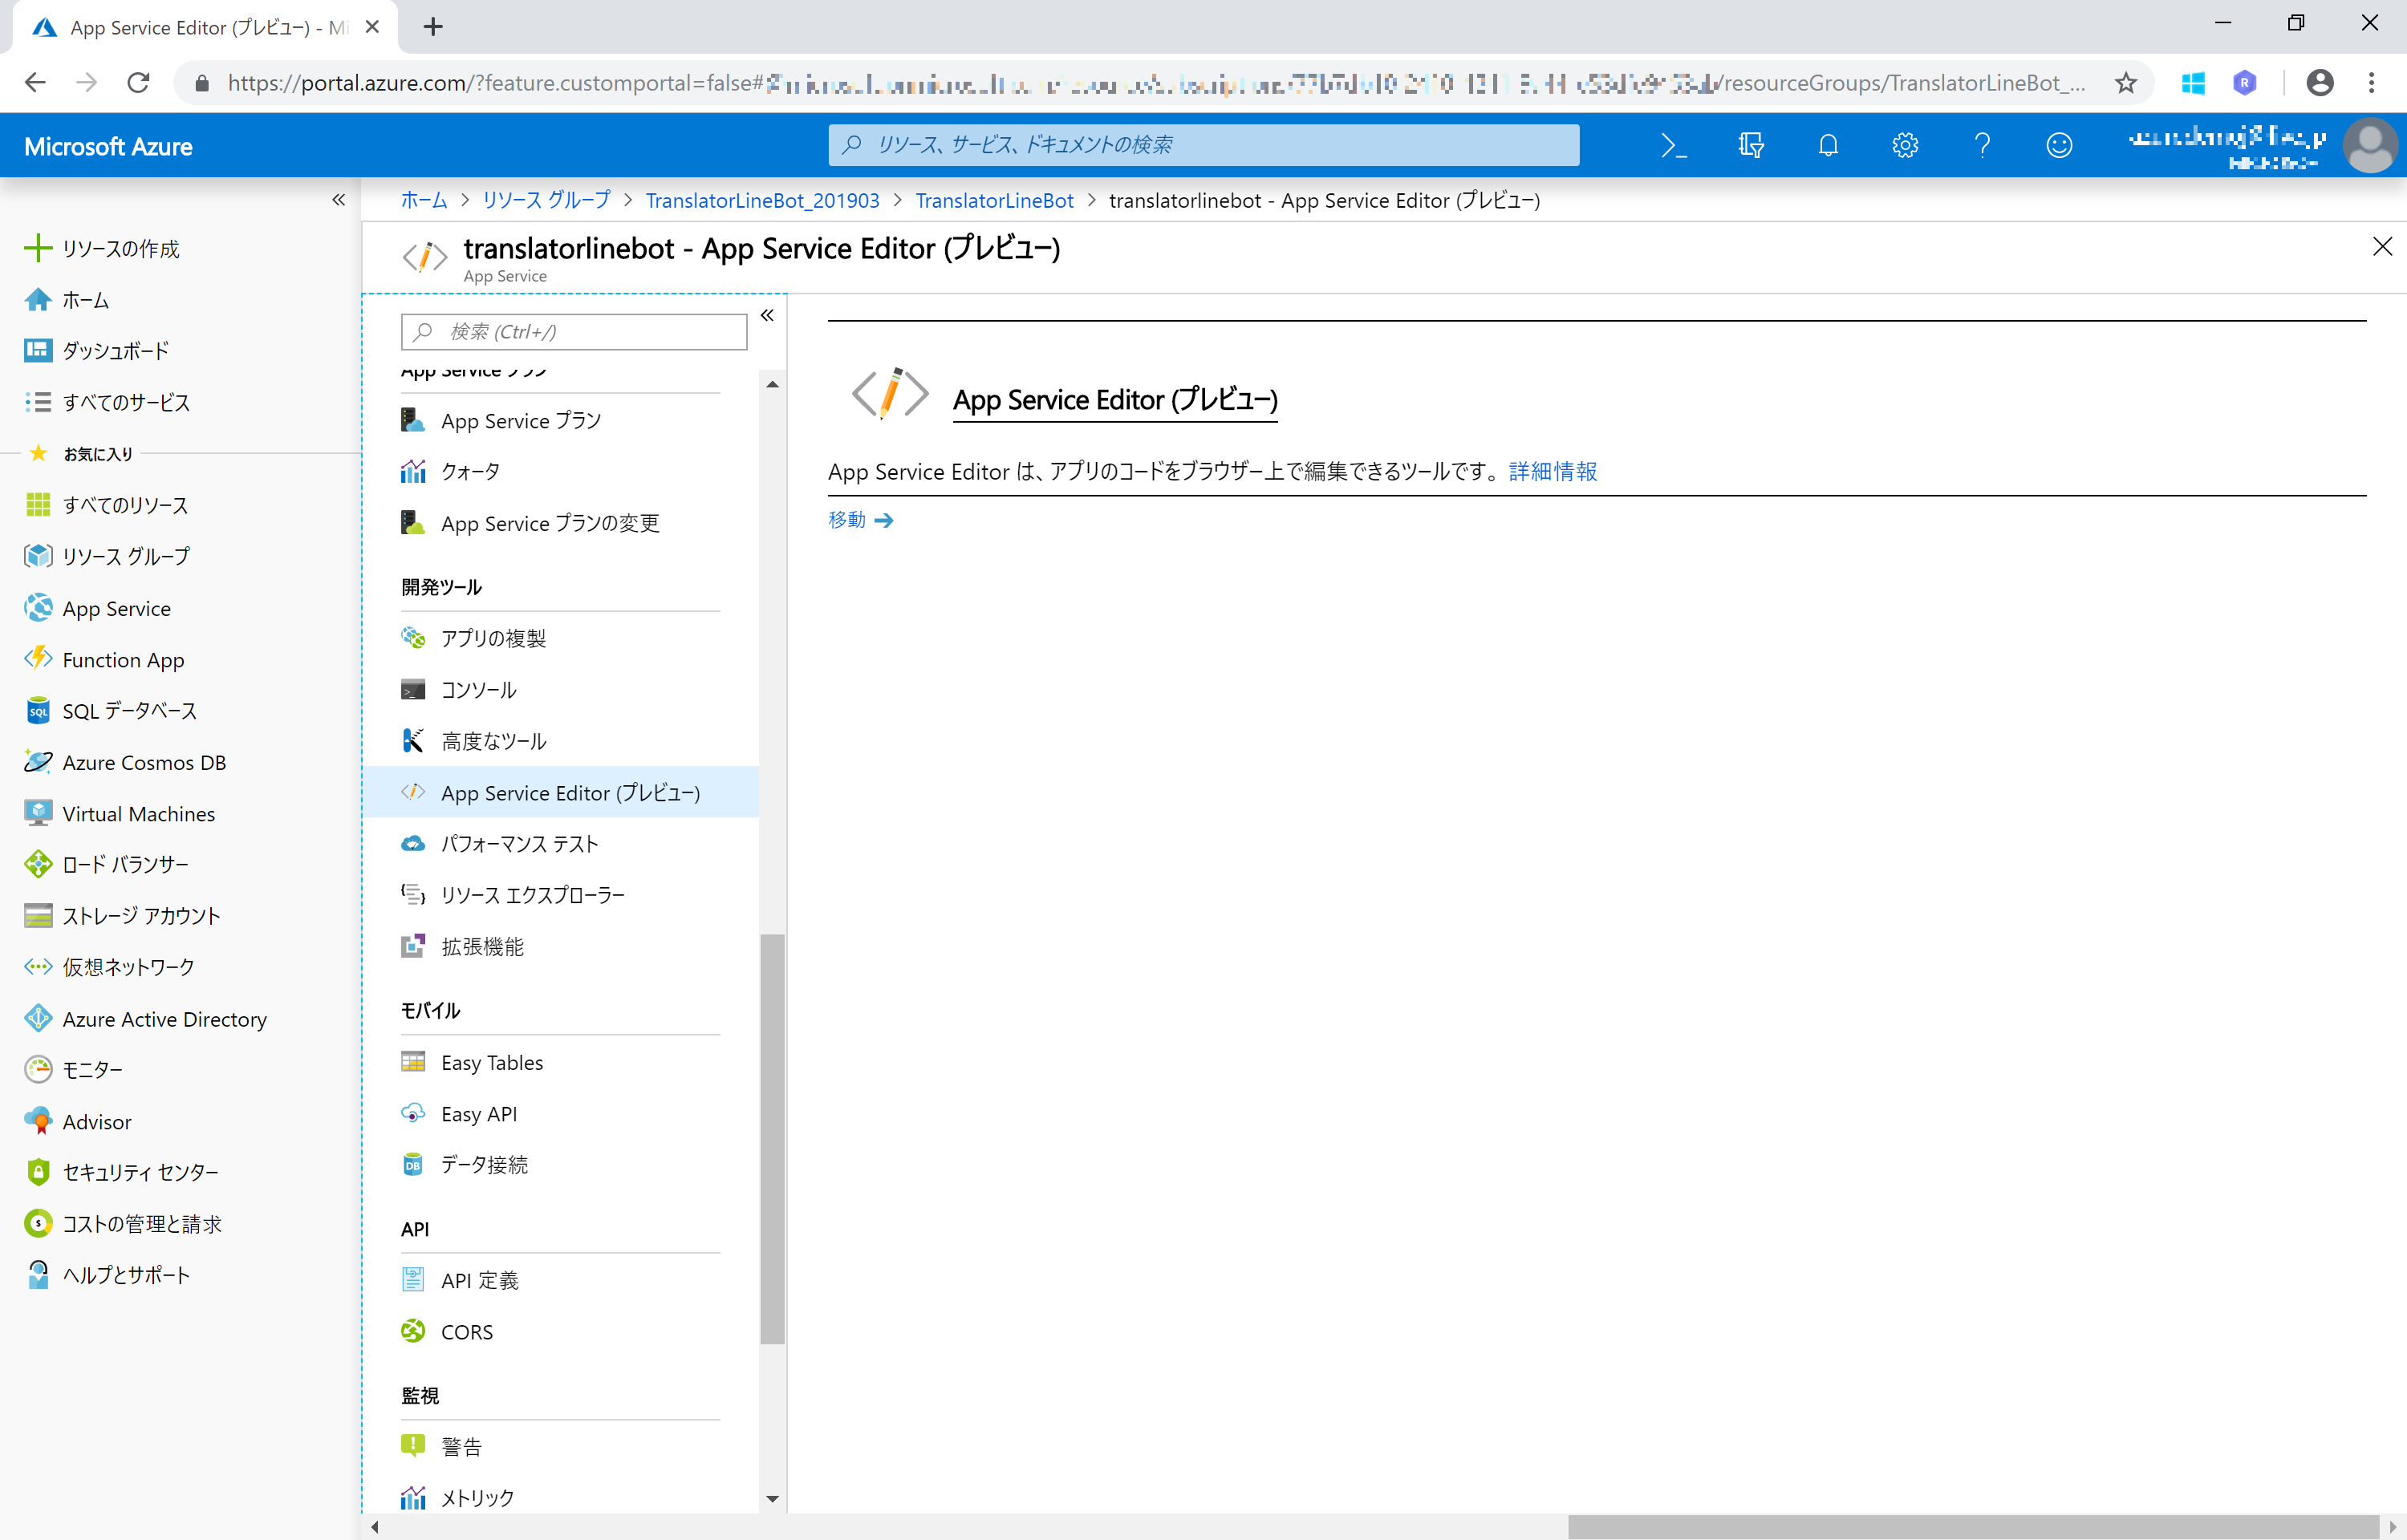
Web アプリ ボット ペインメニューにある 全ての App Service 設定 をクリックし、表示される App Service ペインメニューの App Service Editor をクリックします。
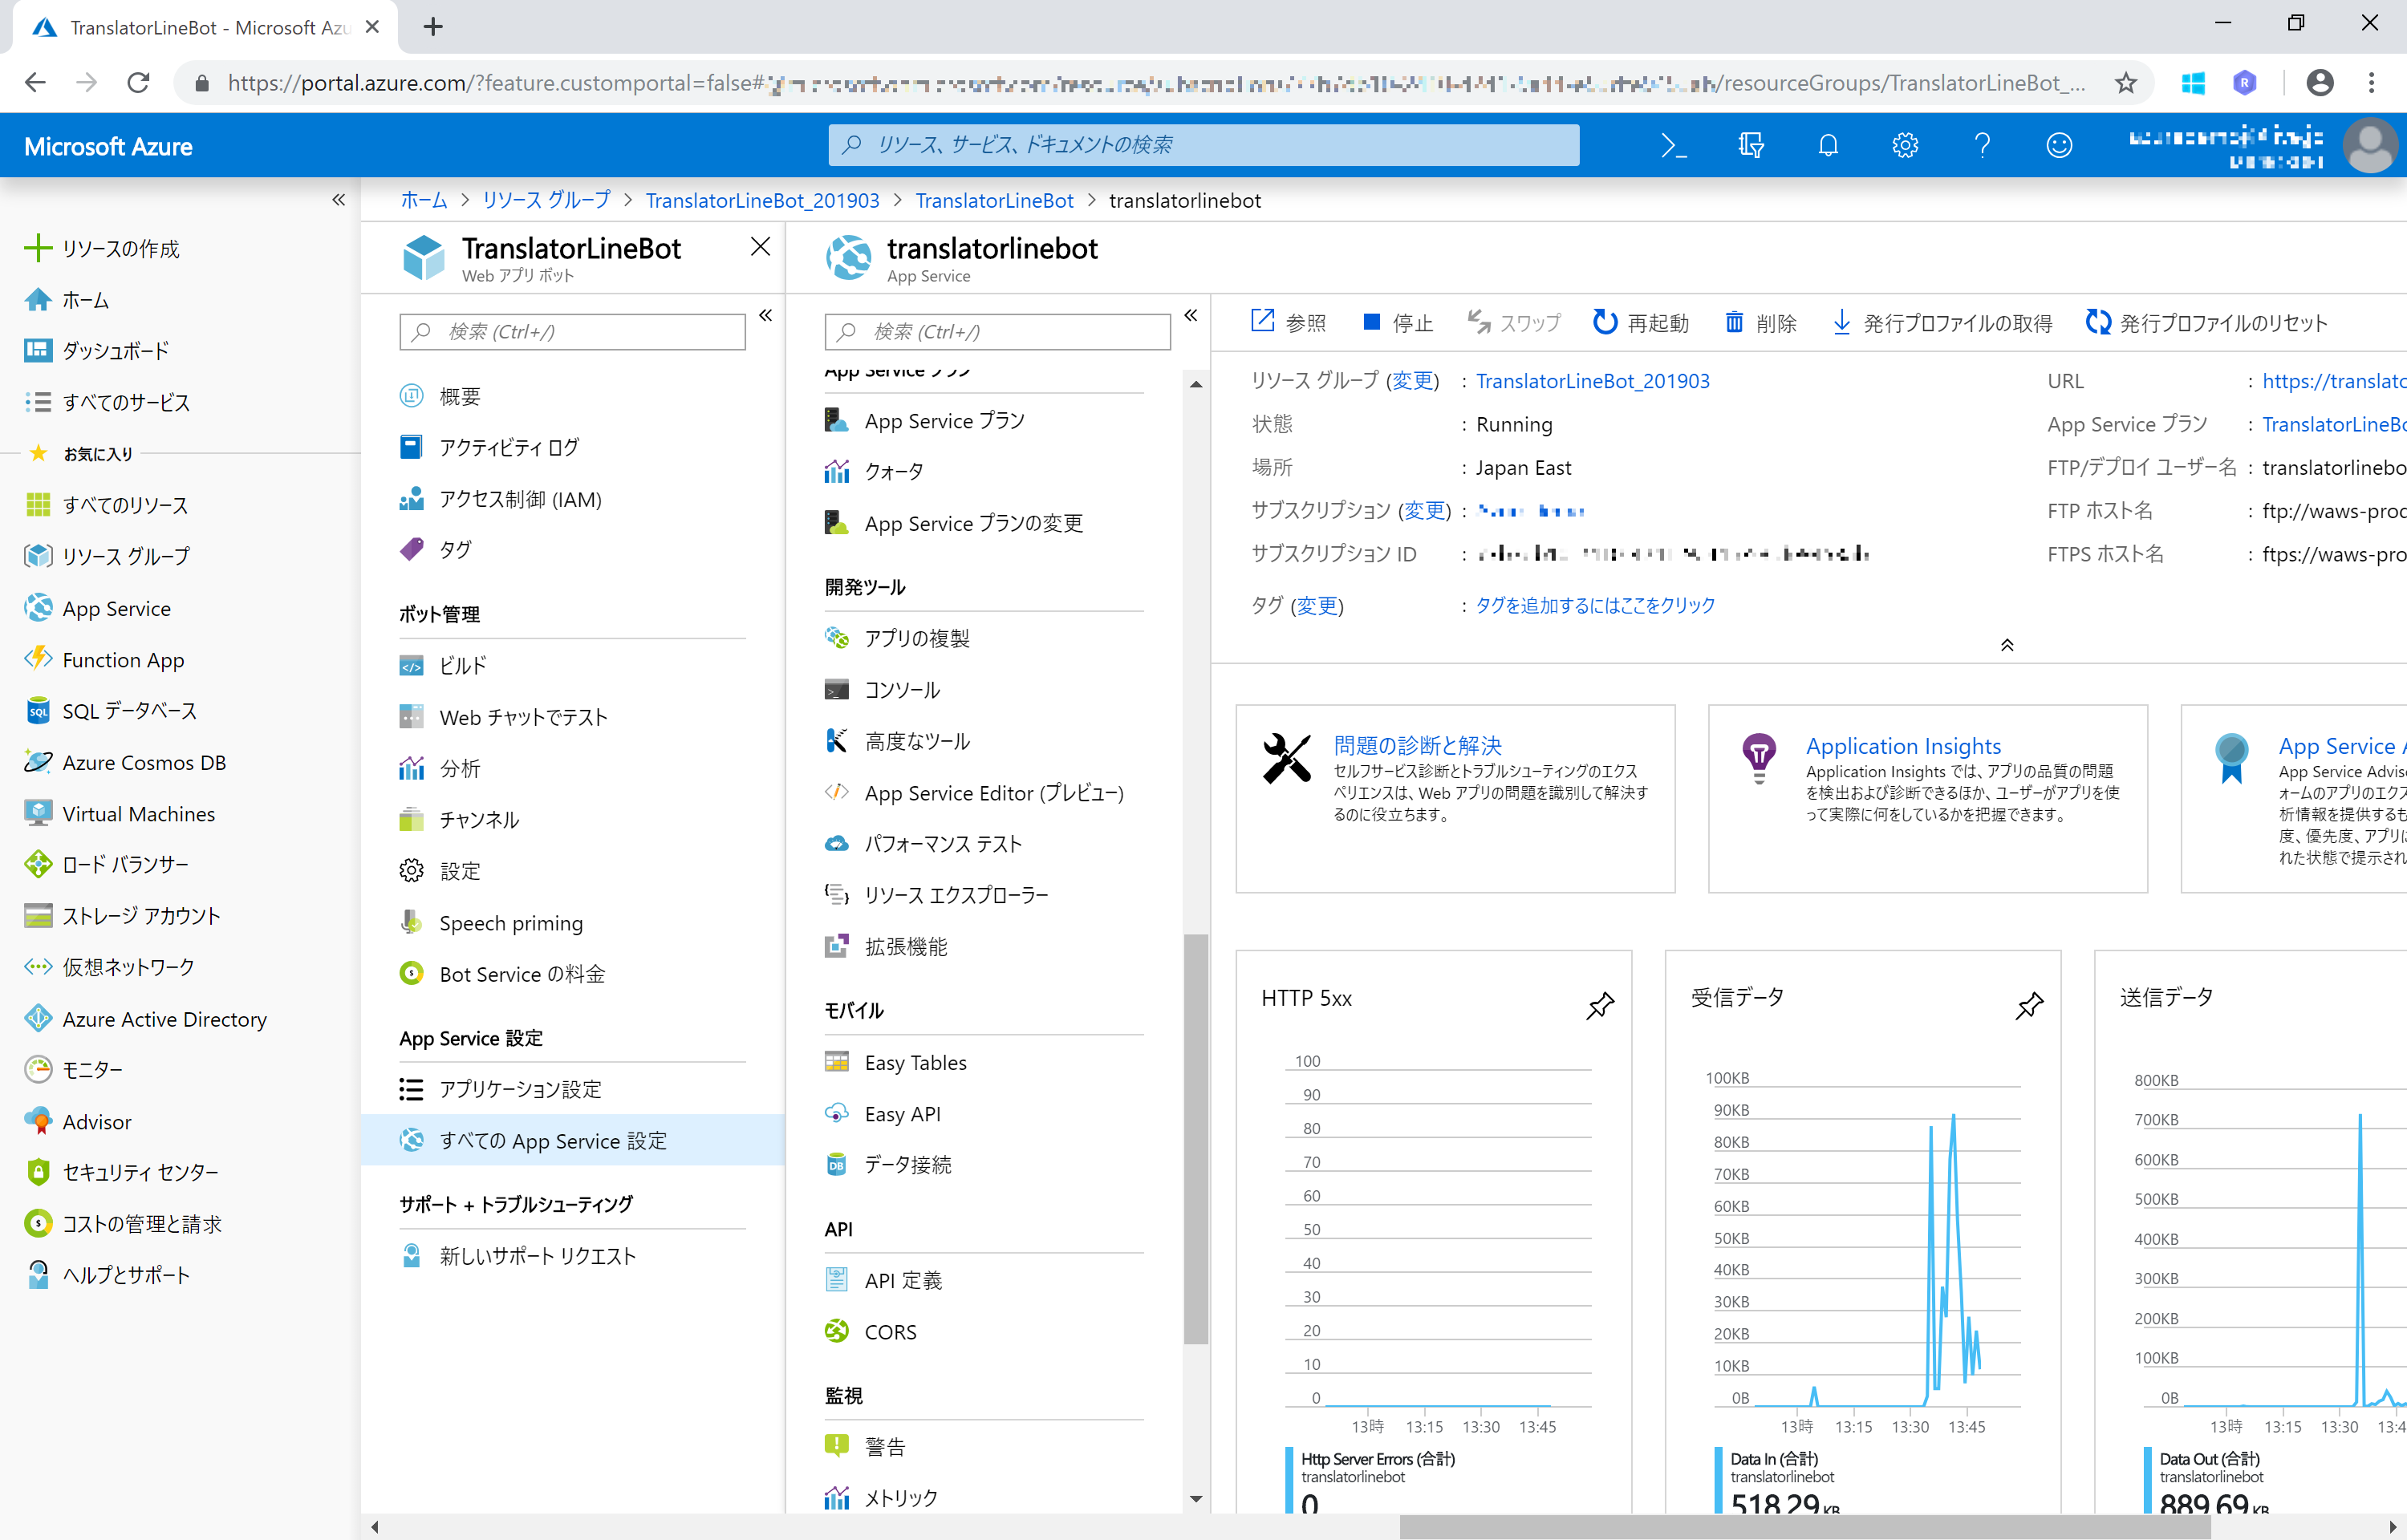
App Service Editor のページで 移動 をクリックすると、ブラウザーの別タブが開き、App Service Editor が起動します。
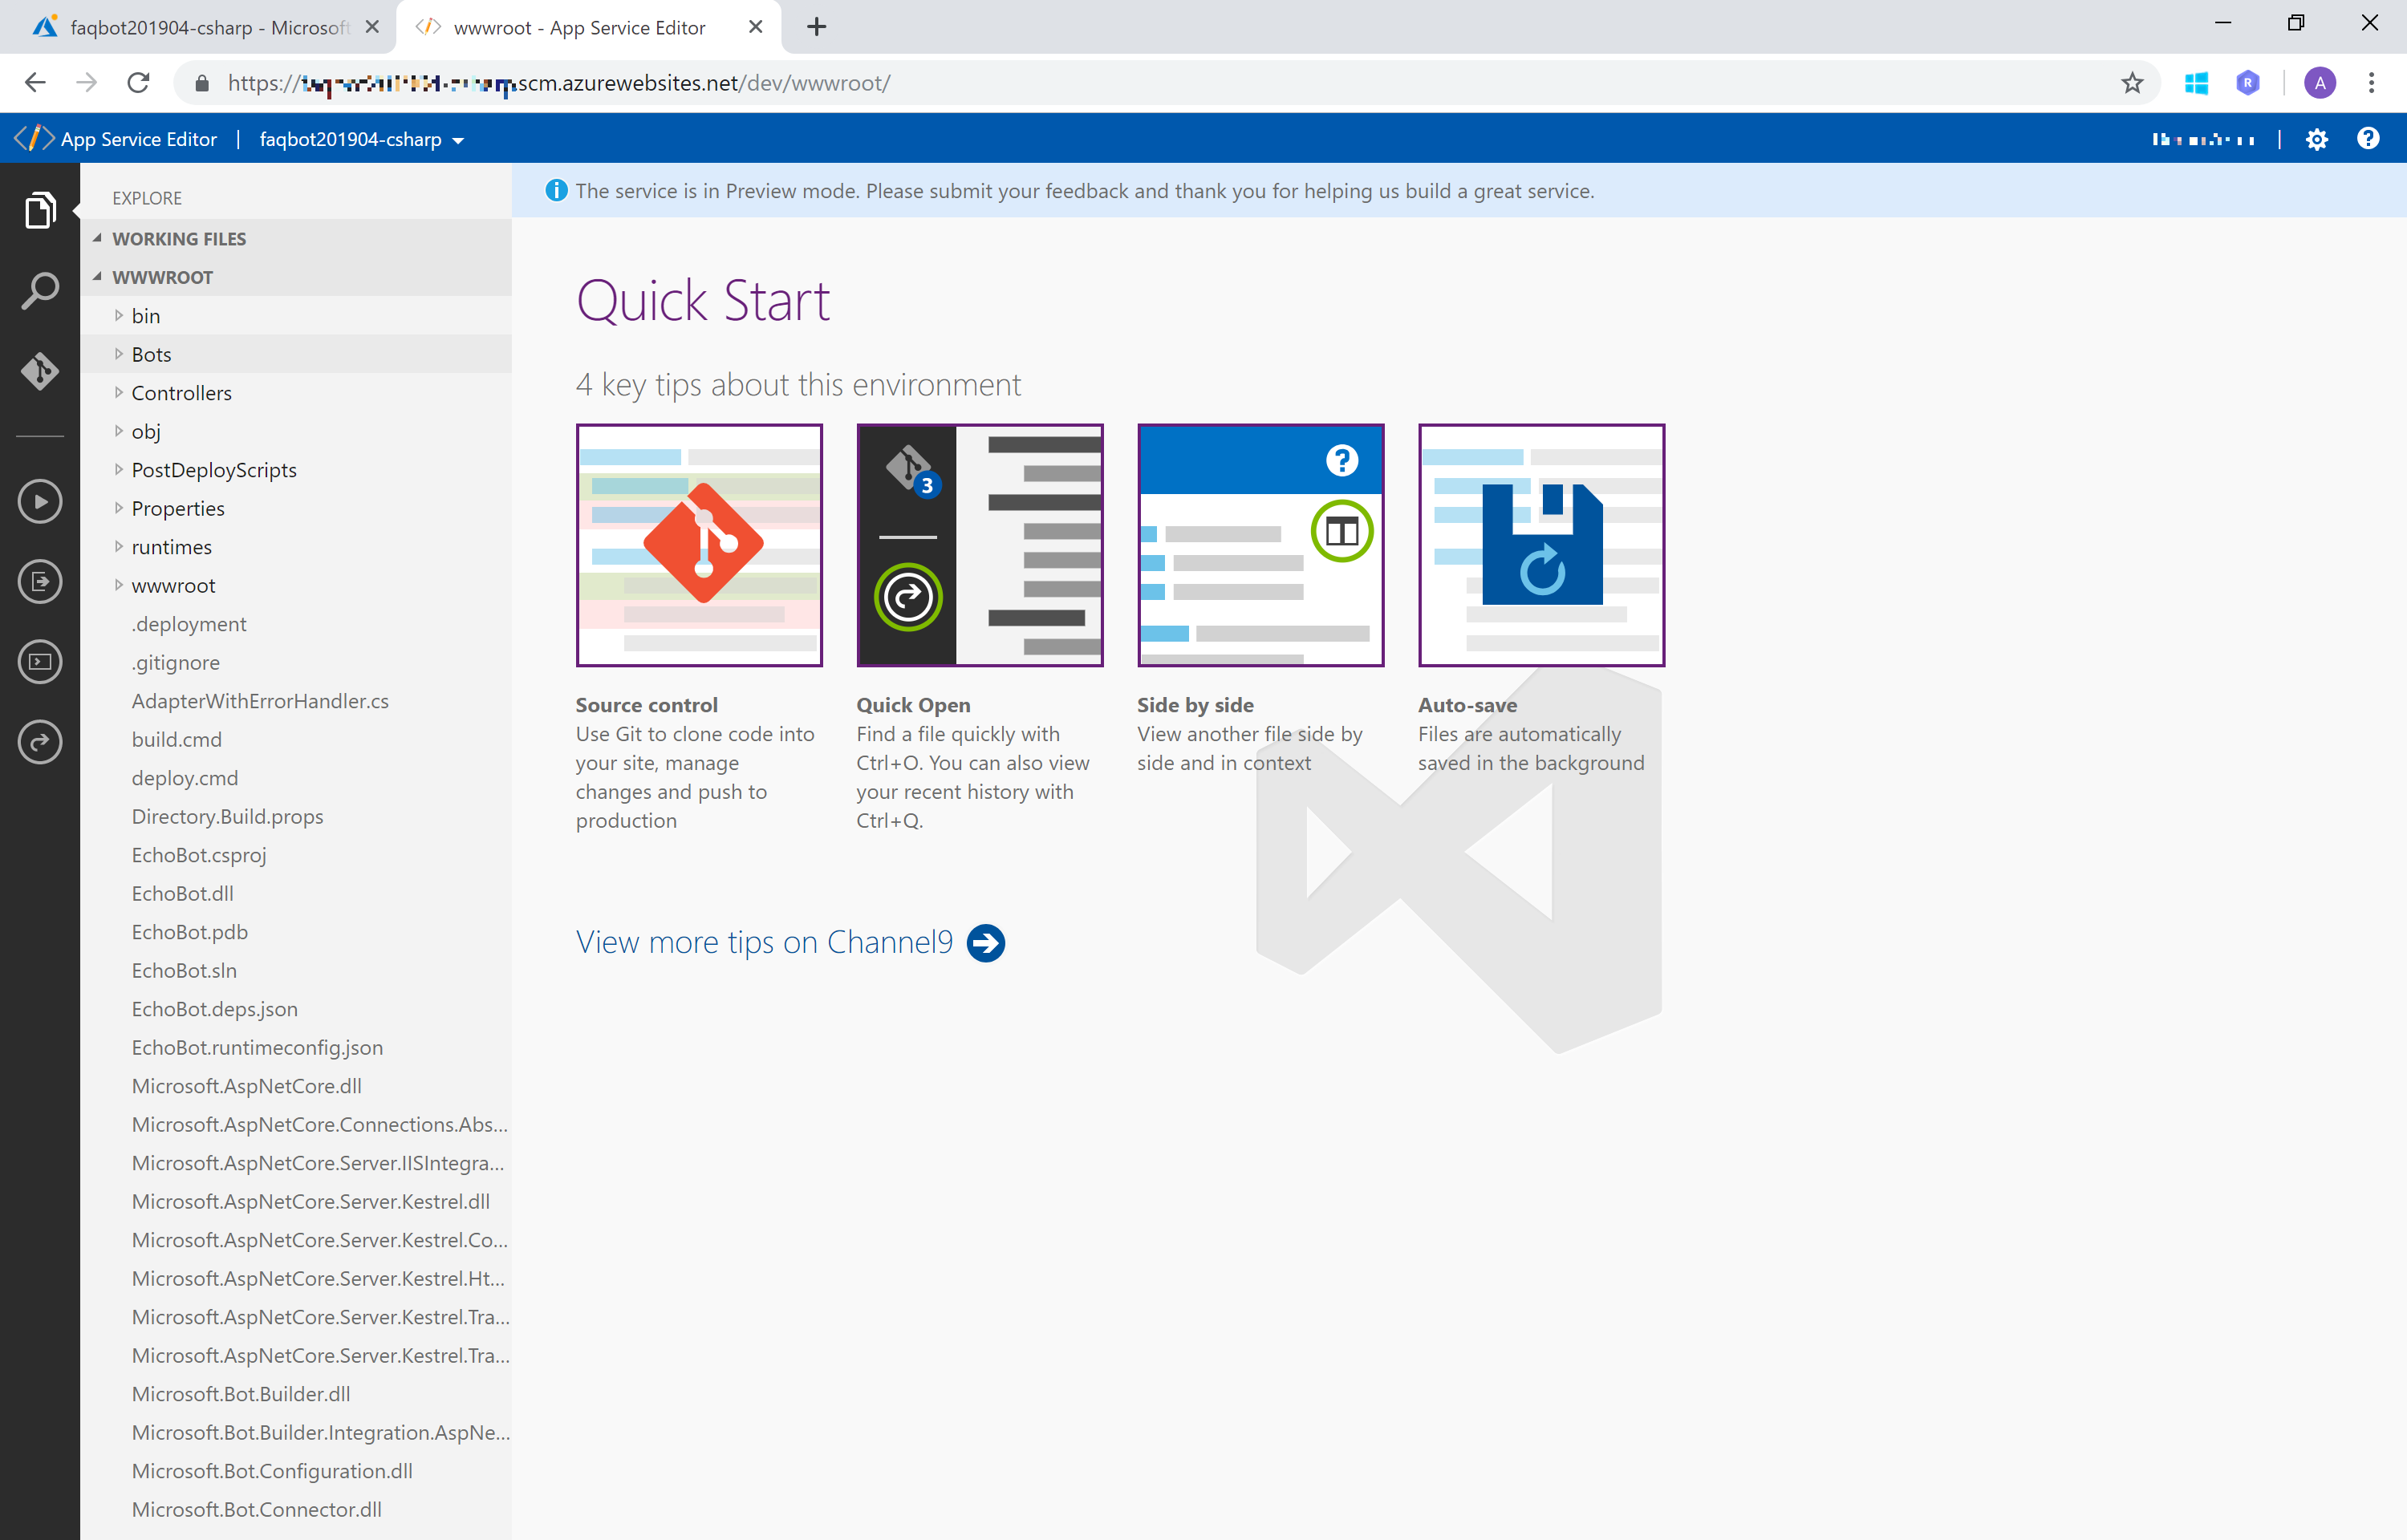
App Service Editor で Web App Bot のディレクトリが表示されます。
これらは、Azure Bot Service (Web App Bot) を作成したときに自動で作成されているソースです。
2.2.2. EchoBot の編集
C# の場合
EXPLORE から wwwroot > Bots > EchoBot.cs を探し、クリックして開きます。
こちらには、ユーザーの入力を取得して、返答を作成するコードが格納されています。

まずは、Web API と Json データの送受信を行うため、必要なライブラリーをファイル冒頭に追加します。
using System;
using System.Net.Http;
using System.Text;
using Newtonsoft.Json;
public class EchoBot ... 以下にチャットボットの対応が記述されているので、その冒頭に Translator Text API の設定を以下のように追加します。(※本来であれば 設定ファイルなどに記載すべきですが、動作確認として今回はここに記載します。)
YOUR_SUBSCRIPTION_KEY の部分に ローカルに保存した Key1 を貼り付けます。
namespace Microsoft.Bot.Builder.EchoBot
{
    public class EchoBot : ActivityHandler
    {
        // Translator Text API の設定
        private readonly string translatorEndpoint = "https://api.cognitive.microsofttranslator.com/translate?api-version=3.0&to=ja";
        private readonly string translatorSubscriptionKey = "YOUR_SUBSCRIPTION_KEY";

        protected override async Task OnMessageActivityAsync(ITurnContext<IMessageActivity> turnContext, CancellationToken cancellationToken)
        {
                :
同じ階層に Translator Text API の 戻り値(JSON) をデシリアライズするためのクラスを以下のように追加します。
namespace Microsoft.Bot.Builder.EchoBot
{
    public class EchoBot : ActivityHandler
    {
                :
        // Translator API クラス(JSON デシリアライズ用)
        public class TranslatorResult
        {
            public Detectedlanguage detectedLanguage { get; set; }
            public List<Translation> translations { get; set; }
        }

        public class Detectedlanguage
        {
            public string language { get; set; }
            public float score { get; set; }
        }

        public class Translation
        {
            public string text { get; set; }
            public string to { get; set; }
        }
いよいよチャットボットの動作部分を編集します。
OnMessageActivityAsync にユーザーの入力を取得した場合の動作が記載されています。
シンプルに「Echo: {ユーザー入力}」と返していた部分を以下のように修整します。
変更前
namespace Microsoft.Bot.Builder.EchoBot
{
    public class EchoBot : ActivityHandler
    {
                :
        protected override async Task OnMessageActivityAsync(ITurnContext<IMessageActivity> turnContext, CancellationToken cancellationToken)
        {
            await turnContext.SendActivityAsync(MessageFactory.Text($"Echo: {turnContext.Activity.Text}"), cancellationToken);
            }
        }
変更後
namespace Microsoft.Bot.Builder.EchoBot
{
    public class EchoBot : ActivityHandler
    {
                :
        protected override async Task OnMessageActivityAsync(ITurnContext<IMessageActivity> turnContext, CancellationToken cancellationToken)
        {
            //await turnContext.SendActivityAsync(MessageFactory.Text($"Echo: {turnContext.Activity.Text}"), cancellationToken);
            //// ユーザー入力を翻訳して返す
            // ユーザー入力の取得
            var body = new object[] { new { Text = turnContext.Activity.Text } };
            var requestBody = JsonConvert.SerializeObject(body);

            // Translator Text API の利用
            using (var client = new HttpClient())
            using (var request = new HttpRequestMessage())
            {
                request.Method = HttpMethod.Post;
                request.RequestUri = new Uri(translatorEndpoint);
                request.Content = new StringContent(requestBody, Encoding.UTF8, "application/json");
                request.Headers.Add("Ocp-Apim-Subscription-Key", translatorSubscriptionKey);
                var response = await client.SendAsync(request);

                // 結果の取得とデシリアライズ
                var jsonResponse = await response.Content.ReadAsStringAsync();
                var result = JsonConvert.DeserializeObject<List<TranslatorResult>>(jsonResponse);

                // 返答にセット
                var responseMessage = MessageFactory.Text(
                    $"「{result[0].translations[0].text}」って言ったね。" +
                    $"(検出言語: {result[0].detectedLanguage.language})"
                    );
                await turnContext.SendActivityAsync(responseMessage);
            }
        }
ユーザーの接続を確認する初期メッセージを以下のようにお好みで変更します。
namespace Microsoft.Bot.Builder.EchoBot
{
    public class EchoBot : ActivityHandler
    {
            :
        protected override async Task OnMembersAddedAsync(IList<ChannelAccount> membersAdded, ITurnContext<IConversationUpdateActivity> turnContext, CancellationToken cancellationToken)
        {
            foreach (var member in membersAdded)
            {
                if (member.Id != turnContext.Activity.Recipient.Id)
                {
                    await turnContext.SendActivityAsync(MessageFactory.Text($"外国語チョットワカル Bot だよ!"), cancellationToken);
                }
            }
        }
編集が終了した EchoBot.cs はこちら
[Github > Azure-LineBot > TranslatorLineBot(v4.3) > EchoBot.cs]
(https://github.com/a-n-n-i-e/Azure-LineBot/blob/master/TranslatorLineBot/BotBuilder_CSharpV4-3/Bots/EchoBot.cs)※ Bot Builder v4.2 以前をお使いの場合は、EchoWithCounterBot を編集します。編集方法はソースコード↓をご覧ください。
Github > Azure-LineBot > TranslatorLineBot(v4.2) > EchoWithCounterBot.cs
Node.js の場合
まず、必要なパッケージをインストールします。
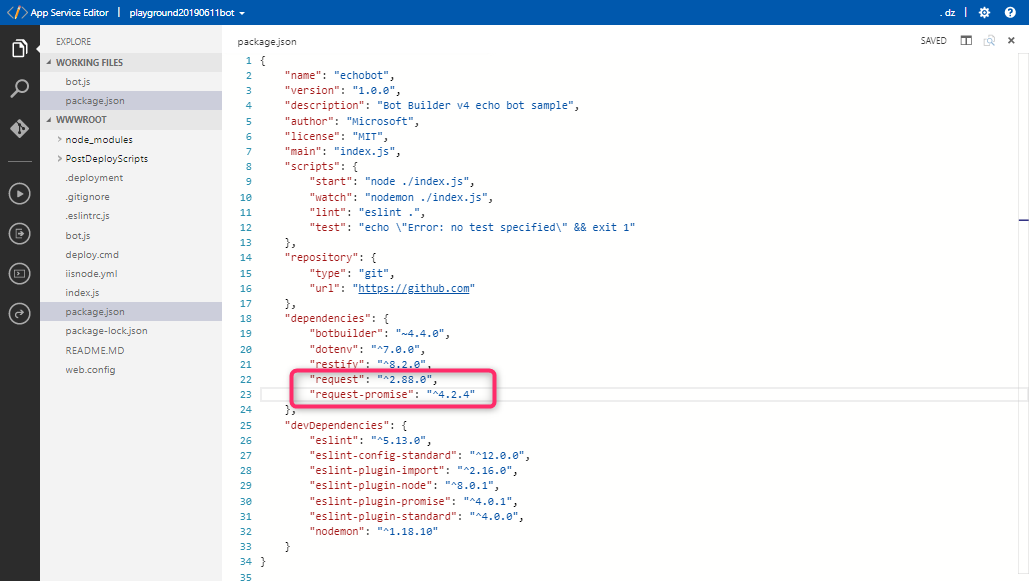
EXPLORE から wwwroot > package.json を探し、クリックして開きます。 dependencies に request と request-promise を追加して保存します。
      "dependencies": {
          "botbuilder": "^4.3.2",
          "dotenv": "^6.1.0",
-         "restify": "^8.2.0"
+         "restify": "^8.2.0",
+         "request": "^2.88.0",
+         "request-promise": "^4.2.4"
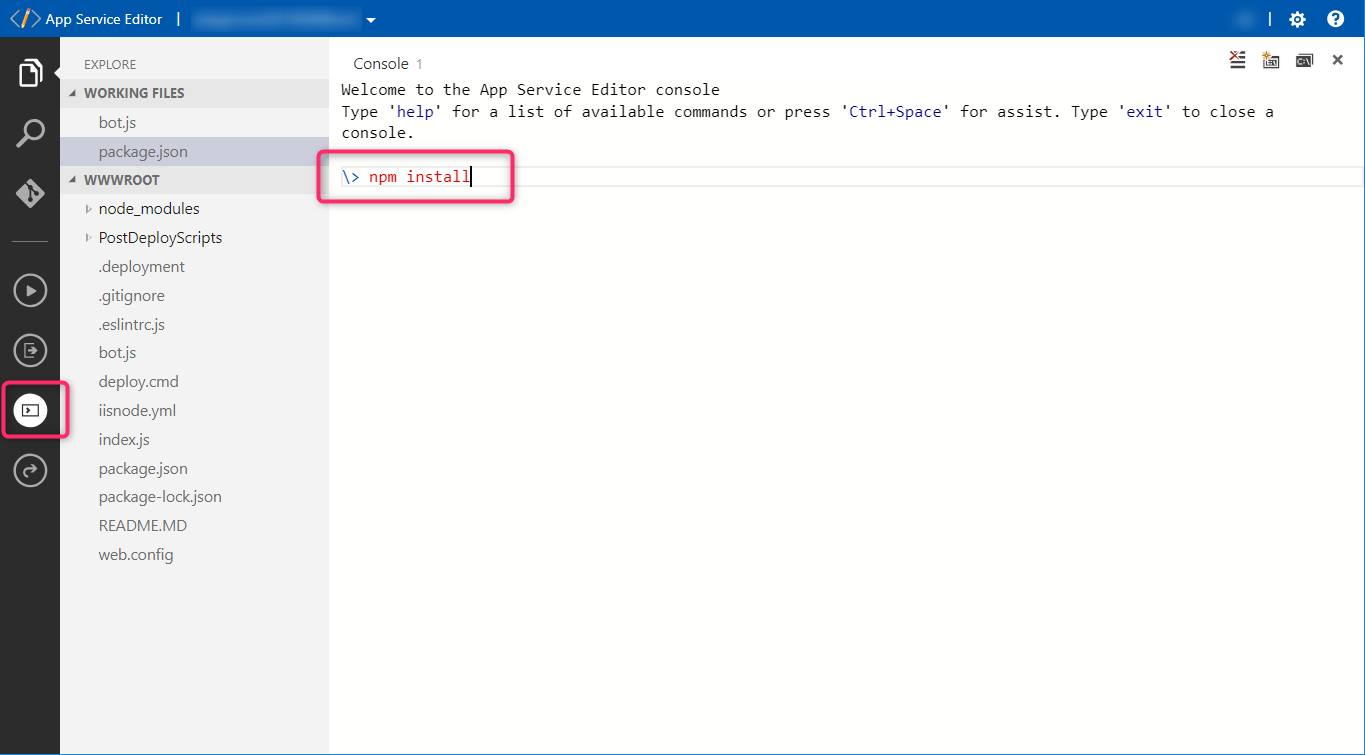
App Service Editor の左端にある Console をクリックして開きます。
コンソール画面で、 npm install と入力し、Enter を押して実行します。
※ 実行結果に WARN と表示されることがありますが、エラーではなく警告なので、今回は先に進めていただいて問題ありません。なお、 Error などの文言がある場合はエラーを解消してから次に進んでください。
パッケージのインストールが終わったら、Translator Text を利用するようコードを編集します。
EXPLORE から wwwroot > bot.js を探し、クリックして開きます。下記のように編集し、保存してください。
-
★ ここから ★から★ ここまで ★と書かれた範囲(2か所)が編集対象です。 -
<YOUR_SUBSCRIPTION_KEY>は先ほど保存した Key1 に置き換えてください。
// Copyright (c) Microsoft Corporation. All rights reserved.
// Licensed under the MIT License.

const { ActivityHandler } = require('botbuilder');

// ★ ↓↓ ここから ↓↓ ★
const rp = require('request-promise');
// ★ ↑↑ ここまで追記する ↑↑ ★

class EchoBot extends ActivityHandler {
    constructor() {
        super();
        // See https://aka.ms/about-bot-activity-message to learn more about the message and other activity types.
        // ★ ↓↓ ここから ↓↓ ★
        // もとの this.onMessage() の処理をコメントアウトする
        // this.onMessage(async (context, next) => {
        //     await context.sendActivity(`You said '${ context.activity.text }'`);

        //     // By calling next() you ensure that the next BotHandler is run.
        //     await next();
        // });

        this.onMessage(async (context, next) => {
            console.log('got a message.');

            // Translate
            const subscriptionKey = '<YOUR_SUBSCRIPTION_KEY>';

            const options = {
                method: 'POST',
                baseUrl: 'https://api.cognitive.microsofttranslator.com/',
                url: 'translate',
                qs: {
                  'api-version': '3.0',
                  'to': 'ja'
                },
                headers: {
                  'Ocp-Apim-Subscription-Key': subscriptionKey,
                  'Content-type': 'application/json'
                },
                body: [{
                      'text': context.activity.text
                }],
                json: true,
            };

            const responseBody = await rp(options);
            const translated = responseBody[0].translations[0].text;
            const responseMessage = `「${translated}」って言ったね。`
                + `(検出言語: ${responseBody[0].detectedLanguage.language})`;

            await context.sendActivity(responseMessage);
            await next();
        });
        // ★ ↑↑ ここまで編集する ↑↑ ★

        this.onMembersAdded(async (context, next) => {
            const membersAdded = context.activity.membersAdded;
            for (let cnt = 0; cnt < membersAdded.length; ++cnt) {
                if (membersAdded[cnt].id !== context.activity.recipient.id) {
                    await context.sendActivity('Hello and welcome!');
                }
            }
            // By calling next() you ensure that the next BotHandler is run.
            await next();
        });
    }
}

module.exports.EchoBot = EchoBot;
なお、上記のコードは下記を参考に作成しました。
2.2.3. Azure App Service Editor からのビルド
※ C# の場合のみ(Node.js の場合は、 2.3. チャットボットの動作確認 に進んでください。)
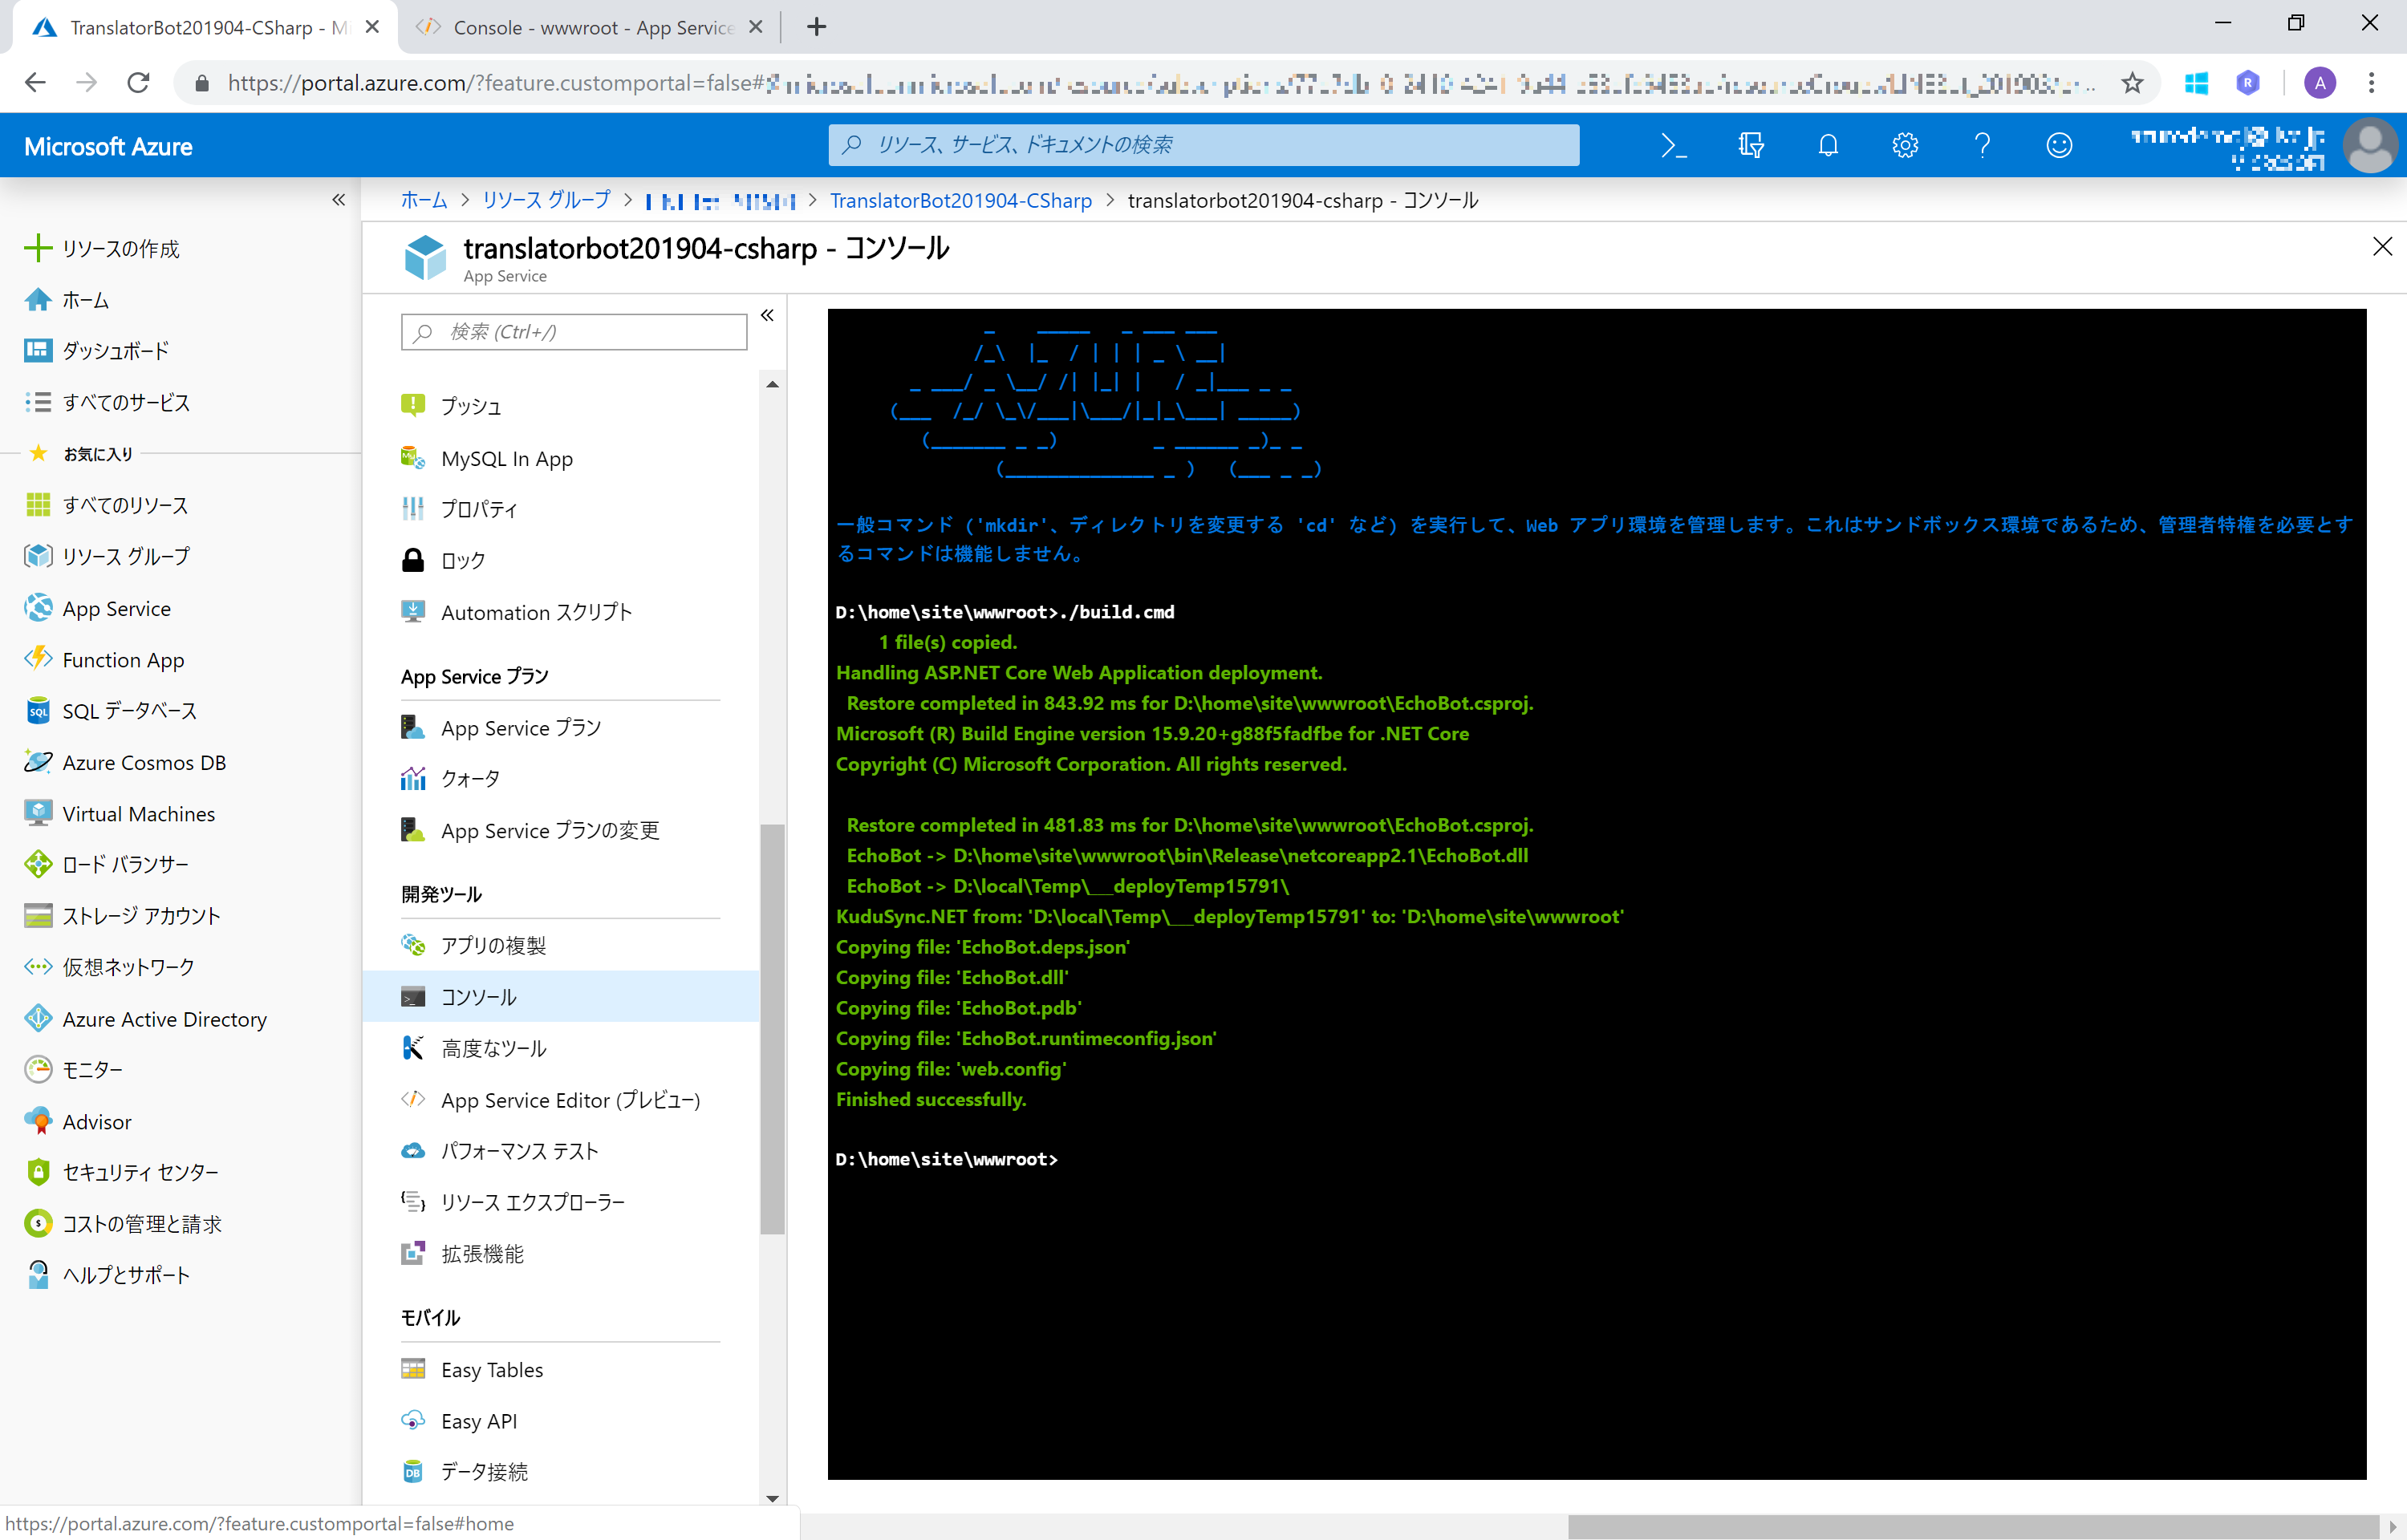
App Service Editor の左端にある Console をクリックして開きます。
コンソール画面で、build.cmd と入力します。
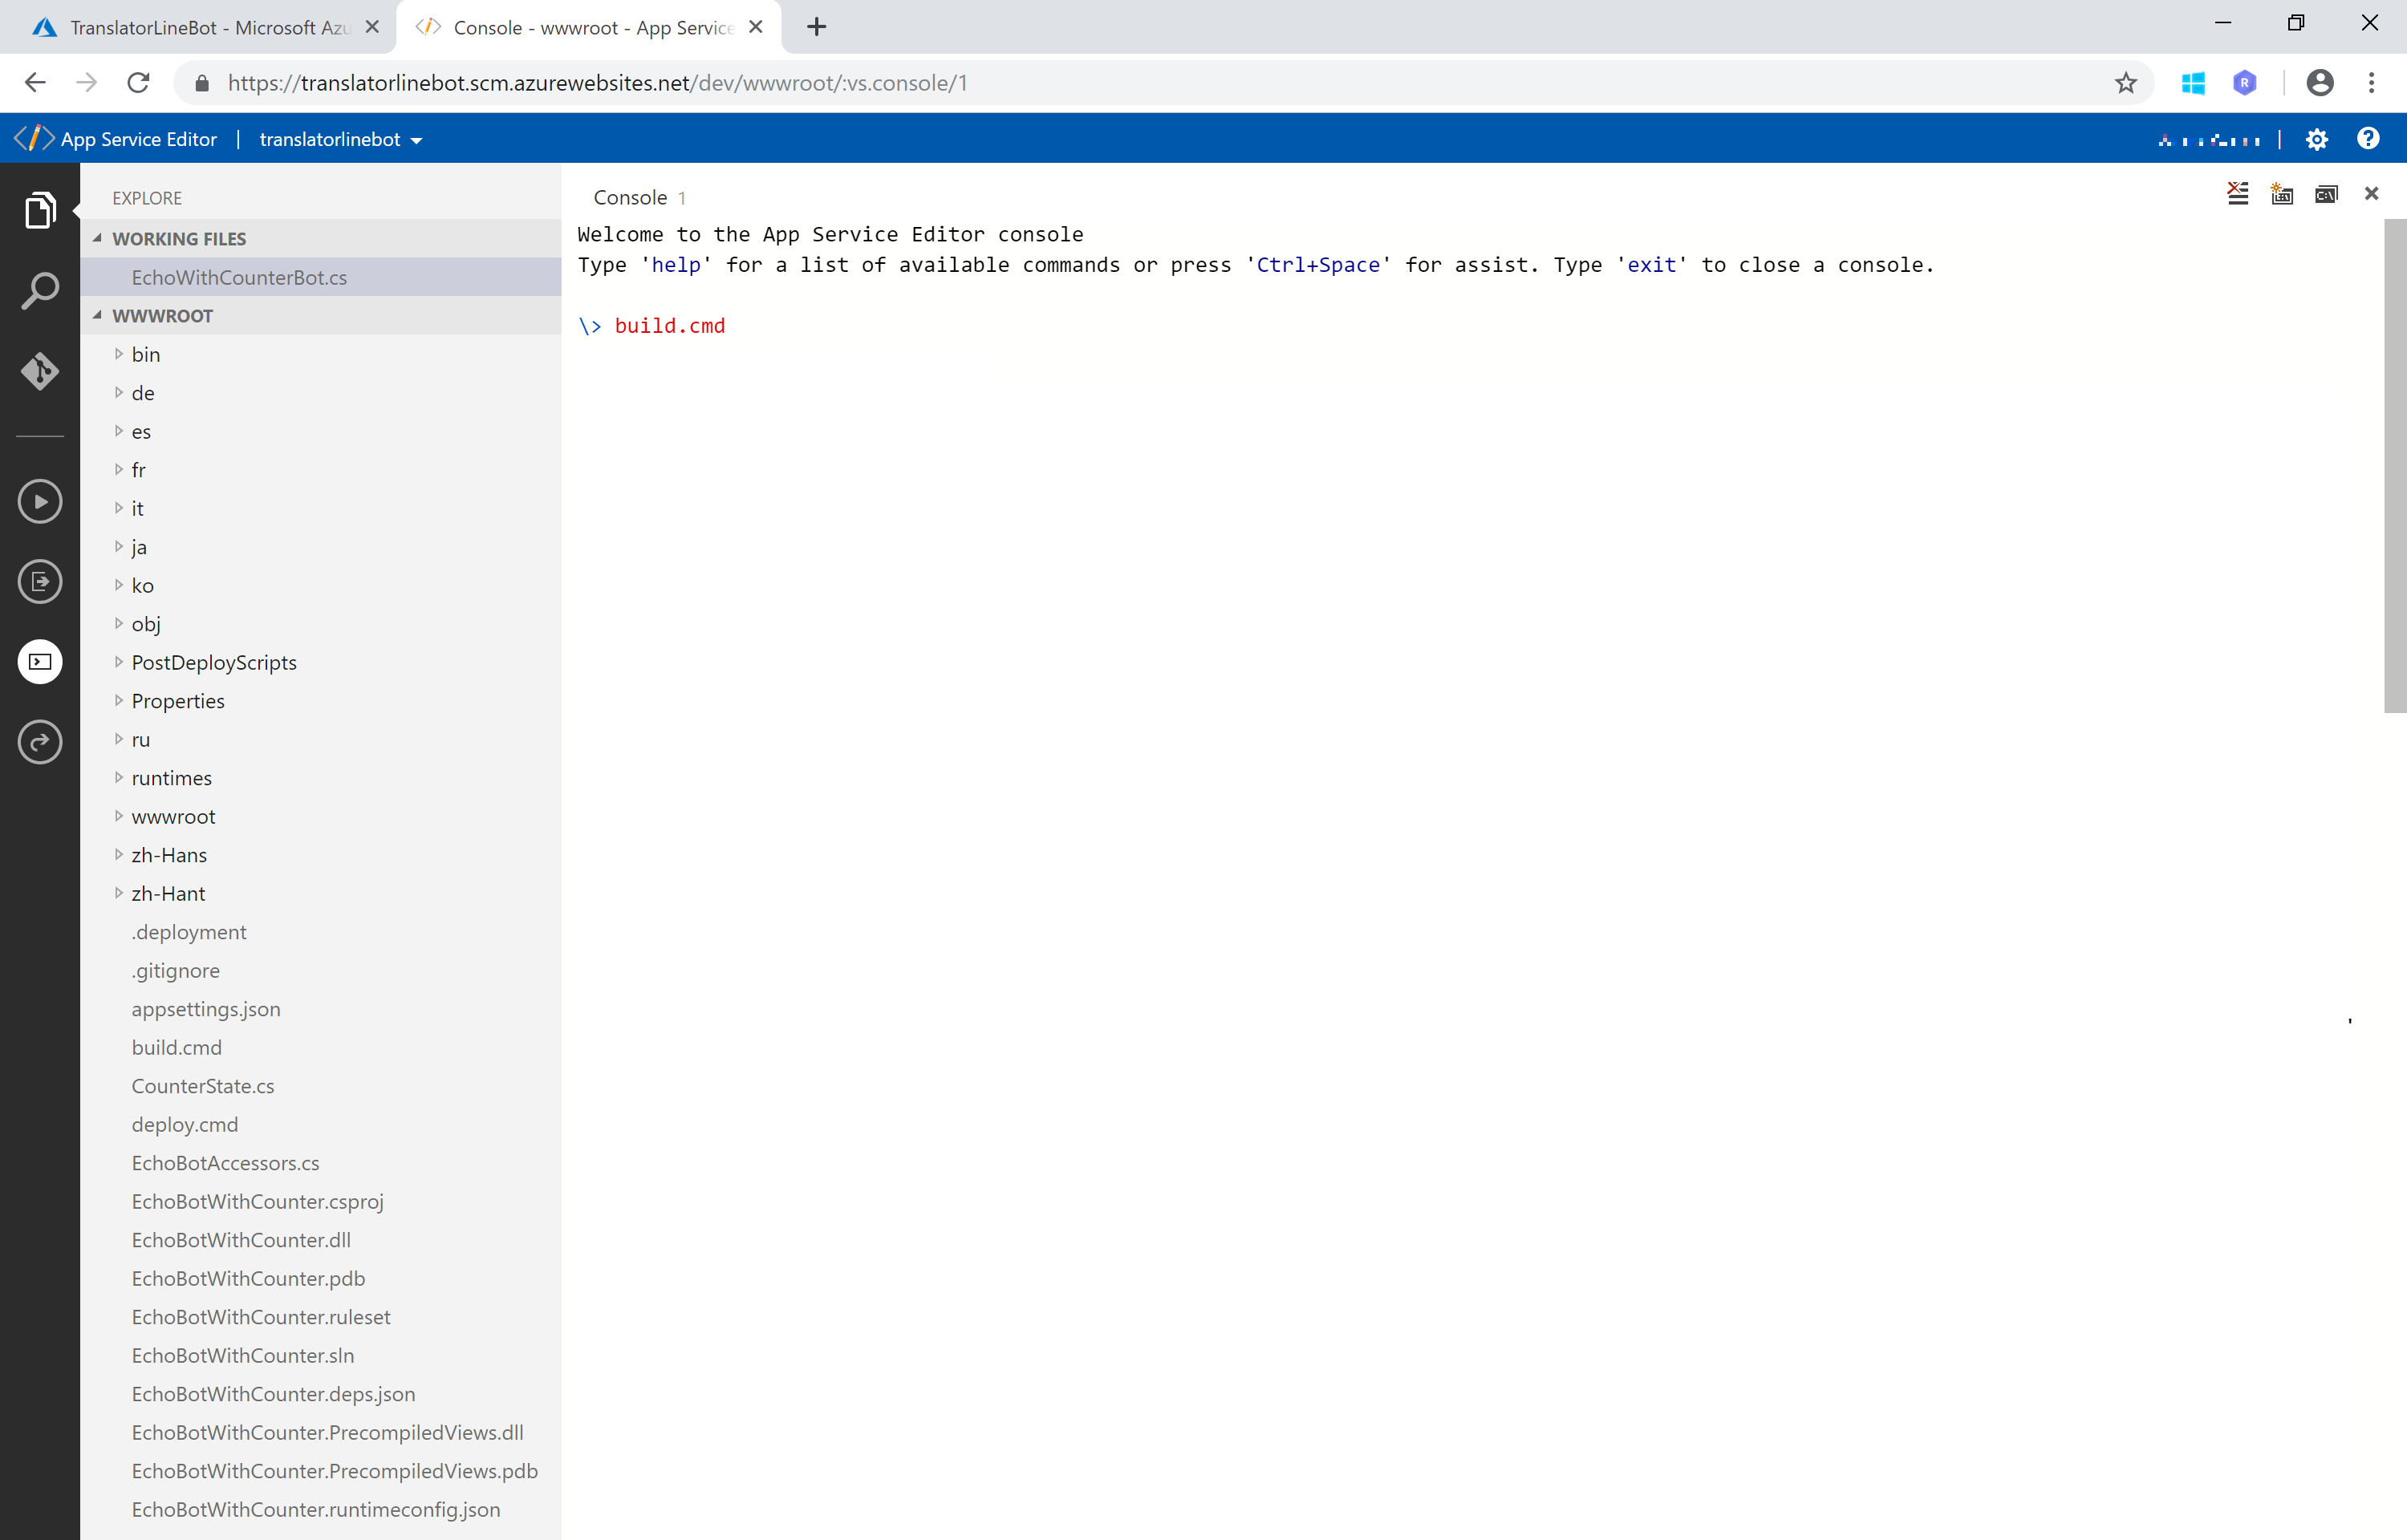
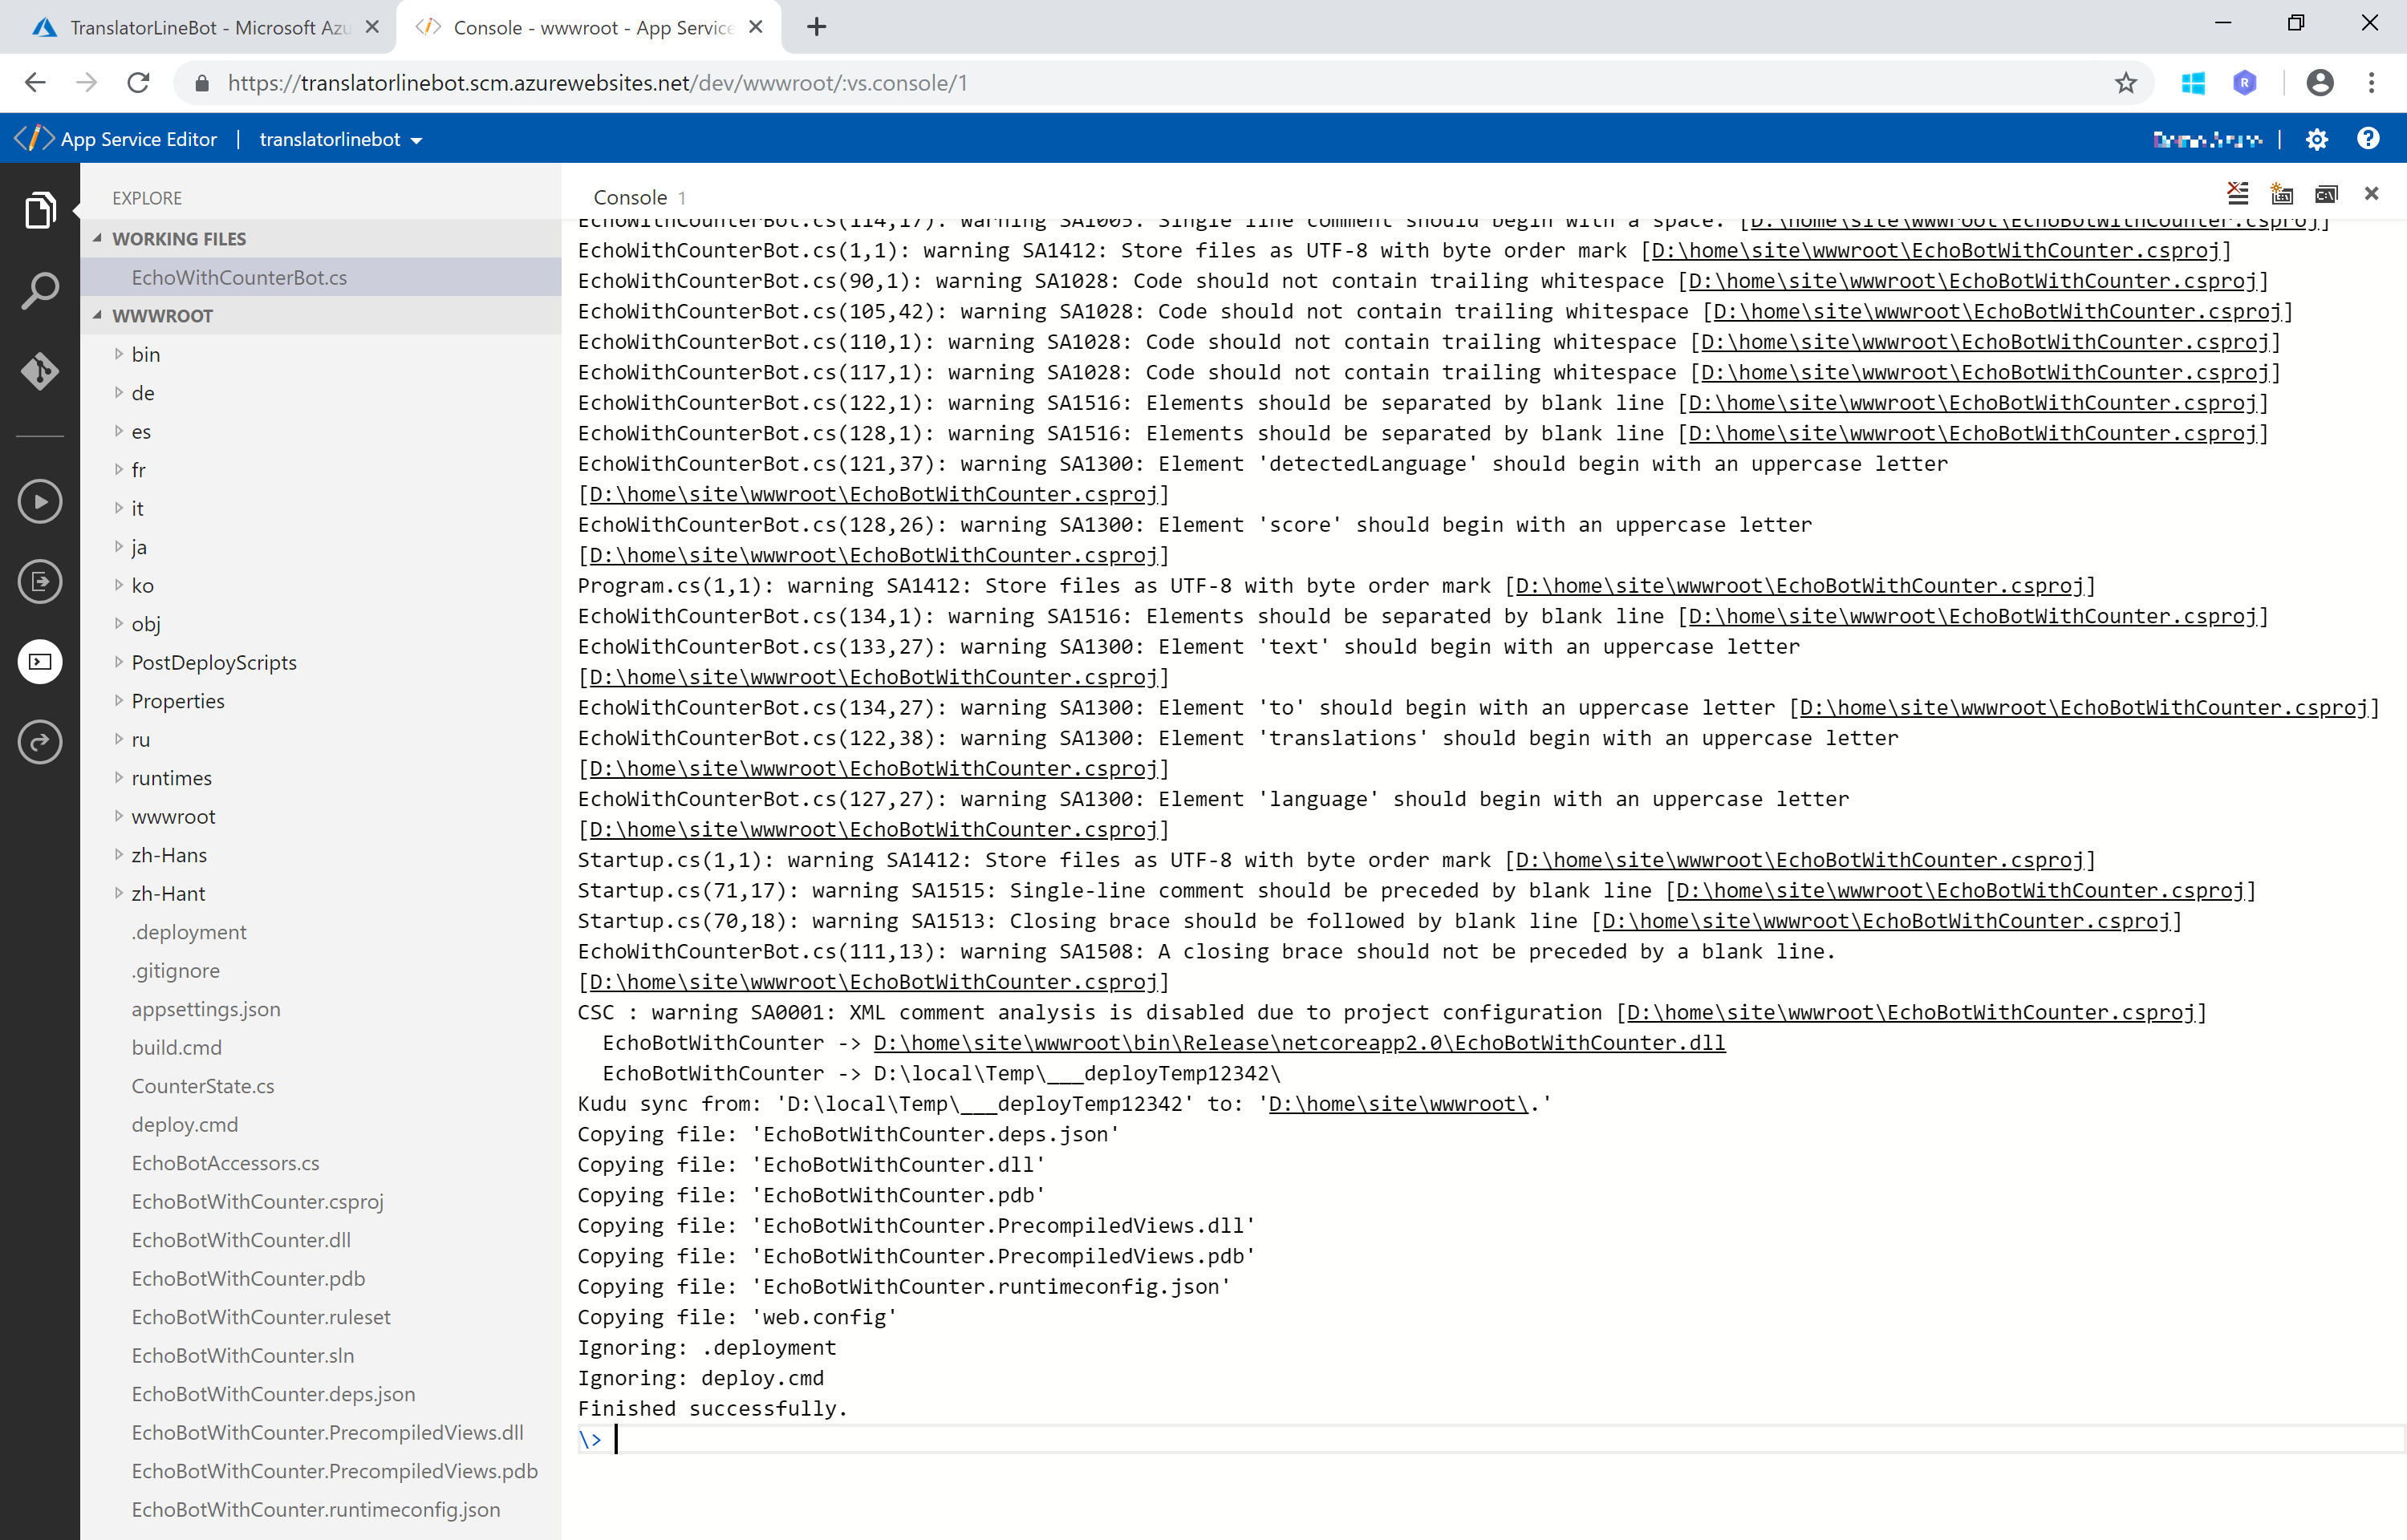
必要なライブラリーのインストールやコードチェックなどが行われ、無事ビルドが完了すると Finished Successfully と表示されます。
ビルドエラーが出てしまう場合
Azure Portal に戻り、App Service ペインメニューの 開発ツール > コンソール をクリックします。コンソール画面で、./build.cmd と入力します。
必要なライブラリーのインストールやコードチェックなどが行われ、Finished Successfully と表示されたら、無事ビルド完了です。
2.3. チャットボットの動作確認
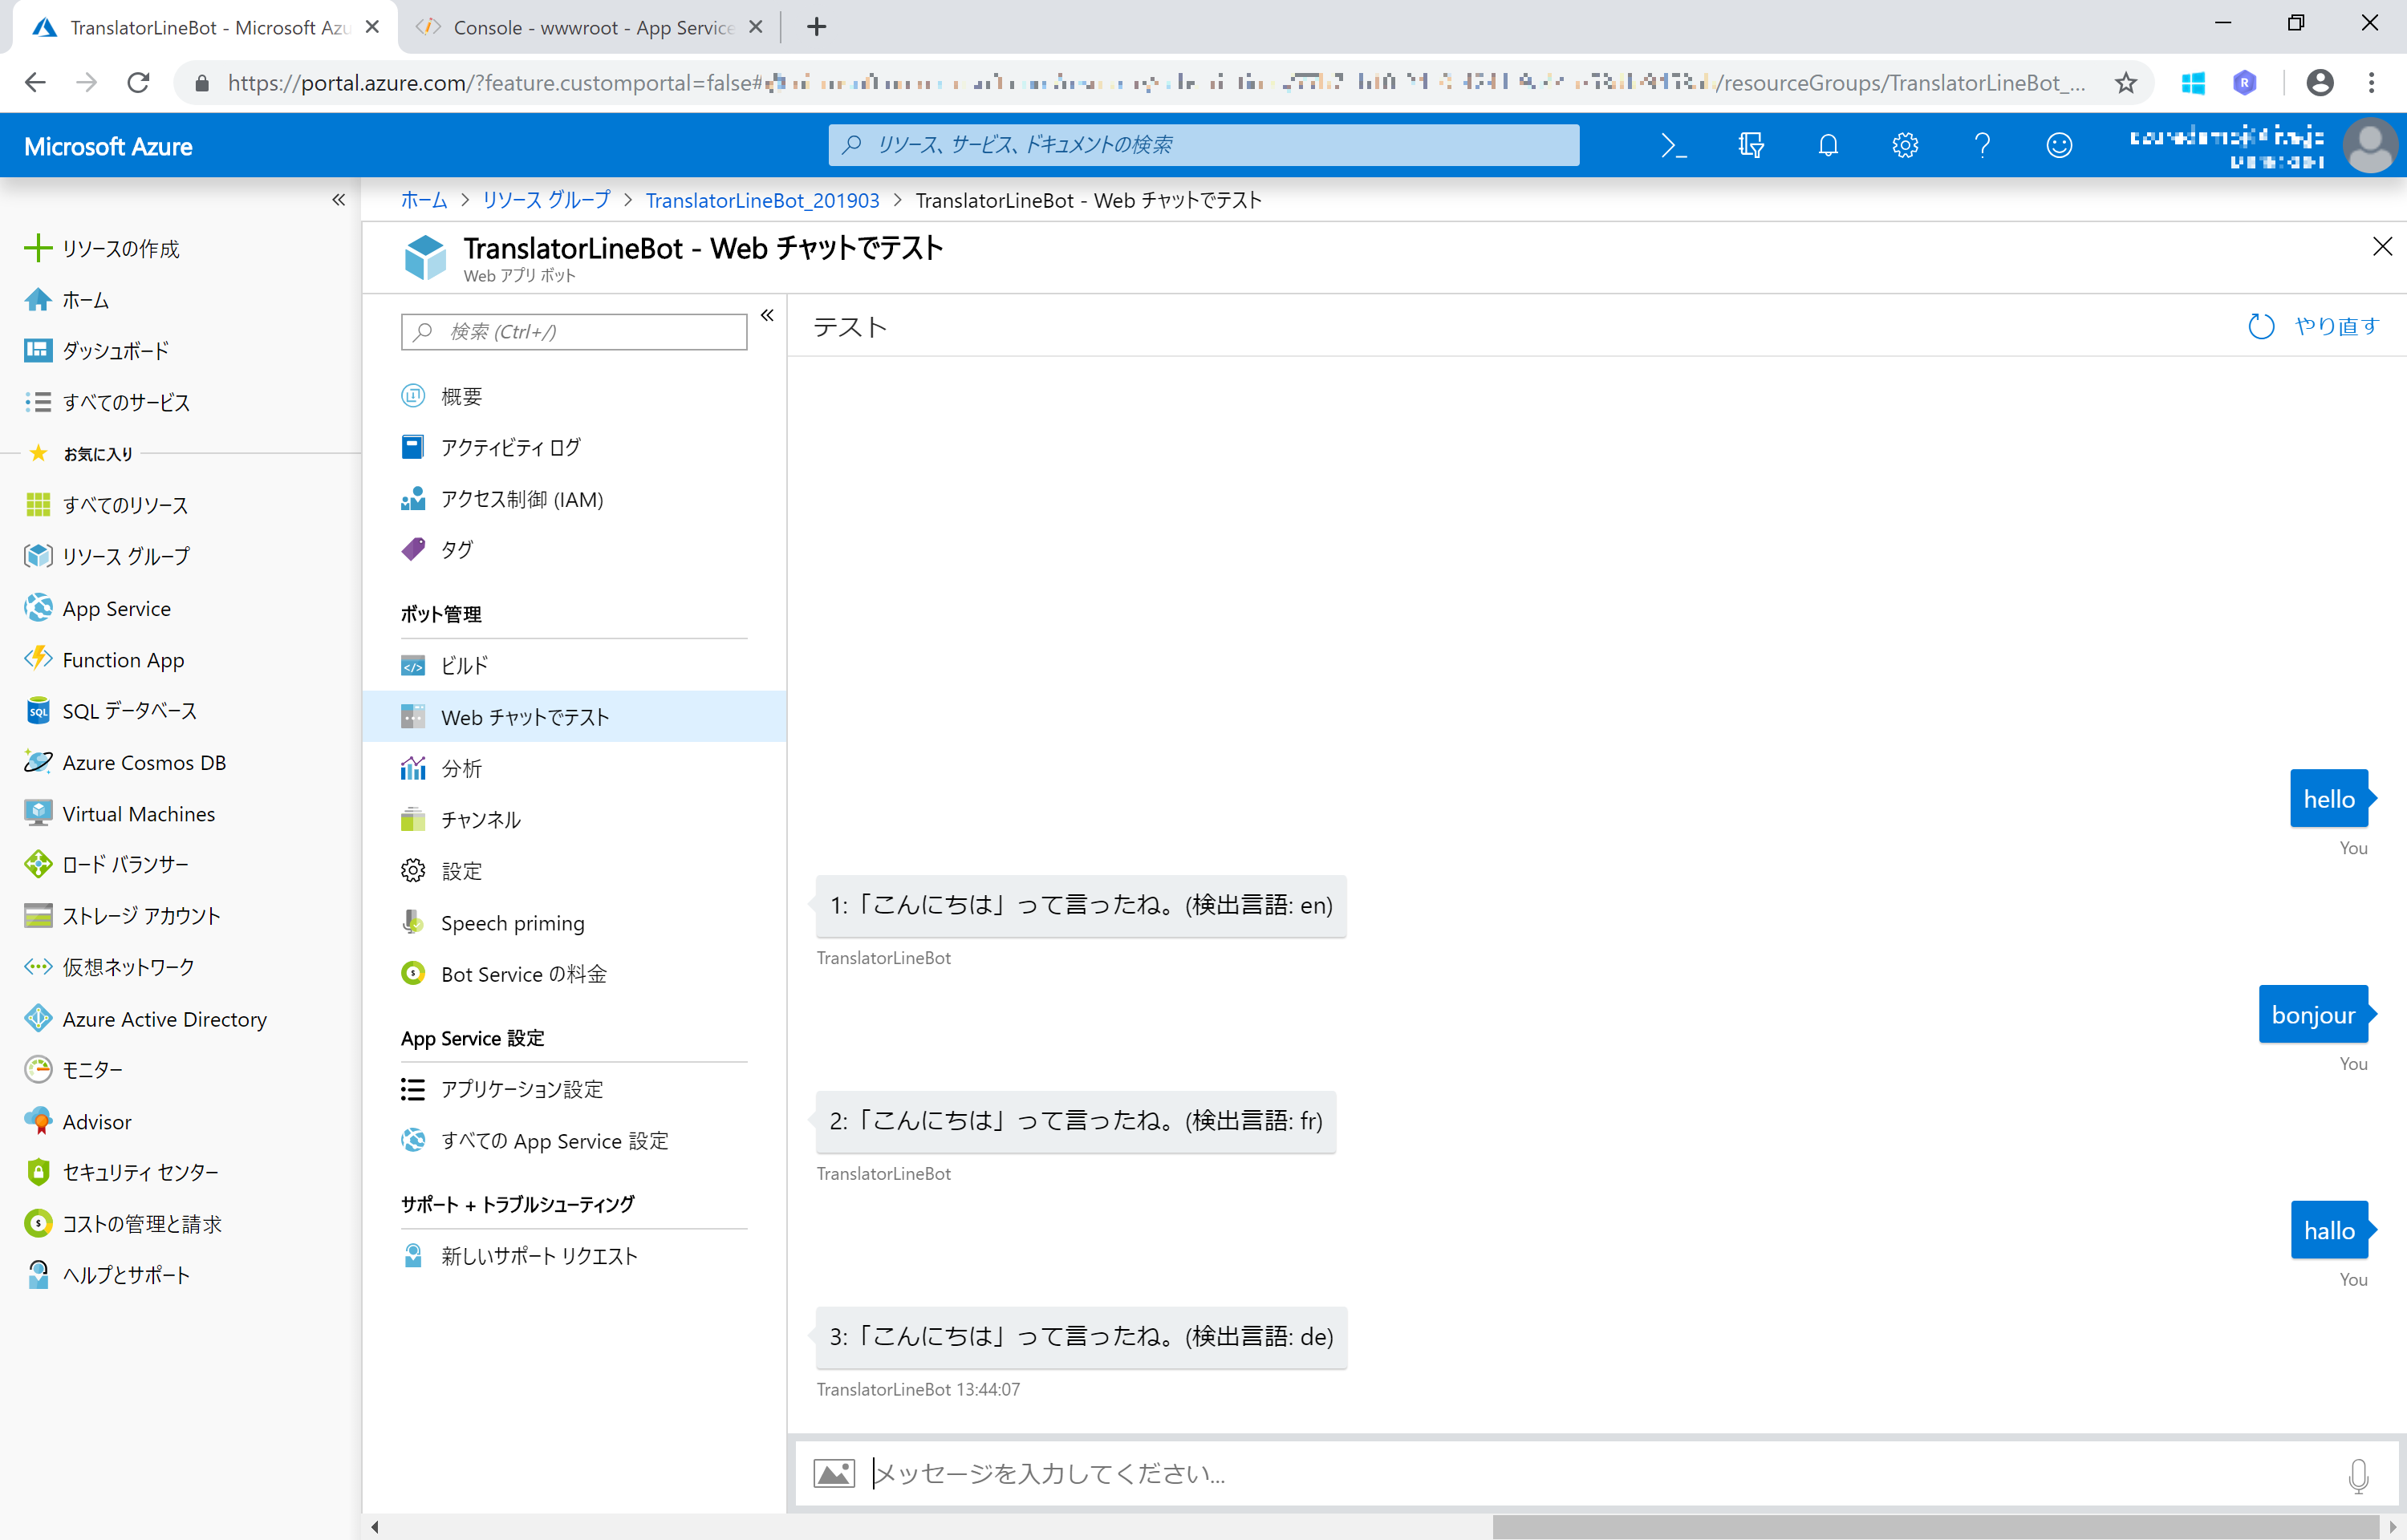
まずは Azure Portal の Web チャットからテストを行います。
入力された文言の日本語訳と元の言語が表示されれば、無事 Translator Text API を利用できています。
LINE アプリから 1. Azure Bot Service から LINE 接続編 で動作確認したアカウントを開きます。
Web チャットと同様に動作したら、翻訳チャットボットの完成です。
