Tensorflow ObjectDetection APIを使ってミレミアム・ファルコンのオリジナル物体検出モデルを作成します。
すでにこのモデル作成方法はこちらで公開されていますが、TensorflowのVersionが古いため、現在の環境での実装方法についてまとめます。
環境
- OS Ubuntu16.04
- CPU Intel Corei7-6700HQ 2.60GHzx8
- GPU Geforce GTX 1060/PCle/SSE2
学習の準備
学習環境をセットアップしていきます。
Tensorflowはインストール済みとします。バージョンは1.9です。
Tensorflow Object Detection APIをインストール
まず、Tensorflow Object Detection APIをインストールします。
インストールは公式の方法に従い行えば問題なくできると思います。
Custom Object Detectionをインストール
この記事はTracking the Millennium Falcon with TensorFlowをもとに作成しています。
ImageデータやAnnotationデータなどをGit-Hub上に公開してくれているため、利用させてもらいます。
# From Home Directory
git clone https://github.com/bourdakos1/Custom-Object-Detection
Original Object Detectionを作成
Custom Object Detectionをベースにオリジナルのディレクトリ内に環境を構築していきます。
modelsとCustom Object Detectionはhomeディレクトリにあるとします。
まず、Object Detection APIの環境を構築します。
# From Home Directory
mkdir Original-Object-Detection
cd models/research
cp -r object_detection slim ~/Original-Object-Detection
cd ~/Original-Object-Detection
CocoAPI Installationをインストール
CocoAPIをインストールします。
# From Original-Object-Detection
git clone https://github.com/cocodataset/cocoapi.git
cd cocoapi/PythonAPI
make
cp -r pycocotools ~/Original-Object-Detection/
Protobufをコンパイル
Protobufのコンパイルを行います。
# From Original-Object-Detection
wget -O protobuf.zip https://github.com/google/protobuf/releases/download/v3.0.0/protoc-3.0.0-linux-x86_64.zip
unzip protobuf.zip
./bin/protoc object_detection/protos/*.proto --python_out=.
PYTHONPATHを追加
PYTHONPATHを追加します。
Object Detection APIを使用する際には毎回宣言するかbasrhcに追加する必要があります。
# From Original-Object-Detection
export PYTHONPATH=$PYTHONPATH:`pwd`:`pwd`/slim
Testing the Installation
Original-Object-DetectionにおいてObject Detection APIが正常に動作するか確認します。
以下のコマンドでOKがでれば成功です。
# From Original-Object-Detection
python object_detection/builders/model_builder_test.py
データセット
Custom-Object-Detection内にあるImageデータとアノテーションデータをOriginal-Object-Detectionのディレクトリ内にコピーします。
# From Home Directory
cd Custom-Object-Detection
cp -r images annotations ~/Original-Object-Detection
TFRecordの作成
データセットをTensorflowが読み込むためにTFRecordに変換する必要があります。
変換スプリクトもCustom-Object-Detectionにて準備されてるものがあるので利用させていただきましょう。
# From Home Directory
cd Custom-Object-Detection/object_detection
cp -r create_tf_record.py ~/Original-Object-Detection/object_detection
cd ~/Original-Object-Detection/object_detection
python create_tf_record.py
Labelの確認
今回検出する物体のクラスを宣言しているファイルを確認してみましょう。
Millennium FalconとTie Fighterを検出対象としていることがわかります。
item {
  id: 1
  name: 'Millennium Falcon'
}

item {
  id: 2
  name: 'Tie Fighter'
}
Configファイルの作成
作成したいBase Modelをmodel zooからダウンロードしてきます。
今回はssd-mobilenet-v1を使用しました。
解凍したモデルからすべてのmodel.ckptファイルとpipeline.configを自分のディレクトリに持ってきます。
# From Download Directory
tar -xvf ssd_mobilenet_v1_coco_2018_01_28
cp -r model.ckpt* pipeline.confg ~/Original-Object-Detection/
次に、pipeline.config内のimageデータ、annotatioデータ、labelに対するPATHを書き換えます。
書き換えるのは"PATH_TO_BE_CONFIGURED"の部分です。
pipeline.config
```config
model {
  ssd {
    num_classes: 2
    image_resizer {
      fixed_shape_resizer {
        height: 300
        width: 300
      }
    }
    feature_extractor {
      type: "ssd_mobilenet_v1"
      depth_multiplier: 1.0
      min_depth: 16
      conv_hyperparams {
        regularizer {
          l2_regularizer {
            weight: 3.99999989895e-05
          }
        }
        initializer {
          truncated_normal_initializer {
            mean: 0.0
            stddev: 0.0299999993294
          }
        }
        activation: RELU_6
        batch_norm {
          decay: 0.999700009823
          center: true
          scale: true
          epsilon: 0.0010000000475
          train: true
        }
      }
    }
    box_coder {
      faster_rcnn_box_coder {
        y_scale: 10.0
        x_scale: 10.0
        height_scale: 5.0
        width_scale: 5.0
      }
    }
    matcher {
      argmax_matcher {
        matched_threshold: 0.5
        unmatched_threshold: 0.5
        ignore_thresholds: false
        negatives_lower_than_unmatched: true
        force_match_for_each_row: true
      }
    }
    similarity_calculator {
      iou_similarity {
      }
    }
    box_predictor {
      convolutional_box_predictor {
        conv_hyperparams {
          regularizer {
            l2_regularizer {
              weight: 3.99999989895e-05
            }
          }
          initializer {
            truncated_normal_initializer {
              mean: 0.0
              stddev: 0.0299999993294
            }
          }
          activation: RELU_6
          batch_norm {
            decay: 0.999700009823
            center: true
            scale: true
            epsilon: 0.0010000000475
            train: true
          }
        }
        min_depth: 0
        max_depth: 0
        num_layers_before_predictor: 0
        use_dropout: false
        dropout_keep_probability: 0.800000011921
        kernel_size: 1
        box_code_size: 4
        apply_sigmoid_to_scores: false
      }
    }
    anchor_generator {
      ssd_anchor_generator {
        num_layers: 6
        min_scale: 0.20000000298
        max_scale: 0.949999988079
        aspect_ratios: 1.0
        aspect_ratios: 2.0
        aspect_ratios: 0.5
        aspect_ratios: 3.0
        aspect_ratios: 0.333299994469
      }
    }
    post_processing {
      batch_non_max_suppression {
        score_threshold: 0.300000011921
        iou_threshold: 0.600000023842
        max_detections_per_class: 100
        max_total_detections: 100
      }
      score_converter: SIGMOID
    }
    normalize_loss_by_num_matches: true
    loss {
      localization_loss {
        weighted_smooth_l1 {
        }
      }
      classification_loss {
        weighted_sigmoid {
        }
      }
      hard_example_miner {
        num_hard_examples: 3000
        iou_threshold: 0.990000009537
        loss_type: CLASSIFICATION
        max_negatives_per_positive: 3
        min_negatives_per_image: 0
      }
      classification_weight: 1.0
      localization_weight: 1.0
    }
  }
}
train_config {
  batch_size: 24
  data_augmentation_options {
    random_horizontal_flip {
    }
  }
  data_augmentation_options {
    ssd_random_crop {
    }
  }
  optimizer {
    rms_prop_optimizer {
      learning_rate {
        exponential_decay_learning_rate {
          initial_learning_rate: 0.00400000018999
          decay_steps: 800720
          decay_factor: 0.949999988079
        }
      }
      momentum_optimizer_value: 0.899999976158
      decay: 0.899999976158
      epsilon: 1.0
    }
  }
  fine_tune_checkpoint: "model.ckpt"
  # Change
  # fine_tune_checkpoint: "PATH_TO_BE_CONFIGURED/model.ckpt"
  from_detection_checkpoint: true
  num_steps: 200000
}
train_input_reader {
  # Change
  # label_map_path: "PATH_TO_BE_CONFIGURED/mscoco_label_map.pbtxt"
  label_map_path: "annotations/label_map.pbtxt"
  tf_record_input_reader {
    # Change
    # input_path: "PATH_TO_BE_CONFIGURED/mscoco_train.record"
    input_path: "train.record"
  }
}
eval_config {
  num_examples: 8000
  max_evals: 10
  use_moving_averages: false
}
eval_input_reader {
  # Change
  # label_map_path: "PATH_TO_BE_CONFIGURED/mscoco_label_map.pbtxt"
  label_map_path: "annotations/label_map.pbtxt"
  shuffle: false
  num_readers: 1
  tf_record_input_reader {
    # Change
    # input_path: "PATH_TO_BE_CONFIGURED/mscoco_val.record"
    input_path: "val.record"
  }
}
学習
さて準備がすべてできたので学習を行いましょう。
データ量によってstep数は変更必要があります。Custom-Object-Detectionでは4.5kstepで安定しているようです。
学習モデルはmodel内に保存されていきます。
python object_detection/model_main.py \
--logtostderr \
--model_dir=model \
--pipeline_config_path=pipeline.config
Tensorboard
学習状態をTensorboardで確認することができます。
# From Original Object Detejection
tensorboard --logdir path to Origina-Object-Detection
Inference graphに学習モデルを登録
学習したモデルを使用するためには、モデルをfrozen inference graphに変換する必要があります。
使用したいモデルをmodelディレクトリから一つ上の階層に移動した後以下のコマンドでcheckpointを変換し、
frozen inference graphとしてoutput_inference_graph内に保存します。
利用するモデルが916stepの場合は以下の通りになります。番号は適宜変更してください。
# From Original-Object-Detection/model
cp -r model.ckpt-916* ../
cd ../
python object_detection/export_inference_graph.py \
        --input_type image_tensor \
        --pipeline_config_path pipeline.config \
        --trained_checkpoint_prefix model.ckpt-916 \
        --output_directory output_inference_graph
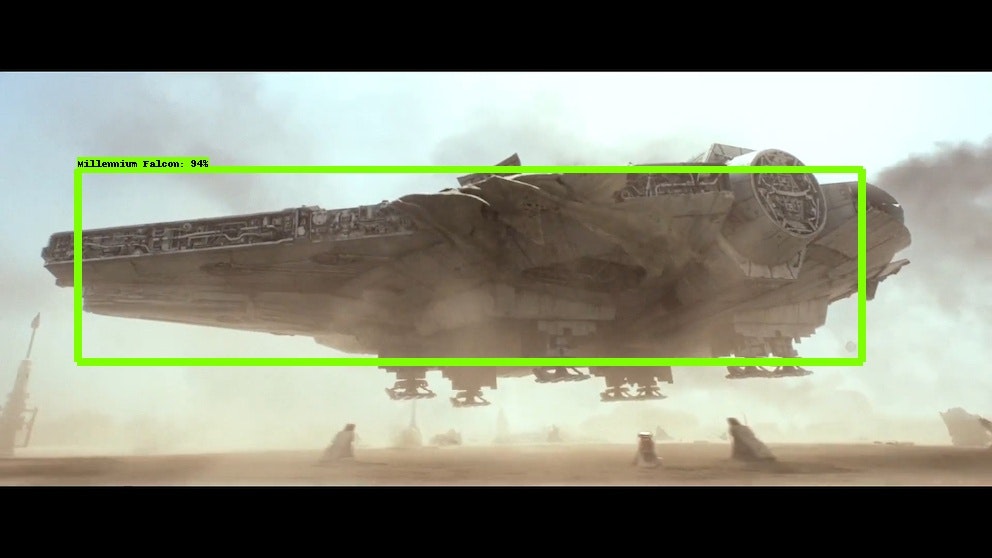
Test Model
学習したモデルで物体検出を行いましょう。
Custom-Object-Detection内にあるtest_imagesとobject_detection_runner.pyを使います。
# From Custom-Object-Detection
cp -r test_images ~/Original-Object-Detection
cd object_detection
cp -r object_detection_runner.py ~/Original-Object-Detection/object_detection.py
物体検出結果はoutputディレクトリ内に保存するようにPATHが宣言されているため、outputディレクトリを作成します。
# From Original-Object-Detection
mkdir output
以下のコマンドを実行するとoutput内に検出結果の画像が保存されます。
# From Original-Object-Detection
python object_detection/object_detection_runner.py
Result
まとめ
Tensorflow Object Detection APIのおかげで、だれでも簡単にオリジナルの画像で物体検出モデルを生成することができるようになっています。
ぜひ、いろいろなデータセットやネットワークを試して遊んで見てください。
オリジナルのデータセットを作る際にはlaelImgを使うのがおすすめです。
さいごまで読んでいただきありがとうございました。
参照
Custom-Object-Detection
Tensorflow Object Detection APIで寿司検出モデルを学習するまで