はじめに
本記事は以下2の続きです。
- Google Kubernetes Engine(GKE)でJavaのWebモジュールをサッと動かしてみる
- Dockerイメージの作成とRegistry登録
- Webモジュールからアクセスするデータベースを作成
- マニフェストの作成とWebモジュールの実行
3-1. データベースの作成
手順3-1.1
Webモジュールからアクセスするデータベースを作成します。
サイドメニューで「SQL」をクリックします。
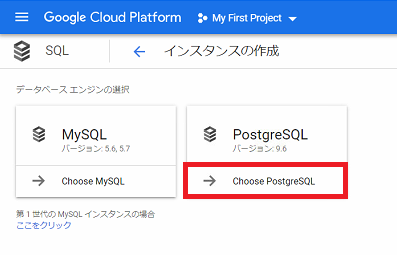
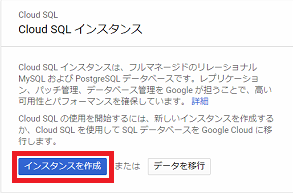
詳細画面がでたら「インスタンス作成」をクリックします。

手順3-1.2
手順3-1.3
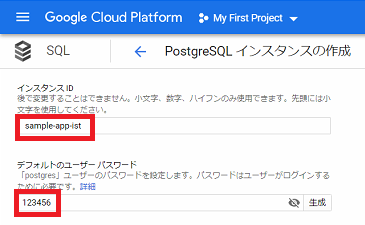
詳細画面でインスタンスIDに「sample-app-ist」とデフォルトユーザーのパスワードに「123456」を入力します。
手順3-1.4
手順3-1.5
手順3-1.6
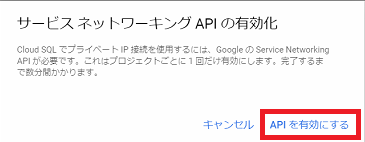
詳細画面が表示された場合は「APIを有効にする」をクリックします。
手順3-1.7
手順3-1.8
手順3-1.9
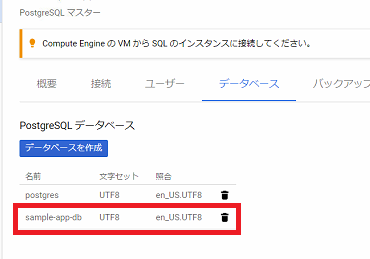
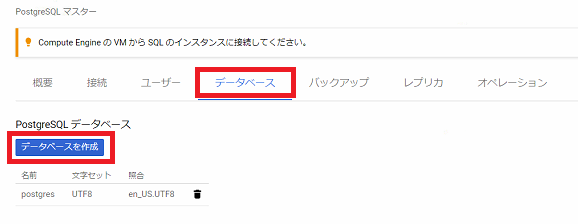
続けてデータベースインスタンスをクリックし詳細画面でデータベースをクリックします。さらに「データベースを作成」をクリックします。
手順3-1.10
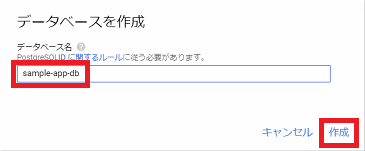
データベース名に「sample-app-db」を入力し「作成」をクリックします。
手順3-1.11
手順3-1.12
早速、データベースインスタンスに接続します。
パスワードを求められたら「123456」を入力します。
[userid]@cloudshell:~ ([project_id])$ sudo gcloud sql connect sample-app-ist --user=postgres
Whitelisting your IP for incoming connection for 5 minutes...done.
Connecting to database with SQL user [postgres].Password for user postgres:
psql (9.6.11, server 9.6.10)
SSL connection (protocol: TLSv1.2, cipher: ECDHE-RSA-AES128-GCM-SHA256, bits: 128, compression: off)
Type "help" for help.
手順3-1.13
操作対象のデータベースがpostgresになっているので先ほど作成したsample-app-dbに切り替えます。パスワードを求められたら「123456」を入力します。
postgres=> \connect sample-app-db
Password for user postgres:
psql (9.6.11, server 9.6.10)
SSL connection (protocol: TLSv1.2, cipher: ECDHE-RSA-AES128-GCM-SHA256, bits: 128, compression: off)
You are now connected to database "sample-app-db" as user "postgres".
手順3-1.14
次に後で使用するproxyuserを作成し、データベースへの接続と権限を与えます。proxyuserに切り替えた後(パスワードを求められたら「123456」を入力)にt_sampleテーブルを作成し、1件テストデータをINSERTします。
sample-app-db=> CREATE ROLE proxyuser WITH LOGIN PASSWORD '123456';
CREATE ROLE
sample-app-db=> GRANT CONNECT ON DATABASE "sample-app-db" TO proxyuser;
sample-app-db=> \connect - proxyuser
Password for user proxyuser:
psql (9.6.11, server 9.6.10)
SSL connection (protocol: TLSv1.2, cipher: ECDHE-RSA-AES128-GCM-SHA256, bits: 128, compression: off)
You are now connected to database "sample-app-db" as user "proxyuser".
sample-app-db=> CREATE TABLE t_sample (order_no BIGINT NOT NULL, cre_dt TIMESTAMP NOT NULL default CURRENT_TIMESTAMP, nickname VARCHAR(30), order_id VARCHAR(5000));
CREATE TABLE
sample-app-db=> INSERT INTO t_sample (order_no, cre_dt, nickname, order_id) VALUES (1, '1999-01-08 04:05:06', 'テスト', 'ABC');
INSERT 0 1
手順3-1.15
作成したテーブルを確認します。
sample-app-db=> \dt
           List of relations
 Schema |   Name   | Type  |   Owner
--------+----------+-------+-----------
 public | t_sample | table | proxyuser
(1 row)
3-2. データベースインスタンスへの接続に必要な設定
手順3-2.1
GKEからデータベースインスタンスへの接続に必要な設定を行います。
まず、Cloud SQL Administration API を有効にするをクリックします。
手順3-2.2
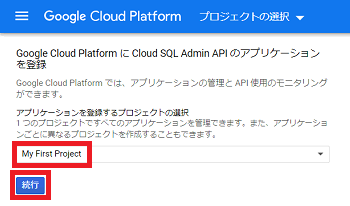
「アプリケーションを登録するプロジェクトの選択」を入力し「続行」をクリックします。
手順3-2.3
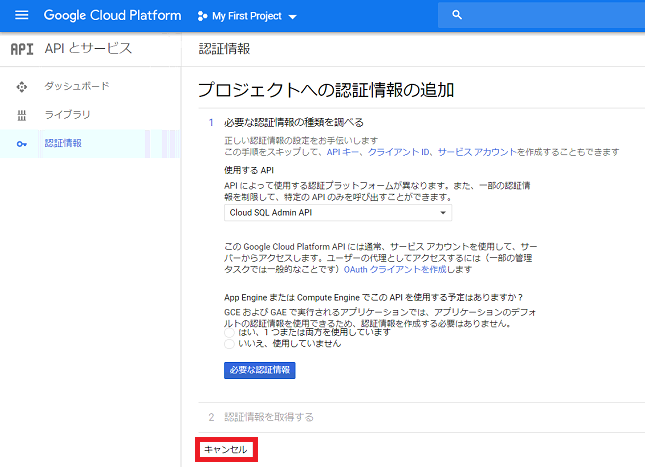
これでCloud SQL Administration APIが有効になりました。
プロジェクトへの認証情報の追加では「キャンセル」をクリックします。
手順3-2.4
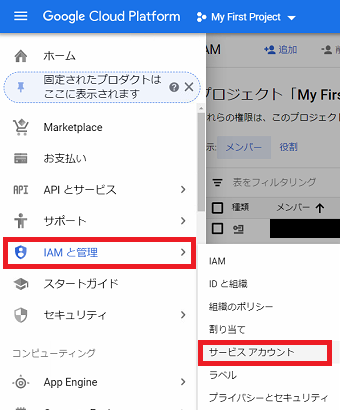
続いて「IAMと管理」 -> 「サービスアカウント」をクリックします。
※サービスアカウントは、個々のエンドユーザーではなく、アプリケーションや仮想マシン(VM)に属している特別なGoogleアカウントです。アプリケーションはサービスアカウントを使用して、ユーザーの関与を必要とせずにGoogleのサービスAPIを呼び出すことができます。
※必ずCloud SQL Administration APIの有効化を先に済ませてください。
手順3-2.5
手順3-2.6
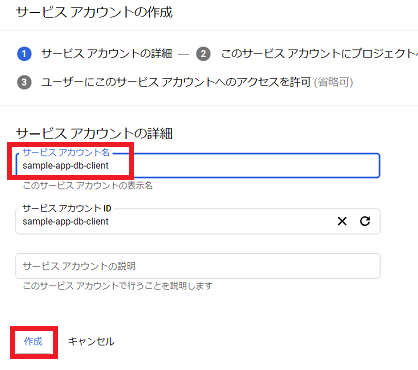
サービスアカウント名に「sample-app-db-client」を入力し「作成」をクリックします。
手順3-2.7
役割に「Cloud SQL クライアント」を入力し「続行」をクリックします。

手順3-2.8
手順3-2.9
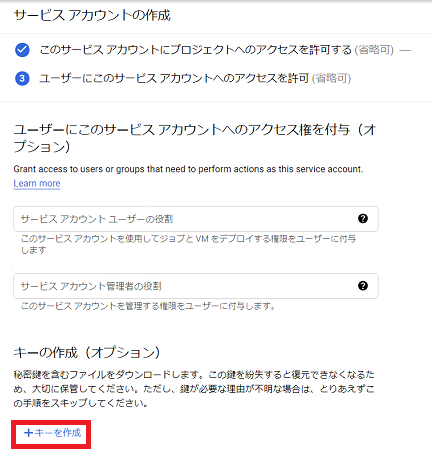
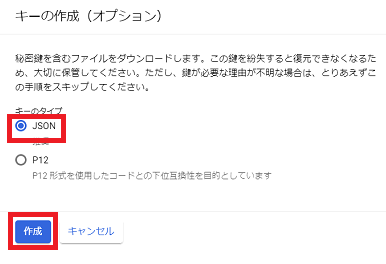
詳細画面で「JSON」が選ばれていることを確認し「作成」をクリックします。
手順3-2.10
手順3-2.11
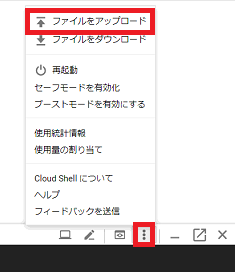
ブラウザにダウンロードされたJSONファイルをアップロードします。
手順3-2.12
ファイルがアップロードされたか確認します。
[userid]@cloudshell:~ ([project_id])$ ls -Fal
-rw-r--r-- 1 [userid] xxxxxxx      2361 Mar 10 09:25 [project_id]-xxxxxxxxxxxx.json
手順3-2.13
先ほどアップロードしたJSONを指定してsecretを作成します。
※[project_id]-xxxxxxxxxxxxの部分は各自の環境に合わせ書き換えてください。
[userid]@cloudshell:~ ([project_id])$ kubectl create secret generic cloudsql-instance-credentials --from-file=credentials.json=[project_id]-xxxxxxxxxxxx.json
secret "cloudsql-instance-credentials" created
手順3-2.14
Cloud Sql Proxyがデータベース・アクセス時に使うユーザとパスワードを指定してsecretを作成します。
[userid]@cloudshell:~ ([project_id])$ kubectl create secret generic cloudsql-db-credentials --from-literal=username=proxyuser --from-literal=password=123456
secret "cloudsql-db-credentials" created
以上
