こんな感じのことがしたい
サービスで利用しているデータが mongo に入っていて、それを KPI などで利用したい。
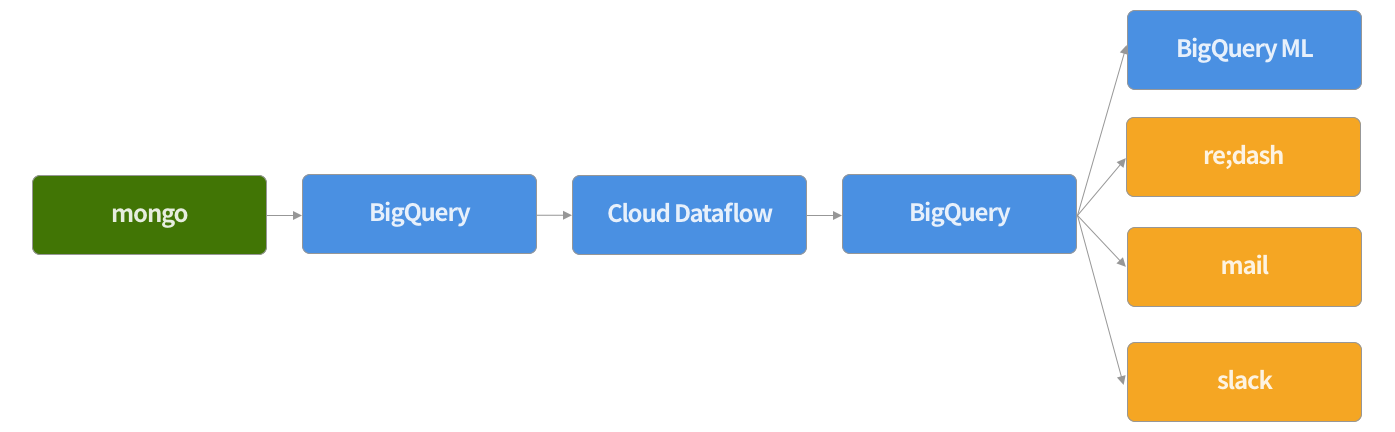
ほぼこれと同じカタチ
練習として Twitter のデータで試す
以下、目次(※ 準備編では手順2まで)
- Twitter API で検索したツイートデータをローカルの mongo に入れる
- ローカルの mongo のデータを BigQuery にそのまま上げる
- BigQuery に上げたデータを Cloud Dataflow を使って加工して、新たに BigQuery にテーブルを作成
- 加工したテーブルをダッシュボードで見れるようにしたり、メールやslackに飛ばす。できたらつい先日でた BigQuery ML も試す
環境
ローカルマシン : Mac Pro (Late 2013)
OS : Mac OS High Sierra 10.13.6
仮想環境
1, 2 の手順は仮想環境の Ubuntu で行っている
VirtualBox : 5.2.12
Vagrant : 2.1.1
OS : Ubuntu 16.04
mongodb : v3.6.5
digdag : 0.9.25
embulk : 0.9.7
python : 3.6.5
1. Twitter API で検索したツイートデータを mongo に入れる
digdag + embulk で入れてます。
ただ自分の環境でやりやすいものがあったので利用しただけで、なんでもいいです。
ローカルの mongodb に突っ込むので、mongo は入れておいてください。
検索するハッシュタグは #SiroTalk でリツイートを除きます。
twitter という DB の search_tweet というコレクションに入れます。
dig ファイルにスケジュールを指定していませんが、毎回これを叩けば最新のツイートが無駄なく取れるようになっています。
ただし Twitter API の仕様上 検索は1週間分しかとれないので、それ以上間隔をあけると漏れます。
久しぶりに Twitter API を触ったら tweet_mode=extended これを入れておかないと全文取れないことに気づきました。
timezone: Asia/Tokyo

_export:
  plugin:
    repositories:
      - https://jitpack.io
    dependencies:
      - com.github.szyn:digdag-slack:0.1.4
  webhook_url: 自分の入れてね
  workflow_name: tweet_search
  ENV: dev

+get_tweet_data:
  py>: api.search_tweets_all
  _error:
    slack>: danger-template.yml

+finish:
  slack>: good-template.yml
# coding: utf-8
from __future__ import print_function
import os
import requests
import json
import time
import calendar
import math
from datetime import datetime
from pymongo import MongoClient
from requests_oauthlib import OAuth1
import digdag

CONSUMER_KEY = "自分のいれてね"
CONSUMER_SECRET = "自分のいれてね"
ACCESS_TOKEN = "自分のいれてね"
ACCESS_TOKEN_SECRET = "自分のいれてね"

SEARCH_API_URL = 'https://api.twitter.com/1.1/search/tweets.json?tweet_mode=extended'


# Twitter検索
def search_tweets_all():
    # Twitter 認証
    oauth = OAuth1(CONSUMER_KEY, CONSUMER_SECRET, ACCESS_TOKEN, ACCESS_TOKEN_SECRET)

    # db に入っている最新のツイートの tweet_id を取得
    # 重複しないように + 1
    since_id = get_last_tweet_id_from_db()
    since_id = since_id + 1

    # 検索クエリ(#SiroTalk をリツイートを除いて検索)
    query_form = {'q': u'#SiroTalk exclude:retweets', 'count': 100, 'result_type': 'recent', 'since_id': since_id}

    tweet_array = []

    while True:
        # Tweet データ取得
        response = requests.get(SEARCH_API_URL, auth = oauth, params = query_form)
        response_json = response.json()
        response_tweet_array = response_json['statuses']

        # 検索結果がなかったら終了
        if len(response_tweet_array) == 0:
            break

        # 検索結果を結合
        tweet_array.extend(response_tweet_array)

        # 次の検索のために tweet_id を今とってきた tweet の一番古い id - 1 に指定
        last_tweet = response_tweet_array[len(response_tweet_array) - 1]
        last_tweet_id = last_tweet['id']
        max_id = last_tweet_id - 1
        query_form['max_id'] = max_id

    # mongo に insert
    for tweet in tweet_array:
        # BigQuery でのパーティションのために、unixtime を ct として追加
        created_at_time_utc = time.strptime(tweet['created_at'], '%a %b %d %H:%M:%S +0000 %Y')
        unix_time = calendar.timegm(created_at_time_utc)
        tweet['ct'] = unix_time
        insert_tweet(tweet)


# mongo に insert
def insert_tweet(tweet):
    client = MongoClient('localhost', 27017)
    db = client.twitter
    collection = db.search_tweet

    # もし既に同じ tweet_id が db に入っていたら、update するようにする
    tweet_id = tweet['id']
    result = collection.update(
        {'tweet_id': tweet_id}
        , {'$set': tweet}
        , upsert=True
    )
    return result


def get_last_tweet_id_from_db():
    client = MongoClient('localhost', 27017)
    db = client.twitter
    collection = db.search_tweet

    last_tweet_array = collection.find().sort('tweet_id', -1).limit(1)
    last_tweet = last_tweet_array[0]
    last_tweet_id = last_tweet['tweet_id']
    return last_tweet_id
mongo でデータが入っているか確認
$mongo

> use twitter
> db.search_tweet.findOne()
2. ローカルの mongo のデータを BigQuery にそのまま上げる
取得した1週間分のツイートデータを BigQuery に上げます。
embulk gem install で予め以下が必要
embulk-input-mongodb
embulk-filter-expand_json
embulk-output-bigquery
timezone: Asia/Tokyo

_export:
  plugin:
    repositories:
      - https://jitpack.io
    dependencies:
      - com.github.szyn:digdag-slack:0.1.4
  webhook_url: 自分の入れてね
  workflow_name: mongo_to_bq
  ENV: dev

+mongo_to_bq:
  _export:
    COLLECTION_NAME: search_tweet
    START_DAY: 2018-07-21
    END_DAY: 2018-07-29

  +insert:
    loop>: ${moment(END_DAY).diff(moment(START_DAY), 'day')}
    _parallel: true
    _do:
      _export:
        START_TIME: ${moment(START_DAY).add(i, 'days').startOf('day').unix()}
        END_TIME: ${moment(START_DAY).add(i + 1, 'days').startOf('day').unix()}
        PARTITION: ${moment(START_DAY).add(i, 'days').format("YYYYMMDD")}

      +embulk:
        sh>: embulk run mongo_to_bq.yml.liquid

  _error:
    slack>: danger-template.yml

+finish:
  slack>: good-template.yml
in:
  type: mongodb
  uri: mongodb://localhost:27017/twitter
  collection: {{ env.COLLECTION_NAME }}
  query: '{ "ct": { $gte: {{ env.START_TIME }}, $lt: {{ env.END_TIME }} } }'

filters:
- type: expand_json
  json_column_name: record
  expanded_columns:
    - {name: "tweet_id", type: long}
    - {name: "created_at", type: string}
    - {name: "ct", type: long}
    - {name: "full_text", type: string}
    - {name: "favorite_count", type: long}
    - {name: "retweet_count", type: long}
    - {name: "source", type: string}
    - {name: "lang", type: string}
    - {name: "place", type: json}
    - {name: "geo", type: json}
    - {name: "user", type: json}
    - {name: "contributors", type: json}
    - {name: "coordinates", type: json}
    - {name: "favorited", type: boolean}
    - {name: "retweeted", type: boolean}
    - {name: "truncated", type: boolean}
    - {name: "in_reply_to_screen_name", type: string}
    - {name: "in_reply_to_status_id", type: long}
    - {name: "in_reply_to_user_id", type: long}
    - {name: "is_quote_status", type: json}
    - {name: "metadata", type: json}
    - {name: "possibly_sensitive", type: boolean}
    - {name: "display_text_range", type: json}
    - {name: "entities", type: json}
    - {name: "extended_entities", type: json}

out:
  type: bigquery
  auth_method: json_key
  # GCPからダウンロードしてきたjsonファイルのパスを書きます
  json_keyfile: 自分のいれてね.json
  project: 自分のいれてね
  dataset: 自分のいれてね
  table: 自分のいれてね${{ env.PARTITION }}
  auto_create_table: true
  mode: append
  prevent_duplicate_insert: true
  allow_quoted_newlines: true

  # gcs_bucket: 自分のいれてね
  # auto_create_gcs_bucket: true
  # compression: GZIP
gcs_bucket を使った方が効率的と見て、使いたかったのですが以下のエラーが解決できず断念
undefined local variable or method `path bigquery gcs
BigQuery にデータが入っていることを確認

3. Cloud Dataflow を使って加工
また今度
ハマっててまだできていません。
Dataflow は java と python が用意されているのですが
python は足りていない機能があるようなのと、 java はコードの書き方が独特すぎて難しかったので Scio を使おうと思っています。
このあたりの理由はこちらとかを参考に