前回の記事 に引き続き、freee の API を触ってみました。
今回は、ウェブアプリ風に
「OAuth認証=>認証済みのユーザー情報を取得」
までを実装してみました。
やること
- freee APIのOAuth認証を利用してアクセストークンを取得する
- OAuth2.0の認可コードフローを使う
- 実装はJavaScript + Node.js で行う
大まかな仕様
- ログイン画面から client_id, client_secret, redirect_uri を入力する
- OAuthの認可コードフローに従い、認可コードを取得する
- freee API の認証を行いトークンJSONを取得、ウェブアプリに返しログイン状態とする
- 認証中のユーザー情報(ユーザー表示名)を取得、画面に表示する
- revoke を実行して、トークンを破棄する
実際の挙動
実際のコード
以下、コードです。
ディレクトリ構成図はこんな感じです。
/
├── index.js*
├── node_modules/
├── package.json*
├── public/
    └── index.html*
index.js
const express = require('express')
const app = express()
const bodyParser = require('body-parser')
const request = require('request')
const port = 3000
app.use('/', express.static('public'));
app.use(bodyParser.urlencoded({
  extended: true
}));
app.use(bodyParser.json());
app.post('/auth/', (req, res) => {
  console.log(req.body);
  const options = {
    method: 'POST',
    url: "https://accounts.secure.freee.co.jp/public_api/token",
    headers: {
      'cache-control': 'no-cache',
      'Content-Type': 'application/json'
    },
    form: req.body,
    json: true
  };
  request(options, function(error, response, body) {
    console.log(body);
    res.send(body);
  });
});

app.post('/revoke/', (req, res) => {
  console.log(req.body.access_token);
  const options = {
    method: 'POST',
    url: "https://accounts.secure.freee.co.jp/public_api/revoke",
    headers: {
      'Content-Type': 'application/json',
      'Authorization': 'Bearer ' + req.body.access_token,
    },
    form: {
      "token" : req.body,
    },
    json: true
  };
  request(options, function(error, response, body) {
    res.send(body);
  });
});

app.post('/username/', (req, res) => {
  console.log(req.body.access_token);
  const options = {
    method: 'GET',
    url: "https://api.freee.co.jp/api/1/users/me",
    headers: {
      'Content-Type': 'application/json',
      'Authorization': 'Bearer ' + req.body.access_token,
    },
    json: true
  };
  request(options, function(error, response, body) {
    console.log(body);
    res.send(body);
  });
});


app.listen(port, () => console.log(`Example app listening on port ${port}!`))
エンドポイントは
- auth
- トークンデータ取得
- revoke
- トークンデータの破棄
- username
- 認証中のユーザー名(display name)の取得
の3つを設定しています。
フォームのコードは以下となります。jQueryでシンプルに実装しました。
index.html
<!DOCTYPE html>
<html lang="ja">
<head>
  <meta charset="utf-8">
  <meta content="IE=edge" http-equiv="X-UA-Compatible">
  <meta content="width=device-width, initial-scale=1" name="viewport">
  <title>freee APIの認証サンプル</title>
  <script src="https://code.jquery.com/jquery-3.4.1.js" integrity="sha256-WpOohJOqMqqyKL9FccASB9O0KwACQJpFTUBLTYOVvVU=" crossorigin="anonymous"></script>
  <link href="https://stackpath.bootstrapcdn.com/bootstrap/4.3.1/css/bootstrap.min.css" rel="stylesheet">
</head>
<body>
  <div class="container">
    <div class="form-group col-sm-8" id="content">
      <h2>freee API サンプル</h2>
        <div class="form-group col-xs-2">
          <input class="form-control" id="client_id" placeholder="Client ID" type="text" >
        </div>
        <div class="form-group">
          <input class="form-control col-xs-2" id="client_secret" placeholder="Client Secret" type="text" >
        </div>
        <div class="form-group">
          <input class="form-control" id="redirect_uri" placeholder="Redirect URL" type="text" >
        </div>
        <div class="form-group">
          <button id="auth">認証</button>
        </div>
    </div>
  </div>
  <script>

  $(function() {

    // 初期情報を入力済みかチェック

    if (sessionStorage.getItem('freee_initial')) {
      const save_val = JSON.parse(sessionStorage.getItem('freee_initial'));
      $('#client_id').val(save_val.id);
      $('#client_secret').val(save_val.secret);
      $('#redirect_uri').val(save_val.redirect);
    }

    // 「認証」ボタンを押して認可コード取得=

    $('#auth').on('click', function() {
      getAuthCode();
    });

    // 64桁の認可コードが取得されたらfreee APへ認証リクエストを送る

    if (getParam('code')) {
      if (getParam('code').length == 64) {
        getToken();
      }
    }

    // トークンが取得できていたら「ログインしています」のメッセージを表示

    checkLogin();

    //  「ユーザー名を確認」ボタンをクリックしたらdisplay_nameを表示

    $('#username').on('click', function() {
      showUsername();
    });

    //  「ログアウト」ボタンをクリックしたらトークン類を破棄

    $('#logout').on('click', function() {
      revokeToken();
    });

    // 関数類をまとめて定義

    function checkLogin() {
      if (sessionStorage.getItem('freee_token')) {
        const access_token = JSON.parse(sessionStorage.getItem('freee_token')).access_token
        const mes = `
        <p>ログインしています。</p>
        <button id="username">ユーザー名確認</button><br>
        <button id="logout">トークン破棄</button>
      `
        $("#content").html(mes);
      }
    }

    function getAuthCode() {
      const initial_data = {
        'id': $('#client_id').val(),
        'secret': $('#client_secret').val(),
        'redirect': $('#redirect_uri').val(),
      };
      sessionStorage.setItem('freee_initial', JSON.stringify(initial_data));
      const URL = 'https://accounts.secure.freee.co.jp/public_api/authorize?client_id=' + $('#client_id').val() + '&redirect_uri=' + $('#redirect_uri').val() + '&response_type=code';
      location.href = URL;
    }

    function getToken() {
      const grant_type = 'authorization_code';
      const code = getParam("code");
      $.ajax({
        type: "POST",
        url: "http://127.0.0.1:3000/auth/",
        data: {
          "client_id": $('#client_id').val(),
          "client_secret": $('#client_secret').val(),
          "redirect_uri": $('#redirect_uri').val(),
          "grant_type": "authorization_code",
          "code": getParam("code"),
        }
      }).then((data) => {
        if (data.access_token) {
          console.log(data);
          sessionStorage.setItem('freee_token', JSON.stringify(data));
          location.href = $('#redirect_uri').val();
        }
      });
    }

    function showUsername() {
      const save_token = JSON.parse(sessionStorage.getItem('freee_token'));
      $.ajax({
        type: 'POST',
        url: 'http://127.0.0.1:3000/username/',
        data: {
          'access_token': save_token.access_token,
        },
      }).then((data) => {
        console.log(data);
        $('#content').after('<h2>こんにちは、' + data.user.display_name + 'さん!</h2>');
      });
    }

    function revokeToken() {
      const revoke_refresh_token = JSON.parse(sessionStorage.getItem('freee_token')).refresh_token;
      $.ajax({
        type: 'POST',
        url: 'http://127.0.0.1:3000/revoke/',
        data: {
          'token': revoke_refresh_token,
        }
      }).then((data) => {
        console.log(data);
        sessionStorage.removeItem('freee_token');
        location.reload();
      });
    }

    function getParam(name, url) {
      if (!url) url = window.location.href;
      name = name.replace(/[\[\]]/g, '\\$&');
      let regex = new RegExp('[?&]' + name + '(=([^&#]*)|&|#|$)'),
        results = regex.exec(url);
      if (!results) return null;
      if (!results[2]) return '';
      return decodeURIComponent(results[2].replace(/\+/g, ' '));
    }
  });

</script>
</body>
</html>
freee API の開発を通じて気がついた事など
CORS制限への対応
freee API はCORS制限がかかっていて、ウェブブラウザから直接トークンを取得したり、各種リクエストの実行が行えませんでした。このため、今回は
- ユーザーインターフェースはhtml
- jQuery+BootStrap
- トークン取得のロジックはNode.jsを利用してサーバーサイドで処理
の流れで実装してみました。
取得可能なデータの定義を行う必要がある
freee が取り扱うデータは、機密性の高いデータが中心となります。
そのためか、freee APIを利用して取得できるデータは、初期状態でかなり制限されています。
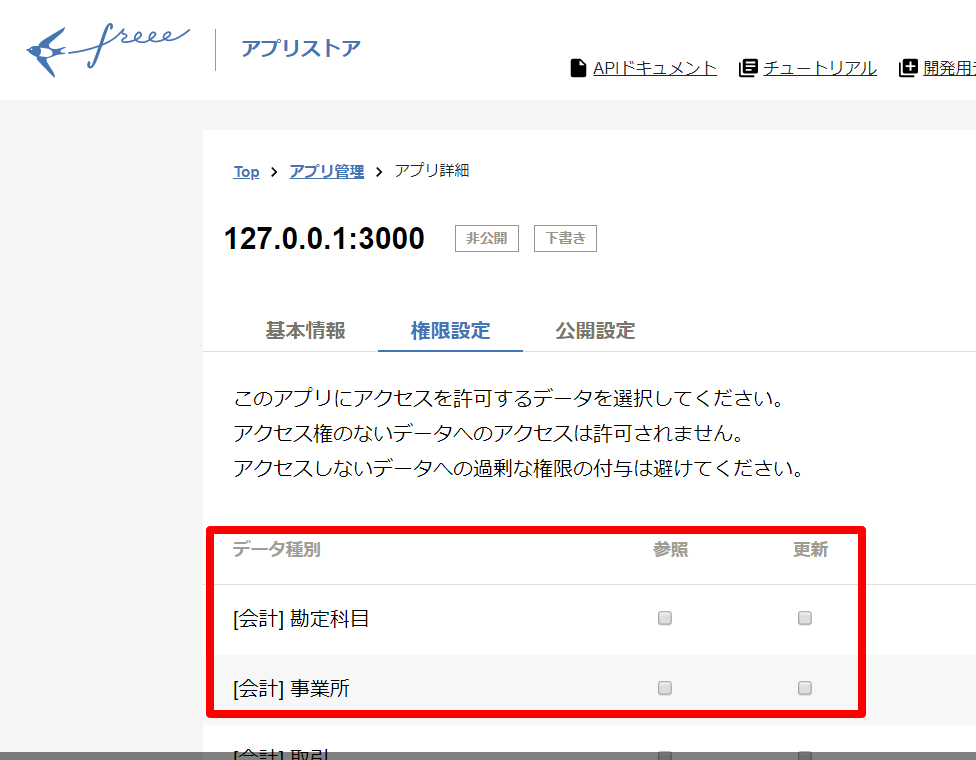
freee APIを利用した開発を行う際は、最初にアプリの権限設定で、取得可能なデータを定義する必要があります。
(取り扱いデータの性質上、不要な権限付与はできるだけ避けたほうが良いでしょう)
アプリは「下書き」状態でも動作可能
アプリを一般に公開せず「下書き」の状態でも、動作します。
間違って未完成のアプリを公開しないように気をつけたほうが良いでしょう。
トークンデータの取得
freee のドキュメントに、Node.js を利用したトークン取得のサンプルコードがありました。こちらをアレンジして、Node.js のコードを記述します。
Express + body-parserでPOSTデータを取得し、RequestでAPIを叩く
フォームからの入力値をNode.jsのサーバー側で受け取るために、Express + body-parser でシンプルなエンドポイントを設定しました。freee APIへの問い合わせには Request を使っています。
拙作のコード を流用しました。
個人的な感想
CORS制限のため、ウェブアプリ開発の際はサーバーサイドのスクリプトを合わせて開発する必要があります。freee API用のSDKが出てくれれば、実装がもう少し楽になりそうです。
免責事項、その他
本アプリはトークンの暗号化を行なっていないサンプル実装となります。また、十分なテストを行っておりません。
そのまま本番環境で利用することはお控えください。
動作保証はいたしかねる旨、ご了承ください。