はじめに
LWC(Lightning Web Components)のDatatableは、Salesforceでデータを表形式で表示するための便利なコンポーネントです。高い拡張性が特徴ですが、それゆえ使いこなすには少しコツが必要です。この記事では、LWCのDatatableを効果的に利用するための実装サンプルを紹介します。
なお、簡略のためエラーハンドリング等は省略しているので、参考にされる際はご注意下さい。
データ型
標準データ型
列で使用できるデータ型が標準でいくつか用意されています。列の定義をcolumns属性に設定します。columns属性が変更されると表は再描画されます。

サンプルコード・詳細
Datatableは標準で下記のデータ型をサポートします(最新の標準データ型はこちらを確認してください)。
| データ型 | コンポーネント | typeAttributesで設定可能 |
|---|---|---|
| action | lightning-button-menu | rowActions(必須), menuAlignment |
| boolean | ||
| button | lightning-button | disabled, iconName, iconPosition, label, name, title, variant |
| button-icon | lightning-button-icon | alternativeText, class, disabled, iconClass, iconName, name, title, variant |
| currency | lightning-formatted-number | currencyCode, currencyDisplayAs, minimumIntegerDigits, minimumFractionDigits, maximumFractionDigits, minimumSignificantDigits, maximumSignificantDigits, step |
| date | lightning-formatted-date-time | day, era, hour, hour12, minute, month, second, timeZone, timeZoneName, weekday, year |
| date-local | lightning-formatted-date-time | day, month, year |
| lightning-formatted-email | ||
| location | lightning-formatted-location | latitude, longitude |
| number | lightning-formatted-number | minimumIntegerDigits, minimumFractionDigits, maximumFractionDigits, minimumSignificantDigits, maximumSignificantDigits |
| percent | lightning-formatted-number | minimumIntegerDigits, minimumFractionDigits, maximumFractionDigits, minimumSignificantDigits, maximumSignificantDigits, step |
| phone | lightning-formatted-phone | |
| text | lightning-formatted-text | linkify |
| url | lightning-formatted-url | label, target, tooltip |
action、button、button-iconのデータ型はonrowactionに設定したメソッドを呼び出します。
<template>
  <lightning-datatable
    key-field="Id"
    columns={columns}
    data={data}
    hide-checkbox-column
    onrowaction={handleRowAction}
  ></lightning-datatable>
</template>
typeAttributeの値を行ごとに使用したい場合は{fieldName: "xxxxx"}のように設定します。
import { LightningElement, wire } from "lwc";
import fetchRecords from "@salesforce/apex/DatatableSampleCtrl.fetchRecords";

const actions = [
    { label: "Show details", name: "show_details" },
    { label: "Delete", name: "delete" }
];

const columns = [
    { label: "action", type: "action", typeAttributes: { rowActions: actions } },
    { label: "boolean", type: "boolean", fieldName: "Checkbox__c" },
    {
        label: "button",
        type: "button",
        typeAttributes: {
            iconName: "utility:alert", // 全ての行で同じ値を使用する場合はリテラルで指定します。
            label: "label", title: "title", name: "name", value: "value"
        }
    },
    { label: "button-icon", type: "button-icon", typeAttributes: {
        iconName: { fieldName: "buttonIconName" }  // fieldNameを渡すことで行ごとに値を設定できます。
    } },
    { label: "currency", type: "currency", fieldName: "Currency__c" },
    { label: "date", type: "date", fieldName: "Date__c" },
    { label: "date-local", type: "date-local", fieldName: "Date__c" },
    { label: "email", type: "email", fieldName: "Email__c" },
    { label: "location", type: "location", fieldName: "Location__c" },
    { label: "number", type: "number", fieldName: "Number__c" },
    { label: "percent", type: "percent", fieldName: "percent" },
    { label: "phone", type: "phone", fieldName: "Phone__c" },
    { label: "text", type: "text", fieldName: "Text__c" },
    { label: "url", type: "url", fieldName: "Url__c" }
];

export default class DatatableSample extends LightningElement {
    data = [];
    columns = columns;

    @wire(fetchRecords)
    getData({ data }) {
        if (data) {
            // この例ではmap関数を使用して「buttonIconName」に値を設定しています。
            this.data = data.map((record) => {
                const buttonIconName = record.isAlarmEnabled__c ? "utility:favorite" : "utility:favorite_off";
                return { ...record, percent: record.Percent__c / 100, buttonIconName };
            });
        }
    }

    handleRowAction(event) {
        console.log(JSON.stringify(event.detail));
        // 処理
    }
}
カスタムデータ型(表示)
標準のデータ型では実現できないデータ入力形式でも、カスタムで定義することができます。
たとえばリッチテキストエリアは標準データ型では扱うことができませんが、独自に実装することでdatatableに表示することが可能です。
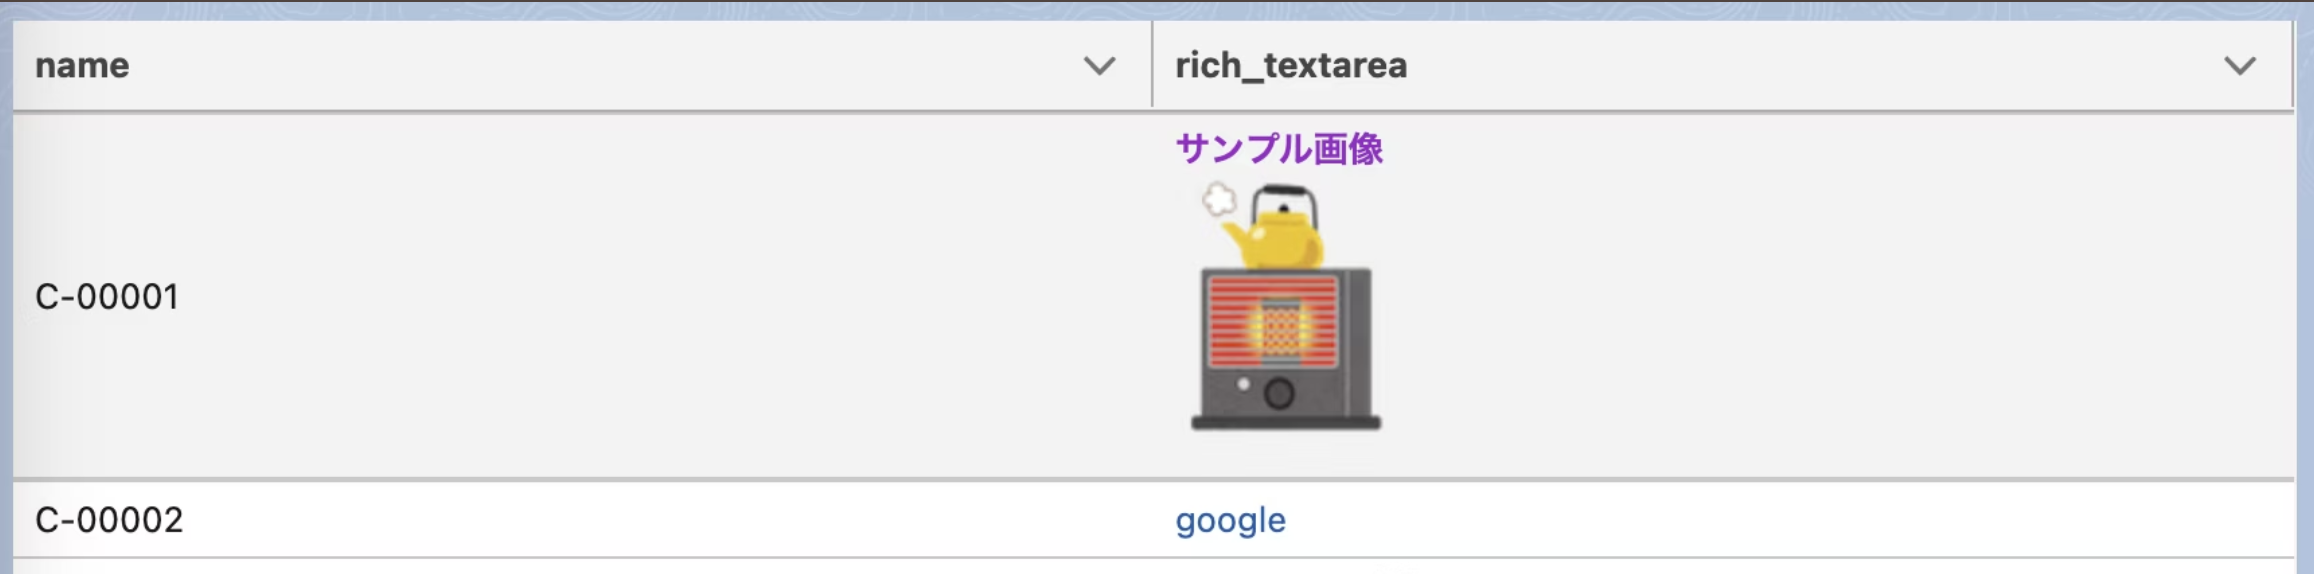
サンプルコード・詳細
カスタムデータ型を使用するには、LWCのコンポーネントを新たに作成して、LightningDatatableを継承するクラスを作成する必要があります。
カスタムデータ型のhtmlを作成して、インポートし、customTypesを宣言します。
テンプレートにはJavaScriptを含めることはできませんが、htmlに他のLWCコンポーネントを使用することはできます。
customDatatable
   ├──richTextarea.html
   ├──customDatatable.js
   └──customDatatable.js-meta.xml
<template>
    <lightning-formatted-rich-text value={value}></lightning-formatted-rich-text>
</template>
import LightningDatatable from "lightning/datatable";
import richTextarea from "./richTextarea.html";

export default class CustomDatatable extends LightningDatatable {
    static customTypes = {
        richTextarea: {
            template: richTextarea,
            standardCellLayout: true
        }
    };
}
lightning-datatableのかわりに作成したカスタムデータテーブルコンポーネントを使用します。
<template>
  <c-custom-datatable
    key-field="Id"
    columns={columns}
    data={data}
    hide-checkbox-column
  ></c-custom-datatable>
</template>
カスタムデータタイプの使い方は標準データタイプと同じです。
import { LightningElement, wire } from "lwc";
import fetchRecords from "@salesforce/apex/DatatableSampleCtrl.fetchRecords";

const columns = [
    { label: "name", fieldName: "Name" },
    { label: "rich_textarea", type: "richTextarea", fieldName: "Html__c" },
];

export default class DatatableSample extends LightningElement  {
    data = [];
    columns = columns;

    @wire(fetchRecords)
    getData({ data }) {
        if (data) {
            this.data = data;
        }
    }
}
カスタムデータ型(インライン編集)
カスタムデータ型をインライン編集に対応させることができます。
たとえば下記のデータ型は標準で対応していませんが、独自に実装することで使用することができます。
- 主従関係・参照関係
- リッチテキストエリア
- ロングテキストエリア
- 時間
- 選択リスト
- 複数選択リスト
下記は選択リストの編集が可能なカスタムデータ型の例です。
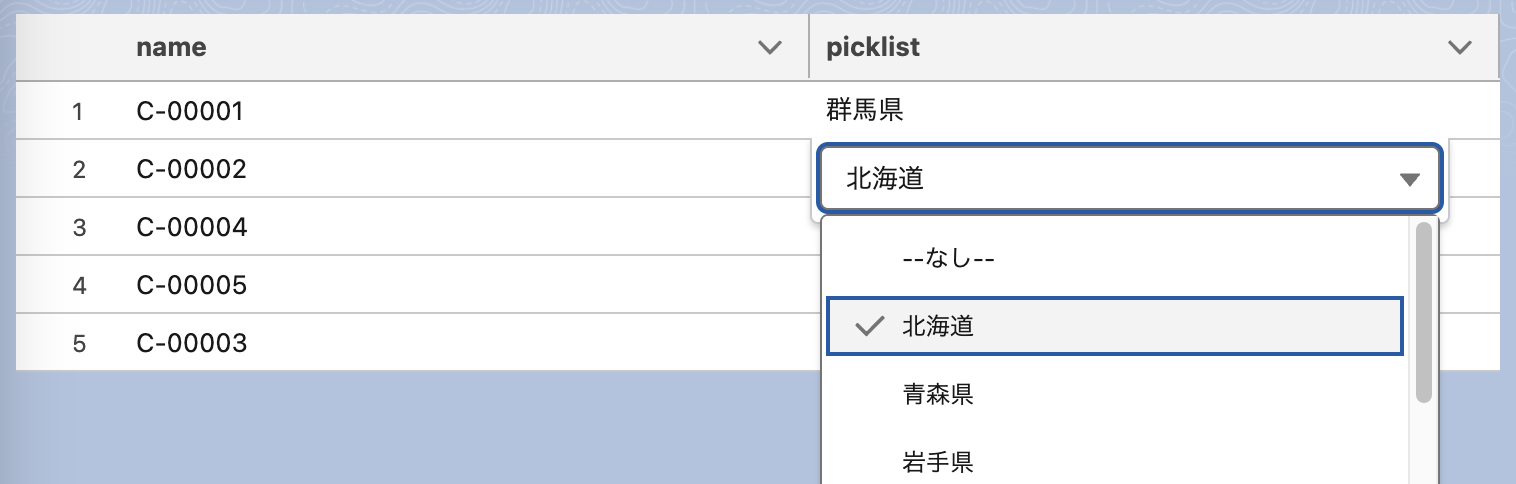
サンプルコード・詳細
テンプレートファイルにはhtmlしか指定できませんが、下記のように自作のコンポーネントを使用することができます。
customDatatable
   ├──template
   │  ├──picklist.html
   │  └──picklistEdit.html
   ├──customDatatable.js
   └──customDatatable.js-meta.xml
<template>
  <c-custom-datatable-combobox
    label={columnLabel}
    options={typeAttributes.options}
    value={editedValue}
    required={required}
    variant="label-hidden"
    data-inputable="true"
  ></c-custom-datatable-combobox>
</template>
import LightningDatatable from "lightning/datatable";
import picklistTemplate from "./template/picklist.html";
import picklistEditTemplate from "./template/picklistEdit.html";

export default class CustomDatatable extends LightningDatatable {
    static customTypes = {
        picklist: {
            template: picklistTemplate,
            editTemplate: picklistEditTemplate,
            standardCellLayout: true,
            typeAttributes: ["options", "placeholder"]
        }
    };
}
上記では下記のコンポーネントを使用しています。
typeAttributesはリストがオブジェクトに変換されてしまうため、lightning-comboboxをそのまま使用することができません。そのため、customDatatableComboboxを作成して、optionsをリストに変換してから使用します。
<template>
  <lightning-combobox
    lwc:ref="combobox"
    label={label}
    options={options}
    value={value}
    required={required}
    variant={variant}
    onchange={handleChange}
  ></lightning-combobox>
</template>
import { LightningElement, api } from "lwc";

export default class CustomDatatableCombobox extends LightningElement {
    @api label;
    @api required;
    @api variant;
    _options;
    _value;

    @api
    get value() {
        return this._value;
    }

    set value(value) {
        this._value = value;
    }

    @api
    get options() {
        return this._options;
    }

    set options(value) {
        // ここでオブジェクトをリストに変換しています。
        const keys = Object.keys(value)
            .map(Number)
            .sort((a, b) => a - b);
        this._options = keys.map((key) => value[key]);
    }

    @api
    get validity() {
        return this.refs.combobox.validity;
    }

    @api
    blur() {
        return this.refs.combobox.blur();
    }

    @api
    checkValidity() {
        return this.refs.combobox.checkValidity();
    }

    @api
    focus() {
        return this.refs.combobox.focus();
    }

    @api
    reportValidity() {
        return this.refs.combobox.reportValidity();
    }

    @api
    setCustomValidity(message) {
        return this.refs.combobox.setCustomValidity(message);
    }

    @api
    showHelpMessageIfInvalid() {
        this.refs.combobox.showHelpMessageIfInvalid();
    }

    handleChange(event) {
        event.stopPropagation();
        this._value = event.detail.value;
        this.dispatchEvent(
            new CustomEvent("change", {
                bubbles: true,
                composed: true,
                detail: {
                    value: this._value
                }
            })
        );
    }
}
import { LightningElement, wire } from "lwc";
import fetchRecords from "@salesforce/apex/DatatableSampleCtrl.fetchRecords";
import fetchOptions from "@salesforce/apex/DatatableSampleCtrl.fetchOptions";

const columns = [
    { label: "name", fieldName: "Name" },
    {
        label: "picklist",
        type: "picklist",
        columnKey: "picklist",
        fieldName: "Picklist__c",
        editable: true,
        typeAttributes: {
            options: []
        }
    }
];

const blankOption = { label: "--なし--", value: "" };

export default class DatatableSample extends LightningElement {
    data = [];
    columns = [];
    initialized = false;

    async connectedCallback() {
        if (this.initialized) {
            return;
        }
        this.columns = await this.generateColumn();
        this.initialized = true;
    }

    async generateColumn() {
        const options = await fetchOptions();
        return columns.map((column) => {
            if (column.columnKey !== "picklist") {
                return column;
            }
            return {
                ...column,
                typeAttributes: {
                    ...column.typeAttributes,
                    options: [blankOption, ...options]
                }
            };
        });
    }

    @wire(fetchRecords)
    getData({ data }) {
        if (data) {
            this.data = data;
        }
    }

    handleSave(event) {
        console.log(event.detail.draftValues);
        // 処理
    }
}
レコードページへのリンク
Datatableでリンクを表示するには、typeにurl、typeAttributes.labelに表示名の属性名を設定します。
レコード詳細ページへのURLはNavigationMixin.GenerateUrlで取得できます
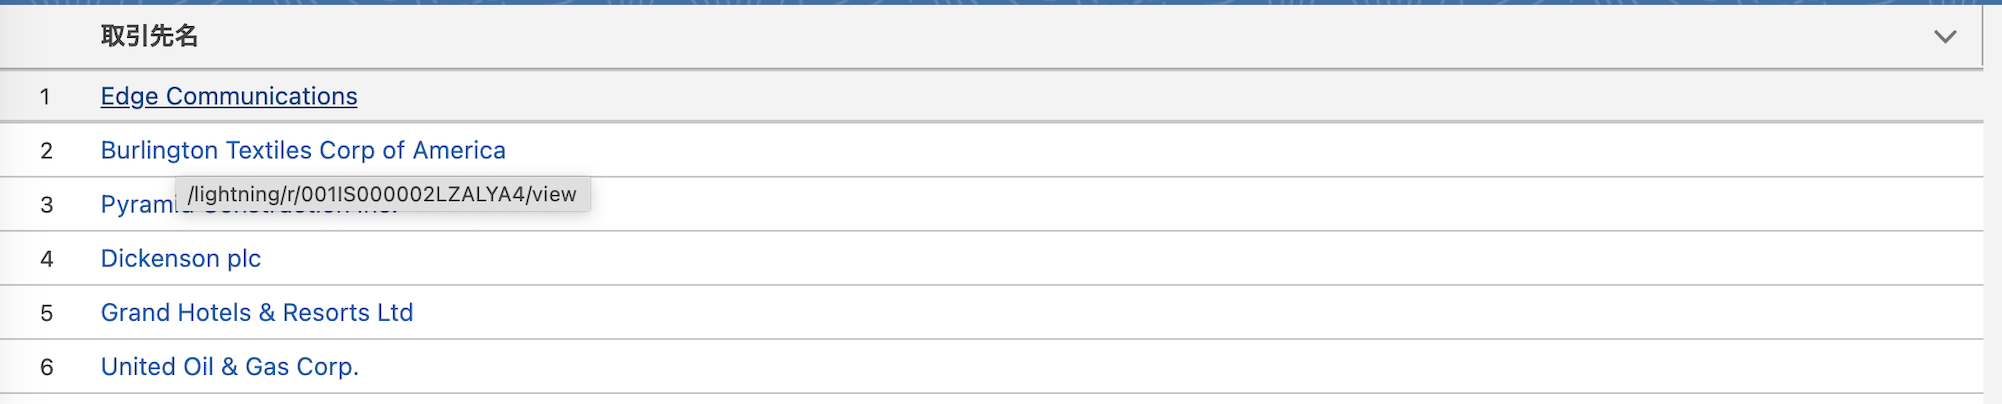
サンプルコード・詳細
import { LightningElement } from "lwc";
import { NavigationMixin } from "lightning/navigation";
import fetchAccounts from "@salesforce/apex/DatatableSampleCtrl.fetchAccounts";

// リンクにはurlタイプを使用します。
const columns = [{
    label: "取引先名",
    fieldName: "url",
    type: "url",
    typeAttributes: { label: { fieldName: "Name" } }
}];

export default class DatatableSample extends NavigationMixin(LightningElement) {
    data = [];
    columns = columns;

    async connectedCallback() {
        const accounts = await fetchAccounts();
        this.data = await Promise.all(
            accounts.map(async (account) => {
                return {
                    ...account,
                    url: await this.generateUrl(account.Id)
                };
            })
        );
    }

    generateUrl(recordId) {
        // NavigationMixin.GenerateUrlでURLを作成します。
        return this[NavigationMixin.GenerateUrl]({
            type: "standard__recordPage",
            attributes: {
                recordId,
                actionName: "view"
            }
        });
    }
}
無限スクロール
無限スクロールを使用すると、テーブルの下端までスクロールした際に追加のデータを読み込むことができます。データの取得を分割することで、パフォーマンスの向上や Salesforce のガバナ制限の回避に役立ちます。
無限スクロールを有効にするには、enable-infinite-loading属性を追加します。テーブルの末尾までスクロールするとonloadmoreに指定したメソッドが呼び出されます。
データの読み込みをトリガーするスクロール位置は、load-more-offset属性で調整可能です。デフォルトでは、テーブルの下端から20ピクセルの位置でonloadmoreイベントが発火します。なお、テーブルの高さを指定しない場合、すべてのデータが一度に表示されてしまうため注意が必要です。

サンプルコード・詳細
<template>
  <div style="height: 200px">
    <lightning-datatable
      lwc:ref="datatable"
      key-field="Id"
      columns={columns}
      data={data}
      hide-checkbox-column
      show-row-number-column
      enable-infinite-loading
      onloadmore={handleLoadMore}
    >
    </lightning-datatable>
  </div>
</template>
SOQLのOFFSETとLIMITを使用してデータを取得する方法もありますが、OFFSETはデータが2000件以上あるとエラーになります。下記の例でははじめに全件のIdを取得して、表示する分のデータをApexで取得します。
import { LightningElement, track } from "lwc";
import fetchRecordIds from "@salesforce/apex/DatatableSampleCtrl.fetchRecordIds";
import fetchRecords from "@salesforce/apex/DatatableSampleCtrl.fetchRecords";

const columns = [
    { label: "取引先名", fieldName: "Name"},
    { label: "業種", fieldName: "Industry"},
    { label: "メモ", fieldName: "Memo__c"}
];

export default class DatatableSample extends LightningElement {
    @track data = [];
    recordIds = [];
    columns = columns;
    displayLimit = 10; // 一度に表示する件数
    currentIndex = 0;  // 現在の表示位置

    async connectedCallback() {
        this.recordIds = await fetchRecordIds();
        this.loadMoreData();
    }

    handleLoadMore() {
        this.loadMoreData();
    }

    async loadMoreData() {
        // スピナーを表示
        this.refs.datatable.isLoading = true;

        // 追加分のデータを取得
        const nextRecordIds = this.recordIds.slice(this.currentIndex, this.currentIndex + this.displayLimit);
        const nextData = await fetchRecords({recordIds: nextRecordIds});
        this.data = [...this.data, ...nextData];
        this.currentIndex += this.displayLimit;

        // データが全て表示されたら infinite loading を無効化
        if (this.currentIndex >= this.recordIds.length) {
            this.refs.datatable.enableInfiniteLoading = false;
        }

        // スピナーを非表示
        this.refs.datatable.isLoading = false;
    }
}
検索

表示データをフィルターする機能はDatatableには備わっていないため、独自に機能を追加する必要があります。
サンプルコード・詳細
下記は検索窓でエンター押した時、検索窓からフォーカスを外した時に検索を実行する例です。
lightning-inputにはtype=searchを使用します。
<template>
  <lightning-card title="取引先" icon-name="standard:account">
    <lightning-input
      type="search"
      label="search"
      placeholder="検索..."
      variant="label-hidden"
      onkeyup={handleKeyUp}
      onblur={handleBlur}
      slot="actions"
    ></lightning-input>
    <div class="slds-p-horizontal_small" style="height: 200px">
      <lightning-datatable key-field="Id" columns={columns} data={data} hide-checkbox-column></lightning-datatable>
    </div>
  </lightning-card>
</template>
import { LightningElement, wire } from "lwc";
import fetchAccounts from "@salesforce/apex/DatatableSampleCtrl.fetchAccounts";

const columns = [
    { label: "取引先名", fieldName: "Name" },
    { label: "業種", fieldName: "Industry" },
    { label: "メモ", fieldName: "Memo__c" }
];
export default class DatatableSample extends LightningElement {
    allData = [];
    data = [];
    columns = columns;
    searchTerm;

    @wire(fetchAccounts)
    getData({ data }) {
        if (data && !this.allData.length) {
            this.allData = data;
            this.filterRows();
        }
    }

    handleKeyUp(event) {
        if (event.key === "Enter" && !event.isComposing) {
            this.searchTerm = event.target.value;
            this.filterRows();
        }
    }

    handleBlur(event) {
        if (this.searchTerm !== event.target.value) {
            this.searchTerm = event.target.value;
            this.filterRows();
        }
    }

    filterRows() {
        if (!this.searchTerm || this.searchTerm === "") {
            this.data = [...this.allData];
            return;
        }

        this.data = this.allData.filter((row) => {
            return Object.values(row).some((value) => String(value).toLowerCase().includes(this.searchTerm.toLowerCase()));
        });
    }
}
並び替え
columnでsortable=trueを設定すると、列ラベルをクリックしてソートを行うことができます。列ラベルをクリックすると、onsortイベントハンドラに設定されたメソッドが呼び出されます。
sorted-by要素は並び替えの方向を指定します。asc(昇順)またはdesc(降順)が設定できます。
default-sort-directionは列ラベルをクリックした初回の並び替えの方向を指定します。
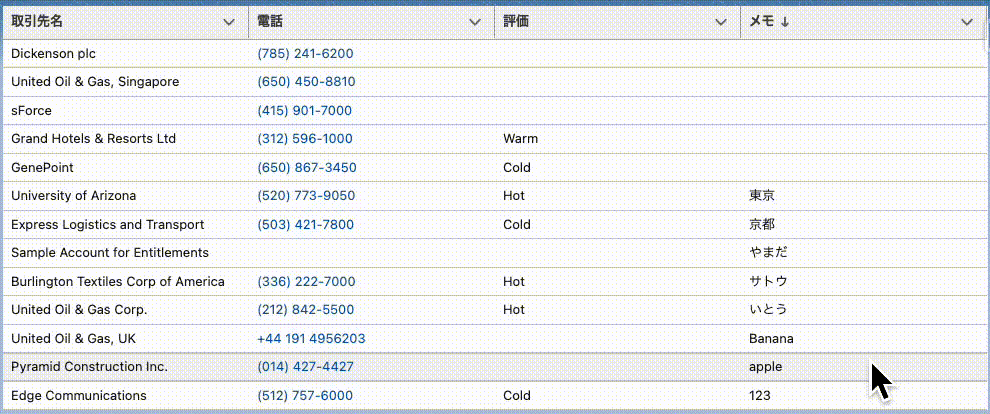
サンプルコード・詳細
<template>
  <lightning-datatable
    key-field="Id"
    columns={columns}
    data={data}
    hide-checkbox-column
    default-sort-direction={defaultSortDirection}
    sorted-direction={sortDirection}
    sorted-by={sortedBy}
    onsort={onHandleSort}
  >
  </lightning-datatable>
</template>
event.detailにはfieldNameとsortDirectionが含まれます。
import { LightningElement, wire } from "lwc";
import fetchAccounts from "@salesforce/apex/DatatableSampleCtrl.fetchAccounts";

const columns = [
    { label: "取引先名", fieldName: "Name", sortable: true },
    { label: "電話", fieldName: "Phone", type: "phone", sortable: true },
    { label: "評価", fieldName: "Rating", sortable: true },
    { label: "メモ", fieldName: "Memo__c", sortable: true }
];

export default class DatatableSample extends LightningElement {
    data = [];
    columns = columns;
    defaultSortDirection = "asc";
    sortDirection = "asc";
    sortedBy;

    @wire(fetchAccounts)
    getData({ data }) {
        if (data) {
            this.data = data;
        }
    }

    onHandleSort(event) {
        const { fieldName: sortedBy, sortDirection } = event.detail;
        const cloneData = [...this.data];

        cloneData.sort(this.sortBy(sortedBy, sortDirection));
        this.data = cloneData;
        this.sortDirection = sortDirection;
        this.sortedBy = sortedBy;
    }

    /**
     * 特定のフィールドでオブジェクトの配列をソートするための関数を生成します。
     *
     * @param {string} fieldName - ソートの基準となるフィールド名。
     * @param {'asc' | 'desc'} sortDirection - ソートの方向。'asc'(昇順)または 'desc'(降順)を指定します。
     * @param {function} [valueTransformer] - ソート前にフィールド値を変換するためのオプションの関数。
     * @returns {function(Object, Object): number} - 配列の Array.prototype.sort メソッドで使用できる比較関数。
     *   - 比較関数のパラメータ:
     *     - {Object} item1 - 比較対象の最初のオブジェクト。
     *     - {Object} item2 - 比較対象の2番目のオブジェクト。
     *   - 比較関数の戻り値:
     *     - {number} - item1 が item2 より小さい場合は負の値、item1 が item2 より大きい場合は正の値、等しい場合は 0 を返します。
     */
    sortBy(fieldName, sortDirection, valueTransformer) {
        const getValue = valueTransformer
            ? function (item) {
                  return valueTransformer(item[fieldName]);
              }
            : function (item) {
                  return item[fieldName];
              };

        const directionMultiplier = sortDirection === "asc" ? 1 : -1;

        return (item1, item2) => {
            const value1 = getValue(item1);
            const value2 = getValue(item2);

            // `undefined` の場合の特別な処理
            if (value1 === undefined || value2 === undefined) {
                if (value1 === undefined && value2 !== undefined) {
                    return directionMultiplier * 1;
                }
                if (value1 !== undefined && value2 === undefined) {
                    return directionMultiplier * -1;
                }
                return 0;
            }

            // 文字列の比較には `localeCompare` を使用
            if (typeof value1 === "string" && typeof value2 === "string") {
                return directionMultiplier * value1.localeCompare(value2);
            }

            return directionMultiplier * ((value1 > value2) - (value2 > value1));
        };
    }
}
インライン編集が可能なデータテーブル
Datatableの保存ボタンを使用する
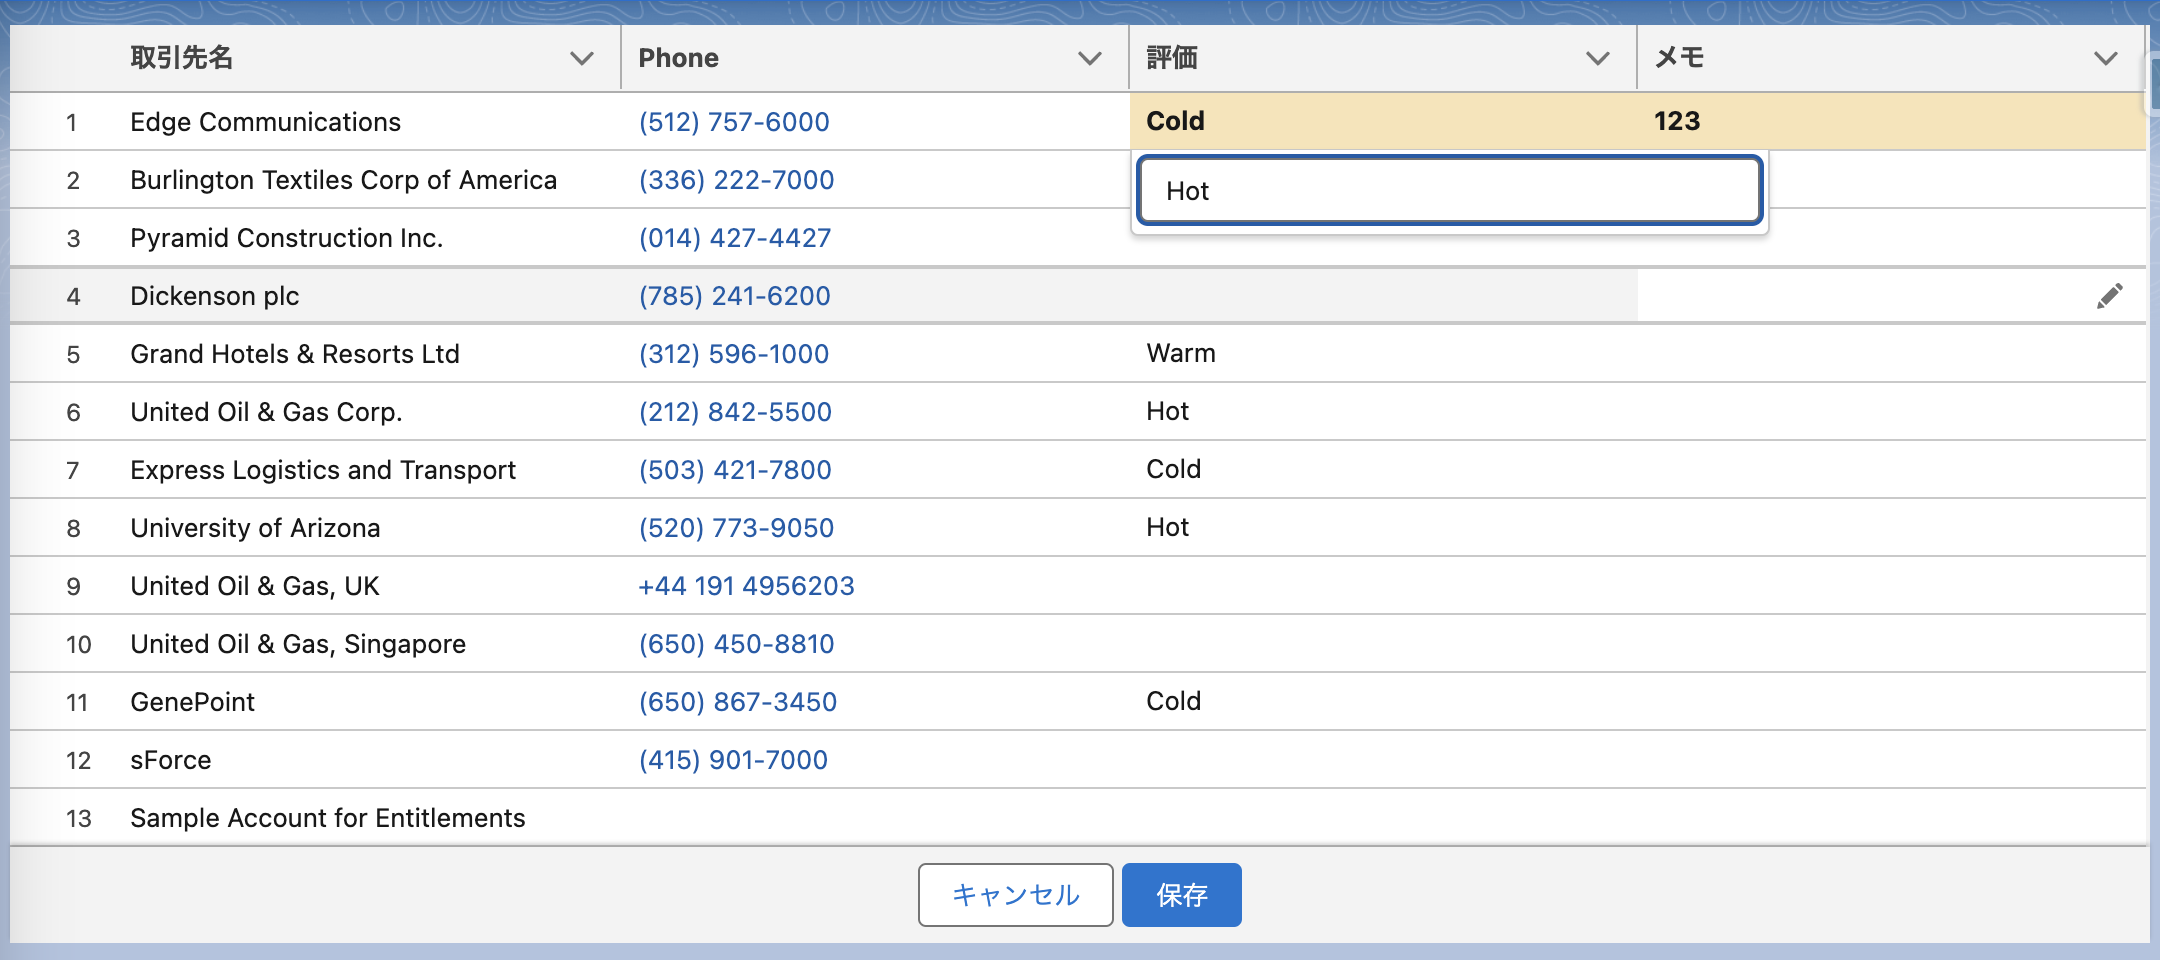
Datatableではインライン編集に対応しています。columnでeditable=trueに設定した項目はセルに鉛筆マークが表示され、クリックすると入力欄が表示されます。
変更を加えるとボトムにキャンセルボタンと保存ボタンが表示されます。それぞれクリックするとoncancelとonsaveに割り当てたメソッドが実行されます。
onsaveではdraft-valuesに空の配列を代入することでボトムのボタンが非表示になります。
サンプルコード・詳細
<template>
  <lightning-datatable
    key-field="Id"
    data={data}
    draft-values={draftValues}
    columns={columns}
    show-row-number-column
    hide-checkbox-column
    onsave={handleSave}
    oncancel={handleCancel}
  >
  </lightning-datatable>
</template>
import { LightningElement, wire } from "lwc";
import { refreshApex } from "@salesforce/apex";
import { notifyRecordUpdateAvailable } from "lightning/uiRecordApi";
import { ShowToastEvent } from "lightning/platformShowToastEvent";
import fetchAccounts from "@salesforce/apex/DatatableSampleCtrl.fetchAccounts";
import saveAccounts from "@salesforce/apex/DatatableSampleCtrl.saveAccounts";

const columns = [
    { label: "取引先名", fieldName: "Name", displayReadOnlyIcon: true },
    { label: "Phone", fieldName: "Phone", type: "phone", displayReadOnlyIcon: true },
    { label: "評価", fieldName: "Rating", editable: true },
    { label: "メモ", fieldName: "Memo__c", editable: true }
];

export default class DatatableSample extends LightningElement {
    data = [];
    columns = columns;
    draftValues = [];
    wiredValue;

    @wire(fetchAccounts)
    getData(value) {
        this.wiredValue = value;
        const { data } = value;
        if (data) {
            this.data = data;
        }
    }

    async connectedCallback() {
        this.data = await fetchAccounts();
    }

    async handleSave(event) {
        // 保存
        const draftValues = event.detail.draftValues;
        await saveAccounts({ accounts: draftValues });
        // LDSに変更を通知
        const changedRecordIds = draftValues.map((account) => { return { recordId: account.Id } });
        await notifyRecordUpdateAvailable(changedRecordIds);
        // 画面を更新
        await refreshApex(this.wiredValue);
        this.draftValues = [];
        this.dispatchEvent(new ShowToastEvent({ title: "保存しました。", variant: "success" }));
    }

    handleCancel(event) {
        // キャンセルボタンをクリックした時の処理
    }
}
onsaveのevent.detailではインライン編集で編集した箇所の情報が取得できます。
{
  "draftValues": [
    { "Rating": "Cold", "Memo__c": "123", "Id": "001IS000002LZALYA4" },
    { "Rating": "Hot", "Id": "001IS000002LZAMYA4" }
  ]
}
カスタムの保存ボタンを使用する
suppress-bottom-barをつけることでインライン編集時にボトムの保存・キャンセルボタンが表示されなくなります。
Datatableの保存ボタンを使用するときはonchangeのeventから変更値を取得していましたが、カスタムの保存ボタンを使用するときはthis.refs.{uniqueId}.draftValueで変更値を取得します。

サンプルコード・詳細
<template>
  <lightning-button label="保存" onclick={handleSave} disabled={disableButton}></lightning-button>
  <lightning-datatable
    lwc:ref="datatable"
    key-field="Id"
    data={data}
    draft-values={draftValues}
    columns={columns}
    show-row-number-column
    hide-checkbox-column
    suppress-bottom-bar
    oncellchange={handleCellChange}
  >
  </lightning-datatable>
</template>
async handleSave() {
    // 保存
    const draftValues = this.refs.datatable.draftValues;
    await saveAccounts({ accounts: draftValues });
    // LDSに変更を通知
    const changedRecordIds = draftValues.map((account) => { return { recordId: account.Id } });
    await notifyRecordUpdateAvailable(changedRecordIds);
    // 画面を更新
    await refreshApex(this.wiredValue);
    this.draftValues = [];
    this.disableButton = true;
    this.dispatchEvent(new ShowToastEvent({ title: "保存しました。", variant: "success" }));
}

handleCellChange(event) {
    // セルに変更があるたびに呼び出されます。
    // event.detailに含まれる情報は変更されたセルとkey-fieldのみです。
    console.log("change", JSON.stringify(event.detail));
    this.disableButton = !this.hasChange();
}

hasChange() {
    return !!this.refs.datatable.draftValues?.length;
}
draft-values属性について
draft-values属性は、インライン編集内容をプログラムから設定するために使用します。ユーザーが入力した内容を取得することはできません。インライン編集で入力された値を取得するには、Datatableのプロパティを直接参照します。
<lightning-datatable key-field="Id" draft-values={draftValues}
draftValues = [];

doSomething() {
    // インライン編集の値の設定
    this.draftValues = [{"Memo__c":"345","Id":"001IS000002LZAMYA4"}];
    // インライン編集状況のリセット
    this.draftValues = [];
    // インライン編集の値の取得
    const draftValues = this.template.querySelector('lightning-datatable').draftValue;
}
参考
Datatableの公式ドキュメントは下記になります。
Datatableの拡張例はUNOFFICIAL SFがかなり優れています。
- Datatableドキュメント | unofficial sf
- 上記のソースコード(github)