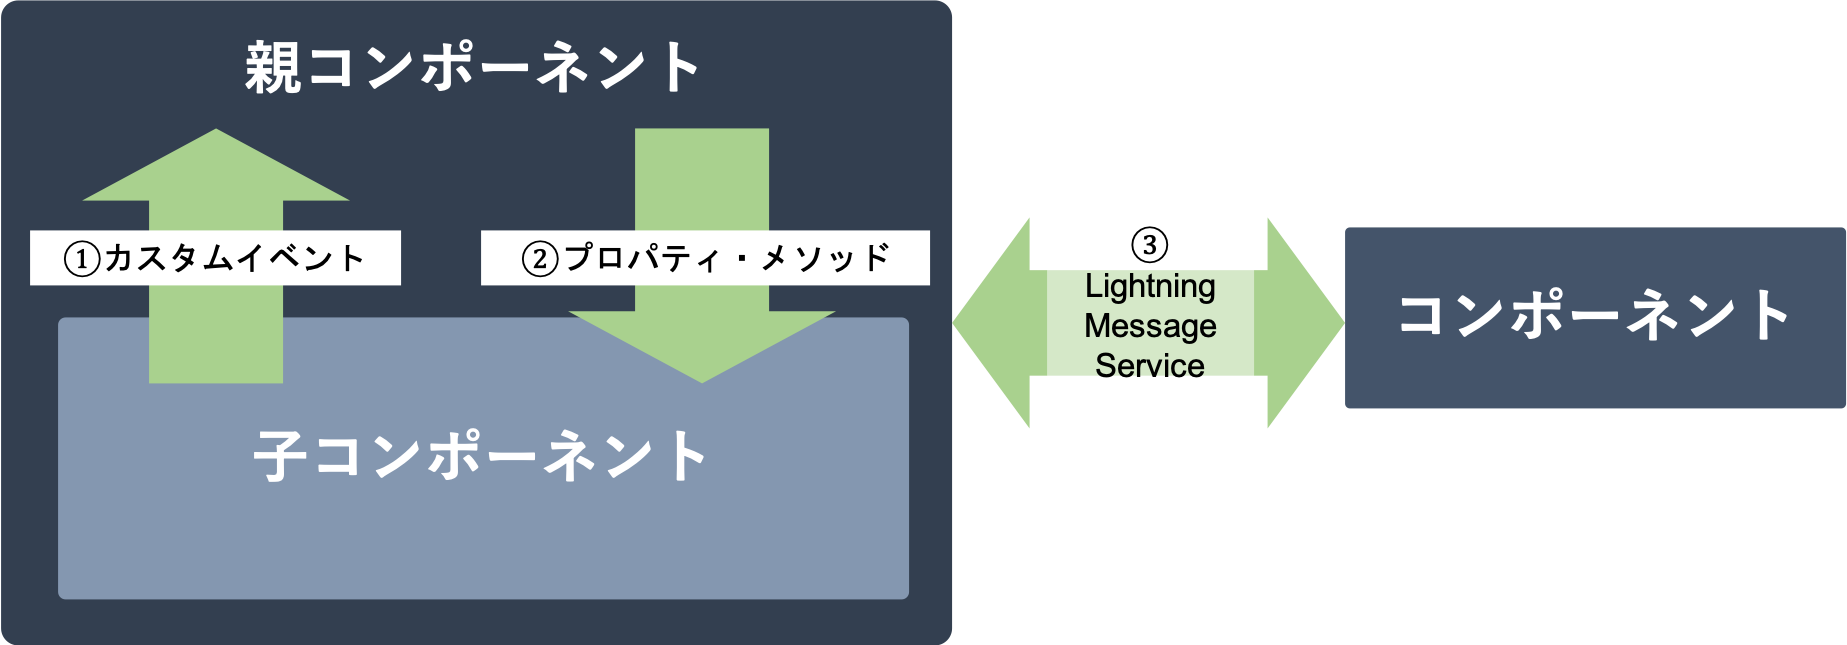
LWCのコンポーネント間通信
LWCのコンポーネント間の通信は主に下記の3つがあります。
- カスタムイベント(子→親)
- パブリックプロパティ・パブリックメソッド(親→子)
- Lightning Message Service
①子から親への通信
カスタムイベント
子コンポーネントから親コンポーネントに情報を伝えるためには、カスタムイベントを使用します。
子コンポーネントでカスタムイベントをディスパッチし、親コンポーネントのイベントハンドラーで処理を行います。
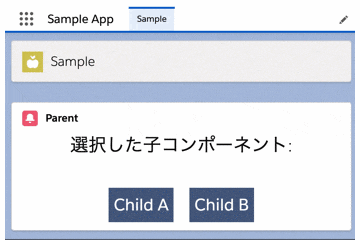
下記の例では、子コンポーネントをクリックしたときにカスタムイベント「select」をディスパッチして、親コンポーネントに「name」の値を渡し、親コンポーネントで画面表示しています。
子コンポーネント
<template>
    <!-- ↓子コンポーネントをクリックしたときにhandleClickメソッドを実行します。 -->
    <a onclick={handleClick}>
        <div class="sample">
            <span>{name}</span>
        </div>
    </a>
</template>
import { LightningElement, api } from 'lwc';
export default class ChildComponent extends LightningElement {
    @api name = '';

    // handleClickでは、「select」という名のカスタムイベントを作成し、値として「this.name」を設定しています。
    // dispatchEventメソッドでカスタムイベントをディスパッチし、親コンポーネントに伝達します。
    handleClick() {
        const selectEvent = new CustomEvent(
            'select',
            { detail: this.name }
        );
        this.dispatchEvent(selectEvent);
    }
}
上記では親の親にイベントは伝播しません。伝播させるためには、Event.bubbles、Event.composedを設定します。
// 親のDOMにイベントを伝えない + 親LWCにイベントを伝えない(デフォルト)
new CustomEvent('sample', { detail: 'sample', bubbles: false, composed: false })

// 親のDOMにイベントを伝える + 親LWCにイベントを伝えない
new CustomEvent('sample', { detail: 'sample', bubbles: true, composed: false })

// 下記の設定はサポートされない
// new CustomEvent('sample', { detail: 'sample', bubbles: false, composed: true })

// 親のDOMにイベントを伝える + 親LWCにイベントを伝える
new CustomEvent('sample', { detail: 'sample', bubbles: true, composed: true })
親コンポーネント
<template>
    <lightning-card title="Parent" icon-name="custom:custom53">
        <p class="slds-align_absolute-center slds-text-heading_large">
            <span>選択した子コンポーネント:  {selected}</span>
        </p>
        <div class="slds-m-top_xx-large slds-align_absolute-center">
            <!-- ↓on「カスタムイベント名」で、カスタムイベントのリスナーを宣言します。
                 ここでは「handleSelect」がリスナーとして宣言されています。 -->
            <c-child
                name="Child A"
                onselect={handleSelect}
                class="slds-m-horizontal_small"></c-child-component>
            <c-child
                name="Child B"
                onselect={handleSelect}
                class="slds-m-horizontal_small"></c-child-component>
        </div>
    </lightning-card>
</template>
import { LightningElement } from 'lwc';
export default class ParentComponent extends LightningElement {
    selected = '';

    // handleSelectメソッドでカスタムイベントを処理します。
    // 子コンポーネントで設定した値は「event.detail」で取り出すことができます。
    handleSelect(event) {
        this.selected = event.detail;
    }
}
イベントの伝播を止めるにはevent.stopPropagation()を、ブラウザ標準のイベント処理を止めるにはevent.preventDefault()を使用します。
②親から子への通信
親から子に値を渡す方法は、パブリックプロパティとパブリックメソッドの二種類あります。
パブリックメソッドを使用した方法は若干複雑になります。
公式開発者ブログでは「パブリックプロパティを常に優先する」とあるので、パブリックプロパティが使える場合はパブリックプロパティを使いましょう。
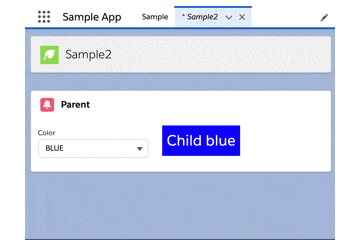
下記の例では、親コンポーネントのコンボボックスで色を選択し、親コンポーネントから子のパブリックプロパティまたはパブリックメソッドを使用して、子コンポーネントの背景色を変更します。
パブリックプロパティ
親コンポーネント
属性名はパブリックプロパティのケバブケースになります。@api colorNameはcolor-name='xxx'となります。
<template>
    <lightning-card title="Parent" icon-name="custom:custom53">
        <lightning-layout>
            <lightning-layout-item padding="around-small">
                <!-- ↓コンボボックスで色を選択します。 -->
                <lightning-combobox
                    name="color"
                    label="Color"
                    value={color}
                    options={options}
                    onchange={handleChange}
                ></lightning-combobox>
            </lightning-layout-item>
            <lightning-layout-item padding="around-small">
                <!-- ↓子コンポーネントのパブリックプロパティ「color」に値を渡します。 -->
                <c-child color-name={color}></c-child>
            </lightning-layout-item>
        </lightning-layout>
    </lightning-card>
</template>
import { LightningElement } from 'lwc';
export default class Parent extends LightningElement {
    // ↓HTMLで子コンポーネントに渡している値です。
    color = 'blue';

    get options() {
        return [
            { label: 'BLUE', value: 'blue' },
            { label: 'RED', value: 'red' },
            { label: 'GREEN', value: 'green' },
        ];
    }

    handleChange(event) {
        this.color = event.detail.value;
    }
}
子コンポーネント
<template>
    <!-- 親から渡された値を使用して、スタイルを設定しています。 -->
    <div class="sample" style={backgroundStyle}>
        <span>Child {colorName}</span>
    </div>
</template>
import { LightningElement, api } from 'lwc';
export default class Child extends LightningElement {
    // ↓パブリックプロパティです。@apiデコレーターを使用して宣言します。
    // @apiをつけることで親コンポーネントからアクセス可能になります。
    @api colorName;

    get backgroundStyle() {
        return `background-color:${this.colorName}`;
    }
}
パブリックメソッド
パブリックプロパティと同じことをパブリックメソッドで実装すると下記のようになります。
親コンポーネント
<template>
    <lightning-card title="Parent" icon-name="custom:custom53">
        <lightning-layout>
            <lightning-layout-item padding="around-small">
                <lightning-combobox
                    name="color"
                    label="Color"
                    value={color}
                    options={options}
                    onchange={handleChange}
                ></lightning-combobox>
            </lightning-layout-item>
            <lightning-layout-item padding="around-small">
                <!-- ↓プロパティは使用しません。 -->
                <c-child></c-child>
            </lightning-layout-item>
        </lightning-layout>
    </lightning-card>
</template>
import { LightningElement } from 'lwc';
export default class Parent extends LightningElement {
    color = 'blue';

    // ↓下記がパブリックメソッドを使用している箇所になります。
    // querySelectorメソッドで子コンポーネントを取得する必要があります。
    // 同じ子コンポーネントが複数ある場合はquerySelectorAllメソッドを使用します。
    renderedCallback() {
        this.template.querySelector('c-child').setColor(this.color);
    }

    handleChange(event) {
        this.color = event.detail.value;
    }

    get options() {
        return [
            { label: 'BLUE', value: 'blue' },
            { label: 'RED', value: 'red' },
            { label: 'GREEN', value: 'green' },
        ];
    }
}
子コンポーネント
import { LightningElement, api } from 'lwc';
export default class Child extends LightningElement {
    color;

    // ↓パブリックメソッドを宣言している箇所になります。
    @api
    setColor(value) {
        this.color = value;
    }

    get backgroundStyle() {
        return `background-color:${this.color}`;
    }
}
③親子関係でないコンポーネントへの通信
Lightning Message Service
親子関係にないコンポーネントへの通信にはLightning Message Service(LMS)を使用します。
LMSはLWCだけでなく、VisualforceやAuraにも対応しています。
LMSを使用するためにはまずメッセージチャネルというメタデータを作成する必要があります。
情報を受け取る側のコンポーネント(Subscriber)は、メッセージチャネルをインポートして、購読(Subscribe)する必要があります。
情報を渡す方側のコンポーネント(Publisher)は、同様にメッセージチャネルをインポートして、送信したいデータを公開(Publish)します。
公開を行ったら、購読中の状態にあるコンポーネントすべてに一度にデータが送信されます。

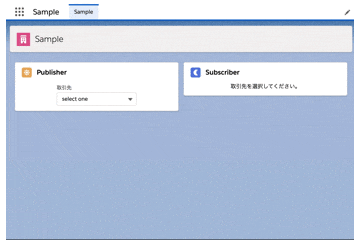
下記の例では、Publisherのコンボボックスで取引先を選択したとき、取引先IDをSampleMessageChannel__cに公開(Publish)します。
SubscriberはSampleMessageChannel__cを購読(Subscribe)しています。
SampleMessageChannel__cから取引先IDを取得したSubscriberは、lightning-record-formに取引先IDを渡し、詳細情報を表示しています。
MessageChannel
LMSを使用するには、MessageChannelのメタデータをデプロイする必要があります。
UIから作成することができないため、SalesforceCLIを使ってデプロイします。
<?xml version="1.0" encoding="UTF-8"?>
<LightningMessageChannel xmlns="http://soap.sforce.com/2006/04/metadata">
    <description>サンプルメッセージサービス</description>
    <isExposed>true</isExposed>
    <lightningMessageFields>
        <description>AccountIdを格納</description>
        <fieldName>recordId</fieldName>
    </lightningMessageFields>
    <masterLabel>SampleMessageChannel</masterLabel>
</LightningMessageChannel>
$ sfdx force:source:deploy -p force-app/main/default/messageChannels/SampleMessageChannel.messageChannel-meta.xml
Publisher
データを送信する側のLWCです。
import { LightningElement, wire } from 'lwc';

// LMSで使用する関数とカスタムMessageChannelをインポートします。
import { publish, MessageContext } from 'lightning/messageService';
import MC from "@salesforce/messageChannel/SampleMessageChannel__c";

export default class Parent extends LightningElement {
    accountId = '';

    // ワイヤーサービスを使用してMessageContextオブジェクトを作成します。
    @wire(MessageContext)
    messageContext;

    handleChange(event) {
        this.accountId = event.detail.value;
        this.sendMessageService(this.accountId);
    }

    sendMessageService(recordId) {
        // publishメソッドで取引先IDをSampleMessageChannelに公開します。
        const payload = {recordId: recordId};
        publish(this.messageContext, MC, payload);
    }

    get options() {
        return [
            { label: 'select one', value: '' },
            { label: 'sForce', value: '0012x000009UhXQAA0' },
            { label: 'United Oil & Gas Corp.', value: '0012x000009UhXKAA0' },
            { label: 'Edge Communications', value: '0012x000009UhXFAA0' },
        ];
    }
}
Subscriber
データを受信する側のLWCです。
import { LightningElement, api, wire } from 'lwc';

// LMSで使用する関数とカスタムMessageChannelをインポートします。
import { subscribe, unsubscribe, MessageContext, APPLICATION_SCOPE } from 'lightning/messageService';
import MC from "@salesforce/messageChannel/SampleMessageChannel__c";

export default class Subscriber extends LightningElement {
    @api recordId;

    // subscribe()の戻り値を格納する変数です。
    subscription;

    // ワイヤーサービスを使用してMessageContextオブジェクトを作成します。
    @wire(MessageContext)
    messageContext;

    // 購読状態にないとき、subscribe()を実行し、SampleMessageChannelを購読します。
    connectedCallback() {
        if (this.subscription || this.recordId) {
            return;
        }
        this.subscribeToMessageChannel();
    }

    // unsubscribeメソッドで購読状態を解除できます。
    disconnectedCallback() {
        unsubscribe(this.subscription);
        this.subscription = null;
    }

    subscribeToMessageChannel() {
        this.subscription = subscribe(
            this.messageContext,
            MC,
            // ↓メッセージを受信したときのコールバック関数です。
            (message) => { this.recordId = message.recordId },
            // ↓非必須の引数です。APPLICATION_SCOPEにすることで、LWCが非アクティブでもメッセージを受信できます。
            { scope: APPLICATION_SCOPE }
        );
    }
}
参考
- 子から親への通信
- 親から子への通信
- 子コンポーネントのプロパティの設定 | Developer Guide
- 子コンポーネントでのメソッドのコール | Developer Guide
- renderedCallback() | Developer Guide
- Step Up Your LWC Skills – Part 1 ー 「Favor public properties over public methods」
- 親子関係にないコンポーネントへの通信