はじめに
ROBO-ONE autoについて
ROBO-ONEは二足歩行ロボットの格闘技大会です。30cm~60cmほどの二足歩行ロボットがリング上で一対一の試合を行います。その自律部門がROBO-ONE autoです。
2018年の第4回ROBO-ONE autoまでは、複数の距離センサなどをロボットに配置して相手を検知するロボットが多かった印象です。しかし、2019年9月に開催された第5回ROBO-ONE autoから認識審査というものが導入され、これをクリアしないと競技に出場できないことになりました。
第5回ROBO-ONE autoの認識審査の項目は次の通りです。
- 立った状態のKHR-3HV※に反応して特定のポーズをとること
- 倒れた状態のKHR-3HVに反応して特定のポーズをとること
- 審判に反応して特定のポーズをとること
- 目の前のペットボトルに反応しないこと
一年前まで距離センサで良かったのに急にレベルが上がりすぎなんじゃないか?という気がしなくもないですが、今回なんとか認識審査を突破できたので、その手法を共有したいと思います。
なお、画像処理を行うコンピュータボードとしてRaspberryPi 3b+を使用しました。しかし、1回の処理に2秒ほどかかっていたため処理能力的にはギリギリだった印象でした。予算に余裕のある方は、Jetson Nano等のGPU搭載ボードを使うか、Neural Compute Stick等のアクセラレータを利用するか、あるいは無線で外部のPCに処理を任せるなどするとといいかもしれません。
※ KHR-3HVは近藤科学が発売しているロボットキット。ROBO-ONE公認ロボットでもある。
物体検出
概要
ある画像が与えられたとき、それが何の画像か推論する技術を画像分類と言います。例えば犬の写真とリンゴの写真を分類するといったものです。対して、画像の中のどの位置に何の物体があるかを推論する技術を物体検出といいます。
ROBO-ONE autoの認識審査は画像分類でもできそうですが、今回は以下の理由から物体検出を選択しました。
- 認識審査時の背景に対象物以外の物体が映り込んでいる可能性があった
- 審査後の試合で、対戦相手の位置を見つける用途にも使いたかった
物体検出用のフレームワークとしてTensorflow Object Detection APIを使用しました。Tensorflow detection model zooから提供されているような学習済みモデルを利用すると、人間や自転車といった一般的な物体を検出することができます。しかし、KHR-3HVのような特殊なものは検出が難しいため、追加で学習させることになります。
オリジナルの物体を学習させて、RaspberryPi 3b+で検出するまでの流れは次のようになります。
- 学習用の環境構築
- アノテーション
- 学習の実行
- Tensorflow Lite用モデルに変換
- RaspberryPi 3b+の環境構築
- 物体検出の実行
1. 学習用の環境構築
- まずTensorflowを実行できる環境を作ります。PCにインストールする、Dockerを使う、Google Colaboratoryを使う、などの方法があるのでInstall Tensorflowを参考にお好みの方法を選んでください。(Tensorflowのバージョンは後述するRaspberryPi 3b+にインストールするTensorflowと同じにするといいと思います。)
- Tensorflowのインストールができたら、Object Detection APIをインストールします。Installationに手順がまとめられています。
2. アノテーション
- 学習データにタグ付けする作業をアノテーションといいます。物体検出では複数の画像ファイルに対して、ひたすら検出したい物体を四角で囲う作業になります。
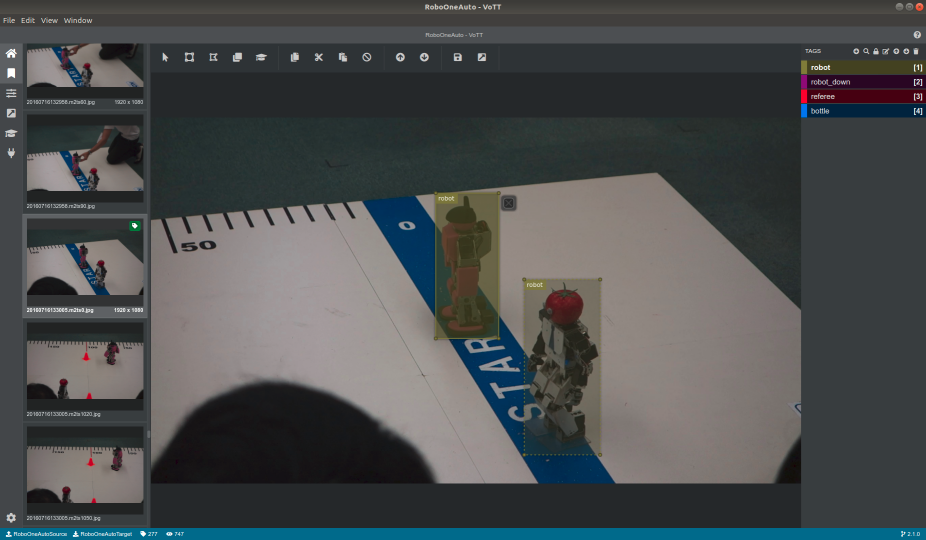
- 個人的にお勧めのツールはVoTTです。これの何が嬉しいのかというと、Tensorflowで読み込めるTFRecords形式で学習データをエクスポートできることです。(とはいえ、VoTT自体は若干不安定なので過信しないでください。)
- 過去のROBO-ONEの写真や動画をVoTTに読み込んで、「ロボット」「倒れたロボット」「審判」「ペットボトル」というクラスを作り、画像を200枚ほどタグ付けしました。
- タグ付けが終わったら、TFRecord形式でエクスポートします。TFRecordファイル群は、次の学習で訓練用(train)と評価用(eval)の2種類に分けておく必要があるので、適当にフォルダ分けしておきましょう。
3. 学習の実行
-
まず、ベースとなる学習モデルをTensorflow detection model zooからダウンロードします。今回使用したのはMobileNet v2 SSD Liteです。
-
学習時の設定をまとめたconfigファイルを作ります。models/research/object_detection/samples/configsディレクトリにssdlite_mobilenet_v2_coco.configというファイルがあるので、ファイルパスや数値を変更します。基本的には以下の項目を変更する必要があります。
- fine_tune_checkpoint ... ベースとなるモデルの3種のmodel.ckptファイルのパス
- train_input_readerのinput_path ... 訓練用TFRecordのファイルパス(ワイルドカードを使って複数個指定できます)
- train_input_readerのlabel_map_path ... ラベル名を記したファイルのパス
- evalのnum_examples ... 評価用TFRecordファイルの数
- eval_input_readerのinput_path ... 評価用TFRecordのファイルパス
- eval_input_readerのlabel_map_path ... ラベル名を記したファイルのパス
-
学習を開始します。???の部分は適切なファイルパスに書き換えてから実行してください。
$ python object_detection/model_main.py \ --pipeline_config_path="???/ssdlite_mobilenet_v2_coco.config" \ # configファイルのパス --model_dir="???" \ # 学習結果の出力先ディレクトリ --num_train_steps=10000 \ # ステップ数 --alsologtostderr -
学習が進むたびにチェックポイントファイル(ckptファイル)が出力されます。学習終了時に出力される最後のckptファイルを使用します。
4. Tensorflow Lite用モデルに変換
-
TensorflowにはTensorflow Liteという組み込み向けフレームワークがあります。学習済みモデルをTensorflow Lite用モデルに変換すると、組み込み機器でも比較的高速に動作するように最適化されます。
-
まず、学習時に出力されたckptファイルをTensorFlow Liteと互換性のあるfrozen graphに変換します。
$ python object_detection/export_tflite_ssd_graph.py \ --pipeline_config_path="???/pipeline.config" \ # 学習時に出力されたpipeline.configファイルのパス --trained_checkpoint_prefix="???/model.ckpt-10000" \ # 学習時に出力されたmodel.ckptファイルのパス --output_directory="???" # frozen graphの出力先フォルダのパス -
次に、frozen graphをTensorFlow Lite flatbuffer formatのtfliteファイルに変換します。
$ bazel run -c opt tensorflow/contrib/lite/toco:toco -- \ --input_file="???/tflite_graph.pb" \ # 先ほど変換したfrozen graphのファイルパス --output_file="???/detect.tflite" \ # 出力されるtfliteファイルのパス --input_shapes=1,300,300,3 \ --input_arrays=normalized_input_image_tensor \ --output_arrays='TFLite_Detection_PostProcess','TFLite_Detection_PostProcess:1','TFLite_Detection_PostProcess:2','TFLite_Detection_PostProcess:3' \ --inference_type=FLOAT \ --allow_custom_ops -
生成したtfliteファイルは後でRaspberryPi 3b+にコピーします。
5. RaspberryPi 3b+の環境構築
- RaspberryPi 3b+に、@PINTOさんが公開されているバイナリをPINTO0309/Tensorflow-binからダウンロードしてインストールしましょう。TensorflowをRaspberryPiで実行するうえで発生する諸々の問題が解決されています。(私はROSとの互換性のためPython2.7を使用する必要があったので、Python2.7版が残っていたarvind-india/Tensorflow-binのものを使用しました。)
6. 物体検出の実行
- 以下のようなPythonコードで、今回作成したtfliteファイルで物体検出を実行できます。(tfliteファイルと画像ファイルを読み込めるように???の部分は適切なファイルパスに変更してください。)
# !/usr/bin/env python
# coding: utf-8

import numpy as np
import sys
import tensorflow as tf

from PIL import Image

sys.path.append("???/models/research") # Object Detection APIのresearchディレクトリのパスを指定してください
from object_detection.utils import ops as utils_ops
from object_detection.utils import label_map_util
from object_detection.utils import visualization_utils as vis_util

# Helper code
def load_image_into_numpy_array(image):
    (im_width, im_height) = image.size
    return np.array(image.getdata()).reshape(
        (im_height, im_width, 3)).astype(np.uint8)

# Detection
def run_inference_for_single_image(image, interpreter):
    global input_details, output_details

    interpreter.set_tensor(input_details[0]['index'], image)
    interpreter.invoke()

    output_dict = {}

    # all outputs are float32 numpy arrays, so convert types as appropriate
    output_dict['num_detections'] = int(interpreter.get_tensor(output_details[3]['index']))
    output_dict['detection_classes'] = interpreter.get_tensor(output_details[1]['index'])[0].astype(np.int64)
    output_dict['detection_boxes'] = interpreter.get_tensor(output_details[0]['index'])[0]
    output_dict['detection_scores'] = interpreter.get_tensor(output_details[2]['index'])[0]

    for i in range(output_dict['detection_classes'].shape[0]):
        output_dict['detection_classes'][i] += 1

    return output_dict

PATH_TO_TFLITE = '???/detect.tflite'      # tfliteファイルのパスを指定してください
PATH_TO_LABELS = '???/tf_label_map.pbtxt' # ラベル名を記したファイルのパス

# Load Tensorflow model
# バージョン1.12まではtf.contrib.lite、バージョン1.13からはtf.lite
interpreter = tf.contrib.lite.Interpreter(model_path=PATH_TO_TFLITE)
interpreter.allocate_tensors()
input_details = interpreter.get_input_details()
output_details = interpreter.get_output_details()

# Load label map
category_index = label_map_util.create_category_index_from_labelmap(PATH_TO_LABELS)

# Detection
PATH_TO_TEST_IMAGES_DIR = '???/images' # テストしたい画像(jpg)を含むフォルダのパスを指定してください
import glob
import os
TEST_IMAGE_PATHS = glob.glob(os.path.join(PATH_TO_TEST_IMAGES_DIR, '*.jpg'))
print(TEST_IMAGE_PATHS)

for image_path in TEST_IMAGE_PATHS:

    # Load image file
    image = Image.open(image_path)
    image = image.resize((300,300))
    image_np = load_image_into_numpy_array(image)

    # Expand dimensions since the model expects images to have shape: [1, None, None, 3]
    image_np_expanded = np.expand_dims(image_np, axis=0)
    image_np_expanded = image_np_expanded.astype('float32')
    image_np_expanded = (2.0 / 255.0) * image_np_expanded - 1.0

    # Actual detection.
    output_dict = run_inference_for_single_image(image_np_expanded, interpreter)

    # Visualization of the results of a detection.
    vis_util.visualize_boxes_and_labels_on_image_array(
        image_np,
        output_dict['detection_boxes'],
        output_dict['detection_classes'],
        output_dict['detection_scores'],
        category_index,
        instance_masks=output_dict.get('detection_masks'),
        use_normalized_coordinates=True,
        line_thickness=8,
        min_score_thresh=.7)
    image_pil = Image.fromarray(image_np)
    image_pil.save(image_path + '_out.png')
- モデルの読み込みに数十秒ほどかかります。
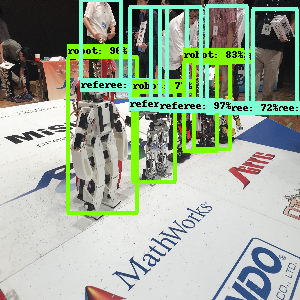
- うまく物体検出できると、下のように検出した物体を四角で囲った画像が保存されます。
参考にさせていただいた記事
@karaage0703さん、@PINTOさん、その他多くの先人の知識に助けられました。本当にありがとうございました。