1.シーズン1総集編
「Window10で TensorFlow liteを使ってみる - 前編」から始まった "TensorFlow lite"シリーズも今回で4回目。今日現在、そこそこの規模のDLモデルである YOLO v3が Nerves/rpi3で動くようになった。無事マイルストーンを一つ越えたので、ここらで一旦中締めの総集編 - 実は小生の備忘録![]() - を打とうと思う。
- を打とうと思う。
これまでの記事の繰り返しとなる部分も多々あろうが、暫しお付き合い願いたい。尚、本記事で紹介したプロジェクトの全ファイルセットは下記で公開している。
2.プロジェクトの概要
今や世はまさにIOTを実装した社会へのトランスフォームが加速進行中である‥と思う。そんなホットな話題のIOTを構成する T/Things側、すなわちエッジ側の本質はセンシングだと言えよう。そして、昨今のエッジコンピューティングの高性能化に伴い、例えばイメージセンサを入力としたフレキシブルかつインテリジェントなセンシングなど所謂エッジAIの実用化も射程圏内に入ってきたようだ。
こんな時代に、Nervesは Elixir/Erlang譲りのネットワーク能力と耐障害性を持ちつつも、非常にコンパクトでポータビリティに富む組み込みシステムとして登場した。IOT社会の大きな一角を占めるポテンシャルを持っていそうだ。否、一翼を担うに違いない![]()
であるならば、Nervesでさくさくと AI出来なきゃダメでしょ
-
プロジェクトの目的:
Tensorflowの組み込みシステム向けソリューションである Tensorflow liteを Nervesで利用する為のインフラの整備。および、実験/ケース・スタディで得たノウハウの共有。 -
スコープ:
小生の専門分野であるコンピューター・ビジョンのフィールドに限定する。動力学系の最適制御や機器のリモート予防保全等のエッジAI応用フィールドに関しては他者に委ねる(勘が働かない故に )
) -
目標(夢):
Raspberry Piのカメラ・モジュールと接続して、AIリモコン・カーを走らすことが出来たら良いなぁ
(資金面が苦しいかな💦)
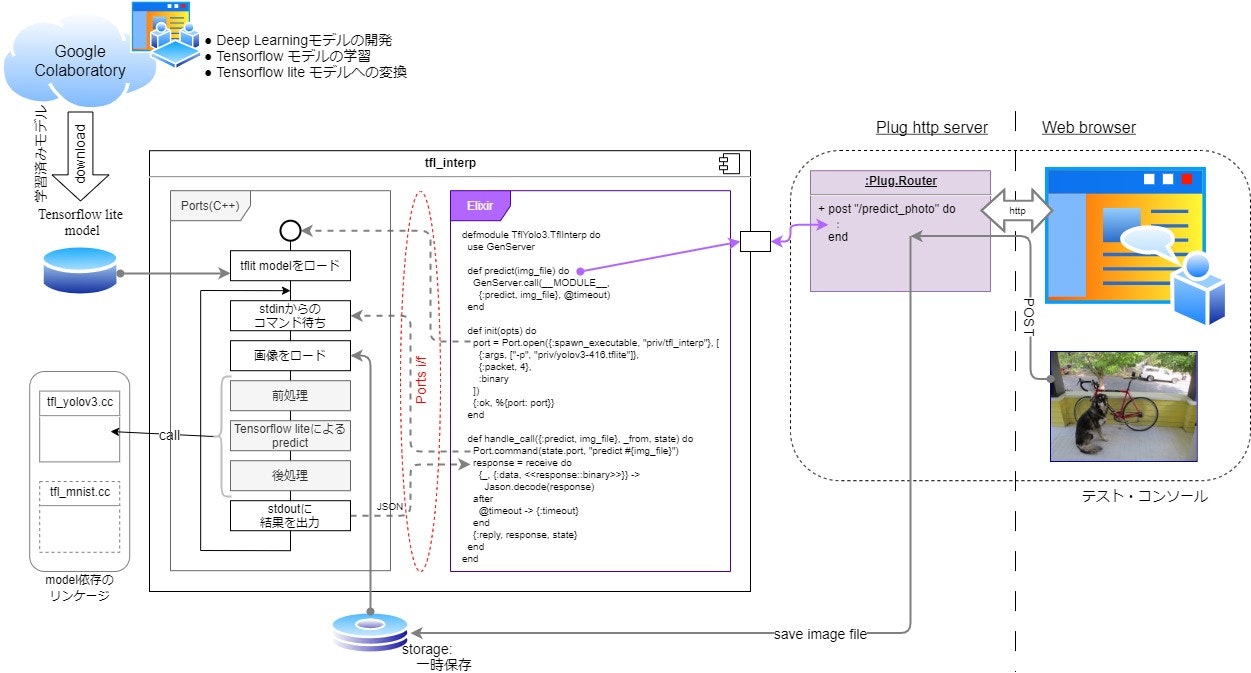
2020年12月現在、システム全体の構成は下図の通りである。Mingw64/Windows10, Ubuntu 20.04/WSL2, Nervesそれぞれのプラットフォームにて、テスト・コンソールから入力した画像を Minst(小規模なNN)並びに YOLO v3(そこそこの規模のNN)で認識することができた。
システムの核となる部分は tfl_interpモジュールで、Erlangの他言語インターフェイス Portsを介して、Tensorflow lite/C++で実装した推論エンジンを呼び出す様になっている。尤も、推論エンジンそのものには大した価値はなく、なんとなればTensorflow liteよりもパフォーマンスの良いソリューションに乗り替えることも視野に入れている。今日現在、質の高い学習済みモデルが入手し易いという理由で Tensorflow liteを選択したに過ぎない。
3.YOLO v3とは
YOLO v3は、CVPR2016で提案されセンセーションを巻き起こした YOLO(You Only Look Once)の後継者の一つである。YOLO以前の物体検出の手法は、画像内で物体らしきものを「検出」する処理と、その物体らしきものが何モノであるかを「識別」する処理が分れており、その構造故に認識速度のボトルネックとなっていた。YOLOは、「検出」と「識別」を同時に行うシンプルな End-to-Endの Deep NNで、検出精度は若干劣るものの認識速度が群を抜く手法であった。リアルタイムな物体検出へのブレークスルーとなったようだ。以上、受け売りである![]()
Deepな話はそろそろボロが出そうなので💦、YOLO v3を Nerves/Elixirに移植する話に歩を進めよう。
YOLO v3の学習済み重みテーブルは本家サイトで公開されているのだが、オリジナルの YOLO v3は Darknetというフレームワークの上に実装されており、その重みテーブルも Darknet向けである。そのままでは、Tensorflowで利用することはできない。そんな訳で、多くの先人たちがTensorflowへの移植を試みており、幸運なことに Tensorflow liteへの移植例もある。ここでは、その一つ Việt Hùngさんの YOLO v3移植モデル(参考文献[4])を使わせて貰った。感謝![]()
Việt Hùngさんの YOLO v3モデルは、概略下記の様な仕様となっている。
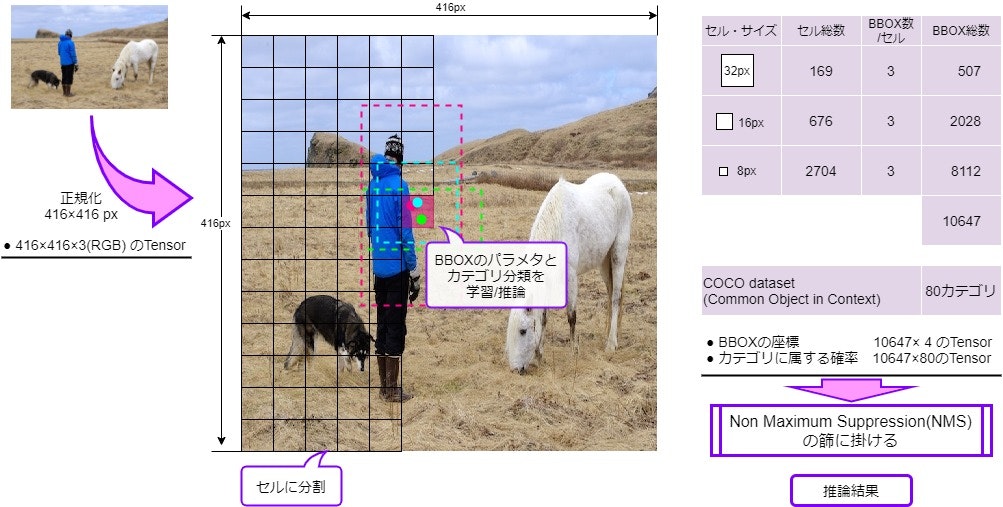
Deep NNへの入力は、対象画像を縦416px、横416pxにリサイズし、かつRGB各プレーンの画素値を0~1.0に正規化した 、416×416×3/float32の tensorである。Deep NNは、この正規化画像を 32px正方、16px正方、8px正方の3つの解像度でセルに分割し、各セル毎に物体が存在するであろう領域を示すBBOXを3つ、またそのBBOXが COCOの各カテゴリ(80)に属する場合の確率80個を推論する。よって Deep NNは、BBOX推論:10647×4/float32、カテゴリ推論:10647×80/float32の2つのtensorを出力する。YOLO v3では、この後 NMS: Non Maximum Suppression(参考文献[5])と呼ばれるフィルタリング処理が行われ、最終的に物体検出の推論結果(BBOXとカテゴリの組)が得られる。
従って、Nerves/ElixirへのYOLO v3の移植に当たっては、Deep NNを実装する Tensorflow lite & modelの他に、前処理の画像正規化、後処理の NMSの実装しなければならない。
4.tfl_interpモジュール
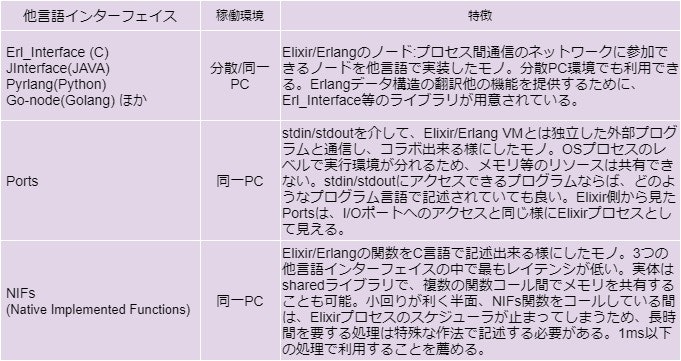
システムの核となる tfl_interpモジュールは、Elixir/Erlangの他言語拡張インターフェイス Portsを利用して実装している。Elixirの土台の Erlangには、下表の3つの他言語拡張インターフェイスが用意されており、Elixirの他言語による機能拡張もこれら3つのどれかを利用することになる。
今回移植に挑戦した YOLO v3は、処理時間が数十msに及ぶことがあると予想されるので Portsを採用することにした。Portsでは「stdin/stdoutを介してデータを交換する」という低レベルのプロトコルしか規定されておらず、それ以上のプロトコルは独自に設計しなければならない。NIFsと比べると少々面倒ではあるが![]()
(※技術者の端くれとして、何でもかんでもNIFsという「ゴールデン・ハンマー」アンチパターンに陥ることは避けたいところだ)
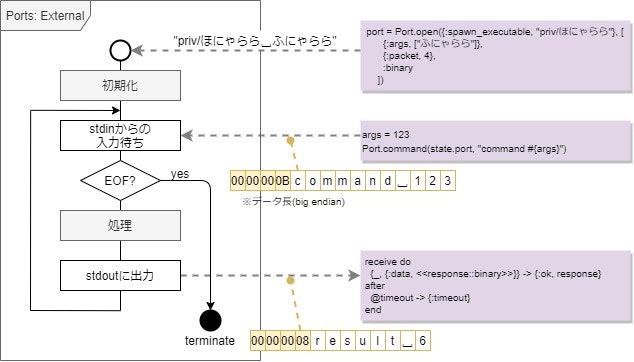
Ports外部プログラムの骨格は下図の様になる。そう、先般Qiitaで流行った「湯婆婆プログラム」と何ら変わらない。僅かな違いは、ElixirのPort.open/2関数でプログラムが起動されることと、stdin/stdoutの入出力データがバイナリ・データ - この例では、データの先頭に4byteのデータ長が付くバイナリ・データ - である点ぐらいだろう。
実装に当たっての注意は、何らかの理由で stdin/stdoutが closeされた場合には、プログラムを確実に終了させなければならない点である。
以下、実コードを交えながら具体的な実装を見ていく。
4.1. [tfl_interp.ex] TflYolo3.TflInterp
TflYolo3.TflInterpは、Portsの Elixir側インターフェイスに当たるモジュールだ。ここでPortsのオープンすなわちPorts外部プログラムの起動を行っている。PortsはElixirプロセスとして振舞うので、オープンするとプロセス識別子PIDが割り当てられ、以後PIDに対し通信を行うことになる。PIDを保持するために、このモジュールはGenServerを実装している。お決まりのパターンだ![]()
init/1では、Port.open/2にPorts外部プログラムのPATH - priv/tfl_interp - とオプション・リストを与え、Portをオープンしている。オプション・リストには、通信モードや Ports外部プログラムに渡すコマンドライン引数などを設定することが出来る。ここでは以下のオプションを設定している。
- {:args, ...}
- Ports外部プログラムの起動時に渡すコマンドライン引数。リビルド無しでモデルの更新/差し替えが出来る様に、Tensorflow liteのモデルはコマンドライン引数で指定するように設計した
- {:packet, 4}
- 送受信データの先頭に4Byteのデータ長(big-endian)を付加する
- :binary
- バイナリ・モードでデータ送受信を行う
その他のオプションについては、参考文献[6]に詳しい説明がある。
handle_call/2では、Ports外部プログラムへのコマンド送受信を行っている。先にも触れた通り、Elixir/Erlangの枠組みでは、通信プロトコルはバイナリ・データを送受信するとしか決まっておらず、上位のプロトコルは独自に設計しなければならない。デバッグのし易さも勘案して、初版のプロトコルは un*xの流儀「特に理由がない限りテキストで情報交換する」に従って設計した。
- 送信: 推論コマンド
- 文字列 "predict <画像ファイルのPATH>" を Port.command/3(実体はsend/3)で送信
- 受信: YOLO v3推論結果
- JSONのArrayを receiveで受信
defmodule TflYolo3.TflInterp do
  use GenServer

  @timeout 300000

  def start_link(opts \\ []) do
    GenServer.start_link(__MODULE__, opts, name: __MODULE__)
  end

  @doc """
  command: predict
  send the img_file to Ports external tfl_interp and return the prediction in Map.
  """
  def predict(img_file) do
    GenServer.call(__MODULE__, {:predict, img_file}, @timeout)
  end


  @doc """
  run Ports external tfl_interp with args. the protocol is size (4byte) headed binary stream.
  """
  def init(opts) do
    executable = Application.app_dir(:tfl_yolo3, "priv/tfl_interp")
    tfl_model  = Application.app_dir(:tfl_yolo3, Keyword.get(opts, :model))
    tfl_opts   = Keyword.get(opts, :opts, "")

    port = Port.open({:spawn_executable, executable}, [
      {:args, String.split(tfl_opts) ++ ["-p", tfl_model]},
      {:packet, 4},
      :binary
    ])

    {:ok, %{port: port}}
  end

  @doc """
  invoke predict command and convert the response in JSON to Map
  """
  def handle_call({:predict, img_file}, _from, state) do
    Port.command(state.port, "predict #{img_file}")
    response = receive do
      {_, {:data, <<response::binary>>}} ->
        {:ok, ans} = Jason.decode(response)
        if Map.has_key?(ans, "error"), do: {:error, ans["error"]}, else: {:ok, ans}
    after
      @timeout -> {:timeout}
    end

    {:reply, response, state}
  end
end
4.2. [application.ex] TflYolo3.Application
Ports外部プログラムにコマンドライン引数として渡すパラメタ類は、下記の様にApplication.start/2内のchildrenリストのTflYolo3.TflInterpの項に記述するようにした。
- model:
- tensorflow liteのモデル・ファイルのPATH (必須)
- opts:
- その他オプション(無くとも良い)
defmodule TflYolo3.Application do
  use Application

  def start(_type, _args) do
    children = [
        {Plug.Cowboy, scheme: :http, plug: TflYolo3.Router, options: [port: 5000]},
        {TflYolo3.TflInterp, [model: "priv/yolov3-416-dr.tflite", opts: "-n"]}
    ] ++ children(target())
    opts = [strategy: :one_for_one, name: TflYolo3.Supervisor]
    Supervisor.start_link(children, opts)
  end
  <以下省略>
end
4.3.[tfl_interp.cc] main, interp, rcv_packet_port, snd_packet_port
tfl_interp.ccは、上で見たPorts外部プログラムの骨格に当たるC++関数群を収めたファイルだ。
Posts外部プログラムは、実のところ極普通のCLIアプリなので、シェルのプロンプトに打ち込めば普通に実行することが出来る。当然コマンドライン引数を渡すことも出来る。4.1.で触れた通り、今回の設計ではコマンド引数で tensorflow liteのモデルファイルを渡すようにしているが、それ以外にデバッグを行い易いように下記のオプションを定義している。
Usage:
tfl_interp <tensorflow liteモデルのPATH> [オプション]
オプション:
-p Portsパケットモード
-n BBOXの座標を画像の縦横に対する比率で返す(1.0x1.0正規化)
-t YOLO v3のモデルが tinyモデル
-d<num> デバッグ出力
1 = 加工済み画像(416x416リサイズ)を保存
2 = NNの入出力 tensorをnpyファイルに保存
3 = 実行結果をJSON形式で保存
mainでは、コマンドライン引数/オプションの解析のほか、stdin/stdoutのモード設定を行っている。特にWindows下では、次に示すコードでstdin/stdoutをバイナリ・モードに変更しておかないと、通信データ上に '0x0A'が現れると ''0x0D 0x0A'(\n\r)に置き換わってしまい困ったことになる。
setmode(fileno(stdin),  O_BINARY);
setmode(fileno(stdout), O_BINARY);
interpでは、まず最初に tensorflow liteの Deep NNインタープリタを初期化し、その後コマンド・ループを開始する。
tfliteモデル・ファイルから インタープリタを初期化するコードはパターンが決まっており、基本的に下記のコードをコピペして使えば良い。
// initialize tensor flow lite
unique_ptr<tflite::FlatBufferModel> model =
   tflite::FlatBufferModel::BuildFromFile("モデル・ファイル名");

tflite::ops::builtin::BuiltinOpResolver resolver;
InterpreterBuilder builder(*model, resolver);
unique_ptr<Interpreter> interpreter;    // Deep NNインタープリタ
builder(&interpreter);

if (interpreter->AllocateTensors() != kTfLiteOk) {
   cerr << "error: AllocateTensors()\n";
   exit(1);
}
コマンド・ループは、Ports外部プログラムの骨格図で見た「stdinからの入力待ち → 処理 → stdoutに出力」のループだ。gSys.mRcv()でコマンド文字列cmd_lineを受け取り、それをparse_cmd_line()で解析してコマンド名commandとその引数argsを得、コマンドに応じた処理を実行し、最後にgSys.mSnd()で処理結果をJSON文字列で出力している。今回の実装では、処理結果はnlohmann::jsonオブジェクトresultに逐次構築するようにした。
rcv_packet_port, snd_packet_port は、sdtin/sdtoutを介した Portsとの送受信を行うルーチンで、先頭にデータ長が付加された通信データの分解/構築と Portsのクローズ(EOF)の監視を行っている。これら二つのルーチンには姉妹ルーチンrcv_packet_terminal, snd_packet_terminalがあり、こちらはshellからインタラクティブにコマンドを入力出来るデバッグ用のルーチンだ。tfl_interpのコマンドラインに '-p'オプションを指定すれば前者を、指定しなければ後者を gSys.mRcv/gSys.mSndにバインドして切り替わる様にした。
/***  File Header  ************************************************************/
/**
* tfl_interp.cc
*
* Elixir/Erlang Port ext. of tensor flow lite
* @author	   Shozo Fukuda
* @date	create Sat Sep 26 06:26:30 JST 2020
* System	   MINGW64/Windows 10<br>
*
**/
/**************************************************************************{{{*/

# include <iostream>
# include <string>
# include <memory>
# include <iterator>
# include <regex>
using namespace std;

# ifdef _WIN32
# include <fcntl.h>
# include <io.h>
# endif

# include <getopt.h>

# include "nlohmann/json.hpp"
using json = nlohmann::json;

# include "tensorflow/lite/interpreter.h"
# include "tensorflow/lite/kernels/register.h"
# include "tensorflow/lite/model.h"
using namespace tflite;

# include "tfl_interp.h"
# include "tfl_helper.h"

/***  Global **************************************************************}}}*/
/**
* system infomation
**/
/**************************************************************************{{{*/
SysInfo gSys = {
    .mPortMode = false,
    .mNormalize = false,
    .mTiny      = false,
    .mDiag     = 0
};

/***  Type ****************************************************************}}}*/
/**
* convert "unsigned short" <-> "char[2]"
**/
/**************************************************************************{{{*/
union Magic {
    unsigned long L;
    char C[4];
};

/***  Module Header  ******************************************************}}}*/
/**
* receive command packet from Elixir/Erlang
* @par DESCRIPTION
*   receive command packet and store it to "cmd_line"
*
* @retval res >  0  success
* @retval res == 0  termination
* @retval res <  0  error
**/
/**************************************************************************{{{*/
ssize_t
rcv_packet_port(string& cmd_line)
{
    try {
        // receive packet size
        Magic len;
        /*+KNOWLEDGE:shoz:20/11/24:can't work "cin.get(len.C[3]).get(len.C[2]).." in WSL */
        len.C[3] = cin.get();
        len.C[2] = cin.get();
        len.C[1] = cin.get();
        len.C[0] = cin.get();

        // receive packet payload
        unique_ptr<char[]> buff(new char[len.L]);
        cin.read(buff.get(), len.L);

        // return received command line
        cmd_line.assign(buff.get(), len.L);
        return len.L;
    }
    catch(ios_base::failure) {
        return (cout.eof()) ? 0 : -1;
    }
    catch (std::bad_alloc& e) {
        cerr << e.what() << "@rcv_packet_port" << endl;
        return -1;
    }
}

/***  Module Header  ******************************************************}}}*/
/**
* send result packet to Elixir/Erlang
* @par DESCRIPTION
*   construct message packet and send it to stdout
*
* @return count of sent byte or error code
**/
/**************************************************************************{{{*/
ssize_t
snd_packet_port(string result)
{
    try {
        Magic len = { static_cast<unsigned long>(result.size()) };
        (cout.put(len.C[3]).put(len.C[2]).put(len.C[1]).put(len.C[0]) << result).flush();
        return len.L;
    }
    catch(ios_base::failure) {
        return (cout.eof()) ? 0 : -1;
    }
}

/***  Module Header  ******************************************************}}}*/
/**
* receive command packet from terminal
* @par DESCRIPTION
*   receive command packet and store it to "cmd_line"
*
* @retval res >  0  success
* @retval res == 0  termination
* @retval res <  0  error
**/
/**************************************************************************{{{*/
ssize_t
rcv_packet_terminal(string& cmd_line)
{
    try {
        cout.put('>').flush();
        getline(std::cin, cmd_line);
        return cmd_line.size();
    }
    catch(ios_base::failure) {
        return (cout.eof()) ? 0 : -1;
    }
}

/***  Module Header  ******************************************************}}}*/
/**
* send result packet to terminal
* @par DESCRIPTION
*   construct message packet and send it to stdout
*
* @return count of sent byte or error code
**/
/**************************************************************************{{{*/
ssize_t
snd_packet_terminal(string result)
{
    try {
        std::cout << result << std::endl;
        return result.size();
    }
    catch(ios_base::failure) {
        return (cout.eof()) ? 0 : -1;
    }
}

/***  Module Header  ******************************************************}}}*/
/**
* parse command line string
* @par DESCRIPTION
*   extract command & arguments strings from "cmd_line"
*
* @retval command string & vector of arguments
**/
/**************************************************************************{{{*/
string
parse_cmd_line(const string& cmd_line, vector<string>& args)
{
    regex reg(R"(\s+)");
    sregex_token_iterator iter(cmd_line.begin(), cmd_line.end(), reg, -1);
    sregex_token_iterator end;

    string command = *iter++;
    args.assign(iter, end);

    return command;
}

/***  Module Header  ******************************************************}}}*/
/**
* tensor flow lite interpreter
* @par DESCRIPTION
*   <<解説記入>>
**/
/**************************************************************************{{{*/
void
interp(string& tfl_model)
{
    // initialize tensor flow lite
    unique_ptr<tflite::FlatBufferModel> model =
        tflite::FlatBufferModel::BuildFromFile(tfl_model.c_str());

    tflite::ops::builtin::BuiltinOpResolver resolver;
    InterpreterBuilder builder(*model, resolver);
    unique_ptr<Interpreter> interpreter;
    builder(&interpreter);

    if (interpreter->AllocateTensors() != kTfLiteOk) {
        cerr << "error: AllocateTensors()\n";
        exit(1);
    }

    // REPL
    for (;;) {
        // receive command packet
        string cmd_line;
        ssize_t n = gSys.mRcv(cmd_line);
        if (n <= 0) {
            break;
        }

        // parse command line
        vector<string> args;
        const string command = parse_cmd_line(cmd_line, args);

        // command branch
        json result;
        result.clear();
        if (command == "predict") {
            extern void predict(unique_ptr<Interpreter>& interpreter, const vector<string>& args, json& result);
            predict(interpreter, args, result);
        }
        else if (command == "info") {
            result["exe"]   = gSys.mExe;
            result["model"] = gSys.mTflModel;
            result["mode"]  = gSys.mPortMode ? "Ports" : "Terminal";
        }
        else {
            result["unknown"] = command;
        }

        // send the result in JSON string
        n = gSys.mSnd(result.dump());
        if (n <= 0) {
            break;
        }
    }
}

/***  Module Header  ******************************************************}}}*/
/**
* prit usage
* @par DESCRIPTION
*   print usage to terminal
**/
/**************************************************************************{{{*/
void usage()
{
    cout
      << "tfl_interp [opts] <model.tflite>\n"
      << "\toption:\n"
      << "\t  -p       : Elixir/Erlang Ports interface\n"
      << "\t  -n       : Normalize BBox predictions by 1.0x1.0\n"
      << "\t  -d <num> : diagnosis mode\n"
      << "\t             1 = save the formed image\n"
      << "\t             2 = save model's input/output tensors\n"
      << "\t             4 = save result of the prediction\n";
}

/***  Module Header  ******************************************************}}}*/
/**
* tensor flow lite for Elixir/Erlang Port ext.
* @par DESCRIPTION
*   Elixir/Erlang Port extension (experimental)
*
* @return exit status
**/
/**************************************************************************{{{*/
int
main(int argc, char* argv[])
{
    int opt, longindex;
    struct option longopts[] = {
        { "port",   no_argument,       NULL, 'p' },
        { "normal", no_argument,       NULL, 'n' },
        { "tiny",   no_argument,       NULL, 't' },
        { "debug",  required_argument, NULL, 'd' },
        { 0,        0,                 0,     0  },
    };

    for (;;) {
        opt = getopt_long(argc, argv, "d:npt", longopts, NULL);
        if (opt == -1) {
            break;
        }
        else switch (opt) {
        case 'p':
            gSys.mPortMode = true;
            break;
        case 'n':
            gSys.mNormalize = true;
            break;
        case 't':
            gSys.mTiny = true;
            break;
        case 'd':
            gSys.mDiag = atoi(optarg);
            break;
        case '?':
        case ':':
            cerr << "error: unknown options\n\n";
            usage();
            return 1;
        }
    }
    if ((argc - optind) < 1) {
        // argument error
        cerr << "error: expect <model.tflite>\n\n";
        usage();
        return 1;
    }

    // save exe infomations
    gSys.mExe.assign(argv[0]);
    gSys.mTflModel.assign(argv[optind]);

    // initialize i/o
    cin.exceptions(ios_base::badbit|ios_base::failbit|ios_base::eofbit);
    cout.exceptions(ios_base::badbit|ios_base::failbit|ios_base::eofbit);

    if (gSys.mPortMode) {
# ifdef _WIN32
        setmode(fileno(stdin),  O_BINARY);
        setmode(fileno(stdout), O_BINARY);
# endif
        gSys.mRcv = rcv_packet_port;
        gSys.mSnd = snd_packet_port;
    }
    else {
        gSys.mRcv = rcv_packet_terminal;
        gSys.mSnd = snd_packet_terminal;
    }

    // run interpreter
    interp(gSys.mTflModel);

    return 0;
}

/*** tfl_interp.cc ********************************************************}}}*/
4.4. [tfl_yolo3.cc] predict, post_yolo3, non_maximum_suppression
tfl_yolo3.ccは YOLO v3による物体検出を実行するC++関数群を収めたファイルだ。また、YOLO v3の後処理で BBOXを対象とした処理をガチャガチャと行うので、簡単な class Boxを定義し抽象化も行っている。
predictは、YOLO v3による物体検出のメイン関数で、[画像ファイルの読み込み → 416x416pix画像へのリサイズ → 画素値の0.0~1.0への正規化]の前処理を経て Deep NNインタープリタで推論を行っている。推論結果は3章で説明した様に、BBOX推論:10647×4/float32、カテゴリ推論:10647×80/float32の2つのtensorとなる。これらの推論結果はまだ中間結果なので、後処理の post_yolo3に通してノイズを除去する必要がある。尚、前処理では C++テンプレート画像処理ライブラリ CImgを利用した。
post_yolo3は YOLO v3の後処理で、Deep NNインタープリタで得た推論結果を篩に掛け、物体検出の最終結果を求めている。最初に物体を表しているであろう確率(スコア)が閾値 thresholdに満たない BBOXを全て篩い落とし、その後残ったBBOXを COCOの各カテゴリー毎に NMSに掛け、最終的な物体検出の推論結果(BBOXとカテゴリの組)を得ている。
no_maximum_supperssionは NMSの実装である。BBOXをスコア順に並べたリストを作成し、そのリストを頭から順に IOUで評価し重複する BBOXを篩い落としている。
/***  File Header  ************************************************************/
/**
* tfl_yolo3.cc
*
* tensor flow lite prediction
* @author	   Shozo Fukuda
* @date	create Sun Nov 01 22:01:42 JST 2020
* System	   MINGW64/Windows 10<br>
*
**/
/**************************************************************************{{{*/
# ifndef cimg_plugin

# define cimg_plugin     "tfl_yolo3.cc"
# define cimg_display    0
# define cimg_use_jpeg
# include "CImg.h"
using namespace cimg_library;

# include <string>
# include <list>
# include <vector>
# include <algorithm>
using namespace std;

# include "nlohmann/json.hpp"
using json = nlohmann::json;

# include "tensorflow/lite/interpreter.h"
using namespace tflite;

# include "tfl_interp.h"
# include "tfl_helper.h"

# include "coco.names"

/***  Class Header  *******************************************************}}}*/
/**
* bounding box
* @par DESCRIPTION
*   it holds bbox and scores needed for NMS and provides IOU function.
**/
/**************************************************************************{{{*/
class Box {
//CONSTANT:
public:

//LIFECYCLE:
public:
    Box(const float* scores, const float box[4]) {
        mScore  = scores;
        mBBox[0] = box[0] - box[2]/2.0;
        mBBox[1] = box[1] - box[3]/2.0;
        mBBox[2] = box[0] + box[2]/2.0;
        mBBox[3] = box[1] + box[3]/2.0;
        mArea   = box[2]*box[3];
    }

//ACTION:
public:
    // calc Intersection over Union
    float iou(const Box& x) const {
        float x1 = min(mBBox[0], x.mBBox[0]);
        float y1 = min(mBBox[1], x.mBBox[1]);
        float x2 = max(mBBox[2], x.mBBox[2]);
        float y2 = max(mBBox[3], x.mBBox[3]);

        if (x1 < x2 && y1 < y2) {
            float v_intersection = (x2 - x1)*(y2 - y1);
            float v_union        = mArea + x.mArea - v_intersection;
            return v_intersection/v_union;
        }
        else {
            return 0.0;
        }
    }

    // put out the scaled BBox in JSON formatting
    json put_json(float scale_x=1.0, float scale_y=1.0) const {
        auto result = json::array();
        if (gSys.mNormalize) {
            result.push_back(mBBox[0]*scale_x);
            result.push_back(mBBox[1]*scale_y);
            result.push_back(mBBox[2]*scale_x);
            result.push_back(mBBox[3]*scale_y);
        }
        else {
            result.push_back(round(mBBox[0], scale_x));
            result.push_back(round(mBBox[1], scale_y));
            result.push_back(round(mBBox[2], scale_x));
            result.push_back(round(mBBox[3], scale_y));
        }
        return result;
    }

//ACCESSOR:
public:
    float score(int class_id) const {
        return mScore[class_id];
    }

//INQUIRY:
public:

//PRINT;
public:
    ostream& put(ostream& s) const
    {
        return s
            << "score: [" << mScore[0] << "," << mScore[1] << "," << mScore[2] << ", ...]\n"
            << "box  : [" << mBBox[0] << "," << mBBox[1] << "," << mBBox[2] << "," << mBBox[3] << "]\n"
            << "area : " << mArea << "\n";
    }

//ATTRIBUTE:
protected:
    const float* mScore;
    float  mBBox[4];
    float  mArea;
};

ostream& operator<<(ostream& s, const Box& box)
{
    return box.put(s);
}

// TYPE: list of Box
typedef list<const Box*> Boxes;

/***  Module Header  ******************************************************}}}*/
/**
* Non Maximum Suppression
* @par DESCRIPTION
*   run non-maximum on the sepcified class
*
* @retval list of predicted boxes
**/
/**************************************************************************{{{*/
Boxes
non_maximum_suppression(int class_id, const vector<Box>& db_candidates, float threshold=0.25, float iou_threshold=0.5)
{
    // pick up box from db_candidates and make a list with it in order of score.
    Boxes prior;
    for (const auto& box : db_candidates) {
        float my_score = box.score(class_id);
        if (my_score < threshold) { continue; }

        auto pos = find_if(prior.begin(), prior.end(), [class_id, my_score](const Box* x) {
            return x->score(class_id) <= my_score;
        });
        prior.insert(pos, &box);
    }

    // remove overlaped boxes by IOU
    Boxes result;
    if (!prior.empty()) {
        do {
            auto highest = prior.front();  prior.pop_front();

            result.push_back(highest);

            prior.remove_if([&highest, iou_threshold](const Box* x) {
                return highest->iou(*x) >= iou_threshold;
            });
        } while (!prior.empty());
    }
    return result;
}

/***  Module Header  ******************************************************}}}*/
/**
* post-processing for yolo3
* @par DESCRIPTION
*   filtering noize and run Non-Maximum-Suppression
*
* @retval command string & vector of arguments
**/
/**************************************************************************{{{*/
void
post_yolo3(json& result, int count, const float* boxes, const float* scores, float scale[2], float threshold=0.25, float iou_threshold=0.5)
{
    // leave only candidates above the threshold.
    vector<Box> db_candidates;
    for (int i = 0; i < count; i++, boxes += 4, scores += COCO_NAMES_MAX) {
        if (any_one_above(COCO_NAMES_MAX, scores, threshold)) {
            db_candidates.emplace_back(scores, boxes);
        }
    }

    // run nms over each classification class.
    bool nothing = true;
    for (int class_id = 0; class_id < COCO_NAMES_MAX; class_id++) {
        auto res = non_maximum_suppression(class_id, db_candidates, threshold, iou_threshold);
        if (res.empty()) { continue; }

        nothing = false;

        auto jboxes = json::array();
        for (const auto* box : res) {
            jboxes.push_back(box->put_json(scale[0], scale[1]));
        }
        result[gCocoNames[class_id]] = jboxes;
    }
    if (nothing) {
        result["error"] = "can't find any objects";
    }
}

/***  Module Header  ******************************************************}}}*/
/**
* predict image by yolo3
* @par DESCRIPTION
*   object detection
**/
/**************************************************************************{{{*/
void
predict(unique_ptr<Interpreter>& interpreter, const vector<string>& args, json& result)
{
/*PRECONDITION*/
    if (args.size() < 1) {
        result["error"] = "not enough argument";
        return;
    }
/**/

    // get basename of image file
    string base = basename(args[0], false);

    // setup the input tensor.
    TfLiteTensor* itensor0 = interpreter->input_tensor(0);
    int width  = size_of_dimension(itensor0, 1);    //416px
    int height = size_of_dimension(itensor0, 2);    //416px
    float scale[2];

    typedef CImg<unsigned char> CImgU8;
    try {
        // load target image
        CImgU8 img(args[0].c_str());

        // save image sacle factor for post process
        if (gSys.mNormalize) {
            scale[0] = 1.0 / width;
            scale[1] = 1.0 / height;
        }
        else {
            scale[0] = float(img.width())  / width;
            scale[1] = float(img.height()) / height;
        }

        // convert the image to required format.
        auto formed_img = img.get_resize(width, height);

        DIAG_FORMED_IMG {
            formed_img.save((base+"_formed.jpg").c_str());
        }

        // put the formed image into the input tensor.
        float* input = get_typed_tensor<float>(itensor0);

        cimg_forXY(formed_img, x, y) {
        cimg_forC(formed_img, c) {
            // normalize the intensity of pixel and set it to the input tensor
            *input++ = formed_img(x, y, c)/255.0;
        }}

        DIAG_IN_OUT_TENSOR {
            save_tensor<float>(itensor0, base+"_input.npy");
        }
    }
    catch (...) {
        result["error"] = "fail CImg";
        return;
    }

    // predict
    if (interpreter->Invoke() == kTfLiteOk) {
        // get result from the output tensors
        const TfLiteTensor *otensor0, *otensor1;
        if (gSys.mTiny) {
            // tiny model results
            otensor0 = interpreter->output_tensor(1);
            otensor1 = interpreter->output_tensor(0);
        }
        else {
            // full model results
            otensor0 = interpreter->output_tensor(0);
            otensor1 = interpreter->output_tensor(1);
        }

        DIAG_IN_OUT_TENSOR {
            save_tensor<float>(otensor0, base+"_output0.npy");
            save_tensor<float>(otensor1, base+"_output1.npy");
        }

        // do post process
        post_yolo3(
            result,
            size_of_dimension(otensor0, 1),
            get_typed_tensor<float>(otensor0),
            get_typed_tensor<float>(otensor1),
            scale,
            0.25,
            0.5
        );
    }
    else {
        result["error"] = "fail predict";
    }
    DIAG_RESULT {
        std::ofstream save_result(base+"_result.txt");
        save_result << result.dump();
    }
}

# else
/**************************************************************************}}}*/
/*** CImg Plugins:                                                          ***/
/**************************************************************************{{{*/
# endif
/*** tfl_yolo3.cc *******************************************************}}}*/
5.Tfliteモデルの作成
前章でシステムの核となる tfl_interpモジュールの用意ができた。次に必要なのは tfl_interpに喰わす tfliteモデル・ファイルだ。tfliteモデル・ファイルは、Tensorflowのモデルからコンバートして作成するので、まず最初に Tensorflowで書かれた YOLO v3のモデルが必要となる。ここは先人の力を借り、3章で触れた通り Việt Hùngさんのモデルを利用させて貰うことにした。
Tensorflowモデルから tfliteモデルへのコンバーターは、Tensorflowフレームワークの一機能として Googleから提供されている。自前でローカルPC上に Tensorflowフレームワークをインストールして利用しても良いのだが、ローカルPCの環境によっては思うように動かずあれこれと試行錯誤しなければならない場合もある[*1]。無駄な抵抗は止めて Google Colaboratory(Colab)を利用しよう。
[*1]事実、小生のPCではGPUの設定が引っ掛かってコンバーターが動かなかった(T_T)
以下、Colabで YOLO v3の tfliteモデルを作成する手順を順を追って見ていく。"Full YOLO v3"、"Tiny YOLO v3"それぞれに対し floatモデル、ダイナミックレンジ 量子化モデルの計4種類の tfliteモデルを作成する。尚、同じ内容を Jupyterの notebookでも用意したので、必要に応じて参照して頂きたい。
Jupyter Notebook: ["Elixir/Nerves用の YOLO v3 tfliteモデルの作成"] (https://github.com/shoz-f/tfl_yolo3_nerves_ex/blob/master/ElixirYOLOv3.ipynb)
**0.**まず最初にClabの環境を整えよう。google.colab.filseは出来上がった tfliteモデルをローカルPCにダウンロードする為のものだ。
from google.colab import files
import tensorflow as tf
**1.**Việt Hùngさんの tensorflow-yolov4-tfliteをロードする
!git clone https://github.com/hunglc007/tensorflow-yolov4-tflite.git
!mv ./tensorflow-yolov4-tflite/* .
!rm -rf ./tensorflow-yolov4-tflite/
**2.**Darknet YOLO v3の fullモデルの重みデータをダウンロードし、その重みデータをTensorflowモデルに変換して保存する[./checkpoints/yolov3-416]
!wget https://pjreddie.com/media/files/yolov3.weights
!mv ./yolov3.weights ./data
!python save_model.py --weights ./data/yolov3.weights --output ./checkpoints/yolov3-416 --input_size 416 --model yolov3 --framework tflite
**2-1.**Tensolflowモデル'yolov3-416'を tfliteモデル(float32)に変換する[./checkpoints/yolov3-416.tflite]
converter = tf.lite.TFLiteConverter.from_saved_model('./checkpoints/yolov3-416')
tflite_model = converter.convert()
open('./checkpoints/yolov3-416.tflite', 'wb').write(tflite_model)
- tfliteモデルをPCにダウンロード(10数分ほど掛かる)
※Google Driveにコピーした後にダウンロードしても良い
files.download('./checkpoints/yolov3-416.tflite')
**2-2.**Tensolflowモデル'yolov3-416'を ダイナミックレンジ量子化したtfliteモデルに変換する[./checkpoints/yolov3-416-dr.tflite]
converter = tf.lite.TFLiteConverter.from_saved_model('./checkpoints/yolov3-416')
converter.optimizations = [tf.lite.Optimize.DEFAULT]
tflite_model = converter.convert()
open('./checkpoints/yolov3-416-dr.tflite', 'wb').write(tflite_model)
- tfliteモデルをPCにダウンロード
files.download('./checkpoints/yolov3-416-dr.tflite')
**3.**Darknet YOLO v3の tinyモデルの重みデータをダウンロードし、その重みデータをTensorflowモデルに変換して保存する[./checkpoints/yolov3-tiny-416]
!wget https://pjreddie.com/media/files/yolov3-tiny.weights
!mv ./yolov3-tiny.weights ./data
!python save_model.py --weights ./data/yolov3-tiny.weights --output ./checkpoints/yolov3-tiny-416 --input_size 416 --model yolov3 --tiny --framework tflite
**3-1.**Tensolflowモデル'yolov3-tiny-416'を tfliteモデル(float32)に変換する[./checkpoints/yolov3-tiny-416.tflite]
converter = tf.lite.TFLiteConverter.from_saved_model('./checkpoints/yolov3-tiny-416')
tflite_model = converter.convert()
open('./checkpoints/yolov3-tiny-416.tflite', 'wb').write(tflite_model)
- tfliteモデルをPCにダウンロード
files.download('./checkpoints/yolov3-tiny-416.tflite')
**3-2.**Tensolflowモデル'yolov3-tiny-416'を ダイナミックレンジ量子化したtfliteモデルに変換する[./checkpoints/yolov3-tiny-416-dr.tflite]
converter = tf.lite.TFLiteConverter.from_saved_model('./checkpoints/yolov3-tiny-416')
converter.optimizations = [tf.lite.Optimize.DEFAULT]
tflite_model = converter.convert()
open('./checkpoints/yolov3-tiny-416-dr.tflite', 'wb').write(tflite_model)
- tfliteモデルをPCにダウンロード
files.download('./checkpoints/yolov3-tiny-416-dr.tflite')
**おまけ.**動作テスト用のスクリプト
!python detect.py --weights ./checkpoints/yolov3-416.tflite --size 416 --model yolov3 --image ./data/kite.jpg --framework tflite
以上の手順を踏めば下記の tfliteモデルが得られる。Elixirプロジェクト・ディレクトリ下の privに保存しておこう。おっと、"Full YOLO v3"のfloatモデルのサイズは 236MBもあるのか!要注意ですな![]()
tfl_yolo3_nerves/priv$ ls -l yolov3-*
-rw-r--r-- 1 shoz shoz 62184688 Dec 12 16:48 yolov3-416-dr.tflite
-rw-r--r-- 1 shoz shoz 247860444 Nov 1 22:17 yolov3-416.tflite
-rw-r--r-- 1 shoz shoz 8916976 Dec 12 16:48 yolov3-tiny-416-dr.tflite
-rw-r--r-- 1 shoz shoz 35449192 Dec 7 20:21 yolov3-tiny-416.tflite
# 6.ビルド環境の構築
さて、ここまでで YOLO v3を Elixir/Nervesで動かすためのコードと tfliteモデルが用意できた訳だが、プログラムをビルドするには Ports外部プログラムが依存している下記のライブラリをNerves開発環境にインストールする必要がある。

1. libtensorflow-lite.a
2. libjpeg.a
3. CImg
4. nlohmann json3
5. numpy.hpp

依存ライブラリのインストール先は、Makeから参照できるディレクトリならば何処でも良いのだが、扱い易い様にプロジェクト・ディレクトリ下に extraサブディレクトリを作りそこに収めることにしよう。Tensorflow liteは extra/tensorflow_srcの下に、それ以外の4つのライブラリは extra/usrの下にセットアップする。

> extra
├── make - Nerves/rpi3向け Tensorflow liteライブラリを作成する為のビルド・スクリプト
├── setup_nerves_extra.sh - 依存ライブラリをダウンロードするシェルスクリプト
├── tensorflow_src - Tensorflowソース・ファイル一式(liteを含む)
└── usr - ライブラリのセットアップ先。Nervesアプリをビルドする際はここを参照

ライブラリのダウンロード&セットアップは定型作業なので、下記のシェルスクリプトを用意した。使い方は、

```bash
export MIX_TARGET=rpi3
source setup_nerves_extra.sh
Debianパッケージ・リポジトリや Tensorflow GitHubから必要なパッケージを掻き集めてセットアップしてくれる。尚、Tensorflow liteはソースコードで提供されるので、ソースコードのダウンロード後に Nerves向けライブラリの作成が走るようにしている。詳しくは、参考文献[8]。
proj_top=`pwd`/..

# setup deb packages
deb_repo=http://ftp.jp.debian.org/debian/pool/main

case "${MIX_TARGET}" in
    "rpi"|"rpi0")
        wget -nc ${deb_repo}/libj/libjpeg-turbo/libjpeg62-turbo-dev_1.5.1-2_armel.deb
        dpkg -x libjpeg62-turbo-dev_1.5.1-2_armel.deb .

        wget -nc ${deb_repo}/libj/libjpeg-turbo/libjpeg62-turbo_1.5.1-2_armel.deb
        dpkg -x libjpeg62-turbo_1.5.1-2_armel.deb .
	;;

    "rpi2"|"rpi3")
        wget -nc ${deb_repo}/libj/libjpeg-turbo/libjpeg62-turbo-dev_1.5.1-2_armhf.deb
        dpkg -x libjpeg62-turbo-dev_1.5.1-2_armhf.deb .

        wget -nc ${deb_repo}/libj/libjpeg-turbo/libjpeg62-turbo_1.5.1-2_armhf.deb
        dpkg -x libjpeg62-turbo_1.5.1-2_armhf.deb .
	;;

    *) echo "Unknown target: ${MIX_TARGET}"
       exit 1
       ;;
esac

wget -nc ${deb_repo}/c/cimg/cimg-dev_2.4.5+dfsg-1_all.deb
dpkg -x cimg-dev_2.4.5+dfsg-1_all.deb .

wget -nc ${deb_repo}/n/nlohmann-json3/nlohmann-json3-dev_3.5.0-0.1_all.deb
dpkg -x nlohmann-json3-dev_3.5.0-0.1_all.deb .

# copy shared lib to target rootfs_overlay
mkdir -p ${proj_top}/rootfs_overlay/usr/lib

rm ${proj_top}/rootfs_overlay/usr/lib/libjpeg.so*
case "${MIX_TARGET}" in
    "rpi"|"rpi0")
        cp -au usr/lib/arm-linux-gnueabi/libjpeg.so* ${proj_top}/rootfs_overlay/usr/lib
	;;

    "rpi2"|"rpi3")
        cp -au usr/lib/arm-linux-gnueabihf/libjpeg.so* ${proj_top}/rootfs_overlay/usr/lib
	;;
esac

# setup other libraries
if [ ! -e usr/include/numpy.hpp ]
then
    git clone https://gist.github.com/rezoo/5656056
    mkdir -p usr/include
    cp 5656056/numpy.hpp usr/include
fi


# setup tensorflow lite
git clone https://github.com/tensorflow/tensorflow.git tensorflow_src

pushd tensorflow_src
tfl_make=./tensorflow/lite/tools/make

if [ ! -e ${tfl_make}/downloads ]
then
    ${tfl_make}/download_dependencies.sh
fi

cp -a ../make/* ${tfl_make}

${tfl_make}/build_nerves_lib.sh

popd
7.テスト・コンソール
以上で、YOLO v3を Nerves上で動かすことが出来る筈だ。sshで NervesにログインしてTflYolo3.TflInterp.predict/1を実行すれば下記のような推論結果が返ってくるに違いない。
>TflYolo3.TflInterp.predict("test/dog.jpg")
{:ok,
%{
"bicycle" => [
[0.21212583780288696, 0.20168866217136383, 0.7340440154075623,
0.7534724473953247]
],
"dog" => [
[0.16242438554763794, 0.34931400418281555, 0.41755345463752747,
0.9783276915550232]
],
"truck" => [
[0.618302583694458, 0.15004517138004303, 0.8970112800598145,
0.28993475437164307]
]
}}
i
う~む、UXの欠片もない:sweat:。推論結果が合っているのかどうかも直ぐに分からないし…
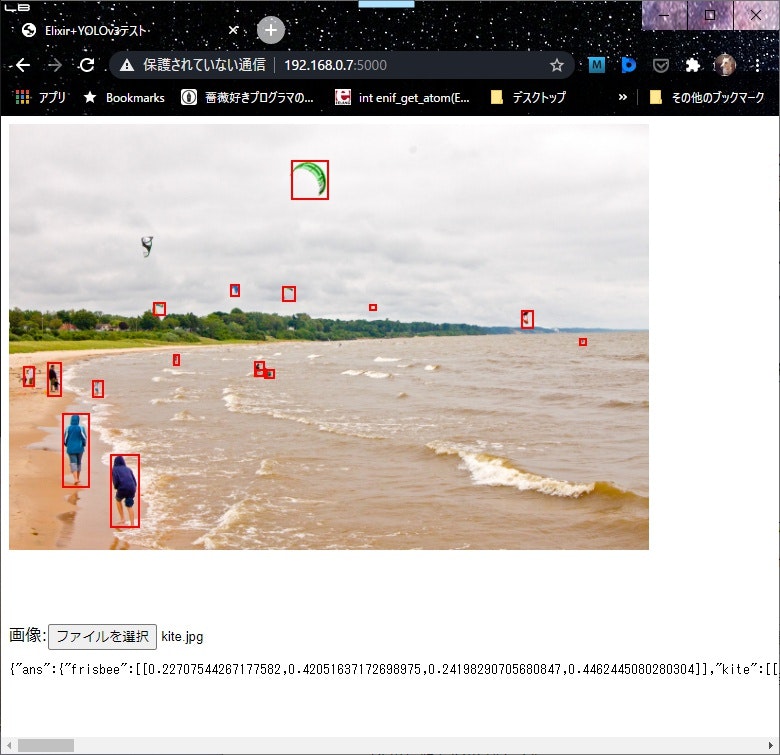
と言う訳で、Nerves上に簡単なWebサーバーを実装して、PCのブラウザーでビジュアルに推論結果を見れる"テスト・コンソール" アプリを用意することにしよう。「ブラウザーで画像を選択して送れば、推論結果が返って来て、画像に結果が重ね合わせて描画される」こんな仕様で良いかな。
ちょこっとWebサーバーを実装するときに重宝するのが Plug&Plug.Staticだ。いつもお世話になっております:bow_tone1:。 上の仕様なら、下記の様に僅か45行のElixirコードとPlug.Static用の priv/static/index.htmlだけで実現できる。
<dl>
<dt>[plug Plug.Static, at: "/", from: :tfl_yolo3]</dt>
<dd>"GET http://nerves.local:5000/"リクエストに対し、テスト・コンソールの画面 priv/static/index.htmlを返す。</dd>
<dt>[get "/photo.jpg"]</dt>
<dd>index.html内の "<img id="photo" src="/photo.jpg">"タグに対し、画像"/root/photo.jpg"を返す。</dd>
<dt>[post "/predict_photo"]</dt>
<dd>ブラウザーから受け取った画像に YOLO v3の物体検出を掛け、その結果をJSONで返す。</dd>
</dl>
```elixir:lib/route.ex
defmodule TflYolo3.Router do
use Plug.Router
alias TflYolo3.TflInterp
@photo_file if Mix.target() == :host, do: Application.app_dir(:tfl_yolo3, "priv/photo.jpg"), else: "/root/photo.jpg"
@opening Application.app_dir(:tfl_yolo3, "priv/photo.jpg")
plug Plug.Static.IndexHtml, at: "/"
plug Plug.Static, at: "/", from: :tfl_yolo3
plug :match
plug Plug.Parsers, parsers: [:urlencoded, :multipart, :json],
pass: ["text/*"],
json_decoder: Jason
plug :dispatch
get "/photo.jpg" do
conn
|> put_resp_header("content-type", "image/jpeg")
|> send_file(200, if(File.exists?(@photo_file), do: @photo_file, else: @opening))
end
post "/predict_photo" do
with \
:ok <- File.cp(conn.params["photo"].path, @photo_file),
{:ok, ans} <- TflInterp.predict(@photo_file)
do
IO.inspect(ans)
send_resp(conn, 200, Jason.encode!(%{"ans" => ans}))
else
{:timeout} ->
send_resp(conn, 200, "tiemout")
{:error, error} ->
send_resp(conn, 200, error)
_ ->
send_resp(conn, 200, "error")
end
end
match _ do
IO.inspect(conn)
send_resp(conn, 404, "Oops!")
end
end
テスト・コンソール画面のhtmlは下記の通り。
物体検出を行いたい画像を選択し Ajaxで Nervesに送ると、検出結果のBBOXが返ってくる。それを、画像に重ね合わせた Canvasに描画しているだけ(draw_result)。尚、画像は Nervesから送り返されたモノを表示している。一見無駄なことをやっているのだが、まぁこのテスト・コンソールはデバッグ/動作確認が目的なので![]()
<!DOCTYPE html>
<html>
  <head>
    <meta charset="utf-8"/>
    <title>Elixir+YOLOv3テスト</title>
    <script src="https://code.jquery.com/jquery-3.3.1.js"></script>
    <!-- <script src="js/app.js"></script> -->
    <!-- <link rel="stylesheet" href="css/app.css"> -->
    <style type="text/css">
      #overlay {
        position: relative;
      }
      #photo {
        width: 640px;
        height: auto;
        position: absolute;
        z-index: 1;
      }
      #result {
        position: absolute;
        z-index: 2;
      }
      #panel {
        padding-top: 500px;
      }
    </style>
  </head>
  <body>
    <div id="overlay">
      <img id="photo" src="/photo.jpg">
      <canvas id="result"></canvas>
    </div>
    <div id="panel">
      画像:<input type="file" id="predict">
      <pre id="answer"></pre>
    </div>

    <script>
      function draw_result(data) {
        return function () {
          var w = $('#photo').width()
          var h = $('#photo').height()

          var canvas = document.getElementById("result")
          canvas.width  = w
          canvas.height = h
          var ctx = canvas.getContext('2d')
          ctx.clearRect(0, 0, canvas.width, canvas.height)

          ctx.lineWidth   = "2";
          ctx.strokeStyle = "red"

          ans = data.ans
          for (var item in ans) {
            console.log(item)
            boxes = ans[item]
            for (var index in boxes) {
              box = boxes[index]
              x0 = Math.round(w*box[0])
              y0 = Math.round(h*box[1])
              x1 = Math.round(w*box[2])
              y1 = Math.round(h*box[3])
              ctx.strokeRect(x0, y0, x1-x0+1, y1-y0+1)
              console.log(x0, y0, x1, y1)
            }
          }
        }
      }
      $('#predict').change(function() {
          var fd = new FormData();
          fd.append("photo", $(this).prop('files')[0]);
          $.ajax({
              url: "/predict_photo",
              type: "POST",
              data: fd,
              processData: false,
              contentType: false,
              dataType: 'json'
          })
          .done(function(data) {
              $("#answer").html(JSON.stringify(data))
              $("#photo").on('load', draw_result(data))
              $("#photo").attr("src", "/photo.jpg?timestamp=" + new Date().getTime());
          });
          return false;
      });
    </script>
  </body>
</html>
8.ビルド&動作確認
システムのビルドは、Ports外部プログラム用の Makefile (https://github.com/shoz-f/tfl_yolo3_nerves_ex/blob/master/Makefile) を用意して、いつもの様に
$ export MIX_TARGET=rpi3
$ mix firmware
で良いのだが、その前に Nervesのコンフィグの一部を変更しておく必要がある。
5章でみたように、"Full YOLO v3"のfloatモデルのサイズは約236MBある。一方で、Nervesの標準のコンフィグでは、Rootfsのパーティション・サイズは128MBだ。そう、モデル・ファイルが入りきらないのだ![]() 。参考文献[9]に従って Rootfsのパーティション・サイズを512MBに拡張しておこう。
。参考文献[9]に従って Rootfsのパーティション・サイズを512MBに拡張しておこう。
Step1. Nerves標準コンフィグのfwup.confとcmdline.txtを./configにコピーする。
$ find deps -name fwup.conf
deps/nerves_system_rpi4/fwup.conf
deps/nerves_system_rpi/fwup.conf
deps/nerves_system_rpi3a/fwup.conf
deps/nerves_system_rpi2/fwup.conf
deps/nerves_system_rpi0/fwup.conf
deps/nerves_system_x86_64/fwup.conf
deps/nerves_system_rpi3/fwup.conf
deps/nerves_system_bbb/fwup.conf

$ cp deps/nerves_system_rpi3/fwup.conf config/
$ cp deps/nerves_system_rpi3/cmdline.txt config/
Step2. config/fwup.confの ROOTFS_A_PART_COUNT設定値を4倍にする
$ diff deps/nerves_system_rpi3/fwup.conf config/fwup.conf
74c74
< define(ROOTFS_A_PART_COUNT, 289044)
---
> define(ROOTFS_A_PART_COUNT, 1156176)
(※289044×512byte ≒ 141MB > 128MB。13MBほど多いが、iノードの分かな?)
(以上)
ふぅ。それではシステムをビルド&インストールして、Nerves/rpi3で YOLO v3を動かしてみよう。
少々応答時間が長いようだが、検出結果はこんなものかな![]() 。
。
はい、お疲れさま。
9.シーズン2予告
まだまだ課題は山積みではあるが、兎に角「Nerves/rpi3でYOLO v3を動かしてみる」というシーズン1の目標は達成できた。めでたしめでたし。
そして、シーズン2の始動である。まだ続くのかぁ![]()
シーズン1では、そこそこの規模の Deep NNを動かすことを第一の目標として取り組んだ。モジュール tfl_interpの汎用化もそれなりに考慮していたのだが、結果は見ての通りモデルにべったりと依存したコードになってしまった。シーズン2では、まず最初にこの部分にメスを入れたいと思う。実験的に書いてみた npy.exや cimg.exが利用できるかもと妄想している。
また、YOLO v3を動かしてみた最初の印象が「あれっ?やけに遅いな」であった。現時点では、処理時間を計測する手段を全く組み込んでいないので、パフォーマンス上で課題があるのかどうかすら分からない状態だ。この面についても改善を図り、課題の洗い出しと対策を進めたいと思う。
そして、シーズン2の達成目標は、数か月前に遊んでみた picam.exをシステムに取り込み、それなりのエッジAIの形を作ることにしようと思う。未だやり方が分らないが、raspi cameraから jpegではなくRGBフォーマットで画像を取り出す方法も調べてみたい。
余力があれば、Tensorfowのサイトに上がっているモデルも試してみたいなぁ‥‥妄想は広がるが、残念ながら頭は一つ手は2本しかない![]()
参考文献
[1] 拙著/ Nerves/rpiで TensorFlow liteを使ってみる
[2] [YOLO (You Only Look Once):ディープラーニングによる一般物体検出手法]
(https://blog.negativemind.com/2019/02/21/general-object-recognition-yolo/)
[3] オブジェクト検出 YOLO
[4] GitHub: Việt Hùng/tensorflow-yolov4-tflite
[5] 拙著/ 実験: Non-Maximum-SuppressionをElixirで実装してみる
[6] Erlang Run-Time System Application (ERTS) Reference Manual: open_port/2
[7] Interfacing Erlang with the Outer World
[8] 拙著/ Nerves/rpiで TensorFlow liteを使ってみる
[9] Nerves: Advanced Configuration - Partitions
[10] 拙著/ Elixir練習帳: .npyファイルの中を覗く
[11] 拙著/ 実験: レガシーなImage ProcessingをElixirのパイプで書いてみる
[12] 拙著/ RemotePicam-Nerves/Picamライブラリを用いた Wifiリモート・スチル・カメラ