本エントリはKong Advent Calendar 2025の12/3の投稿です。
はじめに
Kong Gatewayのリリースの度に様々なプラグインが追加されていますが、2025年10月に登場したKong Gateway 3.12には少し特殊なAI MCP Proxyプラグインが発表されました。このプラグインは一般的なREST APIへのリクエストではなく、MCPによるリクエストに対応する為のプラグインです。このプラグインについてはこちらのエントリで紹介しています。
本エントリでは、AI MCP Proxyプラグイン(以降MCP Proxy)を使ったサンプルを通して、このプラグインの利用方法やアプローチについて紹介します。
尚、本エントリ、ならびに続くMCP Proxyのサンプル環境はGitHubのこちらのレポジトリに用意しいますので、実機で試して頂くことも可能です。しかしながら、本エントリの目的は、読み物としてMCP Proxyがどう言うものかを理解してもらう事を目的としています。なのでなるべく詳しく説明する形で書きます。
デモ環境を実際にお試しになるには、環境にはDocker Compose、Kongの設定にはdecKが必要となります。
MCP ProxyのプラグインはKong Gatewayのエンタープライズ機能の一つである為、利用にはライセンスが必要です。
デモ環境 - OpenWeather API
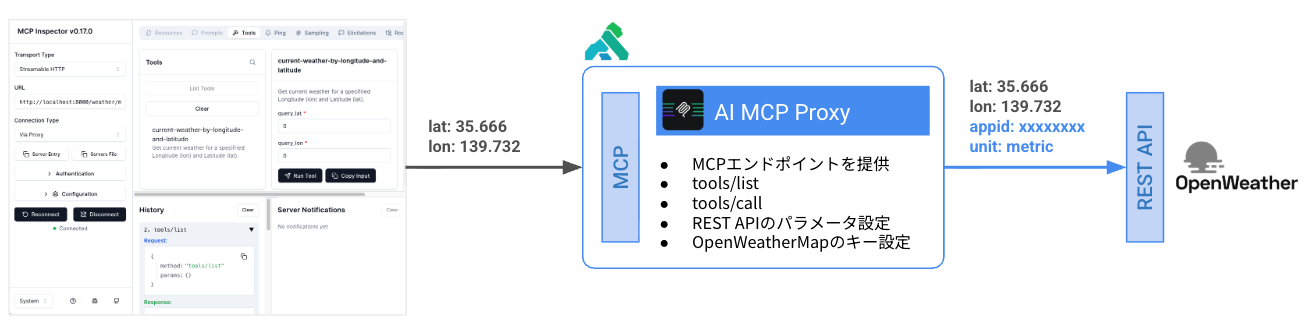
このデモではOpenWeatherのREST APIエンドポイントをMCP ProxyによってMCP化します。簡単に言うとKong Gateway上にOpenWeatherのMCPサーバーを、プラグインを使って建てる事になります。MCP Proxyはいくつかのモードを提供していますが、このデモではconversion-listnerモードのMCP Proxy1つでこれを達成します。デモ環境にはデモスクリプトと、APIアクセスに必要なInsomnia Collectionを用意していますので参照してください。
OpenWeatherへのアクセス
本サンプルではOpenWeatherの公開APIを利用しますが、利用するにはユーザー登録とアクセスキーの取得が必要となります。APIアクセスに必要なパラメーターは4つ:
- appId - アクセスキー
- lat - 緯度(Latitude)
- lon - 軽度(Longitude)
- units - 出力単位の指定(今回は
metricを指定)
これら全てはクエリパラメータとして指定しアクセスする必要があります。

Insomnia Collectionには、本サンプルで使用するのリクエストは1つだけ登録しています。(WeatherMap)実行時には取得したアクセスキーをappidに指定した上で実行します。アクセスキーの設定が正常であれば200 OKのレスポンスと共に結果がJSONで送られます。
Kongの設定
Kongの設定はconversion-weather.yamlに纏めています。
_format_version: "3.0"
plugins:
- config:
    path: /dev/stdout
    reopen: false
  enabled: true
  name: file-log
services:
- name: weather-service
  url: https://api.openweathermap.org/data/2.5/weather
  routes:
  - name: weather-route
    paths:
    - /weather/mcp
    plugins:
      - name: ai-mcp-proxy
        config:
          mode: conversion-listener
          tools:
          - description: Get current weather for a specifried Longitude (lon) and Latitude (lat).
            method: GET
            query:
              appid:
              - ${{ env "DECK_OPENWEATHER_API_KEY" }}
              units:
              - metric
            parameters:
            - name: lon
              in: query
              description: Longitude of the location
              required: true
              schema:
                type: number
            - name: lat
              in: query
              description: Latitude of the location
              required: true
              schema:
                type: number
            annotations:
              title: Current weather by Longitude and Latitude
          server:
            timeout: 60000
          logging:
            log_statistics: true
            log_payloads: true
          max_request_body_size: 8192
services(weather-service).routes(weather-route).plugins(ai-mcp-proxy)の部分がMCP Proxyの定義です。
-
config.mode- MCP ProxyをConversion Listenerモード(REST/MCPのプロトコル変換&MCPエンドポイント)で起動。 -
config.tools.description- MCPのtools/listリクエスト時にクライアント側に返されるTool概要。
の変換と、MCPのエンドポイント)で起動。 -
config.tools.query- MCP Proxyで補完するクエリパラメータ。 -
config.tools.parameters- MCPのtools/listリクエスト時にクライアントに返されるToolのパラメータ定義。 -
config.tools.annotations- MCPのtools/listリクエスト時にクライアントに返されるToolの名称。
ここではqueryで定義されたappidとunits、MCPクライアントから渡されるlatとlonとを合わせて、アップストリームであるOpen WeatherのREST APIに送られます。これらはOpenWeatherのAPIからすると纏まって定義が必要な4項目ですが、クライアントにて設定する項目とMCP Proxyで強制的に設定する項目に切り分けて定義しています。クライアントの選択肢をある程度選絞ったり、ここでの例の様にアップストリームとの接続に必要なアクセス情報をクライアントから隠蔽したりと制御できます。
Kongの起動とMCP Proxyへアクセス
Kong Gatewayの設定反映にはdecKを利用します。上記のconversion-weather.yamlではOpen Weatherのアクセスキーは環境変数を参照しています。この為、アクセスキーを環境変数に設定した上で
export DECK_OPENWEATHER_API_KEY=YOUR_API_KEY
decKコマンドの実行する必要があります。
deck gateway sync conversion-weather.yaml
この時点で、Kong Gateway上にはOpenWeather向けのMCPサーバが用意されている状態です。MCP Proxyは/weather/mcpというパスに紐付けられているので、MCPサーバのアドレスは http://localhost:8000/weather/mcp となります。
検証 1 - MCP Inspectorを使ってMCPサーバにアクセス
エージェントとMCPサーバの通信ステップを把握する為、本サンプルではMPC Inspectorを使ってそのステップを確認します。MCP Inspectorを起動すると
npx @modelcontextprotocol/inspector
MCP Inspectorがブラウザに立ち上がります。上記のアドレスを指定の上、ConnectとするとMCPサーバとの対話が開始されます。
Tools Discovery (tools/list)
エージェントはまず、接続したMCPサーバから利用可能なToolの仕様を取得します。
{
  "method": "tools/list",
  "params": {}
}
MCPサーバー側(つまりMCP Proxy)からのレスポンスは以下です。
{
  "tools": [
    {
      "name": "current-weather-by-longitude-and-latitude",
      "description": "Get current weather for a specifried Longitude (lon) and Latitude (lat).",
      "inputSchema": {
        "type": "object",
        "properties": {
          "query_lon": {
            "description": "Longitude of the location",
            "type": "number"
          },
          "query_lat": {
            "description": "Latitude of the location",
            "type": "number"
          }
        },
        "required": [
          "query_lon",
          "query_lat"
        ],
        "additionalProperties": false
      },
      "annotations": {
        "title": "Current weather by Longitude and Latitude"
      },
      "id": "49aa530f-ec96-4854-abf5-8744496d4833"
    }
  ]
}
上記MCP Proxyのconfig.tools以下にて定義された情報がマッピングされているのが確認できます。エージェントからの観点では、config.tools.parametersで定義されたパラメータのみ設定できるようになっており、かつこれら2つの項目は必須として定義されています。エージェントは取得したTool定義をLLMに送り、LLM側で状況に応じてどのToolを実行するかを判断する訳ですが、今回のケースではMCP Proxyから送られるToolは1つのみです。
Tool Execution (tools/call)
状況に応じて、エージェントは状況に応じてToolの実行を試みます。MCP Inspectorを利用してそのフローを確認します。
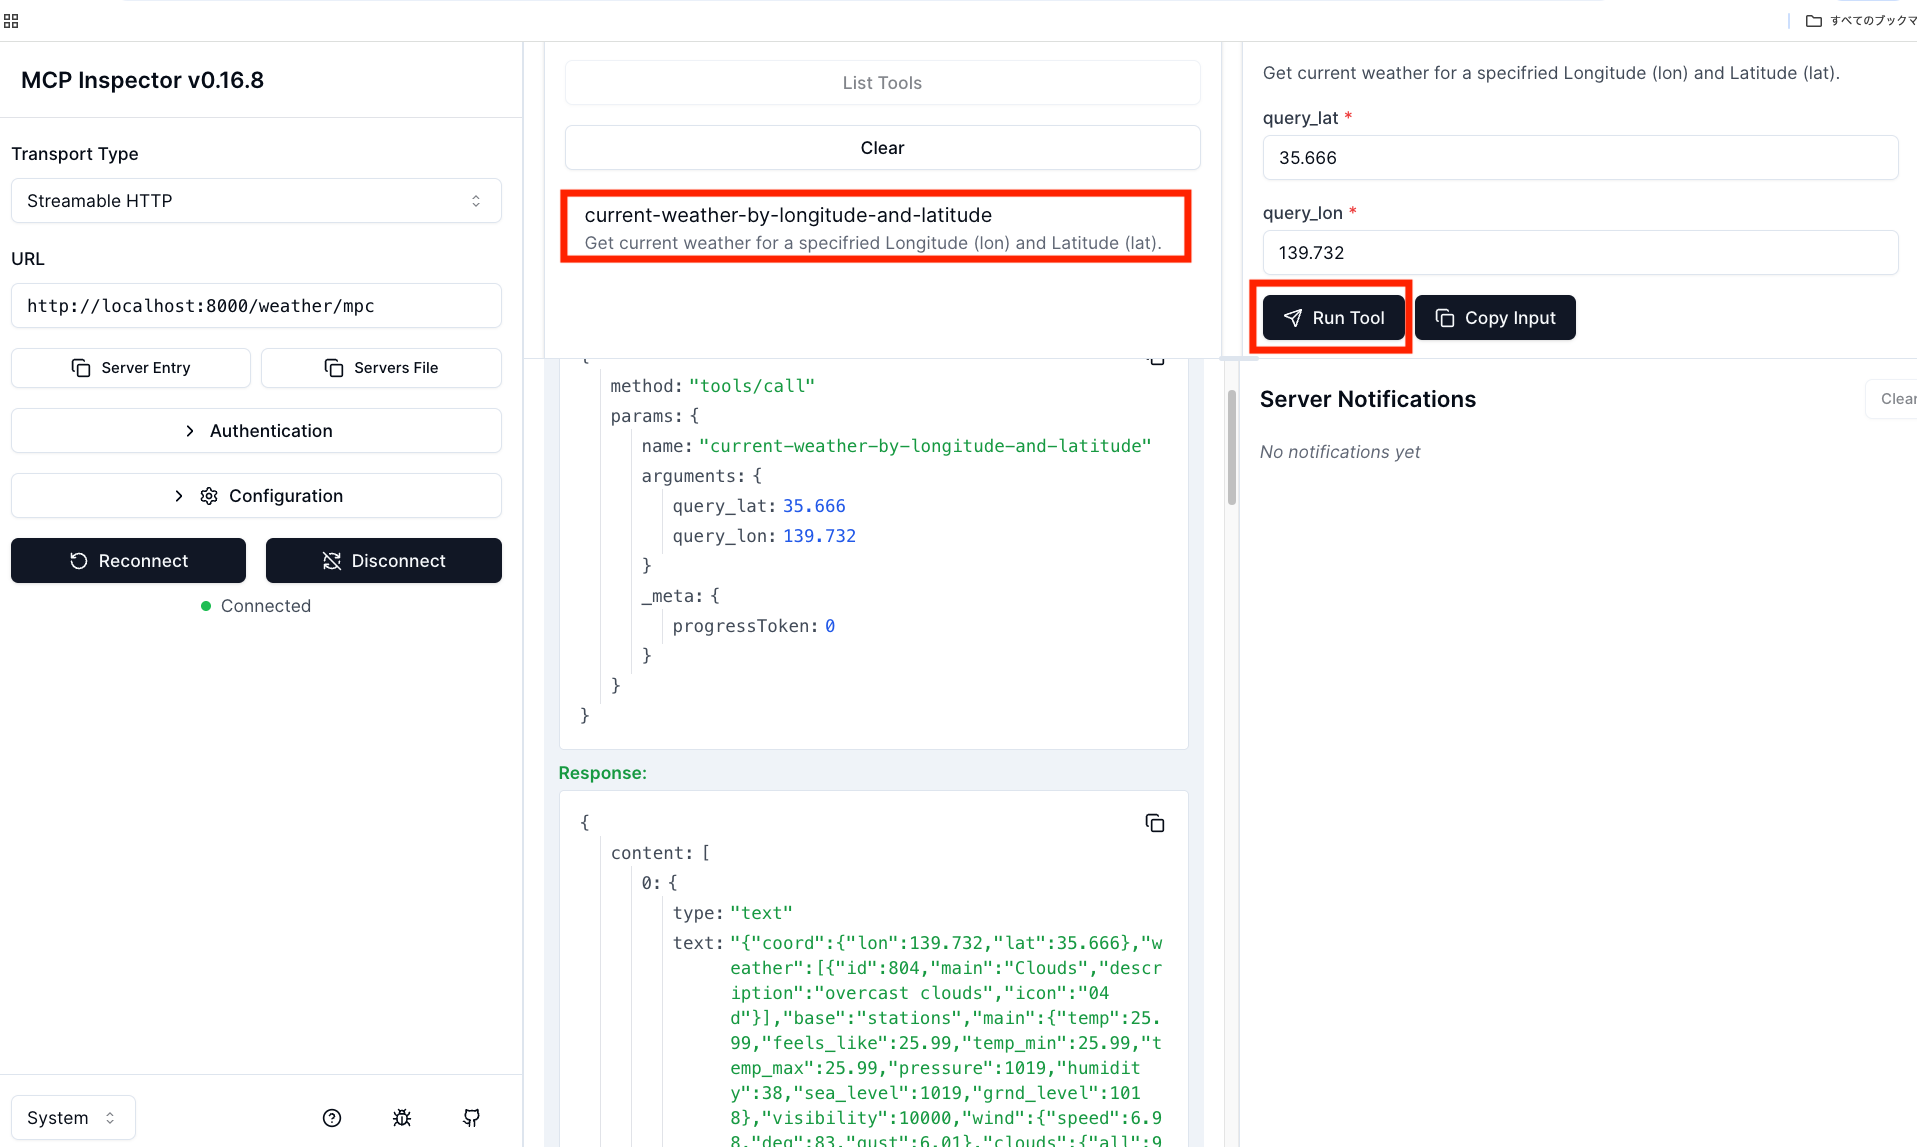
エージェントから、以下のJSON RPCリクエストが送られます。
{
  "method": "tools/call",
  "params": {
    "name": "current-weather-by-longitude-and-latitude",
    "arguments": {
      "query_lon": 35.666,
      "query_lat": 139.732
    },
    "_meta": {
      "progressToken": 0
    }
  }
}
MCP Proxyでは、エージェントから渡されたパラメータと、プラグイン内に定義したconfig.tools.queryで定義した2項目を合わせて、Open Weather APIを実行し、その結果をエージェントに返します。
{
  "content": [
    {
      "type": "text",
      "text": "{\"coord\":{\"lon\":139.732,\"lat\":35.666},\"weather\":[{\"id\":803,\"main\":\"Clouds\",\"description\":\"broken clouds\",\"icon\":\"04d\"}],\"base\":\"stations\",\"main\":{\"temp\":12.97,\"feels_like\":11.89,\"temp_min\":12.66,\"temp_max\":13.87,\"pressure\":1025,\"humidity\":60,\"sea_level\":1025,\"grnd_level\":1023},\"visibility\":10000,\"wind\":{\"speed\":6.17,\"deg\":340},\"clouds\":{\"all\":75},\"dt\":1763861096,\"sys\":{\"type\":2,\"id\":268395,\"country\":\"JP\",\"sunrise\":1763846678,\"sunset\":1763883031},\"timezone\":32400,\"id\":1864815,\"name\":\"Ichibanchō\",\"cod\":200}"
    }
  ],
  "isError": false
}
レスポンスのJSONを抽出すると以下のようになります。
{
  "coord": {
    "lon": 139.732,
    "lat": 35.666
  },
  "weather": [
    {
      "id": 803,
      "main": "Clouds",
      "description": "broken clouds",
      "icon": "04d"
    }
  ],
  "base": "stations",
  "main": {
    "temp": 12.97,
    "feels_like": 11.89,
    "temp_min": 12.66,
    "temp_max": 13.87,
    "pressure": 1025,
    "humidity": 60,
    "sea_level": 1025,
    "grnd_level": 1023
  },
  "visibility": 10000,
  "wind": {
    "speed": 6.17,
    "deg": 340
  },
  "clouds": {
    "all": 75
  },
  "dt": 1763861096,
  "sys": {
    "type": 2,
    "id": 268395,
    "country": "JP",
    "sunrise": 1763846678,
    "sunset": 1763883031
  },
  "timezone": 32400,
  "id": 1864815,
  "name": "Ichibanchō",
  "cod": 200
}
当たり前ではありますが、Insomniaを使って実行した時と同じ結果がエージェントまで返されます。
検証 2 - レスポンスをエージェント利用に即して加工する
MCPサーバでは様々な非機能要件に対応する必要がありますが、中でもエージェントが求める形態でレスポンスを返却するには、何かしらの加工処理が必要となるケースも多く発生します。今回のMCP Proxyの定義でも、「指定した緯度(lat)と経度(lon)に対する天気を取得する」とあるので、OpenWeatherからのレスポンスとしては回答が冗長です。何かしらの方法でエージェントの期待に近い形へと変換する必要があります。
jqプラグインによるレスポンスの変換
MCP Proxyには、REST/MCPのプロトコル変換や、MCPサーバとしてのエンドポイントの提供という機能はありますが、アップストリーム(WeatherMap)とエージェントの中継としてレスポンスデータの変換/加工を行う事は出来ません。
同時に、MCP ProxyはKong Gatewayのプラグインの一種であり、Kong Gatewayでは同一リクエストに対して複数のプラグインを適用する事が可能です。今回はその中でもjqプラグインを使って変換処理を追加します。
修正したKongの設定はconversion-weather-jq.yamlとして別途定義しています。差分は以下です。
    _format_version: "3.0"
    plugins:
    - config:
        path: /dev/stdout
        reopen: false
      enabled: true
      name: file-log
    services:
    - name: weather-service
      url: https://api.openweathermap.org/data/2.5/weather
      routes:
      - name: weather-route
        paths:
        - /weather/mcp
        plugins:
          - name: ai-mcp-proxy
            config:
              mode: conversion-listener
              tools:
              - description: Get current weather for a specifried Longitude (lon) and Latitude (lat).
                method: GET
                query:
                  appid:
                  - ${{ env "DECK_OPENWEATHER_API_KEY" }}
                  units:
                  - metric
                parameters:
                - name: lon
                  in: query
                  description: Longitude of the location
                  required: true
                  schema:
                    type: number
                - name: lat
                  in: query
                  description: Latitude of the location
                  required: true
                  schema:
                    type: number
                annotations:
                  title: Current weather by Longitude and Latitude
              server:
                timeout: 60000
              logging:
                log_statistics: true
                log_payloads: true
              max_request_body_size: 8192
+         - name: jq
+           config:
+             response_jq_program: '{"観測所": "\(.name)", "気温": "\(.main.temp)度", "湿度": "\(.main.humidity)%"}'
この定義により、OpenWeatherからのレスポンスから必要な項目を抽出し、よりシンプルなレスポンス形態に変換しています。このまま新しい定義をKong Gatewayに適用するとMCP Proxyの設定が動的に変更されるので、
deck gateway sync conversion-listener-jq.yaml
実行後に再度同じtools/callを実行すると、今度は変換された形でエージェントに結果が返却されます。
{
  "観測所": "Mita",
  "気温": "13.25度",
  "湿度": "60%"
}
おわりに
本エントリでは、MCP Proxyを利用して公開REST APIに対してMCPアクセスをする手順を説明しました。conversion-listenerというモードはMCP Proxyの最も一般的な利用方法であり、REST API単位で個別にMCPサーバを構築する代わりに、プラグインによってそれを実現するアプローチです。
さらに、jqプラグインを利用してOpenWeatherのレスポンスをエージェントの期待に沿った形で変換しました。今回はレスポンス変換のみを行いましたが、同じアプローチで他のプラグインも利用する事が可能です。
次回は、もう少し複雑な複数REST APIを束ねて1つのMCPサーバとするアプローチについてご紹介します。