こちらは NJC Advent Calendar 2018 23日目の記事です。
本日は平成最後の天皇誕生日ですね。
はじめに
ここでは仕事で開発環境構築にあたりメールサーバを立てる必要が発生し、AWS上に構築したときの手順を備忘録みたいなものとしてまとめておきます。
Amazon Linux2のAMIはamzn2-ami-hvm-2.0.20181114-x86_64-gp2を利用しています。
なお環境は以下として記載してます。
ドメイン:hogehoge.com
メールサーバ:mail.hogehoge.com
VPCネットワークアドレス:10.0.0.0/16
1.DNSサーバへの登録
メールを利用するためにはメールサーバの情報をDNSレコードに登録する必要があります。
現在の環境ではDNSにRoute 53を使用しているのでRoute 53のコンソールからMXレコードとAレコードを登録します。
Route 53の場合、MXレコードの記述は下記のようにName欄は空白としてValue欄に優先度とホストを記載します。
複数台メールサーバがある場合は改行して記載してください。

2.AWSに対する申請
AWSではスパム対策としてインターネットに対するSMTPの利用が制限されているため、AWS上でメールサーバを利用するにはメール送信制限解除申請が必要です。
また、相手先のメールサーバによってはスパム判定に逆引き設定を使用する場合もあるため逆引き設定申請も合わせておこなっておきます。
なお、逆引き設定申請にあたっては事前にAレコードを設定しておかないと申請してもAWSから却下されてしまうためご注意ください。
2-1.申請手順
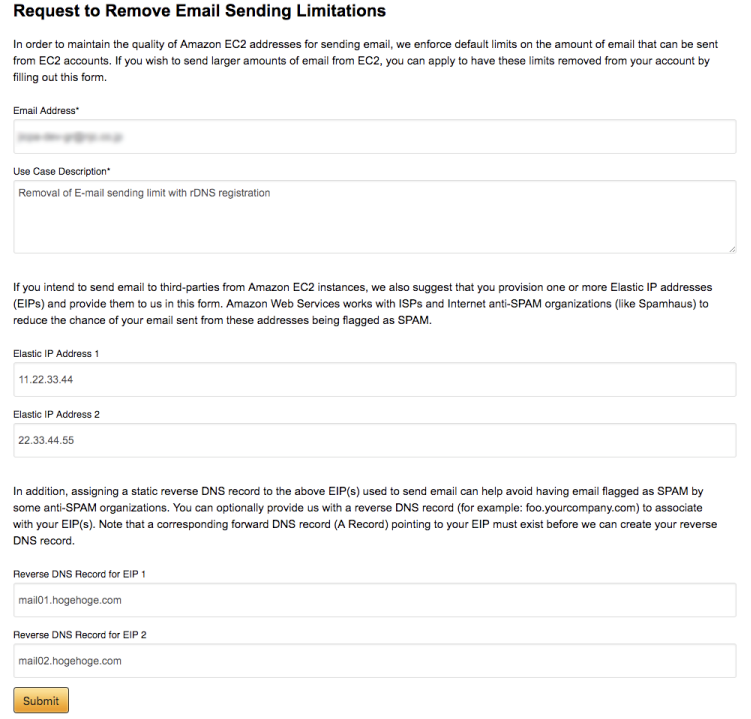
AWSコンソールにルートアカウントにてログインした状態で以下のリンクから申請をおこないます。
Request to Remove Email Sending Limitations
Use Case Description
「Removal of E-mail sending limit with rDNS registration」と記入。
Elastic IP Address
メールサーバのElastic IPを記入。2台まで入力できます。
Reverse DNS Record for EIP
EIPに対するメールサーバのホスト名を記入します。
Submitを押すと申請が完了します。承認されるまで24時間程度かかります。
2-2.承認
承認されると以下のようなメールが届きます。
Subject:Your AWS Inquiry

Hello,

We have configured the reverse DNS record(s) you requested. Your request was mapped for mail.hogehoge.com as rDNS for 11.22.33.44.

Please note that propagation of this update to DNSBL services that Amazon works with may take up to a week.

Email sending limitations have also been removed for any resources for the region your EIP is located in.

Please let us know if you have any questions.

Thank you for your inquiry. Did I solve your problem?

If yes, please click here:
http://www.amazon.com/gp/help/survey?p=***************&k=aa

If no, please click here:
http://www.amazon.com/gp/help/survey?p=***************&k=bb


Best regards,

John Doe
http://aws.amazon.com

---- Original message: ----

AWS AccountId                        999999999999
AccountEmailAddress                        admin@hogehoge.com
UseCaseDescription                        Removal of E-Mail sending limit with rDNS registration.
ElasticIPAddress1                        11.22.33.44
ElasticIPAddress2
ReverseDNSRecord1                        mail.hogehoge.com
ReverseDNSRecord2
Submission received from source IP Address                        55.66.77.88
AWS Account ID                        999999999999
Root Customer ID                        AWS9999888877
IAM Account                        No
Email Address                        admin@hogehoge.com
Name                        hoge-admin
3.セキュリティグループの設定
メールで利用するためにAWSのセキュリティグループで以下のポートを開けておきます。
- SMTP(25)
- SMTPS(465)
- IMAPS(993)
- POP3S(995)
またLet's Encryptの証明書更新に利用するため以下も必要です。
- HTTP(80)
- HTTPS(443)
OS上でFirewallが稼動している場合にはそちらにも設定をおこなってください。
4.Let's Encryptで証明書を取得
4-1.certbotインストール・・・
Let's Encryptを利用するときはいつもならyumでクライアントソフトのcertbot(またはcertbot-auto)をインストールするのですが・・・
$ sudo yum install certbot-auto
うまくいきません。
どうやらAmazon Linux2ではパッケージ管理が違うためうまくいかない模様。
なのでこちらのサイトを参考にさせてもらいました。
4-2.Pythonとpipのインストール
Pythonとpipが必要なようなのでインストールします。
構築時点のAmazon Linux2はデフォルトでPython 2.7.14がインストールされてましたのでpipのみインストールしました。
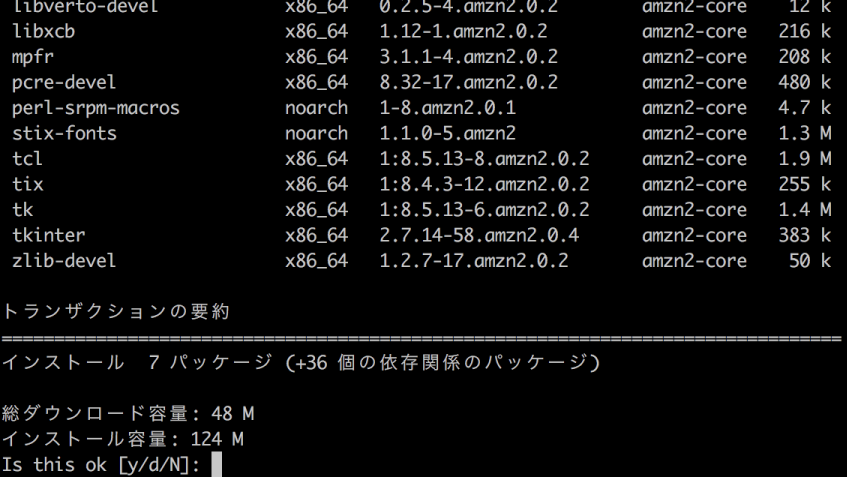
$ sudo yum install python-pip
4-3.cerbot-autoを入手し権限を設定する
$ cd /usr/local/bin
$ sudo wget https://dl.eff.org/certbot-auto
$ sudo chmod 700 certbot-auto
4-4.cerbot-autoの書き換え
cerbot-autoをバックアップしてから中身を書き換えます。
$ sudo cp certbot-auto certbot-auto.bak
$ sudo vi certbot-auto
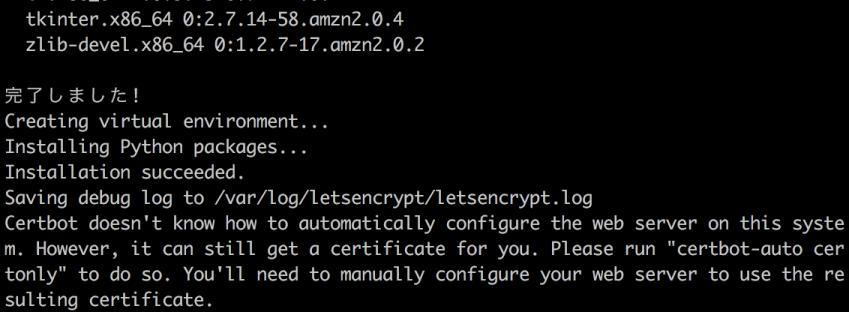
書き換え箇所は"Amazon"で検索してください。今回の環境では843行目に記載がありました。
ここを・・・
elif [ -f /etc/issue ] && grep -iq "Amazon Linux" /etc/issue ; then
このように・・・
elif grep -i "Amazon Linux" /etc/issue > /dev/null 2>&1 || \
  grep 'cpe:.*:amazon_linux:2' /etc/os-release > /dev/null 2>&1; then
変更して保存します。
4-5.certbot-autoを使って証明書を取得
修正したcertbot-autoを使って証明書の取得をおこないます。
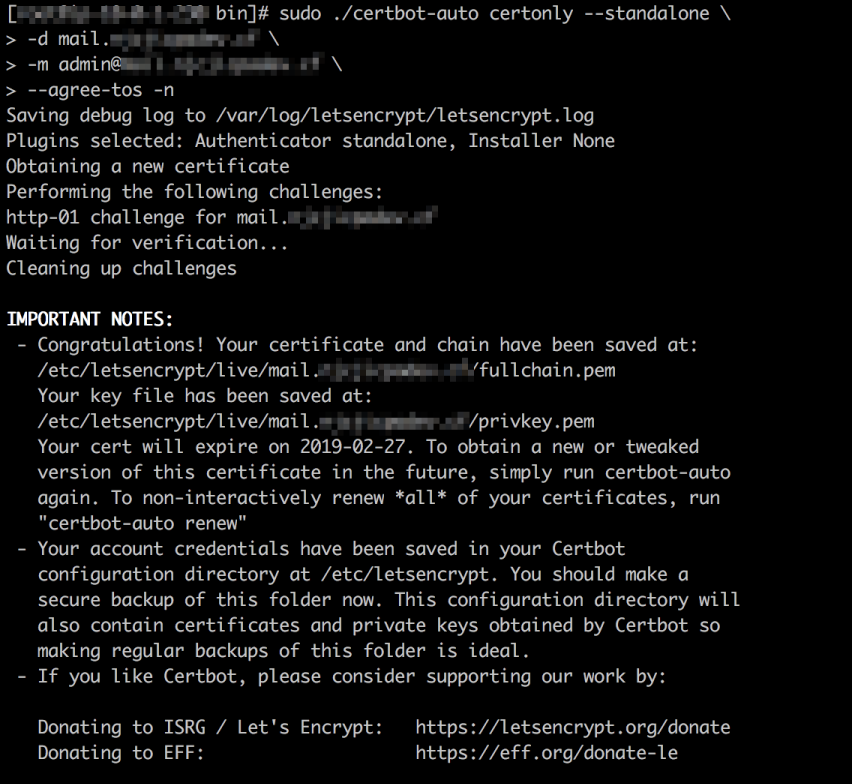
$ sudo ./certbot-auto certonly --standalone \
-d mail.hogehoge.com \   ←メールホスト
-m admin@hogehoge.com \  ←管理者メールアドレス
--agree-tos -n
エラーになりました・・・。
なのでデバッグモードでcertbot-autoを起動し原因を調べます。
$ sudo ./certbot-auto --debug
無事成功しました!
成功すると/etc/letsencrypt/live/mail.hogehoge.com/の下にfullchain.pem等のファイルが生成されます。
Let's Encryptの証明書の有効期間は90日のためcronで自動更新させますが、更新時、PostfixやDovecotの再起動が必要になるのでPostfixやDovecotの作業が終わってから設定します。
5.Postfix
構築時点のAmazon Linux2には最新のPostfixがすでにインストールされていたので設定からおこなっていきます。
5-1.main.cf
コピーしてから設定ファイルのmain.cfをviで開き、自環境に合わせてコメントアウトや追加・修正をおこなっていきます。
$ sudo cp /etc/postfix/main.cf /etc/postfix/main.cf.back
$ sudo vi /etc/postfix/main.cf
# メールサーバのホスト名(FQDN)。
myhostname = mail.hogehoge.com
# メールを利用するドメイン。
mydomain = hogehoge.com
# ローカル配信メールは自ドメインのメールであると認識させる。
myorigin = $mydomain
# すべてのホストからのメールを受信させる。
inet_interfaces = all
# 自ドメイン宛のメールを受信。
mydestination = $myhostname, localhost.$mydomain, localhost, $mydomain
# 知らないローカル受信者を拒否する。
local_recipient_maps = proxy:unix:passwd.byname $alias_maps
# VPC全体を信頼するネットワークとする。
mynetworks = 10.0.0.0/16, 127.0.0.0/8
# メールの保存をメールディレクトリ形式にする。受信されたメールはuser@hogehoge.comなら/home/userのMaildirディレクトリに保存される。
home_mailbox = Maildir/
# メールサーバを隠蔽する。
smtpd_banner = $myhostname ESMTP unknown

# 以下新規で設定追加

# 受信メールサイズ(Byte)とりあえず20MBとする。
message_size_limit = 20971520
# SMTPサーバ認証設定
# saslauthdを利用する設定を追加
smtpd_sasl_auth_enable = yes
smtpd_sasl_type = dovecot
smtpd_sasl_path = private/auth
broken_sasl_auth_clients = yes
smtpd_sasl_security_options = noanonymous
smtpd_sasl_local_domain = $myhostname
smtpd_sender_restrictions = reject_unknown_sender_domain
smtpd_client_restrictions = permit_mynetworks,reject_unknown_client,permit
smtpd_recipient_restrictions = permit_mynetworks,permit_sasl_authenticated,reject_unauth_destination
# SSL設定
smtpd_use_tls = yes
smtp_tls_security_level = may
smtpd_tls_cert_file = /etc/letsencrypt/live/mail.hogehoge.com/fullchain.pem
smtpd_tls_key_file = /etc/letsencrypt/live/mail.hogehoge.com/privkey.pem
smtpd_tls_session_cache_database = btree:/etc/postfix/smtpd_scache
smtpd_tls_received_header = yes
smtpd_tls_loglevel = 1
smtpd_tls_session_cache_timeout = 3600s
5-2.master.cf
submissionポートとSMTPSを利用する設定をおこないます。
$ sudo cp /etc/postfix/master.cf /etc/postfix/master.cf.back
$ sudo vi /etc/postfix/master.cf
必要なところをコメントインしていきます。
# ==========================================================================
# service type  private unpriv  chroot  wakeup  maxproc command + args
#               (yes)   (yes)   (yes)   (never) (100)
# ==========================================================================
smtp      inet  n       -       n       -       -       smtpd
# smtp      inet  n       -       n       -       1       postscreen
# smtpd     pass  -       -       n       -       -       smtpd
# dnsblog   unix  -       -       n       -       0       dnsblog
# tlsproxy  unix  -       -       n       -       0       tlsproxy
submission inet n       -       n       -       -       smtpd
#  -o syslog_name=postfix/submission
  -o smtpd_tls_security_level=encrypt
  -o smtpd_sasl_auth_enable=yes
#  -o smtpd_reject_unlisted_recipient=no
  -o smtpd_client_restrictions=$mua_client_restrictions
#  -o smtpd_helo_restrictions=$mua_helo_restrictions
#  -o smtpd_sender_restrictions=$mua_sender_restrictions
#  -o smtpd_recipient_restrictions=permit_sasl_authenticated,reject
  -o milter_macro_daemon_name=ORIGINATING
smtps     inet  n       -       n       -       -       smtpd
#  -o syslog_name=postfix/smtps
  -o smtpd_tls_wrappermode=yes
  -o smtpd_sasl_auth_enable=yes
#  -o smtpd_reject_unlisted_recipient=no
  -o smtpd_client_restrictions=$mua_client_restrictions
#  -o smtpd_helo_restrictions=$mua_helo_restrictions
#  -o smtpd_sender_restrictions=$mua_sender_restrictions
#  -o smtpd_recipient_restrictions=permit_sasl_authenticated,reject
  -o milter_macro_daemon_name=ORIGINATING
5-3.saslauthd起動
認証用のsaslauthdを起動しようと思ったら・・・
$ sudo service saslauthd start
Redirecting to /bin/systemctl start saslauthd.service
Failed to start saslauthd.service: Unit not found.
動かなーい!!!
確認してみると・・・
$ sudo yum list installed | grep sasl

cyrus-sasl-lib.x86_64                 2.1.26-23.amzn2                installed
cyrus-sasl-plain.x86_64               2.1.26-23.amzn2                installed
メインのモジュールが入ってない気がする・・・
なので足りないモジュールも含めてインストールします。
$ sudo yum install cyrus-sasl cyrus-sasl-md5
再度実行してみます。
$ sudo service saslauthd start
Redirecting to /bin/systemctl start saslauthd.service
$ sudo service saslauthd status
Redirecting to /bin/systemctl status saslauthd.service
● saslauthd.service - SASL authentication daemon.
   Loaded: loaded (/usr/lib/systemd/system/saslauthd.service; disabled; vendor preset: disabled)
   Active: active (running) since 金 2018-11-30 00:39:51 UTC; 1min 30s ago
  Process: 13398 ExecStart=/usr/sbin/saslauthd -m $SOCKETDIR -a $MECH $FLAGS (code=exited, status=0/SUCCESS)
 Main PID: 13399 (saslauthd)
   CGroup: /system.slice/saslauthd.service
           ├─13399 /usr/sbin/saslauthd -m /run/saslauthd -a pam
           ├─13400 /usr/sbin/saslauthd -m /run/saslauthd -a pam
           ├─13401 /usr/sbin/saslauthd -m /run/saslauthd -a pam
           ├─13402 /usr/sbin/saslauthd -m /run/saslauthd -a pam
           └─13403 /usr/sbin/saslauthd -m /run/saslauthd -a pam

11月 30 00:39:51 ip-0-0-0-0.ap-northeast-1.compute.internal systemd[1]: Starting SASL authentication daemon....
11月 30 00:39:51 ip-0-0-0-0.ap-northeast-1.compute.internal systemd[1]: Started SASL authentication daemon..
11月 30 00:39:51 ip-0-0-0-0.ap-northeast-1.compute.internal saslauthd[13399]: detach_tty      : master pid is: 13399
11月 30 00:39:51 ip-0-0-0-0.ap-northeast-1.compute.internal saslauthd[13399]: ipc_init        : listening on socket: /run/...ux
Hint: Some lines were ellipsized, use -l to show in full.
動いたYo!
自動起動にしておきます。
$ sudo chkconfig saslauthd on
5-4.デフォルトMTAの確認
OSで使用しているデフォルトのMTAを確認してみます。
$ sudo alternatives --display mta
mta -ステータスは自動です。
リンクは現在 /usr/sbin/sendmail.postfix を指しています。
/usr/sbin/sendmail.postfix - 優先度 30
 スレーブ mta-mailq: /usr/bin/mailq.postfix
 スレーブ mta-newaliases: /usr/bin/newaliases.postfix
 スレーブ mta-pam: /etc/pam.d/smtp.postfix
 スレーブ mta-rmail: /usr/bin/rmail.postfix
 スレーブ mta-sendmail: /usr/lib/sendmail.postfix
 スレーブ mta-mailqman: /usr/share/man/man1/mailq.postfix.1.gz
 スレーブ mta-newaliasesman: /usr/share/man/man1/newaliases.postfix.1.gz
 スレーブ mta-sendmailman: /usr/share/man/man1/sendmail.postfix.1.gz
 スレーブ mta-aliasesman: /usr/share/man/man5/aliases.postfix.5.gz
現在の「最適」バージョンは /usr/sbin/sendmail.postfix です。
Postfixになっているので問題ないですね。
ここがSendmailになっている場合は変更します。
Amazon Linux2はSendmailはデフォルトでインストールされていないようなので変更するコマンドを使用してもPostfixしか表示されませんでした。
$ sudo alternatives --config mta

1 プログラムがあり 'mta' を提供します。

  選択       コマンド
-----------------------------------------------
*+ 1           /usr/sbin/sendmail.postfix

Enter を押して現在の選択 [+] を保持するか、選択番号を入力します:
5-5.Postfix起動
準備が整ったのでPostfixを起動します。
$ sudo service postfix start
$ sudo chkconfig postfix on
$ sudo service postfix status
Redirecting to /bin/systemctl status postfix.service
● postfix.service - Postfix Mail Transport Agent
   Loaded: loaded (/usr/lib/systemd/system/postfix.service; enabled; vendor preset: disabled)
   Active: active (running) since 金 2018-11-30 01:35:08 UTC; 2s ago
  Process: 13698 ExecStop=/usr/sbin/postfix stop (code=exited, status=0/SUCCESS)
  Process: 13715 ExecStart=/usr/sbin/postfix start (code=exited, status=0/SUCCESS)
  Process: 13711 ExecStartPre=/usr/libexec/postfix/chroot-update (code=exited, status=0/SUCCESS)
  Process: 13707 ExecStartPre=/usr/libexec/postfix/aliasesdb (code=exited, status=0/SUCCESS)
 Main PID: 13788 (master)
   CGroup: /system.slice/postfix.service
           ├─13788 /usr/libexec/postfix/master -w
           ├─13789 pickup -l -t unix -u
           └─13790 qmgr -l -t unix -u

11月 30 01:35:07 ip-0-0-0-0.ap-northeast-1.compute.internal postfix[13715]: /usr/sbin/postconf: warning: /etc/postfix/mas...ons
11月 30 01:35:07 ip-0-0-0-0.ap-northeast-1.compute.internal postfix[13715]: /usr/sbin/postconf: warning: /etc/postfix/mas...ons
11月 30 01:35:07 ip-0-0-0-0.ap-northeast-1.compute.internal postfix[13715]: /usr/sbin/postconf: warning: /etc/postfix/mas...ons
11月 30 01:35:07 ip-0-0-0-0.ap-northeast-1.compute.internal postfix[13715]: /usr/sbin/postconf: warning: /etc/postfix/mas...ons
11月 30 01:35:07 ip-0-0-0-0.ap-northeast-1.compute.internal postfix[13715]: /usr/sbin/postconf: warning: /etc/postfix/mas...ons
11月 30 01:35:08 ip-0-0-0-0.ap-northeast-1.compute.internal postfix[13715]: /usr/sbin/postconf: warning: /etc/postfix/mas...ons
11月 30 01:35:08 ip-0-0-0-0.ap-northeast-1.compute.internal postfix[13715]: /usr/sbin/postconf: warning: /etc/postfix/mas...ons
11月 30 01:35:08 ip-0-0-0-0.ap-northeast-1.compute.internal postfix/postfix-script[13786]: starting the Postfix mail system
11月 30 01:35:08 ip-0-0-0-0.ap-northeast-1.compute.internal postfix/master[13788]: daemon started -- version 2.10.1, confi...ix
11月 30 01:35:08 ip-0-0-0-0.ap-northeast-1.compute.internal systemd[1]: Started Postfix Mail Transport Agent.
Hint: Some lines were ellipsized, use -l to show in full.
無事動きました!
次次ぃぃ!!
6.Dovecot
引き続きIMAPとPOP3サーバであるDovecotの設定をおこないます。
6-1.Dovecotインストール
まずはDovecotをインストールしましょう。
$ sudo yum -y install dovecot
6-2.dovecot.conf
利用するプロトコルの設定をおこないます。
$ sudo cp /etc/dovecot/dovecot.conf /etc/dovecot/dovecot.conf.back
$ sudo vi /etc/dovecot/dovecot.conf
# Protocols we want to be serving.
protocols = imap pop3
6-3.10-master.conf
ポートや認証リスナーの設定をおこないます。
$ sudo cp /etc/dovecot/conf.d/10-master.conf /etc/dovecot/conf.d/10-master.conf.back
$ sudo vi /etc/dovecot/conf.d/10-master.conf
# IMAP→利用不可 IMAPS→利用可能
service imap-login {
  inet_listener imap {
    port = 0
  }
  inet_listener imaps {
    port = 993
    ssl = yes
  }

# POP3→利用不可 POP3S3→利用可能
service pop3-login {
  inet_listener pop3 {
    port = 0
  }
  inet_listener pop3s {
    port = 995
    ssl = yes
  }
}

# 認証リスナーの設定
service auth {
  # auth_socket_path points to this userdb socket by default. It's typically
  # used by dovecot-lda, doveadm, possibly imap process, etc. Users that have
  # full permissions to this socket are able to get a list of all usernames and
  # get the results of everyone's userdb lookups.
  #
  # The default 0666 mode allows anyone to connect to the socket, but the
  # userdb lookups will succeed only if the userdb returns an "uid" field that
  # matches the caller process's UID. Also if caller's uid or gid matches the
  # socket's uid or gid the lookup succeeds. Anything else causes a failure.
  #
  # To give the caller full permissions to lookup all users, set the mode to
  # something else than 0666 and Dovecot lets the kernel enforce the
  # permissions (e.g. 0777 allows everyone full permissions).
  unix_listener /var/spool/postfix/private/auth {
    mode = 0666
    user = postfix
    group = postfix
  }
6-4.10-auth.conf
認証方式の設定をおこないます。
$ sudo cp /etc/dovecot/conf.d/10-auth.conf /etc/dovecot/conf.d/10-auth.conf.back
$ sudo vi /etc/dovecot/conf.d/10-auth.conf
disable_plaintext_auth = no

auth_mechanisms = plain login
6-5.10-ssl.conf
SSL/TLSの有効化と証明書・秘密鍵の指定をおこないます。
$ sudo cp /etc/dovecot/conf.d/10-ssl.conf /etc/dovecot/conf.d/10-ssl.conf.back
$ sudo vi /etc/dovecot/conf.d/10-ssl.conf
ssl = yes

ssl_cert = </etc/letsencrypt/live/mail.hogehoge.com/fullchain.pem
ssl_key = </etc/letsencrypt/live/mail.hogehoge.com/privkey.pem
6-6.10-mail.conf
メールボックスの場所を設定します。
$ sudo cp /etc/dovecot/conf.d/10-mail.conf /etc/dovecot/conf.d/10-mail.conf.back
$ sudo vi /etc/dovecot/conf.d/10-mail.conf
mail_location = maildir:~/Maildir
6-7.10-logging.conf
ログを出力するディレクトリを作成し出力先を変更します。
$ sudo mkdir /var/log/dovecot
$ sudo cp /etc/dovecot/conf.d/10-logging.conf /etc/dovecot/conf.d/10-logging.conf.back
$ sudo vi /etc/dovecot/conf.d/10-logging.conf
log_path = /var/log/dovecot/dovecot.log
6-8.Dovecot起動
Dovecotを起動します。
$ sudo service dovecot start
$ sudo chkconfig dovecot on
$ sudo service dovecot status
Redirecting to /bin/systemctl status dovecot.service
● dovecot.service - Dovecot IMAP/POP3 email server
   Loaded: loaded (/usr/lib/systemd/system/dovecot.service; enabled; vendor preset: disabled)
   Active: active (running) since 金 2018-11-30 04:08:53 UTC; 35s ago
 Main PID: 18924 (dovecot)
   CGroup: /system.slice/dovecot.service
           ├─18924 /usr/sbin/dovecot -F
           ├─18926 dovecot/anvil
           ├─18927 dovecot/log
           └─18929 dovecot/config

11月 30 04:08:53 ip-0-0-0-0.ap-northeast-1.compute.internal systemd[1]: Starting Dovecot IMAP/POP3 email server...
11月 30 04:08:53 ip-0-0-0-0.ap-northeast-1.compute.internal systemd[1]: Started Dovecot IMAP/POP3 email server.
無事起動しました。
7.その他
ちょこちょこした作業が残ってますので片付けていきましょう。
7-1.ログローテーションの設定
必須ではありませんが運用管理していく上でSyslogとはわけたほうがやりやすいのでPostfixとDovecotのログローテーションの設定をおこないます。
Postfix用のログディレクトリを作成し、Syslog設定を変更します。
$ sudo mkdir /var/log/mail
$ sudo cp /etc/rsyslog.conf /etc/rsyslog.conf.back
$ sudo vi /etc/rsyslog.conf
# Log all the mail messages in one place.
mail.*                                                  -/var/log/mail/maillog
Syslogサービスを再起動して不要なログを削除します。
$ sudo service rsyslog restart
$ sudo rm -f /var/log/maillog*
Syslogのログローテーションからメールのログを外します。
$ sudo cp /etc/logrotate.d/syslog /etc/logrotate.d/syslog.back
$ sudo vi /etc/logrotate.d/syslog
/var/log/cron
/var/log/maillog ←この行を削除
/var/log/messages
/var/log/secure
/var/log/spooler
Postfixのログローテーション設定ファイルを作成します。
$ sudo vi /etc/logrotate.d/maillog
/var/log/mail/maillog {
    daily
    missingok
    dateext
    rotate 60
    sharedscripts
    postrotate
        /bin/kill -HUP `cat /var/run/syslogd.pid 2> /dev/null` 2> /dev/null || true
    endscript
}
ログローテーションされるか確認します。
$ sudo logrotate -dv /etc/logrotate.d/maillog
reading config file /etc/logrotate.d/maillog
Allocating hash table for state file, size 15360 B

Handling 1 logs

rotating pattern: /var/log/mail/maillog  after 1 days (60 rotations)
empty log files are rotated, old logs are removed
considering log /var/log/mail/maillog
  log /var/log/mail/maillog does not exist -- skipping
not running postrotate script, since no logs were rotated
問題なくローテーションされたようです。
同様にDovecotも設定していきましょう。
Dovecotはすでにログ出力のディレクトリ作成と出力設定はしているのでログローテーションの設定のみPostfixと同様におこないます。
Dovecotもログローテーション設定ファイルを作って・・・
$ sudo vi /etc/logrotate.d/dovecot
/var/log/dovecot/dovecot.log {
    daily
    missingok
    dateext
    rotate 60
    sharedscripts
    postrotate
        /bin/kill -USR1 `cat /var/run/dovecot/master.pid 2>/dev/null` 2> /dev/null || true
    endscript
}
ログローテーションされるか確認します。
$ sudo logrotate -dv /etc/logrotate.d/dovecot
reading config file /etc/logrotate.d/dovecot
Allocating hash table for state file, size 15360 B

Handling 1 logs

rotating pattern: /var/log/dovecot/dovecot.log  after 1 days (60 rotations)
empty log files are rotated, old logs are removed
considering log /var/log/dovecot/dovecot.log
  log does not need rotating (log has been already rotated)not running postrotate script, since no logs were rotated
問題ないですね。
ログローテーションの設定は無事完了しました。
7-2.Maildir形式自動生成設定
新規ユーザー追加時、Maildir形式のディレクトリが自動で作成されるように設定します。
$ sudo mkdir -p /etc/skel/Maildir/{new,cur,tmp}
$ sudo chmod -R 700 /etc/skel/Maildir/
7-3.Let's Encrypt証明書自動更新
PostfixとDovecotの構築ができましたのでLet's Encrypt証明書の自動更新の設定も忘れずにしておきます。
/etc/cron.d/にスクリプトを作成します。
毎月1日 朝5時に更新をおこない正常に更新された場合はPostfixとDovecotを再起動します。
$ sudo vi /etc/cron.d/letsencrypt
00 05 01 * * root /usr/local/bin/certbot-auto renew -q --no-self-upgrade --deploy-hook "service postfix restart && service dovecot restart"
8.動作検証
すべて構築は完了したので実際に動作を確認してみます!
8-1.Postfix、Dovecot再起動
念の為PostfixとDovecotを再起動します。
$ sudo service postfix restart
$ sudo service dovecot restart
8-2.アカウントの作成
メールアカウントを作成します。アカウントは通常のユーザー作成で問題ありませんが、シェルは**/sbin/nologin**を指定します。
$ sudo useradd -s /sbin/nologin testuser
$ sudo passwd testuser
ユーザー testuser のパスワードを変更。
新しいパスワード:
新しいパスワードを再入力してください:
passwd: すべての認証トークンが正しく更新できました。
8-3.メール送受信テスト
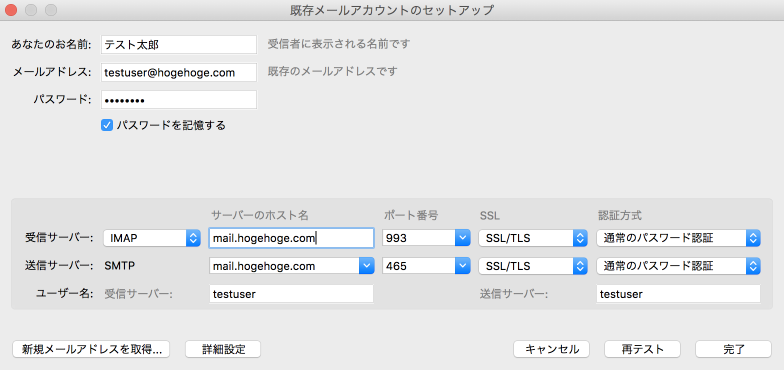
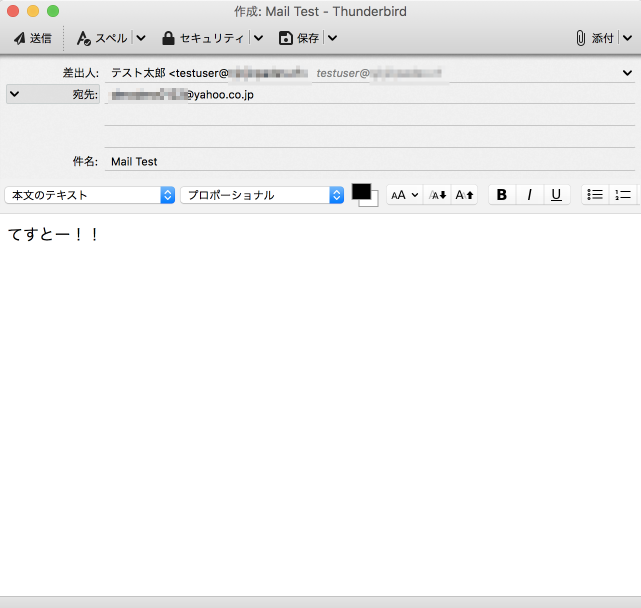
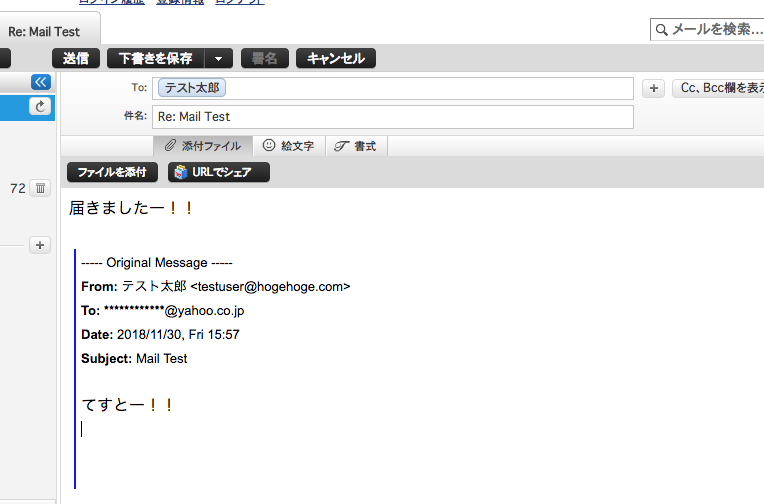
実際にメールクライアントを使用してメールの送受信テストをおこなってみます。
今回はThunderbirdを使います。
Postfixのログも確認してみます。
$ sudo cat /var/log/mail/maillog
Nov 30 15:57:25 ip-0-0-0-0 postfix/qmgr[19804]: 8232E405A0D: from=<testuser@hogehoge.com>, size=809, nrcpt=1 (queue active)
Nov 30 15:57:26 ip-0-0-0-0 postfix/smtp[19985]: 8232E405A0D: to=<hogehoge@yahoo.co.jp>, relay=mx5.mail.yahoo.co.jp[183.79.16.246]:25, delay=0.79, delays=0.05/0.01/0.35/0.36, dsn=2.0.0, status=sent (250 ok dirdel)

Nov 30 16:03:49 ip-0-0-0-0 postfix/qmgr[19804]: 0EC2C405A0D: from=<hogehoge@yahoo.co.jp>, size=4744, nrcpt=1 (queue active)
Nov 30 16:03:49 ip-0-0-0-0 postfix/local[20039]: 0EC2C405A0D: to=<testuser@hogehoge.com>, relay=local, delay=0.12, delays=0.11/0.01/0/0, dsn=2.0.0, status=sent (delivered to maildir)
ちゃんと送受信できていることが確認できますね。
まとめ
以上で無事構築が完了しました。今後はSPF+DKIM対応させてスパム扱いされないようにしていこうと思います。
Amazon Linux2は一般公開されてから数ヶ月たちますが、他の構築の時もそうだったのですがソフトウェアのインストール周りでちょっと癖があります。
まだまだ情報が少ないので参考にしていただければ幸いです。
なお構築にあたっては以下のサイト、他Google先生が探してくれたサイトを参考にさせていただきました。
ありがとうございました。
参考サイト
SSLメールサーバ構築メモ Let's Encrypt+Postfix+Dovecot
Amazon Linux2でLet's Encrypt使おうとしたらコケた話
Postfix+Dovecotによるメールサーバ構築
Amazon Linux on EC2にPostfix+Dovecotでメールサーバー構築
Google先生


