Huawei Adsの実装方法-リワード広告編
リワード広告はこのような広告です。

Ad slot ID
Huawei Adsの実装方法-準備編のAd slot IDをご参照ください。
オフィシャルのテスト用Ad slot IDは
testx9dtjwj8hp
です。
レイアウト
リワード広告の場合、XMLレイアウトの用意がいりません。リワード広告を表示するときに、Huawei AdsはActivityの上にビューを生成します。
Android
ActivityまたはFragmentに、次の種類のソースコードを入れます。
private var rewardAd: RewardAd? = null

private fun loadRewardAd(context: Context) {
    // リワード広告オブジェクトの生成
    rewardAd = RewardAd(context, "Your Ad slot ID").apply {
        // 必須ではないが、リワード検証のために設定しておいたほうがよい
        setRewardVerifyConfig(RewardVerifyConfig.Builder()
            .setData("Your reward ads data")         // リワード検証用など
            .setUserId("Your reward ads user id")    // リワード検証用など
            .build())
    }
    // リワード広告をロード
    rewardAd?.loadAd(
        AdParam.Builder().build(),
        object : RewardAdLoadListener() {
            override fun onRewardedLoaded() {
                // ロード完了後に表示する
                showRewardAd(context)
            }

            override fun onRewardAdFailedToLoad(errorCode: Int) {
                // ロード失敗時の処理
                super.onRewardAdFailedToLoad(errorCode)
            }
        }
    )
}

private fun showRewardAd(context: Context) {
    rewardAd?.let { it ->
        // ロード完了チェック
        if (it.isLoaded) {
            // リワード広告を表示する
            it.show(this.activity, object : RewardAdStatusListener() {
                override fun onRewardAdClosed() {
                    // リワード広告が閉じられたときの処理
                    super.onRewardAdClosed()
                }

                override fun onRewardAdFailedToShow(errorCode: Int) {
                    // リワード広告が表示できないときの処理
                    super.onRewardAdFailedToShow(errorCode)
                }

                override fun onRewardAdOpened() {
                    // リワード広告が開かれたときの処理
                    super.onRewardAdOpened()
                }

                override fun onRewarded(reward: Reward?) {
                    // リワードが与えられたときの処理
                    // リワードのスコア:reward?.amount
                }
            })
        }
    }
}
サーバー
リワードの検証を行う場合のみ、サーバー側の実装が発生します。
Huawei Adsサーバーから送られてきた検証データを受け取るためのAPIの実装
Huawei Adsサーバーは次のデータをユーザーが設定したコールバックAPIで返します。
| データ | 型 | オプショナル | 説明 |
|---|---|---|---|
| adId | String | リワード広告のAd slot ID | |
| data | String | 〇 | RewardVerifyConfig.Builder().setData()に渡した値 |
| keyId | String | 検証用のキーのID | |
| rewardAmount | String | 〇 | リワードの金額 |
| rewardName | String | 〇 | リワード名 |
| sign | String | 検証用signature | |
| uniqueId | String | ユニークなID | |
| userId | String | 〇 | RewardVerifyConfig.Builder().setUserId()に渡した値 |
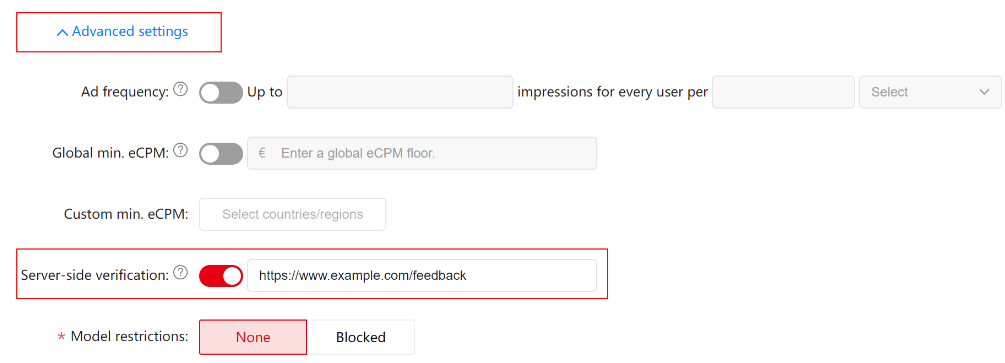
ユーザーが設定する検証用コールバックAPI
1.HUAWEI Ads Publisher Consoleを開きます。
2.[My apps] -> [Add ad unit] -> [Next] -> [Advanced settings]を開きます。
3.Server-side verificationに検証用コールバックAPIを設定します。

Publisher IDと鍵
1.HUAWEI Ads Publisher Consoleを開きます。
2.[Settings]を開きます。

3.[Obtain Key]をクリックします。

検証用コールバックAPIのサンプル
まず、Publisher IDとKeyを使って、公開鍵を取得します。
String data = "";
String url = "https://ppscrowd-dre.op.dbankcloud.com/action-lib-track/publickeys";
String authorization = "Digest validTime=\"{0}\", response=\"{1}\"";
// Developer ID
String userId = "YOUR_PUBLISHER_ID";
// Key
String key = "YOUR_KEY";

HttpClient httpclient = HttpClients.createDefault();
HttpGet request = new HttpGet();
try {
    String validTime = String.valueOf(System.currentTimeMillis());
    String body = validTime + ":/publickeys";
    byte[] keyBytes = Base64.decodeBase64(key);
    byte[] bodyBytes = body.getBytes(Charsets.UTF_8);

    Mac mac = Mac.getInstance("HmacSHA256");
    SecretKey secretKey = new SecretKeySpec(keyBytes, "HmacSHA256");
    mac.init(secretKey);
    byte[] signatureBytes = mac.doFinal(bodyBytes);

    String signature = (signatureBytes == null) ? null : Hex.encodeHexString(signatureBytes);
    authorization = MessageFormat.format(authorization, validTime, signature);
    request.setURI(new URI(url));
    request.setHeader("userId", userId);
    request.setHeader("Authorization", authorization);
    HttpResponse response = httpclient.execute(request);
    data = EntityUtils.toString(response.getEntity());
    } catch (Exception e) {
    }
}
上のコードを実行すれば、次のようなレスポンスが返ってきます。
{
    "keys": [
        {
            "keyId":"12345678",
            "publicKey":"LS0tLS1CRUdJTiBQVUJMSUMgS0VZLS0tLS1cbk1GLi4uc3c9PVxkQgUFVCTElt"
        },
        {
            "keyId": "22345678",
            "publicKey":"LS0tLS1CRUdJTiBQVUJMSUMgS0VZLS0tLS1cbk1GLi4uc3c9PVxkQgUFVCTElt"
        }
    ]
}
検証用コールバックAPIに渡されたkeyIdと同じkeyIdを持つ要素のpublicKeyが公開鍵になります。
次は検証ロジックのメソッドを作ります。
public static boolean verify(byte[] data, String publicKey, String sign) {
    try {
        byte[] keyBytes = base64Decode(publicKey);
        X509EncodedKeySpec keySpec = new X509EncodedKeySpec(keyBytes);
        KeyFactory keyFactory = KeyFactory.getInstance("RSA");
        PublicKey publicK = keyFactory.generatePublic(keySpec);
        Signature signature = Signature.getInstance("SHA256withRSA");
        signature.initVerify(publicK);
        signature.update(data);
        return signature.verify(base64Decode(sign));
    } catch (InvalidKeyException | SignatureException | UnsupportedEncodingException | InvalidKeySpecException | NoSuchAlgorithmException e) {
        return false;
    }
}
private static byte[] base64Decode(String encoded) throws UnsupportedEncodingException {
    return Base64.decodeBase64(encoded.getBytes("UTF-8"));
}
最後はverify()を使って、検証します。
String param = "adId=" + adId + "&data=" + data + "&rewardAmount=" + rewardAmount + "&rewardName=" + rewardName + "&uniqueId=" + uniqueId + "&userId=" + userId;
String sha256Value = Sha256Util.digest(param);
byte[] paramContentData = sha256Value.getBytes(Charset.forName("UTF-8"));

bool result = verify(paramContentData, {公開鍵}, {検証用コールバックAPIのsign})
Huawei Adsシリーズ
- Huawei Adsの機能のまとめ
- Huawei Adsの実装方法-準備編
- Huawei Adsの実装方法-広告用識別子(OAID)編
- Huawei Adsの実装方法-インストールリファラー編
- Huawei Adsの実装方法-バナー広告編
- Huawei Adsの実装方法-ネイティブ広告編
- Huawei Adsの実装方法-リワード広告編
- Huawei Adsの実装方法-インタースティシャル広告編
- Huawei Adsの実装方法-スプラッシュ広告編
GitHub
HMS Ads Kit Demo : https://github.com/Rei2020GitHub/MyPublicProject/tree/master/AdsDemo
参考
- HMS:https://developer.huawei.com/consumer/jp/
- HMS Ads Kitの紹介:https://developer.huawei.com/consumer/jp/hms/huawei-adskit/
- HMS Ads Kitのドキュメント:https://developer.huawei.com/consumer/jp/doc/development/HMSCore-Guides/publisher-service-introduction-0000001070671805
- HUAWEI Ads Publisher Service:https://developer.huawei.com/consumer/jp/monetize/
- HUAWEI Ads Publisher Serviceのドキュメント:https://developer.huawei.com/consumer/jp/doc/distribution/monetize/advantage-0000001051201913
- Huawei Developers:https://forums.developer.huawei.com/forumPortal/en/home
- Facebook Huawei Developersグループ:https://www.facebook.com/Huaweidevs/