どうもこんにちは。
先日、光栄なことに、みのるんさんとX上でこんな会話をさせていただきました。
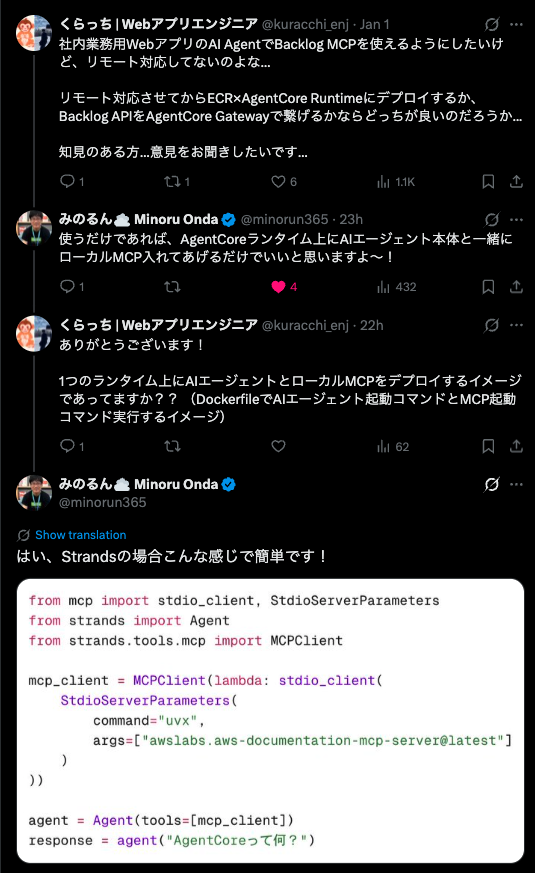
Webアプリに搭載しているAIエージェントのできることを増やすために、どうしてもBacklog MCPを使えるようにしたいという願望があり、X上で貴重な助言をいただきました。
Backlog MCPで何ができるのか
Backlog MCPを使用すると、以下のようなことができます。
- 課題情報の取得、更新
- wikiの検索、作成
- Pull Requestの情報取得
- ユーザ情報の取得
もっとできます。詳細は以下のGithubからお試しください。
エージェント構成
以下のような構成で実装をしました。
.
├── agent.py                # エージェントコード
└── backlog-mcp-server      # Backlog MCPサーバ
実装手順
1. 仮想環境(uv)を用意
ターミナルで以下を実行します。
% uv init --python 3.13
% uv add mcp fastapi 'uvicorn[standard]' pydantic strands-agents python-dotenv
treeコマンドを実行したときに、以下のようになっていればOKです。
.
├── agent.py # main.pyになっている場合は変更しておく(というか百発百中なっている)(というかmain.pyのままでもいい)
├── pyproject.toml
├── README.md
└── uv.lock
2. agent.pyにStrandsAgentsを構築していく
2-1. 必要なライブラリをインポート
from fastapi import FastAPI, HTTPException
from fastapi.responses import StreamingResponse
from pydantic import BaseModel
from typing import Dict, Any, AsyncGenerator
import json
from strands import Agent
from strands.tools.mcp import MCPClient
from mcp import stdio_client, StdioServerParameters
import os
from dotenv import load_dotenv
2-2. 環境変数を.envから読み込み
# 環境変数を読み込み
load_dotenv()
# Uvicornのタイムアウト設定を延長
os.environ['UVICORN_TIMEOUT_KEEP_ALIVE'] = '28800'
os.environ['UVICORN_TIMEOUT_GRACEFUL_SHUTDOWN'] = '28800'

app = FastAPI(title="Strands Agent Server", version="1.0.0")

class InvocationRequest(BaseModel):
    input: Dict[str, Any]
    api_data: Dict[str, Any] = {}
2-3. ストリーミングレスポンスをパースする関数を記述
コピペでOKです。(ストリーミングレスポンス対応しない場合には不要です。)
def extract_serializable_data(event):
    """StrandsのイベントからJSONシリアライズ可能なデータを抽出"""
    # eventがdictでない場合はstr型に変換
    if not isinstance(event, dict):
        return {"type": "raw", "content": str(event)}

    # イベントからシリアライズ可能なデータのみを抽出
    result = {}

    # 一般的なイベントタイプの処理
    if 'event' in event:
        if 'messageStart' in event['event']:
            return {"type": "messageStart", "role": event['event']['messageStart']['role']}
        elif 'contentBlockDelta' in event['event']:
            delta = event['event']['contentBlockDelta'].get('delta', {})
            return {
                "type": "contentBlockDelta",
                "text": delta.get('text', ''),
                "index": event['event']['contentBlockDelta'].get('contentBlockIndex', 0)
            }
        elif 'toolCall' in event['event']:
            tool_data = event['event']['toolCall']
            return {
                "type": "toolCall",
                "name": tool_data.get('name', ''),
                "args": tool_data.get('args', {})
            }
        elif 'toolResult' in event['event']:
            return {
                "type": "toolResult",
                "result": str(event['event']['toolResult'].get('result', ''))
            }

    # その他の既知のキーを処理
    for key in ['init_event_loop', 'start', 'start_event_loop', 'end']:
        if key in event:
            result[key] = event[key]

    # 空の場合はイベント全体を文字列化
    if not result:
        result = {"type": "other", "raw": str(event)}

    return result
2-4. エージェントとやりとりする関数を記述
async def generate_agent_response(user_message: str, backlog_api_key: str) -> AsyncGenerator[str, None]:
    """非同期ジェネレーターでエージェントの応答をストリーミング"""
    backlog_mcp_client = MCPClient(lambda: stdio_client(
        StdioServerParameters(
            command="npx",
            args=["backlog-mcp-server"],
            env={
                "BACKLOG_DOMAIN": os.getenv("BACKLOG_DOMAIN"),
                "BACKLOG_API_KEY": backlog_api_key
            }
        )
    ))

    base_prompt = "あなたはユーザからの質問に正確に回答するAIアシスタントです。必要に応じて、以下のツールを使用して調査し、正確に回答してください。"

    agent = Agent(
        tools=[backlog_mcp_client],
        system_prompt=base_prompt
    )

    try:
        stream = agent.stream_async(user_message)
        async for event in stream:
            serializable_data = extract_serializable_data(event)
            yield json.dumps(serializable_data) + "\n"

    except Exception as e:
        print(f"Streaming error: {str(e)}", flush=True)
        import traceback
        traceback.print_exc()
        yield json.dumps({"type": "error", "message": str(e)}) + "\n"

@app.post("/invocations")
async def invoke_agent(request: InvocationRequest):
    try:
        user_message = request.input.get("prompt", "")
        if not user_message:
            raise HTTPException(
                status_code=400,
                detail="No prompt found in input. Please provide a 'prompt' key in the input."
            )

        print(f"request: {request}", flush=True)

        # api_dataから取得、なければ環境変数から取得
        backlog_api_key = request.api_data.get("backlog_api_key", os.getenv("BACKLOG_API_KEY", ""))

        if not backlog_api_key:
            raise HTTPException(
                status_code=400,
                detail="The 'backlog_api_key' must be provided in the api_data or set as BACKLOG_API_KEY environment variable."
            )

        # StreamingResponseを使用してストリーミング出力を実現
        return StreamingResponse(
            generate_agent_response(user_message, backlog_api_key),
            media_type="application/x-ndjson"  # JSONLフォーマットでストリーミング
        )

    except Exception as e:
        print(f"Error {str(e)}", flush=True)
        raise HTTPException(status_code=500, detail=f"Agent processing failed: {str(e)}")
2-5. 最後にいつものやつ
if __name__ == "__main__":
    import uvicorn
    uvicorn.run(app, host="0.0.0.0", port=8080)
2-6. ローカルサーバを立ち上げてテスト
.envにBACKLOG_DOMAIN=xxxxxxxxx.backlog.comのような、ドメインを設定しておいてください。(ご自身が使用されているBacklogのURLをご参照ください。)
# サーバを立ち上げる
$ uv run uvicorn agent:app --host 0.0.0.0 --port 8080

# テスト実行
$ curl -X POST http://localhost:8080/invocations \
  -H "Content-Type: application/json" \
  -d '{
    "input": {"prompt": "Backlogプロジェクトの一覧を取得してください。"},
    "api_data: {"backlog_api_key": "xxxxxxxxxxxxxxxxxxxxxxxxxxx"}
  }'
3. Dockerで立ち上げる
ローカルでのテストが完了したら、Dockerで立ち上げてみます。
3-1. Dockerfileを作成
以下のコマンドを実行して、Dockerfileを作成します。
$ touch Dockerfile
# Use uv's ARM64 Python base image
FROM --platform=linux/arm64 ghcr.io/astral-sh/uv:python3.13-bookworm-slim

WORKDIR /app

# Copy uv files
COPY pyproject.toml uv.lock ./

# Install dependencies (including strands-agents)
RUN uv sync --frozen --no-cache

# Copy agent file
COPY agent.py ./

# Backlog Configuration
ENV BACKLOG_DOMAIN="xxxxxxxxxxxxxxxxxxxx"

# Expose port
EXPOSE 8080

# Run application
CMD ["uv", "run", "uvicorn", "agent:app", "--host", "0.0.0.0", "--port", "8080"]
3-2. Dockerイメージをビルドする
$ docker buildx create --use
3-3. ビルドしたDockerイメージを起動する
$ docker buildx build --platform linux/arm64 -t sample_agent:arm64 --load .
$ docker run --platform linux/arm64 -p 8080:8080 \
  -e AWS_ACCESS_KEY_ID="$AWS_ACCESS_KEY_ID" \
  -e AWS_SECRET_ACCESS_KEY="$AWS_SECRET_ACCESS_KEY" \
  -e AWS_SESSION_TOKEN="$AWS_SESSION_TOKEN" \
  -e AWS_REGION="$AWS_REGION" \
  sample_agent:arm64
3-4. テストを実行する
# テスト実行
$ curl -X POST http://localhost:8080/invocations \
  -H "Content-Type: application/json" \
  -d '{
    "input": {"prompt": "Backlogプロジェクトの一覧を取得してください。"},
    "api_data: {"backlog_api_key": "xxxxxxxxxxxxxxxxxxxxxxxxxxx"}
  }'
4. エージェントをデプロイする
予め、IAMでロール・ポリシーを用意しておく必要があります。
以下のようにポリシーを用意すればOKなはずです。(Memoryなどの機能を使用するなら別です。)
{
    "Version": "2012-10-17",
    "Statement": [
        {
            "Effect": "Allow",
            "Action": "cloudwatch:PutMetricData",
            "Resource": "*",
            "Condition": {
                "StringEquals": {
                    "cloudwatch:namespace": "bedrock-agentcore"
                }
            }
        },
        {
            "Effect": "Allow",
            "Action": [
                "ecr:GetDownloadUrlForLayer",
                "ecr:BatchGetImage",
            ],
            "Resource": "arn:aws:ecr:*:xxxxxxxxxxxx:repository/*"
        },
        {
            "Effect": "Allow",
            "Action": [
                "logs:DescribeLogStreams",
                "logs:CreateLogGroup"
            ],
            "Resource": "arn:aws:logs:*:xxxxxxxxxxxx:log-group:/aws/bedrock-agentcore/runtimes/*"
        },
        {
            "Effect": "Allow",
            "Action": [
                "logs:CreateLogStream",
                "logs:PutLogEvents"
            ],
            "Resource": "arn:aws:logs:*:xxxxxxxxxxxx:log-group:/aws/bedrock-agentcore/runtimes/*:log-stream:*"
        },
        {
            "Effect": "Allow",
            "Action": "logs:DescribeLogGroups",
            "Resource": "arn:aws:logs:*:xxxxxxxxxxxx:log-group:*"
        },
        {
            "Effect": "Allow",
            "Action": [
                "xray:PutTelemetryRecords",
                "xray:GetSamplingRules",
                "ecr:GetAuthorizationToken",
                "xray:GetSamplingTargets",
                "xray:PutTraceSegments"
            ],
            "Resource": "*"
        },
        {
            "Effect": "Allow",
            "Action": [
                "bedrock:InvokeModel",
                "bedrock:InvokeModelWithResponseStream",
                "bedrock:RetrieveAndGenerate",
                "bedrock:Retrieve"
            ],
            "Resource": [
                "arn:aws:bedrock:*::foundation-model/*",
                "arn:aws:bedrock:*:xxxxxxxxxxxx:*"
            ]
        }
    ]
}
4-1. デプロイ用シェルスクリプトを作成
Shellスクリプトを用意します。
$ mkdir scripts
$ touch scripts/deploy_script.sh
export AWS_ACCOUNT_ID=$(aws sts get-caller-identity --query Account --output text)

export AWS_REGION=ap-northeast-1

export AGENT_NAME=sample_agent

aws ecr get-login-password --region ${AWS_REGION} | docker login --username AWS --password-stdin ${AWS_ACCOUNT_ID}.dkr.ecr.${AWS_REGION}.amazonaws.com

# ECRにDockerイメージをデプロイ
docker buildx build --platform linux/arm64 -t ${AWS_ACCOUNT_ID}.dkr.ecr.${AWS_REGION}.amazonaws.com/${AGENT_NAME}:latest --push .

aws ecr describe-images --repository-name ${AGENT_NAME} --region ${AWS_REGION}

# エージェントデプロイ用のPythonスクリプトを実行
uv run python scripts/deploy_script.py
4-2. エージェントデプロイ用Pythonスクリプトを作成
次に、エージェントデプロイ用のPythonスクリプトを作成します。
$ touch scripts/deploy_script.py
import boto3

account_id = 'xxxxxxxxxxxxx'      # AWSアカウントID
region_name = 'ap-northeast-1'    # リージョン
runtime_name = 'sample_agent'     # エージェント名

# Bedrock AgentCoreクライアント
client = boto3.client('bedrock-agentcore-control', region_name=region_name)

# Bedrock AgentCore RuntimeへデプロイするAPI
create_response = client.create_agent_runtime(
    agentRuntimeName=runtime_name,
    agentRuntimeArtifact={
        'containerConfiguration': {
            'containerUri': f'{account_id}.dkr.ecr.{region_name}.amazonaws.com/{runtime_name}:latest'
        }
    },
    networkConfiguration={"networkMode": "PUBLIC"},
    roleArn=f'arn:aws:iam::{account_id}:role/{ロール名}'
)

print(f"Agent Runtime created successfully!")
print(f"Agent Runtime ARN: {create_response['agentRuntimeArn']}")
print(f"Status: {create_response['status']}")
自分はDockerイメージデプロイをAWS CLI、エージェントデプロイをPythonで実行していますが、どちらもAWS CLIで実行するのが、一番効率的で良いと思います。
5. AgentCore Runtimeへデプロイしたエージェントをテスト
5-1. テスト用スクリプトを用意
$ touch invoke_script.py
import boto3
import json
import random
import traceback

aws_region = 'ap-northeast-1'
runtime_id = 'sample_agent-xxxxxxxxxxxx'

# レスポンスをパースする関数
def parse_agent_response(response_body):
  """
  JSON Lines形式のレスポンスをパースして、テキストを抽出
  """
  # bytesを文字列に変換
  if isinstance(response_body, bytes):
    response_body = response_body.decode('utf-8')

  # 改行で分割して各行を個別にパース
  lines = response_body.strip().split('\n')
  response_text = ""

  for line in lines:
    if not line.strip():
      continue

    try:
      obj = json.loads(line)

      # contentBlockDeltaタイプからテキストを抽出
      if obj.get('type') == 'contentBlockDelta' and 'text' in obj:
        response_text += obj['text']

    except json.JSONDecodeError:
      continue

  return response_text

try:
    # Bedrock AgentCore クライアントを用意
    client = boto3.client('bedrock-agentcore', region_name='ap-northeast-1')

    # パラメータを用意
    payload = json.dumps(
      {
        "input": {
          "prompt": "Backlogプロジェクトの数を教えてください。",
        },
        "api_data": {
          "backlog_api_key": "XXXXXXXXXXXXXXXXXXXXXXXX" # ここにBacklogのAPIキーを設定
        }
      }
    )

    # セッションIDをランダムの33桁で用意
    session_id = ''.join(random.choices('abcdefghijklmnopqrstuvwxyz0123456789', k=33))

    # invoke実行
    response = client.invoke_agent_runtime(
        agentRuntimeArn=f'arn:aws:bedrock-agentcore:{aws_region}:xxxxxxxxxxxx:runtime/{runtime_id}',
        runtimeSessionId=session_id,
        payload=payload,
        qualifier="DEFAULT",
        accept="application/json"
    )

    response_body = response['response'].read()
    parsed_response_body = parse_agent_response(response_body)
    print(parsed_response_body, flush=True)
except Exception as e:
    traceback.print_exc()
5-2. テスト用スクリプトを実行
$ uv run python scripts/deploy_script.py
上記を実行して、Backlogに登録されているプロジェクトの情報が取得されていることが確認できれば、Bedrock AgentCore Runtime上でローカルMCPが動作していることがわかると思います。
まとめ
MCPをデプロイするのに、StreamableHTTP通信が用意されているMCPはBedrock AgentCore Runtime上にデプロイするのが簡単ですが、STDIO通信しか用意されていないMCPはローカルMCPとしてAgentにデプロイするのが一番簡単なんじゃないかなと思います。