※自分がやった事、経歴等を纏めたサイトという意味でのポートフォリオ
はじめに
Ruby + JekyllによるGihubPagesは既にあるのですが、宮崎版コロナ対策サイトでVueに触れ、勉強がてら実際にJSによるサイト作成をする事にしました。
- 作成に取り掛かる前に、JSの現状を知るために参照した主サイト
自分
大学研究でcppを利用しただけの、農学部卒。
ただいま無職、転職活動中(ここ2か月は自粛でstay home
作成に当たって
ReactとNext.jsのtutorialとdocsを一通りやりました。
サイト自体の目的
- 経歴や作成したもののリンクをまとめる
- GithubPagesやQiita、Gistへの投稿物を一か所にまとめる
- Markdownによるページ作成
つくったもの
まだ、ドキュメントや人のコードを参照しながら色々試している最中なので、コードが汚いです。
技術・要件など
- React.js, Next.js
- マークダウン変換: remarkjs/reamrk
- あとでmdx-js/mdxに変更するかも
- シンタックスハイライト: highlight.js
- UIコンポーネント:Material-UI mui-org/material-ui
- マークダウン変換: remarkjs/reamrk
- 目に優しいダークテーマ
環境
- vm:virtualbox + vagrant
- OS: Ubuntu18.04 bionic
- node -v :v12.16.1
- yarn -v :1.22.4
実作業
yarn create next-app
yarn create next-app next-portfolio
# =>
# ? Pick a template › - Use arrow-keys. Return to submit.
# ❯  Default starter app
#    Example from the Next.js repo
Example from the Next.js repoを選択したら
- amp類
- amp, amp-story, amp-first
- google analytics類
- with-google-analytics, with-google-analytics-amp
- aws類
- with-aws-amplify, with-aws-amplify-typescript
- その他: api類, custome server類, preact及び多数(多すぎるので割愛
- 参照:Github: zeit/next.js/example
Default starter appの場合
今回はReact Next.jsの勉強も兼ねているので、defaultの方を利用した。
yarn devすると
作成されるディレクトリ、package.json
# directory
- public
  - favicon.ico, zeit.svg
- pages
  - index.js
- package.json
- node_modules
- README.md
- yarn.lock
// package.json
{
  "name": "next-portfolio",
  "version": "0.1.0",
  "private": true,
  "scripts": {
    "dev": "next dev",
    "build": "next build",
    "start": "next start"
  },
  "dependencies": {
    "next": "9.3.5",
    "react": "16.13.1",
    "react-dom": "16.13.1"
  }
}
Material-UI 導入
見た目重視でmaterial-uiを導入し、主にサイドバーのpermanent / swipeable drawerとGrid
デザインの箇所に使用した。手軽に今風なものが作成できて良かったが、別のuiコンポーネントに変更した際のデザイン崩れが大きそうなので、あとで脱material-uiを図りたい。
yarn add @material-ui/core
yarn add @material-ui/icons
サイトトップ: src/pages/index.jsx の作成
-
srcディレクトリを作成し、下にpagesを収める。 -
src/components/Layout.jsxの作成
複数ページで共通デザインとなるLayout.jsxを作成する。ここでは省略したが、<aside />の中には、material-uiを利用したpermanent-drawerとモバイル用のswipeable-drawerを実装した。
/src/components/Layout.jsx
import React from 'react'
import Link from 'next/link'

import { makeStyles, useTheme } from '@material-ui/core/styles'
import Hidden from '@material-ui/core/Hidden'
import SwipeableDrawer from '@material-ui/core/SwipeableDrawer'
import Drawer from '@material-ui/core/Drawer'
import DoubleArrowIcon from '@material-ui/icons/DoubleArrow'
import { List, ListItem, ListItemIcon, ListItemText, Divider } from '@material-ui/core'
import HomeIcon from '@material-ui/icons/Home'
import { MyDrawerList } from '../components/MyDrawerList'

const drawerWidth = 250
const useStyles = makeStyles((theme) => ({
  // ...
}))

export function Layout({ children }) {
  // ...
  const [state, setState] = React.useState({
    left: false,
  })

  // swipeable-drawerの開閉を制御するボタン
  const toggleDrawer = (anchor, open) => (event) => {
    if (event && event.type === 'keydown' && (event.key === 'Tab' || event.key === 'Shift')) {
      return
}
    setState({ ...state, [anchor]: open })
  }

  const HomeDrawerList = () => {
    return (
      <MyDrawerList>
        <List>
          <Link href='/'>
            <ListItem button>
              <ListItemIcon><HomeIcon /></ListItemIcon>
              <ListItemText primary='Home' />
            </ListItem>
          </Link>
          // ...
        </List>
      </MyDrawerList>
    )
  }

  return (
    <React.Fragment key='left'>
      <Hidden lgUp>
        // モバイル端末用
        // if display-width > 1280px, display: none
        <SwipeableDrawer anchor='left' open={state['left']}
          onClose={toggleDrawer('left', false)} onOpen={toggleDrawer('left', true)}
        >
          <div className='swipeableList' role='presentation'
            onClick={toggleDrawer('left', false)} onKeyDown={toggleDrawer('left', false)}
          >
            <HomeDrawerList />
          </div>
        </SwipeableDrawer>
        <footer>
          <button onClick={toggleDrawer('left', true)}>
            <DoubleArrowIcon color='secondary' style={{ fontSize: 34 }} />
          </button>
        </footer>
      </Hidden>
      <Hidden mdDown>
        // 非モバイルディスプレイ用
        // if device-width < 1280px, display:none
        <aside>
          <Drawer className='permanentDrawer' variant='permanent' anchor='left'>
            <HomeDrawerList />
          </Drawer>
        </aside>
      </Hidden>
      <main className={classes.contents}>
        {children}
      </main>
      <style jsx>{`
        // ...
      `}</style>
    </React.Fragment>
  )
}
-
pages/index.jsxの作成
まだReact等に不慣れなので、pages/index.jsにサイト1ページ目を作りこんで、後からcomponentに分割する方式をとった。
色々試した結果、サイトトップにあたる pages/index.jsxは下の様になった。また、<head><meta/></head>用のデータは/public/manifest.jsonから持ってくる事にした。
import React from 'react'
import Head from 'next/head'
import { Layout } from '../components/Layout'
import { Top, About, History, Works } from '../components/HomeContents'
const manifest = require('../../public/manifest.json')

export default function Home() {
  return (
    <>
      <Layout>
        <Head>
          <title>{manifest.name}</title>
          <meta name='title' content={manifest.name} />
          <meta name='description' content={manifest.description} />
          <meta property='og:title' content={manifest.name} />
          <meta property='og:description' content={manifest.description} />
          <meta property='og:image' content={`${manifest.vercel}/assets/prtsc700.jpg`} />
          <meta property='og:url' content={`${manifest.vercel}`} />
        </Head>
        <Top />
        <About />
        <History />
        <Works />
      </Layout>
      <style jsx global>{`
        // ...
      `}</style>
    </>
  )
}
/src/components/HomeContetnts.jsx`
import React from 'react'
import Link from 'next/link'
import Grid from '@material-ui/core/Grid'
export function Top() {
return ( <section id='top' className='topContainer' /> )
}
export function About() {
return (
<section id='about' className='content'>
<h2>About</h2>
<Grid container spacing={4}>
<Grid item md={12} lg={5}>
<picture>
// ...
</picture>
</Grid>
<Grid item md={12} lg={7}>
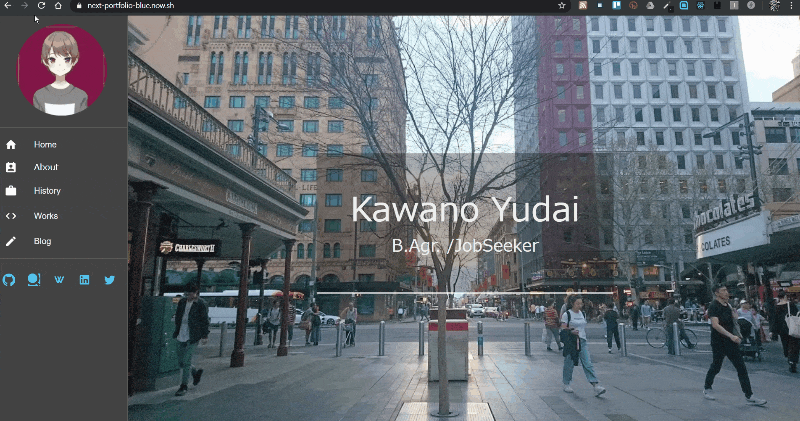
<p>My name is Kawano Yudai.</p>
<p>I graduated from Miyazaki Universiy as Bachelor of Agriculture.</p>
<p>I belonged to agricultural engineering lablatory and studied crop row detecting tech by image processing with C++ and OpenCV.</p>
<p style={{ color: '#F48FB1' }}><em>Now, I'm seeking job as developer. Please contact me from left drawer.</em></p>
</Grid>
</Grid>
</section>
);
}
export function Works() {
return ( <section id='works' className='content' /> )
}
export function History() {
return ( <section id='history' className='content' /> )
}
_app.jsx, _document.jsx, 404.jsxの作成
-
参照
-
_app.jsx- global cssを追加する場所
-
_document.jsx- SSRされる箇所なので、
onclickなどイベントハンドラは動かない -
<Main />の外側にあるコンポーネントはブラウザによる初期化がされないので、Appロジック等を追加したければ、app.jsxに書いて。 -
<title>や<Head />、styled-jsxを書いちゃ駄目。
- SSRされる箇所なので、
Posts周辺の作成
ダイナミックルーティング
ディレクトリ構成
- pages (*directory)
  - index.jsx
  - posts (*directory)
    - hoge.jsx
    - [id].jsx
また、
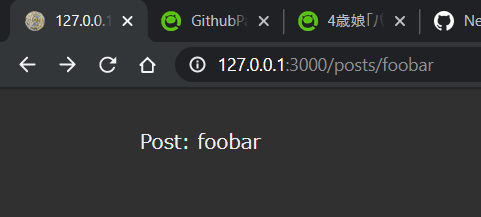
import useRouter from 'next/route'
export default function Post(){
  const router = useRouter()
  const { id } = router.query
  return <p>Post: {id}</p>
}
ファイル名に[]が付いてるので変に見えるが。例えば
-
localhost:3000/posts/hoge/にアクセスするとpages/posts/hoge.jsxが読み込まれる。(これは普通) -
localhost:3000/posts/foobarだと、pages/posts/foobar.jsxが読み込まれ、
dynamic routeとLink( next/link )を併用する時は、hrefに合わせてasも使うなど注意点があるが、非常に便利な代物かと。
getStaticPropsとgetStaticPaths
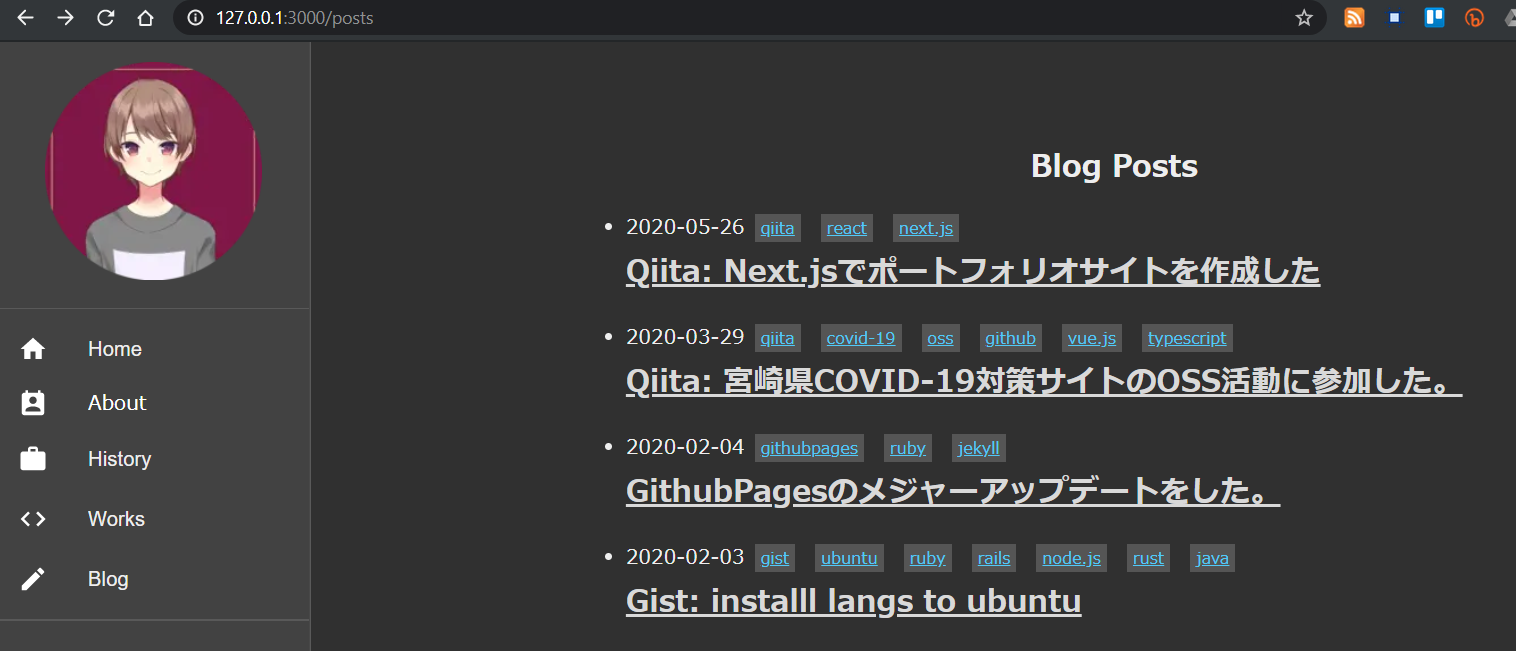
今回はmdファイルを/src/pages/docsに入れる。
-
baseUrl/postsへのアクセス時は、docs下のmdファイルを読込み、posts一覧の出力 -
baseUrl/posts/[id]の場合は、同様にして、post単体の出力 -
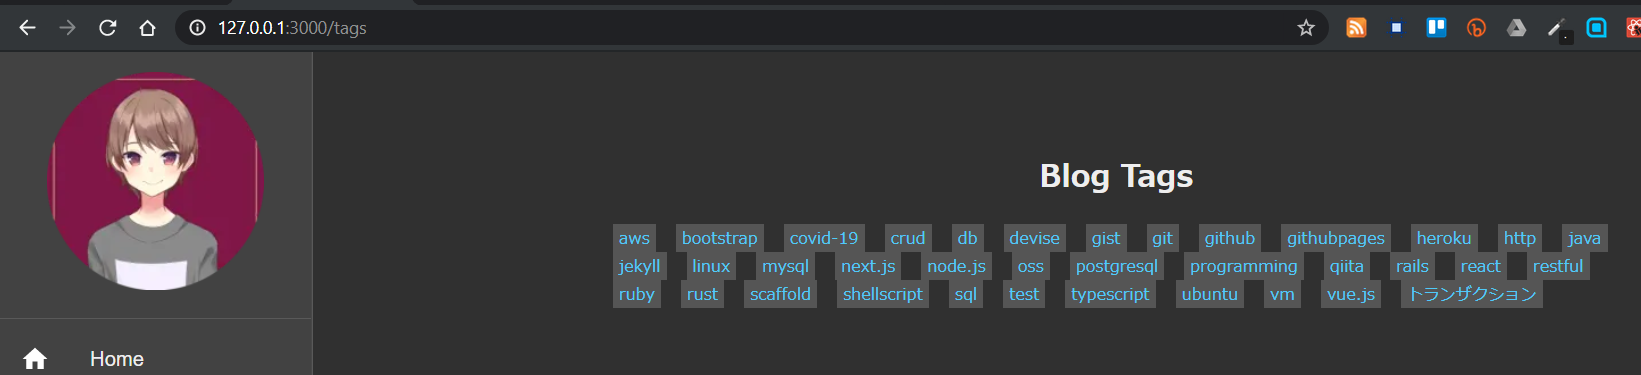
baseUrl/tagsの場合は、同様にpostsで使用されている投稿タグ一覧の出力 -
baseUrl/tags/[tag]なら、同タグを使用するposts一覧を出力- 重複tagが出るので、tag全取得 =>
toLowerCase()=>sort()=> 重複削除
- 重複tagが出るので、tag全取得 =>
- docs配下に無いmdファイル名にアクセスした場合は、
404
ページ出力がsrc/pages/docs/xxx.mdという外部データに依存した静的ページ出力をしたいので、getStaticPropsとgetStaticPathsを使用した。
-
参照
-
getStaticProps- 出力ページのコンテンツが外部データに依存している時に使用
-
getStaticPaths- 出力ページ中のリンクが外部データに依存している時に使用
実装は下を参照しながらしました。タグの方は自分で用意しましたが。
Next.jsのチュートリアルのこのページ
tagsページのスタイルが未だ・・・
マークダウン
-
実現したい事
- QiitaやGist等での投稿を可能な限り手間なく集約したい
-
mdxjs/mdxなら、ファイル中にimportやexport等のjsを組み込める。- 汎用性を考えて、今回は
front-matterを使用する。
- 汎用性を考えて、今回は
-
- QiitaやGist等での投稿を可能な限り手間なく集約したい
-
最終的に利用したもの。
- jonschlinkert / gray-matter
- processor: [remarkjs/remark] (https://remark.js.org/)
- highlighter: highlight.js
-
参考:
mdxjs/mdxらへん
構文木について、しっかり学ばねばと思いました。
/src/lib/posts.jsx
// /src/lib/posts.jsx
import fs from 'fs'
import path from 'path'
import matter from 'gray-matter'
import remark from 'remark'
import html from 'remark-html'
export async function getPostData(id) {
  const fullPath = path.join(postsDirectory, `${id}.md`)
  const fileContents = fs.readFileSync(fullPath, 'utf8')
  const matterResult = matter(fileContents)
  const LowerCaseTags = matterResult.data.tags.map((tag) => (tag.toLowerCase()))
  const highlight = require('remark-highlight.js')

  const processedContent = await remark()
    .use(highlight)
    .use(html)
    .process(matterResult.content)

  const contentHtml = processedContent.toString()

  return {
    id,
    contentHtml,
    LowerCaseTags,
    ...matterResult.data,
  }
}
<head><meta /></head>
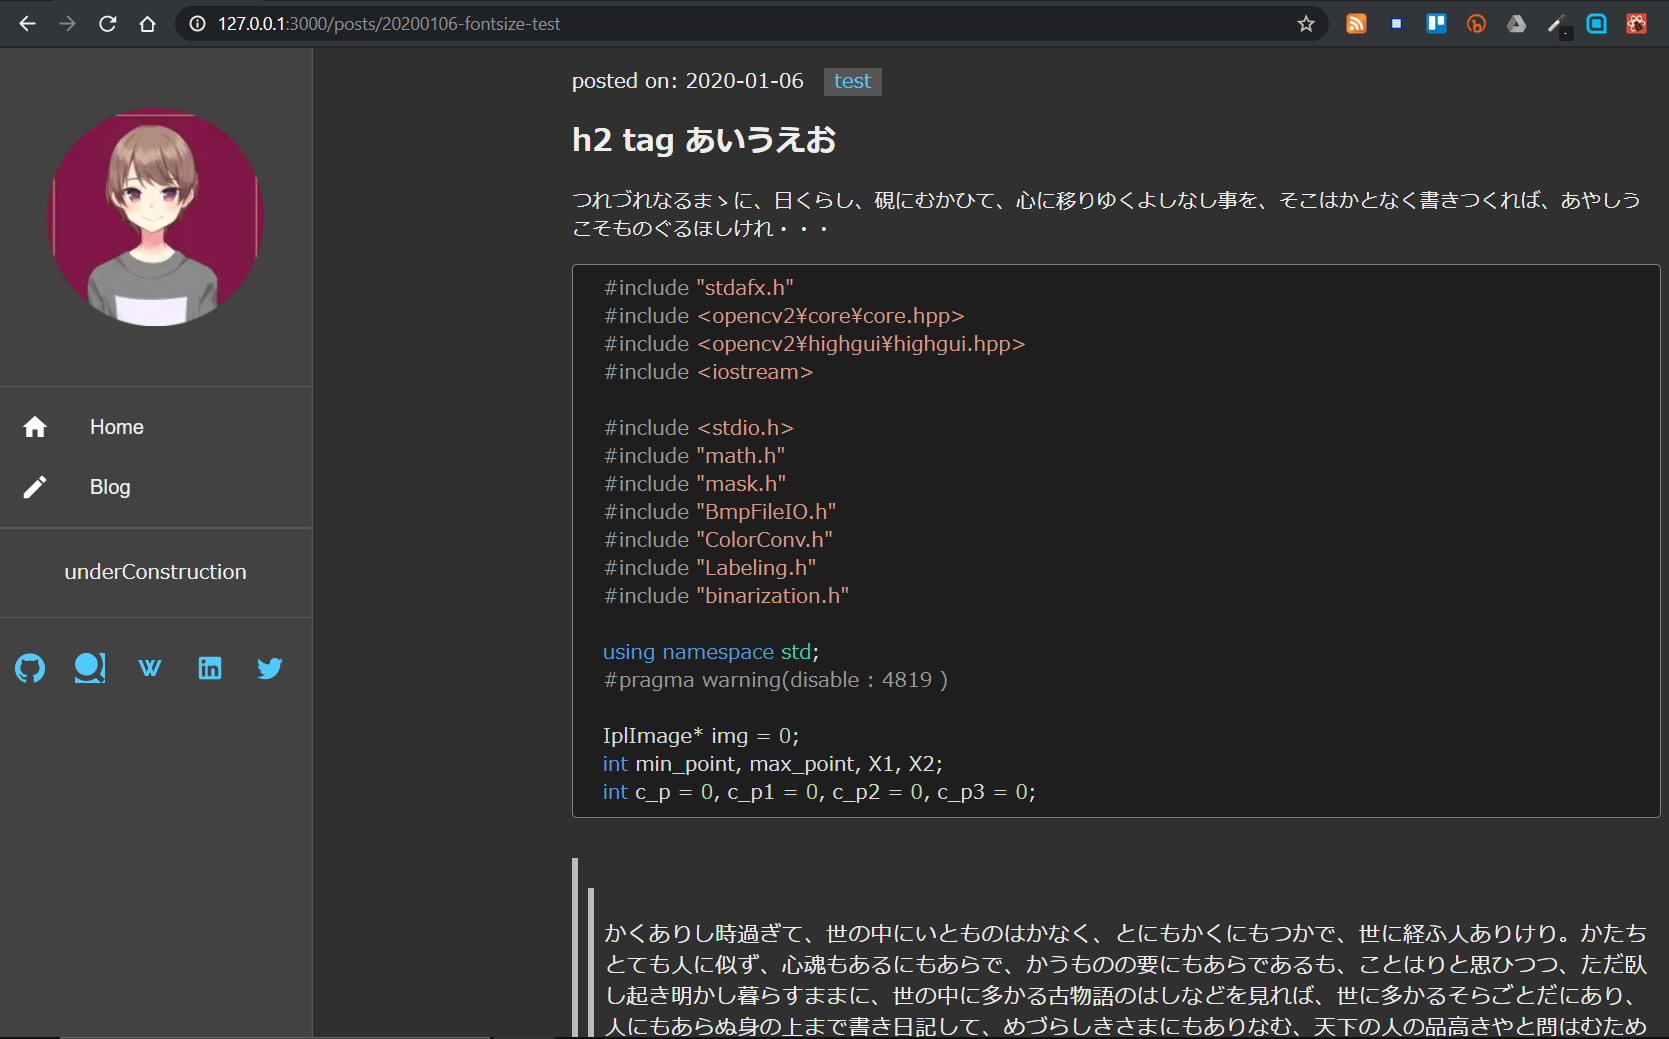
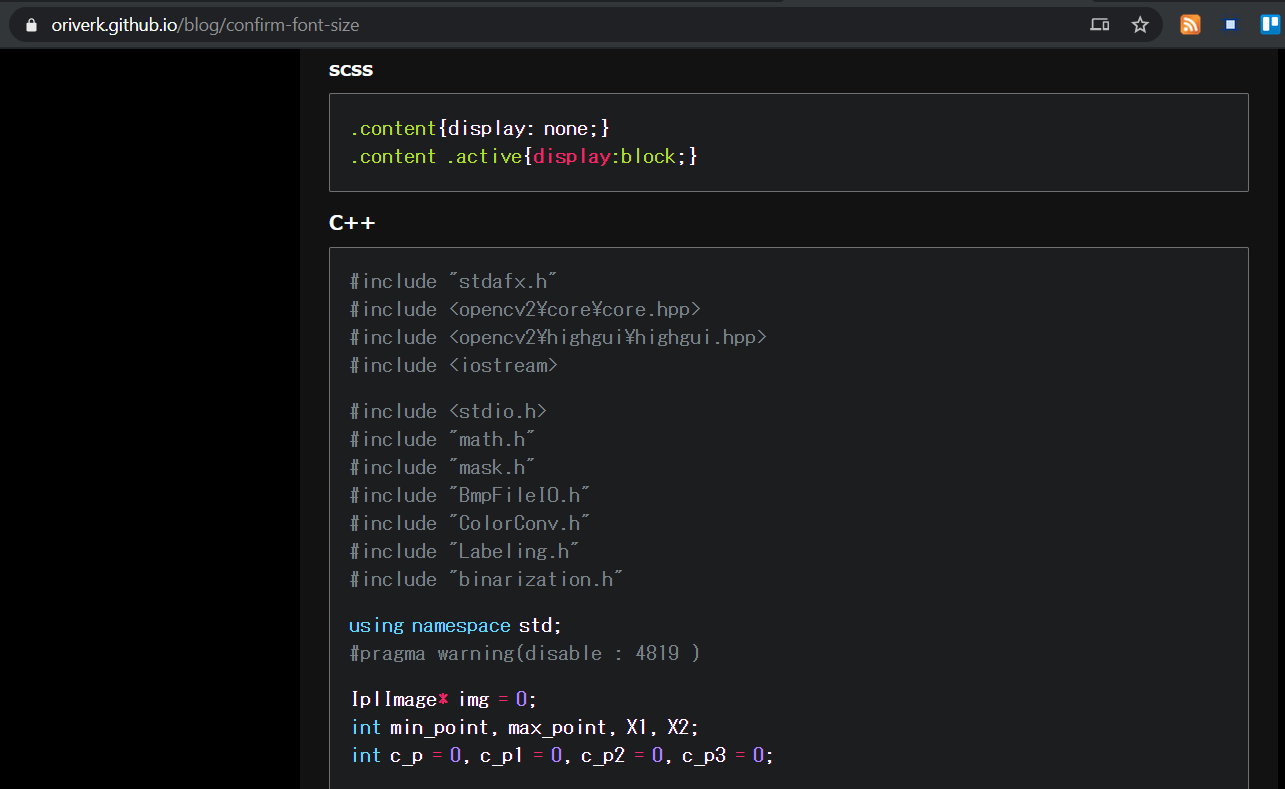
以前にrubyとjekyllで作ったgithubpagesと比較して、syntax-highlightが粗いので改善が必要
また、front-matterは下の様にQiitaと同じにしてあって、またpost情報はgray-matterを使ってpostコンテンツ取得と同時に取得し、next/headで<head><meta /><head>に格納してある。
# front-matter
---
date: '2020-05-26'
author: Kawano Yudai
title: 'Qiita: Next.jsでポートフォリオサイトを作成した'
tags: [Qiita, React, Next.js]
image: '/assets/posts/202003/miyazaki-oss1.jpg'
slide: false
---
SNSシェアボタン
snsシェアボタンも上記の<meta />と同様にした。初めて、hatenaに垢登録しました。
<button className='twitter'>
  <a href={`https://twitter.com/share?text=${postData.title}&hashtags=react,nextjs&url=https://next-portfolio-blue.now.sh/posts/${postData.id}&related=not_you_die`}
    target='_blank' rel='noopener noreferrer'><TwitterIcon /></a>
</button>
<button className='hatena'>
  <a href={`https://b.hatena.ne.jp/entry/https://next-portfolio-blue.now.sh/posts/${postData.id}`} className='hatena-bookmark-button' data-hatena-bookmark-layout='touch-counter'
    title={postData.title} target='_blank' rel='noopener noreferrer'><HatenaIcon /></a>
</button>
UPDATE
README.md
@ 2020-05-27
Qiita投稿の公開に当たり、README.mdを充実させた
npm install 禁止
@ 2020-05-27
特に理由はないがnpmの使用を禁じることにした。
Custom Domain
@ 2020-06-01
- google domainで購入
- Vercel側でドメインを変更
- Google Domain側でdnsをvercel用に変更
- ns1.vercel-dns.com
- ns2.vercel-dns.com
Google Analytics
@ 2020-06-05
GoogleAnalytics側でIDを取得し、_app.jsxと_document.jsxを上コードに従って修正する。
PWA implimentation
@ 2020-06-05
next-offlineを利用した。上リポジトリでも記載してあるが、Vercel( Now )のv1とv2で動作が違う。但し、現在はv2オンリーなので、同レポジトリ内にあるpackages/now2-exampleのnow.jsonとnext.config.jsonに倣えばよい。
To do
- CSSの統一(module.cssなのかstyled-jsxなのか等)
- TypeScript化(触ってみたいだけ
- AMP一部対応( 参照:Next.js next/amp
- api routeを試す
-
/tagsページの整備 - コードブロックの言語またはファイル名の出力
- syntax-highlightの改善
- rssの対応