今回はiOSアプリからGoogle Calenear APIを通してGoogleカレンダーにアクセスしてみたいと思います。
環境: Xcode 12.0、Swift 5
準備
まずGoogle Cloud PlatformにアクセスしてGoogle Calendar APIを有効にします。
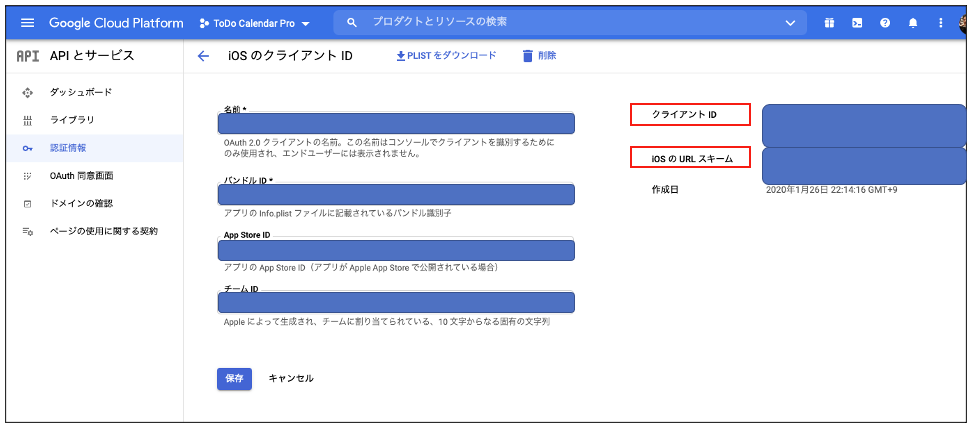
続いてOAuth認証を行うためのOAuthクライアントIDを取得します。
以下の記事の「クライアントIDを登録」に書かれている手順に従ってクライアントIDの取得の申請を行います。
Swift4でGoogleCalendarAPIを叩いてみた
手続きが完了するとクライアントIDとiOSのURLスキームが設定されますのでメモしておきます。
使用する外部ライブラリ
Google API自体はREST APIになっていますが、これを直接呼び出すのは大変なので外部ライブラリを使用することにします。
今回は以下のライブラリを使用します。
・Google認証
AppAuth
GTMAppAuth
・Google Calendarとのアクセス
GoogleAPIClientForREST/Calendar
上記のライブラリはいずれもCocoaPodsで導入できます。
以下のようにPodfileを記述しpod installを実行して導入します。
platform :ios, '14.0'

target 'GoogleCalendarSample' do
  use_frameworks!

  pod 'AppAuth'
  pod 'GTMAppAuth'
  pod 'GoogleAPIClientForREST/Calendar'

end
認証
ではAppAuthとGTMAppAuthを使用してGoogle認証を行う処理を実装します。
まずAppDelegateにOIDExternalUserAgentSessionクラスを追加します。
import UIKit
import AppAuth
import GTMAppAuth

@main
class AppDelegate: UIResponder, UIApplicationDelegate {
    var currentAuthorizationFlow: OIDExternalUserAgentSession?

---------------- (以下略) ----------------
その上でGoogle認証を実施する処理を記述します。
import UIKit
import AppAuth
import GTMAppAuth
import GoogleAPIClientForREST

---------------- (中略) ----------------

private var authorization: GTMAppAuthFetcherAuthorization?
private let clientID = "xxxxxxxxxxxxxxxxxxxx"
private let iOSUrlScheme = "xxxxxxxxxxxxxxxxxxxx"
typealias showAuthorizationDialogCallBack = ((Error?) -> Void)

private func showAuthorizationDialog(callBack: @escaping showAuthorizationDialogCallBack) {
    let scopes = [
        "https://www.googleapis.com/auth/calendar",
        "https://www.googleapis.com/auth/calendar.readonly",
        "https://www.googleapis.com/auth/calendar.events",
        "https://www.googleapis.com/auth/calendar.events.readonly"
    ]

    let configuration = GTMAppAuthFetcherAuthorization.configurationForGoogle()
    let redirectURL = URL.init(string: iOSUrlScheme + ":/oauthredirect")
    let request = OIDAuthorizationRequest.init(
        configuration: configuration,
        clientId: clientID,
        scopes: scopes,
        redirectURL: redirectURL!,
        responseType: OIDResponseTypeCode,
        additionalParameters: nil
    )

    let appDelegate: AppDelegate = UIApplication.shared.delegate as! AppDelegate
    appDelegate.currentAuthorizationFlow = OIDAuthState.authState(
        byPresenting: request,
        presenting: self,
        callback: { (authState, error) in
            if let error = error {
                NSLog("\(error)")
            } else {
                if let authState = authState {
                    self.authorization = GTMAppAuthFetcherAuthorization.init(authState: authState)
                    GTMAppAuthFetcherAuthorization.save(self.authorization!, toKeychainForName: "authorization")
                }
            }
            callBack(error)
    })
}
では、上記の処理の詳細を解説します。
まず、以下の変数に事前に取得したクライアントIDとiOSのURLスキームを設定します。
private let clientID = "xxxxxxxxxxxxxxxxxxxx"
private let iOSUrlScheme = "xxxxxxxxxxxxxxxxxxxx"
今回必要とする権限を配列scopesに設定します。
今回はGoogleカレンダーを検索・変更する為の権限を要求しています。
let scopes = [
        "https://www.googleapis.com/auth/calendar",
        "https://www.googleapis.com/auth/calendar.readonly",
        "https://www.googleapis.com/auth/calendar.events",
        "https://www.googleapis.com/auth/calendar.events.readonly"
    ]
これらの情報を使用して認証を要求するダイアログを表示します。
let configuration = GTMAppAuthFetcherAuthorization.configurationForGoogle()
let redirectURL = URL.init(string: iOSUrlScheme + ":/oauthredirect")
let request = OIDAuthorizationRequest.init(configuration: configuration,
                                                   clientId: clientID,
                                                   scopes: scopes,
                                                   redirectURL: redirectURL!,
                                                   responseType: OIDResponseTypeCode,
                                                   additionalParameters: nil)

 let appDelegate: AppDelegate = UIApplication.shared.delegate as! AppDelegate
 appDelegate.currentAuthorizationFlow = OIDAuthState.authState(
        byPresenting: request,
        presenting: self,
        callback: {
        ---- (中略) ---
        })
OIDAuthStateクラスのauthStateメソッドが実行されたところで以下の様なGoogle認証のダイアログが表示されます。
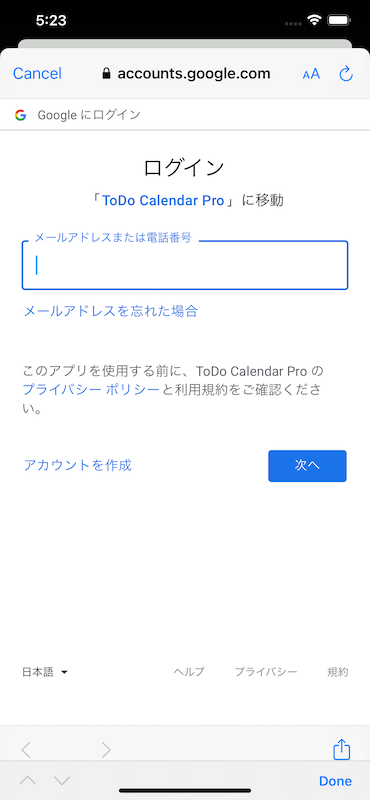
ユーザーがダイアログにgmailアドレスとパスワードを正しく入力し認証が完了した場合は、authStateメソッドのcallback関数でGTMAppAuthFetcherAuthorizationクラスを生成し保存します。
    (authState, error) in
        if let error = error {
            NSLog("\(error)")
        } else {
            if let authState = authState {
                self.authorization = GTMAppAuthFetcherAuthorization.init(authState: authState)
                GTMAppAuthFetcherAuthorization.save(self.authorization!, toKeychainForName: "authorization")
            }
        }
このGTMAppAuthFetcherAuthorizationクラスが残っているうちは認証ダイアログを再度表示する必要はありません。
イベントの検索
では続いてGoogleAPIClientForRESTを使用してGoogleカレンダーにアクセスしてみたいと思います。
まずはGoogleカレンダーから既存のイベントを取得する処理を記載します。
getメソッドに開始日時、終了日時を渡すとGoogleカレンダーから開始日時 〜 終了日時の間にあるイベントを検索するプログラムです。
import UIKit
import AppAuth
import GTMAppAuth
import GoogleAPIClientForREST

---------------- (中略) ----------------

private var authorization: GTMAppAuthFetcherAuthorization?
private let clientID = "xxxxxxxxxxxxxxxxxxxx"
private let iOSUrlScheme = "xxxxxxxxxxxxxxxxxxxx"
typealias showAuthorizationDialogCallBack = ((Error?) -> Void)
struct GoogleCalendaraEvent {
    var id: String
    var name: String
    var startDate: Date?
    var endDate: Date?
}
private var googleCalendarEventList: [GoogleCalendaraEvent] = []

private func showAuthorizationDialog(callBack: @escaping showAuthorizationDialogCallBack) {
---------------- (中略) ----------------
}

private func get(startDateTime: Date, endDateTime: Date) {
    if GTMAppAuthFetcherAuthorization(fromKeychainForName: "authorization") != nil {
        self.authorization = GTMAppAuthFetcherAuthorization(fromKeychainForName: "authorization")!
    }

    if self.authorization == nil {
        showAuthorizationDialog(callBack: {(error) -> Void in
            if error == nil {
                self.getCalendarEvents(startDateTime: startDateTime, endDateTime: endDateTime)
            }
        })
    } else {
        self.getCalendarEvents(startDateTime: startDateTime, endDateTime: endDateTime)
    }
}

private func getCalendarEvents(startDateTime: Date, endDateTime: Date) {
    let calendarService = GTLRCalendarService()
    calendarService.authorizer = self.authorization
    calendarService.shouldFetchNextPages = true

    let query = GTLRCalendarQuery_EventsList.query(withCalendarId: "primary")
    query.timeMin = GTLRDateTime(date: startDateTime)
    query.timeMax = GTLRDateTime(date: endDateTime)

    calendarService.executeQuery(query, completionHandler: { (ticket, event, error) -> Void in
        if let error = error {
            NSLog("\(error)")
        } else {
            if let event = event as? GTLRCalendar_Events, let items = event.items {
                self.googleCalendarEventList.removeAll()
                for item in items {
                    let id: String = item.identifier ?? ""
                    let name: String = item.summary ?? ""
                    let startDate: Date? = item.start?.dateTime?.date
                    let endDate: Date? = item.end?.dateTime?.date
                    self.googleCalendarEventList.append(GoogleCalendaraEvent(id: id, name: name, startDate: startDate, endDate: endDate))
                }
            }
        }
    })
}
まずGoole認証が完了しているかの確認を行います。
GTMAppAuthFetcherAuthorizationクラスが保存されているかを確認し、保存されていなかった場合は先に作成したshowAuthorizationDialog関数を呼び出しGoogle認証のダイアログを表示してGTMAppAuthFetcherAuthorizationクラスを取得します。
GTMAppAuthFetcherAuthorizationクラスが保存されていた場合はそれをそのまま使用します。
続いてGoogleAPIClientForRESTを使用してGooglカレンダーからイベントを取得します。
まずGooleカレンダーにアクセスする為のGTLRCalendarServiceクラスを生成しauthorizerプロパティにGTMAppAuthFetcherAuthorizationクラスを設定します。
let calendarService = GTLRCalendarService()
calendarService.authorizer = self.authorization
calendarService.shouldFetchNextPages = true
続いてGoogleカレンダーからイベントを検索するためのGTLRCalendarQuery_EventsListクラスを生成し、検索条件として開始日時と終了日時を設定します。
let query = GTLRCalendarQuery_EventsList.query(withCalendarId: "primary")
query.timeMin = GTLRDateTime(date: startDateTime)
query.timeMax = GTLRDateTime(date: endDateTime)
そしてこのGTLRCalendarQuery_EventsListクラスを引数にしてGTLRCalendarServiceクラスのexecuteQueryメソッドを実行しGoogleカレンダーからイベントを取得します。
イベントを取得できた時はexecuteQueryメソッドのCallback関数でGTLRCalendar_Eventsクラスが返ってきますのでここからイベントの情報を取得します。
if let event = event as? GTLRCalendar_Events, let items = event.items {
    self.googleCalendarEventList.removeAll()
    for item in items {
        let id: String = item.identifier ?? ""
        let name: String = item.summary ?? ""
        let startDate: Date? = item.start?.dateTime?.date
        let endDate: Date? = item.end?.dateTime?.date
        self.googleCalendarEventList.append(GoogleCalendaraEvent(id: id, name: name, startDate: startDate, endDate: endDate))
    }
}
特にidentifier(イベントのユニークID)が重要です。
イベントの変更や削除を行う時はこのidentifierがキーになります。
イベントの追加
では次はGoogleカレンダーにイベントを追加してみたいと思います。
addメソッドにイベント名、開始日時、終了日時を渡すとGoogleカレンダーにイベントを作成するプログラムです。
import UIKit
import AppAuth
import GTMAppAuth
import GoogleAPIClientForREST

---------------- (中略) ----------------

private var authorization: GTMAppAuthFetcherAuthorization?
typealias showAuthorizationDialogCallBack = ((Error?) -> Void)

private func showAuthorizationDialog(callBack: @escaping showAuthorizationDialogCallBack) {
---------------- (中略) ----------------
}

private func add(eventName: String, startDateTime: Date, endDateTime: Date) {

    if GTMAppAuthFetcherAuthorization(fromKeychainForName: "authorization") != nil {
        self.authorization = GTMAppAuthFetcherAuthorization(fromKeychainForName: "authorization")!
    }

    if self.authorization == nil {
        showAuthorizationDialog(callBack: {(error) -> Void in
            if error == nil {
                self.addCalendarEvent(eventName: eventName, startDateTime: startDateTime, endDateTime: endDateTime)
            }
        })
    } else {
        self.addCalendarEvent(eventName: eventName, startDateTime: startDateTime, endDateTime: endDateTime)
    }
}

private func addCalendarEvent(eventName: String, startDateTime: Date, endDateTime: Date) {

    let calendarService = GTLRCalendarService()
    calendarService.authorizer = self.authorization
    calendarService.shouldFetchNextPages = true

    let event = GTLRCalendar_Event()
    event.summary = eventName

    let gtlrDateTimeStart: GTLRDateTime = GTLRDateTime(date: startDateTime)
    let startEventDateTime: GTLRCalendar_EventDateTime = GTLRCalendar_EventDateTime()
    startEventDateTime.dateTime = gtlrDateTimeStart
    event.start = startEventDateTime

    let gtlrDateTimeEnd: GTLRDateTime = GTLRDateTime(date: endDateTime)
    let endEventDateTime: GTLRCalendar_EventDateTime = GTLRCalendar_EventDateTime()
    endEventDateTime.dateTime = gtlrDateTimeEnd
    event.end = endEventDateTime

    let query = GTLRCalendarQuery_EventsInsert.query(withObject: event, calendarId: "primary")
    calendarService.executeQuery(query, completionHandler: { (ticket, event, error) -> Void in
        if let error = error {
            NSLog("\(error)")
        }
    })
}
GTLRCalendarServiceクラスを生成するところまでは検索の場合と同じなのでその後の部分から説明します。
追加するイベントの情報を設定する為にGTLRCalendar_Eventクラスを生成します。
今回はイベントの名称、開始日時、終了日時を設定しますので、それぞれをGTLRCalendar_Eventクラスのsummaryプロパティ、startプロパティ、endプロパティに設定しています。
let event = GTLRCalendar_Event()
event.summary = eventName

let gtlrDateTimeStart: GTLRDateTime = GTLRDateTime(date: startDateTime)
let startEventDateTime: GTLRCalendar_EventDateTime = GTLRCalendar_EventDateTime()
startEventDateTime.dateTime = gtlrDateTimeStart
event.start = startEventDateTime

let gtlrDateTimeEnd: GTLRDateTime = GTLRDateTime(date: endDateTime)
let endEventDateTime: GTLRCalendar_EventDateTime = GTLRCalendar_EventDateTime()
endEventDateTime.dateTime = gtlrDateTimeEnd
event.end = endEventDateTime
尚、イベントのユニークIDとなるidentifierは新規追加の場合はGoogleカレンダーによって自動的に割り当てられますのでここで設定する必要はありません。
そしてGoogleカレンダーに新規追加する為のGTLRCalendarQuery_EventsInsertクラスをGTLRCalendar_Eventクラスを引数にして生成し、GTLRCalendarServiceクラスのexecuteQueryメソッドを実行することでGoogleカレンダーにイベントが新規追加されます。
イベントの変更
続いて既存のイベントの情報を変更してみます。
updateメソッドにイベントのidentifier、イベント名、開始日時、終了日時を渡すとGoogleカレンダーにある該当のidentifierのイベントの情報を変更するプログラムです。
import UIKit
import AppAuth
import GTMAppAuth
import GoogleAPIClientForREST

---------------- (中略) ----------------

private var authorization: GTMAppAuthFetcherAuthorization?
typealias showAuthorizationDialogCallBack = ((Error?) -> Void)

private func showAuthorizationDialog(callBack: @escaping showAuthorizationDialogCallBack) {
---------------- (中略) ----------------
}

private func update(eventId: String, eventName: String, startDateTime: Date, endDateTime: Date) {

    if GTMAppAuthFetcherAuthorization(fromKeychainForName: "authorization") != nil {
        self.authorization = GTMAppAuthFetcherAuthorization(fromKeychainForName: "authorization")!
    }

    if self.authorization == nil {
        showAuthorizationDialog(callBack: {(error) -> Void in
            if error == nil {
                self.updateCalendarEvent(eventId: eventId, eventName: eventName, startDateTime: startDateTime, endDateTime: endDateTime)
            }
        })
    } else {
        self.updateCalendarEvent(eventId: eventId, eventName: eventName, startDateTime: startDateTime, endDateTime: endDateTime)
    }
}

private func updateCalendarEvent(eventId: String, eventName: String, startDateTime: Date, endDateTime: Date) {
    let calendarService = GTLRCalendarService()
    calendarService.authorizer = self.authorization
    calendarService.shouldFetchNextPages = true

    let event = GTLRCalendar_Event()
    event.identifier = eventId
    event.summary = eventName

    let gtlrDateTimeStart: GTLRDateTime = GTLRDateTime(date: startDateTime)
    let startEventDateTime: GTLRCalendar_EventDateTime = GTLRCalendar_EventDateTime()
    startEventDateTime.dateTime = gtlrDateTimeStart
    event.start = startEventDateTime

    let gtlrDateTimeEnd: GTLRDateTime = GTLRDateTime(date: endDateTime)
    let endEventDateTime: GTLRCalendar_EventDateTime = GTLRCalendar_EventDateTime()
    endEventDateTime.dateTime = gtlrDateTimeEnd
    event.end = endEventDateTime

    let query = GTLRCalendarQuery_EventsUpdate.query(withObject: event, calendarId: "primary", eventId: eventId)
    calendarService.executeQuery(query, completionHandler: { (ticket, event, error) -> Void in
        if let error = error {
            NSLog("\(error)")
        }
    })
}
更新の場合はGTLRCalendar_Eventクラスのidentifierプロパティに該当のイベントのIDを設定します。そして変更する値をGTLRCalendar_Eventクラスのプロパティに設定します。
その後、Googleカレンダーのイベントを更新する為のGTLRCalendarQuery_EventsUpdateクラスをGTLRCalendar_Eventクラスを引数にして生成し、それを引数にGTLRCalendarServiceクラスのexecuteQueryメソッドを実行します。
イベントの削除
最後にGoogleカレンダーのイベントの削除を行います。
deleteメソッドにイベントのidentifierを渡すとGoogleカレンダーから該当のイベントを削除するプログラムです。
import UIKit
import AppAuth
import GTMAppAuth
import GoogleAPIClientForREST

---------------- (中略) ----------------

private var authorization: GTMAppAuthFetcherAuthorization?
typealias showAuthorizationDialogCallBack = ((Error?) -> Void)

private func showAuthorizationDialog(callBack: @escaping showAuthorizationDialogCallBack) {
---------------- (中略) ----------------
}

private func delete(eventId: String) {

    if GTMAppAuthFetcherAuthorization(fromKeychainForName: "authorization") != nil {
        self.authorization = GTMAppAuthFetcherAuthorization(fromKeychainForName: "authorization")!
    }

    if self.authorization == nil {
        showAuthorizationDialog(callBack: {(error) -> Void in
            if error == nil {
                self.deleteCalendarEvent(eventId: eventId)
            }
        })
    } else {
        self.deleteCalendarEvent(eventId: eventId)
    }
}

private func deleteCalendarEvent(eventId: String) {
    let calendarService = GTLRCalendarService()
    calendarService.authorizer = self.authorization
    calendarService.shouldFetchNextPages = true

    let query = GTLRCalendarQuery_EventsDelete.query(withCalendarId: "primary", eventId: eventId)
    calendarService.executeQuery(query, completionHandler: { (ticket, event, error) -> Void in
        if let error = error {
            NSLog("\(error)")
        }
    })
}
削除はGTLRCalendarQuery_EventsDeleteクラスをイベントのidentifierを引数にして生成し、それを引数にGTLRCalendarServiceのexecuteQueryメソッドを実行することで行うことができます。
サンプルプログラム
今回作成したサンプルプログラムはGitHubで公開しています。
参考文献
CocoaDocs.org - GoogleAPIClientForRest
Qiita:Swift4でGoogleCalendarAPIを叩いてみた