経緯
SwiftでGoogleAPIを利用する際のチュートリアル的な資料等があまりにも少ないと思ったのでこれから利用される方の参考になればいいなと考えたから。というかiOSはもはや表示すらされてないんだよなぁ...
開発環境と手順
開発環境
- Swift 4.1.2
- Xcode 9.4.1
手順
大きく分けてGoogle API Console編,Xcode編,開発編です。
1つずつ進めていきましょう!
Google API Consoleでの作業
Google API Consoleから以下の2つを登録します。2つともAPIを叩く上で必須の値なのでしっかりと入手しましょう!
この辺の設定はQiita等で記事が豊富なので駆け足でいきます。
クライアントIDを登録
こちらの方の記事を参考にクライアントIDを取得します。(わかりやすい記事本当にありがとうございます!!)
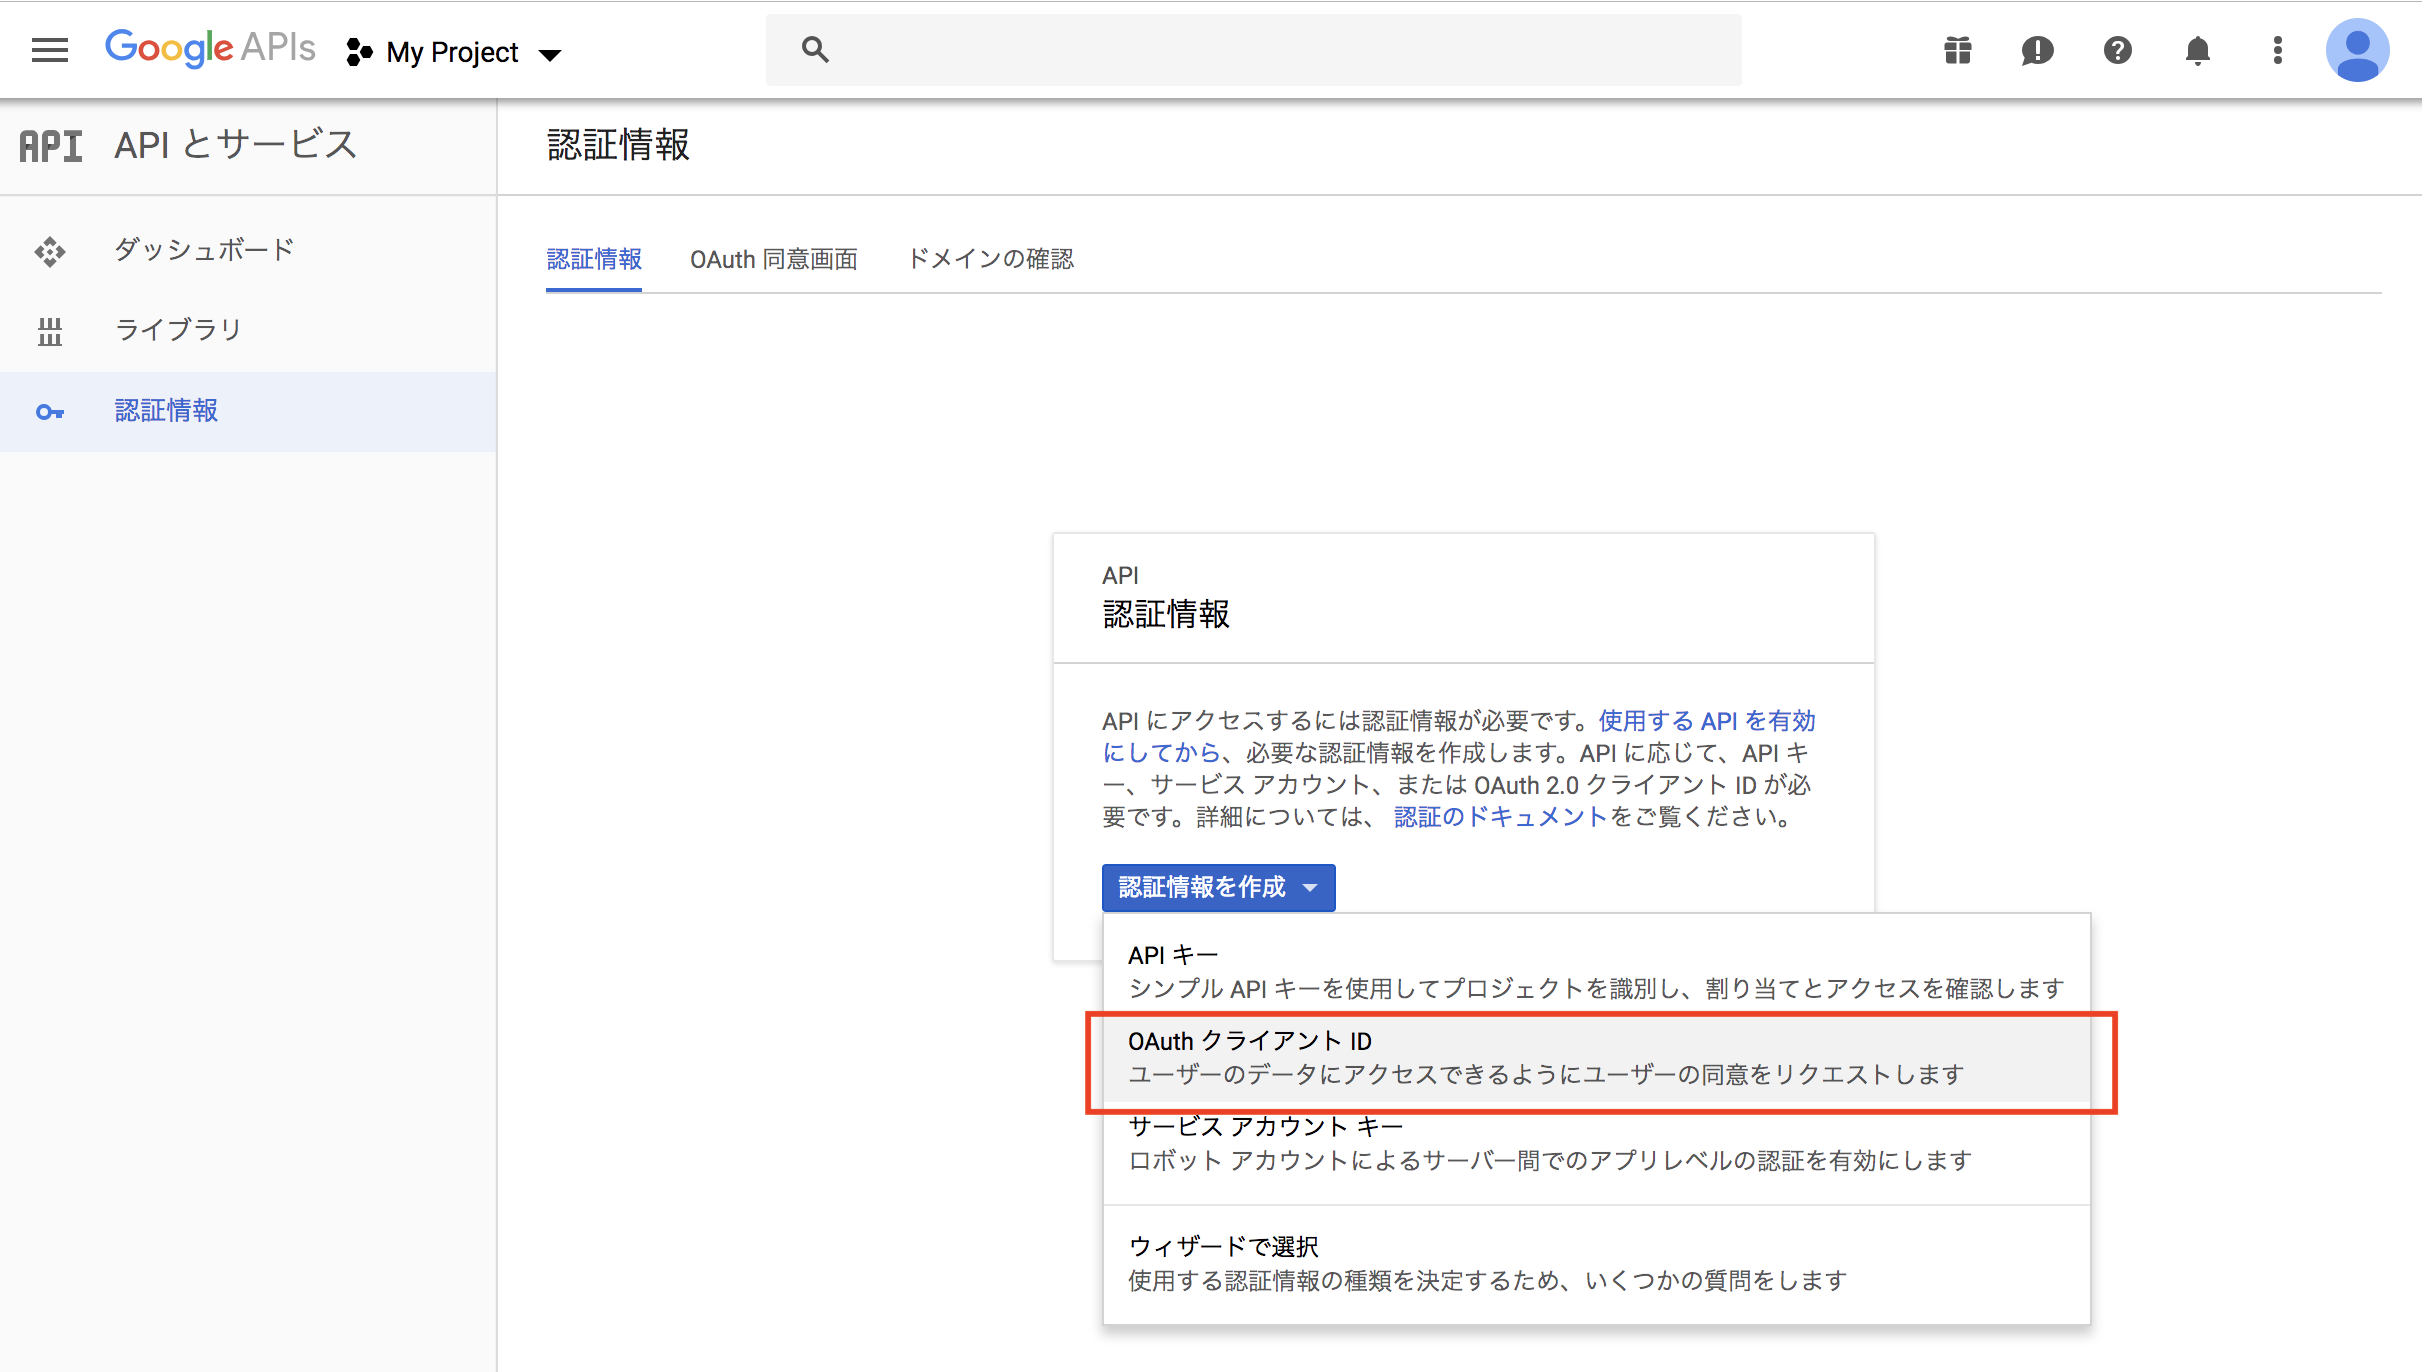
簡単にまとめますとプロジェクトを作成、認証情報を選択、クライアントIDを取得です。
画像でまとめますと以下の画面でクライアントIDを選択する。

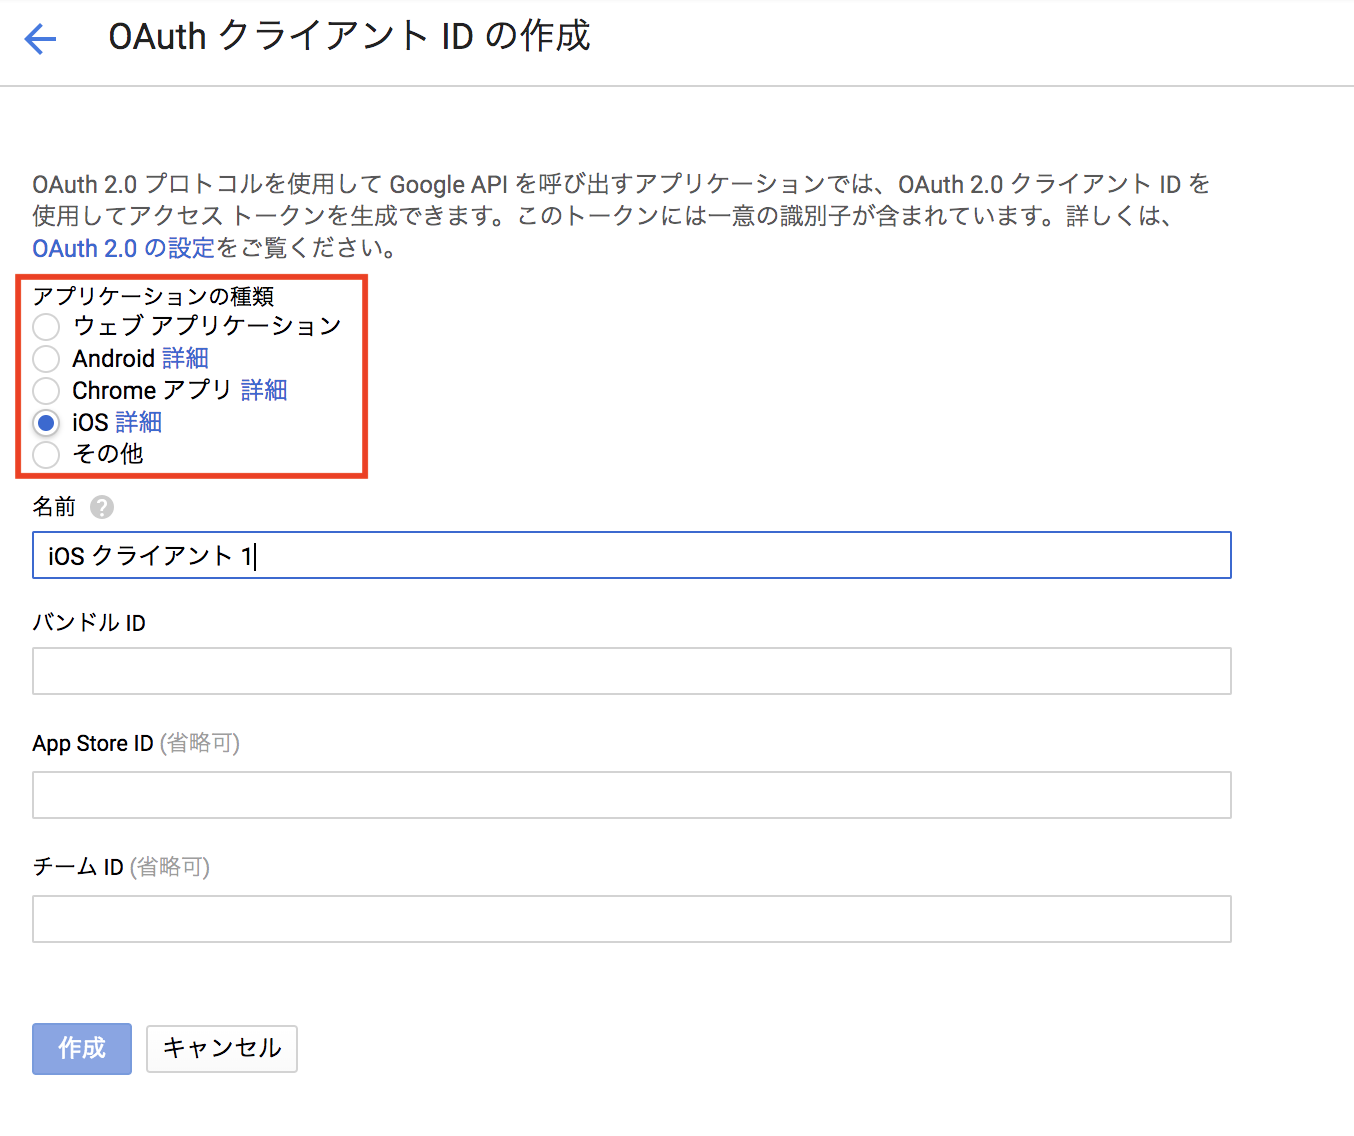
そしてここでしっかりとiOSを選択、ご自身のアプリ名とバンドルIDもしっかり入力しましょう。

その後表示されるクライアントIDをメモしておいてください。
APIキーを取得
これは簡単です。
認証情報を作成の右を押して__APIキーを作成する__で表示されます。
こちらもメモしておいてください。
Xcode での作業
どんどんいきます!!
ここでの作業は簡単です!
ライブラリの導入
必要なライブラリはGoogleの認証用にGTMAppAuth,あとAPIを叩くようにAlamofire,そのレスポンスようにSwiftyJSONを導入します。
Podfileはこんな感じです。
platform :ios, '10.0'

target 'あなたのアプリ名'do

  use_frameworks!

  pod 'GTMAppAuth'
  pod 'Alamofire'
  pod 'SwiftyJSON'
end
URL Typesの登録
Google APIsの認証情報ページから、先ほど作成した認証情報の詳細ページへいきます。
そして、「iOS の URL スキーム」欄にある値をコピーします。
Xcodeに戻り、InfoのURL Typesにて+を押し、URL Schemeの欄に値をペーストします。
いざ開発
ようやくコーディングに移れます!
認証部分とAPI叩く部分の二部構成です!
Googleの認証
認証部分はこの方の記事を参考にさせていただきました。(iOSでのGoogleAPI系の記事は少ないため本当に救われました。ありがとうございます。)
Delegateの部分は参考ページと同じように追記してください。
ViewControllerは
import UIKit
import AppAuth
import GTMAppAuth

class ViewController: UIViewController {

    private let scopes = ["https://www.googleapis.com/auth/calendar","https://www.googleapis.com/auth/calendar.readonly","https://www.googleapis.com/auth/calendar.events","https://www.googleapis.com/auth/calendar.events.readonly"]
    private let kClientID = "クライアントID"
    private let kRedirectURL = URL.init(string: "リバースクライアントID:/oauthredirect")
    private let configuration = GTMAppAuthFetcherAuthorization.configurationForGoogle()
    private var authorization: GTMAppAuthFetcherAuthorization?

    override func viewDidLoad() {
        super.viewDidLoad()
        let request = OIDAuthorizationRequest.init(configuration: configuration,
                                                   clientId: kClientID,
                                                   scopes: self.scopes,
                                                   redirectURL: kRedirectURL!,
                                                   responseType: OIDResponseTypeCode,
                                                   additionalParameters: nil)
        let appDelegate: AppDelegate = UIApplication.shared.delegate as! AppDelegate
        print("Initiating authorization request with scope: \(request.scope!)")

        appDelegate.currentAuthorizationFlow = OIDAuthState.authState(byPresenting: request,
            presenting: self,
            callback: { (authState, error) in if (authState != nil) {
            // 認証情報オブジェクトを生成
            self.authorization = GTMAppAuthFetcherAuthorization.init(authState: authState!)
            let accessToken = authState?.lastTokenResponse?.accessToken
            print("Authorization トークンを取得しました:\(String(describing: accessToken))")

            }
        })
    }
ほぼ参考通りです。ただAPIごとにスコープの部分が違うため、Google APIs Explorerを参考に自分に合うスコープを探してください。
今回はcalendar.events.listですので、4つのスコープを設定しました。
AlamofileとSwiftyJSON
Googleでうまく返してくれるライブラリがあるらしいですが、私はうまく扱えなかったのでAlamofire使ってAPIを叩きました!
alamofireがリクエストを送る部分はGoogle APIs Explorerの以下の画像の部分をコピペしてGoogle API Console編で取得したAPIキーをいれるとできます!
SwiftyJSONに関しては勉強のために使ってみましたが使いやすくてよかったです!

以下その実装コードになります。
Alamofire.request("https://www.googleapis.com/calendar/v3/calendars/メールアドレス/events?key=あなたのAPIキー", method:.get)
            .responseJSON{response in
                let json = JSON(response.result.value)
                json["items"].forEach{(_, data) in
                    let summary = data["summary"].string
                    print(summary)
                print("イベントの取得に成功しました。")
            }
        }
その結果
 こんな風に取得できました!!
あとがき
SwiftではじめてAPIを叩けたのですごい達成感を感じました。まだまだ勉強していくぞー!
ご質問、ご意見お待ちしております。
また完成品はGitHubにも置いてありますので参考になれば。では!