はじめに
少し遅めですが、MCP を理解したいと思い、公式ドキュメントのチュートリアルを試してみました。
手順自体はすでに多くの方が紹介しているので、ここでは私自身が疑問に思った点を調べて解決した内容を、備忘録としてまとめておきます。
疑問に思ったこと
私が疑問に思ったことは、LLM はどのようにしてこれらの関数を理解しているのか、という点でした。
最初は、仕様書のように関数の説明文を書いたり、特別な設定をしないといけないのではと思っていたので、これだけでできるのかと少し驚きました。
裏側で動いている仕組み
調べてみると、このあたりは FastMCP がうまく処理してくれているようです。
mcp = FastMCP("weather")

@mcp.tool()
def get_alerts(state: str):
    ...

@mcp.tool()
def get_forecast(lat: float, lon: float):
    ...
このコードによって、関数が MCP サーバーに登録されています。
そして MCP インスペクターを使うと、どのように登録されているのかを確認できました。
npx @modelcontextprotocol/inspector
このコマンドを実行すると、次のようなブラウザ画面が立ち上がります。

Transport Type は STDIO、Command と Arguments には MCP 設定時に使用した JSON ファイルの内容を入力します。
左下の Connect をクリックし、上部タブの Tools を開いて List Tools をクリックすると、History に tools/list が出てきます。
それを展開して Response を確認すると、ツール情報がどのように登録されているのかを見ることができます。
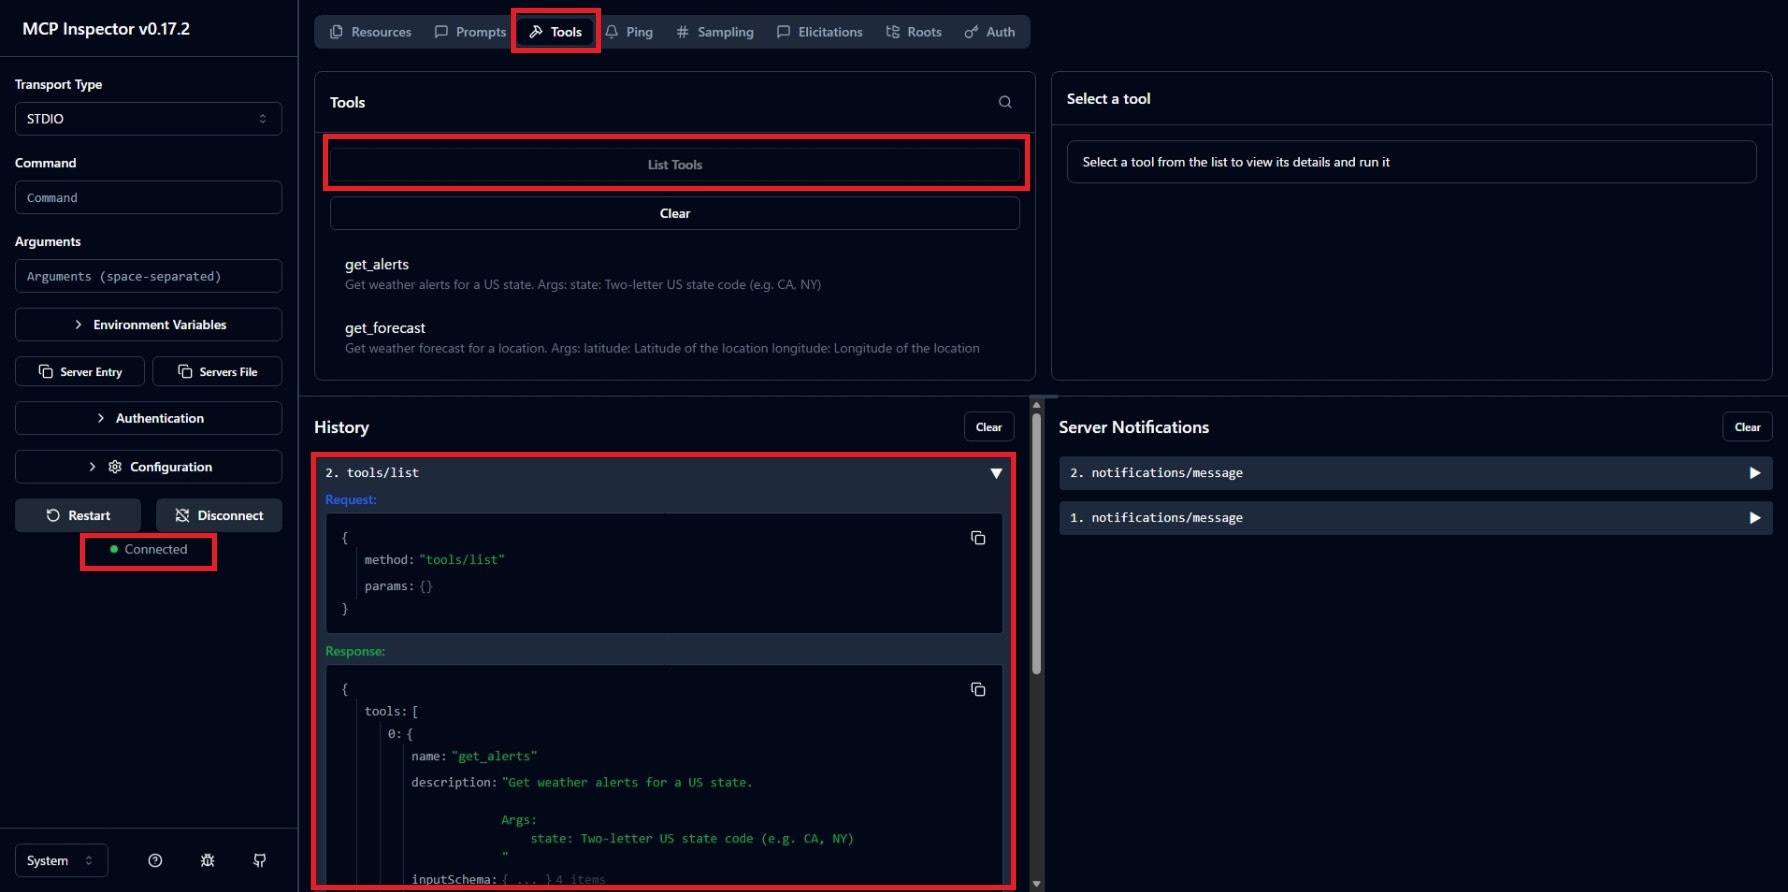
Response の中身は以下のようになっていました。
チュートリアル内で関数にコメント文として説明が書かれていたので、単なる補足だと思っていましたが、実際にはこのコメント文が description として LLM に関数の意味を伝える役割を果たしていました。
get_alertsのコメント文の部分
@mcp.tool()
async def get_alerts(state: str) -> str:
    """Get weather alerts for a US state.

    Args:
        state: Two-letter US state code (e.g. CA, NY)
    """
    ...
Responseの中身
descriptionにコメント文の内容がそのまま含まれていました。
{
  "tools": [
    {
      "name": "get_alerts",
      "description": "Get weather alerts for a US state.\n\nArgs:\n    state: Two-letter US state code (e.g. CA, NY)\n",
      "inputSchema": {
        "type": "object",
        "properties": {
          "state": {
            "title": "State",
            "type": "string"
          }
        },
        "required": [
          "state"
        ],
        "title": "get_alertsArguments"
      },
      "outputSchema": {
        "type": "object",
        "properties": {
          "result": {
            "title": "Result",
            "type": "string"
          }
        },
        "required": [
          "result"
        ],
        "title": "get_alertsOutput"
      }
    },
    {
      "name": "get_forecast",
      "description": "Get weather forecast for a location.\n\nArgs:\n    latitude: Latitude of the location\n    longitude: Longitude of the location\n",
      "inputSchema": {
        "type": "object",
        "properties": {
          "latitude": {
            "title": "Latitude",
            "type": "number"
          },
          "longitude": {
            "title": "Longitude",
            "type": "number"
          }
        },
        "required": [
          "latitude",
          "longitude"
        ],
        "title": "get_forecastArguments"
      },
      "outputSchema": {
        "type": "object",
        "properties": {
          "result": {
            "title": "Result",
            "type": "string"
          }
        },
        "required": [
          "result"
        ],
        "title": "get_forecastOutput"
      }
    }
  ]
}
感想
インスペクターで中身を確認して、こうして関数情報が LLM に伝わっているという仕組みを理解できました。
実際に動かしてみると一気に解像度が上がるので、まだ試していない方はやってみるのをおすすめします。