■はじめに
引き続き色々なコントロールを使ってみます。
キーワード:Label, TextBox, TextBlock, CheckBox, ToggleButton, RadioButton, Expander, ComboBox, ListBox, CheckedListBox, アクセスキー
[注意]
これまでの回で説明済みの操作方法等は、説明を省略したり簡略化している場合があります。
■開発環境
- Windows 10
- Visual Studio Community 2017 ※今回から2017です
- .NET Framework 4.x
■作ってみる
◇新規プロジェクト作成
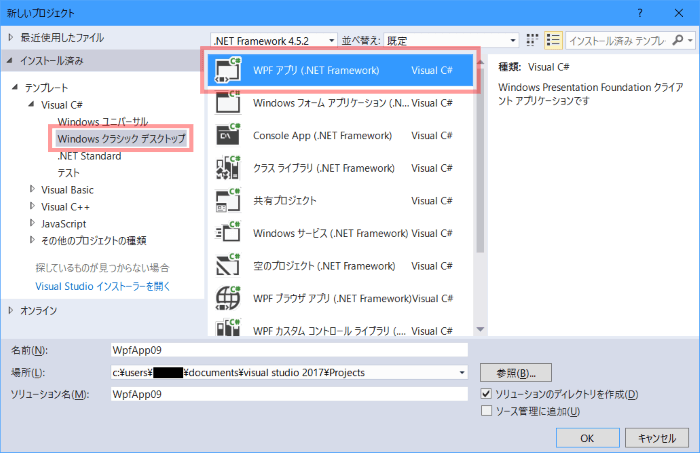
「Windowsクラシックデスクトップ」 - 「WPFアプリ」を選択します。
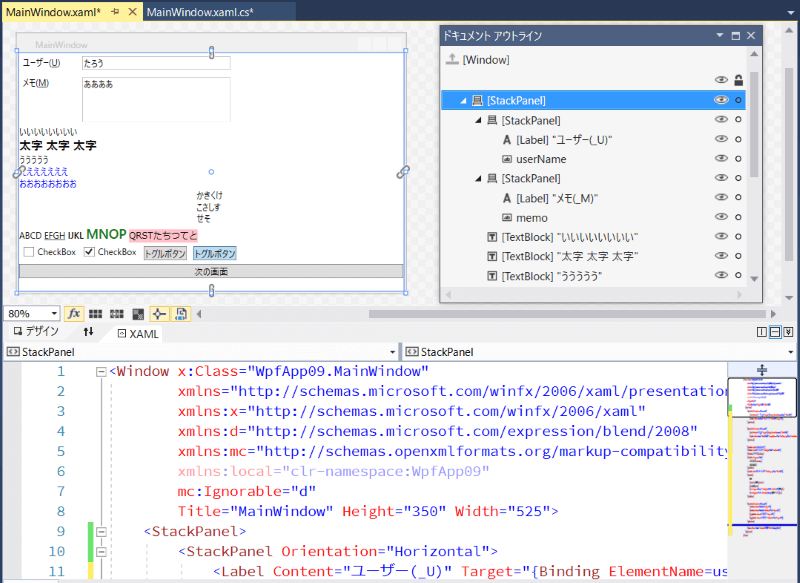
GridをStackPanelに変え、その中にStackPanelを2つ用意します。
<Window x:Class="WpfApp09.MainWindow"
        xmlns="http://schemas.microsoft.com/winfx/2006/xaml/presentation"
        xmlns:x="http://schemas.microsoft.com/winfx/2006/xaml"
        xmlns:d="http://schemas.microsoft.com/expression/blend/2008"
        xmlns:mc="http://schemas.openxmlformats.org/markup-compatibility/2006"
        xmlns:local="clr-namespace:WpfApp09"
        mc:Ignorable="d"
        Title="MainWindow" Height="350" Width="525">
    <StackPanel>
        <StackPanel Orientation="Horizontal">
        </StackPanel>

        <StackPanel Orientation="Horizontal">
        </StackPanel>
    </StackPanel>
</Window>
◇ラベル, テキストボックス
StackPanelの中にLabelとTextBoxを配置します。
Labelにはアクセスキーを設定することができます。
Altを押しながらアクセスキーを押すと、指定したコントロールにフォーカスが移動します。
アクセスキーを設定するには、Contentのアクセスキーにしたい文字の前にアンダースコアを追加します。
移動先のコントロールはTargetで指定します。
書式: Target="{Binding ElementName=【移動先のコントロール名】}"
<StackPanel Orientation="Horizontal">
    <Label Content="ユーザー(_U)" Target="{Binding ElementName=userName}" Width="80"/>
    <TextBox x:Name="userName" Text="たろう" Width="200" Margin="5"/>
</StackPanel>

<StackPanel Orientation="Horizontal">
    <Label Content="メモ(_M)" Target="{Binding ElementName=memo}" Width="80"/>
    <TextBox x:Name="memo" Text="ああああ" AcceptsReturn="True" AcceptsTab="True"
             TextWrapping="Wrap" VerticalScrollBarVisibility="Auto"
             Height="60" Width="200" Margin="5"/>
</StackPanel>
2つ目のTextBoxは、複数行入力させるためのプロパティを指定しています。
■ Labelコントロールでよく使いそうなプロパティ
| プロパティ | カテゴリ | 備考 |
|---|---|---|
| Content | 共通 | ラベルに表示する内容 |
| Target | その他の設定 | アクセスキー押下時にフォーカスを受け取るコントロール |
■ TextBoxコントロールでよく使いそうなプロパティ
| プロパティ | カテゴリ | 備考 |
|---|---|---|
| HorizontalScrollBarVisibility | レイアウト | 横スクロールバー |
| VerticalScrollBarVisibility | レイアウト | 縦スクロールバー |
| AcceptsReturn | テキスト | Enterキーで改行するかどうか |
| AcceptsTab | テキスト | Tabキーでタブ文字を入力するかどうか |
| MaxLength | テキスト | 入力可能な最大文字数 |
| TextWrapping | テキスト | テキスト折り返し設定 |
| Text | 共通 | テキストの内容 |
◇高機能ラベル, ON/OFF
続いて★の部分に以下を入力します。
            :
            :
        </StackPanel>
        ★
    </StackPanel>
</Window>
<TextBlock Text="いいいいいいいい"/>
<TextBlock Text="太字 太字 太字" FontWeight="Bold" FontSize="16"/>
<TextBlock>ううううう</TextBlock>
<TextBlock Foreground="Blue">
    えええええええ<LineBreak/>
    おおおおおおおお
</TextBlock>
<TextBlock Text="かきくけこさしすせそ" TextWrapping="Wrap" Width="40"/>
<TextBlock>
    ABCD
    <Underline>EFGH</Underline>
    <Bold>IJKL</Bold>
    <Run Foreground="Green" FontWeight="Bold" FontSize="18">MNOP</Run>
    <Run Background="Pink" FontFamily="Meiryo">QRSTたちつてと</Run>
</TextBlock>

<StackPanel Orientation="Horizontal">
    <CheckBox Content="CheckBox" Margin="5"/>
    <CheckBox Content="CheckBox" IsChecked="True" Margin="5"/>
    <ToggleButton Content="トグルボタン" Margin="5"/>
    <ToggleButton Content="トグルボタン" IsChecked="True" Margin="5"/>
</StackPanel>

<Button x:Name="button" Content="次の画面"/>
TextBlockは文字装飾を設定できるラベルです。
太字にしたり改行したりできます。
CheckBoxとToggleButtonはON/OFFを表せるコントロールです。
ToggleButtonは標準ではツールボックスに表示されていないので、直接タグ入力してください。
■ TextBlockコントロールでよく使いそうなプロパティ
| プロパティ | カテゴリ | 備考 |
|---|---|---|
| FontWeight | テキスト | 太字 |
| TextWrapping | テキスト | 折り返し |
| Text | 共通 | テキストの内容 |
■ CheckBoxコントロールでよく使いそうなプロパティ
| プロパティ | カテゴリ | 備考 |
|---|---|---|
| Content | 共通 | チェックボックスの内容 |
| IsChecked | 共通 | 選択状態 |
■ ToggleButtonコントロールでよく使いそうなプロパティ
| プロパティ | カテゴリ | 備考 |
|---|---|---|
| Content | 共通 | トグルボタンの内容 |
| IsChecked | 共通 | 選択状態 |
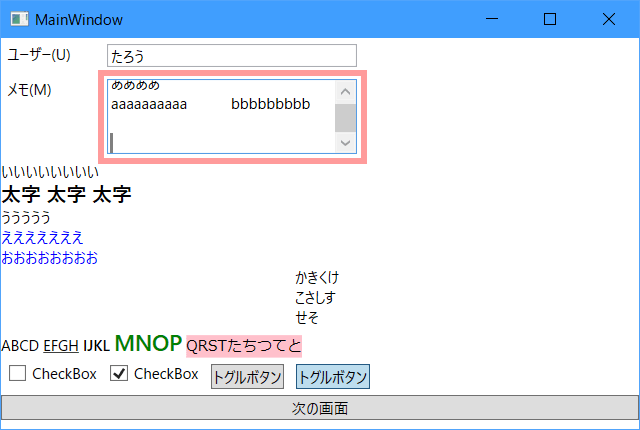
Alt + U, Alt + Mでそれぞれユーザーテキストボックス、メモテキストボックスにフォーカスが移動すること、メモテキストボックスの内容にタブ文字や改行を入力できることを確認してください。
画面を閉じて、プロジェクトに新しい項目「ウィンドウ(WPF)」を追加してください。
名前はWindow1.xamlにします。
「次の画面」ボタンのクリック処理を作ります。
<Button x:Name="button" Content="次の画面" Click="button_Click"/>
private void button_Click(object sender, RoutedEventArgs e)
{
    new Window1().ShowDialog();
}
◇ラジオボタン, コンボボックス, リストボックス
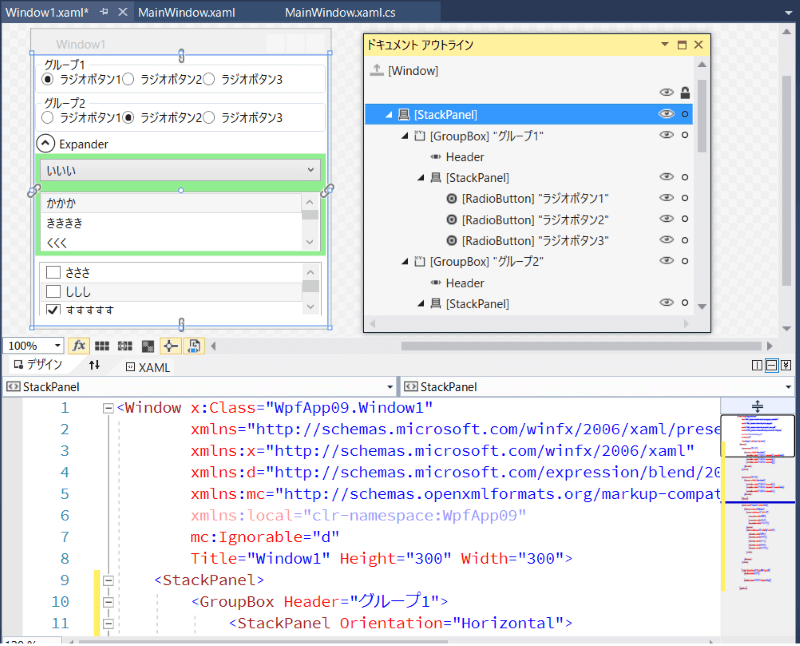
Window1の画面を作ります。
RadioButtonは、同じGroupNameの中で1つだけ選択状態にできるコントロールです。
Expanderは、その中にあるコントロールを畳んで隠したり、展開したりできます。
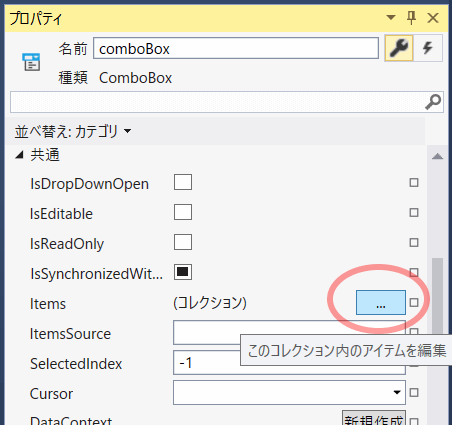
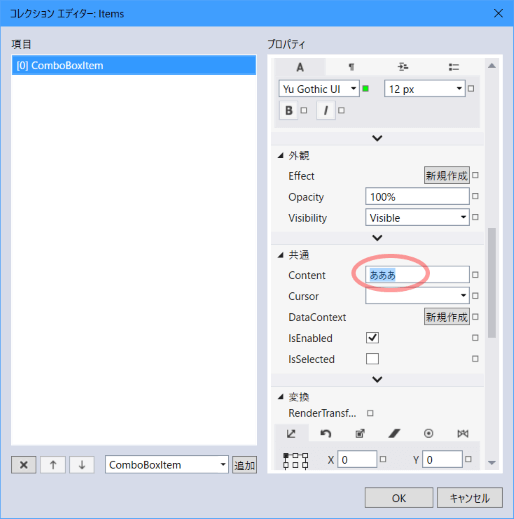
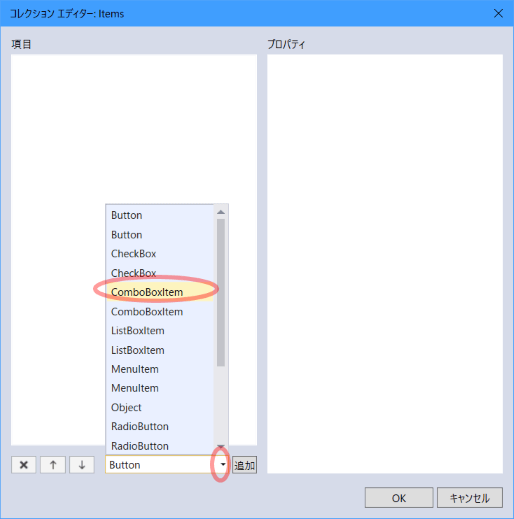
ComboBoxやListBoxの選択肢はItemsプロパティのコレクションエディターから追加することができます。
コレクションエディターで追加するアイテムを選択し、「追加」ボタンを押します。
<Window x:Class="WpfApp09.Window1"
        xmlns="http://schemas.microsoft.com/winfx/2006/xaml/presentation"
        xmlns:x="http://schemas.microsoft.com/winfx/2006/xaml"
        xmlns:d="http://schemas.microsoft.com/expression/blend/2008"
        xmlns:mc="http://schemas.openxmlformats.org/markup-compatibility/2006"
        xmlns:local="clr-namespace:WpfApp09"
        mc:Ignorable="d"
        Title="Window1" Height="300" Width="300">
    <StackPanel>
        <GroupBox Header="グループ1">
            <StackPanel Orientation="Horizontal">
                <RadioButton Content="ラジオボタン1" GroupName="A" IsChecked="True"/>
                <RadioButton Content="ラジオボタン2" GroupName="A"/>
                <RadioButton Content="ラジオボタン3" GroupName="A"/>
            </StackPanel>
        </GroupBox>

        <GroupBox Header="グループ2">
            <StackPanel Orientation="Horizontal">
                <RadioButton Content="ラジオボタン1" GroupName="B"/>
                <RadioButton Content="ラジオボタン2" GroupName="B" IsChecked="True"/>
                <RadioButton Content="ラジオボタン3" GroupName="B"/>
            </StackPanel>
        </GroupBox>

        <Expander Header="Expander" IsExpanded="True">
            <StackPanel Background="LightGreen">
                <ComboBox SelectedIndex="1" Margin="5">
                    <ComboBoxItem Content="あああ"/>
                    <ComboBoxItem Content="いいい"/>
                    <ComboBoxItem Content="うううううう"/>
                </ComboBox>
                <ListBox SelectedIndex="0" Height="60" Margin="5">
                    <ListBoxItem Content="かかか"/>
                    <ListBoxItem Content="きききき"/>
                    <ListBoxItem Content="くくく"/>
                    <ListBoxItem Content="けけけ"/>
                    <ListBoxItem Content="こここここ"/>
                </ListBox>

            </StackPanel>
        </Expander>

        <!-- CheckedListBox -->
        <ListBox SelectedIndex="1" Height="55" Margin="5">
            <CheckBox Content="さささ"/>
            <CheckBox Content="ししし"/>
            <CheckBox Content="すすすすす" IsChecked="True"/>
        </ListBox>
    </StackPanel>
</Window>
■ RadioButtonコントロールでよく使いそうなプロパティ
| プロパティ | カテゴリ | 備考 |
|---|---|---|
| Content | 共通 | ラジオボタンの内容 |
| GroupName | 共通 | グループ名 |
| IsChecked | 共通 | 選択状態 |
■ ComboBoxコントロールでよく使いそうなプロパティ
| プロパティ | カテゴリ | 備考 |
|---|---|---|
| IsEditable | 共通 | 編集可能かどうか |
| Items | 共通 | 選択肢 |
| SelectedIndex | 共通 | 選択項目のインデックス。0が先頭。 |
■ ListBoxコントロールでよく使いそうなプロパティ
| プロパティ | カテゴリ | 備考 |
|---|---|---|
| Items | 共通 | 選択肢 |
| SelectedIndex | 共通 | 選択項目のインデックス。0が先頭。 |
| SelectionMode | その他の指定 | 単一選択や複数選択の設定 |
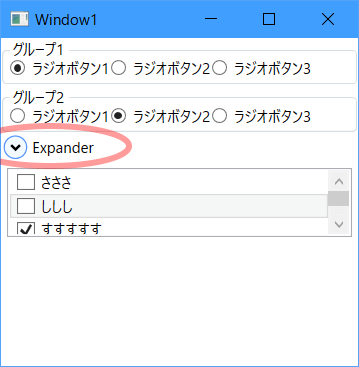
実行してみます。
MainWindowの「次の画面」ボタンを押してWindow1を表示します。
Expanderをクリックして中身を閉じることができます。
おしまい
■参考サイト
- Label クラス - MSDN
- TextBox クラス - MSDN
- TextBlock クラス - MSDN
- CheckBox クラス - MSDN
- ToggleButton クラス - MSDN
- GroupBox クラス - MSDN
- RadioButton クラス - MSDN
- Expander クラス - MSDN
- ComboBox クラス - MSDN
- ListBox クラス - MSDN
