CloudFormationについて知識ゼロ状態から、APIGateway+Lambda関数をデプロイするCodePipleineを組めるようになるまでの道筋を書き残します。
以下のステップで進めます。
(0) まず触ってみる : VPC作成を題材に
(1) Lambda作成
(2) IAMロール作成
(3) コードをS3に配置
(4) API Gateway作成
(5) Swaggerへ移行
(6) CICDパイプラインを作成
(7) Lambda関数のデプロイ
(8) swaggerもCICDパイプラインに乗せる。
なお開始時点の理解状況はこんな感じ
- 登場する種々のリソースはコンソールで作成/利用したことはある。
- CloudFormationが何か自体は知ってるが使ったことが無い。
- Code3兄弟は使ったことがある。
(0) まず触ってみる。
以下の記事を参考にVPCを作成してみてCloudFormationmの書き方、スタック作成/削除を学ぶ。
CFnを使ってVPCを作ってみる
● わかったこと
- template.ymlに書いた設定でリソースを作成できる。
- yamlファイルからスタックが作成され、作成するリソース郡はスタックごとに管理される。
- スタックを削除するとリソース本体も削除できる。
- スタックの作成時に設定する値はパラメータとしてymlに書いておき、CLI実行時にパラメータとして渡すことができる。
- 以下に種々のリソースを作成する時のお作法が載っている。
AWS_リソースおよびプロパティタイプのリファレンス
# 作成
$ aws cloudformation deploy --stack-name test-vpc-stack \
--template-file template.yml \
--parameter-overrides \
VpcCIDR=10.0.0.0/16

# 削除
$ aws cloudformation delete-stack --stack-name test-vpc-stack
(1) CloudFormationでLambdaを作ってみる。
arn:aws:iam::xxxxxxxxxxxx:role/fugafuga
IAM作成は今回のスコープでは無いのでLambda用のロールを事前にコンソールから作っておく。
ポリシーは空にして権限ゼロ状態。
AWSTemplateFormatVersion: "2010-09-09"
Description: >
  Lambda template.

Parameters:
  funcName:
    Type: String
    Description: >
      function name.

Resources:
  # Lambda関数作成
  Function:
    Type: AWS::Lambda::Function
    Properties:
      Code:
        ZipFile: >
          def lambda_handler(event, context):
              return {
                  'statusCode': 200,
                  'body': event
              }
      Description: >
        test cloudformation
      FunctionName: !Ref funcName   # 実行時にパラメータで指定
      Handler: index.lambda_handler
      Role: arn:aws:iam::xxxxxxxxxxxx:role/fugafuga
      Runtime: python3.8
● わかったこと
Lambdaに載せるコードを指定する方法は2通り
- インラインで記述する。
- S3においての参照させる。
インラインでコードを記述する場合
-
ZipFileとつけてからコードを書く。 - ファイル名はindexに固定されるようでHandlerに"index."を付さないといけない。
- nodeかpythonにしか対応していない。
(2) IAMロールも動的に生成してみる。
参照)
https://docs.aws.amazon.com/ja_jp/AWSCloudFormation/latest/UserGuide/aws-resource-iam-role.html
(1)で生成したLambdaを実行してもCloudWatchLogsにログを書き込む権限を持っていないのでロググループもログストリームも生成できない。
試しに実行結果からログへのリンクを踏んでも存在しないとしてエラーの文言が観察できる。
そこで、AWS管理ポリシーであるAWSLambdaBasicExecutionRoleをアタッチした関数名と同名のIAMロールを生成し、Lambda作成時にアタッチする。
AWSTemplateFormatVersion: "2010-09-09"
Description: >
  Lambda template.

Parameters:
  funcName:
    Type: String
    Description: >
      function name.

Resources:
  # IAMロール作成
  LambdaExecutionRole:
    Type: AWS::IAM::Role
    Properties:
      AssumeRolePolicyDocument:
        Version: 2012-10-17
        Statement:
          -
            Effect: "Allow"
            Principal:      # 誰に権限を与えるのか
              Service:
                - "lambda.amazonaws.com"
            Action:         # 何の権限を与えるのか
              - "sts:AssumeRole"    # Lambdaに対して一時的な権限を発行する。
      ManagedPolicyArns:
      - "arn:aws:iam::aws:policy/service-role/AWSLambdaBasicExecutionRole"
      RoleName: !Ref funcName   # 実行時に指定

  # Lambda関数作成
  Function:
    Type: AWS::Lambda::Function
    Properties:
      Code:
        ZipFile: >
          def lambda_handler(event, context):
              return {
                  'statusCode': 200,
                  'body': event
              }
      Description: >
        test cloudformation
      FunctionName: !Ref funcName   # 実行時に指定
      Handler: index.lambda_handler
      Role: !GetAtt LambdaExecutionRole.Arn   # 上で作成したLambdaExecutionRoleのARNを取得して埋め込む
      Runtime: python3.8
実行すると以下のエラーに遭遇した。
An error occurred (InsufficientCapabilitiesException) when calling the CreateChangeSet operation: Requires capabilities : [CAPABILITY_IAM]
AWS Identity and Access Management によるアクセスの制御
上記公式ドキュメントに従い、実行時にパラメータで--capabilities CAPABILITY_NAMED_IAMと指定する。
!Refの代わりに!Subを使うと文字列内に変数を埋め込むことができるらしい。
(2017年12月時点) 私的 CloudFormation ベストプラクティス
(3) コードをS3に配置する。
CloudFormationのインフラ構築用のファイルにソースコードを直書きするのはひどすぎて見てられない。コード部分を分離し、zipしてS3に配置しよう。
S3Bucketでバケット名を指定し、S3Keyでzipファイル名を指定する(拡張子まで記述)。これによりファイル名のindex固定縛りもなくなった。
https://docs.aws.amazon.com/ja_jp/AWSCloudFormation/latest/UserGuide/aws-properties-lambda-function-code.html
  # Lambda関数作成
  Function:
    Type: AWS::Lambda::Function
    Properties:
      Code:
        S3Bucket: hogehoge
        S3Key: hogehoge.zip
      FunctionName: !Ref funcName
      Handler: hogehoge.lambda_handler
      Role: !GetAtt LambdaExecutionRole.Arn
      Runtime: python3.8
(4) API Gatewayもつける。
サーバレスあるあるなAPI Gateway → Lambda構成を作ってみる。認証もかける。
コンソールからぽちぽちしていると気づかなかったが結構いろんなリソースを生成するためCloudFormationで書くとかなり行数が増える。
- POSTメソッドでRestAPIを作成
- リソースとメソッドの作成
- 使用量プランとAPIキーの生成
- Lambdaとの紐付け(権限付与)
- ステージの作成とデプロイ
参照)
Amazon API Gateway リソースタイプのリファレンス
  # API Gateway RestAPI
  ApiGatewayRestApi:
    Type: "AWS::ApiGateway::RestApi"
    Properties:
      Name: !Sub "${funcName}Api"

  # API Gateway Deployment
  ApiGatewayDeployment:
    Type: "AWS::ApiGateway::Deployment"
    DependsOn: ApiGatewayMethod
    Properties:
      RestApiId: !Ref ApiGatewayRestApi

  # API Gateway Stage
  ApiGatewayStage:
    Type: "AWS::ApiGateway::Stage"
    Properties:
      StageName: "v1"
      RestApiId: !Ref ApiGatewayRestApi
      DeploymentId: !Ref ApiGatewayDeployment

  # API Gateway Resource
  ApiGatewayResource:
    Type: "AWS::ApiGateway::Resource"
    Properties:
      RestApiId: !Ref ApiGatewayRestApi
      ParentId: !GetAtt ApiGatewayRestApi.RootResourceId
      PathPart: !Ref funcName

  # API Gateway Method
  ApiGatewayMethod:
    Type: "AWS::ApiGateway::Method"
    Properties:
      RestApiId: !Ref ApiGatewayRestApi
      ResourceId: !Ref ApiGatewayResource
      ApiKeyRequired: True
      HttpMethod: "POST"
      AuthorizationType: "NONE"
      Integration:
        Type: "AWS"
        Uri: !Sub "arn:aws:apigateway:${AWS::Region}:lambda:path/2015-03-31/functions/arn:aws:lambda:${AWS::Region}:${AWS::AccountId}:function:${funcName}/invocations"
        IntegrationHttpMethod: "POST"
        IntegrationResponses:
          - StatusCode: 200
        PassthroughBehavior: WHEN_NO_MATCH
      MethodResponses:
          - StatusCode: 200
            ResponseModels:
              application/json: Empty

  # API Key
  ApiGatewayKey:
    Type: "AWS::ApiGateway::ApiKey"
    DependsOn: ApiGatewayDeployment
    Properties:
      Name: !Sub "${funcName}ApiKey"
      Enabled: True
      StageKeys:
        - RestApiId: !Ref ApiGatewayRestApi
          StageName: !Ref ApiGatewayStage

  # API Gateway UsagePlan
  ApiGatewayUsagePlan:
    Type: "AWS::ApiGateway::UsagePlan"
    Properties:
      ApiStages:
        - ApiId: !Ref ApiGatewayRestApi
          Stage: !Ref ApiGatewayStage
      Quota:
        Limit: 100
        Period: DAY
      Throttle:
        BurstLimit: 10
        RateLimit: 2
      UsagePlanName: !Sub "${funcName}UsagePlan"

  # Connect ApiGatewayKey to UsagePlan
  UsagePlanKey:
    Type: AWS::ApiGateway::UsagePlanKey
    Properties:
      KeyId: !Ref ApiGatewayKey
      KeyType: "API_KEY"
      UsagePlanId: !Ref ApiGatewayUsagePlan

  # Lambda Permission
  LambdaPermission:
    Type: "AWS::Lambda::Permission"
    Properties:
      FunctionName: !GetAtt Function.Arn
      Action: "lambda:InvokeFunction"
      Principal: "apigateway.amazonaws.com"
検証
$ curl -X POST https://xxxxxxxxxx.execute-api.ap-northeast-1.amazonaws.com/v1/fugafuga
{"message":"Forbidden"}%
$ curl -X POST -H 'x-api-key:scXwN5ZHmT5Ucn8tqRxF83U6BeFBdVWG2VHknQDk' https://xxxxxxxxxx.execute-api.ap-northeast-1.amazonaws.com/v1/fugafuga
{"statusCode": 200, "body": {}}%
参考
API Gateway + Lambda のCloudFormationテンプレート
https://github.com/ropupu/apigateway-lambda-cloudformation/blob/master/apigateway-lambda-cf.yml
(5) API仕様をSwaggerに書き出す。
Lambda関数と同様にAPIの仕様は外出ししたい。
Swagger+APIGateway拡張形式でymlファイルにエクスポート(swagger.yml)しておきS3に置いて参照させることにする。
(ほんとはswagger.ymlも一から書けって話だが面倒なのでAPIGatewayコンソールから作ってエクスポートしいい感じに修正して使う)
● わかったこと
- swagger.ymlで作れるのはAPIリソースまでで、ステージは生成されない。cfnのテンプレートファイルで
Stageを構成する必要がある。 - 使用量プランやキーの生成には
Stageができたあとである必要があるのでDependsOn:で依存関係を指定する。 -
AWS::Serverless::ApiやAWS::Serverless::FunctionはSAMのテンプレートなのでcfnの中では使えない。 - swagger.ymlをzipにしてみたがエラーした。
Parameters:
  funcName:
    Type: String
    Default: fugafuga
  stage:
    Type: String
    Default: v1
  s3Bucket:
    Type: String
    Default: hogehoge

Resources:
  # API Gateway RestAPI
  ApiGatewayRestApi:
    Type: "AWS::ApiGateway::RestApi"
    Properties:
      Name: !Sub "${funcName}Api"
      Body:
        Fn::Transform:
          Name: AWS::Include
          Parameters:
            Location: !Sub s3://${s3Bucket}/swagger.yml

  # API Gateway Deployment
  ApiGatewayDeployment:
    Type: "AWS::ApiGateway::Deployment"
    Properties:
      RestApiId: !Ref ApiGatewayRestApi

  # API Gateway Stage
  ApiGatewayStage:
    Type: "AWS::ApiGateway::Stage"
    Properties:
      StageName: !Ref stage
      RestApiId: !Ref ApiGatewayRestApi
      DeploymentId: !Ref ApiGatewayDeployment

  # API Gateway Key
  ApiGatewayKey:
    Type: "AWS::ApiGateway::ApiKey"
    DependsOn: ApiGatewayStage
    Properties:
      Name: !Sub "${funcName}ApiKey"
      Enabled: True
      StageKeys:
        - RestApiId: !Ref ApiGatewayRestApi
          StageName: !Ref stage

  # API Gateway UsagePlan
  ApiGatewayUsagePlan:
    Type: "AWS::ApiGateway::UsagePlan"
    DependsOn: ApiGatewayStage
    Properties:
      ApiStages:
        - ApiId: !Ref ApiGatewayRestApi
          Stage: !Ref stage
      Quota:
        Limit: 100
        Period: DAY
      Throttle:
        BurstLimit: 10
        RateLimit: 2
      UsagePlanName: !Sub "${funcName}UsagePlan"

  # Connect ApiGatewayKey to UsagePlan
  UsagePlanKey:
    Type: AWS::ApiGateway::UsagePlanKey
    DependsOn: ApiGatewayStage
    Properties:
      KeyId: !Ref ApiGatewayKey
      KeyType: "API_KEY"
      UsagePlanId: !Ref ApiGatewayUsagePlan
---
swagger: "2.0"
info:
  version: "1.0.0"
  title:
    Fn::Sub: "${funcName}Api"
host: "ilgcfj40u7.execute-api.ap-northeast-1.amazonaws.com"
basePath:
  Fn::Sub: "/${stage}"
schemes:
- "https"
paths:
  /fugafuga:
    post:
      produces:
      - "application/json"
      responses:
        200:
          description: "200 response"
          schema:
            $ref: "#/definitions/Empty"
      security:
      - api_key: []
      x-amazon-apigateway-integration:
        uri:
          Fn::Sub: "arn:aws:apigateway:${AWS::Region}:lambda:path/2015-03-31/functions/arn:aws:lambda:${AWS::Region}:${AWS::AccountId}:function:${funcName}/invocations"
        responses:
          default:
            statusCode: "200"
        passthroughBehavior: "when_no_match"
        httpMethod: "POST"
        type: "aws"
securityDefinitions:
  api_key:
    type: "apiKey"
    name: "x-api-key"
    in: "header"
definitions:
  Empty:
    type: "object"
    title: "Empty Schema"
参考
CloudFromationのAWS::Includeを利用してAWS SAMからインラインSwaggerを分離して管理する
CloudFormationでサイズの大きいSwaggerファイルを参照させる方法
(6) CI/CDを見据える。
参照)
CodeBuild リソースタイプのリファレンス
CodePipeline リソースタイプのリファレンス
現状だと手動でS3にファイルを置いてあげてから手動でデプロイコマンドを実行しないといけない。
CodeCommitへのGit Pushをトリガーにしてデプロイするように試みる(今回はCodeCommitリポジトリは事前にコンソールから用意した)。
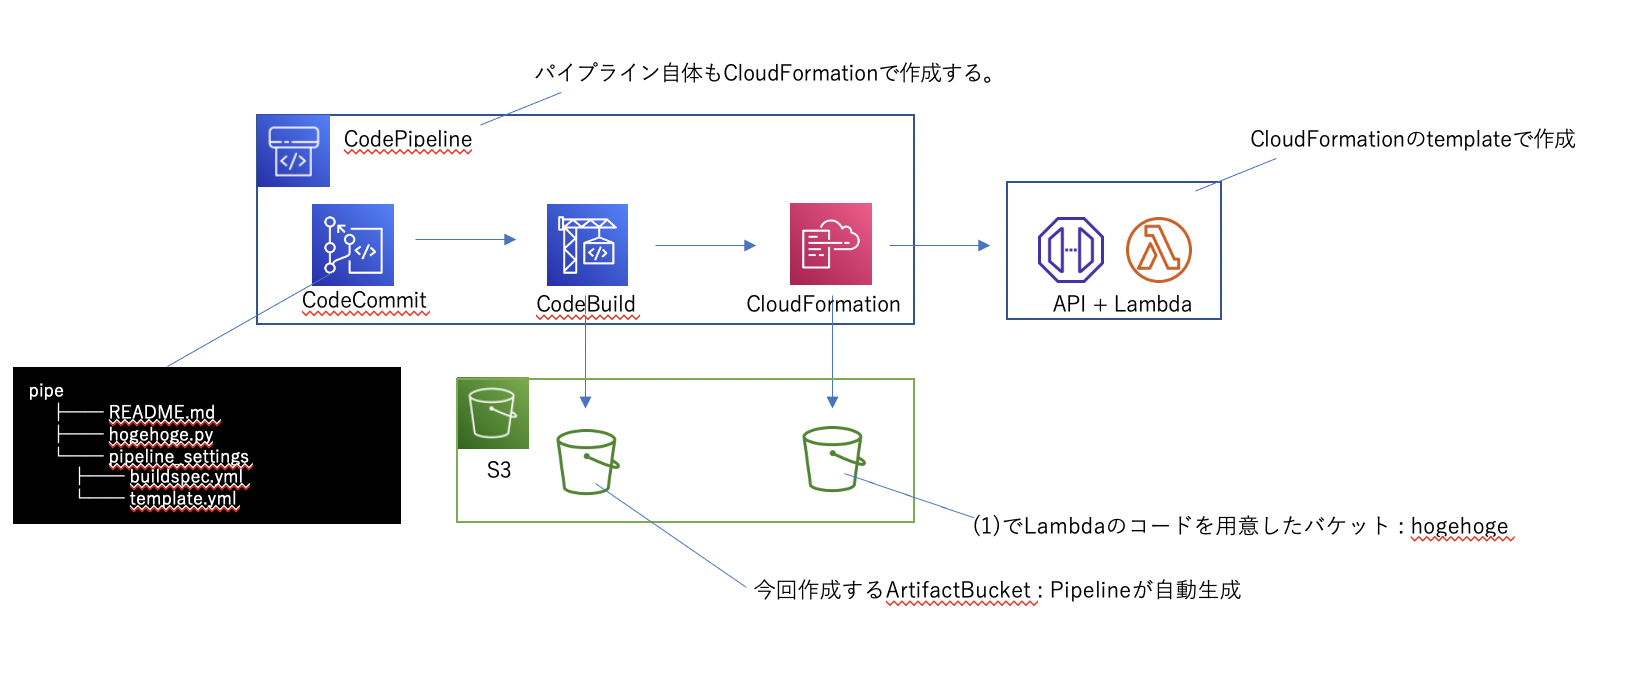
$ tree .
pipe
    ├── README.md     # 使用せず
    ├── hogehoge.py   # 使用せず (※)
    └── pipeline_settings
        ├── buildspec.yml
        └── template.yml
※ (1)~(5)で作成したtemplate.ymlでは独自に用意したS3バケットのhogehoge.zipを参照しているので現状では参照されていない。(7)で参照できるようにする。
まずはCodePipelineを通してデプロイできるようにCloudFormationでパイプラインを作成する。(参考記事のほぼコピペ)
ローカルの任意の場所に次のymlファイルを置いてパイプラインを作成する。
AWSTemplateFormatVersion: "2010-09-09"

Resources:
  ArtifactBucket:
    Type: AWS::S3::Bucket

  BuildProject:
    Type: AWS::CodeBuild::Project
    Properties:
      Name: 'testbuild'
      ServiceRole: !GetAtt CodeBuildRole.Arn
      Artifacts:
        Type: CODEPIPELINE
      Environment:
        Type: LINUX_CONTAINER
        ComputeType: BUILD_GENERAL1_SMALL
        Image: aws/codebuild/ubuntu-base:14.04
        EnvironmentVariables:                       # buildspec.yml内で使用する環境変数。
          - Name: PACKAGED_TEMPLATE_FILE_PATH
            Value: 'packaged.yml'
          - Name: S3_BUCKET
            Value: !Ref ArtifactBucket
      Source:
        Type: CODEPIPELINE
        BuildSpec: pipeline_settings/buildspec.yml  # ルート直下にbuildspecがあるなら指定不要。

  # デプロイ時のロール。面倒なので全てAdmin権限を与えておく。
  PipelineDeployRole:
    Type: AWS::IAM::Role
    Properties:
      AssumeRolePolicyDocument:
        Version: '2012-10-17'
        Statement:
          - Effect: 'Allow'
            Principal:
              Service:
                - 'cloudformation.amazonaws.com'
            Action:
              - 'sts:AssumeRole'
      ManagedPolicyArns:
      - 'arn:aws:iam::aws:policy/AdministratorAccess'
      RoleName: 'cfnrole'

  # パイプラインのロール。面倒なので全てAdmin権限を与えておく。
  PipelineRole:
    Type: AWS::IAM::Role
    Properties:
      AssumeRolePolicyDocument:
        Version: '2012-10-17'
        Statement:
          - Effect: 'Allow'
            Principal:
              Service:
                - 'codepipeline.amazonaws.com'
            Action:
              - 'sts:AssumeRole'
      ManagedPolicyArns:
      - 'arn:aws:iam::aws:policy/AdministratorAccess'
      RoleName: 'pipelinerole'

  # ビルド時のロール。面倒なので全てAdmin権限を与えておく。
  CodeBuildRole:
    Type: AWS::IAM::Role
    Properties:
      AssumeRolePolicyDocument:
        Version: '2012-10-17'
        Statement:
          - Effect: 'Allow'
            Principal:
              Service:
                - 'codebuild.amazonaws.com'
            Action:
              - 'sts:AssumeRole'
      ManagedPolicyArns:
      - 'arn:aws:iam::aws:policy/AdministratorAccess'
      RoleName: 'buildrole'

  Pipeline:
    Type: AWS::CodePipeline::Pipeline
    Properties:
      Name: 'testpipe'
      RoleArn: !GetAtt PipelineRole.Arn
      ArtifactStore:
        Type: S3
        Location: !Ref ArtifactBucket
      Stages:
        - Name: Source
          Actions:
            - Name: DownloadSource
              ActionTypeId:
                Category: Source
                Owner: AWS
                Version: 1
                Provider: CodeCommit
              Configuration:
                RepositoryName: 'pipe'
                BranchName: 'master'
              OutputArtifacts:
                - Name: SourceOutput
        - Name: Build
          Actions:
            - InputArtifacts:
                - Name: SourceOutput
              Name: Package
              ActionTypeId:
                Category: Build
                Provider: CodeBuild
                Owner: AWS
                Version: 1
              OutputArtifacts:
                - Name: BuildOutput
              Configuration:
                ProjectName: !Ref BuildProject
        - Name: Deploy
          Actions:
            - Name: CreateChangeSet
              ActionTypeId:
                Category: Deploy
                Owner: AWS
                Provider: CloudFormation
                Version: '1'
              InputArtifacts:
                - Name: BuildOutput
              Configuration:
                ActionMode: CHANGE_SET_REPLACE
                RoleArn: !GetAtt PipelineDeployRole.Arn
                StackName: 'test-pipeline-stack'
                ChangeSetName: 'test-pipeline-stack-changeset'
                Capabilities: CAPABILITY_NAMED_IAM
                TemplatePath: 'BuildOutput::packaged.yml'
              RunOrder: '1'
            - Name: ExecuteChangeSet
              ActionTypeId:
                Category: Deploy
                Owner: AWS
                Provider: CloudFormation
                Version: '1'
              InputArtifacts:
                - Name: BuildOutput
              Configuration:
                ActionMode: CHANGE_SET_EXECUTE
                ChangeSetName: 'test-pipeline-stack-changeset'
                StackName: 'test-pipeline-stack'
              RunOrder: '2'
version: 0.2

phases:
  build:
    commands:
      - |
        aws cloudformation package \
          --template-file pipeline_settings/template.yml \
          --s3-bucket $S3_BUCKET \
          --output-template-file $PACKAGED_TEMPLATE_FILE_PATH

artifacts:
  files:
    - $PACKAGED_TEMPLATE_FILE_PATH
    - pipeline_settings/*
    - hogehoge.py
  discard-paths: yes
$ aws cloudformation deploy --stack-name test-pipedeploy-stack \
--template-file pipeline.yml \
--capabilities CAPABILITY_NAMED_IAM

Waiting for changeset to be created..
Waiting for stack create/update to complete
Successfully created/updated stack - test-pipedeploy-stack
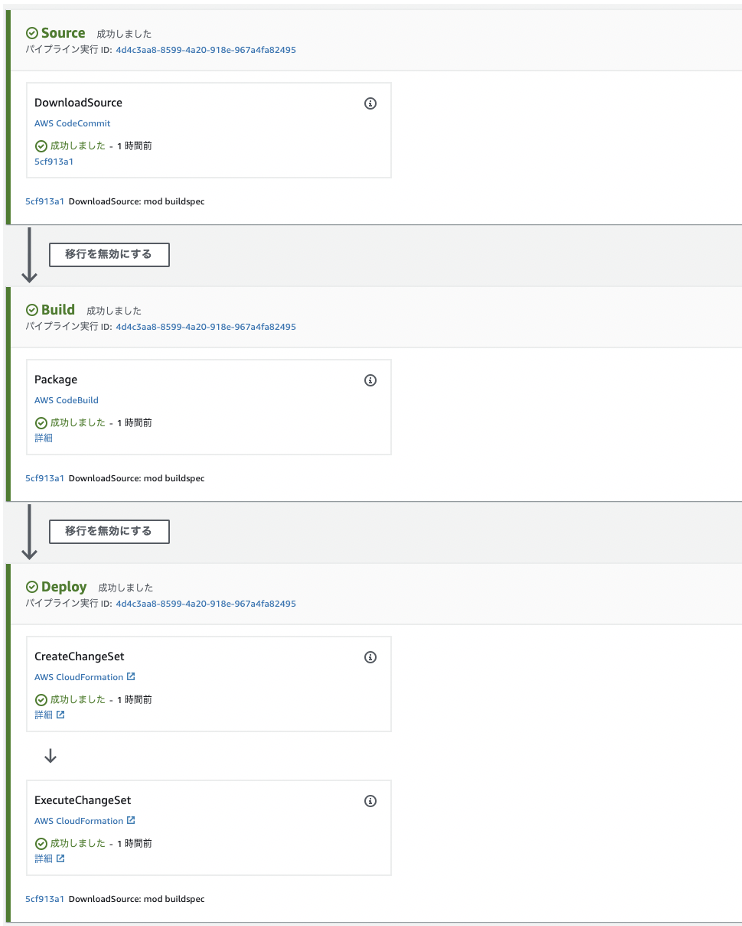
● わかったこと
- CodePipelineのデプロイフェーズにCloudFormationを利用できる。
- CreateChangeSetで以前のスタックとの差分を確認(新規スタックの場合は作成)し、ExecuteChangeSetでデプロイを実行する。
- pipelineのStackを先に削除するとデプロイしたStackを削除するロールが削除されるの削除の順に注意する必要あり。
https://aws.amazon.com/jp/premiumsupport/knowledge-center/cloudformation-role-arn-error/
role/{role-name} is invalid or cannot be assumed
- pipelineを作成するorリポジトリにPushすると自動でパイプラインが回りだす。(ややラグがある)
- CodePipelineによりデプロイされたStackを削除する時、中身が空でないS3バケットがあると削除に失敗するので削除してから実行する。
参考
CloudFormationでLambdaの自動デプロイ環境を構築する
https://qiita.com/is_ryo/items/0382d183f514e0d06f4d
(7) LambdaのコードをCICDパイプラインに乗せる。

詰まったのはLambdaのコードをどこから取ってくるかの指定方法。(6)ではS3のバケットを別で指定しているがCodeCommitのリポジトリにあるコードを参照してデプロイして欲しい。
CodeBuildの成果物(アーティファクト)はPipelineの中で自動生成したS3バケットに格納しているため、Pipelineの中で動的に取得する必要がある。
パラメータオーバーライドを使用することで実現できる。
参考
- [aws-codepipeline] Parameter overrides cannot use Fn::GetArtifactAtt #1588
- CodePipeline パイプラインでのパラメーターオーバーライド関数の使用
- CloudFormationでCodeBuildの出力アーティファクトを使用するにはどうすればよいですか?
- CodePipeLineを使ってLambdaへの自動デプロイ
pipeline.ymlのデプロイステージにパラメータオーバーライドを指定する。
        - Name: Deploy
          Actions:
            - Name: CreateChangeSet
              ActionTypeId:
                Category: Deploy
                Owner: AWS
                Provider: CloudFormation
                Version: '1'
              InputArtifacts:
                - Name: BuildOutput
              Configuration:
                ActionMode: CHANGE_SET_REPLACE
                RoleArn: !GetAtt PipelineDeployRole.Arn
                StackName: 'test-pipeline-stack'
                ChangeSetName: 'test-pipeline-stack-changeset'
                Capabilities: CAPABILITY_NAMED_IAM
                TemplatePath: 'BuildOutput::packaged.yml'
                ParameterOverrides: |
                  {
                    "s3Bucket": { "Fn::GetArtifactAtt" : [ "BuildOutput", "BucketName" ] },
                    "s3Key": { "Fn::GetArtifactAtt" : [ "BuildOutput", "ObjectKey" ] }
                  }
              RunOrder: '1'
Lambdaの設定の方も一部書き換わる。
# パラメータにs3Bucketとs3keyを受け取る口を用意。
Parameters:
  funcName:
    Type: String
    Default: fugafuga
  stage:
    Type: String
    Default: v1
  s3Bucket:
    Type: String
  s3Key:
    Type: String

# swagger.ymlもs3Bucketを参照してしまうので一旦はs3バケットのアドレス直書きに修正しておく
Resources:
  # API Gateway RestAPI
  ApiGatewayRestApi:
    Type: "AWS::ApiGateway::RestApi"
    Properties:
      Name: !Sub "${funcName}Api"
      Body:
        Fn::Transform:
          Name: AWS::Include
          Parameters:
            Location: !Sub s3://hogehoge/swagger.yml

  # コードの参照先を変更。
  Function:
    Type: "AWS::Lambda::Function"
    Properties:
      Code:
        S3Bucket: !Ref s3Bucket
        S3Key: !Ref s3Key
      FunctionName: !Ref funcName
      Handler: "hogehoge.lambda_handler"
      Role: !GetAtt LambdaExecutionRole.Arn
      Runtime: "python3.8"
上記で指定するとスタックの更新時にパラメータとして設定することができる。
コンソールで確認すると以下に反映されている。
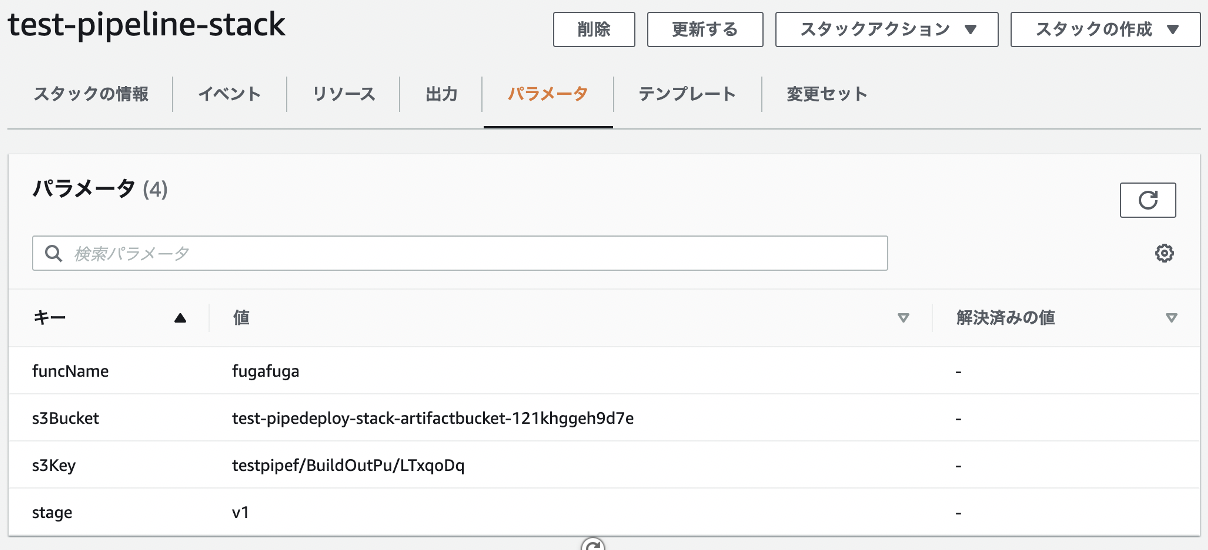
● わかったこと
- ObjectKeyに指定される値はzipファイルになるので中の1ファイルのみを指定してLambdaに乗せるとかはできなそう。
eg.) 以下はむり。
  Function:
    Type: "AWS::Lambda::Function"
    Properties:
      Code:
        S3Bucket: !Ref s3Bucket
        S3Key: !Sub "${s3Key}/hogehoge.py"    # これはムリ
      FunctionName: !Ref funcName
      Handler: "hogehoge.lambda_handler"
      Role: !GetAtt LambdaExecutionRole.Arn
      Runtime: "python3.8"
-
API Gatewayの方もS3を参照しているがこちらはCodeCommitからswagger.ymlを取ってくることも難しそう。出力アーティファクトはzipで固められてしまうのでswagger.ymlをtemplate.ymlにインラインで展開できない。
なお、単に以下のようにS3の参照先をコメントアウトするとpipeline_settings以下のファイルがLambda内に含まれていた。
pipelineのInputArtifactsで指定したBuildOutputの中が組み込まれるということなのだろうか?(調査していないため詳細不明)
  Function:
    Type: "AWS::Lambda::Function"
    Properties:
      # Code:
      #   S3Bucket: !Ref s3Bucket
      #   S3Key: "hogehoge.zip"
      FunctionName: !Ref funcName
      Handler: !Ref handler
      Role: !GetAtt LambdaExecutionRole.Arn
      Runtime: "python3.8"
(8) swaggerもCICDパイプラインに乗せる。
(7)ではswaggerのみ別バケットに配置していたが、これもパイプラインに載せたい。
ただ、普通に載せるとCodeBuildでzipされてしまうため、CloudFormationステージでswaggerをtemplate.ymlにインラインで展開できない。
そこでCodeBuildのセカンダリアーティファクトを利用し、swaggerの出力のみ別で定義する。
  BuildProject:
    Type: AWS::CodeBuild::Project
    Properties:
      Name: 'testbuild'
      ServiceRole: !GetAtt CodeBuildRole.Arn
      Artifacts:
        Type: CODEPIPELINE
      SecondaryArtifacts:
        - Type: S3
          Location: !Ref ArtifactBucket             # 出力先のバケットはLambdaコードなどと同じにする。
          ArtifactIdentifier: artifactswagger       # buildspecに詳細を書く。
          Name: swaggerfiles                        # 出力先のバケットのどのディレクトリに置くか
      Environment:
        Type: LINUX_CONTAINER
        ComputeType: BUILD_GENERAL1_SMALL
        Image: aws/codebuild/ubuntu-base:14.04
        EnvironmentVariables:                       # buildspec.yml内で使用する環境変数。
          - Name: PACKAGED_TEMPLATE_FILE_PATH
            Value: 'packaged.yml'
          - Name: S3_BUCKET
            Value: !Ref ArtifactBucket
      Source:
        Type: CODEPIPELINE
        BuildSpec: pipeline_settings/buildspec.yml  # ルート直下にbuildspecがあるなら指定不要。
これに伴いBuildspecも編集する。
artifacts:
  files:
    - $PACKAGED_TEMPLATE_FILE_PATH
    - pipeline_settings/*
    - lambda_function.py
  secondary-artifacts:
    artifactswagger:
      files:
        - swagger.yml
      name: swaggerfiles
      discard-paths: yes
  discard-paths: yes
ここまでで同じ出力先バケットにswagger.ymlを展開できているので最後にtemplate.ymlのAPI定義を更新する。
  # API Gateway RestAPI
  ApiGatewayRestApi:
    Type: "AWS::ApiGateway::RestApi"
    Properties:
      Name: !Ref apiName
      Body:
        Fn::Transform:
          Name: AWS::Include
          Parameters:
            Location: !Sub s3://${s3Bucket}/swaggerfiles/swagger.yml
      # BodyS3Location:                 # インライン展開しない場合はこれ。この場合swaggerの中に動的な変数は使えない。
      #   Bucket: !Ref s3Bucket
      #   Key: swaggerfiles/swagger.yml
まとめ
$ tree -a -L 2
.
├── pipe        # CodeCommitリポジトリ
│   ├── .git
│   ├── lambda_function.py
│   ├── pipeline_settings
│   │   ├── buildspec.yml
│   │   └── template.yml
│   └── swagger.yml
└── pipeline.yml
最終時点での各ファイルは以下。
一部関数名とか変更した。
最終版の各ymlファイルはここ
# パイプラインの構築
AWSTemplateFormatVersion: "2010-09-09"

Resources:
  ArtifactBucket:
    Type: AWS::S3::Bucket

  BuildProject:
    Type: AWS::CodeBuild::Project
    Properties:
      Name: 'testbuild'
      ServiceRole: !GetAtt CodeBuildRole.Arn
      Artifacts:
        Type: CODEPIPELINE
      SecondaryArtifacts:
        - Type: S3
          Location: !Ref ArtifactBucket
          ArtifactIdentifier: artifactswagger
          Name: swaggerfiles
      Environment:
        Type: LINUX_CONTAINER
        ComputeType: BUILD_GENERAL1_SMALL
        Image: aws/codebuild/ubuntu-base:14.04
        EnvironmentVariables:                       # buildspec.yml内で使用する環境変数。
          - Name: PACKAGED_TEMPLATE_FILE_PATH
            Value: 'packaged.yml'
          - Name: S3_BUCKET
            Value: !Ref ArtifactBucket
      Source:
        Type: CODEPIPELINE
        BuildSpec: pipeline_settings/buildspec.yml  # ルート直下にbuildspecがあるなら指定不要。

  # デプロイ時のロール。面倒なので全てAdmin権限を与えておく。
  PipelineDeployRole:
    Type: AWS::IAM::Role
    Properties:
      AssumeRolePolicyDocument:
        Version: '2012-10-17'
        Statement:
          - Effect: 'Allow'
            Principal:
              Service:
                - 'cloudformation.amazonaws.com'
            Action:
              - 'sts:AssumeRole'
      ManagedPolicyArns:
      - 'arn:aws:iam::aws:policy/AdministratorAccess'
      RoleName: 'cfnrole'

  # パイプラインのロール。面倒なので全てAdmin権限を与えておく。
  PipelineRole:
    Type: AWS::IAM::Role
    Properties:
      AssumeRolePolicyDocument:
        Version: '2012-10-17'
        Statement:
          - Effect: 'Allow'
            Principal:
              Service:
                - 'codepipeline.amazonaws.com'
            Action:
              - 'sts:AssumeRole'
      ManagedPolicyArns:
      - 'arn:aws:iam::aws:policy/AdministratorAccess'
      RoleName: 'pipelinerole'

  # ビルド時のロール。面倒なので全てAdmin権限を与えておく。
  CodeBuildRole:
    Type: AWS::IAM::Role
    Properties:
      AssumeRolePolicyDocument:
        Version: '2012-10-17'
        Statement:
          - Effect: 'Allow'
            Principal:
              Service:
                - 'codebuild.amazonaws.com'
            Action:
              - 'sts:AssumeRole'
      ManagedPolicyArns:
      - 'arn:aws:iam::aws:policy/AdministratorAccess'
      RoleName: 'buildrole'

  Pipeline:
    Type: AWS::CodePipeline::Pipeline
    Properties:
      Name: 'testpipe'
      RoleArn: !GetAtt PipelineRole.Arn
      ArtifactStore:
        Type: S3
        Location: !Ref ArtifactBucket
      Stages:
        - Name: Source
          Actions:
            - Name: DownloadSource
              ActionTypeId:
                Category: Source
                Owner: AWS
                Version: 1
                Provider: CodeCommit
              Configuration:
                RepositoryName: 'pipe'      # CodeCommitリポジトリ名
                BranchName: 'master'
              OutputArtifacts:
                - Name: SourceOutput
        - Name: Build
          Actions:
            - InputArtifacts:
                - Name: SourceOutput
              Name: Package
              ActionTypeId:
                Category: Build
                Provider: CodeBuild
                Owner: AWS
                Version: 1
              OutputArtifacts:
                - Name: BuildOutput
              Configuration:
                ProjectName: !Ref BuildProject
        - Name: Deploy
          Actions:
            - Name: CreateChangeSet
              ActionTypeId:
                Category: Deploy
                Owner: AWS
                Provider: CloudFormation
                Version: '1'
              InputArtifacts:
                - Name: BuildOutput
              Configuration:
                ActionMode: CHANGE_SET_REPLACE
                RoleArn: !GetAtt PipelineDeployRole.Arn
                StackName: 'test-pipeline-stack'
                ChangeSetName: 'test-pipeline-stack-changeset'
                Capabilities: CAPABILITY_NAMED_IAM
                TemplatePath: 'BuildOutput::packaged.yml'
                ParameterOverrides: |
                  {
                    "s3Bucket": { "Fn::GetArtifactAtt" : [ "BuildOutput", "BucketName" ] },
                    "s3Key": { "Fn::GetArtifactAtt" : [ "BuildOutput", "ObjectKey" ] }
                  }
              RunOrder: '1'
            - Name: ExecuteChangeSet
              ActionTypeId:
                Category: Deploy
                Owner: AWS
                Provider: CloudFormation
                Version: '1'
              InputArtifacts:
                - Name: BuildOutput
              Configuration:
                ActionMode: CHANGE_SET_EXECUTE
                ChangeSetName: 'test-pipeline-stack-changeset'
                StackName: 'test-pipeline-stack'
              RunOrder: '2'
version: 0.2

phases:
  build:
    commands:
      - |
        aws cloudformation package \
          --template-file pipeline_settings/template.yml \
          --s3-bucket $S3_BUCKET \
          --output-template-file $PACKAGED_TEMPLATE_FILE_PATH

artifacts:
  files:
    - $PACKAGED_TEMPLATE_FILE_PATH
    - pipeline_settings/*
    - lambda_function.py
  secondary-artifacts:
    artifactswagger:
      files:
        - swagger.yml
      name: swaggerfiles
      discard-paths: yes
  discard-paths: yes
AWSTemplateFormatVersion: "2010-09-09"
Description: >
  Lambda template.

# パラメータにs3Bucketとs3keyを受け取る口を用意。
Parameters:
  funcName:
    Type: String
    Default: testpipelinefunc
  apiName:
    Type: String
    Default: testpipelineapi
  stage:
    Type: String
    Default: v1
  s3Bucket:
    Type: String
  s3Key:
    Type: String

Resources:
  # IAMロール作成
  LambdaExecutionRole:
    Type: AWS::IAM::Role
    Properties:
      AssumeRolePolicyDocument:
        Version: 2012-10-17
        Statement:
          -
            Effect: "Allow"
            Principal:      # 誰に権限を与えるのか
              Service:
                - "lambda.amazonaws.com"
            Action:         # 何の権限を与えるのか
              - "sts:AssumeRole"    # Lambdaに対して一時的な権限を発行する。
      ManagedPolicyArns:
      - "arn:aws:iam::aws:policy/service-role/AWSLambdaBasicExecutionRole"
      RoleName: !Ref funcName   # 実行時に指定

  # API Gateway RestAPI
  ApiGatewayRestApi:
    Type: "AWS::ApiGateway::RestApi"
    Properties:
      Name: !Ref apiName
      Body:
        Fn::Transform:
          Name: AWS::Include
          Parameters:
            Location: !Sub s3://${s3Bucket}/swaggerfiles/swagger.yml
      # BodyS3Location:
      #   Bucket: !Ref s3Bucket
      #   Key: swaggerfiles/swagger.yml

  # API Gateway Deployment
  ApiGatewayDeployment:
    Type: "AWS::ApiGateway::Deployment"
    Properties:
      RestApiId: !Ref ApiGatewayRestApi

  # API Gateway Stage
  ApiGatewayStage:
    Type: "AWS::ApiGateway::Stage"
    Properties:
      StageName: !Ref stage
      RestApiId: !Ref ApiGatewayRestApi
      DeploymentId: !Ref ApiGatewayDeployment

  # API Gateway Key
  ApiGatewayKey:
    Type: "AWS::ApiGateway::ApiKey"
    DependsOn: ApiGatewayStage
    Properties:
      Name: !Ref apiName
      Enabled: True
      StageKeys:
        - RestApiId: !Ref ApiGatewayRestApi
          StageName: !Ref stage

  # API Gateway UsagePlan
  ApiGatewayUsagePlan:
    Type: "AWS::ApiGateway::UsagePlan"
    DependsOn: ApiGatewayStage
    Properties:
      ApiStages:
        - ApiId: !Ref ApiGatewayRestApi
          Stage: !Ref stage
      Quota:
        Limit: 100
        Period: DAY
      Throttle:
        BurstLimit: 10
        RateLimit: 2
      UsagePlanName: !Sub "${apiName}UsagePlan"

  # Connect ApiGatewayKey to UsagePlan
  UsagePlanKey:
    Type: AWS::ApiGateway::UsagePlanKey
    DependsOn: ApiGatewayStage
    Properties:
      KeyId: !Ref ApiGatewayKey
      KeyType: "API_KEY"
      UsagePlanId: !Ref ApiGatewayUsagePlan

  # Lambda Permission
  LambdaPermission:
    Type: "AWS::Lambda::Permission"
    Properties:
      FunctionName: !GetAtt Function.Arn
      Action: "lambda:InvokeFunction"
      Principal: "apigateway.amazonaws.com"

  # Lambda関数作成
  Function:
    Type: "AWS::Lambda::Function"
    Properties:
      Code:
        S3Bucket: !Ref s3Bucket
        S3Key: !Ref s3Key
      FunctionName: !Ref funcName
      Handler: "lambda_function.lambda_handler"
      Role: !GetAtt LambdaExecutionRole.Arn
      Runtime: "python3.8"
---
swagger: "2.0"
info:
  version: "1.0.0"
  title:
    Fn::Sub: "${apiName}"
basePath:
  Fn::Sub: "/${stage}"
schemes:
- "https"
paths:
  /aaa:     # パス名
    post:
      produces:
      - "application/json"
      responses:
        "200":
          description: "200 response"
          schema:
            $ref: "#/definitions/Empty"
      security:
      - api_key: []
      x-amazon-apigateway-integration:
        type: "aws"
        httpMethod: "POST"
        uri:
          Fn::Sub: "arn:aws:apigateway:${AWS::Region}:lambda:path/2015-03-31/functions/arn:aws:lambda:${AWS::Region}:${AWS::AccountId}:function:${funcName}/invocations"
        responses:
          default:
            statusCode: "200"
        passthroughBehavior: "when_no_match"
securityDefinitions:
  api_key:
    type: "apiKey"
    name: "x-api-key"
    in: "header"
definitions:
  Empty:
    type: "object"
    title: "Empty Schema"
$ aws cloudformation deploy --stack-name test-pipedeploy-stack --template-file pipeline.yml --capabilities CAPABILITY_NAMED_IAM
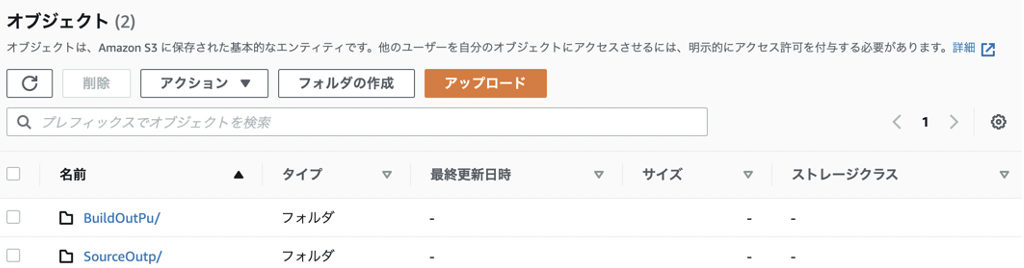
余談
Artifactに指定したフォルダ名が10文字までしか反映されていないようにうかがえる。
改訂履歴
-
2021/01/01, 2021/05/15
ParameterOverridesのアーティファクト名の誤記。BuildOutPut→BuildOutputに訂正。 -
2021/05/15
(8)の追記。