
#IBM Cloud Object Storage(ICOS)の認証方法について
###A. IAM トークン認証方式
- インターネット経由でトークンを発行してプライベートネットワーク経由でアクセスする
- IAM API key を使ってIAM endpointで1時間有効なトークンを発行し、そのトークンを使ってアクセスする
- IAM エンドポイントはインターネット経由のみでアクセス可能
###B. HMAC 認証方式
- access key と secret key からハッシュ関数を使って作成される署名を用いて認証する方式
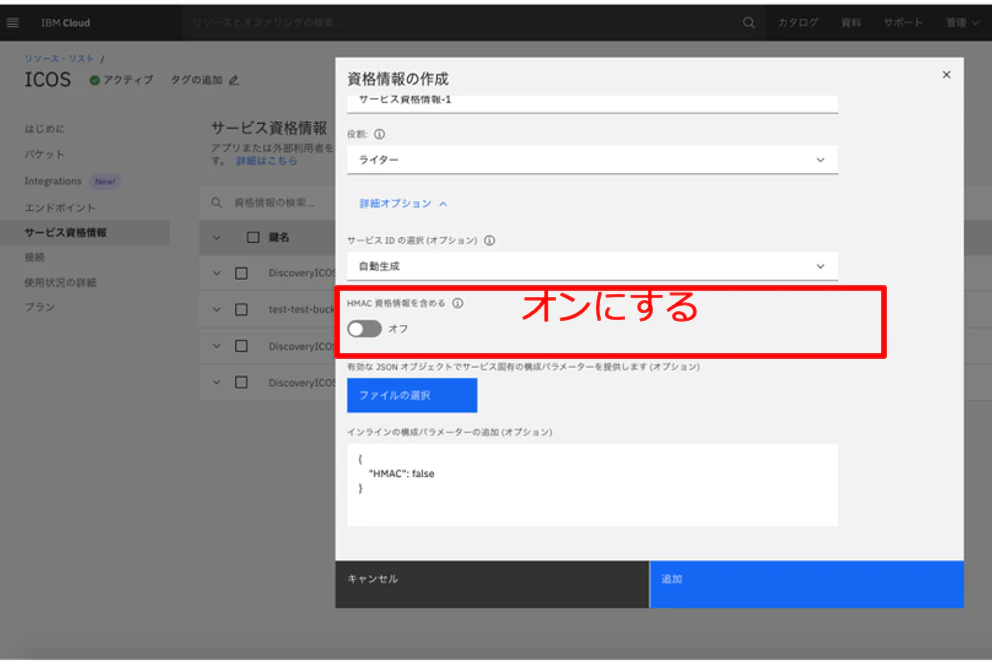
- HMAC認証のCredentialを発行する
- IBM Boto3 を導入するまたは手組みでヘッダーを実装する
詳しくはこちらを参照して下さい。
IBM Cloud Object Storage (ICOS) の認証方式について調べてみた
#B-1. HMAC認証のCredentialを発行する
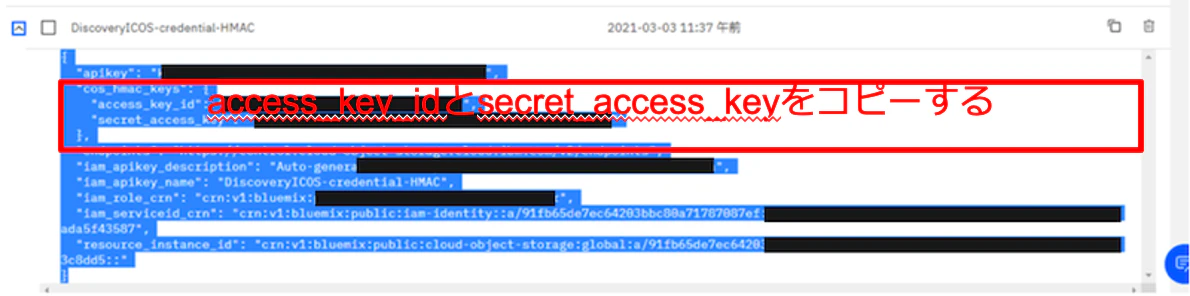
HMAC 資格情報の使用
#B-2. IBM Boto3 (ibm-cos-sdk)を導入する
IBM Boto3とはS3のBoto3のラッパーで、認証などが追加されております。
詳しくは後述しますが、認証周りはごちゃごちゃしております。
試行錯誤のうえ、たどり着いた設定方法をご紹介します。
IBM Boto3 reference
ibm-cos-sdk-python
- ICOS_ENDPOINTをprivateに設定するとHMAC認証となります
- AWS S3のライブラリーであるBoto3のラッパーであるため変数名はAWS_ACCESS_KEY_IDとAWS_SECRET_ACCESS_KEYとなります
$ pip install ibm-cos-sdk
$ vi .env

コピーしたaccess_key_idとsecret_access_keyをペーストする
ICOS_ENDPOINT = https://s3.private.jp-tok.cloud-object-storage.appdomain.cloud
AWS_ACCESS_KEY_ID="xxxxxxxxxxxxxxxxxxxxxxxxxxxxxxx"
AWS_SECRET_ACCESS_KEY="xxxxxxxxxxxxxxxxxxxxxxxxxxxxxxxxxxxxxxx"
#B-2. 補足説明 IBM Boto3 (ibm-cos-sdk)を導入する
GitのReadmeに記載されている環境構築手順は、
- ホームディレクトリにcos_credentialsという名前でcredentialファイルを作成する
※この方法だとユーザー毎にcredentialファイルを作成する必要があるため気をつけて下さい
$ mkdir  ~/.bluemix
$ cd  ~/.bluemix/cos_credentials
$ vi  cos_credentials
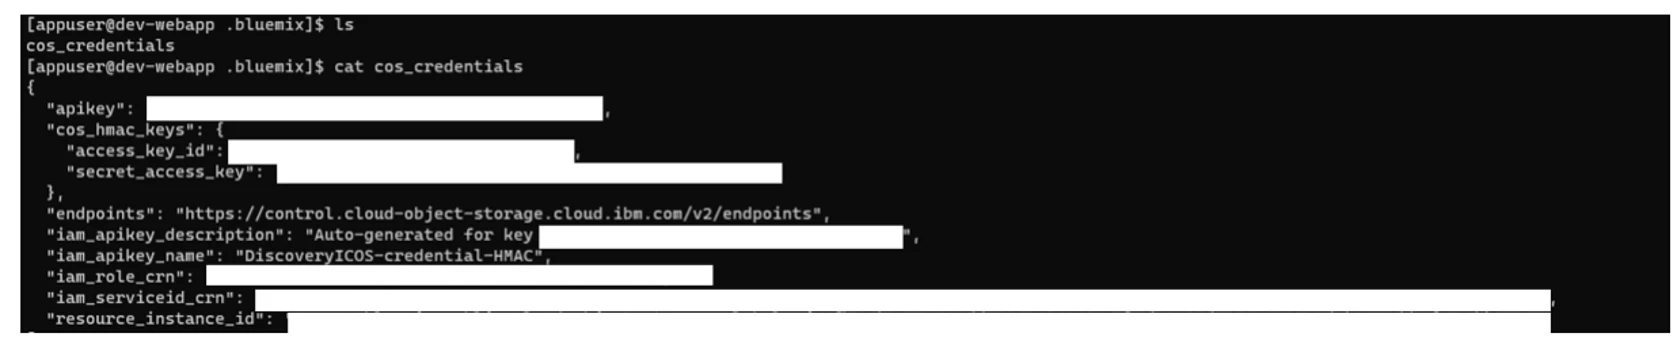
補足説明として、ラッパーの認証でやっていることは、状況に応じたチェックを実施したいようですが、環境によって上手く動かない可能性があります。
私はrootやcronで実行する際にcos_credentialsファイルのパスが参照できなくて試行錯誤することになりました。
とにかく、最終的にセットしたい値であるAWS_ACCESS_KEY_IDとAWS_SECRET_ACCESS_KEYを設定するのが最も確実だと思います。
ちなみにラッパーでやっていること、
- COS_CREDENTIALS_FILEをチェックする
- AWS_SHARED_CREDENTIALS_FILEをチェックする
https://github.com/IBM/ibm-cos-sdk-python-core/blob/18e8a854a2a4fdca7fbb50d5b80fb666734def1f/ibm_botocore/configprovider.py - cos_hmac_keysをチェックする
https://github.com/IBM/ibm-cos-sdk-python-core/blob/18e8a854a2a4fdca7fbb50d5b80fb666734def1f/ibm_botocore/credentials.py
#B-2. 手組みでヘッダーを実装する
IBM Boto3を使わなくてもヘッダーを手組みで実装すればHMAC認証できます
リンク先にはPython、Java、NodeJSのサンプルコードがあります
authorization ヘッダーの生成
curlの場合はこちらを参考にして下さい
IBM Cloud Object Storage(ICOS)にcurl+HMACでアクセスする
import os
import datetime
import hashlib
import hmac
import requests

# please don't store credentials directly in code
access_key = os.environ.get('COS_HMAC_ACCESS_KEY_ID')
secret_key = os.environ.get('COS_HMAC_SECRET_ACCESS_KEY')

# request elements
http_method = 'GET'
host = 's3.us.cloud-object-storage.appdomain.cloud'
region = 'us-standard'
endpoint = 'http://s3.us.cloud-object-storage.appdomain.cloud'
bucket = '' # add a '/' before the bucket name to list buckets
object_key = ''
request_parameters = ''


# hashing and signing methods
def hash(key, msg):
    return hmac.new(key, msg.encode('utf-8'), hashlib.sha256).digest()

# region is a wildcard value that takes the place of the AWS region value
# as COS doen't use the same conventions for regions, this parameter can accept any string
def createSignatureKey(key, datestamp, region, service):

    keyDate = hash(('AWS4' + key).encode('utf-8'), datestamp)
    keyString = hash(keyDate, region)
    keyService = hash(keyString, service)
    keySigning = hash(keyService, 'aws4_request')
    return keySigning


# assemble the standardized request
time = datetime.datetime.utcnow()
timestamp = time.strftime('%Y%m%dT%H%M%SZ')
datestamp = time.strftime('%Y%m%d')

standardized_resource = bucket + '/' + object_key
standardized_querystring = request_parameters
standardized_headers = 'host:' + host + '\n' + 'x-amz-date:' + timestamp + '\n'
signed_headers = 'host;x-amz-date'
payload_hash = hashlib.sha256(''.encode('utf-8')).hexdigest()

standardized_request = (http_method + '\n' +
                        standardized_resource + '\n' +
                        standardized_querystring + '\n' +
                        standardized_headers + '\n' +
                        signed_headers + '\n' +
                        payload_hash).encode('utf-8')


# assemble string-to-sign
hashing_algorithm = 'AWS4-HMAC-SHA256'
credential_scope = datestamp + '/' + region + '/' + 's3' + '/' + 'aws4_request'
sts = (hashing_algorithm + '\n' +
       timestamp + '\n' +
       credential_scope + '\n' +
       hashlib.sha256(standardized_request).hexdigest())


# generate the signature
signature_key = createSignatureKey(secret_key, datestamp, region, 's3')
signature = hmac.new(signature_key,
                     (sts).encode('utf-8'),
                     hashlib.sha256).hexdigest()


# assemble all elements into the 'authorization' header
v4auth_header = (hashing_algorithm + ' ' +
                 'Credential=' + access_key + '/' + credential_scope + ', ' +
                 'SignedHeaders=' + signed_headers + ', ' +
                 'Signature=' + signature)


# create and send the request
headers = {'x-amz-date': timestamp, 'Authorization': v4auth_header}
# the 'requests' package autmatically adds the required 'host' header
request_url = endpoint + standardized_resource + standardized_querystring

print('\nSending `%s` request to IBM COS -----------------------' % http_method)
print('Request URL = ' + request_url)
request = requests.get(request_url, headers=headers)

print('\nResponse from IBM COS ----------------------------------')
print('Response code: %d\n' % request.status_code)
print(request.text)