はじめに
本記事では、AcoustiXを用いて、自作環境において音響シミュレーションを行う手順を説明します。
AcoustiXは、NeurIPS 2024 Spotlightに採択された論文「Acoustic Volume Rendering for Neural Impulse Response Fields」で提案された、音の到達時間や位相の正確さに重点をおいた物理ベースの音響シミュレータです。
※ 論文解説は、別記事にまとめていますので、ぜひご参照ください。
【NeurIPS 2024 Spotlight 論文】Acoustic Volume Rendering (AVR)を読んで動かしてみた
本記事では、Blenderで自作した簡易な環境において、AcoustiXによる音響シミュレーションを行い、インパルス応答(IR)を取得する方法を解説します。
なお、AcoustiXはNVIDIAが開発した電波用のレイトレーシングシミュレータSionna RTに強く依存しており、シミュレーション環境の形式もSionna RTの仕様に合わせています。NVIDIA公式によるSionna RTの環境構築解説動画も公開されていますので、ぜひそちらもご参照ください。
Sionna RT: Scene Creation with Blender using OpenStreetMap
※ OpenStreetMapを使う部分は本記事と関係ないため、スキップしてください。
目次
-
環境構築
1.1 依存ソフトウェア一覧
1.2 セットアップ手順 -
Blenderを用いたシミュレーション環境構築
2.1 簡易な3Dオブジェクト作成
2.2 材料の設定
2.3 Mitsuba形式でのエクスポート -
AcoustiXを用いた音響シミュレーション
3.1 シミュレーションコード作成
3.2 IR波形の確認とレイの経路可視化
1. 環境構築
1.1 依存ソフトウェア一覧
- 音響シミュレーション
- Python 3.10.13
- TensorFlow 2.13.0
- NumPy 1.24.0
- SciPy 1.15.3
- Matplotlib 3.10.3
- Mitsuba 3.4.1
- Sionna(AcoustiX に含まれるフォーク版)
- Jupyter上でのシミュレーション環境可視化
- pythreejs 2.4.2
- ipywidgets 8.0.4
- ipydatawidgets 4.3.2
- jupyterlab-widgets 3.0.5
- 自作シミュレーション環境の作成
- Blender 3.6.4
- Mitsuba-Blender v0.3.0
なお、音響シミュレーション及び可視化はUbuntu 20.04、自作シミュレーション環境の作成はWindows 11で実行しました。
1.2 セットアップ手順
a. 仮想環境の作成
venvを用いてPythonの仮想環境を作成します。
# 仮想環境の作成
python -m venv env_acoustix

# 仮想環境を有効化
source env_acoustix/bin/activate
b. AcoustiXのクローンと依存パッケージのインストール
git clone https://github.com/penn-waves-lab/AcoustiX.git
クローン後、AcoustiX/sionna/setup.cfgに記載されているinstall_requiresを、依存ソフトウェア一覧に沿って適切なバージョンに調整します。
※ 特に、Mitsubaのバージョンを明示的に指定しない場合、最新版がインストールされてしまいます。その結果、AcoustiX 内部に含まれる Sionna フォーク版との互換性の問題によりエラーが発生することがあります。
cd AcoustiX/sionna
pip install .
c. Blenderのインストール
公式ページから、使用しているOSに対応したBlender 3.6.4をダウンロード及びインストールします。
d. Mitsuba-Blenderアドオンのインストール
BlenderからMitsuba形式の.xmlファイルをエクスポートするために、Mitsuba-Blenderアドオンをインストールする必要があります。
まず、GitHubリポジトリからmitsuba-blender.zipをダウンロードします。
次に、Blenderを立ち上げて、インストールガイドに従ってMitsuba-Blenderアドオンをインストールします。
2. Blenderを用いたシミュレーション環境構築
2.1 簡易な3Dオブジェクト作成
ここでは、簡易な3Dオブジェクトとして1辺10mの立方体を作成します。
これを簡易的な部屋とみなし、音響シミュレーションに用います。
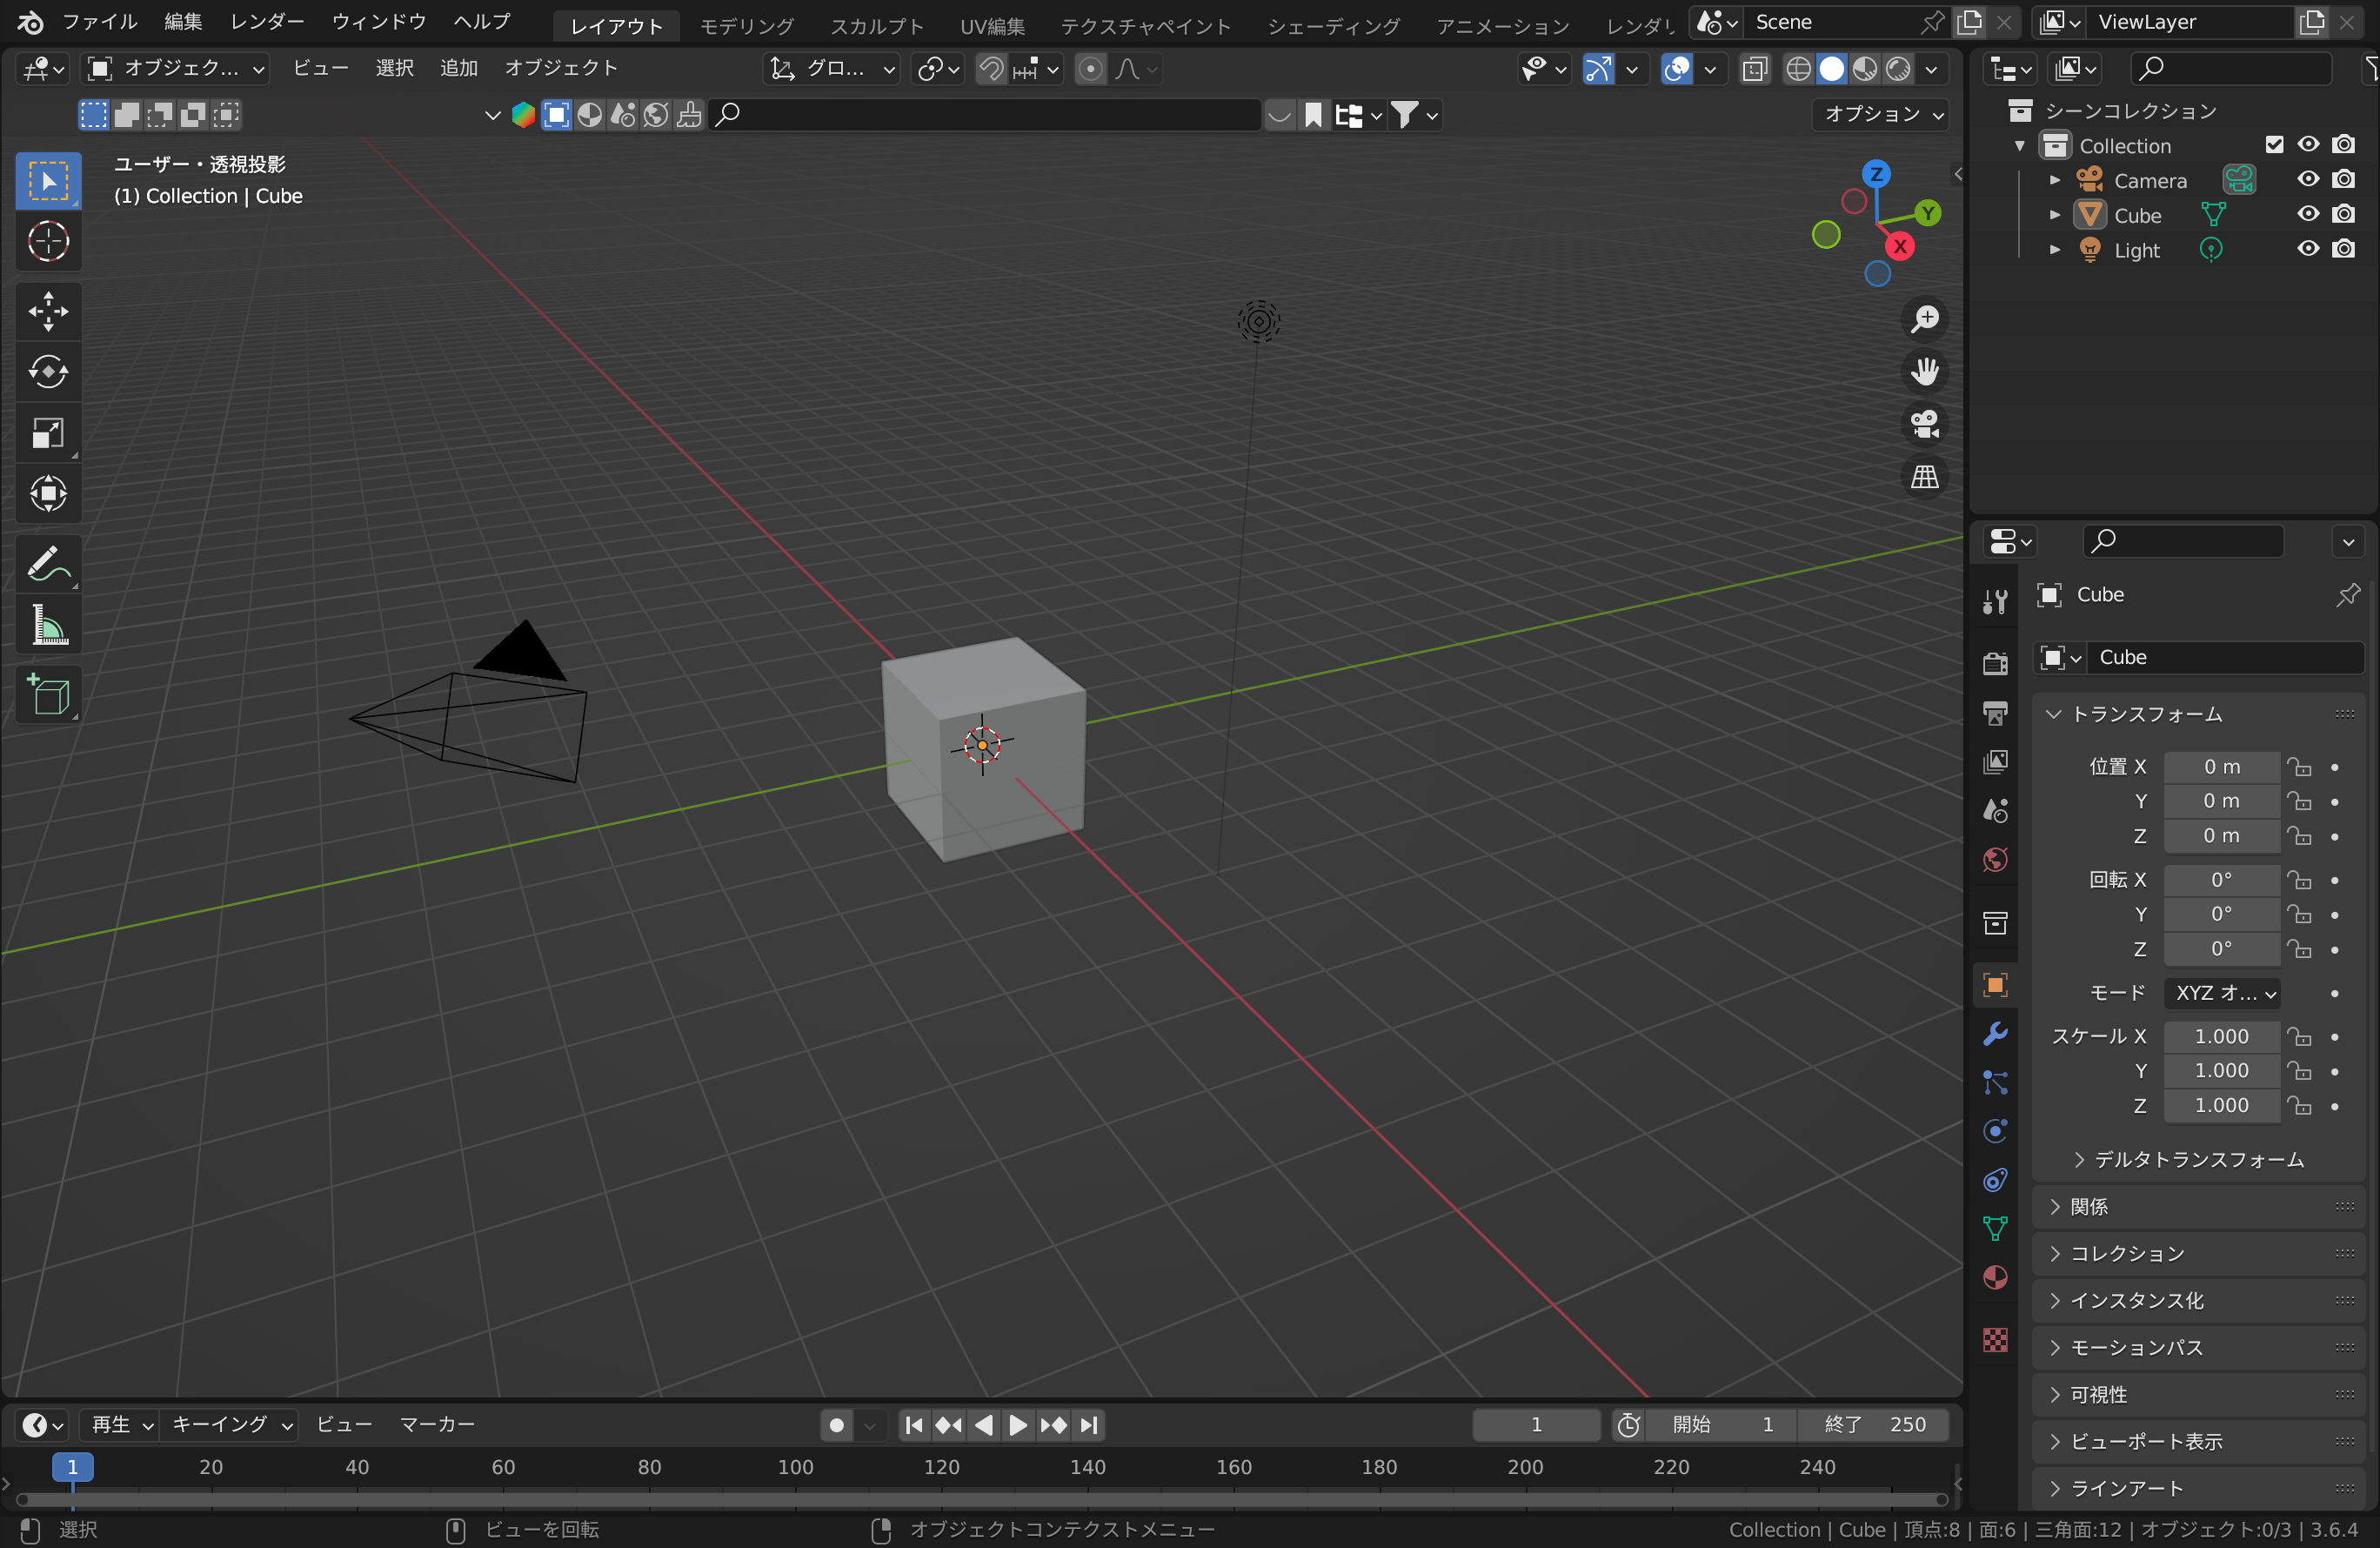
まず、Blenderを立ち上げると、1辺2mの立方体とカメラ、ライトがデフォルトで用意されています。
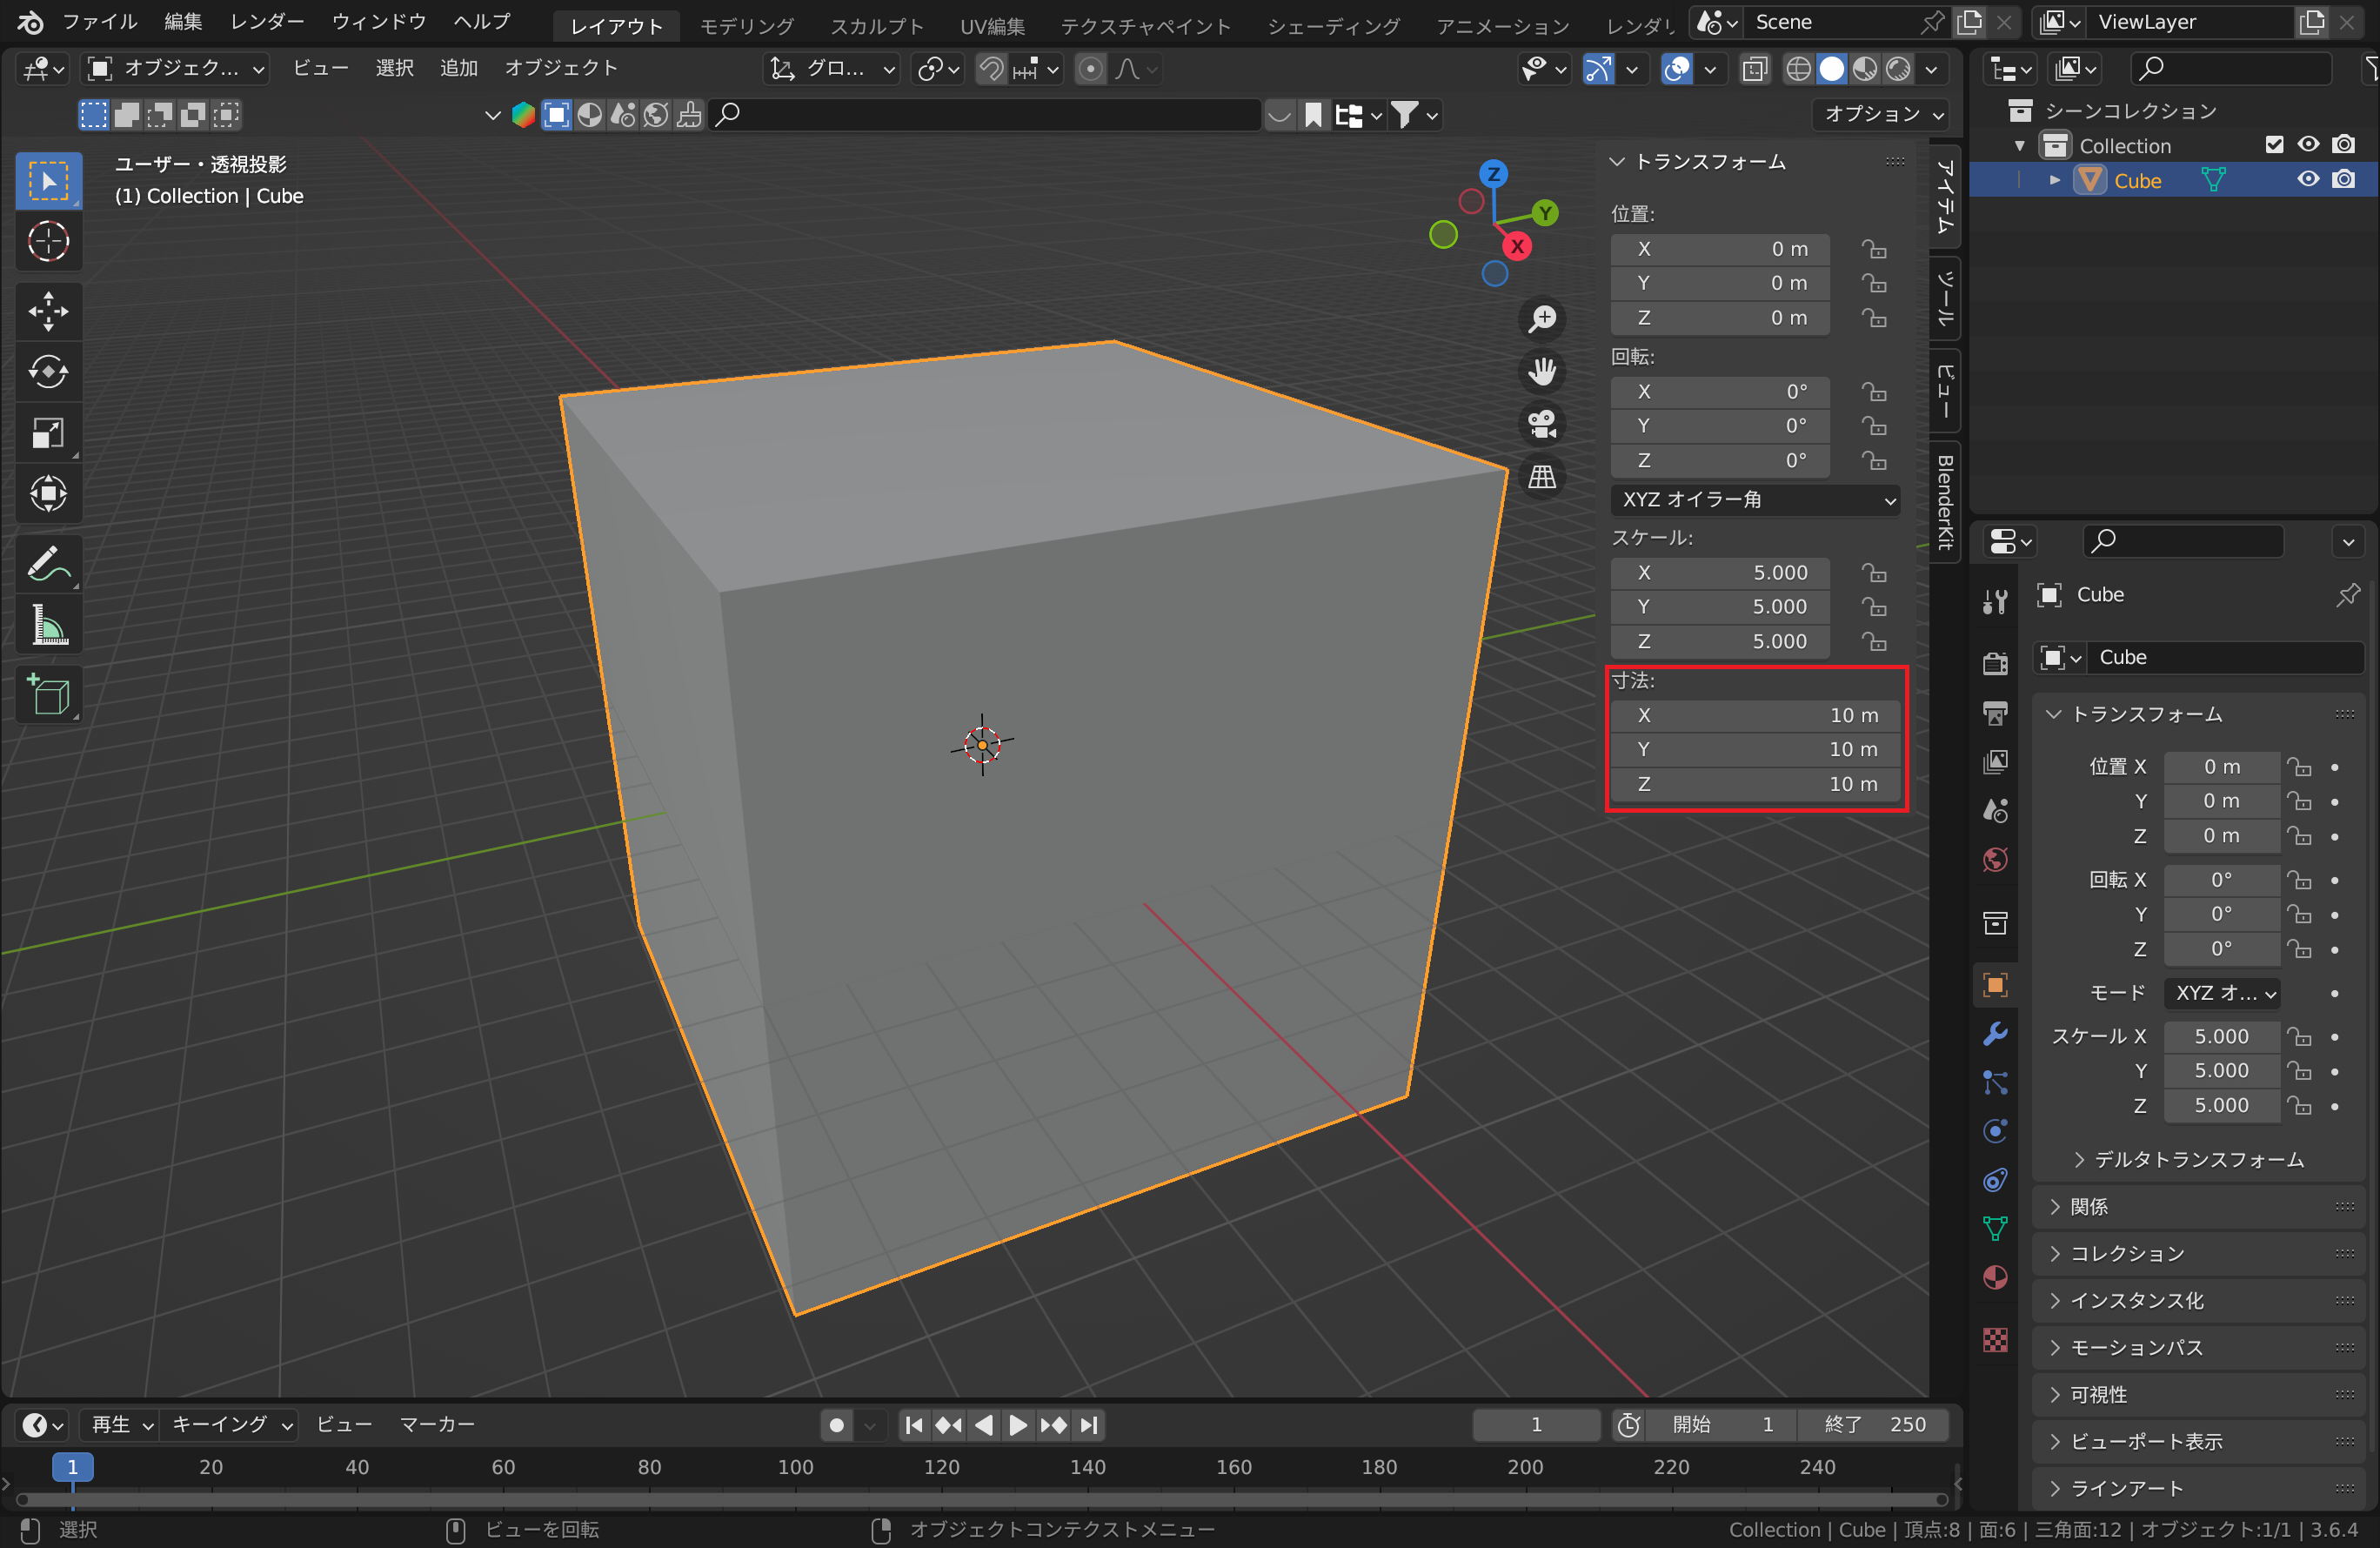
カメラとライトを削除した後、立方体を選択し、Nキーを押します。サイドバーが現れるので、トランスフォーム→寸法のX、Y、Zをすべて10mに設定します(下画像の赤枠参照)。すると、立方体の1辺が2mから10mに変化します。
2.2 材料の設定
次に、立方体の各面に使用する材料を設定します。AcoustiX/acoustic_absorptions.jsonのキーから材料を選択してください。AcoustiX内部で、各材料に対応した吸音率をシミュレーション時に計算します。
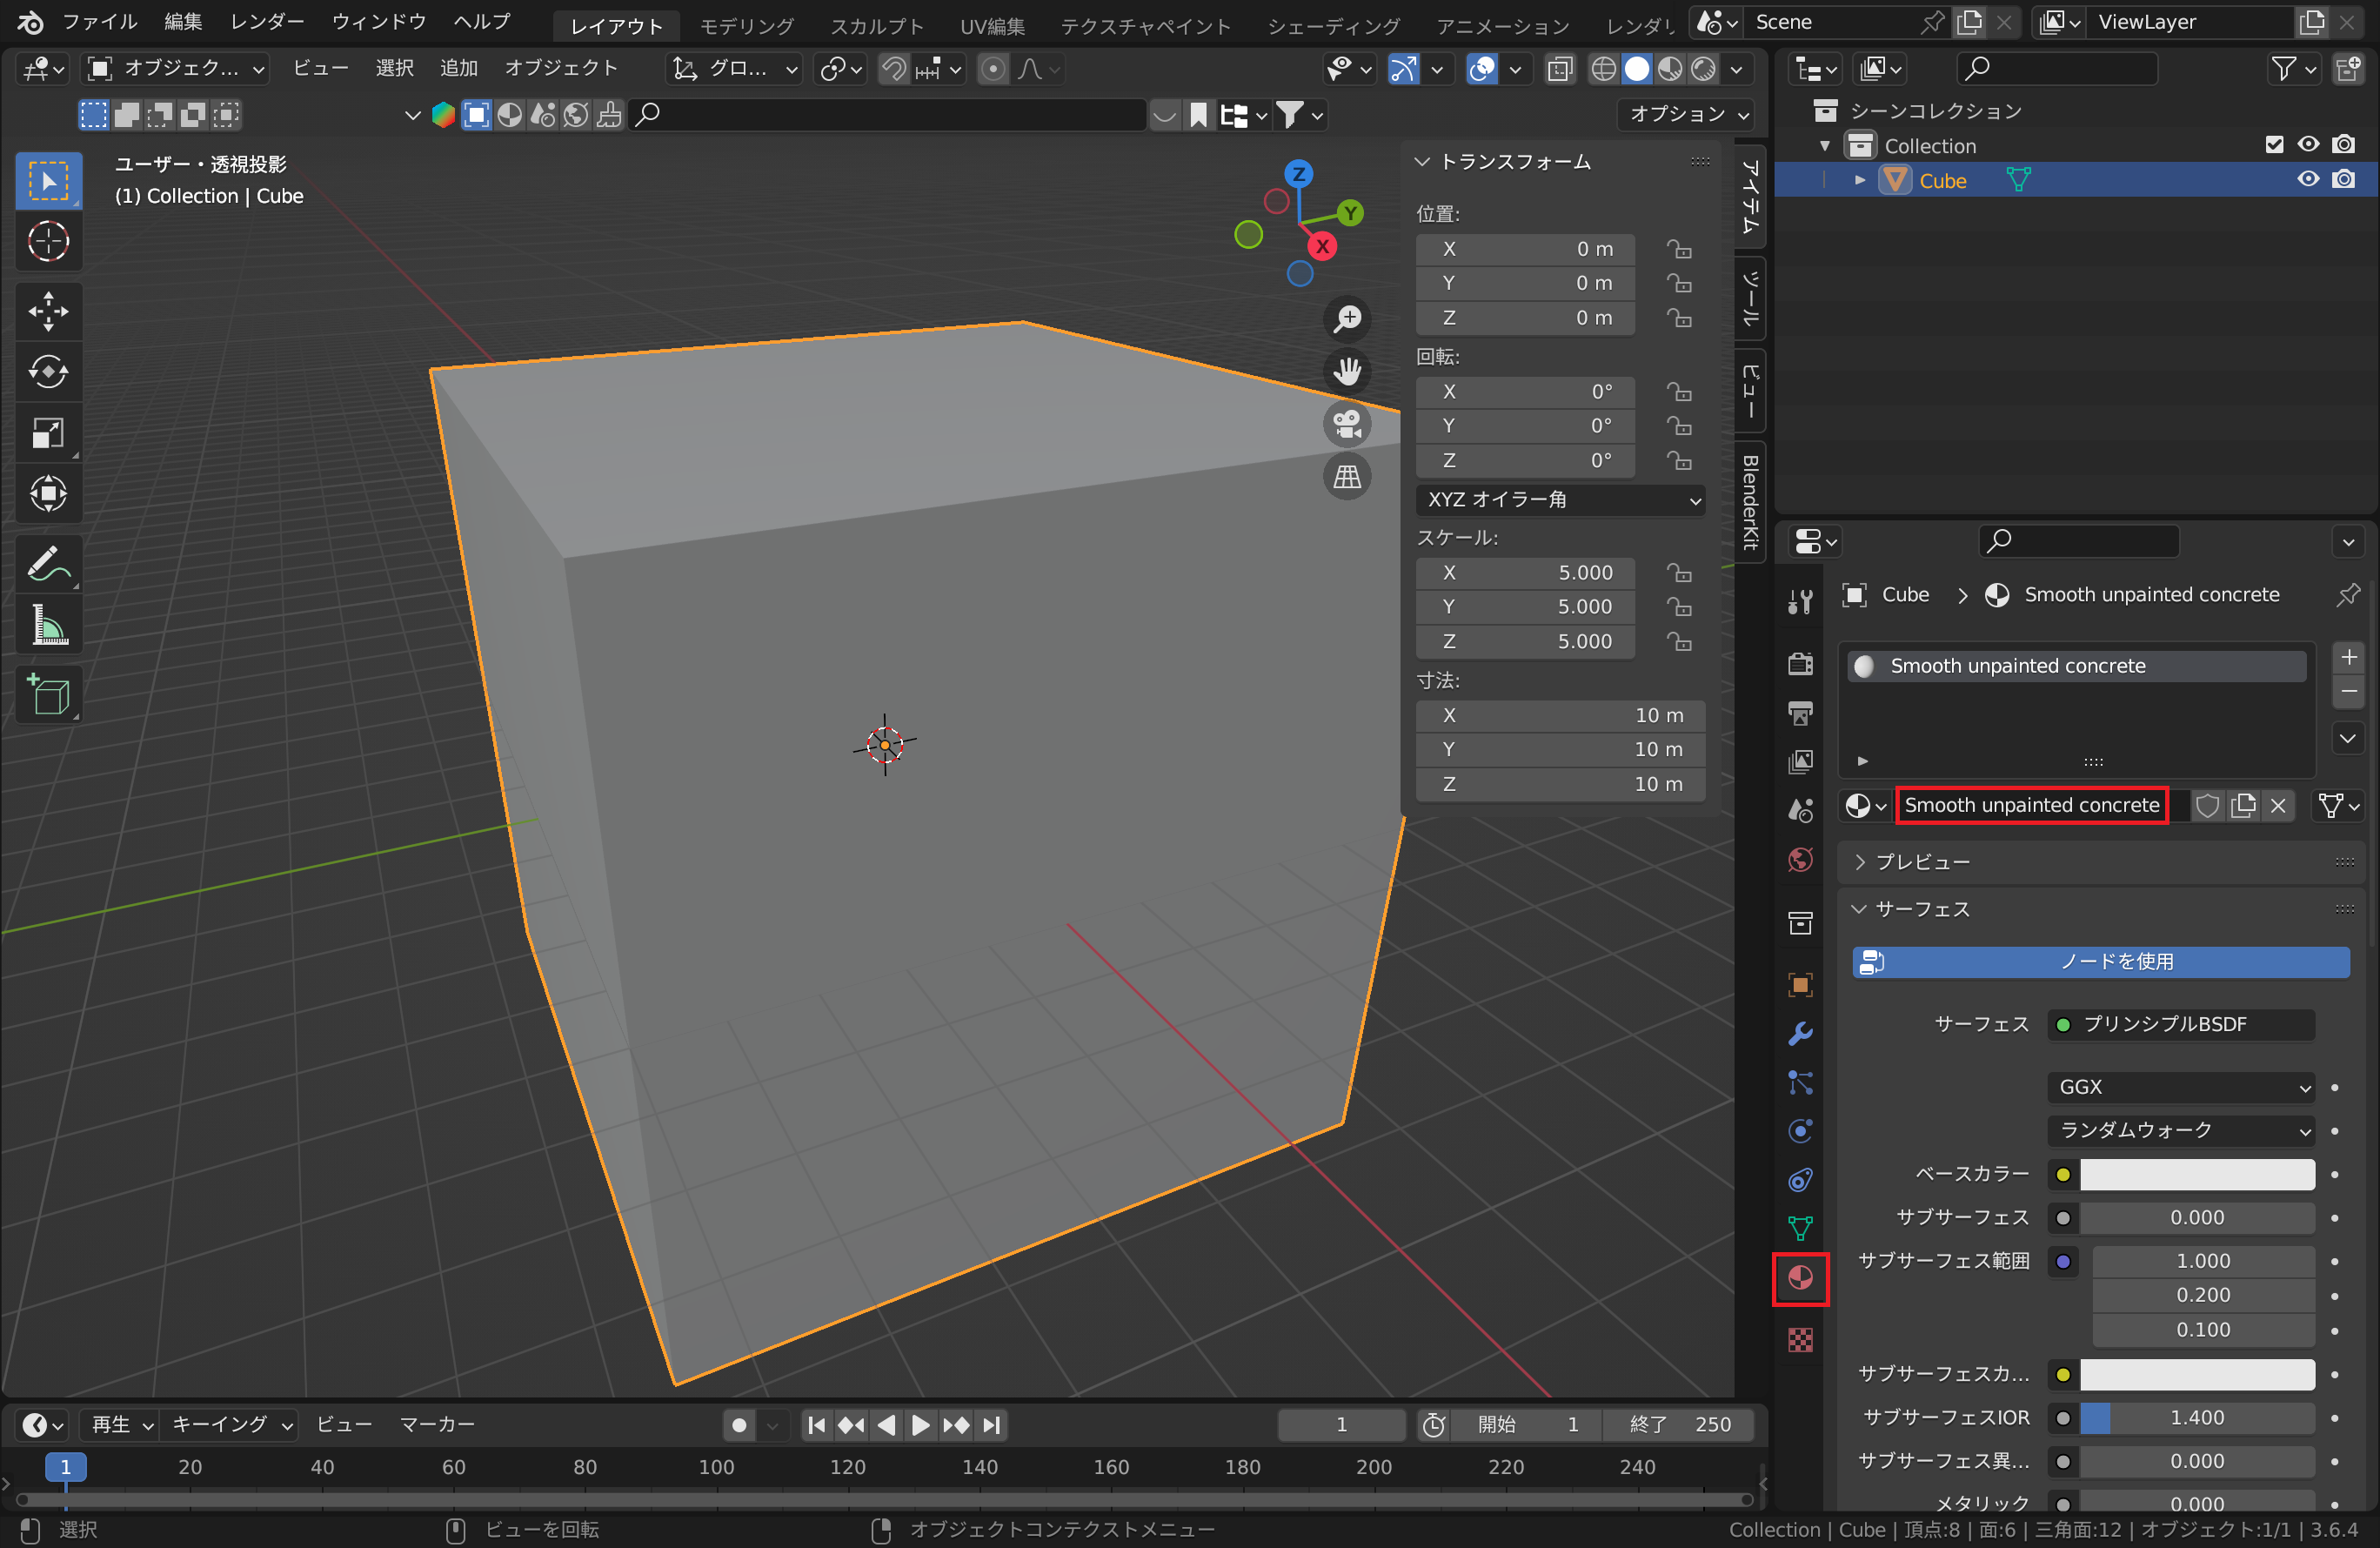
例えば、Smooth unpainted concreteを使用する場合は、Blenderで立方体を選択した状態で右下パネルのマテリアルプロパティを開き、名前をSmooth unpainted concreteとします。画像内赤枠のピンク色の円形マークがマテリアルプロパティです。
2.3 Mitsuba形式でのエクスポート
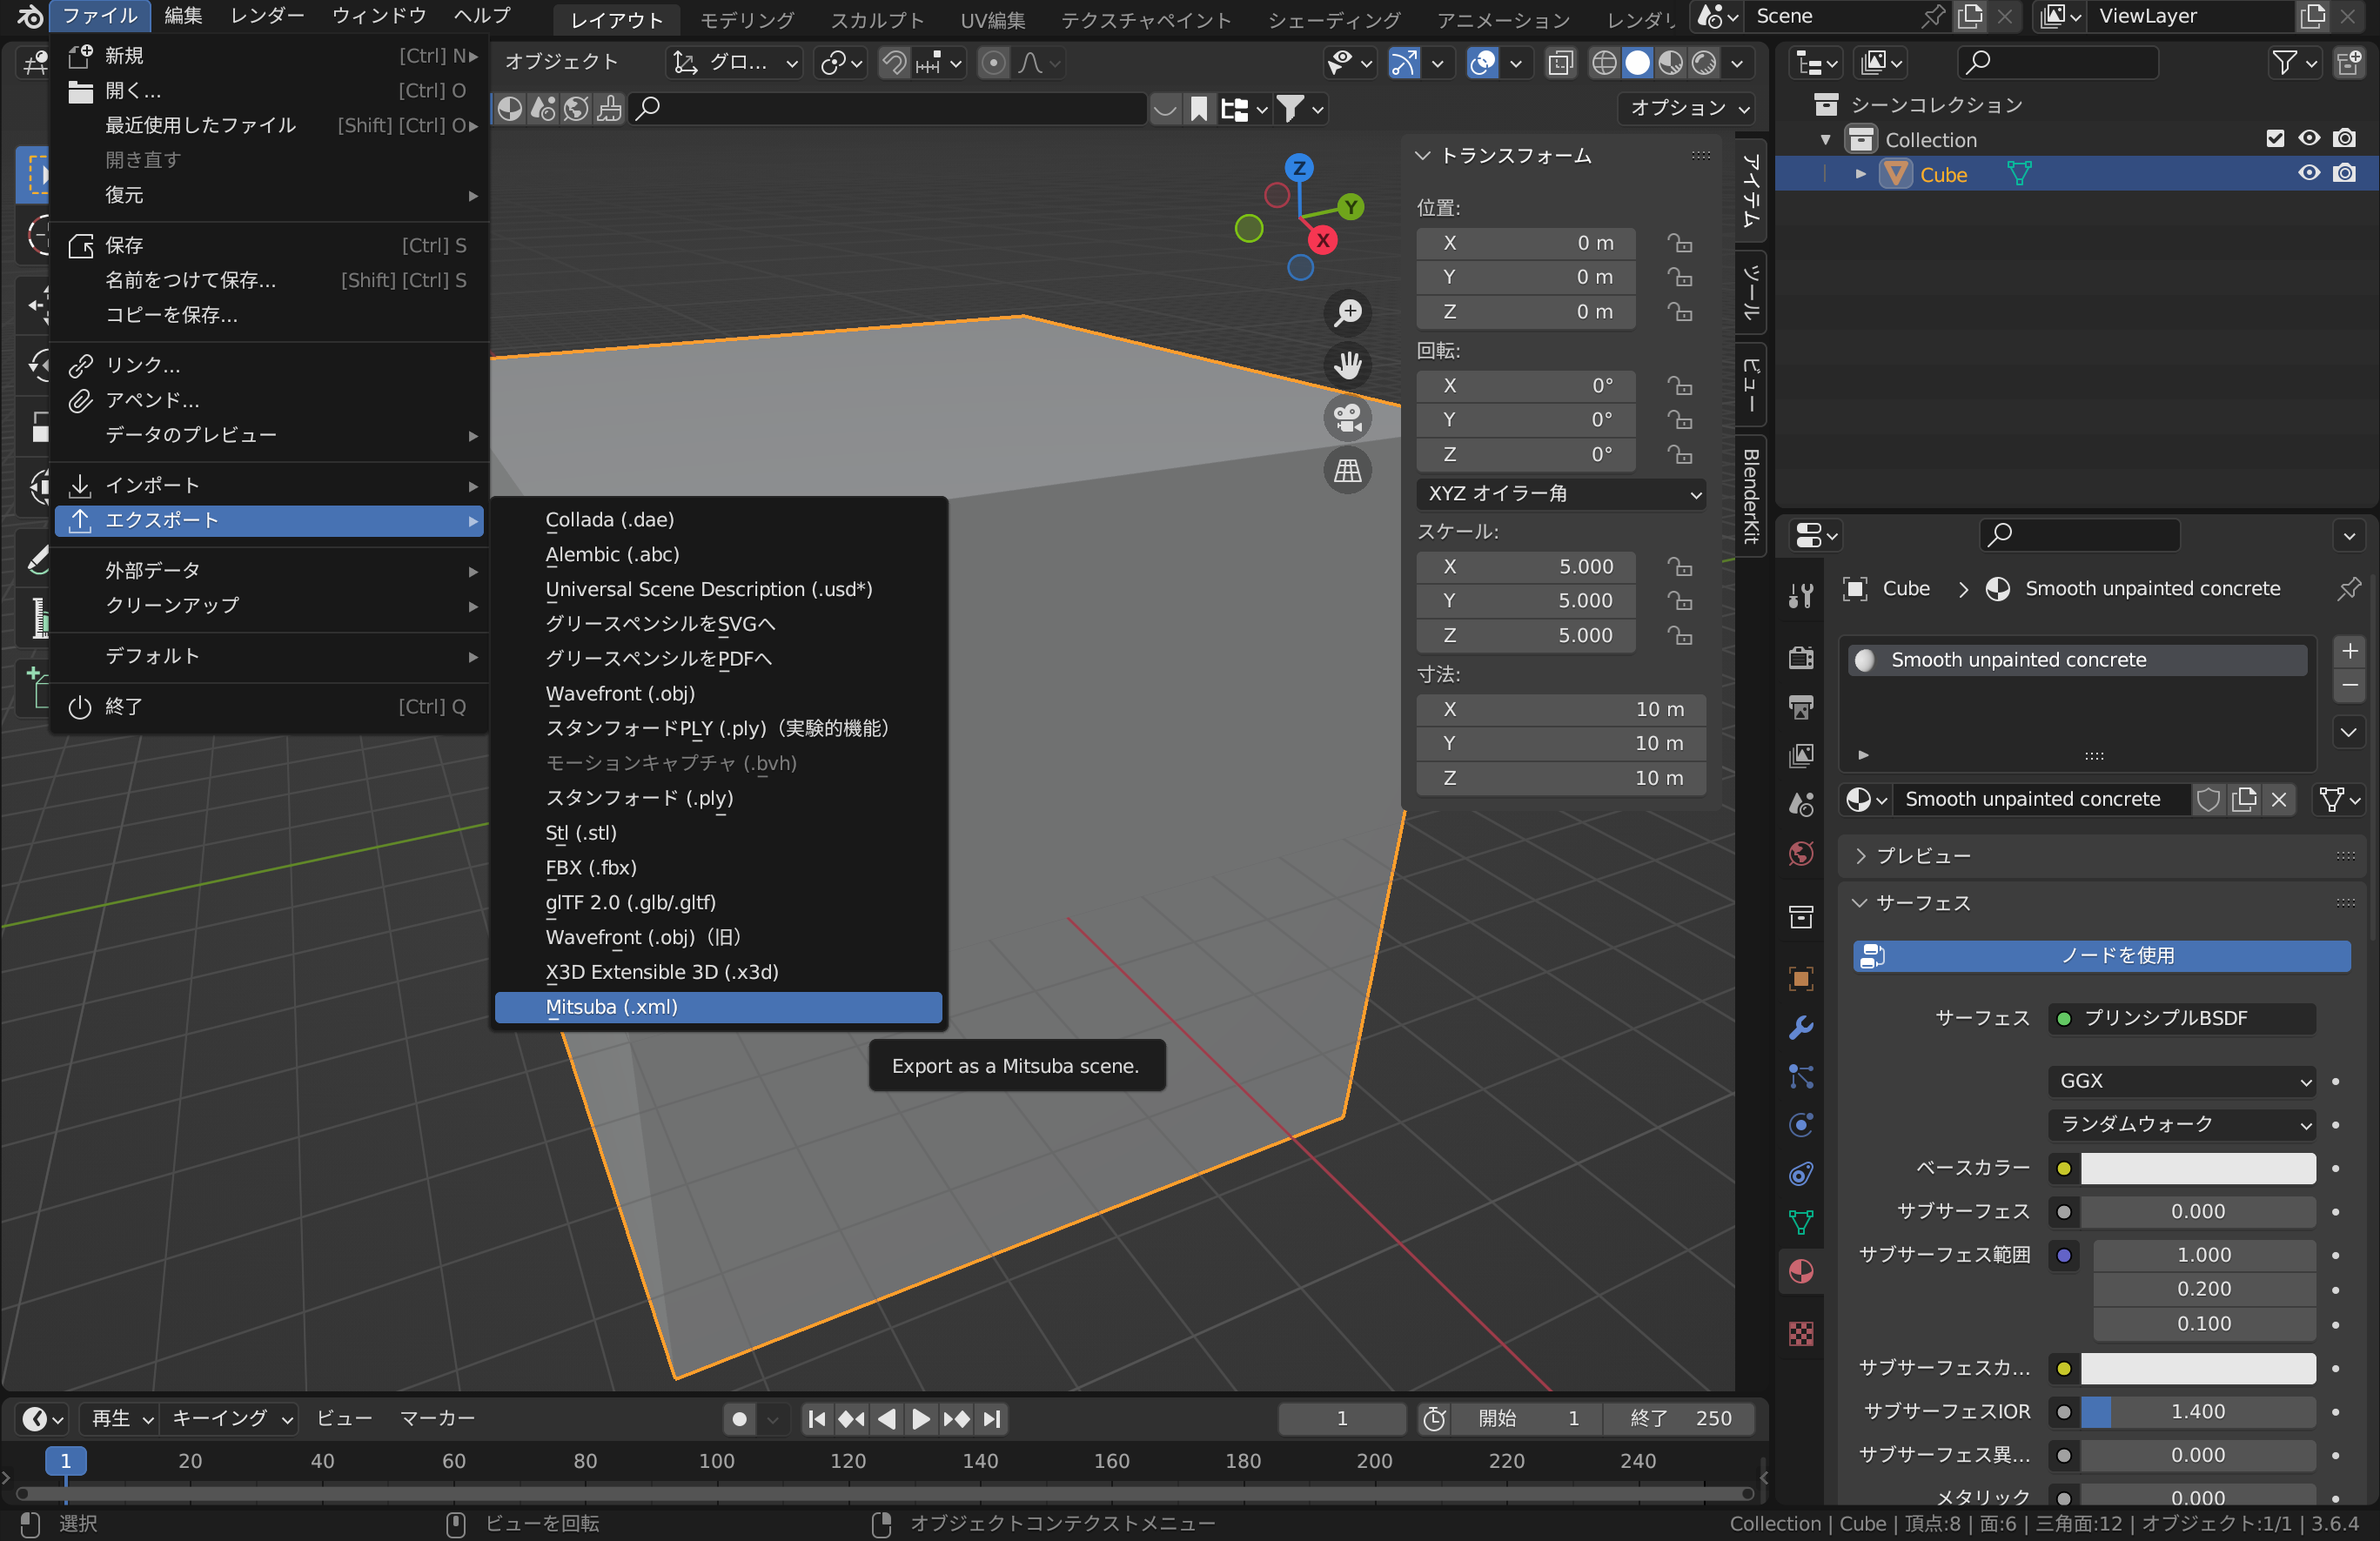
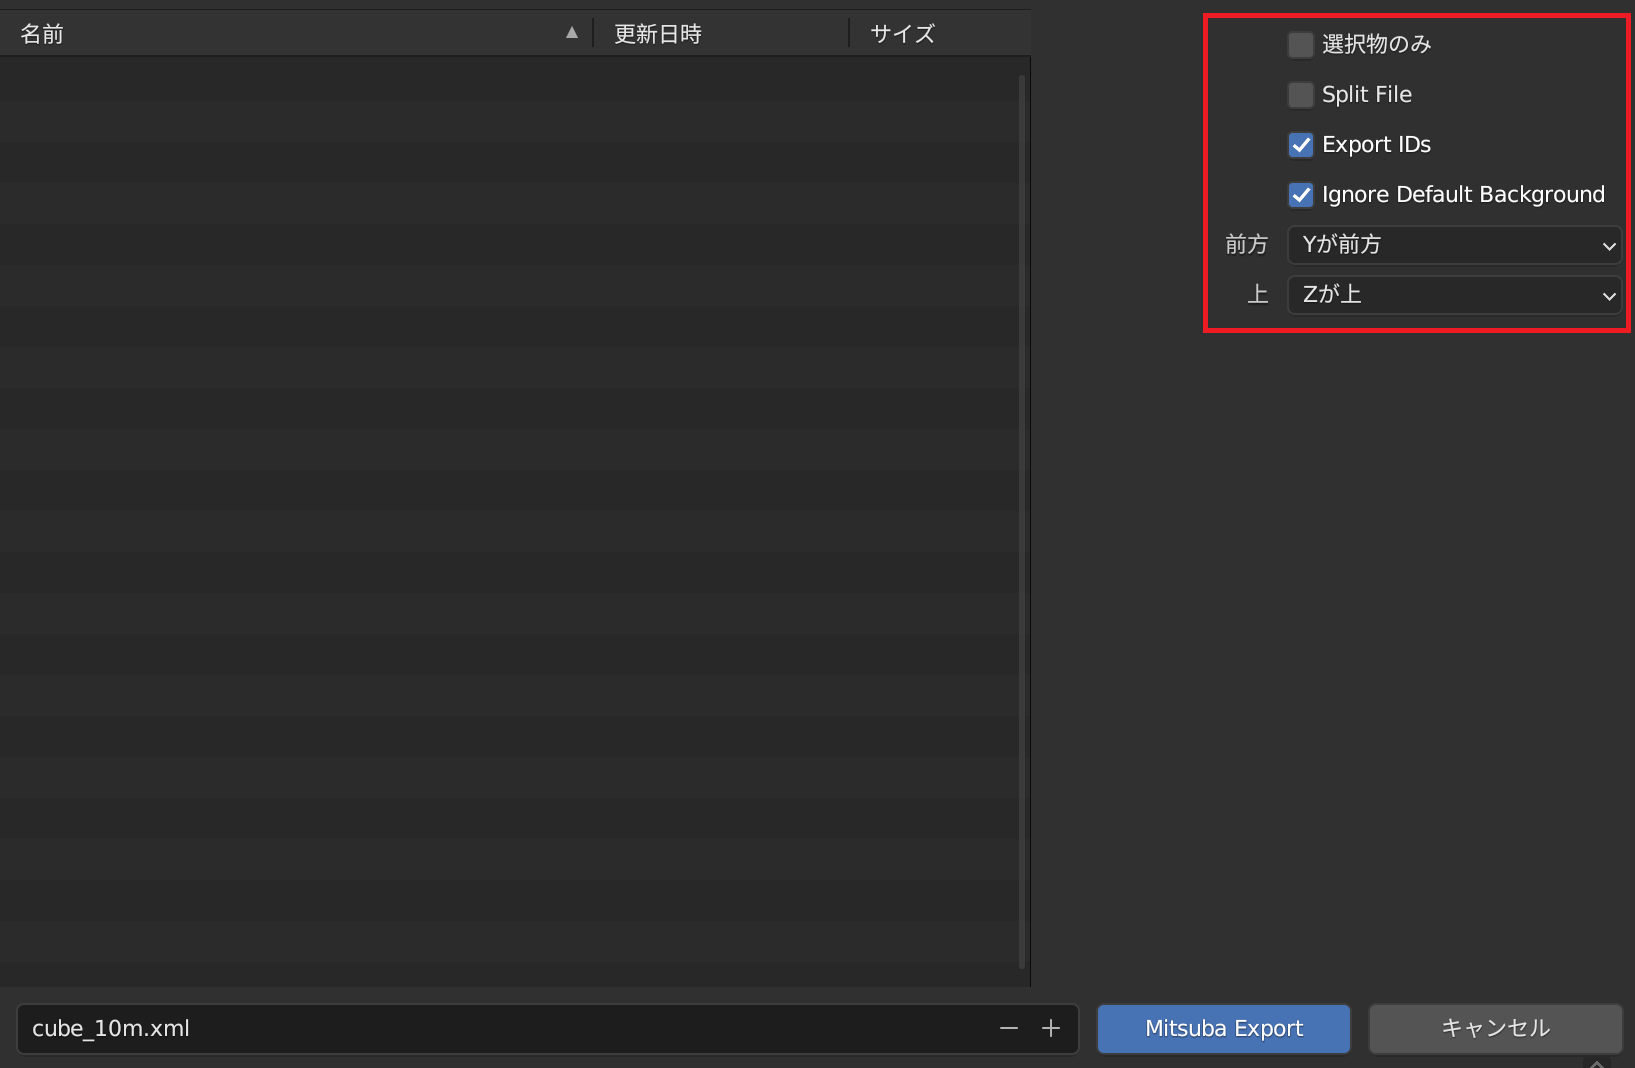
Blender画面左上のファイル→エクスポート→Mitsuba (.xml)を選択します。ここで、Mitsuba (.xml)が表示されない場合は、d. Mitsuba-Blenderアドオンのインストール をもう一度参照してください。
Export IDs、Ignore Default Backgroundにチェックが入っていること、Yが前方、Zが上となっていることを確認し、適当な名前を付けて保存します。
3. AcoustiXを用いた音響シミュレーション
3.1 シミュレーションコード作成
AcoustiX/collect_dataset.pyをベースとして、以下のようなシミュレーションコードを作成します。
import os
import sys
sys.path.append(os.path.dirname(os.path.dirname(os.path.abspath(__file__))))

import tensorflow as tf
tf.get_logger().setLevel('ERROR')
tf.random.set_seed(1)

import json
import numpy as np
from simu_utils import ir_simulation, save_ir, load_cfg
from shutil import copyfile

if __name__ == '__main__':
    # シミュレーション設定ファイルとシーンファイルのパス
    config_file = "./simu_config/basic_config.yml"
    dataset_name = "cube_10m"
    scene_path = "./custom_scene/cube_10m/cube_10m.xml"

    # 受信機の位置と向き
    rx_pos = np.asarray([[0.0, 0.0, 1.5]])
    rx_ori = np.asarray([[1.0, 0.0, 0.0]])

    # 送信機の位置と向き
    tx_pos = np.asarray([4.0, 4.0, 1.5])
    tx_ori = np.asarray([1.0, 0.0, 0.0])

    rx_ori /= np.linalg.norm(rx_ori)
    tx_ori /= np.linalg.norm(tx_ori)

    # 出力先ディレクトリの作成と設定ファイルのコピー
    scene_folder = os.path.dirname(os.path.abspath(scene_path))
    output_path = os.path.join(scene_folder, dataset_name)
    os.makedirs(output_path, exist_ok=True)
    copyfile(config_file, os.path.join(output_path, "config.yml"))

    # 設定ファイルの読み込み
    simu_config = load_cfg(config_file=config_file)

    # 送信機の情報をJSONで保存
    data = {
        "speaker": {
            "positions": tx_pos.tolist(),
            "orientations": tx_ori.tolist()
        }
    }
    with open(os.path.join(output_path, 'speaker_data.json'), 'w') as json_file:
        json.dump(data, json_file, indent=4)

    # IRのシミュレーション
    ir_time_all, rx_pos, rx_ori = ir_simulation(
        scene_path=scene_path,
        rx_pos=rx_pos,
        tx_pos=tx_pos,
        rx_ori=rx_ori,
        tx_ori=tx_ori,
        simu_config=simu_config
    )

    # IRデータの保存
    save_ir(
        ir_samples=ir_time_all,
        rx_pos=rx_pos,
        rx_ori=rx_ori,
        tx_pos=tx_pos,
        tx_ori=tx_ori,
        save_path=output_path,
        prefix=0
    )
上記コードでは、config_fileとしてAcoustiXにデフォルトで用意されているファイルを使用し、scene_pathとして上記で作成した自作シミュレーション環境ファイルを使用しています。また、計算はCPUで行っています。
受信機及び送信機の位置は、Blender上でのXYZ座標を使用します。今回作成した1辺10mの立方体環境だと、XYZともに-5~5の範囲で選択します。
受信機及び送信機の向きは、指向性のある受信機や送信機を用いる際に影響するパラメータですが、デフォルトでは無指向性になっているので、今回は無視して構いません。
3.2 IR波形の確認とレイの経路可視化
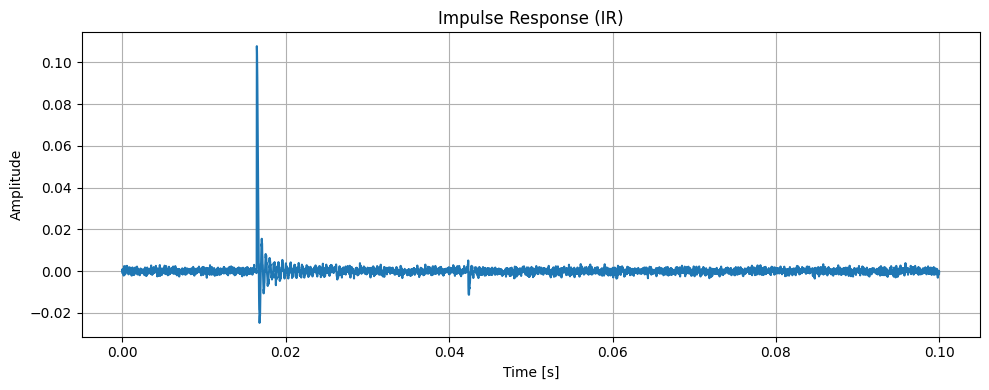
上記シミュレーションコードを実行し、取得したIR波形をプロットすると、以下のようになりました。
また、Jupyter上で下記コードを実行し、シミュレータ内部で計算される各レイの経路を可視化しました。
import numpy as np
import tensorflow as tf
import yaml

from sionna.rt import load_scene, Transmitter, Receiver, PlanarArray
import matplotlib.pyplot as plt

# === シーンの基本設定 ===
scene = load_scene("./custom_scene/cube_10m/cube_10m.xml")
scene.frequency = 17.9 * 1e9
scene.synthetic_array = True

scene.tx_array = PlanarArray(
    num_rows=1,
    num_cols=1,
    vertical_spacing=0.1,
    horizontal_spacing=0.1,
    pattern="iso",
    polarization="V"
)
scene.rx_array = PlanarArray(
    num_rows=1,
    num_cols=1,
    vertical_spacing=0.1,
    horizontal_spacing=0.1,
    pattern="iso",
    polarization="cross"
)

# === 送信機・受信機の追加 ===
tx = Transmitter(name="tx", position=[4.0, 4.0, 1.5])
scene.add(tx)

rx = Receiver(name="rx", position=[0.0, 0.0, 1.5], orientation=[0, 0, 0])
scene.add(rx)

# === シミュレーション設定の読み込み ===
with open("./simu_config/basic_config.yml", 'r') as file:
    config = yaml.load(file, Loader=yaml.FullLoader)
rt_config = config['rt_config']

# === レイの経路計算 ===
paths = scene.compute_paths(
    max_depth=rt_config['max_depth'],
    num_samples=rt_config['num_samples'],
    los=rt_config['los'],
    reflection=rt_config['reflection'],
    diffraction=rt_config['diffraction'],
    scattering=rt_config['scattering'],
    scat_keep_prob=rt_config['scat_prob'],
    scat_random_phases=False
)
paths.normalize_delays = False

# === レイの経路可視化 ===
scene.preview(paths=paths)
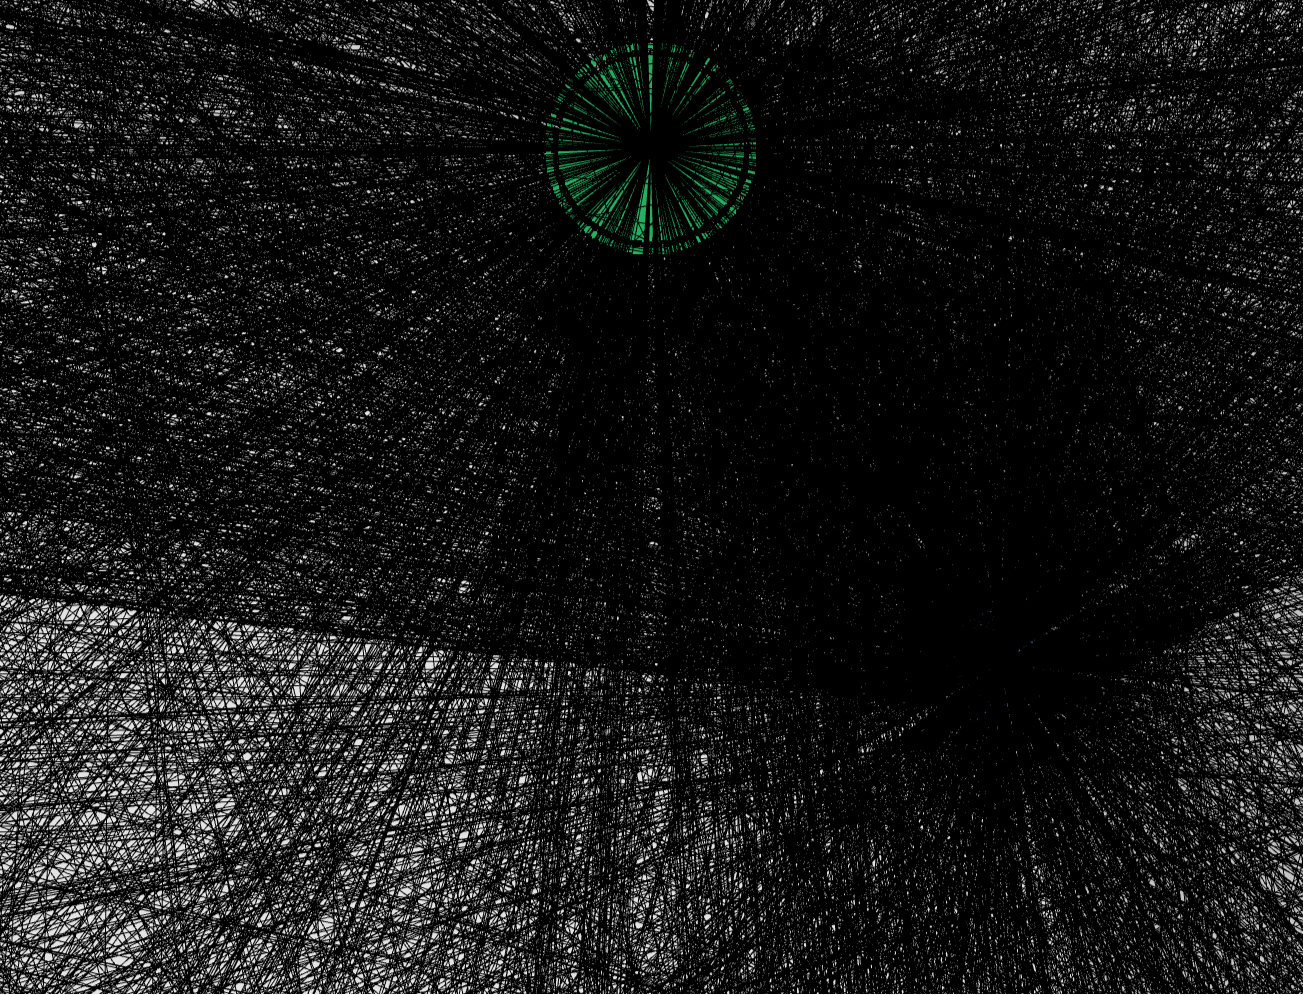
可視化結果は以下のようになりました。緑色の点が受信機の位置、黒色の線がレイの経路を表しています。AcoustiXのデフォルトconigファイルでは、max_depth=10(10回までのレイの反射を追跡)となっているため、レイの経路によって画像全体がほとんど真っ黒になっています。
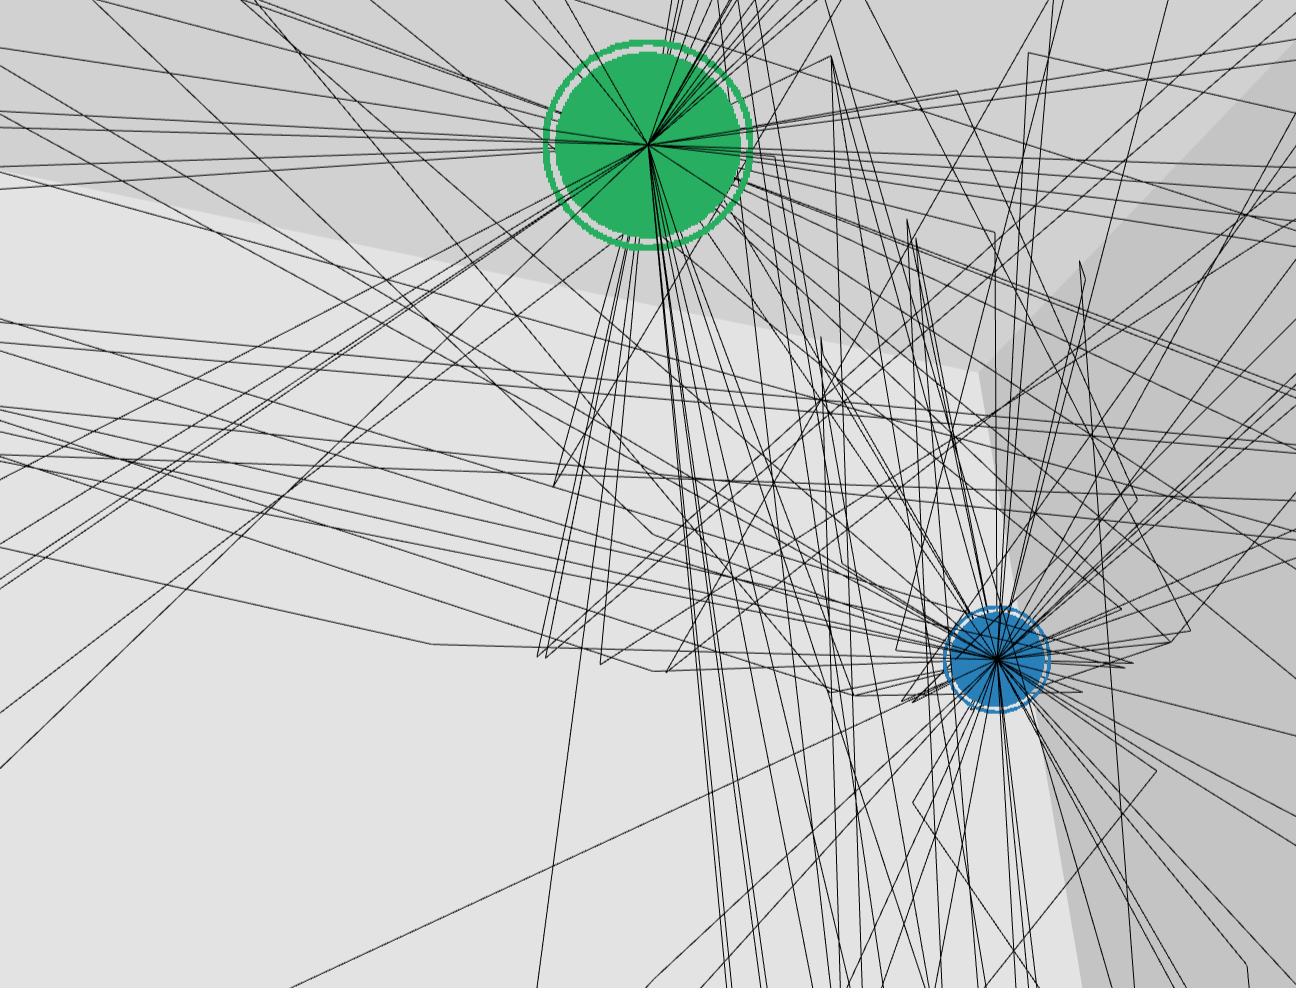
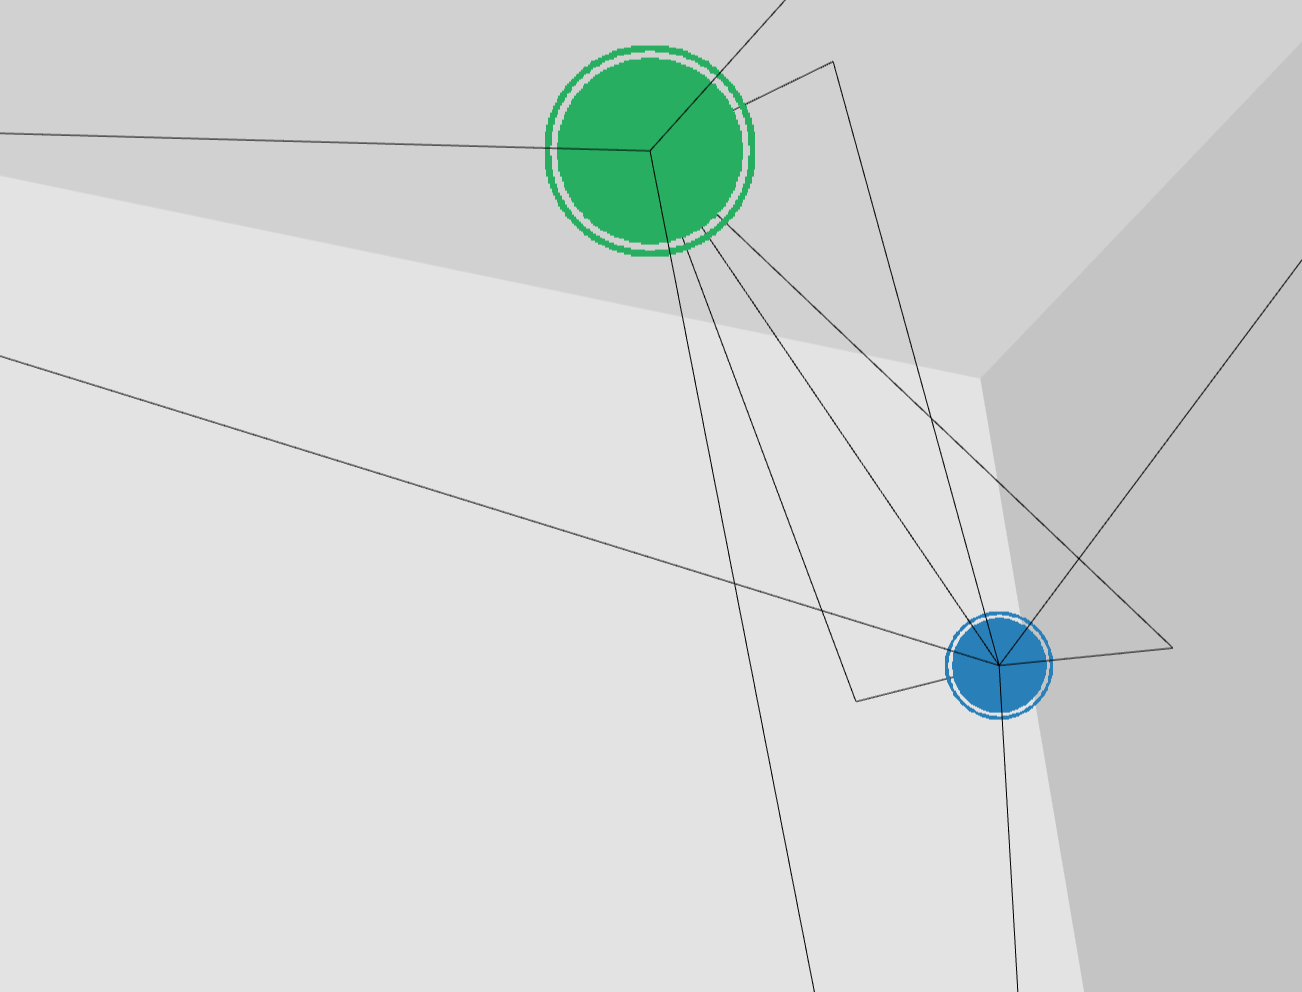
もう少し見やすくするため、max_depth=3として以下のコードを実行して可視化しました。
# === レイの経路計算 ===
paths = scene.compute_paths(
    max_depth=3,
    num_samples=rt_config['num_samples'],
    los=rt_config['los'],
    reflection=rt_config['reflection'],
    diffraction=rt_config['diffraction'],
    scattering=rt_config['scattering'],
    scat_keep_prob=rt_config['scat_prob'],
    scat_random_phases=False
)
paths.normalize_delays = False

# === レイの経路可視化 ===
scene.preview(paths=paths)
可視化結果は以下のようになりました。青色の点が送信機の位置、緑色の点が受信機の位置を表しています。送信機から出たレイが立方体の各面で反射して、受信機に届いていることがわかります。
また、max_depth=1とすると、以下のような可視化結果となり、1回反射までのレイの経路のみ可視化されていることがわかります。
おわりに
Blenderで自作した簡易な環境において、AcoustiXによる音響シミュレーションを行い、インパルス応答を取得する方法を解説しました。
本記事の手順に従ってBlenderで環境を自作することで、用途に応じて自由な環境でシミュレーションを行うことが可能になります。
なお、AcoustiXが提案された論文の解説を別記事にまとめていますので、併せてぜひご参照ください。
【NeurIPS 2024 Spotlight 論文】Acoustic Volume Rendering (AVR)を読んで動かしてみた
(この記事は研究室インターンで取り組みました:https://kojima-r.github.io/kojima/)
