はじめに
Power Automate Desktop の組織全体での運用を検討する際、Power Automate Desktop の完全自動実行(無人実行)による運用を検討するかと思います。
導入前には、Power Automate Desktop の非アテンド型RPAアドオンを検証したいケースも必然的に出てくるかと思いますので、「非アテンド型RPAアドオン」のトライアル開始手順を備忘録的にまとめます。
当記事が、Power Automate Desktop の組織全体での運用を検討する方の助けに少しでもなりましたら幸いです。
※Power Automate Desktop の非アテンド型RPAアドオンは、名前の通り「アドオン」であるため、事前に「アテンド型RPAのユーザーごとのプラン」のライセンスをテナントに割り当てしている必要があります
本記事について
2021年8月19日時点の内容を基に作成しております。
Power Automate Desktop の有償ライセンス(アテンド型 RPA のユーザーごとのプラン)のトライアル開始方法についてはPower Automate のページからでも開始できますが、今回は管理センターから開始する方法を記載しています。
前提条件
・Microsoft 365 が利用できること。(開発者ライセンスでも可)
・Microsoft 365 管理センターにアクセスできること。
・Microsoft 365 のテナント管理者であること。
1.アテンド型RPAのユーザーごとのプラン トライアル開始手順
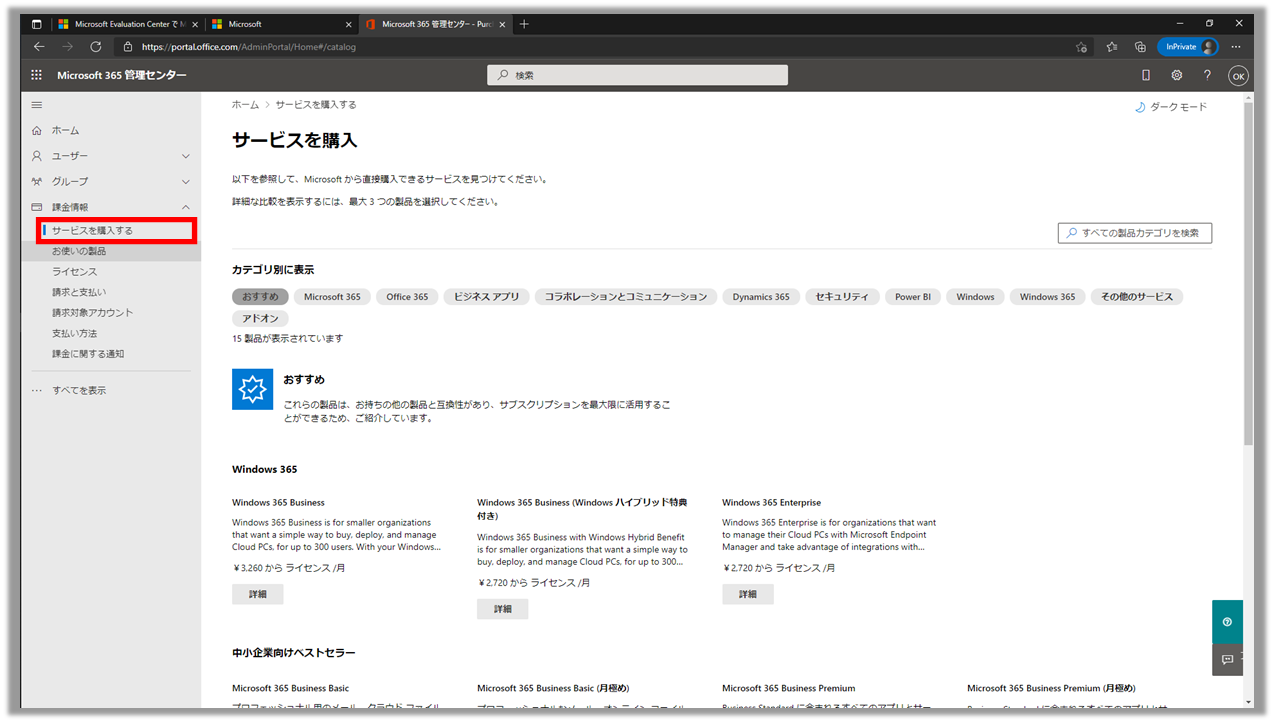
1-1.「Microsot 365 管理センター」 にアクセスする
1-2.「サービスを購入する」ページに遷移する
「課金情報」> 「サービスを購入する」
1-3.Power Automate Desktop の有償ライセンス(アテンド型 RPA のユーザーごとのプラン)の試用を開始する
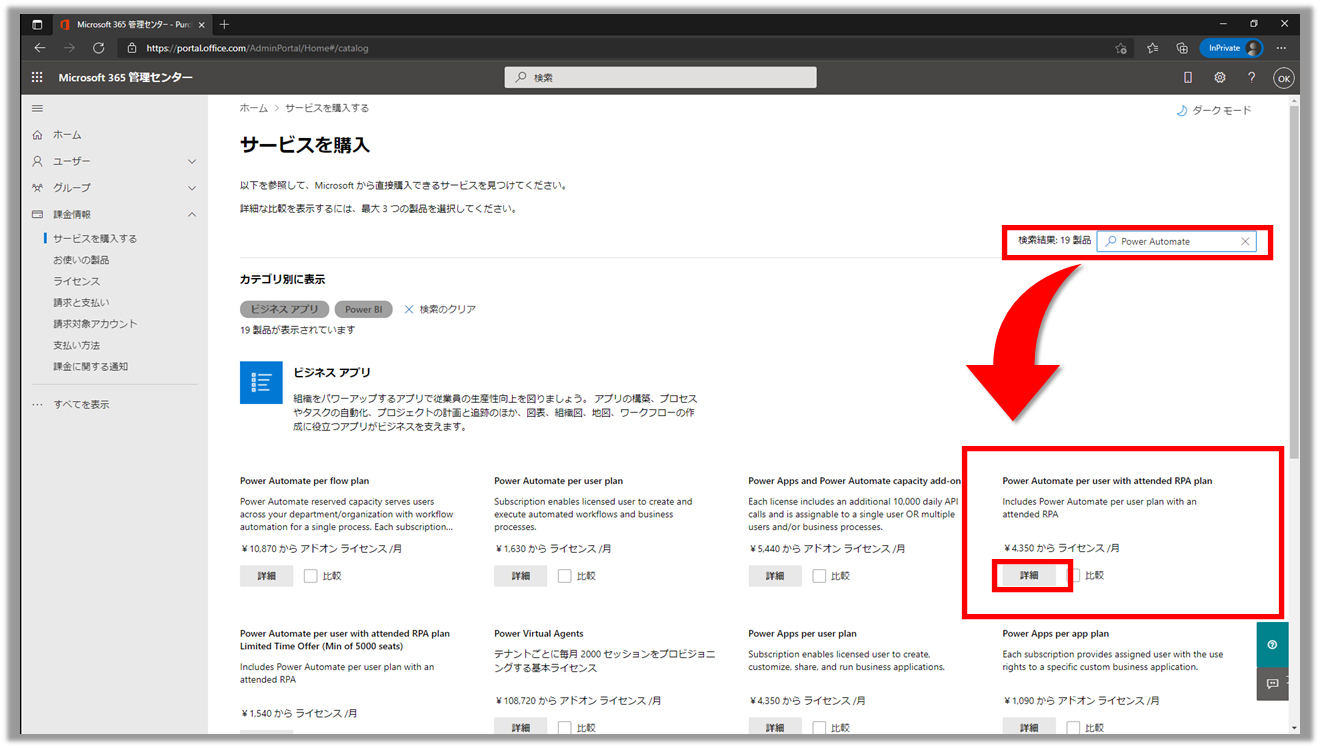
①:検索窓に「Power Automate」と入力し、検索する
②:Power Automate の有償ライセンス「Power Automate per user with attended RPA plan」の詳細ボタンをクリックする
※今回は検索窓から検索したが、カテゴリを「ビジネスアプリ」に絞って探す方法でもOK
③:「Power Automate per user with attended RPA plan」の製品詳細ページに遷移したら、「購入」ボタン横にある "無料試用の開始"をクリックする
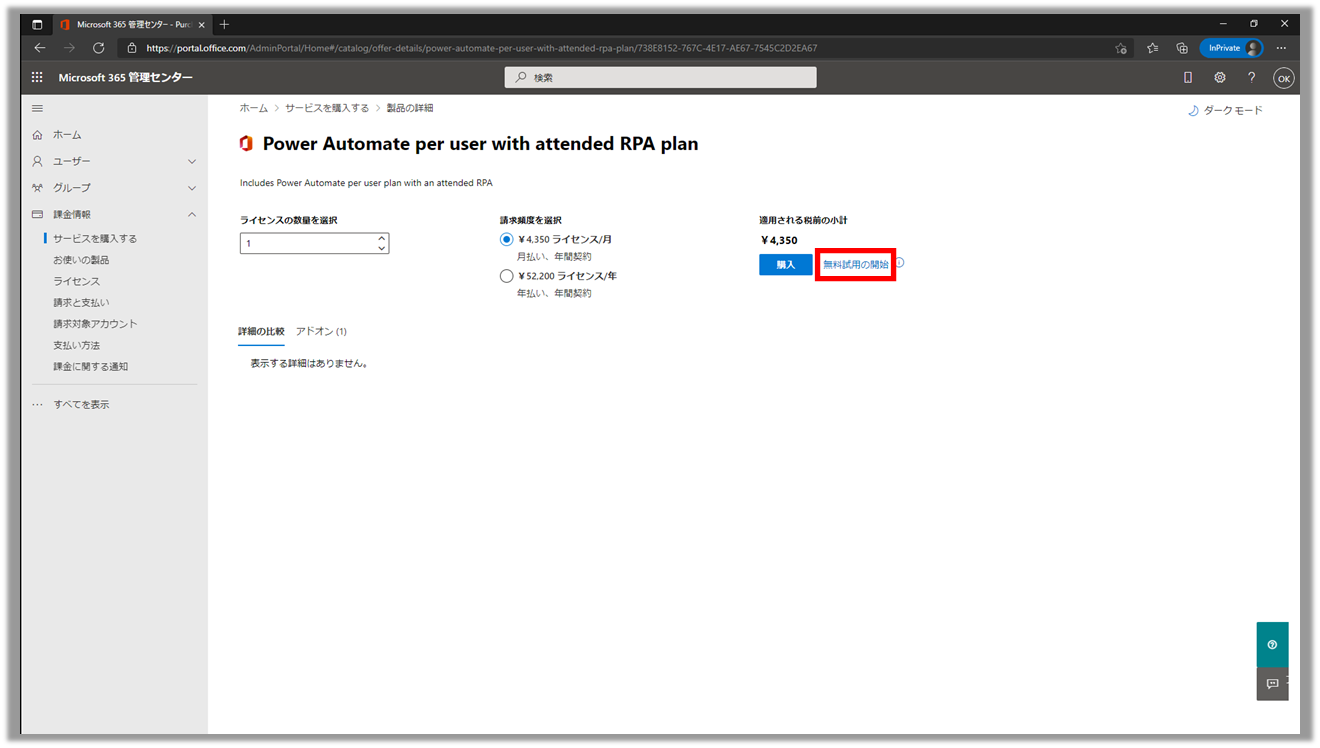
④:購入手続き画面で「無料トライアル」ボタンをクリック
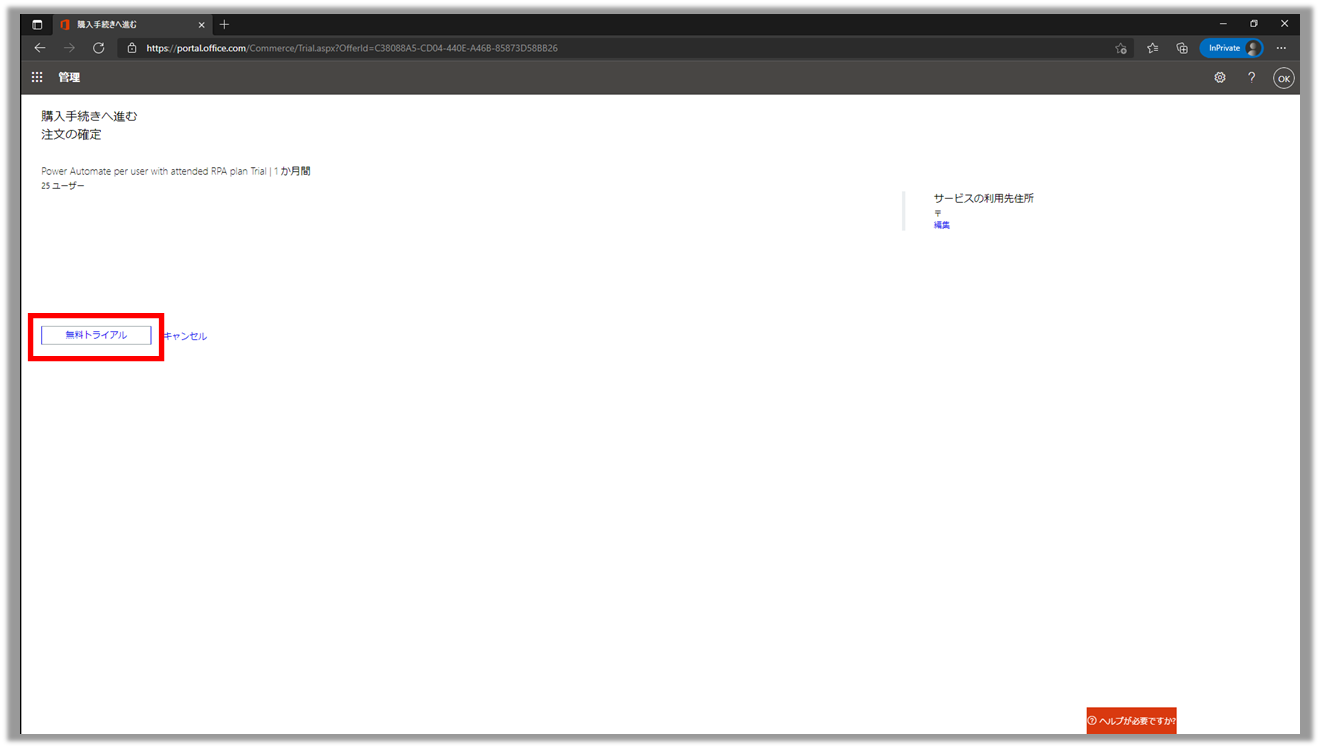
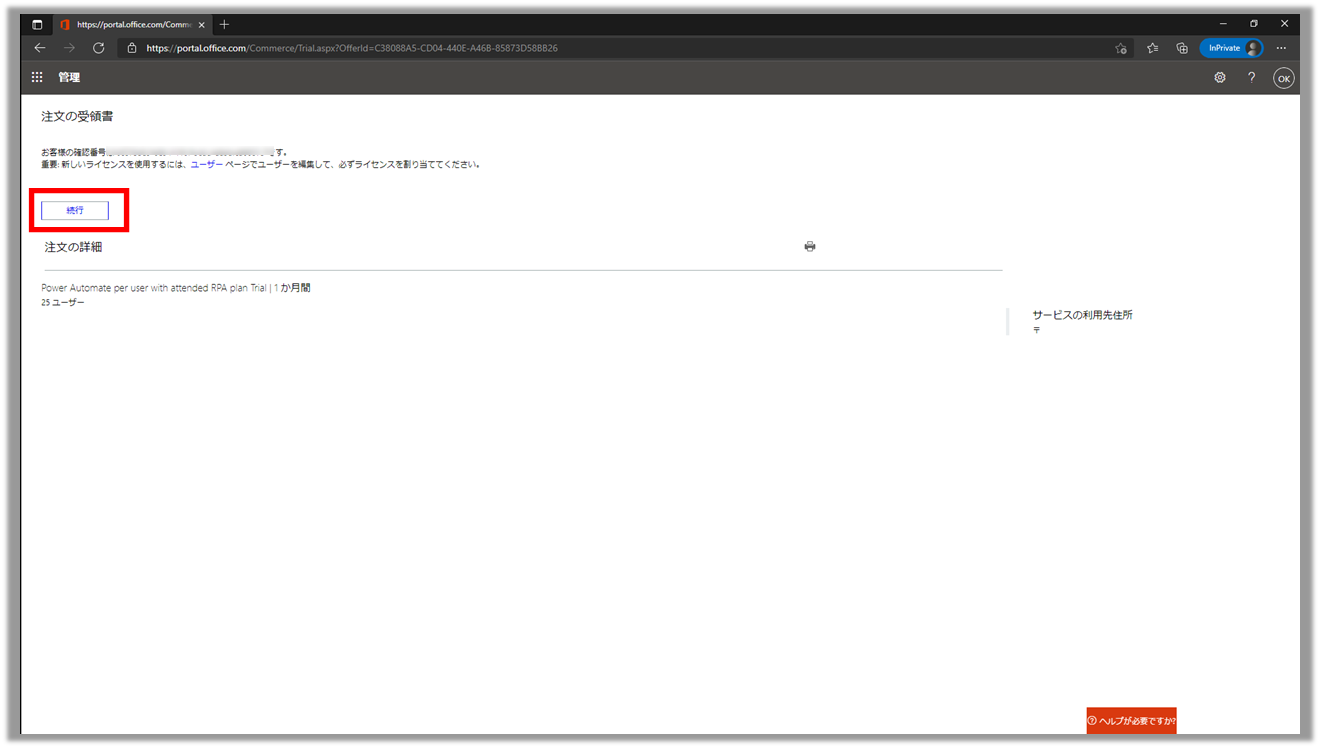
⑤:「続行」ボタンをクリック
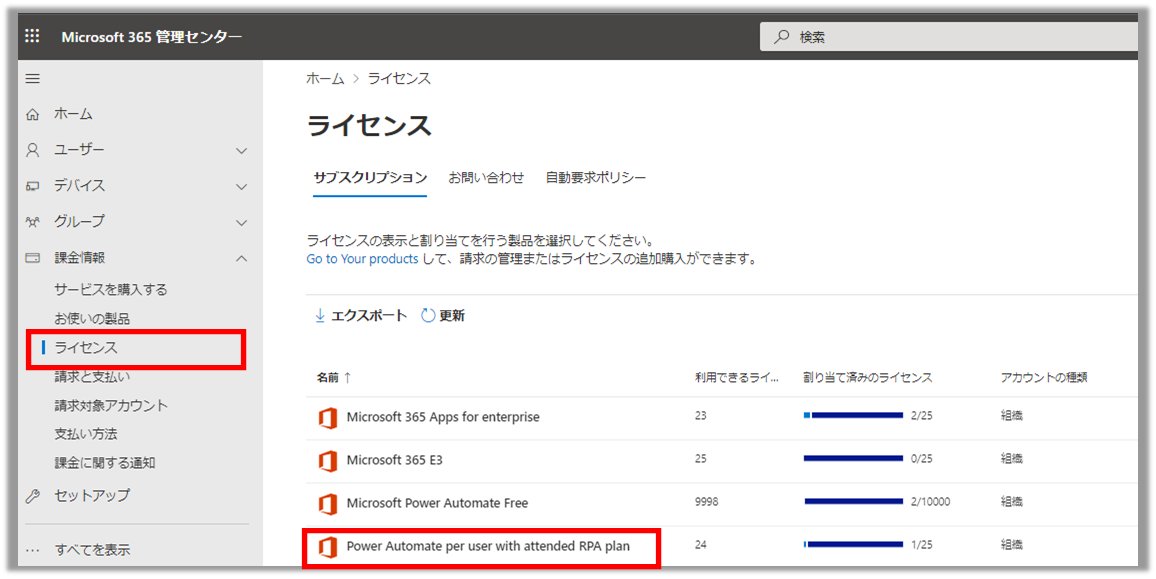
1-4.テナントにライセンスが適用されたか確認する
「課金情報」> [ライセンス」をクリックし、「Power Automate per user with attended RPA plan」があることを確認
2.非アテンド型 RPA アドオンのトライアル開始手順
2-1.「Power Automate per user with attended RPA plan」の製品詳細ページ内のアドオンから試用を開始する
①:「Power Automate per user with attended RPA plan」の製品詳細 のアドオンタブをクリックする
②:Power Automate unattended RPA add-on Trialの「詳細」ボタンをクリックする

③:「Power Automate unattended RPA add-on」の製品詳細ページに遷移したら、「購入」ボタン横にある "無料試用の開始"をクリックする

④:購入手続き画面で「無料トライアル」ボタンをクリック
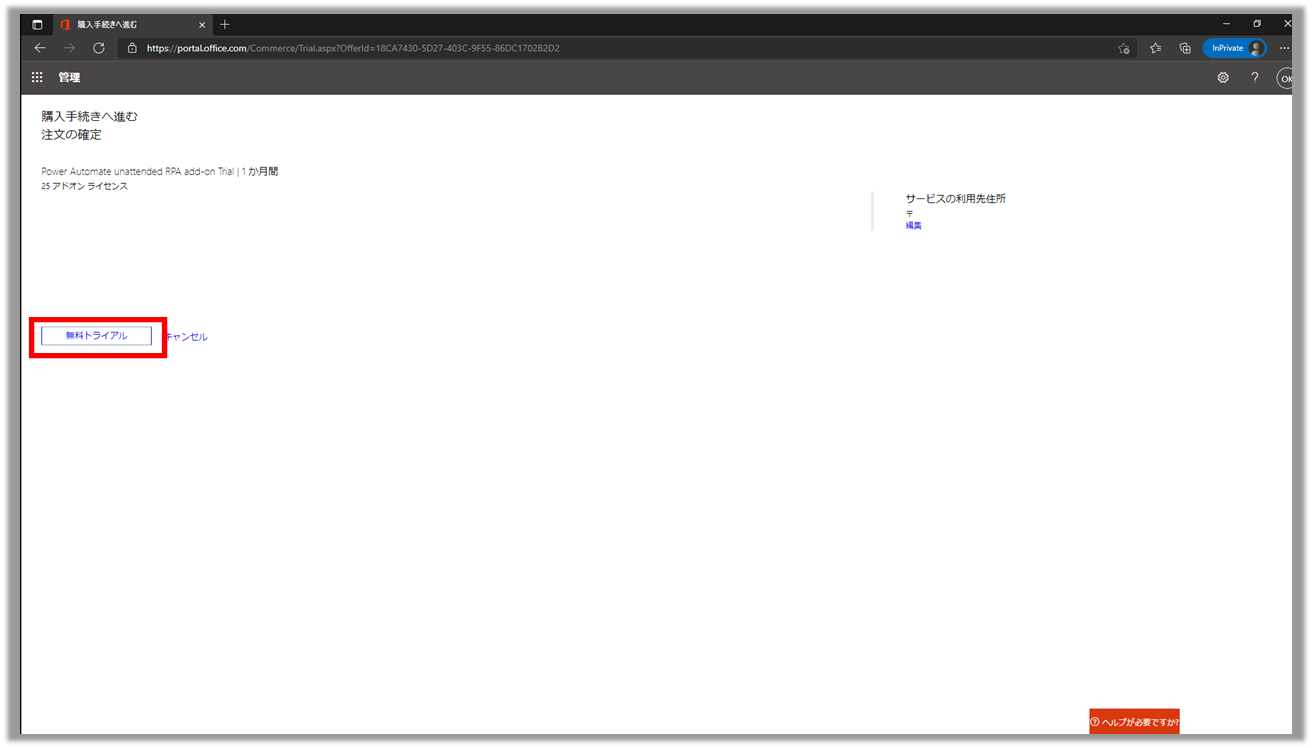
⑤:「続行」ボタンをクリック

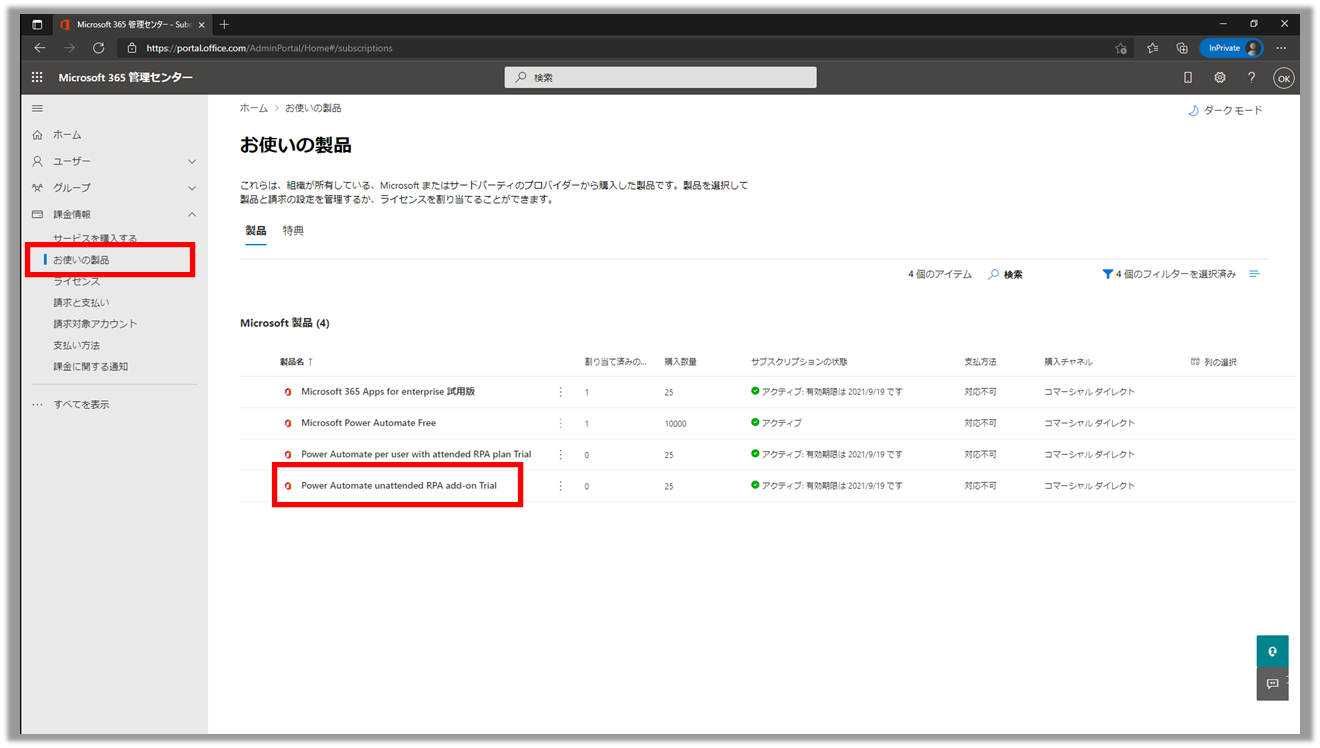
2-2.テナントにライセンスが適用されたか確認する
「課金情報」 > 「お使いの製品」で「Power Automate unattended RPA add-on Trial」があることを確認する
2-3.無人実行を試したい環境へ非アテンド型 RPA アドオンを適用する
①:Power Platform 管理センターのページを開く
「Microsot 365 管理センター」 > 「すべての管理センター」 > 「Power Automate」をクリック
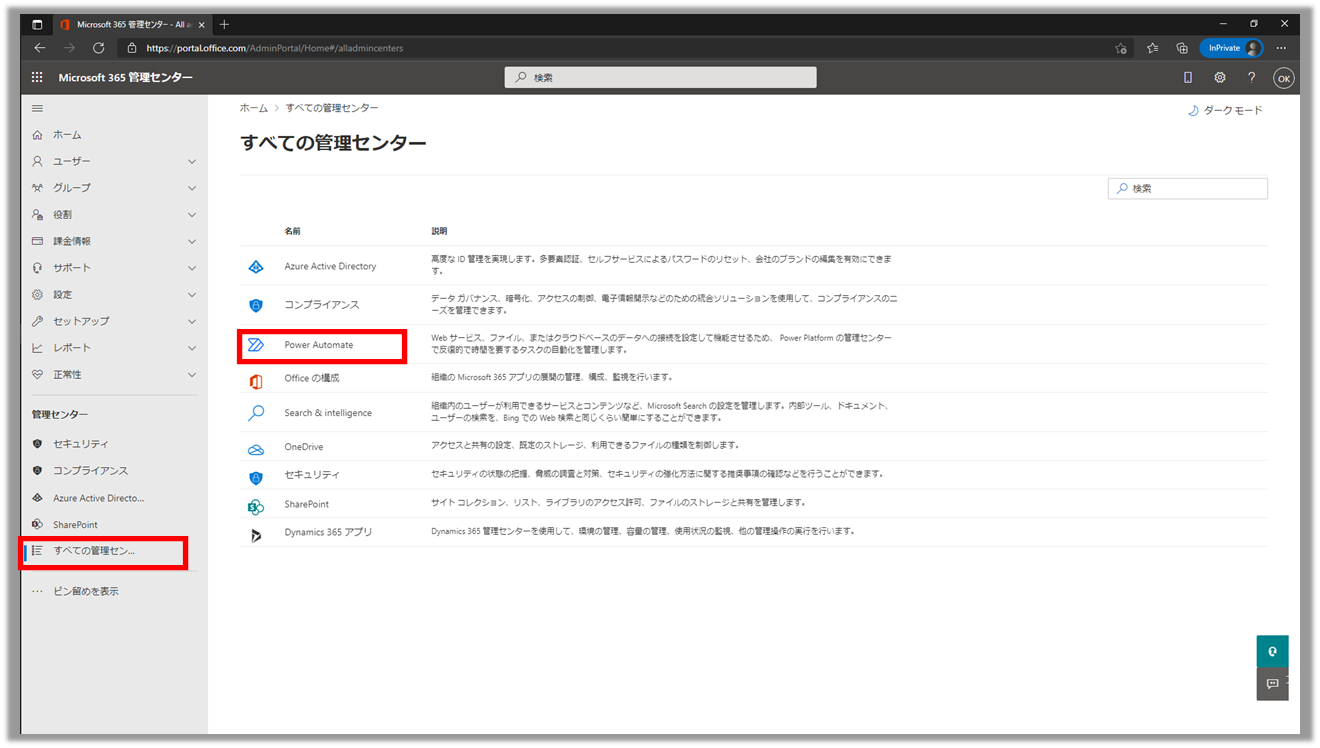
※以下のURLからも直接遷移可能です
https://admin.powerplatform.microsoft.com/
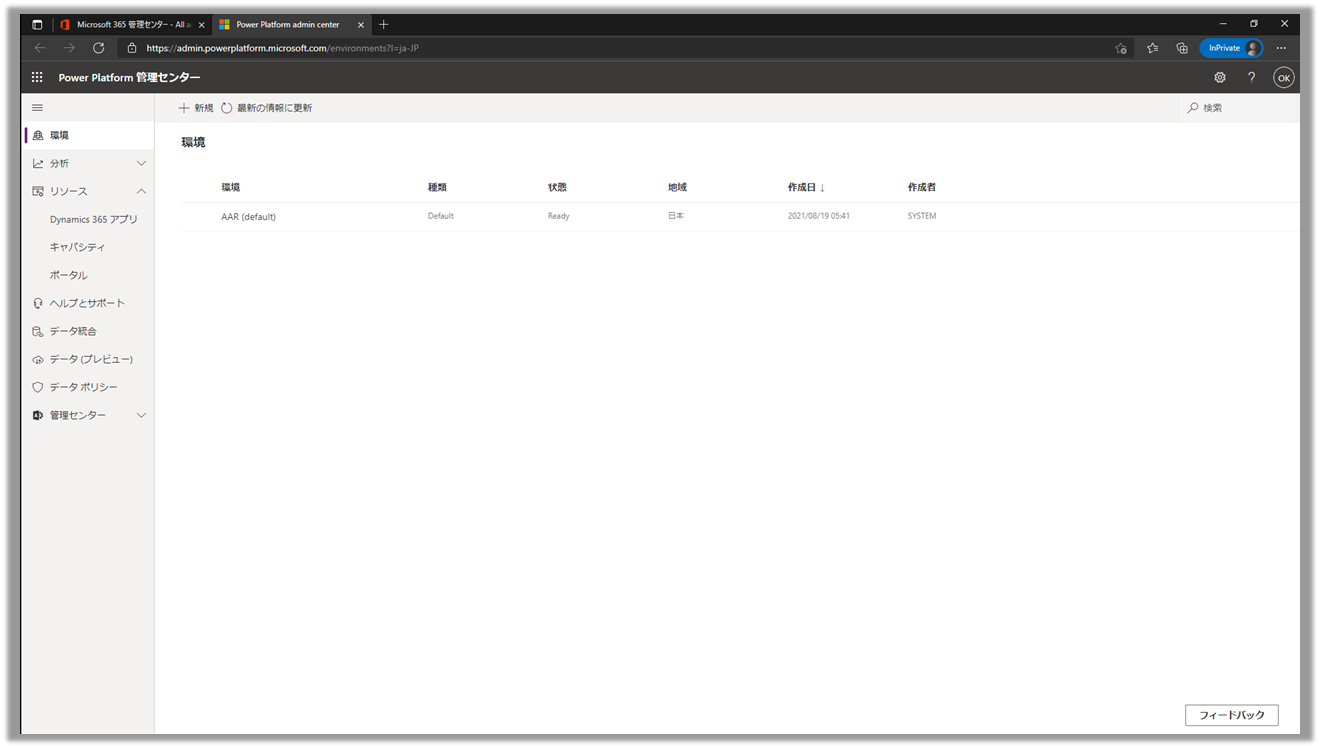
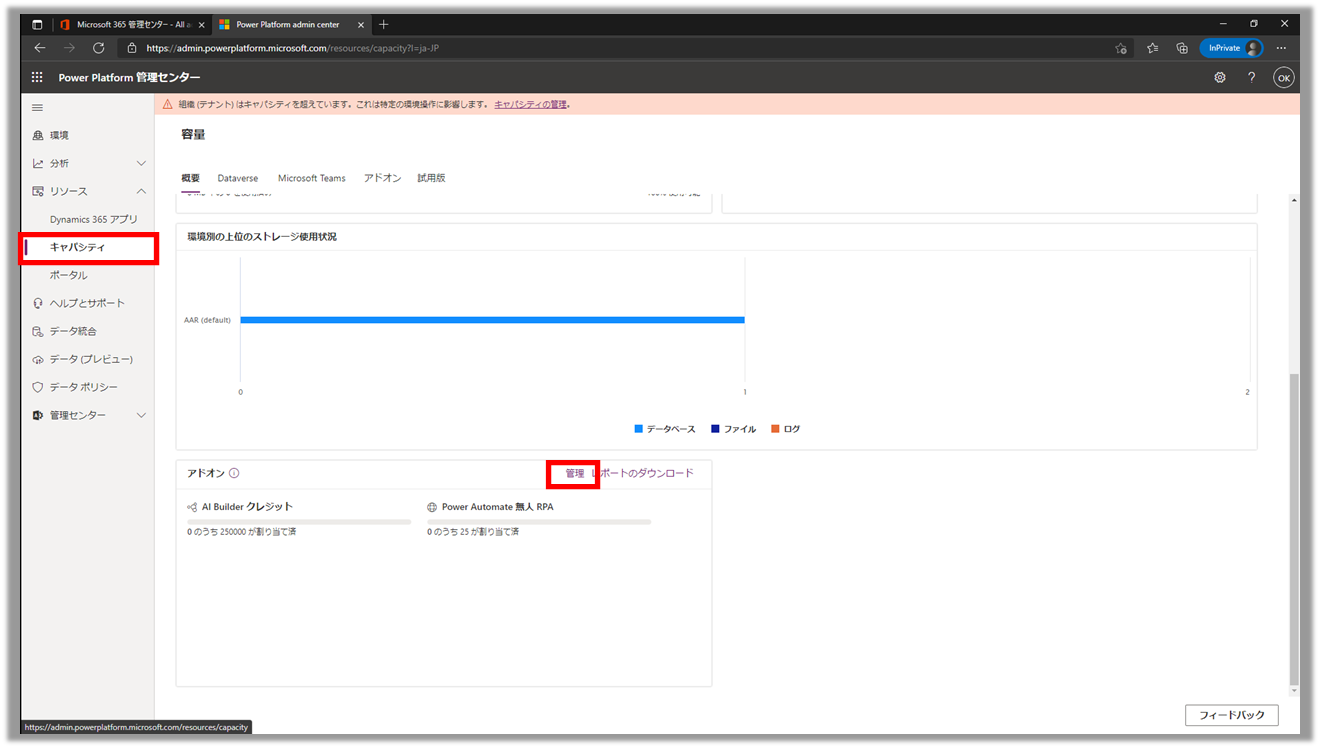
②:キャパシティの画面へ遷移し、「管理」をクリックする
・「リソース」 > 「キャパシティ」をクリック
・画面下部にある「アドオン」の「管理」をクリックする
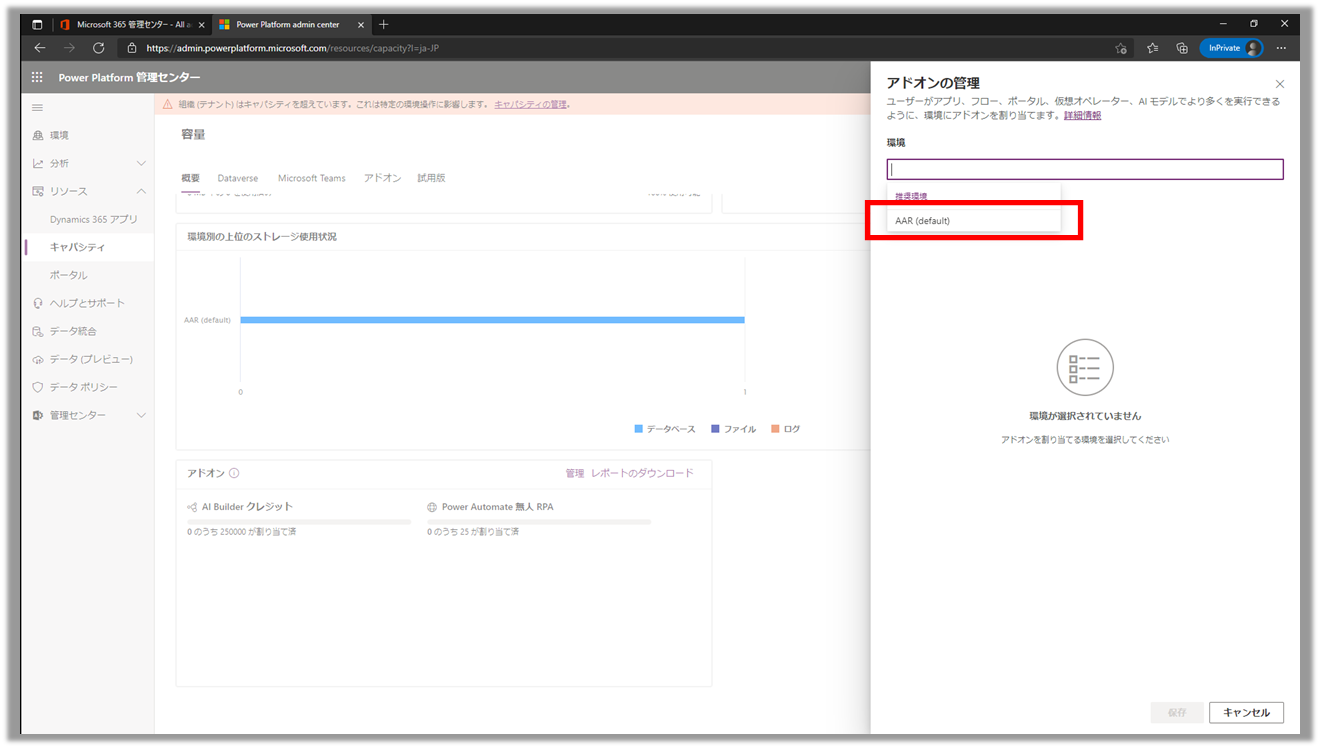
③:「アドオンの管理」ウィンドウで、アドオンを適用する環境を選択する
今回はdefault環境を選択する
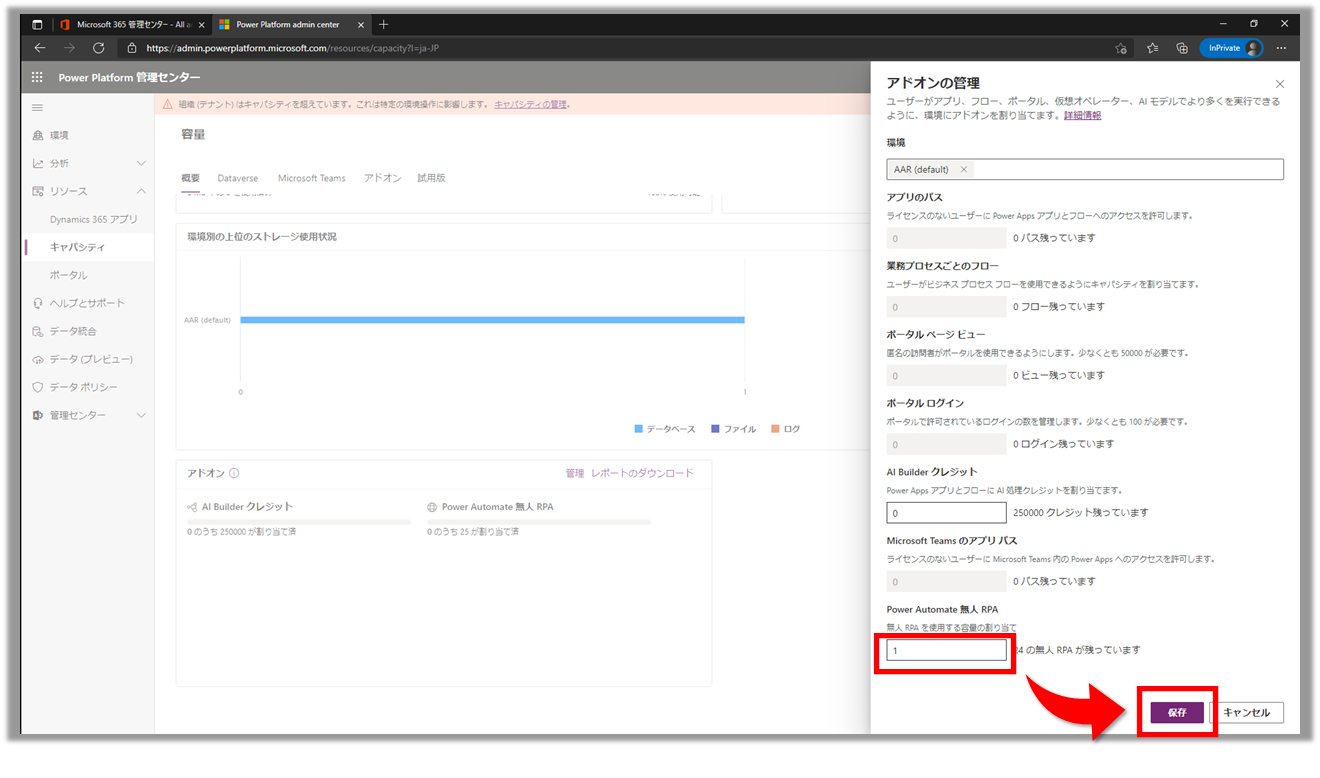
④:「Power Automate 無人 RPA」項目に適用するアドオンの数を入力し、保存をクリックする
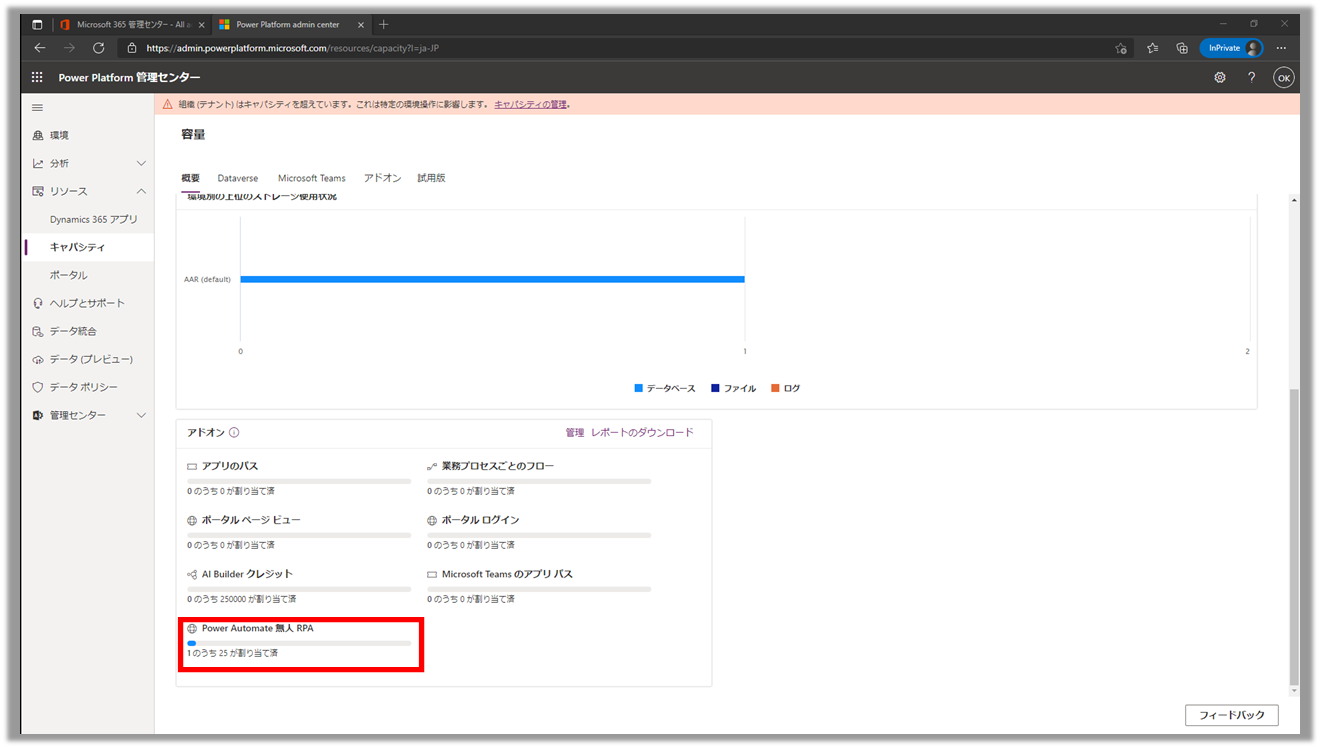
⑤:キャパシティのアドオンに「Power Automate 無人 RPA」が適用されたことが確認できる
以上の手順で設定は完了です。
まとめ
Microsoft 365 管理センターからPower Automate Desktopの有償ライセンスとアドオンのトライアルを簡単に開始できました。
Power Automate Desktop を組織全体で導入、運用する際には「非アテンド型 RPAアドオン」が必要になるケースが出てくると思いますので、導入前の検証作業にぜひトライアルを活用しつつ、必要なライセンス数やアドオン数などを確認していただければと思います。
なお、無人実行の際には有償ライセンス(Power Automate per user with attended RPA plan)+アドオン(Power Automate unattended RPA add-on)の他に「Microsoft 365 E3 Unattended」が必要になるケースもありますのでご利用の際にはご注意ください。
※実際の無人実行については別記事でまとめる予定です
↓↓
【Power Automate for desktop】無人実行の 開始手順