はじめに
これの続きです。
STEP
・要件整理(画面デザイン作成)
・フロンドエンド開発
・静的画面
・表示切り替え(useState)
・画面遷移(useRouter)
・APIモック作成 ←いまここ
・バックエンド開発
今回のやることとゴール
このSTEPではひとつ前の工程作成したログイン画面から、呼び出すAPIを仮実装して、
本物APIが作成されていなくても開発を進められるようにします。
目次
1. APIを作成するようにCopilotに伝える
開発開始
呪文は以下
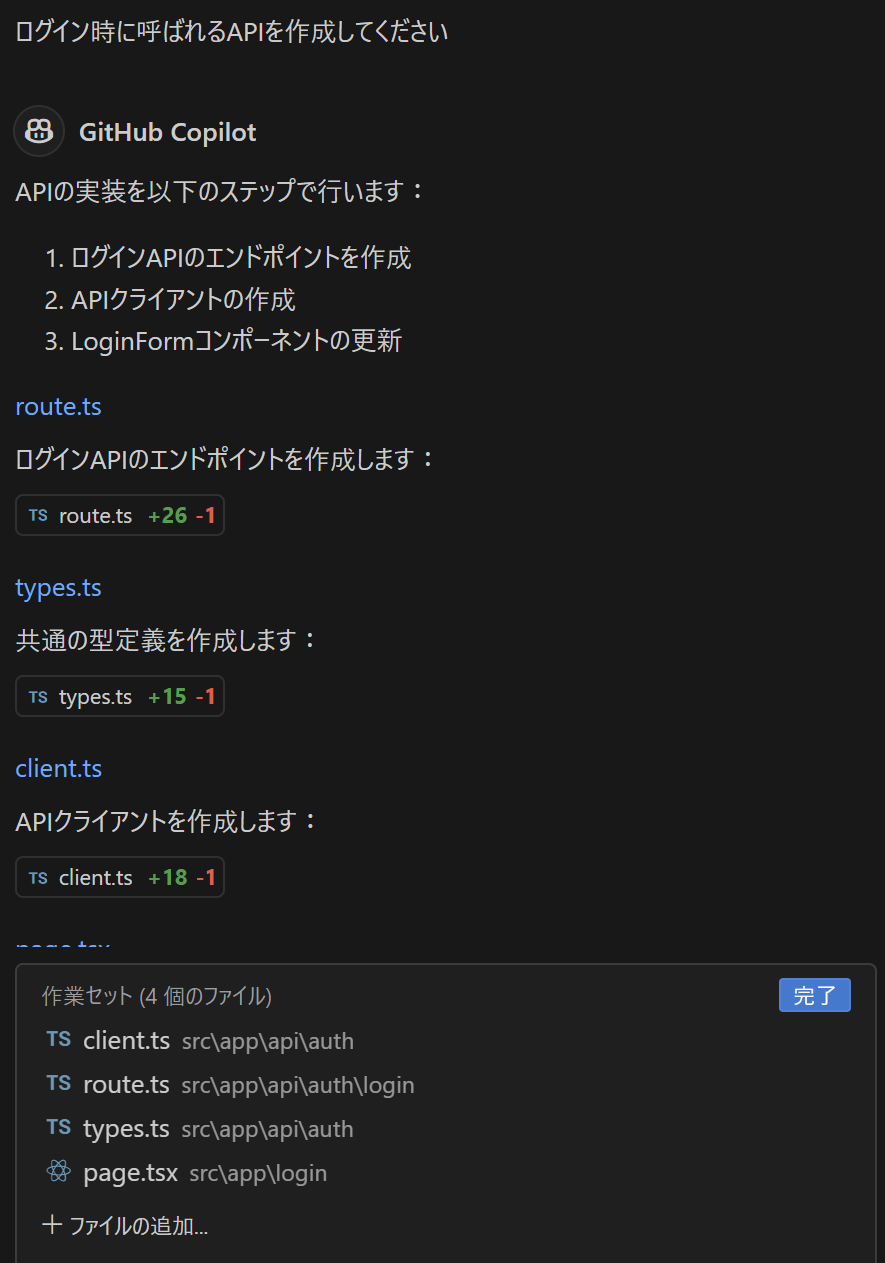
ログイン時に呼ばれるAPIを作成してください
作成されたコード
画面の修正箇所
src\app\login\page.tsx
~省略~
import { loginApi } from '../api/auth/client'

    ~省略~
  const handleSubmit = async (e: React.FormEvent) => {
    e.preventDefault()
    setIsLoading(true)
    setError(null)

    try {
      const response = await loginApi({ email, password })
      if (response.success) {
        router.push('/dashboard')
      }
    } catch (error) {
      setError(error instanceof Error ? error.message : '予期せぬエラーが発生しました')
    } finally {
      setIsLoading(false)
    }
  }

  return (
    <>
      <form className="space-y-6" onSubmit={handleSubmit}>
        {error && (
          <div className="bg-red-50 border border-red-200 text-red-600 px-4 py-3 rounded-md">
            {error}
          </div>
        )}
        ~省略~

        <button
          type="submit"
          disabled={isLoading}
          className="w-full bg-blue-600 text-white py-2 px-4 rounded-md hover:bg-blue-700 focus:outline-none focus:ring-2 focus:ring-blue-500 focus:ring-offset-2 disabled:opacity-50"
        >
          {isLoading ? 'ログイン中...' : 'ログイン'}
        </button>
      </form>
      ~省略~
追加されたサーバー処理
import { loginApi } from '../api/auth/client'
const response = await loginApi({ email, password })
↑ここで呼ばれるloginApi処理は以下
サーバー実装が完了したら以下fetchのパスを書き換えます。
src\app\api\auth\client.ts
import { LoginRequest, LoginResponse } from './types'

export const loginApi = async (credentials: LoginRequest): Promise<LoginResponse> => {
  const response = await fetch('/api/auth/login', {
    method: 'POST',
    headers: { 'Content-Type': 'application/json' },
    body: JSON.stringify(credentials),
  })

  const data = await response.json()

  if (!response.ok) {
    throw new Error(data.error || 'ログインに失敗しました')
  }

  return data
}
↑ここの型は以下
src\app\api\auth\types.ts
export interface LoginRequest {
  email: string
  password: string
}

export interface LoginResponse {
  success: boolean
  user?: {
    id: number
    email: string
    name: string
  }
  error?: string
}
APIは以下
src\app\api\auth\login\route.ts
import { NextResponse } from 'next/server'

export async function POST(request: Request) {

  try {
    const { email, password } = await request.json()

    // TODO: 実際の認証ロジックをここに実装
    if (email === 'test@example.com' && password === 'password123') {
      return NextResponse.json({
        success: true,
        user: { id: 1, email, name: 'テストユーザー' }
      })
    }

    return NextResponse.json(
      { success: false, error: '認証に失敗しました' },
      { status: 401 }
    )
  } catch (error) {
    return NextResponse.json(
      { success: false, error: 'サーバーエラーが発生しました' },
      { status: 500 }
    )
  }
}
動作確認
まずは直接APIをキックしてみる

成功しましたね
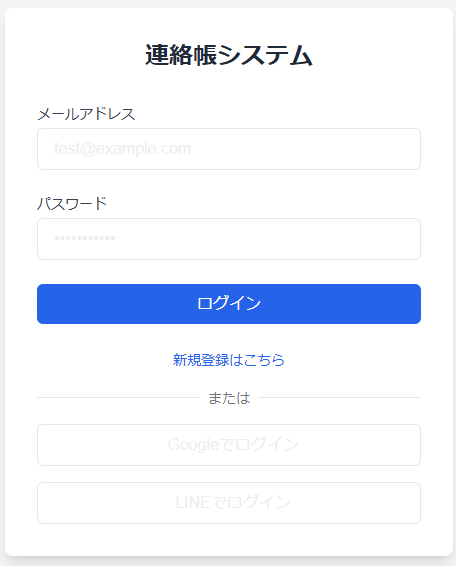
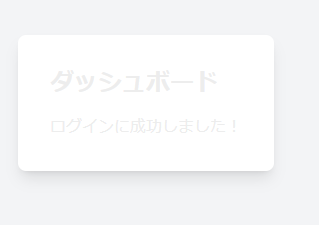
次に画面操作でもログインできるか見てみます。
正しい入力値の時
不正な入力値の場合
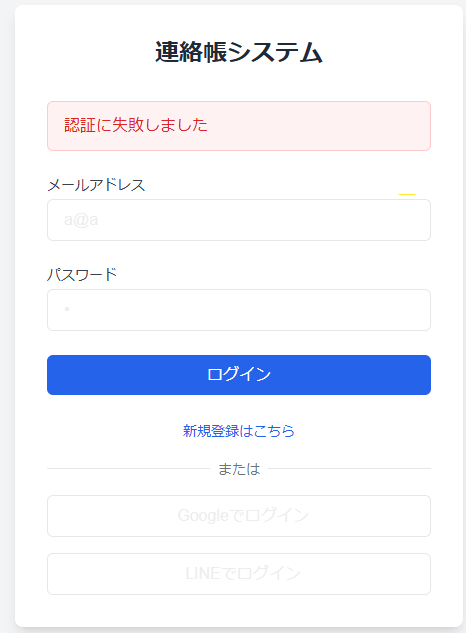
エラーメッセージも受け取れましたね。
まとめ
簡単ですね