はじめに
「Reactの勉強、座学だけで終わっていませんか?」 この記事では、たった 「1時間」 で、手を動かしながら本格的なWebパズルゲームを作りきります。
以前、 C#だけでWebゲームを作る 記事で「箱入り娘」を作りました。
今回はWeb開発のデファクトスタンダードである React + TypeScript で挑戦します。
環境構築が面倒なReactですが、今回はモダンなフレームワーク Next.js を使うことで、コマンド一発で開発をスタートできます。
🎯こんな方へお勧め
- ReactやNext.jsのチュートリアルを終えたが、次に何を作ればいいか分からない
- useState と useRef、useEffect... 正直、どれをいつ使うのか悩んでいる
- 他の言語(C#やJavaなど)の経験はあるが、モダンフロントエンドは未経験
- ステップバイステップですこしずつ理解しながら作ります。
- 章ごとに動作する完全版のソースを添付してます。
📖この記事で「React Hooks」が完全に腑に落ちます
パズルゲームの実装を通して、以下のHooksを実践的に学びます。
-
useStateとuseRef: 「画面を再描画するかどうか」という明確な基準での使い分け -
useEffect: コンポーネントの「表示時・破棄時」の処理(タイマー管理など) - イベントハンドリング: マウスやタッチ操作をHTMLライクに直感的に書く方法
🎮実際に遊んでみよう!

実際に遊んでみるのが一番わかりやすいです。
是非ご自分で操作してみてください!
1.わたしの環境
| アプリケーション | バージョン |
|---|---|
| node.js | v20.19.6 |
| next.js | @16.1.0 |
| react | @19.2.3 |
| tailwindcss | @4.1.18 |
エディターはVSCodeを利用してます。
2.プロジェクトを作成し構成を知る
ターミナルで下記を実行します。
今のカレントフォルダの下に{アプリ名}フォルダができます。
※ とりあえず demo というアプリ名で進めます。
npx create-next-app@latest {アプリ名} --yes
VSCodeで作らられたフォルダを開きます

ファイルがたくさんありますが安心してください。今回利用するのは
src/app/page.tsx ファイルだけです。
この状態で一度実行して動くことを確認しましょう。
ターミナルで下記を実行します
npm run dev
ブラウザで
http://localhost:3000/
を表示します。

この画面が表示されたらプロジェクトの作成は成功です。
3.Tailwind CSS を知る
/src/app/page.tsxを開き中身をすべて削除して以下のコードに置き換えます。
export default function Demo() {
  return (
    <div>
      <h1>箱入り娘(大家族)</h1>
      <p>「娘だけ」を玄関から出してね!</p>
    </div>
  );
}
ファイルを保存しブラウザで確認します。

<h1> タグなのに スタイルが効いていないのがわかります。
Tailwind CSSが「ブラウザごとのデフォルトスタイルの差異」をなくすために、すべての要素をフラットにしてます。
Tailwind CSSで装飾します。
export default function Demo() {
  return (
    <div>
        <h1 className="text-3xl font-bold">箱入り娘(大家族)</h1>
        <p>「娘だけ」を玄関から出してね!</p>
    </div>
  );
}
意図したスタイル className="text-3xl font-bold" が適応されました。
4.盤面を用意する
配列変数で盤面を用意します。
  // 盤面定義 (0=空, 1=壁, 9=出口)
  const BOARD_LAYOUT = [
    [1, 1, 1, 1, 1, 1, 1, 1],
    [1, 0, 0, 0, 0, 0, 0, 1],
    [1, 0, 0, 0, 0, 0, 0, 1],
    [1, 0, 0, 0, 0, 0, 0, 1],
    [1, 0, 0, 0, 0, 0, 0, 1],
    [1, 0, 0, 0, 0, 0, 0, 1],
    [1, 1, 1, 9, 9, 1, 1, 1],
  ]
セル1つのサイズ(幅や高さ)と行列数も定数化します。
  const CELL_SIZE = 50
  const ROWS = BOARD_LAYOUT.length
  const COLS = BOARD_LAYOUT[0].length
HTMLで盤面を描画します。
コード内にできるだけ分かりやすいようにコメントしました。
  return (
    {/* 盤面全体を中央寄せ */}
    <div className="flex justify-center p-10">
      {/* 盤面(ここをCSS Gridにする) */}
      <div
        className="relative grid w-fit border-2 border-black"
        style={{
          // ここで列と行の定義をするのがポイント(回数, 幅や高さのpx)
          gridTemplateColumns: `repeat(${COLS}, ${CELL_SIZE}px)`,
          gridTemplateRows: `repeat(${ROWS}, ${CELL_SIZE}px)`,
        }}
      >
        {/* 2重ループで 変数で定義したセルを描画 */}
        {BOARD_LAYOUT.map((row, y) =>
          row.map((cell, x) => (
            <div
              {/* key=で生成されるセル(エレメント)にIDを割り振る */}
              key={`${y}-${x}`}
              className={`
                border border-gray-300 flex items-center justify-center
                ${cell === 1 ? "bg-gray-200" : ""}
              `}
            >
              {/* デバッグ用に座標を表示(本番では消す) */}
              <span className="text-xs text-gray-400">
                {cell === 9 ? "出" : `${x},${y}`}
              </span>
            </div>
          ))
        )}
      </div>
    </div>
  )
このように表示されれば成功です。

============================
ソースコード全体を表示(折りたたみ)
=============================
// ================================================================
//                            定数・型定義
// ================================================================
// 盤面定義 (0=空, 1=壁, 9=出口)
const BOARD_LAYOUT = [
  [1, 1, 1, 1, 1, 1, 1, 1],
  [1, 0, 0, 0, 0, 0, 0, 1],
  [1, 0, 0, 0, 0, 0, 0, 1],
  [1, 0, 0, 0, 0, 0, 0, 1],
  [1, 0, 0, 0, 0, 0, 0, 1],
  [1, 0, 0, 0, 0, 0, 0, 1],
  [1, 1, 1, 9, 9, 1, 1, 1],
]
const CELL_SIZE = 50
const ROWS = BOARD_LAYOUT.length
const COLS = BOARD_LAYOUT[0].length

// ================================================================
//                            コンポーネント
// ================================================================
export default function Demo() {
  return (
    <div className="flex justify-center p-10">
      {/* 盤面(ここをCSS Gridにする) */}
      <div
        className="relative grid w-fit border-2 border-black"
        style={{
          // ここで列と行の定義をするのがポイント
          gridTemplateColumns: `repeat(${COLS}, ${CELL_SIZE}px)`,
          gridTemplateRows: `repeat(${ROWS}, ${CELL_SIZE}px)`,
        }}
      >
        {/* 2重ループでセルを描画 */}
        {BOARD_LAYOUT.map((row, y) =>
          row.map((cell, x) => (
            <div
              key={`${y}-${x}`}
              className={`
                border border-gray-300 flex items-center justify-center
                ${cell === 1 ? "bg-gray-200" : ""}
              `}
            >
              {/* デバッグ用に座標を表示(本番では消す) */}
              <span className="text-xs text-gray-400">
                {cell === 9 ? "出" : `${x},${y}`}
              </span>
            </div>
          ))
        )}
      </div>
    </div>
  )
}
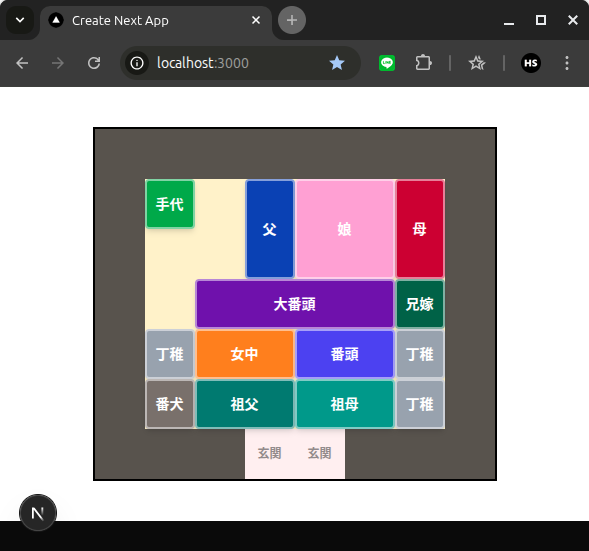
5.駒を用意する
駒には「娘」、「父親」などの名前、初期位置、サイズ、色などの情報があります。
これらを格納できる駒のtypeを用意します。
type Piece = {
  id: number;
  name: string;
  x: number;
  y: number;
  width: number;
  height: number;
  colorClass: string;
};
駒の初期値を定義します。
const INITIAL_PIECES: Piece[] = [
{ id: 1, name: '父', x: 2, y: 1, width: 1, height: 2, colorClass: 'bg-blue-800' },
  { id: 2, name: '娘', x: 3, y: 1, width: 2, height: 2, colorClass: 'bg-pink-300' },
  { id: 3, name: '母', x: 5, y: 1, width: 1, height: 2, colorClass: 'bg-rose-700' },
  { id: 4, name: '手代', x: 1, y: 3, width: 1, height: 1, colorClass: 'bg-green-600' },
  { id: 5, name: '大番頭', x: 2, y: 3, width: 4, height: 1, colorClass: 'bg-purple-800' },
  { id: 6, name: '兄嫁', x: 6, y: 3, width: 1, height: 1, colorClass: 'bg-emerald-800' },
  { id: 7, name: '丁稚', x: 1, y: 4, width: 1, height: 1, colorClass: 'bg-gray-400' },
  { id: 8, name: '女中', x: 2, y: 4, width: 2, height: 1, colorClass: 'bg-orange-400' },
  { id: 9, name: '番頭', x: 4, y: 4, width: 2, height: 1, colorClass: 'bg-indigo-600' },
  { id: 10, name: '丁稚', x: 6, y: 4, width: 1, height: 1, colorClass: 'bg-gray-400' },
  { id: 11, name: '番犬', x: 1, y: 5, width: 1, height: 1, colorClass: 'bg-stone-500' },
  { id: 12, name: '祖父', x: 2, y: 5, width: 2, height: 1, colorClass: 'bg-teal-700' },
  { id: 13, name: '祖母', x: 4, y: 5, width: 2, height: 1, colorClass: 'bg-teal-600' },
  { id: 14, name: '丁稚', x: 6, y: 5, width: 1, height: 1, colorClass: 'bg-gray-400' },
];
コンポーネントで駒の配列を宣言します
export default function Demo() {
  // 表示用データ (今は変更しないので setPieces は省略)
  const [pieces] = useState<Piece[]>(INITIAL_PIECES);
駒の配列宣言で useState を利用しました。
これはReact Hooksと呼ばれ、クライアントコンポーネントでのみ利用可能です。
useState は 「状態(State)」と呼ばれる、変化する値を管理する機能です。 この値が変更されると、Reactはコンポーネントを再描画(リレンダリング) し、画面上の表示を自動的に最新の状態に更新してくれます。
ファイルの先頭でクライアントコンポーネントであることを宣言します。
"use client";
合わせて useState をインポートします。
import { useState } from "react";
HTMLで駒を描画します。
{/* 駒描画 */}
{pieces.map((p) => (
  <div
    key={p.id}
    className={`
      absolute flex items-center justify-center
      border-2 border-white/50 rounded shadow-md
      text-white font-bold text-sm select-none
      ${p.colorClass}
    `}
    style={{
      left: p.x * CELL_SIZE,
      top: p.y * CELL_SIZE,
      width: p.width * CELL_SIZE,
      height: p.height * CELL_SIZE,
    }}
  >
    {p.name}
  </div>
))}
あとデバッグ用の盤面もこのタイミングできれいにします。
<div
  key={`${y}-${x}`}
  className={`
    flex items-center justify-center text-xs text-gray-400
    ${cell === 0 ? "bg-amber-100 border border-amber-100" : ""}
    ${cell === 1 ? "bg-stone-600 border border-stone-600" : ""}
    ${cell === 9 ? "bg-red-100/50" : ""}
  `}
>
  {cell === 9 && (
    <span className="text-neutral-800/50 font-bold">玄関</span>
  )}
</div>
盤面の上に駒が表示されれば成功です。

============================
ソースコード全体を表示(折りたたみ)
=============================
"use client";

import { useState } from "react";

// ================================================================
//                            定数・型定義
// ================================================================

// --- 盤面 ---
const BOARD_LAYOUT = [
  [1, 1, 1, 1, 1, 1, 1, 1],
  [1, 0, 0, 0, 0, 0, 0, 1],
  [1, 0, 0, 0, 0, 0, 0, 1],
  [1, 0, 0, 0, 0, 0, 0, 1],
  [1, 0, 0, 0, 0, 0, 0, 1],
  [1, 0, 0, 0, 0, 0, 0, 1],
  [1, 1, 1, 9, 9, 1, 1, 1],
];
const CELL_SIZE = 50;
const ROWS = BOARD_LAYOUT.length;
const COLS = BOARD_LAYOUT[0].length;

// --- 駒 ---
type Piece = {
  id: number;
  name: string;
  x: number;
  y: number;
  width: number;
  height: number;
  colorClass: string;
};

// prettier-ignore
const INITIAL_PIECES: Piece[] = [
{ id: 1, name: '父', x: 2, y: 1, width: 1, height: 2, colorClass: 'bg-blue-800' },
  { id: 2, name: '娘', x: 3, y: 1, width: 2, height: 2, colorClass: 'bg-pink-300' },
  { id: 3, name: '母', x: 5, y: 1, width: 1, height: 2, colorClass: 'bg-rose-700' },
  { id: 4, name: '手代', x: 1, y: 3, width: 1, height: 1, colorClass: 'bg-green-600' },
  { id: 5, name: '大番頭', x: 2, y: 3, width: 4, height: 1, colorClass: 'bg-purple-800' },
  { id: 6, name: '兄嫁', x: 6, y: 3, width: 1, height: 1, colorClass: 'bg-emerald-800' },
  { id: 7, name: '丁稚', x: 1, y: 4, width: 1, height: 1, colorClass: 'bg-gray-400' },
  { id: 8, name: '女中', x: 2, y: 4, width: 2, height: 1, colorClass: 'bg-orange-400' },
  { id: 9, name: '番頭', x: 4, y: 4, width: 2, height: 1, colorClass: 'bg-indigo-600' },
  { id: 10, name: '丁稚', x: 6, y: 4, width: 1, height: 1, colorClass: 'bg-gray-400' },
  { id: 11, name: '番犬', x: 1, y: 5, width: 1, height: 1, colorClass: 'bg-stone-500' },
  { id: 12, name: '祖父', x: 2, y: 5, width: 2, height: 1, colorClass: 'bg-teal-700' },
  { id: 13, name: '祖母', x: 4, y: 5, width: 2, height: 1, colorClass: 'bg-teal-600' },
  { id: 14, name: '丁稚', x: 6, y: 5, width: 1, height: 1, colorClass: 'bg-gray-400' },
];

// ================================================================
//                            コンポーネント
// ================================================================
export default function Demo() {
  // 表示用データ (今は変更しないので setPieces は省略)
  const [pieces] = useState<Piece[]>(INITIAL_PIECES);

  return (
    <div className="flex justify-center p-10 bg-white">
      {/* 盤面(ここをCSS Gridにする) */}
      <div
        className="relative grid w-fit border-2 border-black"
        style={{
          // ここで列と行の定義をするのがポイント
          gridTemplateColumns: `repeat(${COLS}, ${CELL_SIZE}px)`,
          gridTemplateRows: `repeat(${ROWS}, ${CELL_SIZE}px)`,
        }}
      >
        {/* 2重ループでセルを描画 */}
        {BOARD_LAYOUT.map((row, y) =>
          row.map((cell, x) => (
            <div
              key={`${y}-${x}`}
              className={`
      flex items-center justify-center text-xs text-gray-400
      ${cell === 0 ? "bg-amber-100 border border-amber-100" : ""}
      ${cell === 1 ? "bg-stone-600 border border-stone-600" : ""}
      ${cell === 9 ? "bg-red-100/50" : ""}
    `}
            >
              {cell === 9 && (
                <span className="text-neutral-800/50 font-bold">玄関</span>
              )}
            </div>
          ))
        )}

        {/* 駒描画 */}
        {pieces.map((p) => (
          <div
            key={p.id}
            className={`
      absolute flex items-center justify-center
      border-2 border-white/50 rounded shadow-md
      text-white font-bold text-sm select-none
      ${p.colorClass}
    `}
            style={{
              left: p.x * CELL_SIZE,
              top: p.y * CELL_SIZE,
              width: p.width * CELL_SIZE,
              height: p.height * CELL_SIZE,
            }}
          >
            {p.name}
          </div>
        ))}
      </div>
    </div>
  );
}
6.駒を選択してハイライトする
駒をクリック(タップ)したときに、選択中と分かるようにします。
選択された駒を格納する selectedId を useStateで追加します。
また、駒をクリックされたときのイベントハンドラも追加します。
export default function Demo() {
  const [pieces, setPieces] = useState<Piece[]>(INITIAL_PIECES);
  // ▼ 追加:選択中の駒ID (nullなら選択なし)
  const [selectedId, setSelectedId] = useState<number | null>(null);

  // ▼ 追加:駒を押したときの処理
  const handlePointerDown = (e: React.PointerEvent, id: number) => {
    // 選択状態にする
    setSelectedId(id);
  };
駒に
- クリックのイベントハンドラ
onPointerDownを追加 - 自分が選択状態なら(
selectedId === p.id) リング表示を追加
  <div
    key={p.id}
+    /* ▼ 追加:イベントハンドラ */
+    onPointerDown={(e) => handlePointerDown(e, p.id)}
    className={`
    absolute flex items-center justify-center
    border-2 border-white/50 rounded shadow-md
    text-white font-bold text-sm select-none
    ${p.colorClass}
+    /* ▼ 選択中のスタイル適用 (リング表示 + 最前面へ) */
+      ${
+        selectedId === p.id ? "ring-4 ring-yellow-400 z-10" : "z-0"
+      }    `}
    style={{
      left: p.x * CELL_SIZE,
      top: p.y * CELL_SIZE,
      width: p.width * CELL_SIZE,
      height: p.height * CELL_SIZE,
    }}
  >
駒が選択できてますか?(娘を選択中です)

============================
ソースコード全体を表示(折りたたみ)
=============================
"use client";

import { useState } from "react";

// ================================================================
//                            定数・型定義
// ================================================================

// --- 盤面 ---
const BOARD_LAYOUT = [
  [1, 1, 1, 1, 1, 1, 1, 1],
  [1, 0, 0, 0, 0, 0, 0, 1],
  [1, 0, 0, 0, 0, 0, 0, 1],
  [1, 0, 0, 0, 0, 0, 0, 1],
  [1, 0, 0, 0, 0, 0, 0, 1],
  [1, 0, 0, 0, 0, 0, 0, 1],
  [1, 1, 1, 9, 9, 1, 1, 1],
];
const CELL_SIZE = 50;
const ROWS = BOARD_LAYOUT.length;
const COLS = BOARD_LAYOUT[0].length;

// --- 駒 ---
type Piece = {
  id: number;
  name: string;
  x: number;
  y: number;
  width: number;
  height: number;
  colorClass: string;
};

// prettier-ignore
const INITIAL_PIECES: Piece[] = [
{ id: 1, name: '父', x: 2, y: 1, width: 1, height: 2, colorClass: 'bg-blue-800' },
  { id: 2, name: '娘', x: 3, y: 1, width: 2, height: 2, colorClass: 'bg-pink-300' },
  { id: 3, name: '母', x: 5, y: 1, width: 1, height: 2, colorClass: 'bg-rose-700' },
  { id: 4, name: '手代', x: 1, y: 3, width: 1, height: 1, colorClass: 'bg-green-600' },
  { id: 5, name: '大番頭', x: 2, y: 3, width: 4, height: 1, colorClass: 'bg-purple-800' },
  { id: 6, name: '兄嫁', x: 6, y: 3, width: 1, height: 1, colorClass: 'bg-emerald-800' },
  { id: 7, name: '丁稚', x: 1, y: 4, width: 1, height: 1, colorClass: 'bg-gray-400' },
  { id: 8, name: '女中', x: 2, y: 4, width: 2, height: 1, colorClass: 'bg-orange-400' },
  { id: 9, name: '番頭', x: 4, y: 4, width: 2, height: 1, colorClass: 'bg-indigo-600' },
  { id: 10, name: '丁稚', x: 6, y: 4, width: 1, height: 1, colorClass: 'bg-gray-400' },
  { id: 11, name: '番犬', x: 1, y: 5, width: 1, height: 1, colorClass: 'bg-stone-500' },
  { id: 12, name: '祖父', x: 2, y: 5, width: 2, height: 1, colorClass: 'bg-teal-700' },
  { id: 13, name: '祖母', x: 4, y: 5, width: 2, height: 1, colorClass: 'bg-teal-600' },
  { id: 14, name: '丁稚', x: 6, y: 5, width: 1, height: 1, colorClass: 'bg-gray-400' },
];

// ================================================================
//                            コンポーネント
// ================================================================
export default function Demo() {
  const [pieces, setPieces] = useState<Piece[]>(INITIAL_PIECES);
  // ▼ 追加:選択中の駒ID (nullなら選択なし)
  const [selectedId, setSelectedId] = useState<number | null>(null);

  // ▼ 追加:駒を押したときの処理
  const handlePointerDown = (e: React.PointerEvent, id: number) => {
    // 選択状態にする
    setSelectedId(id);
  };

  return (
    <div className="flex justify-center p-10 bg-white">
      {/* 盤面(ここをCSS Gridにする) */}
      <div
        className="relative grid w-fit border-2 border-black"
        style={{
          // ここで列と行の定義をするのがポイント
          gridTemplateColumns: `repeat(${COLS}, ${CELL_SIZE}px)`,
          gridTemplateRows: `repeat(${ROWS}, ${CELL_SIZE}px)`,
        }}
      >
        {/* 2重ループでセルを描画 */}
        {BOARD_LAYOUT.map((row, y) =>
          row.map((cell, x) => (
            <div
              key={`${y}-${x}`}
              className={`
      flex items-center justify-center text-xs text-gray-400
      ${cell === 0 ? "bg-amber-100 border border-amber-100" : ""}
      ${cell === 1 ? "bg-stone-600 border border-stone-600" : ""}
      ${cell === 9 ? "bg-red-100/50" : ""}
    `}
            >
              {cell === 9 && (
                <span className="text-neutral-800/50 font-bold">玄関</span>
              )}
            </div>
          ))
        )}

        {/* 駒描画 */}
        {pieces.map((p) => (
          <div
            key={p.id}
            /* ▼ 追加:イベントハンドラ */
            onPointerDown={(e) => handlePointerDown(e, p.id)}
            className={`
      absolute flex items-center justify-center
      border-2 border-white/50 rounded shadow-md
      text-white font-bold text-sm select-none
      ${p.colorClass}
            /* ▼ 選択中のスタイル適用 (リング表示 + 最前面へ) */
              ${
                selectedId === p.id ? "ring-4 ring-yellow-400 z-10" : "z-0"
              }    `}
            style={{
              left: p.x * CELL_SIZE,
              top: p.y * CELL_SIZE,
              width: p.width * CELL_SIZE,
              height: p.height * CELL_SIZE,
            }}
          >
            {p.name}
          </div>
        ))}
      </div>
    </div>
  );
}
7.移動の準備( useRef )
駒をスムーズに動かすために、マウス(指)の位置を追跡する必要があります。 ここで useState とは別の React Hooksの useRef という機能を使います。
useState : 値が変わると画面を 再描画します。(表示用)
useRef : 値が変わっても画面は 再描画しません。(裏方用)
ドラッグ中のマウス座標は1秒間に何十回も変わるため、いちいち再描画していると重くなります。そのため useRef を使います。
import に useRef を追加し、変数を用意します。
// useRefを追加
import { useState, useRef } from "react";

// (中略)

export default function Demo() {
  const [pieces] = useState<Piece[]>(INITIAL_PIECES);
  const [selectedId, setSelectedId] = useState<number | null>(null);

+  // ▼ 追加:ドラッグ操作の情報を保存する(再描画させないためuseRef)
+  const dragState = useRef({
+    startX: 0,  // クリック開始したX座標
+    startY: 0   // クリック開始したY座標
+  });
先ほどの handlePointerDown を更新して、クリックした瞬間の座標を覚えるようにします。
const handlePointerDown = (e: React.PointerEvent, id: number) => {
    setSelectedId(id);
    e.preventDefault();

    // ▼ 追加:ポインター(マウス・指)をこの要素にロックする
    e.currentTarget.setPointerCapture(e.pointerId);

    // ▼ 追加:開始位置を記憶
    dragState.current = {
      startX: e.clientX,
      startY: e.clientY,
    };
  };
8.衝突判定を作る
ここがこのゲームで一番難しい部分ですが、コピペでOKです。 「移動しようとした場所に、壁や他の駒がないか?」をチェックする関数です。
export default function... の中に以下の関数を追加してください。
// --------------------------------------------------------
  // 衝突判定ロジック
  // --------------------------------------------------------
  const checkCollision = (target: Piece, newX: number, newY: number): boolean => {
    // 1. 盤外チェック
    if (newX < 0 || newX + target.width > COLS) return false;
    if (newY < 0 || newY + target.height > ROWS) return false;

    // 2. 壁チェック
    for (let y = 0; y < target.height; y++) {
      for (let x = 0; x < target.width; x++) {
        if (BOARD_LAYOUT[newY + y][newX + x] === 1) return false;
      }
    }

    // 3. 他の駒との衝突チェック
    const collision = pieces.some((p) => {
      if (p.id === target.id) return false; // 自分自身は無視
      // 矩形の重なり判定
      return (
        newX < p.x + p.width &&
        newX + target.width > p.x &&
        newY < p.y + p.height &&
        newY + target.height > p.y
      );
    });

    // 衝突していたら false (移動不可)
    return !collision;
  };
9.駒を動かす(イベントハンドラの実装)
駒を動かすことでだいぶゲームらしくなります。
これから「マウスを動かしたとき(Move)」と「離したとき(Up)」の処理を作ります。
// ▼ 追加:ドラッグ中の処理
  const handlePointerMove = (e: React.PointerEvent) => {
    if (selectedId === null) return;

    const currentX = e.clientX;
    const currentY = e.clientY;
    const startX = dragState.current.startX;
    const startY = dragState.current.startY;
    const THRESHOLD = CELL_SIZE / 2;

    let dx = 0;
    let dy = 0;

    if (Math.abs(currentX - startX) > THRESHOLD) {
      dx = currentX > startX ? 1 : -1;
    } else if (Math.abs(currentY - startY) > THRESHOLD) {
      dy = currentY > startY ? 1 : -1;
    }
    // 移動量に達してなければ終了
    if (dx === 0 && dy === 0) return;

    const target = pieces.find((p) => p.id === selectedId);
    if (target) {
      const newX = target.x + dx;
      const newY = target.y + dy;

      // 移動先は壁や他の駒が存在したりしないか?
      if (checkCollision(target, newX, newY)) {
        // 問題なければ移動
        setPieces((prev) =>
          prev.map((p) => (p.id === selectedId ? { ...p, x: newX, y: newY } : p))
        );
        dragState.current = { startX: currentX, startY: currentY };
      }
    }
  };

  // ▼ 追加:ドラッグ終了時の処理
  const handlePointerUp = (e: React.PointerEvent) => {
    setSelectedId(null);
    dragState.current = { startX: 0, startY: 0 };
    e.currentTarget.releasePointerCapture(e.pointerId);
  };
作成した関数を JSXの駒( div )に紐付けます。
{pieces.map((p) => (
  <div
    key={p.id}
    onPointerDown={(e) => handlePointerDown(e, p.id)}
+    /* ▼ 追加:MoveとUpイベントを紐付け */
+    onPointerMove={handlePointerMove}
+    onPointerUp={handlePointerUp}
駒をドラッグできれば成功です。
============================
ソースコード全体を表示(折りたたみ)
=============================
"use client";

import { useRef, useState } from "react";

// ================================================================
//                            定数・型定義
// ================================================================

// --- 盤面 ---
const BOARD_LAYOUT = [
  [1, 1, 1, 1, 1, 1, 1, 1],
  [1, 0, 0, 0, 0, 0, 0, 1],
  [1, 0, 0, 0, 0, 0, 0, 1],
  [1, 0, 0, 0, 0, 0, 0, 1],
  [1, 0, 0, 0, 0, 0, 0, 1],
  [1, 0, 0, 0, 0, 0, 0, 1],
  [1, 1, 1, 9, 9, 1, 1, 1],
];
const CELL_SIZE = 50;
const ROWS = BOARD_LAYOUT.length;
const COLS = BOARD_LAYOUT[0].length;

// --- 駒 ---
type Piece = {
  id: number;
  name: string;
  x: number;
  y: number;
  width: number;
  height: number;
  colorClass: string;
};

// prettier-ignore
const INITIAL_PIECES: Piece[] = [
{ id: 1, name: '父', x: 2, y: 1, width: 1, height: 2, colorClass: 'bg-blue-800' },
  { id: 2, name: '娘', x: 3, y: 1, width: 2, height: 2, colorClass: 'bg-pink-300' },
  { id: 3, name: '母', x: 5, y: 1, width: 1, height: 2, colorClass: 'bg-rose-700' },
  { id: 4, name: '手代', x: 1, y: 3, width: 1, height: 1, colorClass: 'bg-green-600' },
  { id: 5, name: '大番頭', x: 2, y: 3, width: 4, height: 1, colorClass: 'bg-purple-800' },
  { id: 6, name: '兄嫁', x: 6, y: 3, width: 1, height: 1, colorClass: 'bg-emerald-800' },
  { id: 7, name: '丁稚', x: 1, y: 4, width: 1, height: 1, colorClass: 'bg-gray-400' },
  { id: 8, name: '女中', x: 2, y: 4, width: 2, height: 1, colorClass: 'bg-orange-400' },
  { id: 9, name: '番頭', x: 4, y: 4, width: 2, height: 1, colorClass: 'bg-indigo-600' },
  { id: 10, name: '丁稚', x: 6, y: 4, width: 1, height: 1, colorClass: 'bg-gray-400' },
  { id: 11, name: '番犬', x: 1, y: 5, width: 1, height: 1, colorClass: 'bg-stone-500' },
  { id: 12, name: '祖父', x: 2, y: 5, width: 2, height: 1, colorClass: 'bg-teal-700' },
  { id: 13, name: '祖母', x: 4, y: 5, width: 2, height: 1, colorClass: 'bg-teal-600' },
  { id: 14, name: '丁稚', x: 6, y: 5, width: 1, height: 1, colorClass: 'bg-gray-400' },
];

// ================================================================
//                            コンポーネント
// ================================================================
export default function Demo() {
  const [pieces, setPieces] = useState<Piece[]>(INITIAL_PIECES);
  // ▼ 追加:選択中の駒ID (nullなら選択なし)
  const [selectedId, setSelectedId] = useState<number | null>(null);

  // ▼ 追加:ドラッグ操作の情報を保存する(再描画させないためuseRef)
  const dragState = useRef({
    startX: 0, // クリック開始したX座標
    startY: 0, // クリック開始したY座標
  });

  // ▼ 追加:駒を押したときの処理
  const handlePointerDown = (e: React.PointerEvent, id: number) => {
    setSelectedId(id);
    e.preventDefault();

    // ▼ 追加:ポインター(マウス・指)をこの要素にロックする
    e.currentTarget.setPointerCapture(e.pointerId);

    // ▼ 追加:開始位置を記憶
    dragState.current = {
      startX: e.clientX,
      startY: e.clientY,
    };
  };

  // --------------------------------------------------------
  // 衝突判定ロジック
  // --------------------------------------------------------
  const checkCollision = (
    target: Piece,
    newX: number,
    newY: number
  ): boolean => {
    // 1. 盤外チェック
    if (newX < 0 || newX + target.width > COLS) return false;
    if (newY < 0 || newY + target.height > ROWS) return false;

    // 2. 壁チェック
    for (let y = 0; y < target.height; y++) {
      for (let x = 0; x < target.width; x++) {
        if (BOARD_LAYOUT[newY + y][newX + x] === 1) return false;
      }
    }

    // 3. 他の駒との衝突チェック
    const collision = pieces.some((p) => {
      if (p.id === target.id) return false; // 自分自身は無視
      // 矩形の重なり判定
      return (
        newX < p.x + p.width &&
        newX + target.width > p.x &&
        newY < p.y + p.height &&
        newY + target.height > p.y
      );
    });

    // 衝突していたら false (移動不可)
    return !collision;
  };

  // ▼ 追加:ドラッグ中の処理
  const handlePointerMove = (e: React.PointerEvent) => {
    if (selectedId === null) return;

    const currentX = e.clientX;
    const currentY = e.clientY;
    const startX = dragState.current.startX;
    const startY = dragState.current.startY;
    const THRESHOLD = CELL_SIZE / 2;

    let dx = 0;
    let dy = 0;

    if (Math.abs(currentX - startX) > THRESHOLD) {
      dx = currentX > startX ? 1 : -1;
    } else if (Math.abs(currentY - startY) > THRESHOLD) {
      dy = currentY > startY ? 1 : -1;
    }
    // 移動量に達してなければ終了
    if (dx === 0 && dy === 0) return;

    const target = pieces.find((p) => p.id === selectedId);
    if (target) {
      const newX = target.x + dx;
      const newY = target.y + dy;

      // 移動先は壁や他の駒が存在したりしないか?
      if (checkCollision(target, newX, newY)) {
        // 問題なければ移動
        setPieces((prev) =>
          prev.map((p) =>
            p.id === selectedId ? { ...p, x: newX, y: newY } : p
          )
        );
        dragState.current = { startX: currentX, startY: currentY };
      }
    }
  };

  // ▼ 追加:ドラッグ終了時の処理
  const handlePointerUp = (e: React.PointerEvent) => {
    setSelectedId(null);
    dragState.current = { startX: 0, startY: 0 };
    e.currentTarget.releasePointerCapture(e.pointerId);
  };

  return (
    <div className="flex justify-center p-10 bg-white">
      {/* 盤面(ここをCSS Gridにする) */}
      <div
        className="relative grid w-fit border-2 border-black"
        style={{
          // ここで列と行の定義をするのがポイント
          gridTemplateColumns: `repeat(${COLS}, ${CELL_SIZE}px)`,
          gridTemplateRows: `repeat(${ROWS}, ${CELL_SIZE}px)`,
        }}
      >
        {/* 2重ループでセルを描画 */}
        {BOARD_LAYOUT.map((row, y) =>
          row.map((cell, x) => (
            <div
              key={`${y}-${x}`}
              className={`
      flex items-center justify-center text-xs text-gray-400
      ${cell === 0 ? "bg-amber-100 border border-amber-100" : ""}
      ${cell === 1 ? "bg-stone-600 border border-stone-600" : ""}
      ${cell === 9 ? "bg-red-100/50" : ""}
    `}
            >
              {cell === 9 && (
                <span className="text-neutral-800/50 font-bold">玄関</span>
              )}
            </div>
          ))
        )}

        {/* 駒描画 */}
        {pieces.map((p) => (
          <div
            key={p.id}
            /* ▼ 追加:イベントハンドラ */
            onPointerDown={(e) => handlePointerDown(e, p.id)}
            /* ▼ 追加:MoveとUpイベントを紐付け */
            onPointerMove={handlePointerMove}
            onPointerUp={handlePointerUp}
            className={`
      absolute flex items-center justify-center
      border-2 border-white/50 rounded shadow-md
      text-white font-bold text-sm select-none
      ${p.colorClass}
            /* ▼ 選択中のスタイル適用 (リング表示 + 最前面へ) */
              ${
                selectedId === p.id ? "ring-4 ring-yellow-400 z-10" : "z-0"
              }    `}
            style={{
              left: p.x * CELL_SIZE,
              top: p.y * CELL_SIZE,
              width: p.width * CELL_SIZE,
              height: p.height * CELL_SIZE,
            }}
          >
            {p.name}
          </div>
        ))}
      </div>
    </div>
  );
}
10.タイマー表示を組み込む
ゲームとしては今何秒経過したのか表示したいですよね。
内部的なタイマーカウントを useRef そして 画面描画用に タイマーの値が変わるたびに再描画して欲しいので useState を使います。
// ▼ 追加:タイマー用StateとRef
  const [elapsed, setElapsed] = useState(0);
  const timerRef = useRef<NodeJS.Timeout | null>(null);
このコンポーネントが開始された直後からタイマーカウントを始めたいので useEffect を使います。
インポートで useEffect を追加
import { useState, useRef, useEffect } from "react";
// ▼ 追加:起動時にタイマー開始
  useEffect(() => {
    // 起動時に必ず実行される処理
    timerRef.current = setInterval(() => {
      setElapsed((prev) => prev + 1);
    }, 1000);

    // 終了時に必ず実行される処理
    // 画面が消えるときにタイマーを破棄(クリーンアップ)
    return () => {
      if (timerRef.current) clearInterval(timerRef.current);
    };
  }, []);
コンポーネントの戻り値で生成するHTML全体を縦並びにして、タイマー表示を追加します。
return (
    // ▼ 修正:flex-col にして縦並びにする
    <div className="flex flex-col items-center justify-center p-10 min-h-screen bg-gray-50">

      {/* ▼ 追加:タイマー表示 */}
      <div className="mb-4 text-2xl font-bold text-gray-700">
        経過時間: {elapsed} 秒
      </div>
経過時間がカウントアップされ始めました。

============================
ソースコード全体を表示(折りたたみ)
=============================
"use client";

import { useEffect, useRef, useState } from "react";

// ================================================================
//                            定数・型定義
// ================================================================

// --- 盤面 ---
const BOARD_LAYOUT = [
  [1, 1, 1, 1, 1, 1, 1, 1],
  [1, 0, 0, 0, 0, 0, 0, 1],
  [1, 0, 0, 0, 0, 0, 0, 1],
  [1, 0, 0, 0, 0, 0, 0, 1],
  [1, 0, 0, 0, 0, 0, 0, 1],
  [1, 0, 0, 0, 0, 0, 0, 1],
  [1, 1, 1, 9, 9, 1, 1, 1],
];
const CELL_SIZE = 50;
const ROWS = BOARD_LAYOUT.length;
const COLS = BOARD_LAYOUT[0].length;

// --- 駒 ---
type Piece = {
  id: number;
  name: string;
  x: number;
  y: number;
  width: number;
  height: number;
  colorClass: string;
};

// prettier-ignore
const INITIAL_PIECES: Piece[] = [
{ id: 1, name: '父', x: 2, y: 1, width: 1, height: 2, colorClass: 'bg-blue-800' },
  { id: 2, name: '娘', x: 3, y: 1, width: 2, height: 2, colorClass: 'bg-pink-300' },
  { id: 3, name: '母', x: 5, y: 1, width: 1, height: 2, colorClass: 'bg-rose-700' },
  { id: 4, name: '手代', x: 1, y: 3, width: 1, height: 1, colorClass: 'bg-green-600' },
  { id: 5, name: '大番頭', x: 2, y: 3, width: 4, height: 1, colorClass: 'bg-purple-800' },
  { id: 6, name: '兄嫁', x: 6, y: 3, width: 1, height: 1, colorClass: 'bg-emerald-800' },
  { id: 7, name: '丁稚', x: 1, y: 4, width: 1, height: 1, colorClass: 'bg-gray-400' },
  { id: 8, name: '女中', x: 2, y: 4, width: 2, height: 1, colorClass: 'bg-orange-400' },
  { id: 9, name: '番頭', x: 4, y: 4, width: 2, height: 1, colorClass: 'bg-indigo-600' },
  { id: 10, name: '丁稚', x: 6, y: 4, width: 1, height: 1, colorClass: 'bg-gray-400' },
  { id: 11, name: '番犬', x: 1, y: 5, width: 1, height: 1, colorClass: 'bg-stone-500' },
  { id: 12, name: '祖父', x: 2, y: 5, width: 2, height: 1, colorClass: 'bg-teal-700' },
  { id: 13, name: '祖母', x: 4, y: 5, width: 2, height: 1, colorClass: 'bg-teal-600' },
  { id: 14, name: '丁稚', x: 6, y: 5, width: 1, height: 1, colorClass: 'bg-gray-400' },
];

// ================================================================
//                            コンポーネント
// ================================================================
export default function Demo() {
  const [pieces, setPieces] = useState<Piece[]>(INITIAL_PIECES);
  // ▼ 追加:選択中の駒ID (nullなら選択なし)
  const [selectedId, setSelectedId] = useState<number | null>(null);

  // ▼ 追加:ドラッグ操作の情報を保存する(再描画させないためuseRef)
  const dragState = useRef({
    startX: 0, // クリック開始したX座標
    startY: 0, // クリック開始したY座標
  });

// ▼ 追加:タイマー用StateとRef
  const [elapsed, setElapsed] = useState(0);
  const timerRef = useRef<NodeJS.Timeout | null>(null);


// ▼ 追加:起動時にタイマー開始
  useEffect(() => {
    // 起動時に必ず実行される処理
    timerRef.current = setInterval(() => {
      setElapsed((prev) => prev + 1);
    }, 1000);

    // 終了時に必ず実行される処理
    // 画面が消えるときにタイマーを破棄(クリーンアップ)
    return () => {
      if (timerRef.current) clearInterval(timerRef.current);
    };
  }, []);

  // ▼ 追加:駒を押したときの処理
  const handlePointerDown = (e: React.PointerEvent, id: number) => {
    setSelectedId(id);
    e.preventDefault();

    // ▼ 追加:ポインター(マウス・指)をこの要素にロックする
    e.currentTarget.setPointerCapture(e.pointerId);

    // ▼ 追加:開始位置を記憶
    dragState.current = {
      startX: e.clientX,
      startY: e.clientY,
    };
  };

  // --------------------------------------------------------
  // 衝突判定ロジック
  // --------------------------------------------------------
  const checkCollision = (
    target: Piece,
    newX: number,
    newY: number
  ): boolean => {
    // 1. 盤外チェック
    if (newX < 0 || newX + target.width > COLS) return false;
    if (newY < 0 || newY + target.height > ROWS) return false;

    // 2. 壁チェック
    for (let y = 0; y < target.height; y++) {
      for (let x = 0; x < target.width; x++) {
        if (BOARD_LAYOUT[newY + y][newX + x] === 1) return false;
      }
    }

    // 3. 他の駒との衝突チェック
    const collision = pieces.some((p) => {
      if (p.id === target.id) return false; // 自分自身は無視
      // 矩形の重なり判定
      return (
        newX < p.x + p.width &&
        newX + target.width > p.x &&
        newY < p.y + p.height &&
        newY + target.height > p.y
      );
    });

    // 衝突していたら false (移動不可)
    return !collision;
  };

  // ▼ 追加:ドラッグ中の処理
  const handlePointerMove = (e: React.PointerEvent) => {
    if (selectedId === null) return;

    const currentX = e.clientX;
    const currentY = e.clientY;
    const startX = dragState.current.startX;
    const startY = dragState.current.startY;
    const THRESHOLD = CELL_SIZE / 2;

    let dx = 0;
    let dy = 0;

    if (Math.abs(currentX - startX) > THRESHOLD) {
      dx = currentX > startX ? 1 : -1;
    } else if (Math.abs(currentY - startY) > THRESHOLD) {
      dy = currentY > startY ? 1 : -1;
    }
    // 移動量に達してなければ終了
    if (dx === 0 && dy === 0) return;

    const target = pieces.find((p) => p.id === selectedId);
    if (target) {
      const newX = target.x + dx;
      const newY = target.y + dy;

      // 移動先は壁や他の駒が存在したりしないか?
      if (checkCollision(target, newX, newY)) {
        // 問題なければ移動
        setPieces((prev) =>
          prev.map((p) =>
            p.id === selectedId ? { ...p, x: newX, y: newY } : p
          )
        );
        dragState.current = { startX: currentX, startY: currentY };
      }
    }
  };

  // ▼ 追加:ドラッグ終了時の処理
  const handlePointerUp = (e: React.PointerEvent) => {
    setSelectedId(null);
    dragState.current = { startX: 0, startY: 0 };
    e.currentTarget.releasePointerCapture(e.pointerId);
  };

  return (
    <div className="flex flex-col items-center justify-center p-10 min-h-screen bg-gray-50">
      {/* ▼ 追加:タイマー表示 */}
      <div className="mb-4 text-2xl font-bold text-gray-700">
        経過時間: {elapsed} 秒
      </div>

      {/* 盤面(ここをCSS Gridにする) */}
      <div
        className="relative grid w-fit border-2 border-black"
        style={{
          // ここで列と行の定義をするのがポイント
          gridTemplateColumns: `repeat(${COLS}, ${CELL_SIZE}px)`,
          gridTemplateRows: `repeat(${ROWS}, ${CELL_SIZE}px)`,
        }}
      >
        {/* 2重ループでセルを描画 */}
        {BOARD_LAYOUT.map((row, y) =>
          row.map((cell, x) => (
            <div
              key={`${y}-${x}`}
              className={`
      flex items-center justify-center text-xs text-gray-400
      ${cell === 0 ? "bg-amber-100 border border-amber-100" : ""}
      ${cell === 1 ? "bg-stone-600 border border-stone-600" : ""}
      ${cell === 9 ? "bg-red-100/50" : ""}
    `}
            >
              {cell === 9 && (
                <span className="text-neutral-800/50 font-bold">玄関</span>
              )}
            </div>
          ))
        )}

        {/* 駒描画 */}
        {pieces.map((p) => (
          <div
            key={p.id}
            /* ▼ 追加:イベントハンドラ */
            onPointerDown={(e) => handlePointerDown(e, p.id)}
            /* ▼ 追加:MoveとUpイベントを紐付け */
            onPointerMove={handlePointerMove}
            onPointerUp={handlePointerUp}
            className={`
      absolute flex items-center justify-center
      border-2 border-white/50 rounded shadow-md
      text-white font-bold text-sm select-none
      ${p.colorClass}
            /* ▼ 選択中のスタイル適用 (リング表示 + 最前面へ) */
              ${
                selectedId === p.id ? "ring-4 ring-yellow-400 z-10" : "z-0"
              }    `}
            style={{
              left: p.x * CELL_SIZE,
              top: p.y * CELL_SIZE,
              width: p.width * CELL_SIZE,
              height: p.height * CELL_SIZE,
            }}
          >
            {p.name}
          </div>
        ))}
      </div>
    </div>
  );
}
11.ここまでで学習できたReactの機能
-
useStateの値を書き換えると、画面表示が自動的に更新される -
useRefなら、再描画を発生させずに裏方で値を管理できる -
useEffectで コンポーネントの 開始時(表示)と終了時(破棄) の処理を書ける - HTMLタグに属性を書く感覚で、マウス操作などのイベントを簡単に追加できる
12.仕上げる
Reactの学習からは離れるので最後に一気に仕上げます。
■ これから追加する機能
- 娘だけが玄関を出られるようにする
- 娘以外が玄関を出ようとしたら「娘以外は出られない」メッセージ
- 娘が出られたら ゲームクリア!
- リセットボタンを追加
============================
ソースコード全体を表示(折りたたみ)
=============================
"use client";

import { useEffect, useRef, useState } from "react";

// ================================================================
//                            定数・型定義
// ================================================================

// --- 盤面 ---
const BOARD_LAYOUT = [
  [1, 1, 1, 1, 1, 1, 1, 1],
  [1, 0, 0, 0, 0, 0, 0, 1],
  [1, 0, 0, 0, 0, 0, 0, 1],
  [1, 0, 0, 0, 0, 0, 0, 1],
  [1, 0, 0, 0, 0, 0, 0, 1],
  [1, 0, 0, 0, 0, 0, 0, 1],
  [1, 1, 1, 9, 9, 1, 1, 1],
];
const CELL_SIZE = 50;
const ROWS = BOARD_LAYOUT.length;
const COLS = BOARD_LAYOUT[0].length;

// --- 駒 ---
type Piece = {
  id: number;
  name: string;
  x: number;
  y: number;
  width: number;
  height: number;
  colorClass: string;
};

// prettier-ignore
const INITIAL_PIECES: Piece[] = [
{ id: 1, name: '父', x: 2, y: 1, width: 1, height: 2, colorClass: 'bg-blue-800' },
  { id: 2, name: '娘', x: 3, y: 1, width: 2, height: 2, colorClass: 'bg-pink-300' },
  { id: 3, name: '母', x: 5, y: 1, width: 1, height: 2, colorClass: 'bg-rose-700' },
  { id: 4, name: '手代', x: 1, y: 3, width: 1, height: 1, colorClass: 'bg-green-600' },
  { id: 5, name: '大番頭', x: 2, y: 3, width: 4, height: 1, colorClass: 'bg-purple-800' },
  { id: 6, name: '兄嫁', x: 6, y: 3, width: 1, height: 1, colorClass: 'bg-emerald-800' },
  { id: 7, name: '丁稚', x: 1, y: 4, width: 1, height: 1, colorClass: 'bg-gray-400' },
  { id: 8, name: '女中', x: 2, y: 4, width: 2, height: 1, colorClass: 'bg-orange-400' },
  { id: 9, name: '番頭', x: 4, y: 4, width: 2, height: 1, colorClass: 'bg-indigo-600' },
  { id: 10, name: '丁稚', x: 6, y: 4, width: 1, height: 1, colorClass: 'bg-gray-400' },
  { id: 11, name: '番犬', x: 1, y: 5, width: 1, height: 1, colorClass: 'bg-stone-500' },
  { id: 12, name: '祖父', x: 2, y: 5, width: 2, height: 1, colorClass: 'bg-teal-700' },
  { id: 13, name: '祖母', x: 4, y: 5, width: 2, height: 1, colorClass: 'bg-teal-600' },
  { id: 14, name: '丁稚', x: 6, y: 5, width: 1, height: 1, colorClass: 'bg-gray-400' },
];

// ================================================================
//                            コンポーネント
// ================================================================
export default function Demo() {
  const [pieces, setPieces] = useState<Piece[]>(INITIAL_PIECES);
  const [selectedId, setSelectedId] = useState<number | null>(null);

  const [elapsed, setElapsed] = useState(0);
  const [isCleared, setIsCleared] = useState(false);
  const [message, setMessage] = useState("");

  const timerRef = useRef<NodeJS.Timeout | null>(null);
  const dragState = useRef({
    startX: 0, // クリック開始したX座標
    startY: 0, // クリック開始したY座標
  });

  // 起動時・終了時処理
  useEffect(() => {
    // クリア済みならタイマーを進めない
    if (isCleared) return;

    timerRef.current = setInterval(() => {
      setElapsed((prev) => prev + 1);
    }, 1000);

    // 終了時に必ず実行される処理
    // 画面が消えるときにタイマーを破棄(クリーンアップ)
    return () => {
      if (timerRef.current) clearInterval(timerRef.current);
    };
  }, [isCleared]); // isClearedが変化したら再評価

  // リセット処理
  const initGame = () => {
    setPieces(INITIAL_PIECES);
    setElapsed(0);
    setIsCleared(false);
    setMessage("");
    setSelectedId(null);
  };

  // ▼ 追加:駒を押したときの処理
  const handlePointerDown = (e: React.PointerEvent, id: number) => {
    // クリア済みなら操作無効
    if (isCleared) return;

    setMessage(""); // クリック時にメッセージを一旦消す
    setSelectedId(id);
    e.preventDefault();

    // ▼ 追加:ポインター(マウス・指)をこの要素にロックする
    e.currentTarget.setPointerCapture(e.pointerId);

    // ▼ 追加:開始位置を記憶
    dragState.current = {
      startX: e.clientX,
      startY: e.clientY,
    };
  };

  // --------------------------------------------------------
  // 衝突判定ロジック
  // --------------------------------------------------------
  const checkCollision = (
    target: Piece,
    newX: number,
    newY: number
  ): { allowed: boolean; msg?: string; win?: boolean } => {
    // 1. 盤外チェック
    if (newX < 0 || newX + target.width > COLS) return { allowed: false };
    if (newY < 0 || newY + target.height > ROWS) return { allowed: false };

    // 2. 壁・出口チェック
    let hitExit = false;
    for (let y = 0; y < target.height; y++) {
      for (let x = 0; x < target.width; x++) {
        const cell = BOARD_LAYOUT[newY + y][newX + x];
        if (cell === 1) return { allowed: false }; // 壁
        if (cell === 9) hitExit = true; // 出口
      }
    }

    // 出口に入った場合の判定
    if (hitExit) {
      if (target.name === "娘") {
        return { allowed: true, win: true };
      } else {
        return { allowed: false, msg: "娘以外は出られません!" };
      }
    }

    // 3. 他の駒との衝突チェック
    const collision = pieces.some((p) => {
      if (p.id === target.id) return false;
      return (
        newX < p.x + p.width &&
        newX + target.width > p.x &&
        newY < p.y + p.height &&
        newY + target.height > p.y
      );
    });

    if (collision) return { allowed: false };

    return { allowed: true };
  };

  // ポインター移動
  const handlePointerMove = (e: React.PointerEvent) => {
    if (selectedId === null || isCleared) return;

    const currentX = e.clientX;
    const currentY = e.clientY;
    const startX = dragState.current.startX;
    const startY = dragState.current.startY;
    const THRESHOLD = CELL_SIZE / 2;

    let dx = 0;
    let dy = 0;

    if (Math.abs(currentX - startX) > THRESHOLD) {
      dx = currentX > startX ? 1 : -1;
    } else if (Math.abs(currentY - startY) > THRESHOLD) {
      dy = currentY > startY ? 1 : -1;
    }
    // 移動量に達してなければ終了
    if (dx === 0 && dy === 0) return;

    const target = pieces.find((p) => p.id === selectedId);
    if (target) {
      const newX = target.x + dx;
      const newY = target.y + dy;

      const result = checkCollision(target, newX, newY);

      // メッセージがあれば表示
      if (result.msg) setMessage(result.msg);

      if (result.allowed) {
        // 勝利判定
        if (result.win) {
            setIsCleared(true);
            setMessage("🎉ゲームクリア!🎉");
        }

        setPieces((prev) =>
          prev.map((p) => (p.id === selectedId ? { ...p, x: newX, y: newY } : p))
        );
        dragState.current = { startX: currentX, startY: currentY };
      }
    }
  };

  // ポインターアップ
  const handlePointerUp = (e: React.PointerEvent) => {
    setSelectedId(null);
    dragState.current = { startX: 0, startY: 0 };
    e.currentTarget.releasePointerCapture(e.pointerId);
  };

  return (
    <div className="flex flex-col items-center justify-center p-10 min-h-screen bg-gray-50">
      {/* ヘッダーエリア */}
      <div className="mb-6 flex flex-col items-center gap-2">
        <h1 className="text-2xl font-bold text-gray-800">箱入り娘</h1>
        <p className="text-xl text-gray-800">娘だけを出してね!</p>

        <div className="flex items-center gap-4">
          <div className="text-xl text-gray-800 font-mono bg-white px-4 py-1 rounded border">
            経過時間: {elapsed}
          </div>
          <button
            onClick={initGame}
            className="px-4 py-1 bg-blue-500 text-white rounded hover:bg-blue-600 transition-colors shadow"
          >
            リセット
          </button>
        </div>

        {/* メッセージエリア */}
        <div className="h-8 flex items-center">
            {message && (
                <span className={`font-bold ${isCleared ? "text-red-500 text-xl animate-bounce" : "text-red-600"}`}>
                    {message}
                </span>
            )}
        </div>
      </div>

      {/* 盤面(ここをCSS Gridにする) */}
      <div
        className="relative grid w-fit border-2 border-black"
        style={{
          // ここで列と行の定義をするのがポイント
          gridTemplateColumns: `repeat(${COLS}, ${CELL_SIZE}px)`,
          gridTemplateRows: `repeat(${ROWS}, ${CELL_SIZE}px)`,
        }}
      >
        {/* 2重ループでセルを描画 */}
        {BOARD_LAYOUT.map((row, y) =>
          row.map((cell, x) => (
            <div
              key={`${y}-${x}`}
              className={`
      flex items-center justify-center text-xs text-gray-400
      ${cell === 0 ? "bg-amber-100 border border-amber-100" : ""}
      ${cell === 1 ? "bg-stone-600 border border-stone-600" : ""}
      ${cell === 9 ? "bg-red-100/50" : ""}
    `}
            >
              {cell === 9 && (
                <span className="text-neutral-800/50 font-bold">玄関</span>
              )}
            </div>
          ))
        )}

        {/* 駒描画 */}
        {pieces.map((p) => (
          <div
            key={p.id}
            onPointerDown={(e) => handlePointerDown(e, p.id)}
            onPointerMove={handlePointerMove}
            onPointerUp={handlePointerUp}
            className={`
      absolute flex items-center justify-center
      border-2 border-white/50 rounded shadow-md
      text-white font-bold text-sm select-none
      ${p.colorClass}
            /* ▼ 選択中のスタイル適用 (リング表示 + 最前面へ) */
              ${
                selectedId === p.id ? "ring-4 ring-yellow-400 z-10" : "z-0"
              }    `}
            style={{
              left: p.x * CELL_SIZE,
              top: p.y * CELL_SIZE,
              width: p.width * CELL_SIZE,
              height: p.height * CELL_SIZE,
            }}
          >
            {p.name}
          </div>
        ))}
      </div>
    </div>
  );
}
🎉 これで完成です 🎉

13.最後に
わたしは元々C#のエンジニアなので、最初はReactの省略記法に戸惑いました。
例えば useState でも、
const [pieces, setPieces] = useState<Piece[]>(INITIAL_PIECES);
const [監視する変数名, この変数の値を書き換えるメソッド名] =
useState<監視する変数の型>(変数の初期値);
慣れれば短くコンパクトに書けるメリットが大きいですが、初見では分かりづらかったです。
この記事が同じように悩んでいる方の一助になれば幸いです。
14.公開ソース
細かな差異はありますが、デモアプリの完全なソースを公開してます。