TensorFlow Object Detection APIを使ってGoogle Cloud ML Engineで訓練をしました。
適当にGoogle画像検索で堀川君の画像を使ったのですが、結果いまいちです。教師データの画像も約40枚と少なく、色々な点で手を抜いています。
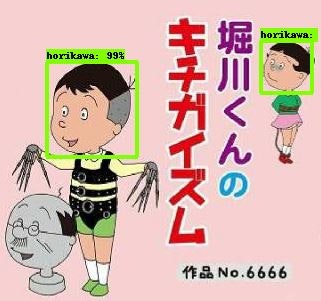
※Google画像検索すると変な画像も多かったです。評価画像を6枚しか用意していなかったため、一番わかりやすかったのが↑なのですが、ファンの方すいません・・・
モデルのエクスポートは「Object Detection APIのsaved_model出力」を参照ください。
概要
- 教師画像:訓練用30枚、評価用6枚
- Epoch:1000回
- バッチサイズ:1
- アルゴリズム: Faster R-CNN with Resnet-101 (v1)
- 転移学習:Tensorflow detection model zooのCOCO-trained modelsを使用
参考
- Google Cloud ML EngineでTensorFlow機械学習訓練実行
- TensorFlow Object Detection APIをUbuntuにインストール
- Object Detectionのためのアノテーション(ラベリング)
- Object Detection APIのsaved_model出力
- Access Tokenを取得してGoogle Cloud MLでオンライン予測
環境
| 種類 | バージョン | 内容 |
|---|---|---|
| OS | Ubuntu18.04.01 LTS | Windows8.1からOracle VirtualBoxを使って動かしています |
| Python | 3.5.6 | Python3.5.6をpyenvで動かしています。Google Cloud MLのランタイム1.10を使うのでPythonは最新の3.7を使いません(2019/1/5時点) |
| TensorFlow | 1.10 | Google Cloud MLのランタイム1.10を使うのでTensorFlowは最新の1.12を使いません(2019/1/5時点) |
| ※後で気になって調べたのですが、2019/1/5時点でもTensorFlow1.12が使えました。日本語の情報だと1.10までしかなかったのですが、英語で見ると1.12も使えました。 |
前提
- pyenvはインストール済
- GCPのアカウントを持っていること
- Google Cloud SDKインストール済
- TensorFlow Object Detection API インストール済
- 訓練用データ作成済
手順
1. 訓練事前準備
1.1. パッケージング
Google Cloud ML Engineに送るプログラムをパッケージングします。
# From tensorflow/models/research/
bash object_detection/dataset_tools/create_pycocotools_package.sh /tmp/pycocotools
python setup.py sdist
以下のコマンドでファイル生成を確認します。
$ ls /tmp/pycocotools/
pycocotools-2.0.tar.gz

$ ls dist
object_detection-0.1.tar.gz
カレントディレクトリをslimにして、setup.py実行。
(cd slim && python setup.py sdist)
同様にファイル生成を確認。
$ ls slim/dist
slim-0.1.tar.gz
1.2. 訓練ジョブYAMLファイル作成
訓練ジョブのYAMLファイルを作成します。ランタイムのバージョンを1.10にして、サーバ構成をBASIC_GPUというGPUを使用したシンプルな構成にしています。
TrainingInputに各パラメータの説明があります。
trainingInput:
  runtimeVersion: "1.10"
  scaleTier: BASIC_GPU
1.3. 転移学習元モデルのダウンロード
Tensorflow detection model zooからfaster_rcnn_resnet101_cocoをダウンロードして解凍。今回訓練するモデルが転移学習元と関係なくても、少ないEpochで精度が高くなるので転移学習は非常におすすめです。
1.4. Configファイル作成
"models/research/object_detection/samples/configs/"フォルダにあるファイル"faster_rcnn_resnet101_coco.config"をコピーして一部、変更します。
ここでは、次の手順「1.5. Google Cloud Storageへのアップロード」でファイルアップロードすることを見越してファイルパスの設定もしています。
# Faster R-CNN with Resnet-101 (v1), configuration for MSCOCO Dataset.
# Users should configure the fine_tune_checkpoint field in the train config as
# well as the label_map_path and input_path fields in the train_input_reader and
# eval_input_reader. Search for "PATH_TO_BE_CONFIGURED" to find the fields that
# should be configured.

model {
  faster_rcnn {
    num_classes: 1
    image_resizer {
      keep_aspect_ratio_resizer {
        min_dimension: 600
        max_dimension: 1024
      }
    }
    feature_extractor {
      type: 'faster_rcnn_resnet101'
      first_stage_features_stride: 16
    }
    first_stage_anchor_generator {
      grid_anchor_generator {
        scales: [0.25, 0.5, 1.0, 2.0]
        aspect_ratios: [0.5, 1.0, 2.0]
        height_stride: 16
        width_stride: 16
      }
    }
    first_stage_box_predictor_conv_hyperparams {
      op: CONV
      regularizer {
        l2_regularizer {
          weight: 0.0
        }
      }
      initializer {
        truncated_normal_initializer {
          stddev: 0.01
        }
      }
    }
    first_stage_nms_score_threshold: 0.0
    first_stage_nms_iou_threshold: 0.7
    first_stage_max_proposals: 300
    first_stage_localization_loss_weight: 2.0
    first_stage_objectness_loss_weight: 1.0
    initial_crop_size: 14
    maxpool_kernel_size: 2
    maxpool_stride: 2
    second_stage_box_predictor {
      mask_rcnn_box_predictor {
        use_dropout: false
        dropout_keep_probability: 1.0
        fc_hyperparams {
          op: FC
          regularizer {
            l2_regularizer {
              weight: 0.0
            }
          }
          initializer {
            variance_scaling_initializer {
              factor: 1.0
              uniform: true
              mode: FAN_AVG
            }
          }
        }
      }
    }
    second_stage_post_processing {
      batch_non_max_suppression {
        score_threshold: 0.0
        iou_threshold: 0.6
        max_detections_per_class: 100
        max_total_detections: 300
      }
      score_converter: SOFTMAX
    }
    second_stage_localization_loss_weight: 2.0
    second_stage_classification_loss_weight: 1.0
  }
}

train_config: {
  batch_size: 1
  optimizer {
    momentum_optimizer: {
      learning_rate: {
        manual_step_learning_rate {
          initial_learning_rate: 0.0003
          schedule {
            step: 900000
            learning_rate: .00003
          }
          schedule {
            step: 1200000
            learning_rate: .000003
          }
        }
      }
      momentum_optimizer_value: 0.9
    }
    use_moving_average: false
  }
  gradient_clipping_by_norm: 10.0
  fine_tune_checkpoint: "gs://cl-ml01/train_input/transfer/model.ckpt"
  from_detection_checkpoint: true
  num_steps: 1000
  data_augmentation_options {
    random_horizontal_flip {
    }
  }
  data_augmentation_options {
    random_crop_pad_image {
    }
  }
  data_augmentation_options {
    random_black_patches {
      max_black_patches: 5
    }
  }
}

train_input_reader: {
  tf_record_input_reader {
    input_path: "gs://cl-ml01/train_input/train.record"
  }
  label_map_path: "gs://cl-ml01/train_input/label_map.pbtxt"
}

eval_config: {
  num_examples: 6
  num_visualizations: 6
  save_graph: true

  # Note: The below line limits the evaluation process to 10 evaluations.
  # Remove the below line to evaluate indefinitely.
  max_evals: 10
}

eval_input_reader: {
  tf_record_input_reader {
    input_path: "gs://cl-ml01/train_input/eval.record"
  }
  label_map_path: "gs://cl-ml01/train_input/label_map.pbtxt"
  shuffle: false
  num_readers: 1
}
意識したパラメータは以下の点です。詳しくないですがConfiguring the Object Detection Training Pipelineに情報があります。
| パス | 変更点 |
|---|---|
| model -> faster_rcnn -> num_classes | 分類クラスの値を3から1(堀川君のみ)に変更 |
| train_config -> fine_tune_checkpoint | 転移学習のためのモデルパスを記載 |
| train_config -> num_steps | 訓練するEpoch数として1000を設定 |
| train_config -> data_augmentation_options | データ水増しのオプションとして以下を追加 random_crop_pad_image random_black_patches |
| eval_config -> num_examples | 評価に使う画像枚数 |
| eval_config -> num_visualizations | TensorBoardに表示する評価の画像枚数 |
1.5. Google Cloud Storageへのアップロード
"gsutil cp"コマンドを使うのが王道かと思いますが、面倒なのでブラウザを使ってGoogle Cloud Storageへ各ファイルをアップロードしました。バケット名をcl-ml01にしています。プロジェクト等の設定は別記事「Google Cloud ML EngineでTensorFlow機械学習訓練実行」を参考にしてください。
- faster_rcnn_resnet101_coco.config: 「1.4. Configファイル作成」で作成したConfigファイル
- eval.record: 評価用教師データセット(作成方法は別記事参照)
- label_map.pbtxt: ラベルデータ(作成方法は別記事参照)
- train.record: 訓練用教師データセット(作成方法は別記事参照)
- transferフォルダの中身: 「1.3. 転移学習元モデルのダウンロード」で取得・解凍したファイル
.
└── cl-ml01
    ├── train_input
    │   ├── config
    │   │   └── faster_rcnn_resnet101_coco.config
    │   ├── eval.record
    │   ├── label_map.pbtxt
    │   ├── train.record
    │   └── transfer
    │       ├── checkpoint
    │       ├── frozen_inference_graph.pb
    │       ├── model.ckpt.data-00000-of-00001
    │       ├── model.ckpt.index
    │       ├── model.ckpt.meta
    │       ├── pipeline.config
    │       └── saved_model
    │           ├── saved_model.pb
    │           └── variables
    └── train_output
        ├── job
        └── model
1.6. 訓練実行
環境変数を設定し、venv仮想環境を有効化します。
export PYTHONPATH=$PYTHONPATH:`pwd`:`pwd`/slim
source ~/Documents/python/venv/clml-od/bin/activate
訓練実行開始です。
# From tensorflow/models/research/
gcloud ml-engine jobs submit training object_detection_`date +%m_%d_%Y_%H_%M_%S` \
    --runtime-version 1.10 \
    --job-dir=gs://cl-ml01/train_output/job \
    --packages dist/object_detection-0.1.tar.gz,slim/dist/slim-0.1.tar.gz,/tmp/pycocotools/pycocotools-2.0.tar.gz \
    --module-name object_detection.model_main \
    --config ~/Documents/od/test01/train_input/config/config.yml \
    --region us-central1 \
    -- \
    --model_dir=gs://cl-ml01/train_output/model \
    --pipeline_config_path=gs://cl-ml01/train_input/config/faster_rcnn_resnet101_coco.config
指定したパラメータは以下の通りです。
| パラメータ | 内容 |
|---|---|
| job-dir | パッケージングしたファイルが保存される場所(クラウド) |
| packages | パッケージングしたファイル(ローカル) |
| module-name | 実行するモジュール |
| config | YAMLファイル(ローカル) |
| model_dir | 訓練結果のモデル?が保存される場所 |
| pipeline_config_path | パイプラインのコンフィグファイル |
2. 結果確認
2.1. ジョブ確認
GCPのコンソールからジョブを確認します。正常終了してるのがわかります。30分もかからず終わっています。さすがGPU!
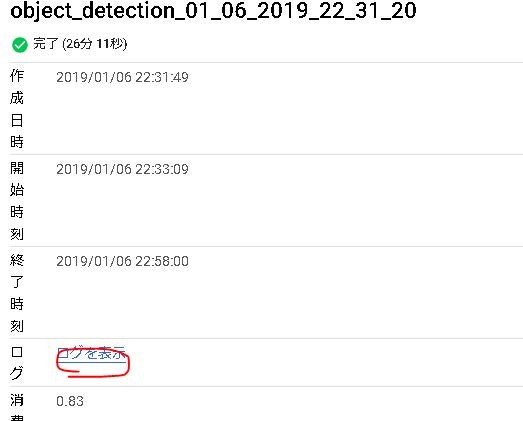
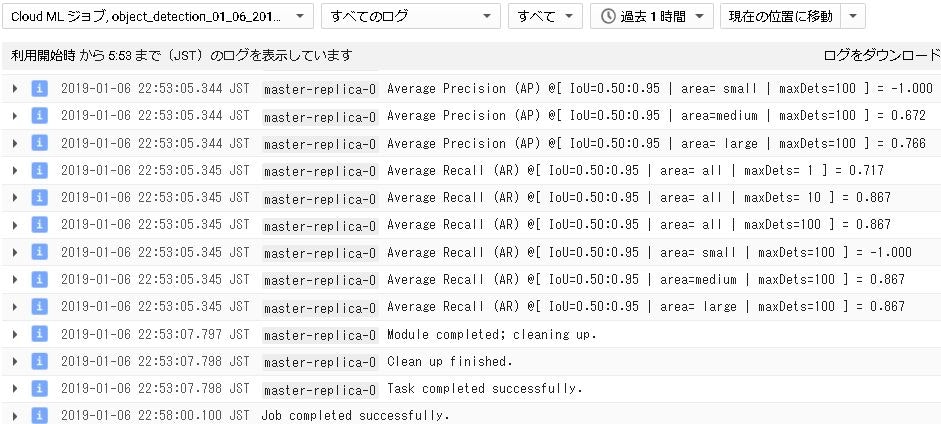
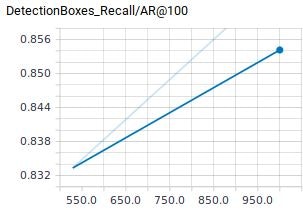
「ログを表示」をクリックして詳細ログを確認します。最後にPrecisionやRecallの数値を出してくれています。
2.2. TensorBoard確認
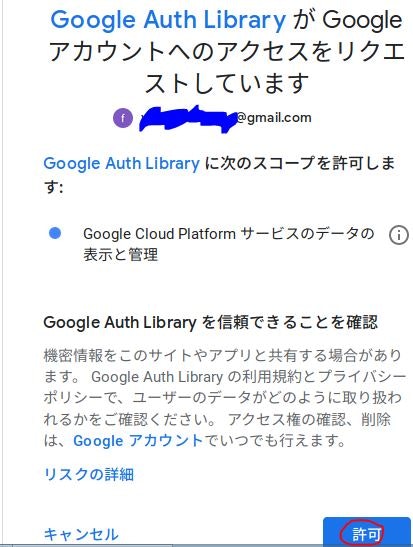
TensorBoard確認の前にGCPにログインします。
gcloud auth application-default login
「許可」をクリック。これでTensorBoardから結果を参照できます。
TensorBoardで直接、Google Cloud Storageにつないで確認します。Windowsだと一回、ローカルPCにダウンロードしないとTensorBoardで見られません。
tensorboard --logdir=gs://cl-ml01/train_output/model
結果はTensorBoardで見るとこんな感じです。
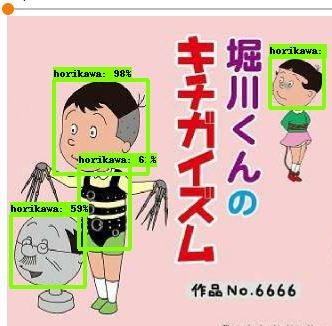
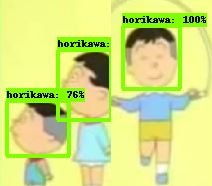
訓練途中(529Epoch時)と最終結果(1000Epoch)で並べると学習していることがわかります。波平や変な衣装は識別できましたが、ワカメちゃんは識別できていないですね。
そもそも画像サイズを統一していなかったのですが、TensorFlow Object Detection APIが統一しないでもOKか調べてません。本当はだめかもしれません。
| 529Epoch | 1000Epoch |
|---|---|
 |
|
吹き出しまで検出しているのはひどい・・・
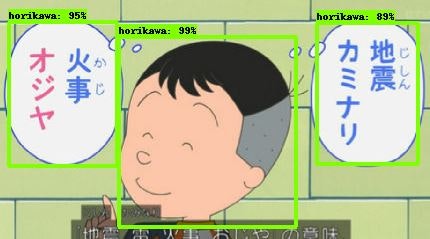
っていうか、他の人は機械学習的にはすごい似ているのか?
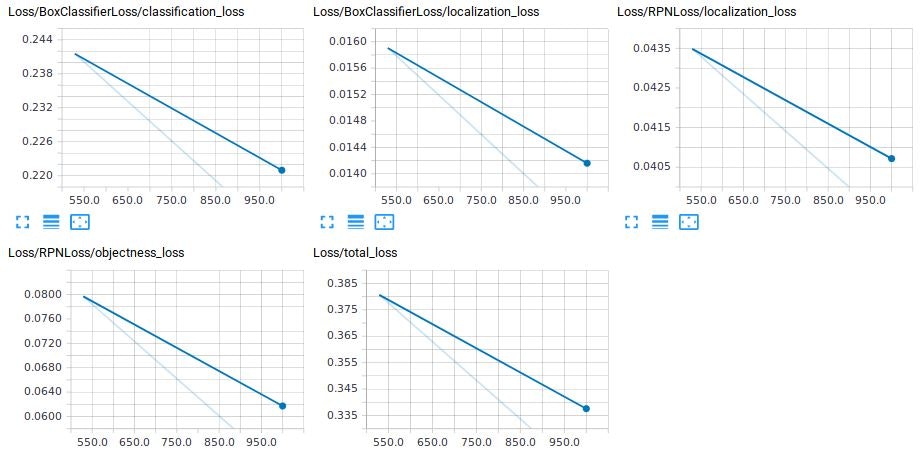
その他Scalar系ものせておきます。評価時の情報しかTensorBoardに出ませんでした。多分、何かやり方が間違っているのですが、今回はそこまで調べません。

感想
昔やったときより、すんなり動きました。ジョブの失敗が1回もありません!昔はいろいろとエラーが多く、プログラムを書き換えたりしていました。
以下は調査不足な点です。
- データ水増しオプション:3つ使っていますが、もっと使えるはず。
- 画像サイズ:統一しないとうまく動かない。少なくてもTensorBoardで確認時には少し変に表示されていました。今までは統一した画像サイズでやっていたので気づかなかった。
- TensorBoardのScalar:訓練時のデータが表示されない。なんでだろう・・・