Tensorflow Object Detection APIをインストールしたので、そのときの記録です。以前はWindowsでやっていたのですが、Ubuntuの方が圧倒的に簡単にできました。
参考
- GitHub(tensorflow/models)のガイド
- WSLのUbuntuにpyenvとvenvでPython開発環境構築
- WSLのUbuntuにTensorFlowをインストール
- Google Cloud ML EngineでTensorFlow機械学習訓練実行
- Object Detectionのためのアノテーション(ラベリング)
- Object Detection APIを使って堀川君を検知
- Object Detection APIのsaved_model出力
- Access Tokenを取得してGoogle Cloud MLでオンライン予測
環境
| 種類 | バージョン | 内容 |
|---|---|---|
| Host OS | Windows8.1 64bit | 自宅環境なのでProfessionalでもないです |
| Guest OS | Ubuntu18.04 LTS 64bit | Oracle VirtualBox上に環境作成 |
| Python | Python3.5.6 |
Google Cloud MLのランタイム1.10を使うのでPythonは最新の3.7を使いません(2019/1/3時点) pyenvを使っています。 |
手順
0. 前提
pyenvでpython3.5.6のバージョンを使っています。別記事「WSLのUbuntuにpyenvとvenvでPython開発環境構築」参照。
1. インストール
1.1. TensorFlowインストール
venvの仮想環境を有効化して、TensorFlow CPU onlyのversion1.10をインストール。仮想環境は"clml-od"という名前にしています。別記事「WSLのUbuntuにTensorFlowをインストール」参照
※ TensorFlow1.11以下の場合は、「2.2. Jupyter Notebookで確認」でエラーが起きます。例外箇所をコメントあるとするだけで回避できるのですが、訓練などができるか確認できていません。
source ~/Documents/python/venv/clml-od/bin/activate
pip install tensorflow==1.10
1.2. 依存パッケージインストール
依存している必要なパッケージをインストールします。
まずはapt-getを使います。
sudo apt-get install protobuf-compiler python-pil python-lxml python-tk
そしてpipでインストール。
pip install Cython contextlib2 jupyter matplotlib pillow lxml
1.3. TensorFlow Object Detection APIをクローン
TensorFlow Object Detection APIをGitHubからクローンします。Object Detection以外もたくさん含まれているので重いです。
git clone https://github.com/tensorflow/models.git
1.4. COCO APIインストール
COCO APIをGit Hubからクローンしてインストールします。
Cythonをpipでインストールしたvenv仮想環境を有効にして実行してください。
git clone https://github.com/cocodataset/cocoapi.git
cd cocoapi/PythonAPI
make
cp -r pycocotools ~/Documents/python/models/research/
1.5. Protobufコンパイル
Protobufのコンパイルをします。Windowsだとエラーが出て個々にコンパイルしたのですが、一発で問題なくコンパイルできました。
# From tensorflow/models/research/
protoc object_detection/protos/*.proto --python_out=.
1.6. ライブラリをPYTHONPATHに追加
起動時に毎回実行する必要があります。ひとまず、.bashrcに書かないでおきます。
# From tensorflow/models/research/
export PYTHONPATH=$PYTHONPATH:`pwd`:`pwd`/slim
2. インストール確認
2.1. テスト実行
以下のコマンドを実行してテスト実行します。OKが出ました。
# From tensorflow/models/research/
$ python object_detection/builders/model_builder_test.py
................./home/yohei/Documents/python/venv/clml-od/lib/python3.5/site-packages/tensorflow/python/util/tf_inspect.py:75: DeprecationWarning: inspect.getargspec() is deprecated, use inspect.signature() instead
  return _inspect.getargspec(target)
.....
----------------------------------------------------------------------
Ran 22 tests in 0.476s

OK
2.2. Jupyter Notebookで確認
ターミナルからJupyter Notebookを起動します。
$ jupyter notebook
[I 10:40:51.715 NotebookApp] Writing notebook server cookie secret to /run/user/1000/jupyter/notebook_cookie_secret
[I 10:40:53.861 NotebookApp] Serving notebooks from local directory: /home/yohei/Documents/python/models/research
[I 10:40:53.861 NotebookApp] The Jupyter Notebook is running at:
[I 10:40:53.861 NotebookApp] http://localhost:8888/?token=dec95a0acadee9803a9b2d57078a3debe51e26616407e344
[I 10:40:53.861 NotebookApp] Use Control-C to stop this server and shut down all kernels (twice to skip confirmation).
[C 10:40:53.890 NotebookApp]

    To access the notebook, open this file in a browser:
        file:///run/user/1000/jupyter/nbserver-5320-open.html
    Or copy and paste one of these URLs:
        http://localhost:8888/?token=dec95a0acadee9803a9b2d57078a3debe51e26616407e344
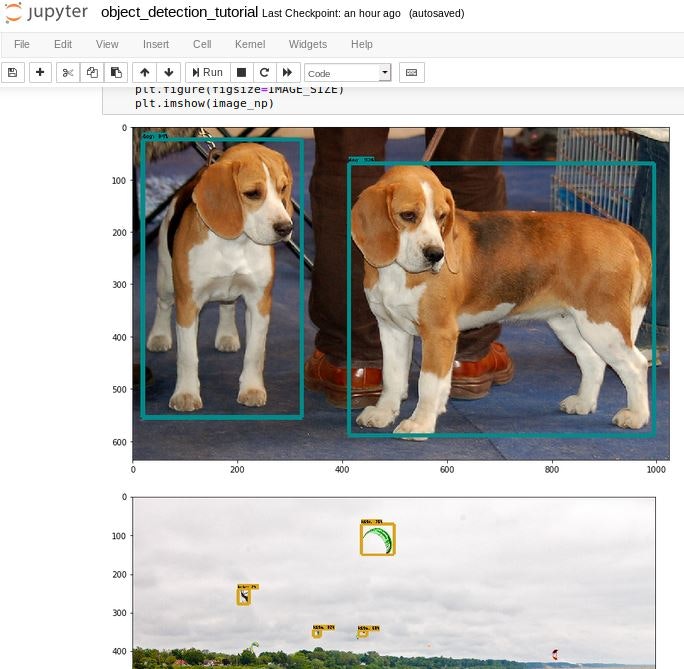
表示されているURLをブラウザで開き、object_detection/object_detection_tutorial.ipynbを開きます。実行するとObject Detectionが成功して画像に枠で検知されているのがわかります。
※最初はなぜか、失敗して結果画像が表示されませんでした。ターミナルにメモリ不足の警告が出ていたので、他プロセスを止めて再実行したら画像表示されました。正しいトラブルシュート方法かわかりませんが、細かく見ないで終わらしています。
最後のセルを以下のように"%matplotlib inline"の1文を追加したらうまくいったこともありました。
for image_path in TEST_IMAGE_PATHS:
  image = Image.open(image_path)
  # the array based representation of the image will be used later in order to prepare the
  # result image with boxes and labels on it.
  image_np = load_image_into_numpy_array(image)
  # Expand dimensions since the model expects images to have shape: [1, None, None, 3]
  image_np_expanded = np.expand_dims(image_np, axis=0)
  # Actual detection.
  output_dict = run_inference_for_single_image(image_np, detection_graph)
  # Visualization of the results of a detection.
  vis_util.visualize_boxes_and_labels_on_image_array(
      image_np,
      output_dict['detection_boxes'],
      output_dict['detection_classes'],
      output_dict['detection_scores'],
      category_index,
      instance_masks=output_dict.get('detection_masks'),
      use_normalized_coordinates=True,
      line_thickness=8)
  %matplotlib inline
  plt.figure(figsize=IMAGE_SIZE)
  plt.imshow(image_np)
※2019/7/23追記
object_detection/object_detection_tutorial.ipynbの最初のセルにこんなコードがあって、TensorFlow1.12より下位バージョンだとエラーが置きました。raise部分をコメントアウトすれば実行できましたが、訓練ができるかは試していません。
if StrictVersion(tf.__version__) < StrictVersion('1.12.0'):
  raise ImportError('Please upgrade your TensorFlow installation to v1.12.*.')
わけあって低いTensorFlowのバージョンで動かしたかったので少し古めのcommitを使いました。git logで更新があったcommitのひとつ前を調べ、git checkout XXXXXで戻しました。