↓これを

↓こうして

↓こうします。

画像出典:
https://commons.wikimedia.org/wiki/File:Pygoscelis_papua.jpg
https://commons.wikimedia.org/wiki/File:Gentoo_Linux_logo_matte.svg
https://commons.wikimedia.org/wiki/File:Marsala_sabayon_with_cookie_and_local_stone_fruit.jpg
無 保 証 で す
当方執筆の技術情報に関するライセンス、免責事項、禁止事項
要約
-
UEFI マザーな LUKS+LVM 環境に Stage3+systemd な Gentoo を展開、設定、genkernel し運用可能な環境を構築する。
-
Overlays により Gentoo に Entropy を導入し Sabayon 化する。有効化する Overlay はsabayon及びsabayon-distro、emerge するのはsys-apps/entropy及びapp-admin/equo(GUI 環境で用いる場合はapp-admin/rigoも)。
-
Wikipedia 英語版によると 1 Gentoo のロゴは勾玉に似せてあるらしい。
-
同じく Wikipedia 英語版によると Sabayon のロゴは鶏のあしあと。
注意
/boot と /sys/firmware/efi/efivars
普段はリードオンリーで再マウントさせておくことで、変にいじって壊すリスクを軽減出来ます。
とりあえず rc.local っぽいスクリプトを作って
mount /boot -o ro,remount
mount /sys/firmware/efi/efivars -o ro,remount
等と記述するか、/etc/fstab で例えば以下のように記述することが考えられます。
/dev/sdz1 /boot vfat ro 0 2
efivarfs /sys/firmware/efi/efivars efivarfs ro,nosuid,nodev,noexec,realtime,remount 0 0
※ mount の引数なしの実行結果によると /sys/firmware/efi/efivars のデバイスは efivarfs なので上のように記述しました。
参考とした文献
参考とした文献
https://firmware.intel.com/blog/accessing-uefi-variables-linux
https://www.redhat.com/sysadmin/replacing-rclocal-systemd
https://wiki.gentoo.org/wiki/EFI_stub_kernel
Gentoo の Sabayon 化に伴うリスク
今回のような変則的なインストールでは /etc/default/sabayon-grub 等、インストーラによって作成・編集されるべきファイルがいくつか欠けているものと予想されます。通常使用する環境は Sabayon のインストールメディアから導入・構築するのが無難です。
Qiita における先行研究記事
Gentoo タグを日付で遡りました。EFI+LUKS+LVM なものをピックアップ。
Gentooをインストールして、XmonadでGUI環境を整える - Qiita
https://qiita.com/YoshikuniJujo/items/6888f3ff42b3f06c9741
Gentooインストール(無線LANで): LUKS, LVM, UEFI, systemd, GNOME3 - Qiita
https://qiita.com/kentakozuka/items/e2a8943b972ab29e53c4
はじめに
Gentoo+LUKS+LVM+systemd の基本的な流れは幾つか書かれており、以下のふたつを執筆時に参考としました。
How to install Gentoo with LUKS LVM and systemd | amedeos home
https://amedeos.github.io/gentoo/2019/01/14/install-gentoo-with-luks-lvm-and-systemd.html
Sakaki's EFI Install Guide - Gentoo Wiki
https://wiki.gentoo.org/wiki/Sakaki's_EFI_Install_Guide
また、少し工夫するだけで USB メモリーを LUKS の復号鍵デバイスとして用いることも可能であるそうです 3 。これはガンダムXを自作する際のGコントローラーにも応用出来るかもしれません。
Unlocking a luks volume with a USB key – /dev/blog
https://possiblelossofprecision.net/?p=300
※「PC から HDD を取り外されて解析される」ことへの備えとしては、パスフレーズよりも強そう。
ところで、鍵っぽい USB メモリ 4 は Amazon を探すと色々ありました。
https://www.amazon.co.jp/dp/B07JFTRHJ2
https://www.amazon.co.jp/dp/B071YWMST2
https://www.amazon.co.jp/dp/B01MS6RPN2
参考とした文献
参考とした文献
[観賞用・保存用・布教用で三つ買うというジョークの元ネタとは? - NAVER まとめ](https://matome.naver.jp/odai/2136193360824499501)
[https://ja.wikipedia.org/wiki/R.U.R.](https://ja.wikipedia.org/wiki/R.U.R.)
https://ja.wikipedia.org/wiki/哲学的ゾンビ
https://ja.wikipedia.org/wiki/ロボット工学三原則
https://dic.pixiv.net/a/ジャミル・ニート
Gentoo Wiki / Gentoo Handbook
本稿の作業手順は "Gentoo AMD64 Handbook" と "EFI stub kernel" 及び "Systemd" の記述の独自解釈であり、恐らく誤りを含むものです。本稿を読む前に Gentoo Handbook 等に目を通しましょう 5 。また、Qiita の Gentoo タグによっても多くのヒントを得られるはずです。閲覧下さいませ。ここに、先人の努力にこっそり敬意と感謝を表します。
Gentoo AMD64 Handbook - Gentoo Wiki
https://wiki.gentoo.org/wiki/Handbook:AMD64/ja
https://wiki.gentoo.org/wiki/Handbook:AMD64/Installation/Kernel/ja#アーキテクチャに即したカーネルコンフィグ
このハンドブックでは、一定の選択肢を提示したときには必ず、賛否両論の併記に努めます。デフォルトの選択肢で進める記載をした際にも(見出しに「デフォルト:」と記載)、他に取りうる選択肢も記載します(見出しに「代替案:」と記載)。決して、「デフォルトは Gentoo のお勧めだ」と考えないでください。デフォルトはあくまでも、多くのユーザーが利用すると思われる選択肢にすぎません。
出典:https://wiki.gentoo.org/wiki/Handbook:AMD64/Installation/About/ja
EFI stub kernel - Gentoo Wiki
https://wiki.gentoo.org/wiki/EFI_stub_kernel
EFIシステムパーティション
https://wiki.gentoo.org/wiki/EFI_System_Partition/ja
efibootmgr
https://wiki.gentoo.org/wiki/Efibootmgr/ja
Systemd - Gentoo Wiki
https://wiki.gentoo.org/wiki/Systemd/ja
トラブルシューティング - Gentoo Wiki
https://wiki.gentoo.org/wiki/Troubleshooting/ja
Gentoo インストールのヒントとトリック - Gentoo Wiki
https://wiki.gentoo.org/wiki/Gentoo_installation_tips_and_tricks/ja
以下によれば、Gentoo Handbook への改善提案も歓迎されるとのことです。
ハンドブック:メインページ > どうやってハンドブックを改善しますか? - Gentoo Wiki
https://wiki.gentoo.org/wiki/Handbook:Main_Page/ja#どうやってハンドブックを改善しますか?
基本的な GNU コマンド/GNU/Linux チュートリアル
GNU/Linux の基本的なコマンドや使い方について不明点がある場合、以下の文献を参照下さい。
Bash - Gentoo Wiki
https://wiki.gentoo.org/wiki/Bash
man page - Gentoo Wiki
https://wiki.gentoo.org/wiki/Man_page/Navigate/ja
GNU Coreutils 8.26 の info 版マニュアルの翻訳 - JM Project
https://linuxjm.osdn.jp/info/GNU_coreutils/coreutils-ja.html
第1章 GNU/Linux チュートリアル - Debian リファレンス
https://www.debian.org/doc/manuals/debian-reference/ch01.ja.html
※ 初めての Linux で Gentoo を選ぶ場合、Linux の入門書や UNIX シェルの入門書(必要があれば UEFI や GPT 等、最近のハードウェア事情が載っているパソコン自作の入門書も)あるいは身近な Gentoo ユーザーを手の届くところに置いて始めると良いかもしれません。このディストリビューションを用いて出来ることは非常に多岐にわたるため、「自分が何をしたいか」を明確化することで様々な選択肢の中から何を採り入れるのか、方針を立てやすいと思います。
Gentoo のインストール CD イメージの入手
以下から最新版の install-amd64-minimal-日付.iso をダウンロードし、CD や USB メモリに書き込んで PC/仮想マシンにセットします(仮想マシンの場合 iso イメージを直接読めるかもしれません)。
https://www.gentoo.org/downloads/
https://www.gentoo.org/downloads/mirrors/#JP
日本のミラーの install-amd64-minimal-日付.iso が置かれたディレクトリ
http://ftp.jaist.ac.jp/pub/Linux/Gentoo/releases/amd64/autobuilds/current-install-amd64-minimal/
http://ftp.iij.ad.jp/pub/linux/gentoo/releases/amd64/autobuilds/current-install-amd64-minimal/
Note
2018年8月23日現在、公式 Minimal CD は UEFI モードで起動できます。古いバージョンは BIOS (MBR) モードでのみ起動します。UEFI ブート可能なシステムを構築しようとしている読者は最新の ISO をダウンロードする必要があります。
出典:https://wiki.gentoo.org/wiki/Handbook:AMD64/Installation/Media/ja
インストールメディアの準備の詳細
Minimalインストール CD イメージの入手と CD や USB メモリへの書き込みの詳細については以下の文献を参照下さい。
基本的な環境の構築
事前に作業ブロック毎にテキストファイル化してUSBメモリに入れておき、インストール時にマウントして source してやると簡単です。
執筆者のハードウェア構成
CPU:          x86_64 4 Core
M/B:          UEFI
Memory:       2G
OpticalDrive: SATA AHCI
HDD:          SATA AHCI 24G
※ 今回は VirtualBox を使用しました。
基本的な環境の構築:作業の流れ
!!ガッ!! ぬるぽ !!ガッ!!
!!注意!! 以下、/dev/sdz は環境に応じて適宜読み替えて下さい !!注意!!
BABEL BABEL BABEL BABEL BABEL BABEL 帆場暎一 BABEL BABEL BABEL BABEL BABEL BABEL
!!警告!! フォーマットするドライブを間違えると大切なデータを失います !!警告!!
BABEL BABEL BABEL BABEL BABEL BABEL BABEL BABEL BABEL BABEL BABEL BABEL BABEL
作業の流れ
gdisk -l /dev/sdz # 悲しい結末を回避したいなら、初期化前には必ず disk の確認を
# /dev/sdz 上の既存のデータ構造の破壊
sgdisk --zap-all /dev/sdz # ヒャッハー!
sgdisk --clear /dev/sdz # 汚物は消毒だー!
dd if=/dev/zero of=/dev/sdz # ゼロで塗り潰し/必要に応じて/ディスクの書き込み速度相応の処理時間を消費
# GPT パーティションテーブルの作成
cgdisk /dev/sdz # cgdisk で GPT パーティションテーブルを作成
# /dev/sdz1 ESP(ef00)1G/ESP 容量は用途に応じて設定、UEFI が読み取りエラーを起す場合 100M 程度を設定
# /dev/sdz2 Linux(8300)残り全て
gdisk -l /dev/sdz # 作成したパーティションの確認
# ESP(EFI System Partition)のフォーマット
mkfs.fat -F32 /dev/sdz1 # ESP(EFI System Partition)のフォーマット
# LUKS 領域のフォーマット
dd if=/dev/urandom of=/dev/sdz2 # データ領域隠蔽のため/必要に応じて/ディスクの書き込み速度相応の処理時間を消費
cryptsetup --key-size 512 --verify-passphrase luksFormat /dev/sdz2 # Are you sure?(Type uppercase yes): に対して、大文字で YES/領域の暗号化及び復号パスワードの設定
# LUKS 領域内部への論理ボリュームの作成
cryptsetup luksOpen /dev/sdz2 gentoocrypt # 領域をアンロック
pvcreate /dev/mapper/gentoocrypt # 物理ボリュームを作成(LVMで物理ボリュームとはこれ如何に)
pvdisplay # 作成した物理ボリュームの確認
vgcreate cryptvg /dev/mapper/gentoocrypt # ボリュームグループ cryptvg を作成
vgdisplay # 作成したボリュームグループの確認
lvcreate --size 4G --name swap cryptvg # 論理ボリューム swap(サイズ:4G)をボリュームグループ cryptvg に作成
lvcreate --extents 100%FREE --name root cryptvg # 論理ボリューム root(サイズ:残り全て)をボリュームグループ cryptvg に作成
lvdisplay # 作成した論理ボリュームの確認
vgscan --mknodes # ボリュームグループのチェック/ノードのチェック
vgchange --activate y # vgchange changes VG attributes, changes LV activation in the kernel, and includes other utilities for VG maintenance.
# swap と / の準備
mkswap /dev/mapper/cryptvg-swap # swap の作成/「/dev/ボリュームグループ名/論理ボリューム名」でもアクセス可能
swapon /dev/mapper/cryptvg-swap # swap の有効化
mkfs.ext4 /dev/mapper/cryptvg-root # / 用に ext4 でフォーマット
mount /dev/mapper/cryptvg-root /mnt/gentoo # /mnt/gentoo にマウント
# Stage 3 イメージのダウンロードと展開
cd /mnt/gentoo # /mnt/gentoo に移動
links 'https://www.gentoo.org/downloads/mirrors/#JP'
# links で gentoo.org にアクセス、適切なミラーのhttpリンクを選択
# releases/amd64/autobuilds/current-stage3-amd64-systemd/へ移動
# stage3-amd64-systemd-日付.tar.bz2 及び stage3-amd64-systemd-日付.tar.bz2.DIGESTS をダウンロード
# q キーで links を終了
# 本稿ではスキップしていますが、必要に応じて Handbook に従い DIGESTS ファイルの署名の確認を行って下さい。
cat stage3-amd64-systemd-日付.tar.bz2.DIGESTS # ファイル内容を表示
sha512sum stage3-amd64-systemd-日付.tar.bz2 # チェックサムを表示
tar xpvf stage3-*.tar.bz2 --xattrs-include='*.*' --numeric-owner # stage3 アーカイブを /mnt/gentoo に展開
# Portage の設定
echo >> /mnt/gentoo/etc/portage/make.conf # 改行
echo MAKEOPTS=\"--jobs=$((1+$(grep processor /proc/cpuinfo | wc --lines)))\" >> /mnt/gentoo/etc/portage/make.conf # MAKEOPTS の追記、ジョブ数は number of core + 1
mirrorselect --interactive --output >> /mnt/gentoo/etc/portage/make.conf # mirror の設定を追記
mkdir --parents /mnt/gentoo/etc/portage/repos.conf # ディレクトリ /mnt/gentoo/etc/portage/repos.conf を作成
cp /mnt/gentoo/usr/share/portage/config/repos.conf /mnt/gentoo/etc/portage/repos.conf/gentoo.conf # repos.conf を gentoo.conf として貼り付け
test -f /mnt/gentoo/etc/resolv.conf && mv /mnt/gentoo/etc/resolv.conf /mnt/gentoo/etc/resolv.conf.orig # /mnt/gentoo/etc/resolv.conf のバックアップ
cp --dereference /etc/resolv.conf /mnt/gentoo/etc/ # /etc/resolv.conf をコピー
# pre-chroot works
mount --types proc /proc /mnt/gentoo/proc # proc をマウント
mount --rbind /sys /mnt/gentoo/sys # /sys を再帰的にバインドマウント
mount --make-rslave /mnt/gentoo/sys # Since Linux 2.6.15 it is possible to mark a mount and its submounts as shared, private, slave or unbindable.
mount --rbind /dev /mnt/gentoo/dev # /dev を再帰的にバインドマウント
mount --make-rslave /mnt/gentoo/dev # Since Linux 2.6.15 it is possible to mark a mount and its submounts as shared, private, slave or unbindable.
# chroot
pwd # 現在地が /mnt/gentoo であることを確認
chroot /mnt/gentoo /bin/bash # chroot の実行
# post-chroot works
source /etc/profile # /etc/profile を source
export PS1="(chroot) ${PS1}" # bash の prompt に (chroot) を表示
mount /dev/sdz1 /boot # ESP を /boot にマウント
# emerge の autounmask の為の設定
for d in package.accept_keywords package.keywords package.mask package.use; do test -d /etc/portage/$d || mkdir /etc/portage/$d; done
for d in $(find /etc/portage/package.* -maxdepth 0 -type d); do touch $d/zzz_autounmask; done
find /etc/portage/package.* -maxdepth 1 # 生成物の確認
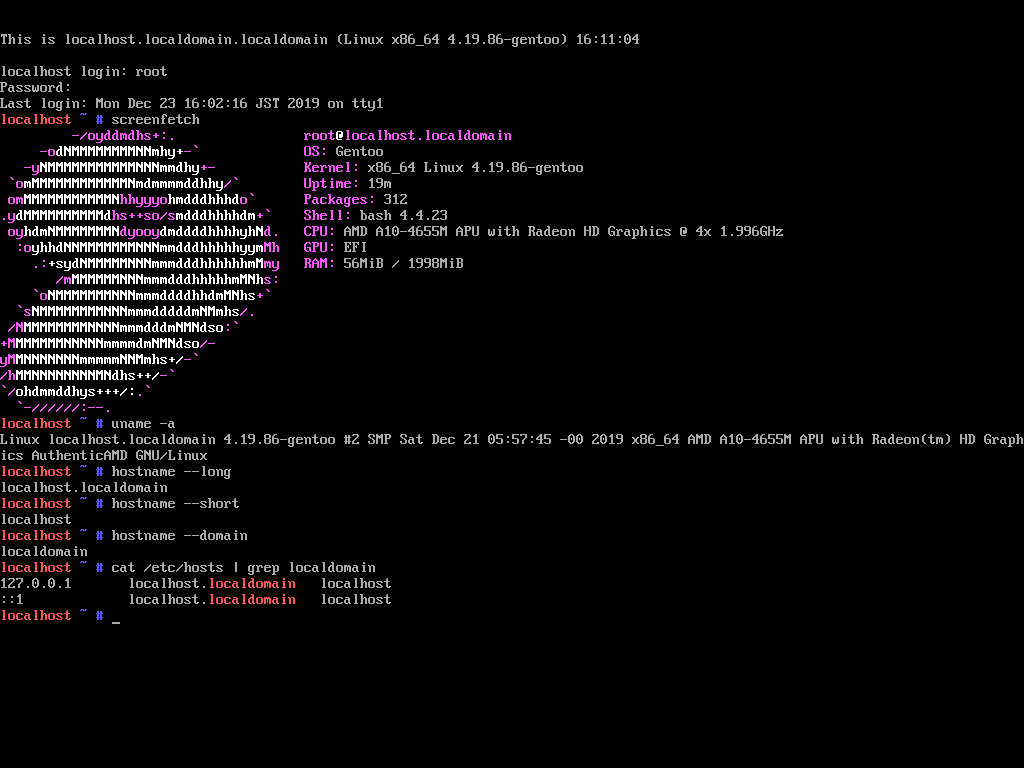
# emerge の準備と screenfetch の導入・実行
emerge-webrsync # Gentoo リポジトリの更新
emerge --ask screenfetch # screenfetch の導入/必要に応じて
screenfetch # screenfetch の実行/必要に応じて
# ロケールの生成
nano --nowrap /etc/locale.gen # /etc/locale.gen の編集
locale-gen # locale-gen の実行
env-update && source /etc/profile && export PS1="(chroot) ${PS1}" # 環境の更新
# ロケールの変更
export LC_ALL=en_US.UTF-8 # ロケールの変更/必要に応じて
/etc/locale.genの編集例
# /etc/locale.gen: list all of the locales you want to have on your system.
# See the locale.gen(5) man page for more details.
#
# The format of each line:
# <locale name> <charset>
#
# Where <locale name> starts with a name as found in /usr/share/i18n/locales/.
# It must be unique in the file as it is used as the key to locale variables.
# For non-default encodings, the <charset> is typically appended.
#
# Where <charset> is a charset located in /usr/share/i18n/charmaps/ (sans any
# suffix like ".gz").
#
# All blank lines and lines starting with # are ignored.
#
# For the default list of supported combinations, see the file:
# /usr/share/i18n/SUPPORTED
#
# Whenever glibc is emerged, the locales listed here will be automatically
# rebuilt for you.  After updating this file, you can simply run `locale-gen`
# yourself instead of re-emerging glibc.

en_US ISO-8859-1
en_US.UTF-8 UTF-8
ja_JP.EUC-JP EUC-JP
ja_JP.UTF-8 UTF-8
# ja_JP EUC-JP
# en_HK ISO-8859-1
# en_PH ISO-8859-1
# de_DE ISO-8859-1
# de_DE@euro ISO-8859-15
# es_MX ISO-8859-1
# fa_IR UTF-8
# fr_FR ISO-8859-1
# fr_FR@euro ISO-8859-15
# it_IT ISO-8859-1
MAN/INFOPAGE
gdisk
https://rodsbooks.com/gdisk/gdisk.html
```#``` ※コメント
https://linuxjm.osdn.jp/html/GNU_bash/man1/bash.1.html#lbAR
sgdisk
http://www.rodsbooks.com/gdisk/sgdisk.html
dd
https://linuxjm.osdn.jp/html/GNU_coreutils/man1/dd.1.html
https://linuxjm.osdn.jp/info/GNU_coreutils/coreutils-ja_79.html#dd-invocation
cgdisk
http://www.rodsbooks.com/gdisk/cgdisk.html
mkfs.fat
https://linuxjm.osdn.jp/html/util-linux/man8/mkfs.8.html
https://linux.die.net/man/8/mkfs.vfat
cryptsetup
https://linux.die.net/man/8/cryptsetup
pvcreate
https://linux.die.net/man/8/pvcreate
pvdisplay
https://linux.die.net/man/8/pvdisplay
vgcreate
https://linux.die.net/man/8/vgcreate
vgdisplay
https://linux.die.net/man/8/vgdisplay
lvcreate
https://linux.die.net/man/8/lvcreate
lvdisplay
https://linux.die.net/man/8/lvdisplay
vgscan
https://linux.die.net/man/8/vgscan
vgchange
https://linux.die.net/man/8/vgchange
mkswap
https://linuxjm.osdn.jp/html/util-linux/man8/mkswap.8.html
swapon
https://linuxjm.osdn.jp/html/util-linux/man8/swapon.8.html
mkfs.ext4
https://linux.die.net/man/8/mkfs.ext4
mount
https://linuxjm.osdn.jp/html/util-linux/man8/mount.8.html
cd
https://linuxjm.osdn.jp/html/GNU_bash/man1/bash.1.html#lbDB
https://linuxjm.osdn.jp/html/GNU_bash/man1/builtins.1.html
links
https://linux.die.net/man/1/links
```'``` ※(シングル)クォート
https://linuxjm.osdn.jp/html/GNU_bash/man1/bash.1.html#lbAS
cat
https://linuxjm.osdn.jp/html/GNU_coreutils/man1/cat.1.html
https://linuxjm.osdn.jp/info/GNU_coreutils/coreutils-ja_18.html#cat-invocation
sha512sum
https://linuxjm.osdn.jp/html/GNU_coreutils/man1/sha512sum.1.html
tar
https://linuxjm.osdn.jp/html/GNU_tar/man1/tar.1.html
echo
https://linuxjm.osdn.jp/html/GNU_bash/man1/bash.1.html#lbDB
https://linuxjm.osdn.jp/html/GNU_bash/man1/builtins.1.html
https://linuxjm.osdn.jp/html/GNU_coreutils/man1/echo.1.html
https://linuxjm.osdn.jp/info/GNU_coreutils/coreutils-ja_105.html#echo-invocation
```>>``` ※リダイレクトによる追加出力
https://linuxjm.osdn.jp/html/GNU_bash/man1/bash.1.html#lbBL
※ ```>```(出力のリダイレクト)を使うと出力先を**上書き**してしまうことに注意。
```\``` ※エスケープ文字
https://linuxjm.osdn.jp/html/GNU_bash/man1/bash.1.html#lbAS
```"``` ※(ダブル)クォート
https://linuxjm.osdn.jp/html/GNU_bash/man1/bash.1.html#lbAS
```$()``` ※コマンド置換
https://linuxjm.osdn.jp/html/GNU_bash/man1/bash.1.html#lbBC
```$(())``` ※算術式展開
https://linuxjm.osdn.jp/html/GNU_bash/man1/bash.1.html#lbBD
grep
https://linuxjm.osdn.jp/html/GNU_grep/man1/grep.1.html
```|``` ※パイプライン/パイプ
https://linuxjm.osdn.jp/html/GNU_bash/man1/bash.1.html#lbAM
wc
https://linuxjm.osdn.jp/html/GNU_coreutils/man1/wc.1.html
https://linuxjm.osdn.jp/info/GNU_coreutils/coreutils-ja_34.html#wc-invocation
mirrorselect
https://www.linuxhowtos.org/manpages/8/mirrorselect.htm
https://wiki.gentoo.org/wiki/Mirrorselect
mkdir
https://linuxjm.osdn.jp/html/GNU_coreutils/man1/mkdir.1.html
https://linuxjm.osdn.jp/info/GNU_coreutils/coreutils-ja_87.html#mkdir-invocation
cp
https://linuxjm.osdn.jp/html/GNU_coreutils/man1/cp.1.html
https://linuxjm.osdn.jp/info/GNU_coreutils/coreutils-ja_78.html#cp-invocation
test
https://linuxjm.osdn.jp/html/GNU_bash/man1/bash.1.html#lbDB
https://linuxjm.osdn.jp/html/GNU_bash/man1/builtins.1.html
https://linuxjm.osdn.jp/html/GNU_coreutils/man1/test.1.html
https://linuxjm.osdn.jp/info/GNU_coreutils/coreutils-ja_111.html#test-invocation
```&&``` ※AND リスト/制御演算子
https://linuxjm.osdn.jp/html/GNU_bash/man1/bash.1.html#lbAN
pwd
https://linuxjm.osdn.jp/html/GNU_coreutils/man1/pwd.1.html
https://linuxjm.osdn.jp/info/GNU_coreutils/coreutils-ja_132.html#pwd-invocation
chroot
https://linuxjm.osdn.jp/html/GNU_coreutils/man1/chroot.1.html
https://linuxjm.osdn.jp/info/GNU_coreutils/coreutils-ja_169.html#chroot-invocation
source
https://linuxjm.osdn.jp/html/GNU_bash/man1/bash.1.html#lbDB
https://linuxjm.osdn.jp/html/GNU_bash/man1/builtins.1.html
export
https://linuxjm.osdn.jp/html/GNU_bash/man1/bash.1.html#lbDB
https://linuxjm.osdn.jp/html/GNU_bash/man1/builtins.1.html
```${}``` ※変数展開
https://linuxjm.osdn.jp/html/GNU_bash/man1/bash.1.html#lbBB
for
https://linuxjm.osdn.jp/html/GNU_bash/man1/bash.1.html#lbDB
https://linuxjm.osdn.jp/html/GNU_bash/man1/builtins.1.html
find
https://linuxjm.osdn.jp/html/GNU_findutils/man1/find.1.html
```||``` ※ OR リスト/制御演算子
https://linuxjm.osdn.jp/html/GNU_bash/man1/bash.1.html#lbAN
touch
https://linuxjm.osdn.jp/html/GNU_coreutils/man1/touch.1.html
https://linuxjm.osdn.jp/info/GNU_coreutils/coreutils-ja_97.html#touch-invocation
emerge-webrsync
https://wiki.gentoo.org/wiki/Handbook:AMD64/Working/Portage/ja#Gentooリポジトリの更新
emerge
https://dev.gentoo.org/~zmedico/portage/doc/man/emerge.1.html
Portage
https://dev.gentoo.org/~zmedico/portage/doc/man/portage.5.html
screenfetch
https://www.mankier.com/1/screenfetch
locale.gen
https://www.linuxhowtos.org/manpages/5/locale.gen.htm
locale-gen
https://www.linuxhowtos.org/manpages/8/locale-gen.htm
スクリーンショット
参考とした文献
https://wiki.archlinux.jp/index.php/LVM
https://www.slackwiki.com/LVM/Luks_Encryption
https://wiki.gentoo.org/wiki//etc/portage
https://wiki.gentoo.org/wiki/Knowledge_Base:Autounmask-write
https://www.tagindex.com/html_tag/text_font/font.html
https://wiki.archlinux.jp/index.php/ディスクの完全消去
https://wiki.gentoo.org/wiki/Handbook:AMD64/Installation/Media/ja#ダウンロードしたファイルを検証する
https://wiki.gentoo.org/wiki/Handbook:AMD64/Installation/Stage/ja#検証して確認する
https://wiki.gentoo.org/wiki/Handbook:AMD64/Working/Portage/ja
https://ja.wikipedia.org/wiki/X64
chroot "jail" - what is it and how do I use it? - Unix & Linux Stack Exchange
https://unix.stackexchange.com/questions/105/chroot-jail-what-is-it-and-how-do-i-use-it
仙石浩明の日記: chroot されたディレクトリから脱出してみる
https://www.gcd.org/blog/2007/09/132/
※ chroot jail break, chroot 脱獄。
物理 CPU、CPU コア、および論理 CPU の数を確認する - Red Hat Customer Portal
https://access.redhat.com/ja/solutions/2159401
引数を処理する | UNIX & Linux コマンド・シェルスクリプト リファレンス
https://shellscript.sunone.me/parameter.html
How to display Unicode in a Linux virtual terminal? - Super User
https://superuser.com/questions/556993/how-to-display-unicode-in-a-linux-virtual-terminal
第98回 Plamo-7.0とUTF-8:玩式草子─ソフトウェアとたわむれる日々|gihyo.jp … 技術評論社
https://gihyo.jp/lifestyle/serial/01/ganshiki-soushi/0098
GitHub - Gentoo-zh/linux-cjktty: Linux kernel source tree with CJKTTY patch
https://github.com/Gentoo-zh/linux-cjktty
GitHub - detiam/Linux-TTY-UTF-8-Patch: Let TTY of the Linux kernel support UTF-8 (like CJKTTY
https://github.com/detiam/Linux-TTY-UTF-8-Patch
※ /etc/locale.gen 編集時、使用したいロケールをアンコメント(行頭の#を除去)します。その際に少なくともひとつ、UTF-8 なロケールを用意するとよいそうです。
※ 非 X 環境で CJK ロケールを用いたい場合、sys-apps/kmscon, app-i18n/fbterm, app-i18n/jfbterm, mlterm 6(fb または sdl2 のサポートを有効化しビルド)等を使うか、カーネルにパッチを当てる必要があります。
※ 各コマンドのオプションは本稿の性格上、出来るだけ省略形ではないものを使っています。日常の運用では省略形を用いることで打鍵数の節約が可能です。
※ ディレクトリやコマンド名の入力時、Tab補完が便利です。bash でコマンドのオプション/パラメータを補完したい場合、app-shells/bash-completion があります 7 。
※ 本稿では UEFI な M/B のみを対象とすることから、パーティション構成の単純化を狙い BIOS ブートパーティションを採用しませんでした 8 。
つぎはどうしますか?
そのまま Gentoo をインストールする
👉Gentoo のインストールへ
Entropy を導入し Sabayon 化する
👉Gentoo の Sabayon 化へ
こんな記事読んでいられるか!私は星に帰らせてもらう!
👉恒星間宇宙船で星の海の向こうへ 9
※ ゲームブックやインタラクティブフィクションには独特の面白さがある気がします。
Gentoo のインストール
gentoo(ジェンツー)を無理矢理「げんとう」と読むと「幻灯 Linux」。ファンタスマゴリア感がアップします。変幻自在なこの OS のイメージにぴったりです。冗談です。
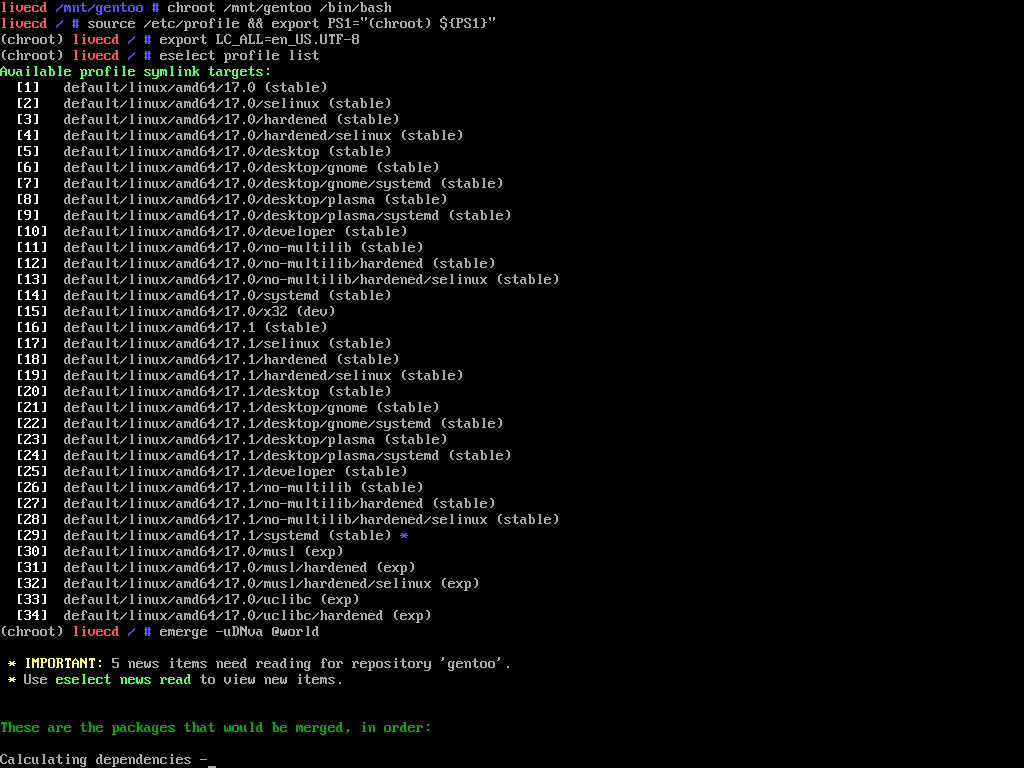
make.conf への -march=native の追記と、うどん@ワールド
nano --nowrap /etc/portage/make.conf # /etc/portage/make.conf の COMMON_FLAGS に -march=native を追記

eselect news list # ニュースを列挙
eselect news read 番号 # もしくは eselect news read all | less 等で、ニュースを閲覧
eselect profile list # 現在のプロファイルの確認、デスクトップ環境をビルドしたい場合はプロファイルを変更すること ※デスクトップ環境のビルドにはマシンスペック相応の時間を要します※

emerge --ask --verbose --update --deep --newuse @world
# emerge -uDN @world #……世界のうどん……香川県でしょうか?
# emerge -uDNva @world #……うどん「ヴぁ」……こちらは日下部みさお?

emerge --depclean # 必要に応じて実行
MAN/INFOPAGE
nano
https://linux.die.net/man/1/nano
```#``` ※コメント
https://linuxjm.osdn.jp/html/GNU_bash/man1/bash.1.html#lbAR
eselect news
https://www.linuxhowtos.org/manpages/5/news.eselect.htm
eselect profile
https://www.linuxhowtos.org/manpages/5/profile.eselect.htm
emerge
https://dev.gentoo.org/~zmedico/portage/doc/man/emerge.1.html
スクリーンショット

nano --nowrap /etc/portage/make.conf
eselect news list
emerge --ask --verbose --update --deep --newuse @world
※ 小文字の@を使うとメンションが飛んでいってしまう(´・ω・`)
emerge --depclean
参考とした文献
Gentoo Linuxでうどんワールドする - 備忘録 blog
http://sharply.hatenablog.com/entry/2016/03/20/234230
日下部みさおとは (クサカベミサオとは) [単語記事] - ニコニコ大百科
https://dic.nicovideo.jp/a/日下部みさお
ザ・ワールド (ざわーるど)とは【ピクシブ百科事典】
https://dic.pixiv.net/a/ザ・ワールド
/etc/fstab の編集
UUIDの確認と/etc/fstabの編集
blkid # UUID の確認、GPM によるコピペが便利
nano --nowrap /etc/fstab # 適切な fstab を作成
fstabの記述例
UUID=</dev/sdz1のUUID>  /boot vfat   defaults  0 2
/dev/mapper/cryptvg-swap none  swap   sw        0 0
/dev/mapper/cryptvg-root /     ext4   noatime   0 1
MAN/INFOPAGE
blkid
https://linuxjm.osdn.jp/html/e2fsprogs/man8/blkid.8.html
nano
https://linux.die.net/man/1/nano
スクリーンショット

blkid
nano --nowrap /etc/fstab
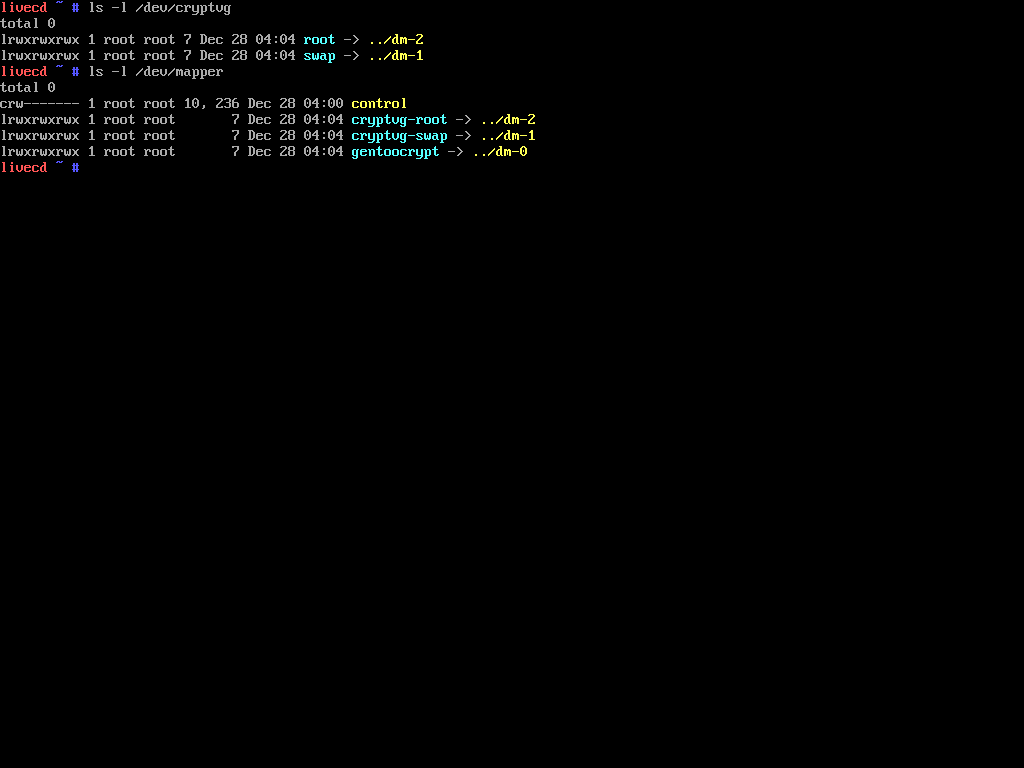
ls -l /dev/cryptvg
ls -l /dev/mapper
※ UUID を扱う場合は GPM (the General Purpose Mouse server) によるコピー&ペーストが便利です。
※ UUID はls -l /dev/disk/by-uuidとしても確認できます。
※ 自分は blkid の出力どおりに UUID をダブルクォートで囲んで記述しています。例:UUID="8519-9E66" /boot vfat defaults 0 2
※ 手元の環境ではカーネルに渡すコマンドラインオプション(GRUB やカーネル埋め込み)でデバイスの指定に UUID を用いつつ値をダブルクォートで囲わない場合、対応するドライブ/パーティションを見つけられませんでした。……上手く行かずにしばらく悩みました。
genkernel-next による initramfs 埋め込み EFIBootStub カーネルの構築
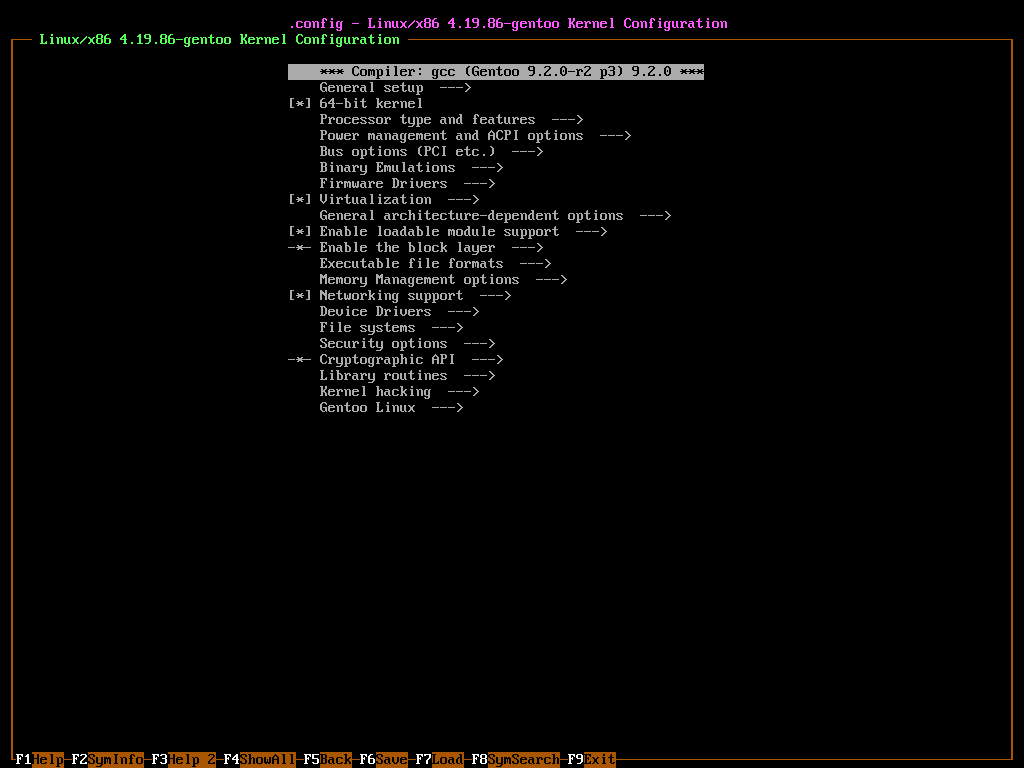
Gentoo におけるカーネルについての詳細はカーネル - Gentoo Wiki を参照下さい。
何か間違えたのか無印 genkernel でビルドしたカーネルで LUKS 領域の復号/平文化に失敗したので、今回は genkernel-next を使用しました。
また、CLI では nconfig の使い勝手が良いそうなので、本稿ではオプション "--nconfig" を用いた手順を紹介しています。他に "--menuconfig" "--gconfig" "--xconfig" があります。
genkernel-nextの導入と実行
emerge --ask sys-boot/efibootmgr sys-fs/cryptsetup sys-fs/lvm2 sys-kernel/gentoo-sources sys-kernel/genkernel-next # genkernel-next の導入
blkid # /dev/sdz2(crypt_root)の UUID を確認、GPM のテキストバッファに格納
genkernel --integrated-initramfs --makeopts="--jobs=$((1+$(grep processor /proc/cpuinfo | wc --lines)))" --loglevel=2 --color --luks --lvm --nconfig all # initramfs 埋め込み EFIBootStub カーネルのビルド
MAN/INFOPAGE
emerge
https://dev.gentoo.org/~zmedico/portage/doc/man/emerge.1.html
```#``` ※コメント
https://linuxjm.osdn.jp/html/GNU_bash/man1/bash.1.html#lbAR
blkid
https://linuxjm.osdn.jp/html/e2fsprogs/man8/blkid.8.html
genkernel
https://github.com/Sabayon/genkernel-next/blob/master/doc/genkernel.8.txt
```$()``` ※コマンド置換
https://linuxjm.osdn.jp/html/GNU_bash/man1/bash.1.html#lbBC
```$(())``` ※算術式展開
https://linuxjm.osdn.jp/html/GNU_bash/man1/bash.1.html#lbBD
grep
https://linuxjm.osdn.jp/html/GNU_grep/man1/grep.1.html
```|``` ※パイプライン/パイプ
https://linuxjm.osdn.jp/html/GNU_bash/man1/bash.1.html#lbAM
wc
https://linuxjm.osdn.jp/html/GNU_coreutils/man1/wc.1.html
https://linuxjm.osdn.jp/info/GNU_coreutils/coreutils-ja_34.html#wc-invocation
スクリーンショット
※ "--integrated-initramfs" 使用時、アクション all 以外では kernel への initramfs の埋め込みに失敗しました。
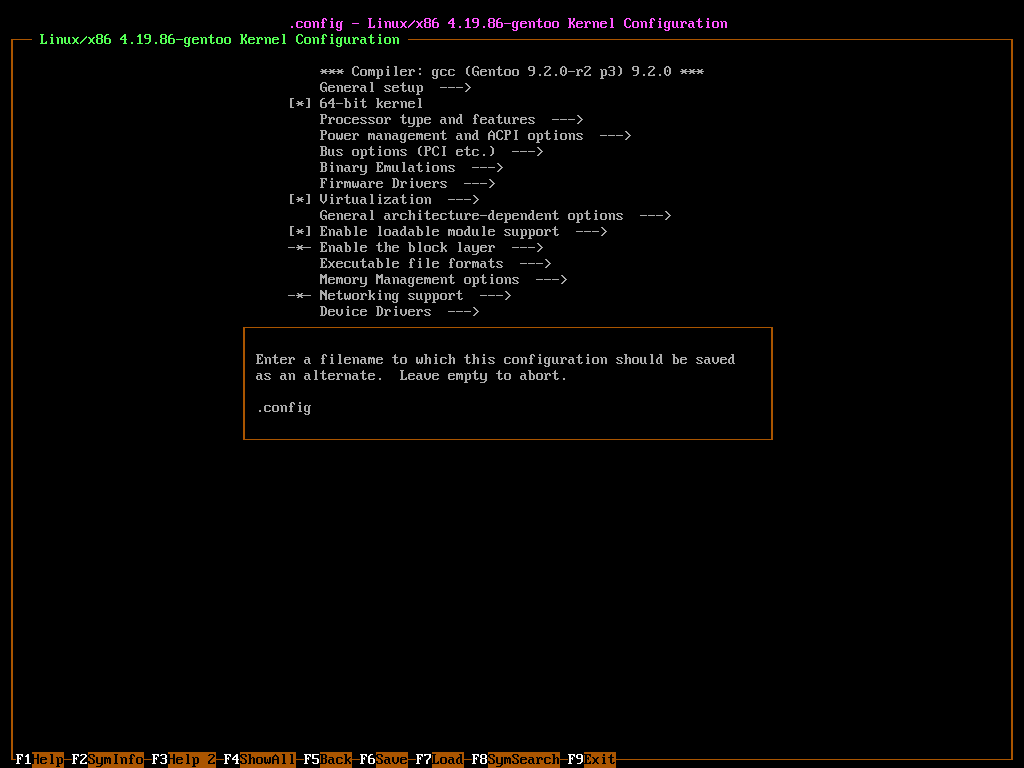
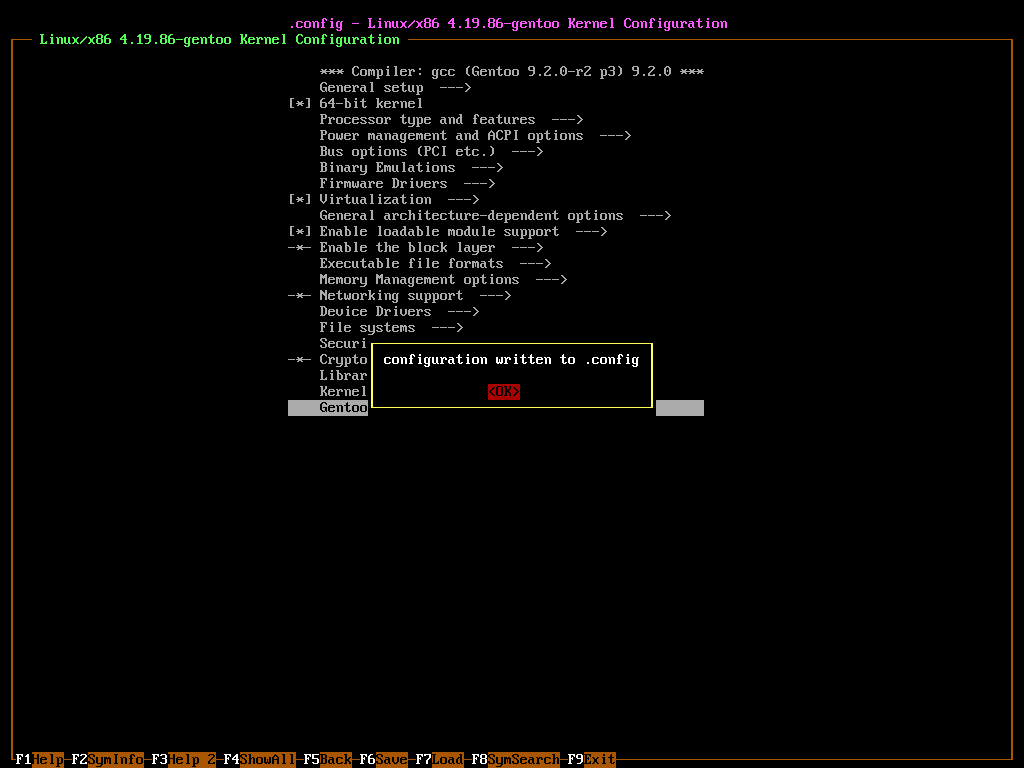
※ nconfig でメニューを戻る場合はカーソルキー左(←)やF5キーがおすすめ。ESCキーでも戻ることが出来ますが、うっかり連打して初期メニュー画面でESCキーを押すと nconfig が終了してしまうので注意。
カーネルの追加コンフィギュレーション例
genkernel/genkernel-next では、初期設定で x86_64 で必要な機能を最大公約数的に有効化してくれるそうです 10 。そのため初期状態では自分の環境・用途向けにコンフィギュレーションを厳選/最適化した場合に比べ、カーネルのコンパイル時間が伸びます。
今回の用途では、以下の EFI support/EFI Variable Support via sysfs/GPT への対応/iso8859-1 コードページサポート/Systemd への対応 の 5 項目について設定値を確認し、問題が無ければ F6 で保存、F9 で nconfig を終了しビルドに進みます。
EFI support
EFI及びEFI_stubサポートの有効化
Processor type and features  --->
    [*] EFI runtime service support
    [*]   EFI stub support
    [*]     EFI mixed-mode support
    ...
    ...
    [*] Built-in kernel command line
    (dolvm init=/lib/systemd/systemd crypt_root=UUID="blkidで調べた/dev/sdz2のUUID" root=/dev/mapper/cryptvg-root resume=/dev/mapper/cryptvg-swap)      Built-in kernel command string
    [*] Built-in command line overrides boot loader arguments
スクリーンショット


上記設定項目でチェックが外れている箇所([ ])があればスペースキーでチェック([*])を入れます。また、Built-in kernel command stringには上の例等を参考に適切な値を設定します。
※ Built-in kernel command line における UUID の記述には GPM によるコピペが便利です。ビルドしたカーネルが crypt_root を見失う場合は UUID の値をダブルクォート(")で囲んで下さい。
※ EFI mixed-mode:32bit UEFI で 64bit カーネルをロードする機能とのこと。
※ / のファイルシステムタイプの判別に失敗する場合はビルトインカーネルコマンドラインにrootfstype=ext4等と追記します。
※ Built-in command line overrides boot loader arguments にチェックを入れることで、GRUB や ELILO 等のブートローダーから渡される引数を組み込みのコマンドラインで上書きするよう設定出来ます。
EFI Variable Support via sysfs
EFI_Variable_Support_via_sysfsの組み込み
Firmware Drivers  --->
    EFI (Extensible Firmware Interface) Support  --->
        <*> EFI Variable Support via sysfs
スクリーンショット


上記設定項目でチェックが外れている箇所(< >)があればスペースキーでチェック(<*>)を入れます。
※ gentoo ハンドブックでは M(モジュール)ではなく*(組み込み)としてあったので今回はそれにならいました。
GPTへの対応
-*- Enable the block layer --->
    Partition Types --->
        [*] Advanced partition selection
        ...
        [*] EFI GUID Partition support
スクリーンショット


参考とした文献
ハンドブック:AMD64/ブロック/ディスク - Gentoo Wiki
https://wiki.gentoo.org/wiki/Handbook:AMD64/Blocks/Disks/ja
Chapter 7. Configuring a Linux Kernel - Linux Sea
http://swift.siphos.be/linux_sea/kernelbuilding.html
EFIシステムパーティション - Gentoo Wiki
https://wiki.gentoo.org/wiki/EFI_System_Partition/ja
上記設定項目でチェックが外れている箇所([ ])があればスペースキーでチェック([*])を入れます。
ISO8859-1 コードページサポート
ISO8859-1サポート
-*- File Systems --->
    Native Language support --->
        ...
        [*] NLS ISO 8859-1  (Latin 1; Western European Languages)
        ...
スクリーンショット
参考とした文献
EFIシステムパーティション - Gentoo Wiki
https://wiki.gentoo.org/wiki/EFI_System_Partition/ja
上記設定項目でチェックが外れている箇所([ ])があればスペースキーでチェック([*])を入れます。
Systemd への対応
Systemdへの対応
Gentoo Linux --->
    Support for init systems, system and service managers --->
        ...
        [*] systemd
スクリーンショット


上記設定項目でチェックが外れている箇所([ ])があればスペースキーでチェック([*])を入れます。
余談
カーネル設定で気になる機能は kernel.org のドキュメントを読んで(必要に応じて google 翻訳等を活用しつつ)有効化無効化を決めるとよさそうです。
実は genkernel-next は Sabayon 開発チーム製だったりします。Sabayon は使ったことないけど genkernel-next は使ったことあるって人は多いはず。
補遺:カーネルのアップグレード作業の自動化
以下の文献を参照下さい。
おまけ:カスタム initramfs を埋め込む場合の作業例
注:本手順では上述の手順とはことなり "--integrated-initramfs" オプションを使用しません。
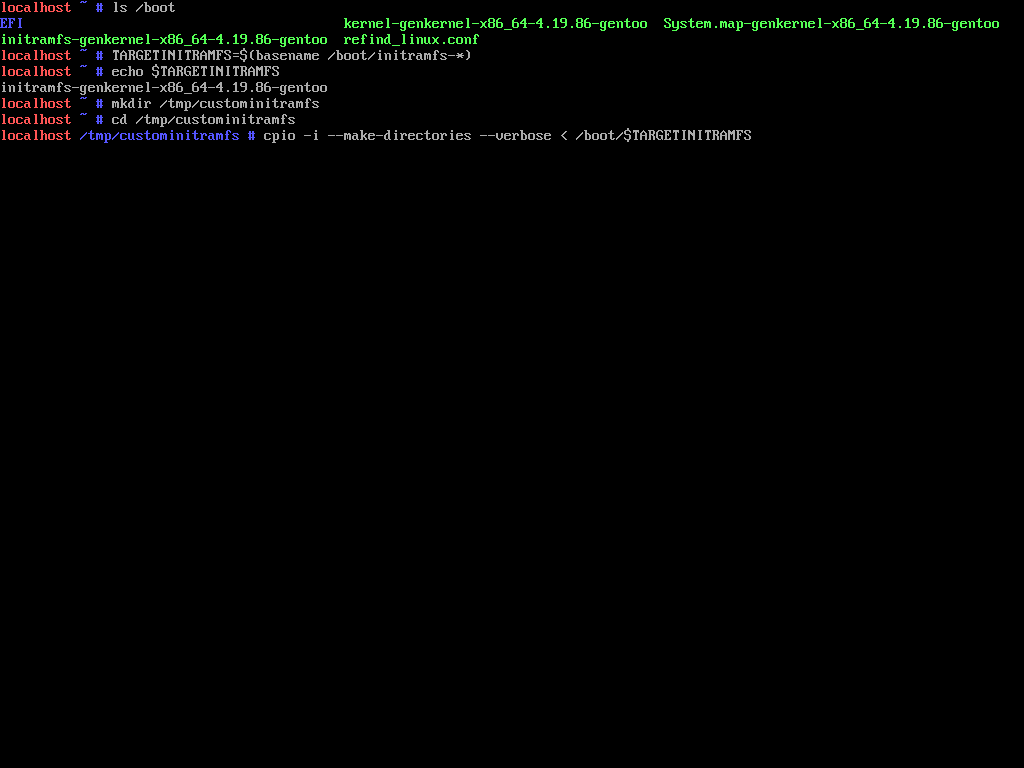
1.initramfs の作成と展開
適切にカーネルを設定後、非圧縮の initramfs cpio アーカイブを生成・展開します。
initramfsの作成と展開
genkernel --no-compress-initramfs --makeopts="--jobs=$((1+$(grep processor /proc/cpuinfo | wc --lines)))" --loglevel=2 --color --luks --lvm --nconfig all
TARGETINITRAMFS=$(basename /boot/initramfs-*)
mkdir /tmp/custominitramfs
cd /tmp/custominitramfs
cpio -i --make-directories --verbose < /boot/$TARGETINITRAMFS
unset TARGETINITRAMFS
MAN/INFOPAGE
genkernel
https://github.com/Sabayon/genkernel-next/blob/master/doc/genkernel.8.txt
```$()``` ※コマンド置換
https://linuxjm.osdn.jp/html/GNU_bash/man1/bash.1.html#lbBC
```$(())``` ※算術式展開
https://linuxjm.osdn.jp/html/GNU_bash/man1/bash.1.html#lbBD
grep
https://linuxjm.osdn.jp/html/GNU_grep/man1/grep.1.html
```|``` ※パイプライン/パイプ
https://linuxjm.osdn.jp/html/GNU_bash/man1/bash.1.html#lbAM
wc
https://linuxjm.osdn.jp/html/GNU_coreutils/man1/wc.1.html
https://linuxjm.osdn.jp/info/GNU_coreutils/coreutils-ja_34.html#wc-invocation
mkdir
https://linuxjm.osdn.jp/html/GNU_coreutils/man1/mkdir.1.html
https://linuxjm.osdn.jp/info/GNU_coreutils/coreutils-ja_87.html#mkdir-invocation
cd
https://linuxjm.osdn.jp/html/GNU_bash/man1/bash.1.html#lbDB
https://linuxjm.osdn.jp/html/GNU_bash/man1/builtins.1.html
cpio
https://linuxjm.osdn.jp/html/GNU_cpio/man1/cpio.1.html
```<``` ※入力のリダイレクト
https://linuxjm.osdn.jp/html/GNU_bash/man1/bash.1.html#lbBJ
unset
https://linuxjm.osdn.jp/html/GNU_bash/man1/bash.1.html#lbDB
https://linuxjm.osdn.jp/html/GNU_bash/man1/builtins.1.html
スクリーンショット


2.initramfs のカスタマイズ
/tmp/custominitramfs に展開された initramfs のソースを編集します。
例えば以下のような処理を行うよう改変する等します。
Unlocking a luks volume with a USB key – /dev/blog
https://possiblelossofprecision.net/?p=300
LUKS の鍵のセキュアな取り扱いに関しては以下の文献も参照下さい。
3.カスタム initramfs 埋め込みカーネルの生成
カーネルコンフィグでInitramfs source file(s)にカスタム initramfs のソースツリーのパスを記述し F6 で保存、F9 で nconfig を終了し、カーネルをビルドします。アクション bzImage を指定していても完了時 /boot 内に initramfs が生成されましたが、カーネル単体でブート可能でした。
カスタムinitramfs埋め込みカーネルのビルド
genkernel --makeopts="--jobs=$((1+$(grep processor /proc/cpuinfo | wc --lines)))" --loglevel=2 --color --luks --lvm --nconfig bzImage
カーネルの設定例
General setup  --->
    ...
    [*] Initial RAM filesystem and RAM disk (initramfs/initrd) support
    (/tmp/custominitramfs) Initramfs source file(s)
    ...
MAN/INFOPAGE
genkernel
https://github.com/Sabayon/genkernel-next/blob/master/doc/genkernel.8.txt
```$()``` ※コマンド置換
https://linuxjm.osdn.jp/html/GNU_bash/man1/bash.1.html#lbBC
```$(())``` ※算術式展開
https://linuxjm.osdn.jp/html/GNU_bash/man1/bash.1.html#lbBD
grep
https://linuxjm.osdn.jp/html/GNU_grep/man1/grep.1.html
```|``` ※パイプライン/パイプ
https://linuxjm.osdn.jp/html/GNU_bash/man1/bash.1.html#lbAM
wc
https://linuxjm.osdn.jp/html/GNU_coreutils/man1/wc.1.html
https://linuxjm.osdn.jp/info/GNU_coreutils/coreutils-ja_34.html#wc-invocation
スクリーンショット


埋め込み initramfs の圧縮
カーネルの設定例(以下はxz圧縮を選択した場合)
General setup  --->
    ...
    [*] Built-in initramfs compression mode (XZ)  --->
            None
            Gzip
        <X> XZ
            LZ4
スクリーンショット


Built-in initramfs compression mode を指定することで、埋め込む initramfs を圧縮できるようです。
efibootmgr による EFIBootStub カーネルの UEFI 起動項目への追加
cd /boot
mkdir --parents /boot/EFI/Gentoo
TARGETKERNEL=$(basename ./kernel-*)
cp --archive ./$TARGETKERNEL ./EFI/Gentoo/$TARGETKERNEL.efi
efibootmgr --verbose # 既存のエントリの確認
efibootmgr --create --label "EFI Stub" --loader "\\EFI\\Gentoo\\$TARGETKERNEL.efi" # エントリの追加
efibootmgr --verbose # 追加したエントリの確認
unset TARGETKERNEL
MAN/INFOPAGE
cd
https://linuxjm.osdn.jp/html/GNU_bash/man1/bash.1.html#lbDB
https://linuxjm.osdn.jp/html/GNU_bash/man1/builtins.1.html
mkdir
https://linuxjm.osdn.jp/html/GNU_coreutils/man1/mkdir.1.html
https://linuxjm.osdn.jp/info/GNU_coreutils/coreutils-ja_87.html#mkdir-invocation
```$()``` ※コマンド置換
https://linuxjm.osdn.jp/html/GNU_bash/man1/bash.1.html#lbBC
basename
https://linuxjm.osdn.jp/html/GNU_coreutils/man1/basename.1.html
https://linuxjm.osdn.jp/info/GNU_coreutils/coreutils-ja_126.html#basename-invocation
cp
https://linuxjm.osdn.jp/html/GNU_coreutils/man1/cp.1.html
https://linuxjm.osdn.jp/info/GNU_coreutils/coreutils-ja_78.html#cp-invocation
efibootmgr
https://linux.die.net/man/8/efibootmgr
```#``` ※コメント
https://linuxjm.osdn.jp/html/GNU_bash/man1/bash.1.html#lbAR
unset
https://linuxjm.osdn.jp/html/GNU_bash/man1/bash.1.html#lbDB
https://linuxjm.osdn.jp/html/GNU_bash/man1/builtins.1.html
スクリーンショット

参考とした文献
https://wiki.gentoo.org/wiki/Efibootmgr/ja
https://wiki.gentoo.org/wiki/EFI_stub_kernel
https://wiki.archlinux.jp/index.php/EFISTUB
https://wiki.debian.org/EFIStub
※ 起動項目の削除は、例えば 0007 番エントリを削除する場合efibootmgr --delete-bootnum --bootnum 0007とします。
セキュアブート
以下の文献を参照下さい。カーネルイメージ/initramfs の改竄に対して一定の抵抗性能が見込めるものと思います 11 。
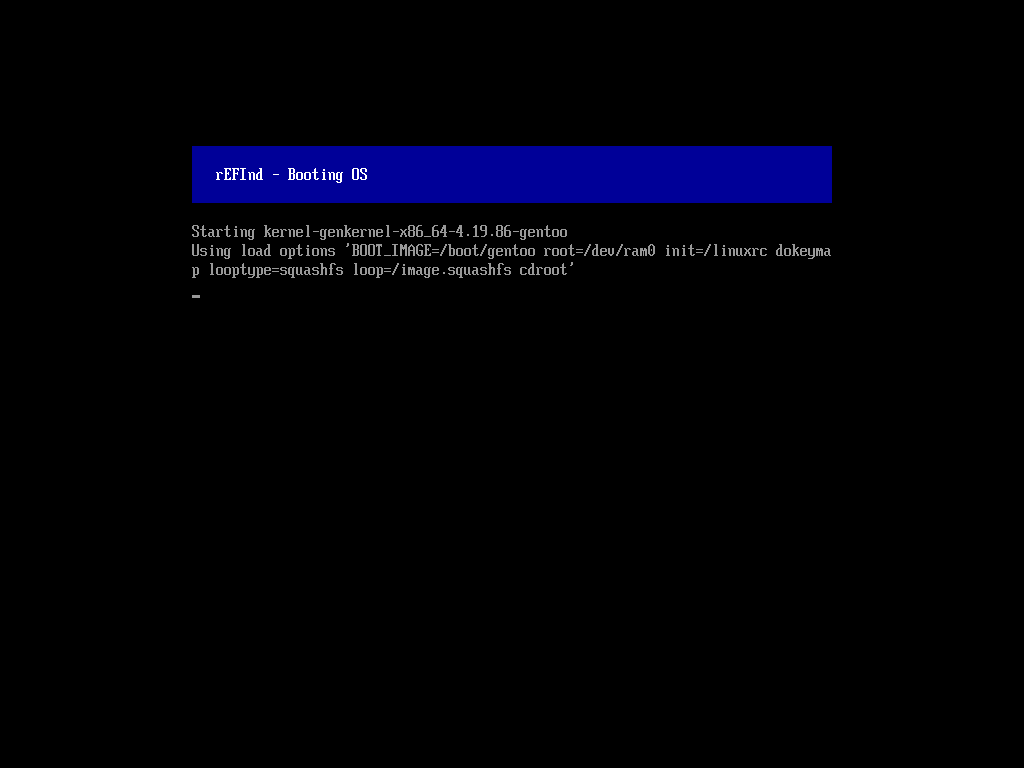
おまけ:rEFInd
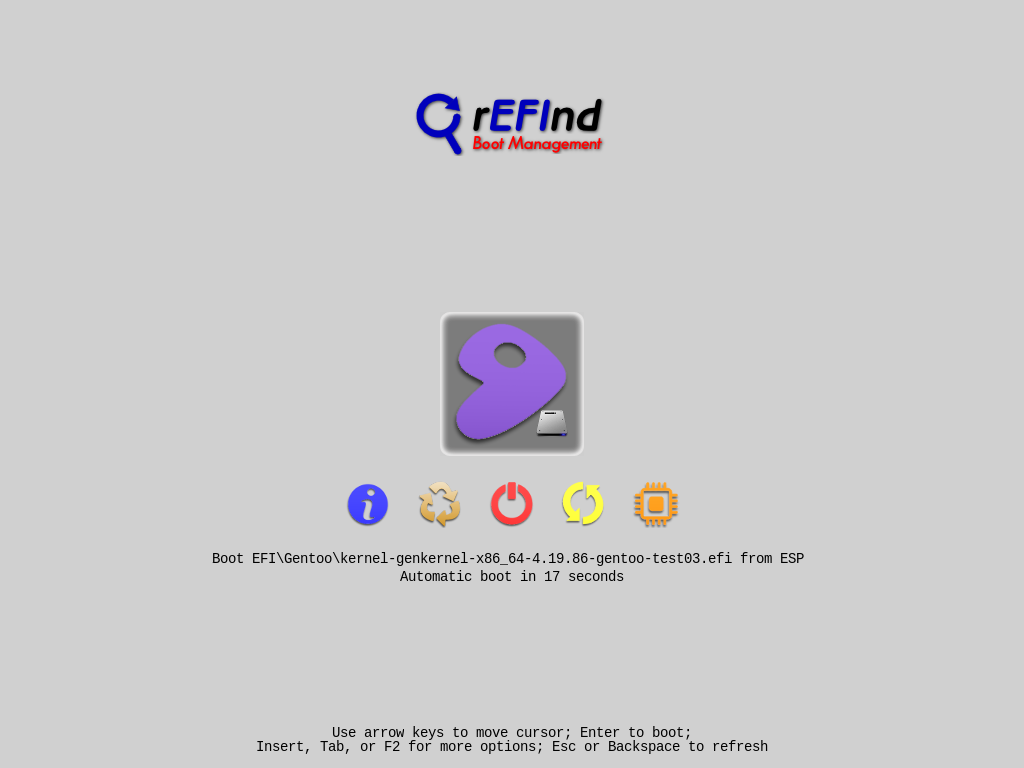
作者サイト
http://www.rodsbooks.com/refind/
rEFInd - Gentoo Wiki
https://wiki.gentoo.org/wiki/Refind
UEFI のエントリをグラフィカルに切り替え可能なブートマネージャーです。様々なテーマが公開されています。
導入
emerge --ask sys-boot/refind
エントリの優先順位が変更された場合の再度のrEFInd最優先化
MAN/INFOPAGE
emerge
https://dev.gentoo.org/~zmedico/portage/doc/man/emerge.1.html
refind-install
http://www.rodsbooks.com/refind/refind-install.html
refind-mkdefault
http://www.rodsbooks.com/refind/refind-mkdefault.html
スクリーンショット


ESP な /boot に直置きされたカーネルも検出してくれました。今回のカーネルには initramfs とカーネルコマンドラインパラメータを埋め込んであるので、カーソルキーで選択してエンターキーを押し下げるだけでブート出来ます。従って、rEFInd を使用する環境では前述の「efibootmgr による EFIBootStub カーネルの UEFI 起動項目への追加」作業を**行わない**横着も可能でした。
ただしこれを行うとテキストログイン画面でドメイン名が重複しました。
ログイン後に uname -a や hostname、screenfetch をしても正常に表示されます。
/boot/EFI/hogefuga/kernel-piyo のように配置したカーネルでは発生しませんでした。
どうやら、/boot 直置きカーネルに rEFInd が自動で渡すパラメータに原因があるようです。何やら以前 Refind からブートした minimal install CD と勘違いしている様子。カーネルコンフィグで"Built-in command line overrides boot loader arguments"を付けているので致命的なことにはならないとは思いますが。
※ ブートローダーとブートマネージャーの違いについては以下の文献を参照下さい。
Managing EFI Boot Loaders for Linux: Basic Principles
https://www.rodsbooks.com/efi-bootloaders/principles.html
root パスワードの設定と再起動
rootパスワードの設定と再起動
passwd
exit # chroot 環境の終了
reboot
MAN/INFOPAGE
chroot
https://linuxjm.osdn.jp/html/GNU_coreutils/man1/chroot.1.html
https://linuxjm.osdn.jp/info/GNU_coreutils/coreutils-ja_169.html#chroot-invocation
passwd
https://linuxjm.osdn.jp/html/util-linux/man1/passwd.1.html
exit
https://linuxjm.osdn.jp/html/GNU_bash/man1/bash.1.html#lbDB
https://linuxjm.osdn.jp/html/GNU_bash/man1/builtins.1.html
```#``` ※コメント
https://linuxjm.osdn.jp/html/GNU_bash/man1/bash.1.html#lbAR
reboot
https://linuxjm.osdn.jp/html/util-linux/man8/shutdown.8.html
スクリーンショット

※ パスワードを設定し忘れて新しいシステムにログイン出来無い場合、再度インストールメディアからブートし、適切に chroot して passwd コマンドを実行します。これに限らず、間違えてドライブを完全消去する以外のミスは大抵リカバリ出来ます。
参考とした文献
参考とした文献
[まちカドおるみんさんのツイート: "OSC 会場で開始した #GentooInstallBattle ですが,誤って USB のインストールメディアのほうのパーティションとファイルシステムを上書きしてしまいあらゆるコマンドが消滅したので 3 分で終了しました。"](https://twitter.com/kotatsu_mi/status/966924060503433216)
※ 自分用の環境構築時に似たようなことをやらかしたことがありますが、消すドライブ間違えるとココロに来ます。三歳は老けると思う。
ローカライゼーション
ローカライゼーション(地域化)
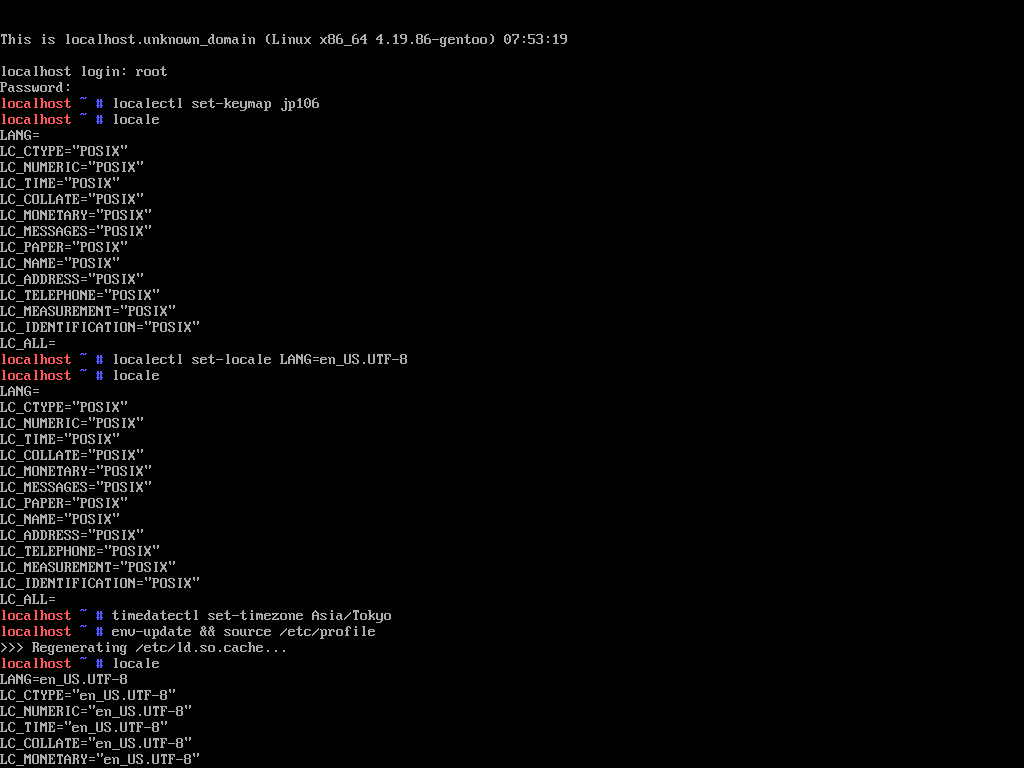
# キーマップの設定
localectl list-keymaps
localectl set-keymap jp106 # 日本語キーボードの場合
# GUIを導入した場合
# localectl list-x11-keymap-layouts
# localectl set-x11-keymap jp # 日本語キーボードの場合
# 言語の設定
localectl list-locales
localectl set-locale LANG=en_US.UTF-8 # ロケールに en_US.UTF-8 を指定する場合
# タイムゾーンの設定
timedatectl list-timezones
timedatectl set-timezone Asia/Tokyo # 現在地点が UTC+9 の場合

env-update && source /etc/profile # 環境のリロード
MAN/INFOPAGE
```#``` ※コメント
https://linuxjm.osdn.jp/html/GNU_bash/man1/bash.1.html#lbAR
systemd
http://man7.org/linux/man-pages/man1/init.1.html
localectl
http://man7.org/linux/man-pages/man1/localectl.1.html
timedatectl
http://man7.org/linux/man-pages/man1/timedatectl.1.html
env-update
https://dev.gentoo.org/~zmedico/portage/doc/man/env-update.1.html
```&&``` ※AND リスト/制御演算子
https://linuxjm.osdn.jp/html/GNU_bash/man1/bash.1.html#lbAN
source
https://linuxjm.osdn.jp/html/GNU_bash/man1/bash.1.html#lbDB
https://linuxjm.osdn.jp/html/GNU_bash/man1/builtins.1.html
スクリーンショット
参考とした文献
【 localectl 】コマンド――ロケール設定の確認と変更:Linux基本コマンドTips(262) - @IT
https://www.atmarkit.co.jp/ait/articles/1811/30/news060.html
Systemd におけるネットワークの設定
systemd-networkd を使う場合
/etc/systemd/network/50-dhcp.networkの作成と編集
nano --nowrap /etc/systemd/network/50-dhcp.network
/etc/systemd/network/50-dhcp.networkに記述する内容
[Match]
Name=en*

[Network]
DHCP=yes
ネットワークの有効化
test -f /etc/resolv.conf && mv /etc/resolv.conf /etc/resolv.conf.bak # /etc/resolv.conf のバックアップ
ln --symbolic --no-dereference --force /run/systemd/resolve/resolv.conf /etc/resolv.conf # タイプミスに注意
systemctl enable systemd-resolved.service
systemctl start systemd-resolved.service
systemctl enable systemd-networkd.service
systemctl start systemd-networkd.service

route # ネットワークの確認
MAN/INFOPAGE
```&&```※ AND リスト/制御演算子
https://linuxjm.osdn.jp/html/GNU_bash/man1/bash.1.html#lbAN
nano
https://linux.die.net/man/1/nano
test
https://linuxjm.osdn.jp/html/GNU_bash/man1/bash.1.html#lbDB
https://linuxjm.osdn.jp/html/GNU_bash/man1/builtins.1.html
https://linuxjm.osdn.jp/html/GNU_coreutils/man1/test.1.html
https://linuxjm.osdn.jp/info/GNU_coreutils/coreutils-ja_111.html#test-invocation
ln
https://linuxjm.osdn.jp/html/GNU_coreutils/man1/ln.1.html
https://linuxjm.osdn.jp/info/GNU_coreutils/coreutils-ja_86.html#ln-invocation
```#``` ※コメント
https://linuxjm.osdn.jp/html/GNU_bash/man1/bash.1.html#lbAR
systemctl
http://man7.org/linux/man-pages/man1/systemctl.1.html
route
https://linuxjm.osdn.jp/html/net-tools/man8/route.8.html
スクリーンショット

出典:
Systemd:ネットワーク - Gentoo Wiki
https://wiki.gentoo.org/wiki/Systemd/ja#ネットワーク
systemd-networkd を使わないなら、ネットワーク設定は NetworkManager に任せるのが簡単
nmtui(NetworkManager)の導入
emerge --ask net-misc/networkmanager
dispatch-conf # 質問には内容に応じて適切に返答/必要に応じて
emerge --ask net-misc/networkmanager # 必要に応じて
前節「systemd-networkdを使う場合」を実行済みの場合はNetworkManager有効化前にsystemd-networkd及びsystemd-resolvedを無効化
systemctl disable systemd-networkd.service
systemctl stop systemd-networkd.service
systemctl disable systemd-resolved.service
systemctl stop systemd-resolved.service
ls -l /etc/resolv.conf # /etc/resolv.conf が削除して良いファイルかを確認
rm /etc/resolv.conf # /run/systemd/resolve/resolv.conf へのリンクであることを確認後、削除
touch /etc/resolv.conf # 念の為空の /etc/resolv.conf を作成
cat /etc/systemd/network/50-dhcp.network # /etc/systemd/network/50-dhcp.network が削除して良いファイルかを確認
rm /etc/systemd/network/50-dhcp.network # 以前の工程で作成したファイルであることを確認後、削除
nmtui(NetworkManager)の有効化
systemctl enable NetworkManager
systemctl start NetworkManager
nmtui # nmtui(NetworkManager の TUI)の実行

nmcli # ネットワークの確認
MAN/INFOPAGE
emerge
https://dev.gentoo.org/~zmedico/portage/doc/man/emerge.1.html
dispatch-conf
https://dev.gentoo.org/~zmedico/portage/doc/man/dispatch-conf.1.html
systemctl
http://man7.org/linux/man-pages/man1/systemctl.1.html
ls
https://linuxjm.osdn.jp/html/GNU_coreutils/man1/ls.1.html
https://linuxjm.osdn.jp/info/GNU_coreutils/coreutils-ja_66.html#ls-invocation
```#``` ※コメント
https://linuxjm.osdn.jp/html/GNU_bash/man1/bash.1.html#lbAR
rm
https://linuxjm.osdn.jp/html/GNU_coreutils/man1/rm.1.html
https://linuxjm.osdn.jp/info/GNU_coreutils/coreutils-ja_82.html#rm-invocation
touch
https://linuxjm.osdn.jp/html/GNU_coreutils/man1/touch.1.html
https://linuxjm.osdn.jp/info/GNU_coreutils/coreutils-ja_97.html#touch-invocation
cat
https://linuxjm.osdn.jp/html/GNU_coreutils/man1/cat.1.html
https://linuxjm.osdn.jp/info/GNU_coreutils/coreutils-ja_18.html#cat-invocation
nmtui
https://manpages.debian.org/buster/network-manager/nmtui.1.en.html
nmcli
https://linux.die.net/man/1/nmcli
スクリーンショット


出典:
Systemd:NetworkManager - Gentoo Wiki
https://wiki.gentoo.org/wiki/Systemd/ja#NetworkManager
"localhost.unknown_domain" の修正
気になる場合、/etc/hosts を修正します。
作業例
hostname --short
hostname --domain
hostname --long
nano --nowrap /etc/hosts
env-update && source /etc/profile # 環境のリロード(不要かもしれない)
hostname --short
hostname --domain
hostname --long
/etc/hostsの編集例(localhost.localdomainとする場合)
# IPv4 and IPv6 localhost aliases
127.0.0.1    localhost.localdomain    localhost
::1          localhost.localdomain    localhost
MAN/INFOPAGE
hostname
https://linuxjm.osdn.jp/html/GNU_coreutils/man1/hostname.1.html
https://linuxjm.osdn.jp/info/GNU_coreutils/coreutils-ja_162.html#hostname-invocation
nano
https://linux.die.net/man/1/nano
/etc/hosts
https://linuxjm.osdn.jp/html/LDP_man-pages/man5/hosts.5.html
env-update
https://dev.gentoo.org/~zmedico/portage/doc/man/env-update.1.html
```&&``` ※AND リスト/制御演算子
https://linuxjm.osdn.jp/html/GNU_bash/man1/bash.1.html#lbAN
source
https://linuxjm.osdn.jp/html/GNU_bash/man1/bash.1.html#lbDB
https://linuxjm.osdn.jp/html/GNU_bash/man1/builtins.1.html
```#``` ※コメント
https://linuxjm.osdn.jp/html/GNU_bash/man1/bash.1.html#lbAR
スクリーンショット


参考とした文献
[Solved] Set domain name on systemd system / Networking, Server, and Protection / Arch Linux Forums
https://bbs.archlinux.org/viewtopic.php?id=157441
インストール時の各種設定 | 逆襲のSlackware
https://slackware.jp/install/5-configurations.html
名前衝突(Name Collision)問題 - JPNIC
https://www.nic.ad.jp/ja/dom/new-gtld/name-collision/
GPM の導入と有効化
GPMの導入と有効化
emerge --ask sys-libs/gpm
systemctl enable gpm
systemctl start gpm
MAN/INFOPAGE
emerge
https://dev.gentoo.org/~zmedico/portage/doc/man/emerge.1.html
systemctl
http://man7.org/linux/man-pages/man1/systemctl.1.html
スクリーンショット


各種サービスの有効化
用途に応じて各種サービスを有効化します。
各種サービスの有効化
# サービスの有効化
systemctl enable lvm2-monitor
systemctl start lvm2-monitor
MAN/INFOPAGE
```#``` ※コメント
https://linuxjm.osdn.jp/html/GNU_bash/man1/bash.1.html#lbAR
systemctl
http://man7.org/linux/man-pages/man1/systemctl.1.html
スクリーンショット


※ lvmetad デーモンが動いていない場合は [/etc/lvm/lvm.conf を確認します](https://wiki.gentoo.org/wiki/Systemd/ja#LMV2_.E3.81.A8_initramfs_.E3.82.92.E4.BD.BF.E3.81.86)。
Systemd におけるログファイルの対応
以下の文献を参照下さい。
Systemd から OpenRC へ戻す場合のヒント
以下の文献を参照下さい。
Gentoo Forums :: View topic - how to change from systemd to open-rc?
https://forums.gentoo.org/viewtopic-t-1082152.html
※ 必要なバックアップをとってから OpenRC な Stage3 で再インストールが手っ取り早いかもしれません。
※ 別の init システムを用いる系を併用する場合 KVM 等の仮想環境に入れるとすっきりしそうです。
インストール後の運用のヒント
以下の文献を参照下さい。
デスクトップ用途向けのヒント
ビルド/コンパイルに費す時間を短縮する
デスクトップ用途/モバイル用途における Gentoo は最適化で得られる恩恵が大きい反面、コンパイルに必要な時間や処理能力がボトルネックとなってしまいます。そこでホームネットワーク内にビルドサーバ群を用意することにより、この問題を幾分 12 緩和出来るものと思います。
なお筆者はまだ試みてはいませんが、ビルドサーバ群のメンテナンスは Ansible の Portage モジュール等で省力化可能と考えます。
参考とした文献
RaspberryPi クラスタ製作記 第一回「スパコンを作ろう」 - 計算工学ナビ
http://www.cenav.org/raspi2/
サーバー廃人のススメ | 雑廉堂の雑記帳
https://www.rough-and-cheap.jp/sest/become_a_server_fleak/
個人用途のスティック型PCを使ったクラスター考 - Togetter
https://togetter.com/li/825836
distcc を用いた分散コンパイル
Distccはネットワーク上のホストで分散コンパイルを行うためのプログラムで、サーバー側であるdistccdとクライアント側であるdistccで構成されています。またccache、Portage、Automakeとの連携もちょっとしたセットアップで可能となります。
出典:https://wiki.gentoo.org/wiki/Distcc/ja
例えば Raspberry Pi で分散クロスコンパイルすると面白いかもしれません。
make.confファイルを編集するとき、CFLAGSやCXXFLAGS変数でmarch=nativeを設定してはいけません。これはよく確認してください。marchがnativeに設定されていると、distccdは作業を他のマシンにうまく分散しなくなるでしょう。そのかわり、次のコマンドを実行すれば適切な-march=の値やだいたいのマシンフラグのセットを得ることができます:
gcc -v -E -x c -march=native -mtune=native - < /dev/null 2>&1 | grep cc1 | perl -pe 's/^.* - //g;'
出典:https://wiki.gentoo.org/wiki/Distcc/ja#CFLAGS_と_CXXFLAGS
以下に gcc の x86_64 向け -m<何とか> のリストがあります。
Using the GNU Compiler Collection (GCC): x86 Options
https://gcc.gnu.org/onlinedocs/gcc/x86-Options.html
https://gcc.gnu.org/onlinedocs/gcc-9.2.0/gcc/x86-Options.htm
※ アーキテクチャが判っているなら-march=で native のかわりにそれを指定すればよいですし、そうでないなら-march=x86-64等として最適化レベルを少し下げるのも有りかと。
もしdistcc環境のホスト間でGCCのバージョンが違っていたら、奇怪な問題が起こるかもしれません。解決法は、すべてのホストが同じバージョンのGCCであることをしっかり確認することです。
出典:https://wiki.gentoo.org/wiki/Distcc/ja#GCC_のバージョンが混在する場合
GCC のバージョンを揃える場合、以下のドキュメントがヒントとなるでしょう。
GCC のアップグレード - Gentoo Wiki
https://wiki.gentoo.org/wiki/Upgrading_GCC/ja
multiple-version gcc management in gentoo system - Stack Overflow
https://stackoverflow.com/questions/9688388/multiple-version-gcc-management-in-gentoo-system
ccache によるコンパイラキャッシュ
distcc と組み合わせると良さそう。
quickpkg の応用/バイナリパッケージホストのセットアップ
他のアプローチとして、例えば-march=の指定に注意を払いつつ別のマシンでビルドしたパッケージを quickpkg でバイナリパッケージ化し標的マシンに移植する方法が思いつきます。libreoffice や Firefox 等のコンパイルに時間がかかるパッケージを自分の用途に最適化したい場合に使えそう。
quickpkg - ハンドブック:AMD64/Portage/ツール - Gentoo Wiki
https://wiki.gentoo.org/wiki/Handbook:AMD64/Portage/Tools/ja#quickpkg
もしくはバイナリパッケージのビルド/ホスティングサーバを用意して、完全に構築環境と利用環境を切り分けてしまうのもアリかと。ここでも-march=は取り扱い注意です。-march=nativeこわい。
バイナリーパッケージガイド - Gentoo Wiki
https://wiki.gentoo.org/wiki/Binary_package_guide/ja
応用として、例えばワークステーション機でラズパイ向けバイナリパッケージをクロスコンパイルしホスト、ラズパイ側ではパッケージのビルドを行わないといった運用も出来そうです。
コンパイラの最適化
凝れば凝るほど性能 UP!……というわけでもないようです。肩の力を抜いて取り組むが吉。
カーネルの最適化方針の選択
General setup  --->
    ...
    Compiler optimization level (Optimize for size)  --->
            Optimize for performance
        <X> Optimize for size
スクリーンショット
カーネルコンフィギュレーション時、上記オプションでカーネルコンパイルに際しての-O2と-Osの切り替えを行えるようです。
参考とした文献
https://gcc.gnu.org/onlinedocs/gcc/Optimize-Options.html
https://stackoverflow.com/questions/10509993/how-can-i-check-linux-kernel-compiler-optimisation-level
現在のカーネルのコンフィギュレーションの確認
zcat /proc/config.gz | less
適当な場所に展開・複製し genkernel で読み込んでやればそのままカーネル設定のベースに使えるそうです。
参考とした文献
https://wiki.sabayon.org/index.php?title=HOWTO:_Unoffical_Guide_To_World_Update
OpenMP
計算資源の有効活用に。対応アプリいっぱい。
ラズパイでも OpenMP。
OpenMP Parallel computing in Raspberry Pi | Software Coven
https://www.softwarecoven.com/parallel-computing-in-embedded-mobile-devices/
Gentoo インストールあるあるねーよ
おまわりさん、全て私がやりました。
これだけ不注意であっても、インストールメディアからリブート/chroot し該当の問題をひとつひとつ解決していくことにより、運用可能な環境の立ち上げまで辿り着けました。
Gentoo の Sabayon 化
SabayonWiki の記事 2020/1/4追記
HOWTO: Install from an existing Linux system - Sabayon Wiki
https://wiki.sabayon.org/index.php?title=HOWTO:_Install_from_an_existing_Linux_system
Sabayon の開発環境を分離すべく Sabayon Wiki で chroot に関する記事を探していたところ、Gentoo から Sabayon への移行について簡潔に書かれた記事に行き当たりました。どうやら今回もいつものように車輪の再発明だったみたいですが、以下の手順はそう間違っていないようで一安心。
Gentoo に Entropy を導入
GentooにEntropyを導入する
# /run のバインドマウント
exit # chroot 環境の終了
mount --rbind /run /mnt/gentoo/run
mount --make-rslave /mnt/gentoo/run

# 再度chroot
chroot /mnt/gentoo /bin/bash
source /etc/profile
export PS1="(chroot) ${PS1}"

# ロケールを en_US.UTF-8 に
export LC_ALL=en_US.UTF-8

# 饂飩@世界
eselect news list # ニュースを列挙
eselect news read 番号 # もしくは eselect news read all | less 等で、ニュースを閲覧
eselect profile list # 現在のプロファイルの確認
emerge --ask --verbose --update --deep --newuse @world # システム更新
emerge --depclean # 必要に応じて実行

# Overlays により Gentoo に Entropy を導入
emerge --ask dev-vcs/git app-portage/layman
layman --list
layman --add sabayon
layman --add sabayon-distro
emerge --autounmask --autounmask-write sys-apps/entropy app-admin/equo
dispatch-conf # 質問には内容に応じて適切に返答
emerge --ask sys-apps/entropy app-admin/equo
equo rescue generate # 質問に対して Yes を 3回、パッケージデータベースを新規に構築
MAN/INFOPAGE
emerge
https://dev.gentoo.org/~zmedico/portage/doc/man/emerge.1.html
layman
https://wiki.gentoo.org/wiki/Layman
dispatch-conf
https://dev.gentoo.org/~zmedico/portage/doc/man/dispatch-conf.1.html
entropy
https://wiki.sabayon.org/index.php?title=En:Entropy
equo
https://wiki.sabayon.org/index.php?title=En:Equo
https://wiki.sabayon.org/index.php?title=En:List_Of_Equo_Functions
rigo
https://wiki.sabayon.org/index.php?title=Rigo
スクリーンショット


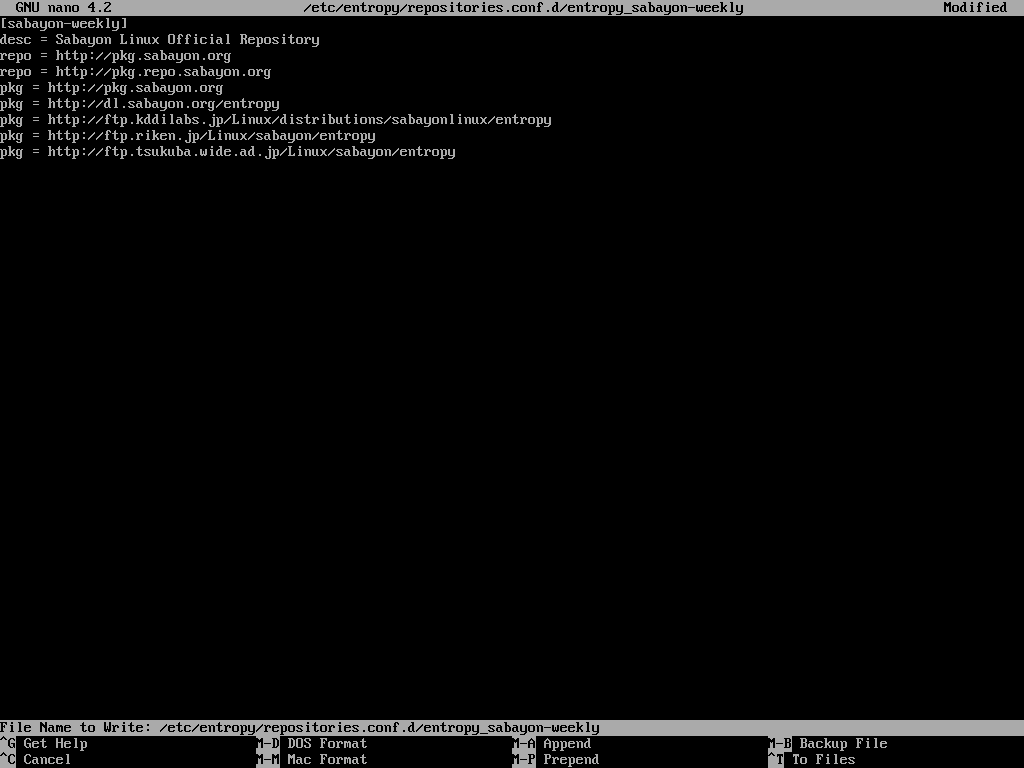
リポジトリ "sabayon-weekly" を有効化しパッケージ管理を Portage から Entropy に移行
/etc/entropy/repositories.conf.d/entropy_sabayon-weeklyの作成と編集
nano --nowrap /etc/entropy/repositories.conf.d/entropy_sabayon-weekly
entropy_sabayon-weeklyの記述例
[sabayon-weekly]
desc = Sabayon Linux Official Repository
repo = http://pkg.sabayon.org
repo = http://pkg.repo.sabayon.org
pkg = http://pkg.sabayon.org
pkg = http://dl.sabayon.org/entropy
pkg = http://ftp.kddilabs.jp/Linux/distributions/sabayonlinux/entropy
pkg = http://ftp.riken.jp/Linux/sabayon/entropy
pkg = http://ftp.tsukuba.wide.ad.jp/Linux/sabayon/entropy
システムの更新
equo update
equo repo mirrorsort sabayon-weekly
equo update
equo upgrade --ask --relaxed
equo conf update
equo deptest
equo libtest
MAN/INFOPAGE
nano
https://linux.die.net/man/1/nano
equo
https://wiki.sabayon.org/index.php?title=En:Equo
https://wiki.sabayon.org/index.php?title=En:List_Of_Equo_Functions
スクリーンショット


参考とした文献
https://wiki.sabayon.org/index.php?title=En:Entropy
/etc/fstab の編集
/etc/fstabの編集
blkid # UUID の確認、GPM によるコピペが便利
nano --nowrap /etc/fstab # 適切な fstab を作成
fstabの記述例
UUID=</dev/sdz1のUUID>  /boot vfat   defaults  0 2
/dev/mapper/cryptvg-swap none  swap   sw        0 0
/dev/mapper/cryptvg-root /     ext4   noatime   0 1
MAN/INFOPAGE
blkid
https://linuxjm.osdn.jp/html/e2fsprogs/man8/blkid.8.html
nano
https://linux.die.net/man/1/nano
スクリーンショット


/etc/default/sabayon-grub の作成と編集
/etc/default/sabayon-grubの作成と編集
nano --nowrap /etc/default/sabayon-grub
以下を追記
GRUB_CMDLINE_LINUX_DEFAULT='dolvm init=/lib/systemd/systemd crypt_root=UUID="blkidで調べた/dev/sdz2のUUID" root=/dev/mapper/cryptvg-root resume=/dev/mapper/cryptvg-swap'
MAN/INFOPAGE
nano
https://linux.die.net/man/1/nano
スクリーンショット


※ UUID の値をダブルクォートで囲んだため、GRUB_CMDLINE_LINUX_DEFAULT の値全体をシングルクォートで囲いました。
※ / のファイルシステムタイプの判別に失敗する場合は環境に応じてrootfstype=ext4等を加えて下さい。
GRUB2 のインストール
今回の Sabayon 化では genkernel しないので、こちらでは GRUB を使ってみました。
GRUBとテーマのインストール
equo install sys-boot/grub x11-themes/sabayon-artwork-grub --ask
MAN/INFOPAGE
equo
https://wiki.sabayon.org/index.php?title=En:Equo
https://wiki.sabayon.org/index.php?title=En:List_Of_Equo_Functions
スクリーンショット

カーネルのインストール、及び GRUB2 の ESP へのインストール
カーネルのインストールとGRUBの設定
equo install sys-kernel/linux-sabayon sys-kernel/sabayon-sources --ask

grub2-install --efi-directory=/boot
cp /usr/share/grub/default-splash.png /boot/grub/
grub2-mkconfig --output=/boot/grub/grub.cfg
MAN/INFOPAGE
equo
https://wiki.sabayon.org/index.php?title=En:Equo
https://wiki.sabayon.org/index.php?title=En:List_Of_Equo_Functions
grub-install
https://linux.die.net/man/8/grub-install
grub-mkconfig
https://wiki.gentoo.org/wiki/GRUB2_Quick_Start/ja
スクリーンショット


※ linux-sabayon と sabayon-sources のバージョンを揃えること(リビジョンで差異が出ることはある模様)。
nmtui(NetworkManager)と GPM のインストール
NetworkManagerとGPMのインストール
equo install net-misc/networkmanager sys-libs/gpm --ask
MAN/INFOPAGE
equo
https://wiki.sabayon.org/index.php?title=En:Equo
https://wiki.sabayon.org/index.php?title=En:List_Of_Equo_Functions
スクリーンショット

root パスワードの設定と再起動
rootパスワードの設定と再起動
passwd
exit # chroot 環境の終了
reboot
MAN/INFOPAGE
chroot
https://linuxjm.osdn.jp/html/GNU_coreutils/man1/chroot.1.html
https://linuxjm.osdn.jp/info/GNU_coreutils/coreutils-ja_169.html#chroot-invocation
passwd
https://linuxjm.osdn.jp/html/util-linux/man1/passwd.1.html
exit
https://linuxjm.osdn.jp/html/GNU_bash/man1/bash.1.html#lbDB
https://linuxjm.osdn.jp/html/GNU_bash/man1/builtins.1.html
reboot
https://linuxjm.osdn.jp/html/util-linux/man8/shutdown.8.html
スクリーンショット


各種設定
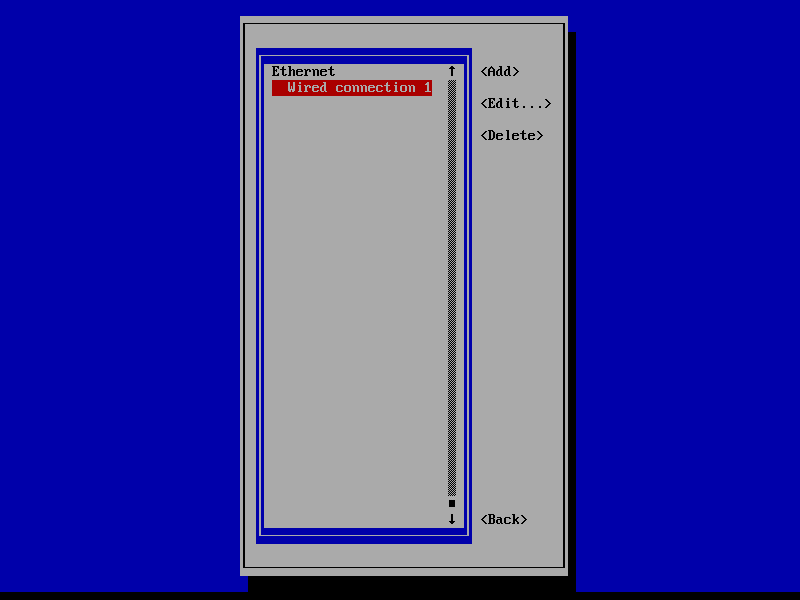
地域化及びサービスの有効化
df --si # HDD 容量の残量を確認/必要に応じて

# ロケール(言語及びキーマップ)の設定
localectl list-locales
localectl set-locale LANG=en_US.UTF-8 # ロケールに en_US.UTF-8 を指定する場合
localectl list-keymaps
localectl set-keymap jp106 # 日本語キーボードの場合
# localectl list-x11-keymap-layouts # GUIを導入した場合
# localectl set-x11-keymap jp # 日本語キーボードの場合

# 日付と時刻の設定
timedatectl list-timezones
timedatectl set-timezone Asia/Tokyo # 現在地点が UTC+9 の場合

env-update && source /etc/profile # 環境のリロード

# サービスの有効化
systemctl enable gpm
systemctl start gpm
systemctl enable lvm2-monitor
systemctl start lvm2-monitor
systemctl enable NetworkManager
systemctl start NetworkManager

nmtui # ネットワークの設定

nmcli # ネットワークの確認
MAN/INFOPAGE
df
https://linuxjm.osdn.jp/html/GNU_coreutils/man1/df.1.html
https://linuxjm.osdn.jp/info/GNU_coreutils/coreutils-ja_99.html#df-invocation
systemd
http://man7.org/linux/man-pages/man1/init.1.html
localectl
http://man7.org/linux/man-pages/man1/localectl.1.html
timedatectl
http://man7.org/linux/man-pages/man1/timedatectl.1.html
env-update
https://dev.gentoo.org/~zmedico/portage/doc/man/env-update.1.html
```&&``` ※AND リスト/制御演算子
https://linuxjm.osdn.jp/html/GNU_bash/man1/bash.1.html#lbAN
source
https://linuxjm.osdn.jp/html/GNU_bash/man1/bash.1.html#lbDB
https://linuxjm.osdn.jp/html/GNU_bash/man1/builtins.1.html
systemctl
http://man7.org/linux/man-pages/man1/systemctl.1.html
nmtui
https://manpages.debian.org/buster/network-manager/nmtui.1.en.html
nmcli
https://linux.die.net/man/1/nmcli
スクリーンショット


Systemd におけるロギング
一般ユーザーの追加と sudo の導入
一般ユーザーの追加とsudoのインストール・設定
equo install app-admin/superadduser --ask
superadduser # Slackware の adduser コマンドはユーザーフレンドリィィィィイッ!
equo install app-admin/sudo --ask
EDITOR=nano visudo
MAN/INFOPAGE
equo
https://wiki.sabayon.org/index.php?title=En:Equo
https://wiki.sabayon.org/index.php?title=En:List_Of_Equo_Functions
adduser
http://gentoo.linuxhowtos.org/superadduser/
nano
https://linux.die.net/man/1/nano
visudo
https://linuxjm.osdn.jp/html/sudo/man8/visudo.8.html
sudoers
https://linuxjm.osdn.jp/html/sudo/man5/sudoers.5.html
スクリーンショット


残る Portage 由来パッケージの Entropy 由来パッケージへの完全置換
GCCとAutomakeのインストール
equo install sys-devel/gcc sys-devel/automake-wrapper sys-devel/automake:1.9 sys-devel/automake:1.10 sys-devel/automake:1.11 sys-devel/automake:1.12 sys-devel/automake:1.13 sys-devel/automake:1.14 sys-devel/automake:1.15 --ask
Portage由来のGCCとAutomakeの確認と削除
equo query revisions 9999 # 確認例
equo remove automake-1.16.1-r1 gcc-9.2.0-r2 --ask # 削除例
env-update && source /etc/profile # 環境のリロード
equo deptest # パッケージ依存関係の整合性を検証
equo libtest # ライブラリ依存関係の整合性を検証
全てのパッケージの再インストール
equo install $(equo query list installed --quiet) --relaxed --ask
env-update && source /etc/profile # 環境のリロード
equo conf update
equo update
equo upgrade --ask
equo conf update
equo deptest
equo libtest
MAN/INFOPAGE
equo
https://wiki.sabayon.org/index.php?title=En:Equo
https://wiki.sabayon.org/index.php?title=En:List_Of_Equo_Functions
env-update
https://dev.gentoo.org/~zmedico/portage/doc/man/env-update.1.html
```&&``` ※AND リスト/制御演算子
https://linuxjm.osdn.jp/html/GNU_bash/man1/bash.1.html#lbAN
source
https://linuxjm.osdn.jp/html/GNU_bash/man1/bash.1.html#lbDB
https://linuxjm.osdn.jp/html/GNU_bash/man1/builtins.1.html
```$()``` ※コマンド置換
https://linuxjm.osdn.jp/html/GNU_bash/man1/bash.1.html#lbBC
スクリーンショット


Sabayon 化されたことを確認
MAN/INFOPAGE
screenfetch
https://www.mankier.com/1/screenfetch
スクリーンショット

おまけ:GUI環境向けメタパッケージ、その他
xtermの導入
equo install x11-terms/xterm --ask
日本語フォント及びインプットメソッドの導入
equo install media-fonts/noto-cjk app-i18n/ibus-anthy --ask
デスクトップ環境のインストール
equo install kde-plasma/plasma-meta --ask # KDE
equo install gnome-base/gnome --ask # GNOME
equo install mate-base/mate --ask # MATE
equo install xfce-base/xfce4-meta --ask # Xfce 4
equo install lxde-base/lxde-meta --ask # lxde
equo install lxqt-base/lxqt-meta --ask # lxqt
その他メタパッケージの検索例
equo query license metapackage
equo search "virtual/" --quiet | grep "virtual/"
何らかのDM(SDDMのような)の導入例
equo install x11-misc/sddm --ask
systemctl enable sddm
systemctl start sddm
おわりに
現在、Stage3 アーカイブと Genkernel コマンド、及び日本語訳された Handbook のおかげで、PC への Gentoo 導入の敷居はそれほど高くありません。
ですが今回のように UEFI と LUKS と LVM と Systemd を併用しようとすると、それぞれを単体で使おうとする場合よりもつまづきやすいように感じました。
本稿が同様の挑戦で困難に直面している方へのヒントになれば幸いです。


